#howtoinstructions
Explore tagged Tumblr posts
Visit Tumblr Blog
Explore Tumblr blogs with no restrictions, modern design and the best experience.
Last Seen Tumblr Blogs


Fun Fact
Premium Tumblr themes are available from anywhere between $9 to $49.
Text
can't do push ups|Can't Do a Push-Up? Here's Where to Start

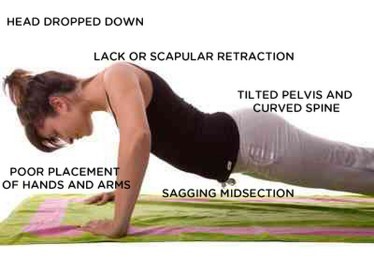
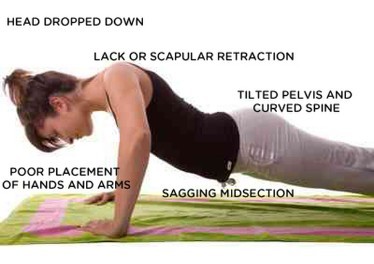
Avoiding push ups like they are the plague? We do not blame you -- that the bodyweight exercise is frightening when you are not used to fitness center. However, if you are reaching for almost any mad excuse to bypass this boot-camp favorite, you may be cheating yourself out of a badly effective work out. RELATED: Hate Crunches? 6 Better Core Exercises for Novices The pushup is obviously an perfect movement for beginners, states Michelle Hobgood, MS, Daily burn off Fitness/Nutrition coach. "It aims your own torso, triceps, shoulders, heart and thighs," she states. Translation: Without any muscle band extends unaffected! And fact remains, you will find a lot of techniques to alter the movement for a level of skill. You are better off completing a couple sets of modified push ups with good technique than fighting through routine push ups with erroneous form. By placing both fingers onto a wall or seat or bringing your knees into a ground, you are going to lessen the quantity of triceps you are pushing, which makes the movement the ideal sum of hard. Everybody else has to start out somewhere, and we have only the motions that will assist you to work your way upward into the normal push. Our motto Stronger daily. 3 Beginner-Friendly Push up Modifications In case you can not float out flawless push ups, those 3 alterations may possibly be your most useful starting place, Hobgood states. Listed in simplest to hardest, it's your decision which course you require! RELATED: Taking Step One With Fitness: Daily Burn Authentic Allergic hips-push-up2 Inch. Pushup at Dining Table Top Perhaps not everybody is able to encourage their whole human body weight in the beginning, which is okay. This variant will greatly help lighten your load which means that you may effortlessly build up your upper body strength. Just how to: start your knees and hands at desk top posture. Together with your arms straight, your shoulders should be on your wrists and your buttocks should be on your knees (a). Bend your elbows and lower your chest muscles directly into the floor (b). Whenever your nose reaches on the floor, then press up with your arms and then come back to the starting position (c). Play three sets of 8 10 reps. Coach says: you need to begin to have that the burn up mid way during the next group. If you're still fighting, Hobgood urges performing the logically pushup (third option) onto a wall socket. Breezing throughout your own sets? Try out the push knees variant below. knee-push-up-new Pushup on Knees By putting a number of your own weight onto your knees, then you are going to manage to safely and efficiently execute this beginner-friendly adjustment. Howto: Begin your knees and hands at a modified plank posture. Your arms must be straight, with your shoulders above your wrists. Rest your own knees onto the bottom (rather with a towel or mat under them), legs together, together with the feet suspended from the atmosphere (a). Gently bend your elbows and decrease your torso to the ground, while keeping up a direct line by the top of one's head on your knees (b). Next, press upward, engaging your torso and center (c). Complete 3 sets of 8 10 reps. Writer says: you ought to feel contested mid way through group number 2. If you should be barely breaking a sweat, then try out the incline push ups below. RELATED: 3 Quick HIIT Workouts for Beginners wall-push-up Incline Pushup Look ma, no knees! Locate a hardy box, either seat or other raised surface to conduct this alteration -- the taller it's, the easier the movement will probably soon be (and viceversa). Just how to: start with placing both hands about shoulder-width apart in the carton or surface that is elevated. Engage your heart so that your body forms a straight line from head to toe, and maintain your legs. Your arms must be straight but not secured (a). Gently bend your elbows and decrease your torso to the box (b). Next, press upward and participate your torso and center (c). Complete 3 sets of 8 10 reps. Writer says: Not feeling the burnt mid way through the next group? In the event you are breezing through but still can not do standard push ups, grow to 15 repetitions a pair or look for a lowered, harder surface for the incline push ups. Push Ups: Assessing Your Progress push-up-new Conventional Pushup Mastered the drills previously? It is the right time to try out the real thing. Howto: Begin at a board position with your arms directly. Your shoulders must be on your wrists as well as your own body needs to form a straight line from head to toe. Keep your heart engaged and do not let your hips sag (a). Then slowly bend your elbows and lower your chest to the floor (b). Subsequently, press up straight back again to board posture (c). Complete 3 sets of 8 10 push ups. Writer says: In case you are fighting until the finish of your next group, be aware of the number of push ups you finished with good shape (therefore that you have a few to overcome the next occasion!) . Afterward, drop on your knees or perform some other alteration above in order to complete off your hands Desire more beginner-friendly workout? To decide to try Authentic Beginner free for 1 month, check out DailyBurn.com/truebeginner. Notice: The articles within this report is related to the core service provided by Daily burn off. At the sake of article disclosure and ethics, the reader ought to be aware of website is owned and run by Daily burn off. Read the full article
#DIY#DoPushUpsIfYouCan'tNow#howdoI#howtoarticles#howtoinstructions#howto#learn#Lifehacker#push-ups#tips#upperbodyworkout
0 notes
Text
can't do push ups|Can't Do a Push-Up? Here's Where to Start

Avoiding push ups like they are the plague? We do not blame you -- that the bodyweight exercise is frightening when you are not used to fitness center. However, if you are reaching for almost any mad excuse to bypass this boot-camp favorite, you may be cheating yourself out of a badly effective work out. RELATED: Hate Crunches? 6 Better Core Exercises for Novices The pushup is obviously an perfect movement for beginners, states Michelle Hobgood, MS, Daily burn off Fitness/Nutrition coach. "It aims your own torso, triceps, shoulders, heart and thighs," she states. Translation: Without any muscle band extends unaffected! And fact remains, you will find a lot of techniques to alter the movement for a level of skill. You are better off completing a couple sets of modified push ups with good technique than fighting through routine push ups with erroneous form. By placing both fingers onto a wall or seat or bringing your knees into a ground, you are going to lessen the quantity of triceps you are pushing, which makes the movement the ideal sum of hard. Everybody else has to start out somewhere, and we have only the motions that will assist you to work your way upward into the normal push. Our motto Stronger daily. 3 Beginner-Friendly Push up Modifications In case you can not float out flawless push ups, those 3 alterations may possibly be your most useful starting place, Hobgood states. Listed in simplest to hardest, it's your decision which course you require! RELATED: Taking Step One With Fitness: Daily Burn Authentic Allergic hips-push-up2 Inch. Pushup at Dining Table Top Perhaps not everybody is able to encourage their whole human body weight in the beginning, which is okay. This variant will greatly help lighten your load which means that you may effortlessly build up your upper body strength. Just how to: start your knees and hands at desk top posture. Together with your arms straight, your shoulders should be on your wrists and your buttocks should be on your knees (a). Bend your elbows and lower your chest muscles directly into the floor (b). Whenever your nose reaches on the floor, then press up with your arms and then come back to the starting position (c). Play three sets of 8 10 reps. Coach says: you need to begin to have that the burn up mid way during the next group. If you're still fighting, Hobgood urges performing the logically pushup (third option) onto a wall socket. Breezing throughout your own sets? Try out the push knees variant below. knee-push-up-new Pushup on Knees By putting a number of your own weight onto your knees, then you are going to manage to safely and efficiently execute this beginner-friendly adjustment. Howto: Begin your knees and hands at a modified plank posture. Your arms must be straight, with your shoulders above your wrists. Rest your own knees onto the bottom (rather with a towel or mat under them), legs together, together with the feet suspended from the atmosphere (a). Gently bend your elbows and decrease your torso to the ground, while keeping up a direct line by the top of one's head on your knees (b). Next, press upward, engaging your torso and center (c). Complete 3 sets of 8 10 reps. Writer says: you ought to feel contested mid way through group number 2. If you should be barely breaking a sweat, then try out the incline push ups below. RELATED: 3 Quick HIIT Workouts for Beginners wall-push-up Incline Pushup Look ma, no knees! Locate a hardy box, either seat or other raised surface to conduct this alteration -- the taller it's, the easier the movement will probably soon be (and viceversa). Just how to: start with placing both hands about shoulder-width apart in the carton or surface that is elevated. Engage your heart so that your body forms a straight line from head to toe, and maintain your legs. Your arms must be straight but not secured (a). Gently bend your elbows and decrease your torso to the box (b). Next, press upward and participate your torso and center (c). Complete 3 sets of 8 10 reps. Writer says: Not feeling the burnt mid way through the next group? In the event you are breezing through but still can not do standard push ups, grow to 15 repetitions a pair or look for a lowered, harder surface for the incline push ups. Push Ups: Assessing Your Progress push-up-new Conventional Pushup Mastered the drills previously? It is the right time to try out the real thing. Howto: Begin at a board position with your arms directly. Your shoulders must be on your wrists as well as your own body needs to form a straight line from head to toe. Keep your heart engaged and do not let your hips sag (a). Then slowly bend your elbows and lower your chest to the floor (b). Subsequently, press up straight back again to board posture (c). Complete 3 sets of 8 10 push ups. Writer says: In case you are fighting until the finish of your next group, be aware of the number of push ups you finished with good shape (therefore that you have a few to overcome the next occasion!) . Afterward, drop on your knees or perform some other alteration above in order to complete off your hands Desire more beginner-friendly workout? To decide to try Authentic Beginner free for 1 month, check out DailyBurn.com/truebeginner. Notice: The articles within this report is related to the core service provided by Daily burn off. At the sake of article disclosure and ethics, the reader ought to be aware of website is owned and run by Daily burn off. Read the full article
#DIY#DoPushUpsIfYouCan'tNow#howdoI#howtoarticles#howtoinstructions#howto#learn#Lifehacker#push-ups#tips#upperbodyworkout
0 notes
Text
How to make a hot compress |How to Make a Warm Compress Easily

Nothing may soothe you longer compared to the blissful warmth of a hot compress, specially after having a long and exhausting day. A hot compress may nearly magically takeaway all types of pain and aches. The warmth penetrates deep to the cells of the human system, increasing blood flow circulation in the region and relieving the muscles that are tight. For people that understand very well what it seems just like, a hot compress may truly be described as a boon in menstrual cramps. Sexy compress may also come convenient to eliminate muscles spasms and pains, in addition to pain. Additionally, you can find quite a few herbal baits made out of medicinal herbs that not only provide physical aid but also can excite your own organs and also calm your senses. It's fairly straightforward to generate a hot compress all on your personal with stuff you most likely already have in your cabinet. Create your personal hot compress in your home Create your personal hot compress in your home However, prior to intending to produce and work with a hot compress perform ensure if your medical or pain issue is treated by the use of squeeze. Solutions when a cold compress works than heating. Additionally, make certain that you take the correct security precautions to guard yourself from potential burns off. In case a hot compress is everything that you require, listed below are the 5 best methods explain to you the way you can earn a hot compress in your home. Notice: Examine the warmth of this popular compress by pressing from the arm before putting it within the aching joint or muscle. Contents Procedure 1: Bags Number Rice Bag Rice grains may maintain heat for a extended duration of time and, for that reason, may be utilised to produce a simple and easy-to-use scorching compress, notably to spine pain. It is possible to either make use of a fabric handbag and sometimes maybe better a classic sock. Single Measure Method: Fill out a sock with rice warm it, also utilize Make a rice purse with a classic sock, warmth and utilize just as a hot compress Make a rice purse with a classic sock, warmth and utilize just as a hot compress Fill-up 2/3 of a old sock. Either fasten the open end with tying a knot or pull a second sock within the end. Maintain the rice sack in a microwave oven and heating it for two minutes. Retrieve it out of the microwave and set it on your sore joint or muscle. Rice tote works nicely, specially, for shoulder and neck blade. Number Salt Bag Very similar to rice, even the rough grains of salt are now capable of keeping heat and providing Consistent warmth. You might even package a small hot compress to soothe a earache or even a toothache. Things you will want: Utilize Seasalt to Create hot compress Sea-salt or two cups (depending on how large the influenced region is) Sterile cotton cloth/handkerchief Single-Step Method: Bundle salt up at a fabric and use it hot compress Bundle salt up to Create a salt tote; warmth and utilize as a hot compress Bundle salt up to Create a salt tote; warmth and utilize as a hot compress Spread-out a sheet of cloth or handkerchief onto a level working surface. Place 1 cup of sea salt at the heart of this cloth. Bundle up it and fasten it tightly with a rope or rubber ring. Be certain the seal is tight in order the sizzling salt cannot escape. Heat it in the microwave for 2-3 minutes. Put it at the face of the aching ear or tooth or any different muscular which feels or feels rigid. # Water Bags Nothing may replace the fantastic ol' hotwater tote. In case a pinch, also you also don't need the conventional welding tote; help-yourself using a wrought hotwater tote employing a zip loc baggie. Single-Step Method: Heat water up at a Zip Loc bag Create your personal Zip Loc Heated Water jar Create your personal Zip Loc Heated Water jar Fill 50% a mediumsized zip loc bag with plain water. Seal the bag and then heating it up in the microwave for 1 second. Set the bag in the affected area to give warmth. # Contents If you'd like the lingering heat of a wet popular compress however need to prevent the mess, then here's just a quickfix. Simply set a wet towel in a zip loc bag, microwave it and then use as you want a wet compress. Things you will want: Utilize flannel fabric and Zip Loc bag to Create hot compress Water -- two cups Flannel fabric Small Zip Loc bag Measure 1. Wet that the flannel fabric and Put It into a Zip Loc bag Scrub the flannel cloth in water. Squeeze the excess moisture and put it into a zip loc bag to produce hot compress Scrub the flannel cloth in water. Squeeze the excess moisture and put it into a zip loc bag Submerge a flannel material completely from the plain water. Wring out the excess water and then fold it small enough to easily fit from the zip loc bag. Put it within the zip loc bag but don't seal the bag. Measure Two. Heat up the tote and also utilize Heat the bag and use it like a hot compress; Re-heat when demanded Heat the bag and use it like a hot compress; Re-heat when demanded Place the zip loc bag in the microwave oven and then heating it up for 1 minute on high temperature. Retrieve the bag and put it within the aching joint or muscle to alleviate the pain. Re heat the tote as needed. Method2: Steamed Warm Compress There's been a consistent debate on wet heat over heat. Both have their own benefits and drawbacks. But, wet heat guarantees stronger insight to the cells at precisely the exact same temperature as chilly heat. If you do not obey the clutter of wet warmth, then you will find two methods to achieve that. It is possible to either use plain water or add into certain salt, then in other words, when you've got a bloated muscle. # Warm Towel Single Measure Procedure: Soak a towel in warm water and then utilize Spray a thick towel certain sexy water squeeze and utilize as a hot compress Spray a thick towel certain sexy water squeeze and utilize as a hot compress Spray a towel thoroughly in hotwater. Squeeze the excess water and put the towel on the tender muscle. When the towel melts, repeat the boil procedure. Carry on this until you obtain relief. # warm Water & Epsom Salt Things you will want: Matters Required to Create warm water and Epsom salt compress Flannel fabric Hot water two cups Epsom salt (reduces puffiness) -- 1 tbsp Single-Step Method: Drink a flannel fabric in Epsom salt alternative and also utilize Insert 1 tablespoon of Epsom salt two cups of hot water. Mix it well before salt melts completely. Soak a flannel cloth while in the saline solution and wring out the excess water. Set the hot material within the aching joint or muscle and allow the cells to absorb all of the warmth. When the fabric warms off, then soak it at the clear answer. Carry on this until you're relieved from the own pain. Notice: it is also possible to use Epsom salt to generate magnesium acrylic in your home and make use of it in the event that you usually have problems with muscle and joint strain. Method 3: Hot Spoon Working with a hot metallic spoon would be your fastest solution to earn a warm twist. It can notably be employed to soothe weary eyes do away with a mosquito sting. Single-Step Method: Put a hot cup on your eye Warm a spoon up into certain hot water and apply over your closed eyes as hot compress Warm a spoon up into certain hot water and apply over your closed eyes as hot compress Dunk a steel spoon 1 cup of warm water for two minutes. You could even dip 2 or more strands to truly own a steady source of hot spoons. Assess whether the heat can be in accordance with your own liking. Set the spoon on your closed eye and then take it until it melts. Change the spoon having a hot one and utilize before your own relief. Method 4: Used Tea Bags (Eyes) Both green tea and black tea are all full of tannins which have antimicrobial properties. Placing a wet tea bag on your eye may simply take the redness and swelling. Single-Step Method: Hold a used teabag on your eye Employ warm tea bags on the own eyes as hot compress Employ warm tea bags on the own eyes as hot compress Dunk a tea bag in 1 cup of hot water for about less than six minutes. Eliminate the tea bag and squeeze the extra water. Lay the hot tea bag on your eye and wait for 10 minutes until it melts. Procedure 5: Herbal Compresses Herbal components are silent popular at the Thai civilization for soothing muscles and stimulating the critical organs and sensations. These herbal baits are created out of a assortment of curative herbs tangled up closely in a muslin cloth. Here are both recipes you may attempt to earn a hot compress in your home, while also reaping the advantages of numerous pain-relieving herbs and essential oils. # Rice Poultice Things you will want: Matters Required to Create Hot Water deal with raw rice Uncooked rice (keeps warmth) -- 1 cup Sandalwood powder (calms and soothes muscles) -- two tsp Chamomile Tea (Anti Inflammatory) -- two tsp Lemon zest (antibacterial) -- 1 tsp Cocoa powder (alleviates congestion and raises blood flow) -- 1 tsp Turmeric powder (antiseptic) -- 1 tsp Flannel fabric Measure 1. Mix all of the herbs at the corn Take ginger, rice and garlic powder, and lemon zest in a bowl Take ginger, rice and garlic powder, and lemon zest in a bowl Require 1 cup of uncooked rice in a bowl. Insert 1 tsp of lemon powder, 1 tsp of garlic powder, and one tsp of lemon zest. Measure Two. Insert sandalwood and chamomile Insert sandalwood powder, chamomile tea, and combine well Insert sandalwood powder, chamomile tea, and combine well Insert two tsp all sandal wood lavender and powder tea into the rice. Mix the ingredients well. Measure 3. Bundle it up and microwave to utilize Produce a package using a flannel fabric and microwave to be used as hot compress Produce a package using a flannel fabric and microwave to be used as hot compress Spread a flannel cloth on a level working surface. Set the mixture in the middle of this cloth and package this up. Safe the package having a rubber ring or ribbon. Heat the pouch up inside the microwave for 2-3 minutes. Simply take out it and then apply softly to your system in rolling and circular motions. # Ginger and Lemon Things you will want: Grated ginger (alleviates congestion and raises blood flow) -- 1/2 cup Lemon zest (antibacterial) -- 1 tbsp Sandalwood powder (calms and soothes muscles) -- 1/2 tbsp Sea-salt (keeps warmth) -- 1/2 tbsp Shared salt (keeps warmth) -- 1/2 tbsp Eucalyptus Acrylic (Anti Spasmodic)-- Three or Four drops Lemongrass Acrylic (alleviates muscle strain) -- Three or Four drops Measure 1. Mix all of the herbs in a bowl Mix grated ginger, lemon zest and the Many herbs in a bowl Mix grated ginger, lemon zest and the Many herbs in a bowl Require 1/2 cup of ginger in a bowl. Add 1 tbsp of lemon zest. Insert 1/2 tbsp of sandal wood powder too. Insert Seasalt and frequent salt to Create herbal compress Insert Seasalt along with frequent salt Insert 1/2 tbsp all seasalt along with ordinary salt. Measure Two. Insert the Critical oils Insert lemongrass and lavender essential oils Insert lemongrass and lavender essential oils Add three to four drops of lemongrass and lavender oil. Mix all of the ingredients well utilizing a spoon. Measure 3. Bundle up and heating it in the microwave Bundle up it and warm it in the microwave to create herbal hot compress Bundle up it and warm it in the microwave to create herbal hot compress Spread a muslin or organic fiber material. Set the herb mixture during this cloth and package this up. Secure it using a wool ribbon and then place it into the microwave for 1 second. Press it lightly from the bloated muscle in small circular moves to ease the pain and also leave you feeling relaxed and calm. Employ your herbal hot compress to get relief Employ your herbal hot compress to get relief Recommendations Do not leave the squeeze resting a single area for too much time; simply press and touch firmly, then lift and then proceed to another spot. The herbal compress may be used three to four days. Store in the fridge after each and every use. Related DIY's 1-1 Amazing Egg Hacks To Create Your Life Easy Howto Make a Fantastic Omelet -- Stepbystep Guide Howto Make Use of Rice Water for Glowing Skin Care and Shiny Hair (Asian Secret) Howto Create Rice Water to Get Younger-looking Hair and Skin Howto Produce Pain-relieving Heating Pads How to Work with Epsom Salt for Health and Beauty Top Powerful DIY Salve Recipes for Sore Muscles and Pain-relief Howto Use Sea-salt and Common Salt for Health and Beauty DIY Easy Hacks to Produce Stunning Rangoli Designs That Diwali The 3 Hottest Ways to Get Coconut-oil From Hair (We Tried All) Read the full article
0 notes
Text
can't do push ups|Can't Do a Push-Up? Here's Where to Start

Avoiding push ups like they are the plague? We do not blame you -- that the bodyweight exercise is frightening when you are not used to fitness center. However, if you are reaching for almost any mad excuse to bypass this boot-camp favorite, you may be cheating yourself out of a badly effective work out. RELATED: Hate Crunches? 6 Better Core Exercises for Novices The pushup is obviously an perfect movement for beginners, states Michelle Hobgood, MS, Daily burn off Fitness/Nutrition coach. "It aims your own torso, triceps, shoulders, heart and thighs," she states. Translation: Without any muscle band extends unaffected! And fact remains, you will find a lot of techniques to alter the movement for a level of skill. You are better off completing a couple sets of modified push ups with good technique than fighting through routine push ups with erroneous form. By placing both fingers onto a wall or seat or bringing your knees into a ground, you are going to lessen the quantity of triceps you are pushing, which makes the movement the ideal sum of hard. Everybody else has to start out somewhere, and we have only the motions that will assist you to work your way upward into the normal push. Our motto Stronger daily. 3 Beginner-Friendly Push up Modifications In case you can not float out flawless push ups, those 3 alterations may possibly be your most useful starting place, Hobgood states. Listed in simplest to hardest, it's your decision which course you require! RELATED: Taking Step One With Fitness: Daily Burn Authentic Allergic hips-push-up2 Inch. Pushup at Dining Table Top Perhaps not everybody is able to encourage their whole human body weight in the beginning, which is okay. This variant will greatly help lighten your load which means that you may effortlessly build up your upper body strength. Just how to: start your knees and hands at desk top posture. Together with your arms straight, your shoulders should be on your wrists and your buttocks should be on your knees (a). Bend your elbows and lower your chest muscles directly into the floor (b). Whenever your nose reaches on the floor, then press up with your arms and then come back to the starting position (c). Play three sets of 8 10 reps. Coach says: you need to begin to have that the burn up mid way during the next group. If you're still fighting, Hobgood urges performing the logically pushup (third option) onto a wall socket. Breezing throughout your own sets? Try out the push knees variant below. knee-push-up-new Pushup on Knees By putting a number of your own weight onto your knees, then you are going to manage to safely and efficiently execute this beginner-friendly adjustment. Howto: Begin your knees and hands at a modified plank posture. Your arms must be straight, with your shoulders above your wrists. Rest your own knees onto the bottom (rather with a towel or mat under them), legs together, together with the feet suspended from the atmosphere (a). Gently bend your elbows and decrease your torso to the ground, while keeping up a direct line by the top of one's head on your knees (b). Next, press upward, engaging your torso and center (c). Complete 3 sets of 8 10 reps. Writer says: you ought to feel contested mid way through group number 2. If you should be barely breaking a sweat, then try out the incline push ups below. RELATED: 3 Quick HIIT Workouts for Beginners wall-push-up Incline Pushup Look ma, no knees! Locate a hardy box, either seat or other raised surface to conduct this alteration -- the taller it's, the easier the movement will probably soon be (and viceversa). Just how to: start with placing both hands about shoulder-width apart in the carton or surface that is elevated. Engage your heart so that your body forms a straight line from head to toe, and maintain your legs. Your arms must be straight but not secured (a). Gently bend your elbows and decrease your torso to the box (b). Next, press upward and participate your torso and center (c). Complete 3 sets of 8 10 reps. Writer says: Not feeling the burnt mid way through the next group? In the event you are breezing through but still can not do standard push ups, grow to 15 repetitions a pair or look for a lowered, harder surface for the incline push ups. Push Ups: Assessing Your Progress push-up-new Conventional Pushup Mastered the drills previously? It is the right time to try out the real thing. Howto: Begin at a board position with your arms directly. Your shoulders must be on your wrists as well as your own body needs to form a straight line from head to toe. Keep your heart engaged and do not let your hips sag (a). Then slowly bend your elbows and lower your chest to the floor (b). Subsequently, press up straight back again to board posture (c). Complete 3 sets of 8 10 push ups. Writer says: In case you are fighting until the finish of your next group, be aware of the number of push ups you finished with good shape (therefore that you have a few to overcome the next occasion!) . Afterward, drop on your knees or perform some other alteration above in order to complete off your hands Desire more beginner-friendly workout? To decide to try Authentic Beginner free for 1 month, check out DailyBurn.com/truebeginner. Notice: The articles within this report is related to the core service provided by Daily burn off. At the sake of article disclosure and ethics, the reader ought to be aware of website is owned and run by Daily burn off. Read the full article
#DIY#DoPushUpsIfYouCan'tNow#howdoI#howtoarticles#howtoinstructions#howto#learn#Lifehacker#push-ups#tips#upperbodyworkout
0 notes
Text
How to make a hot compress |How to Make a Warm Compress Easily

Nothing may soothe you longer compared to the blissful warmth of a hot compress, specially after having a long and exhausting day. A hot compress may nearly magically takeaway all types of pain and aches. The warmth penetrates deep to the cells of the human system, increasing blood flow circulation in the region and relieving the muscles that are tight. For people that understand very well what it seems just like, a hot compress may truly be described as a boon in menstrual cramps. Sexy compress may also come convenient to eliminate muscles spasms and pains, in addition to pain. Additionally, you can find quite a few herbal baits made out of medicinal herbs that not only provide physical aid but also can excite your own organs and also calm your senses. It's fairly straightforward to generate a hot compress all on your personal with stuff you most likely already have in your cabinet. Create your personal hot compress in your home Create your personal hot compress in your home However, prior to intending to produce and work with a hot compress perform ensure if your medical or pain issue is treated by the use of squeeze. Solutions when a cold compress works than heating. Additionally, make certain that you take the correct security precautions to guard yourself from potential burns off. In case a hot compress is everything that you require, listed below are the 5 best methods explain to you the way you can earn a hot compress in your home. Notice: Examine the warmth of this popular compress by pressing from the arm before putting it within the aching joint or muscle. Contents Procedure 1: Bags Number Rice Bag Rice grains may maintain heat for a extended duration of time and, for that reason, may be utilised to produce a simple and easy-to-use scorching compress, notably to spine pain. It is possible to either make use of a fabric handbag and sometimes maybe better a classic sock. Single Measure Method: Fill out a sock with rice warm it, also utilize Make a rice purse with a classic sock, warmth and utilize just as a hot compress Make a rice purse with a classic sock, warmth and utilize just as a hot compress Fill-up 2/3 of a old sock. Either fasten the open end with tying a knot or pull a second sock within the end. Maintain the rice sack in a microwave oven and heating it for two minutes. Retrieve it out of the microwave and set it on your sore joint or muscle. Rice tote works nicely, specially, for shoulder and neck blade. Number Salt Bag Very similar to rice, even the rough grains of salt are now capable of keeping heat and providing Consistent warmth. You might even package a small hot compress to soothe a earache or even a toothache. Things you will want: Utilize Seasalt to Create hot compress Sea-salt or two cups (depending on how large the influenced region is) Sterile cotton cloth/handkerchief Single-Step Method: Bundle salt up at a fabric and use it hot compress Bundle salt up to Create a salt tote; warmth and utilize as a hot compress Bundle salt up to Create a salt tote; warmth and utilize as a hot compress Spread-out a sheet of cloth or handkerchief onto a level working surface. Place 1 cup of sea salt at the heart of this cloth. Bundle up it and fasten it tightly with a rope or rubber ring. Be certain the seal is tight in order the sizzling salt cannot escape. Heat it in the microwave for 2-3 minutes. Put it at the face of the aching ear or tooth or any different muscular which feels or feels rigid. # Water Bags Nothing may replace the fantastic ol' hotwater tote. In case a pinch, also you also don't need the conventional welding tote; help-yourself using a wrought hotwater tote employing a zip loc baggie. Single-Step Method: Heat water up at a Zip Loc bag Create your personal Zip Loc Heated Water jar Create your personal Zip Loc Heated Water jar Fill 50% a mediumsized zip loc bag with plain water. Seal the bag and then heating it up in the microwave for 1 second. Set the bag in the affected area to give warmth. # Contents If you'd like the lingering heat of a wet popular compress however need to prevent the mess, then here's just a quickfix. Simply set a wet towel in a zip loc bag, microwave it and then use as you want a wet compress. Things you will want: Utilize flannel fabric and Zip Loc bag to Create hot compress Water -- two cups Flannel fabric Small Zip Loc bag Measure 1. Wet that the flannel fabric and Put It into a Zip Loc bag Scrub the flannel cloth in water. Squeeze the excess moisture and put it into a zip loc bag to produce hot compress Scrub the flannel cloth in water. Squeeze the excess moisture and put it into a zip loc bag Submerge a flannel material completely from the plain water. Wring out the excess water and then fold it small enough to easily fit from the zip loc bag. Put it within the zip loc bag but don't seal the bag. Measure Two. Heat up the tote and also utilize Heat the bag and use it like a hot compress; Re-heat when demanded Heat the bag and use it like a hot compress; Re-heat when demanded Place the zip loc bag in the microwave oven and then heating it up for 1 minute on high temperature. Retrieve the bag and put it within the aching joint or muscle to alleviate the pain. Re heat the tote as needed. Method2: Steamed Warm Compress There's been a consistent debate on wet heat over heat. Both have their own benefits and drawbacks. But, wet heat guarantees stronger insight to the cells at precisely the exact same temperature as chilly heat. If you do not obey the clutter of wet warmth, then you will find two methods to achieve that. It is possible to either use plain water or add into certain salt, then in other words, when you've got a bloated muscle. # Warm Towel Single Measure Procedure: Soak a towel in warm water and then utilize Spray a thick towel certain sexy water squeeze and utilize as a hot compress Spray a thick towel certain sexy water squeeze and utilize as a hot compress Spray a towel thoroughly in hotwater. Squeeze the excess water and put the towel on the tender muscle. When the towel melts, repeat the boil procedure. Carry on this until you obtain relief. # warm Water & Epsom Salt Things you will want: Matters Required to Create warm water and Epsom salt compress Flannel fabric Hot water two cups Epsom salt (reduces puffiness) -- 1 tbsp Single-Step Method: Drink a flannel fabric in Epsom salt alternative and also utilize Insert 1 tablespoon of Epsom salt two cups of hot water. Mix it well before salt melts completely. Soak a flannel cloth while in the saline solution and wring out the excess water. Set the hot material within the aching joint or muscle and allow the cells to absorb all of the warmth. When the fabric warms off, then soak it at the clear answer. Carry on this until you're relieved from the own pain. Notice: it is also possible to use Epsom salt to generate magnesium acrylic in your home and make use of it in the event that you usually have problems with muscle and joint strain. Method 3: Hot Spoon Working with a hot metallic spoon would be your fastest solution to earn a warm twist. It can notably be employed to soothe weary eyes do away with a mosquito sting. Single-Step Method: Put a hot cup on your eye Warm a spoon up into certain hot water and apply over your closed eyes as hot compress Warm a spoon up into certain hot water and apply over your closed eyes as hot compress Dunk a steel spoon 1 cup of warm water for two minutes. You could even dip 2 or more strands to truly own a steady source of hot spoons. Assess whether the heat can be in accordance with your own liking. Set the spoon on your closed eye and then take it until it melts. Change the spoon having a hot one and utilize before your own relief. Method 4: Used Tea Bags (Eyes) Both green tea and black tea are all full of tannins which have antimicrobial properties. Placing a wet tea bag on your eye may simply take the redness and swelling. Single-Step Method: Hold a used teabag on your eye Employ warm tea bags on the own eyes as hot compress Employ warm tea bags on the own eyes as hot compress Dunk a tea bag in 1 cup of hot water for about less than six minutes. Eliminate the tea bag and squeeze the extra water. Lay the hot tea bag on your eye and wait for 10 minutes until it melts. Procedure 5: Herbal Compresses Herbal components are silent popular at the Thai civilization for soothing muscles and stimulating the critical organs and sensations. These herbal baits are created out of a assortment of curative herbs tangled up closely in a muslin cloth. Here are both recipes you may attempt to earn a hot compress in your home, while also reaping the advantages of numerous pain-relieving herbs and essential oils. # Rice Poultice Things you will want: Matters Required to Create Hot Water deal with raw rice Uncooked rice (keeps warmth) -- 1 cup Sandalwood powder (calms and soothes muscles) -- two tsp Chamomile Tea (Anti Inflammatory) -- two tsp Lemon zest (antibacterial) -- 1 tsp Cocoa powder (alleviates congestion and raises blood flow) -- 1 tsp Turmeric powder (antiseptic) -- 1 tsp Flannel fabric Measure 1. Mix all of the herbs at the corn Take ginger, rice and garlic powder, and lemon zest in a bowl Take ginger, rice and garlic powder, and lemon zest in a bowl Require 1 cup of uncooked rice in a bowl. Insert 1 tsp of lemon powder, 1 tsp of garlic powder, and one tsp of lemon zest. Measure Two. Insert sandalwood and chamomile Insert sandalwood powder, chamomile tea, and combine well Insert sandalwood powder, chamomile tea, and combine well Insert two tsp all sandal wood lavender and powder tea into the rice. Mix the ingredients well. Measure 3. Bundle it up and microwave to utilize Produce a package using a flannel fabric and microwave to be used as hot compress Produce a package using a flannel fabric and microwave to be used as hot compress Spread a flannel cloth on a level working surface. Set the mixture in the middle of this cloth and package this up. Safe the package having a rubber ring or ribbon. Heat the pouch up inside the microwave for 2-3 minutes. Simply take out it and then apply softly to your system in rolling and circular motions. # Ginger and Lemon Things you will want: Grated ginger (alleviates congestion and raises blood flow) -- 1/2 cup Lemon zest (antibacterial) -- 1 tbsp Sandalwood powder (calms and soothes muscles) -- 1/2 tbsp Sea-salt (keeps warmth) -- 1/2 tbsp Shared salt (keeps warmth) -- 1/2 tbsp Eucalyptus Acrylic (Anti Spasmodic)-- Three or Four drops Lemongrass Acrylic (alleviates muscle strain) -- Three or Four drops Measure 1. Mix all of the herbs in a bowl Mix grated ginger, lemon zest and the Many herbs in a bowl Mix grated ginger, lemon zest and the Many herbs in a bowl Require 1/2 cup of ginger in a bowl. Add 1 tbsp of lemon zest. Insert 1/2 tbsp of sandal wood powder too. Insert Seasalt and frequent salt to Create herbal compress Insert Seasalt along with frequent salt Insert 1/2 tbsp all seasalt along with ordinary salt. Measure Two. Insert the Critical oils Insert lemongrass and lavender essential oils Insert lemongrass and lavender essential oils Add three to four drops of lemongrass and lavender oil. Mix all of the ingredients well utilizing a spoon. Measure 3. Bundle up and heating it in the microwave Bundle up it and warm it in the microwave to create herbal hot compress Bundle up it and warm it in the microwave to create herbal hot compress Spread a muslin or organic fiber material. Set the herb mixture during this cloth and package this up. Secure it using a wool ribbon and then place it into the microwave for 1 second. Press it lightly from the bloated muscle in small circular moves to ease the pain and also leave you feeling relaxed and calm. Employ your herbal hot compress to get relief Employ your herbal hot compress to get relief Recommendations Do not leave the squeeze resting a single area for too much time; simply press and touch firmly, then lift and then proceed to another spot. The herbal compress may be used three to four days. Store in the fridge after each and every use. Related DIY's 1-1 Amazing Egg Hacks To Create Your Life Easy Howto Make a Fantastic Omelet -- Stepbystep Guide Howto Make Use of Rice Water for Glowing Skin Care and Shiny Hair (Asian Secret) Howto Create Rice Water to Get Younger-looking Hair and Skin Howto Produce Pain-relieving Heating Pads How to Work with Epsom Salt for Health and Beauty Top Powerful DIY Salve Recipes for Sore Muscles and Pain-relief Howto Use Sea-salt and Common Salt for Health and Beauty DIY Easy Hacks to Produce Stunning Rangoli Designs That Diwali The 3 Hottest Ways to Get Coconut-oil From Hair (We Tried All) Read the full article
0 notes
Text
can't do push ups|Can't Do a Push-Up? Here's Where to Start

Avoiding push ups like they are the plague? We do not blame you -- that the bodyweight exercise is frightening when you are not used to fitness center. However, if you are reaching for almost any mad excuse to bypass this boot-camp favorite, you may be cheating yourself out of a badly effective work out. RELATED: Hate Crunches? 6 Better Core Exercises for Novices The pushup is obviously an perfect movement for beginners, states Michelle Hobgood, MS, Daily burn off Fitness/Nutrition coach. "It aims your own torso, triceps, shoulders, heart and thighs," she states. Translation: Without any muscle band extends unaffected! And fact remains, you will find a lot of techniques to alter the movement for a level of skill. You are better off completing a couple sets of modified push ups with good technique than fighting through routine push ups with erroneous form. By placing both fingers onto a wall or seat or bringing your knees into a ground, you are going to lessen the quantity of triceps you are pushing, which makes the movement the ideal sum of hard. Everybody else has to start out somewhere, and we have only the motions that will assist you to work your way upward into the normal push. Our motto Stronger daily. 3 Beginner-Friendly Push up Modifications In case you can not float out flawless push ups, those 3 alterations may possibly be your most useful starting place, Hobgood states. Listed in simplest to hardest, it's your decision which course you require! RELATED: Taking Step One With Fitness: Daily Burn Authentic Allergic hips-push-up2 Inch. Pushup at Dining Table Top Perhaps not everybody is able to encourage their whole human body weight in the beginning, which is okay. This variant will greatly help lighten your load which means that you may effortlessly build up your upper body strength. Just how to: start your knees and hands at desk top posture. Together with your arms straight, your shoulders should be on your wrists and your buttocks should be on your knees (a). Bend your elbows and lower your chest muscles directly into the floor (b). Whenever your nose reaches on the floor, then press up with your arms and then come back to the starting position (c). Play three sets of 8 10 reps. Coach says: you need to begin to have that the burn up mid way during the next group. If you're still fighting, Hobgood urges performing the logically pushup (third option) onto a wall socket. Breezing throughout your own sets? Try out the push knees variant below. knee-push-up-new Pushup on Knees By putting a number of your own weight onto your knees, then you are going to manage to safely and efficiently execute this beginner-friendly adjustment. Howto: Begin your knees and hands at a modified plank posture. Your arms must be straight, with your shoulders above your wrists. Rest your own knees onto the bottom (rather with a towel or mat under them), legs together, together with the feet suspended from the atmosphere (a). Gently bend your elbows and decrease your torso to the ground, while keeping up a direct line by the top of one's head on your knees (b). Next, press upward, engaging your torso and center (c). Complete 3 sets of 8 10 reps. Writer says: you ought to feel contested mid way through group number 2. If you should be barely breaking a sweat, then try out the incline push ups below. RELATED: 3 Quick HIIT Workouts for Beginners wall-push-up Incline Pushup Look ma, no knees! Locate a hardy box, either seat or other raised surface to conduct this alteration -- the taller it's, the easier the movement will probably soon be (and viceversa). Just how to: start with placing both hands about shoulder-width apart in the carton or surface that is elevated. Engage your heart so that your body forms a straight line from head to toe, and maintain your legs. Your arms must be straight but not secured (a). Gently bend your elbows and decrease your torso to the box (b). Next, press upward and participate your torso and center (c). Complete 3 sets of 8 10 reps. Writer says: Not feeling the burnt mid way through the next group? In the event you are breezing through but still can not do standard push ups, grow to 15 repetitions a pair or look for a lowered, harder surface for the incline push ups. Push Ups: Assessing Your Progress push-up-new Conventional Pushup Mastered the drills previously? It is the right time to try out the real thing. Howto: Begin at a board position with your arms directly. Your shoulders must be on your wrists as well as your own body needs to form a straight line from head to toe. Keep your heart engaged and do not let your hips sag (a). Then slowly bend your elbows and lower your chest to the floor (b). Subsequently, press up straight back again to board posture (c). Complete 3 sets of 8 10 push ups. Writer says: In case you are fighting until the finish of your next group, be aware of the number of push ups you finished with good shape (therefore that you have a few to overcome the next occasion!) . Afterward, drop on your knees or perform some other alteration above in order to complete off your hands Desire more beginner-friendly workout? To decide to try Authentic Beginner free for 1 month, check out DailyBurn.com/truebeginner. Notice: The articles within this report is related to the core service provided by Daily burn off. At the sake of article disclosure and ethics, the reader ought to be aware of website is owned and run by Daily burn off. Read the full article
#DIY#DoPushUpsIfYouCan'tNow#howdoI#howtoarticles#howtoinstructions#howto#learn#Lifehacker#push-ups#tips#upperbodyworkout
0 notes
Text
How to make a hot compress |How to Make a Warm Compress Easily

Nothing may soothe you longer compared to the blissful warmth of a hot compress, specially after having a long and exhausting day. A hot compress may nearly magically takeaway all types of pain and aches. The warmth penetrates deep to the cells of the human system, increasing blood flow circulation in the region and relieving the muscles that are tight. For people that understand very well what it seems just like, a hot compress may truly be described as a boon in menstrual cramps. Sexy compress may also come convenient to eliminate muscles spasms and pains, in addition to pain. Additionally, you can find quite a few herbal baits made out of medicinal herbs that not only provide physical aid but also can excite your own organs and also calm your senses. It's fairly straightforward to generate a hot compress all on your personal with stuff you most likely already have in your cabinet. Create your personal hot compress in your home Create your personal hot compress in your home However, prior to intending to produce and work with a hot compress perform ensure if your medical or pain issue is treated by the use of squeeze. Solutions when a cold compress works than heating. Additionally, make certain that you take the correct security precautions to guard yourself from potential burns off. In case a hot compress is everything that you require, listed below are the 5 best methods explain to you the way you can earn a hot compress in your home. Notice: Examine the warmth of this popular compress by pressing from the arm before putting it within the aching joint or muscle. Contents Procedure 1: Bags Number Rice Bag Rice grains may maintain heat for a extended duration of time and, for that reason, may be utilised to produce a simple and easy-to-use scorching compress, notably to spine pain. It is possible to either make use of a fabric handbag and sometimes maybe better a classic sock. Single Measure Method: Fill out a sock with rice warm it, also utilize Make a rice purse with a classic sock, warmth and utilize just as a hot compress Make a rice purse with a classic sock, warmth and utilize just as a hot compress Fill-up 2/3 of a old sock. Either fasten the open end with tying a knot or pull a second sock within the end. Maintain the rice sack in a microwave oven and heating it for two minutes. Retrieve it out of the microwave and set it on your sore joint or muscle. Rice tote works nicely, specially, for shoulder and neck blade. Number Salt Bag Very similar to rice, even the rough grains of salt are now capable of keeping heat and providing Consistent warmth. You might even package a small hot compress to soothe a earache or even a toothache. Things you will want: Utilize Seasalt to Create hot compress Sea-salt or two cups (depending on how large the influenced region is) Sterile cotton cloth/handkerchief Single-Step Method: Bundle salt up at a fabric and use it hot compress Bundle salt up to Create a salt tote; warmth and utilize as a hot compress Bundle salt up to Create a salt tote; warmth and utilize as a hot compress Spread-out a sheet of cloth or handkerchief onto a level working surface. Place 1 cup of sea salt at the heart of this cloth. Bundle up it and fasten it tightly with a rope or rubber ring. Be certain the seal is tight in order the sizzling salt cannot escape. Heat it in the microwave for 2-3 minutes. Put it at the face of the aching ear or tooth or any different muscular which feels or feels rigid. # Water Bags Nothing may replace the fantastic ol' hotwater tote. In case a pinch, also you also don't need the conventional welding tote; help-yourself using a wrought hotwater tote employing a zip loc baggie. Single-Step Method: Heat water up at a Zip Loc bag Create your personal Zip Loc Heated Water jar Create your personal Zip Loc Heated Water jar Fill 50% a mediumsized zip loc bag with plain water. Seal the bag and then heating it up in the microwave for 1 second. Set the bag in the affected area to give warmth. # Contents If you'd like the lingering heat of a wet popular compress however need to prevent the mess, then here's just a quickfix. Simply set a wet towel in a zip loc bag, microwave it and then use as you want a wet compress. Things you will want: Utilize flannel fabric and Zip Loc bag to Create hot compress Water -- two cups Flannel fabric Small Zip Loc bag Measure 1. Wet that the flannel fabric and Put It into a Zip Loc bag Scrub the flannel cloth in water. Squeeze the excess moisture and put it into a zip loc bag to produce hot compress Scrub the flannel cloth in water. Squeeze the excess moisture and put it into a zip loc bag Submerge a flannel material completely from the plain water. Wring out the excess water and then fold it small enough to easily fit from the zip loc bag. Put it within the zip loc bag but don't seal the bag. Measure Two. Heat up the tote and also utilize Heat the bag and use it like a hot compress; Re-heat when demanded Heat the bag and use it like a hot compress; Re-heat when demanded Place the zip loc bag in the microwave oven and then heating it up for 1 minute on high temperature. Retrieve the bag and put it within the aching joint or muscle to alleviate the pain. Re heat the tote as needed. Method2: Steamed Warm Compress There's been a consistent debate on wet heat over heat. Both have their own benefits and drawbacks. But, wet heat guarantees stronger insight to the cells at precisely the exact same temperature as chilly heat. If you do not obey the clutter of wet warmth, then you will find two methods to achieve that. It is possible to either use plain water or add into certain salt, then in other words, when you've got a bloated muscle. # Warm Towel Single Measure Procedure: Soak a towel in warm water and then utilize Spray a thick towel certain sexy water squeeze and utilize as a hot compress Spray a thick towel certain sexy water squeeze and utilize as a hot compress Spray a towel thoroughly in hotwater. Squeeze the excess water and put the towel on the tender muscle. When the towel melts, repeat the boil procedure. Carry on this until you obtain relief. # warm Water & Epsom Salt Things you will want: Matters Required to Create warm water and Epsom salt compress Flannel fabric Hot water two cups Epsom salt (reduces puffiness) -- 1 tbsp Single-Step Method: Drink a flannel fabric in Epsom salt alternative and also utilize Insert 1 tablespoon of Epsom salt two cups of hot water. Mix it well before salt melts completely. Soak a flannel cloth while in the saline solution and wring out the excess water. Set the hot material within the aching joint or muscle and allow the cells to absorb all of the warmth. When the fabric warms off, then soak it at the clear answer. Carry on this until you're relieved from the own pain. Notice: it is also possible to use Epsom salt to generate magnesium acrylic in your home and make use of it in the event that you usually have problems with muscle and joint strain. Method 3: Hot Spoon Working with a hot metallic spoon would be your fastest solution to earn a warm twist. It can notably be employed to soothe weary eyes do away with a mosquito sting. Single-Step Method: Put a hot cup on your eye Warm a spoon up into certain hot water and apply over your closed eyes as hot compress Warm a spoon up into certain hot water and apply over your closed eyes as hot compress Dunk a steel spoon 1 cup of warm water for two minutes. You could even dip 2 or more strands to truly own a steady source of hot spoons. Assess whether the heat can be in accordance with your own liking. Set the spoon on your closed eye and then take it until it melts. Change the spoon having a hot one and utilize before your own relief. Method 4: Used Tea Bags (Eyes) Both green tea and black tea are all full of tannins which have antimicrobial properties. Placing a wet tea bag on your eye may simply take the redness and swelling. Single-Step Method: Hold a used teabag on your eye Employ warm tea bags on the own eyes as hot compress Employ warm tea bags on the own eyes as hot compress Dunk a tea bag in 1 cup of hot water for about less than six minutes. Eliminate the tea bag and squeeze the extra water. Lay the hot tea bag on your eye and wait for 10 minutes until it melts. Procedure 5: Herbal Compresses Herbal components are silent popular at the Thai civilization for soothing muscles and stimulating the critical organs and sensations. These herbal baits are created out of a assortment of curative herbs tangled up closely in a muslin cloth. Here are both recipes you may attempt to earn a hot compress in your home, while also reaping the advantages of numerous pain-relieving herbs and essential oils. # Rice Poultice Things you will want: Matters Required to Create Hot Water deal with raw rice Uncooked rice (keeps warmth) -- 1 cup Sandalwood powder (calms and soothes muscles) -- two tsp Chamomile Tea (Anti Inflammatory) -- two tsp Lemon zest (antibacterial) -- 1 tsp Cocoa powder (alleviates congestion and raises blood flow) -- 1 tsp Turmeric powder (antiseptic) -- 1 tsp Flannel fabric Measure 1. Mix all of the herbs at the corn Take ginger, rice and garlic powder, and lemon zest in a bowl Take ginger, rice and garlic powder, and lemon zest in a bowl Require 1 cup of uncooked rice in a bowl. Insert 1 tsp of lemon powder, 1 tsp of garlic powder, and one tsp of lemon zest. Measure Two. Insert sandalwood and chamomile Insert sandalwood powder, chamomile tea, and combine well Insert sandalwood powder, chamomile tea, and combine well Insert two tsp all sandal wood lavender and powder tea into the rice. Mix the ingredients well. Measure 3. Bundle it up and microwave to utilize Produce a package using a flannel fabric and microwave to be used as hot compress Produce a package using a flannel fabric and microwave to be used as hot compress Spread a flannel cloth on a level working surface. Set the mixture in the middle of this cloth and package this up. Safe the package having a rubber ring or ribbon. Heat the pouch up inside the microwave for 2-3 minutes. Simply take out it and then apply softly to your system in rolling and circular motions. # Ginger and Lemon Things you will want: Grated ginger (alleviates congestion and raises blood flow) -- 1/2 cup Lemon zest (antibacterial) -- 1 tbsp Sandalwood powder (calms and soothes muscles) -- 1/2 tbsp Sea-salt (keeps warmth) -- 1/2 tbsp Shared salt (keeps warmth) -- 1/2 tbsp Eucalyptus Acrylic (Anti Spasmodic)-- Three or Four drops Lemongrass Acrylic (alleviates muscle strain) -- Three or Four drops Measure 1. Mix all of the herbs in a bowl Mix grated ginger, lemon zest and the Many herbs in a bowl Mix grated ginger, lemon zest and the Many herbs in a bowl Require 1/2 cup of ginger in a bowl. Add 1 tbsp of lemon zest. Insert 1/2 tbsp of sandal wood powder too. Insert Seasalt and frequent salt to Create herbal compress Insert Seasalt along with frequent salt Insert 1/2 tbsp all seasalt along with ordinary salt. Measure Two. Insert the Critical oils Insert lemongrass and lavender essential oils Insert lemongrass and lavender essential oils Add three to four drops of lemongrass and lavender oil. Mix all of the ingredients well utilizing a spoon. Measure 3. Bundle up and heating it in the microwave Bundle up it and warm it in the microwave to create herbal hot compress Bundle up it and warm it in the microwave to create herbal hot compress Spread a muslin or organic fiber material. Set the herb mixture during this cloth and package this up. Secure it using a wool ribbon and then place it into the microwave for 1 second. Press it lightly from the bloated muscle in small circular moves to ease the pain and also leave you feeling relaxed and calm. Employ your herbal hot compress to get relief Employ your herbal hot compress to get relief Recommendations Do not leave the squeeze resting a single area for too much time; simply press and touch firmly, then lift and then proceed to another spot. The herbal compress may be used three to four days. Store in the fridge after each and every use. Related DIY's 1-1 Amazing Egg Hacks To Create Your Life Easy Howto Make a Fantastic Omelet -- Stepbystep Guide Howto Make Use of Rice Water for Glowing Skin Care and Shiny Hair (Asian Secret) Howto Create Rice Water to Get Younger-looking Hair and Skin Howto Produce Pain-relieving Heating Pads How to Work with Epsom Salt for Health and Beauty Top Powerful DIY Salve Recipes for Sore Muscles and Pain-relief Howto Use Sea-salt and Common Salt for Health and Beauty DIY Easy Hacks to Produce Stunning Rangoli Designs That Diwali The 3 Hottest Ways to Get Coconut-oil From Hair (We Tried All) Read the full article
0 notes