#htmlattributes
Explore tagged Tumblr posts
Visit Tumblr Blog
Explore Tumblr blogs with no restrictions, modern design and the best experience.
Last Seen Tumblr Blogs


Fun Fact
70% of Tumblr users say the Dashboard is their favorite place to spend time online.
Text
Mastering Series: HTML Tags & Attributes
Welcome to the Mastering Series on HTML Tags & Attributes! In this article, we'll delve deep into the core elements of HTML, exploring various tags and attributes that form the building blocks of web development. Whether you're a novice looking to enhance your understanding of HTML or a seasoned developer seeking to master the intricacies of HTML tags and attributes, this comprehensive guide is designed to empower you with valuable insights and practical knowledge.
#FrontEndDevelopment#HTMLGuide#HTML#HTMLTags#HTMLAttributes#FreeCourse#OnlineCourse#TechTutorials#MasteringSeries#MasteringHTML
1 note
·
View note
Text
HTML Attributes

HTML Attributes : All HTML elements have attributes that will provide additional information about that particular element. It takes 2 parameters, ie, a name & a value which define the properties of the element and are placed inside the element tag.
Core Attributes
The four core attributes that can be used on the majority of HTML elements (although not all) are − - Id - Title - Class - Style Alt Attribytes : - This example explains the HTML alt Attributes to specify the name of the file when the image is not loaded properly. src Attribute "https://media.geeksforgeeks.org/wp-content/cdn-uploads/Geek_logi_-low_res.png"> Generic Attributes Here's a table of some other attributes that are readily usable with many of the HTML tags. Attribute Options Function align right, left, center Horizontally aligns tags valign top, middle, bottom Vertically aligns tags within an HTML element. bgcolor numeric, hexidecimal, RGB values Places a background color behind an element background URL Places a background image behind an element id User Defined Names an element for use with Cascading Style Sheets. class User Defined Classifies an element for use with Cascading Style Sheets. width Numeric Value Specifies the width of tables, images, or table cells. height Numeric Value Specifies the height of tables, images, or table cells. title User Defined "Pop-up" title of the elements. Read the full article
0 notes
Link
We have seen few HTML tags and their usage like heading tags <h1>, <h2>,paragraph tag <p> and other tags. We used them so far in their simplest form, but most of the HTML tags can also have attributes, which are extra bits of information.
All HTML elements can have attributes.
Attributes provide additional information about an element.
Attributes are always specified in the start tag.
Attributes usually come in name/value pairs like: name=”value”

An attribute is used to define the characteristics of an HTML element and is placed inside the element’s opening tag. All attributes are made up of two parts − a name and a value
The name is the property you want to set. For example, the paragraph <p> element in the example carries an attribute whose name is align, which you can use to indicate the alignment of paragraph on the page.
The value is what you want the value of the property to be set and always put within quotations. The below example shows three possible values of align attribute: left, center and right.
EXAMPLE
<!DOCTYPE html>
<html>
<head>
<title>Align Attribute Example</title>
</head>
<body>
<p align = “left”>This is left aligned</p>
<p align = “center”>This is center aligned</p>
<p align = “right”>This is right aligned</p>
</body>
</html>
THE HREF ATTRIBUTE
HTML links are defined with the <a> tag. The link address is specified in the href attribute:
EXAMPLE
<a href=”https://www.w3schools.com”>This is a link</a>
THE SRC ATTRIBUTE
HTML images are defined with the <img> tag.
The filename of the image source is specified in the src attribute:
EXAMPLE
<img src=”img_girl.jpg”>
THE WIDTH AND HEIGHT ATTRIBUTES
Images in HTML have a set of size attributes, which specifies the width and height of the image:
EXAMPLE
<img src=”img_girl.jpg” width=”500″ height=”600″>
THE ALT ATTRIBUTE
The alt attribute specifies an alternative text to be used, when an image cannot be displayed.
The value of the attribute can be read by screen readers. This way, someone “listening” to the webpage, e.g. a vision impaired person, can “hear” the element.
EXAMPLE
<img src=”img_girl.jpg” alt=”Girl with a jacket”>
The alt attribute is also useful if the image does not exist.
CORE ATTRIBUTES
The four core attributes that can be used on the majority of HTML elements (although not all) are −
Id
Title
Class
Style
THE ID ATTRIBUTE
The id attribute of an HTML tag can be used to uniquely identify any element within an HTML page. There are two primary reasons that you might want to use an id attribute on an element −
If an element carries an id attribute as a unique identifier, it is possible to identify just that element and its content.
If you have two elements of the same name within a Web page (or style sheet), you can use the id attribute to distinguish between elements that have the same name.
We will discuss style sheet in separate tutorial. For now, let’s use the id attribute to distinguish between two paragraph elements as shown below.
EXAMPLE
<p id = “html”>This para explains what is HTML</p>
<p id = “css”>This para explains what is Cascading Style Sheet</p>
THE TITLE ATTRIBUTE
The title attribute gives a suggested title for the element. They syntax for the title attribute is similar as explained for id attribute −
The behavior of this attribute will depend upon the element that carries it, although it is often displayed as a tooltip when cursor comes over the element or while the element is loading.
EXAMPLE
<!DOCTYPE html>
<html>
<head>
<title>The title Attribute Example</title>
</head>
<body>
<h3 title = “Hello HTML!”>Titled Heading Tag Example</h3>
</body>
</html>
TITLED HEADING TAG EXAMPLE
THE CLASS ATTRIBUTE
The class attribute is used to associate an element with a style sheet, and specifies the class of element. You will learn more about the use of the class attribute when you will learn Cascading Style Sheet (CSS). So for now you can avoid it.
The value of the attribute may also be a space-separated list of class names. For example −
class = “className1 className2 className3”
THE STYLE ATTRIBUTE
The style attribute allows you to specify Cascading Style Sheet (CSS) rules within the element.
EXAMPLE:
<!DOCTYPE html>
<html>
<head>
<title>The style Attribute</title>
</head>
<body>
<p style = “font-family:arial; color:#FF0000;”>Some text…</p>
</body>
</html>
INTERNATIONALIZATION ATTRIBUTES
There are three internationalization attributes, which are available for most (although not all) XHTML elements.
dir
lang
xml:lang
THE DIR ATTRIBUTE
The dir attribute allows you to indicate to the browser about the direction in which the text should flow. The dir attribute can take one of two values, as you can see in the table that follows −
ValueMeaning
ltrLeft to right (the default value)
rtlRight to left (for languages such as Hebrew or Arabic that are read right to left)
EXAMPLE
<!DOCTYPE html>
<html dir = “rtl”>
<head>
<title>Display Directions</title>
</head>
<body>
This is how IE 5 renders right-to-left directed text.
</body>
</html>
When dir attribute is used within the <html> tag, it determines how text will be presented within the entire document. When used within another tag, it controls the text’s direction for just the content of that tag.
THE LANG ATTRIBUTE
The lang attribute allows you to indicate the main language used in a document, but this attribute was kept in HTML only for backwards compatibility with earlier versions of HTML. This attribute has been replaced by the xml:lang attribute in new XHTML documents.
The values of the lang attribute are ISO-639 standard two-character language codes. Check HTML Language Codes: ISO 639 for a complete list of language codes.
EXAMPLE
<!DOCTYPE html>
<html lang = “en”>
<head>
<title>English Language Page</title>
</head>
<body>
This page is using English Language
</body>
</html>
THE XML:LANG ATTRIBUTE
The xml:lang attribute is the XHTML replacement for the lang attribute. The value of the xml:lang attribute should be an ISO-639 country code as mentioned in previous section.
GENERIC ATTRIBUTES
Here’s a table of some other attributes that are readily usable with many of the HTML tags.
AttributeOptionsFunction
alignright, left, centerHorizontally aligns tags
valigntop, middle, bottomVertically aligns tags within an HTML element.
bgcolornumeric, hexidecimal, RGB valuesPlaces a background color behind an element
backgroundURLPlaces a background image behind an element
idUser DefinedNames an element for use with Cascading Style Sheets.
classUser DefinedClassifies an element for use with Cascading Style Sheets.
widthNumeric ValueSpecifies the width of tables, images, or table cells.
heightNumeric ValueSpecifies the height of tables, images, or table cells.
titleUser Defined“Pop-up” title of the elements.
0 notes
Video
youtube
Learn About HTML Elements and Attributes | Learn HTML and CSS | HTML Tut...
0 notes
Text
ASP.NET MVC - How to set HtmlAttributes programmatically in Razor HTML helpers

If you're a seasoned ASP.NET MVC developer, you most likely already know that most Razor HTML helpers let you use an anonymous object in a parameter called htmlAttributes. As the name says, its members will be used to generate the HTML attribures of that element. For example, this: Will become this: The only two notable exceptions are Html.EditorFor and Html.DisplayFor, which uses a slightly different syntax: As we can see, even though they're using an anonymous object into an anonymous object container, the overall logic is basically the same. It's worth noting that this "enhanced" capability for the two above methods has been added in ASP.NET 5.1 to ease the life of most developers. For the sake of simplicity, we'll stick to this post topic and avoid explaining this specific behaviour: to read the whole story, we strongly suggest to read this official MS post. For now, let's just assume that we're all using ASP.NET MVC 5.1 (or above). As you probably know, anonymous types are created by the compiler at runtime level, so they aren't exactly handy when we want to modify them at execution level... to put it in other words, it just cannot be done.
The Problem
So, what if we need to assign these HTML attributes programmatically and dinamically? As a matter of fact, we can do a lot of things using variables, inline methods, conditional blocks or other viable strategies: However, there are scenarios where we need to conditionally add (or skip) certain attributes as a whole. The perfect example of this is a TextBoxFor element which we would like to set readonly only in some circumstances. The readonly attribute is a tricky one, because it works as a property setting and not as a valued attribute. Its mere presence is enough to set the element read-only, despite of its value: this basically means that there's no way to explicitly set it to FALSE. Pretty neat, isn't it? To know more about it, read here. For the above reason, we cannot do something like this:
The Solution
There are a lot of viable workarounds around the web: most of them are collected in this StackOverflow threads. However, no one of the listed one was DRY enough for my tastes. For this very reason, I did some research and eventually I came up writing this simple helper method: The above technique allows me to deal with this issue just the way I wanted to, without having to repeat a single line of code. It can be used in the following way:
Conclusion
That's it for now: I hope that the above method will help most ASP.NET MVC developers to deal with their htmlAttributes! Read the full article
0 notes
Text
Uninted Updates In Asp.Net MVC
New Post has been published on https://is.gd/vOy3e7
Uninted Updates In Asp.Net MVC

In this article we will understand if we don’t want to update certain fields means Uninted Updates how we acheive that in Asp.Net MVC By Sagar Jaybhay.
Uninted Updates
In the previous article, we know how to Edit the details but here as you see all fields are editable and you will able to change that all. but we don’t want to change that ID and Name field and want to mark this as read-only to do this we change the Html helper method from EditFor to DisplayFor.

By doing this we have below UI when we click on the Save button.

To overcome this we need to use HiddenField for code for this is below
@Html.ValidationSummary(true, "", new @class = "text-danger" ) <div class="form-group"> @Html.LabelFor(model => model.EmpID, htmlAttributes: new @class = "control-label col-md-2" ) <div class="col-md-10"> @Html.DisplayFor(model => model.EmpID, new htmlAttributes = new @class = "form-control" ) @Html.HiddenFor(mode=>mode.EmpID) @Html.ValidationMessageFor(model => model.EmpID, "", new @class = "text-danger" ) </div> </div> <div class="form-group"> @Html.LabelFor(model => model.EmpName, htmlAttributes: new @class = "control-label col-md-2" ) <div class="col-md-10"> @Html.DisplayFor(model => model.EmpName, new htmlAttributes = new @class = "form-control" ) @Html.HiddenFor(mode => mode.EmpName) @Html.ValidationMessageFor(model => model.EmpName, "", new @class = "text-danger" ) </div> </div>
We able to save values and ID and Name is Uneditable our functionality is achieved but anyone can easily hack our application by using tools like fiddler and Postman.
How they can post requests from these tools as shown below. When you click F12 keys in chrome inspector window is open under this you need to click on network tab by doing so you will able to see calls which are generated by our site and simply copy request URL and parameters from their

See this image you can copy URL and Formsdata to the postman and you able to hack our application.

To Overcome this we need to UpdateModel overloaded method which allows us to define only that property that needs to update. Code for this is shown below
[HttpPost] public ActionResult Edit(Employee employee) var emp = new BusinessLogic.Business().GetEmployee(employee.EmpID.ToString()); UpdateModel(emp, new string[] "EmpSalary", "EmpGender", "EmpCity", "EmpEmail", "DepartmentID" ); if (ModelState.IsValid) new BusinessLogic.Business().UpdateEmployee(emp); return RedirectToAction("DisplayCompleteEmployee"); return View(employee);
In above code, we get Employee for that id which is present in database after that use UpdateModel method which has one overloaded version in which we can pass the what property we need to update give name array of that property in this we exclude EmpID and EmpName property.
It will use this from database which we retrieve and newly changed values from our edit view or PostMan request and UpdateEmployee method of Business class we pass an object which we created not which we took as a parameter so the only information we required that’s updated in the database.
Overloaded method of UpdateModel method which we can use is shown below
IncludeList or WhiteList
UpdateModel(Our_Model(in our case Employee),string[] includedProperties);
Excluded Propeties or BlackList
UpdateModel(Our_Model(in our case Employee),string prefix,string[] includedProperties,string [] excludedProperties);
Now our method becomes for this shown below
UpdateModel(Our_Model(in our case Employee),null,null,string [] “EmpName”,”EmpID”);
GitHub :- https://github.com/Sagar-Jaybhay/MVC5
0 notes
Link
リクルートテクノロジーズ兼リクルートライフスタイルのASGチームに所属しているフロントエンドエンジニアの可児です。本記事は、リクルートライフスタイルアドベントカレンダー4日目の記事です。 本記事では、リクルートライフスタイルで取り組んでいる新規Webサービスのモダンなフロントエンド開発に関することとして、Next.jsやAMPについて紹介します。 目次 はじめに モダンなWebフレームワーク React/Next.js TypeScript styled-components AMP AMPとは AMPの開発パターン Next.jsとAMP AMPキャッシュ AMP と 非AMP の共存 検索結果カルーセルとSEO AMPの開発における注意点 まとめ はじめに リクルートライフスタイルでは、じゃらんやホットペッパーグルメ、ホットペッパービューティーといった従来のWebサービスだけではなく、様々な新しい領域の開拓を狙ったサービスにもチャレンジしています。組織としては柔軟に技術選定することが可能な新規Webサービス開発を通して、最新の技術スタックを取り入れた開発を行い、有用性を確認した上でリクルートの様々なサービスに横展開していくことで、リクルート全体のWebサービス開発のDX(Developer eXperience)とUX(User eXperience)を高めていきたいと考えています。 ホテルや飲食店といったクライアント様の情報を、Webを介して様々な情報の中からより素早く適切にユーザにお届けするための1つの施策として、Webサービスを高速に表示することが���められています。それを実現するための技術として、最近ではGoogleが提唱するAMPという技術に注目が集まってきています。今回は、実際にリクルートライフスタイルの開発現場で利用しているモダンなWebフレームワークとしてNext.js、周辺技術としてTypeScript、styled-components、そして上述のAMP、それらの技術スタックでAMP対応のページを開発する方法と注意点、AMPのメリット・デメリットなどについて紹介します。 モダンなWebフレームワーク React / Next.js Reactは近年のWebサービス開発において広く使われているUIフレームワークです。また先日の Chrome Dev Summit 2019 のキーノートやWebフレームワークの技術を紹介するセッションでは、Reactで容易に開発可能なWebフレームワークである Next.js が大々的に紹介されました。UIフレームワークとしてのReact、それを利用するWebフレームワークとしての Next.js が Webサービス開発の代表格となりつつあります。 Next.js はフロントエンド開発で一種の鬼門であるwebpackの設定であったり、BFFのWebサーバの構築やサーバサイドレンダリングを、zero config 、つまり何の設定もなくいきなり Reactで書きはじめることができます。周辺プラグインも充実し、公式のGitHub内には多数の example も用意され、後述する AMP のサポートももちろん行われています。リクルートでも Next.js を活用したWebサービス開発が多数進められています。 TypeScript JavaScript には型がないため、これまでも様々なAltJSが世の中に出回ってきましたが、いまはTypeScriptが非常に強い印象を受けます。TypeScript は @DefinitelyTyped の充実さが光っており、有名なモジュールにはほとんど型定義が用意されてきています。今後のモジュール開発も TypeScriptが利用されるものも増え、より一層型で縛ることのできる世界に近づいていくものと思われます。上述の Next.js ではデフォルトでTypeScriptの開発が可能です。 styled-components CSS in JS の代表格の1つとして、styled-components というライブラリがあります。近年では emotion なども人気が出てきており、いくつかの選択肢があるように思います。styled-components でも emotion でも js で変数値を style に利用することができます。 1 2 3 4 5 6 7 8 9 10 11 const Color = { Border: { Default: "#e4e4e4", Fixed: "#b8b8b8" } ... } const StyledItem = styled.div` border-top: 1px solid ${Color.Border.Default}; `; Next.js では styled-components を活用した example も紹介されています。 AMP AMP とは 最近のWebサービスはよりリッチなUI/UXを提供するようになってきています。それに伴って JavaScript, CSS が肥大化したり、表示する画像は高画質化したりしていて、結果的に表示したいWebページのサイズが増加しています。さらにWebサービスに対して改善を加え続けていくと、Webページ内に不要なコードが残って��まったりすることでページのサイズが大きくなってしまい、ページのレンダリング速度が遅くなることで顕著にUXが悪くなることがあります。 それらの問題に対し、Google はパフォーマンスを低下させないための仕組みとして AMPを提唱しています。AMP は “Valid な状態” が明確に定義されています。例えば、 AMP ページには任意のJavaScriptは含めないこと CSS は 50KB以内にすることなど ルールを制約として設けることで AMP Valid な状態にしておくことでページサイズを抑えレンダリングの速度を遅くしないようにしています。 AMPは独自のAMP用の Validator を用意することで、AMP Valid な状態かどうかを確認することができます。AMP Valid な状態でWebページを公開すると、Google 側が検索結果に AMP Valid であることを示す稲妻マークを表示してくれるため、ユーザはそのページがAMPであり高速に表示されることがわかります。そして、Googleは自動的にAMP ValidなページをGoogleのCDNにキャッシュとしてのせてくれるため、より高速にユーザに検索結果を表示することができます。 AMP では任意のJavaScriptが記述することが許容されない代わりに、AMP用の UI コンポーネントが提供されています。Web Components として作られている AMP コンポーネントは、 といった形式のタグとして html に書くことで簡単に利用できます。 例えば、画像を表示する は従来の タグと似たタグとなっています。しかし、 が属性値で指定された src の画像を表示するだけのものであるのに対し、 はそれ単体で、レスポンシブに表示することを可能にするとともに、自動的に lazy load 機能が働き、画像がブラウザに表示され必要となったタイミングでダウンロードされるようになります。このように AMP コンポーネントは、単体でパフォーマンスに考慮された設計がなされているHTMLタグとして活用することが可能です。 そのほかにも、 や といった、サイドバー、画像のカルーセル表示など、自前で開発しようとすると大変そうなコンポーネントもすでに用意されているので、十分に活用することができます。最近では amp-story と呼ばれる新たに大きな機能がリリースされ注目されています。 AMPの開発パターン AMP の開発パターンには2種類あります。 Hybrid AMP Full AMP(AMP First とも呼ばれる) Hybrid AMP はオリジナルの AMP Valid ではない Webページに対して、 AMP用の AMP Valid なページをカノニカルとして用意するものです。実際には、既存のオリジナルWebサイトや記事がすでにリリースされている場合に、Google検索による流入増加を目的としてAMPページを用意する形で開発が進められることが多いため、 Hybrid AMP の開発パターンの方が現在は多いです。 しかし、Hybrid AMP でAMPのページを開発することだけが目的となってしまい、本来のオリジナルのページとはUXが異なる簡素なページを開発されるケースが見られます。AMPを開発しているGoogleは、基本的にはAMPとオリジナルのページの UX は大きく変えないことを推奨していますし、ユーザ体験としても同じページを見ているのに、AMPページを見る場合とオリジナルのページを見る場合で、機能やUIが異なってしまうのは体験上良いものとは言えないため、オリジナルのページとほぼ同等のAMPページを作り込むべきです。 新規���ページを開発する場合には Hybrid AMP では、同じWebページをオリジナル、AMPの2ページ分開発してしまうことになり、二重開発が発生してしまいます。そのため、Full AMP で開発することで、はじめからAMPを利用して開発を行うことで、二重開発を避けられます。 ちなみに、AMPコンポーネント は必ずしも AMP Valid な状態で使う必要はありません。AMPコンポーネントは単なる Web Components として利用することもできます。AMPコンポーネントそのものとして有用なものも多いので、Webページの開発を行う際に部分的にAMPコンポーネントを一種のUIライブラリとして利用することで、パフォーマンスを担保しつつ、開発効率も高めることができます。 Next.js と AMP Next.js ではpagesフォルダ配下のファイルが自動的にファイル名でルーティングされ、1つのページとして機能し表示されます。デフォルトの設定でサーバサイドレンダリング(SSR)されます。 AMP 化は容易で、pages のファイル内で export const config = { amp: true }; と書いておけば、AMP を有効化するために必要なスクリプト等を含んだ形でSSRを行ってくれます。ただし、それだけで自動的にAMP Valid になるわけではないので注意が必要です。 AMP Valid かどうかは Next.js がSSRするタイミングで、AMP用のValidationを通してくれるので、Next.jsの標準出力で確認することができます。AMP Validにするためには、ページやコンポーネント内にクライアントサイドで実行されるJavaScriptを書かず、 CSSも50KB以内に抑えつつ、 内の1箇所にまとめてに書く必要があります。Chrome Extensionや、 AMP ValidatorがWebページになっているので、それらも活用できます。 AMPキャッシュ AMP Validな状態だと、AMPページのキャッシュ(AMP キャッシュと呼ぶ)がGoogleのCDNにのります。GoogleのAMPキャッシュにのることで、Googleの検索結果でカルーセル的に表示されて検索結果表示に優遇されるようなことがあったり、AMPキャッシュにのっているページは検索結果ページが表示されている状態であらかじめ(ユーザがクリックする前に)HTMLドキュメントをダウンロードしておき、ユーザが実際にクリックしたら高速に表示することができるようにしたりします。 しかし、AMPキャッシュが返されるということは最新のHTMLドキュメントがSSRされるわけではなく、前回キャッシュにのったタイミングのものがAMPキャッシュからユーザに届けられることになります。そのため例えば、飲食店の予約情報などといった変化の激しいデータがAMPキャッシュにのってしまうと、ユーザに正しくないデータが届けられてしまう可能性があることに注意が必要です。ただAMPキャッシュは Stale-While-Revalidate モデルに従ったものになっています。つまりユーザの誰かがキャッシュにアクセスしたタイミングで、GoogleがオリジナルのサーバにアクセスしAMPキャッシュを更新させることが可能になりますので、問題になるケースは絞られるのではないかと思います。 また、AMPキャッシュはGoogleのCDNにのっているためGoogleのドメインとして表示されてしまうことにも注意が必要です。基本的にページの表示そのものに問題はありませんが、ユーザがURLバーを見てどこのサイトのものなのかわかりづらかったり、モニタリング分析系の通信で思ったようなデータを収集できないケースがあります。AMP用の分析タグとして amp-analytics が用意されているものの、例えばITP2.3の影響で Safari では別ドメインによるCookieの書き込みやLink Decorationであると判断されてしまうことで、これまで取得できていたような分析データが収集できないかもしれないので注意が必要です。 ちなみにChromeブラウザのみを対象にす��ば、Signed HTTP Exchange (SXG) という仕組みを適用することができます。これはWebページへのリクエストとレスポンスに対して署名を行いAMPキャッシュとしてGoogle側が保管しておき、Chromeブラウザがその署名が正しいものであると検証できた場合に、Googleから配信された署名つきAMPキャッシュを本来のオリジナルのドメインとして扱うことができるものです。そのため、Googleから配信された AMPキャッシュをブラウザで表示しているにも関わらず、 URLバーの表示はオリジナルのURLが正しく表記されるようになります。CDNサービスを提供しているCloudflareは簡単にSXG化させることができます。しかしながらSXGの仕組みは Chromeブラウザでしか実装されていないため、現状Safariでは変わらずGoogleドメインとして扱われてしまいます。 AMP と 非AMP の共存 Full AMPで開発を進めていたときにユーザ固有のログインページなど、AMP Valid である必要がないページも同じサービス内に作る場合でも、Next.jsで開発していればpagesで定義するページに対し、 amp: true の config を用意しなければそのままReactのページとしてレンダリングされることになります。つまり、開発体系を大きく変えることなくコンポーネントも使い回しながら開発を進めることができるため、AMP ValidとAMP Validではないページを共存させることは難しくありません。 検索結果カルーセルとSEO Googleの検索結果でカルーセル表示になるページは、ニュース記事や飲食店情報といった限定された分類のページに限られています。商品情報や店舗情報といったその他の内容のものはAMP Validなものにしても検索結果として優遇されるカルーセルになるとは限らないことに注意が必要です。 また、SEOとしてAMPページが優遇され検索結果が上位になるといったことがGoogleから明言されているわけではありません。しかし、Googleはページの表示パフォーマンスはSEOに影響します。AMP Validにすれば必ず検索結果が上位になるわけではありませんが、ページのレンダリング速度は一定の高速化が可能になり、これは間接的にSEOへの効果が寄与されるものと言えます。 AMPの開発における注意点 AMP では任意のJavaScriptを記述して動的な処理をページ内に含められない代わりに、AMPコンポーネントに対して動的な処理を記述することが可能です。AMPコンポーネントに対しても制約上JavaScriptを記述できないので、HTML属性にスクリプトライクな文字列を記述して、動的な処理を定義します。例えば でサイドバーを利用する際は、サイドバーの開閉処理をボタンなどに対して on 属性で定義することができます。 1 2 3 4 5 6 7 8 9 // サイドバー本体 <amp-sidebar id="sidebar" <div サイドバーの中身 </div </amp-sidebar // idがsidebarのサイドバーを開くトグルボタン <button on="tap:sidebar.toggle"開く/閉じる</button この時、開発時にNext.jsでTypeScriptを利用している場合、AMP独自のWeb ComponentsはReactのJSXとして型が用意されているわけではありません。 現時点ではAMP公式の型定義が公開されているわけではありませんので、開発者がAMPコンポーネント向けに型定義をそれぞれ用意する必要があります。また、on 属性自体ももともとbuttonタグには存在しないものなので、型違反になるためこちらも同様にHTMLAttributesの型定義の拡張が必要です。 また styled-components と組み合わせる場合には、 const StyledSidebar = styled["amp-sidebar"] のようにAMPコンポーネントの style を直接修飾することはできず、 をラップしたReactコンポーネントを定義し、styled関数で囲うことでスタイルを修飾する必要があります。 このようにAMPが既存のHTMLにないタグ名だったり属性値を使用しているために、TypeScriptやstyled-components���いった他のライブラリで一般的な仕様上のHTMLを想定されたものになっているときに不具合が生じることがあるので注意が必要です。 一方で、styled-componentsではもともとAMP用の on 属性が付与されたHTMLコンポーネントにスタイルを修飾すると on 属性の情報が消えてしまうバグがありましたが、今は解消されています。このようにだんだんとAMPとモダンなライブラリとの親和性が高くなってきていることも事実です。 AMPそのものが発展途上であるがゆえに、AMPそのものにもバグが入り込んでしまうことがあります。バグが入り込んでしまうこと自体はライブラリとして利用している以上逃れることができません。しかし、npm などで配信されるモジュールに対しては、package.jsonでモジュールのバージョンを指定しておき、必要に応じてバージョンを上げたりビルドし直すことで異常を確認できますが、 AMPではAMPコンポーネント向けのスクリプトがCDN経由で配信されているため、パッチがあたった瞬間にCDN側が更新されることに伴い、リリースされているプロダクションで参照しているスクリプトが急に新しくなることがあります。ここにバグや想定外の仕様変更が入り込んでいる場合、いきなりプロダクションのサービスに直に影響が出ることがあり得ます。つまり、AMPコンポーネントやAMP用のスクリプトはある一定の依存度を保ったり、エラーハンドリングをきめ細やかにしておくなどの細心の注意が必要になります。 また、DX的にはAMPは上述の通り、スクリプトライクな文字列でロジックを管理しなければなりません。これはAMP独自のスクリプトであるため、はじめてAMPを触る場合には学習コストがかかります。それに加えて、今のところこのAMP 独自のスクリプトに対して適切なシンタックスハイライトが行われるエディタであったり、lint機能は提供されていません。せっかくTypeScriptを利用していても、このままでは型を効かせることもできません。そのため、もしきちんとAMP独自のスクリプトを管理するためには、AMP用のスクリプトビルダーを内部で開発するなどして、適切な管理が必要になります。 まとめ 本記事ではWebフレームワークとしてのNext.jsやGoogleの提唱しているAMPについて紹介しました。 これまでの内容を踏まえ、私が考えるAMPのメリットは、以下になると思います。 - Validな状態にするための制約に従うことで、パフォーマンス低下を防ぐことができる点 - AMPキャッシュにのせることによる検索結果のカルーセルと表示高速化 - AMPコンポーネントそのものの有用性 一方でAMPによるデメリットは以下だと思っています。 - AMP Validにする厳しい制約による機能開発の難しさ - AMPを扱うためのスクリプト更新への追従 - AMPキャッシュやAMPの制約下で分析、広告タグが利用しづらいこと もちろんメリット・デメリットは上記に挙げた点だけではありません。AMPを導入することによる学習コストの増加や制約による開発が難しくなることはあります。しかしながら、AMPの根本的な考え方である、必要最低限のスクリプトやCSSでWebページの高度なパフォーマンスを担保しながらユーザ体験が良いものを提供していくことはどのような開発を行うにも参考にすべきことであると思います。例えば、AMPコンポーネントをWeb Componentsとして利用しながら、パフォーマンスバジェットをlighthouse CIで管理し、パフォーマンス低下を防ぎながらサービス開発を行ったとしても一定の同様の効果を得られると思っています。すべての技術に言えることですが、開発するサービスや開発チームにとってどのような技術を組み合わせること��ベストなのかどうか判断しながら先進的なフレームワークを取り入れて開発を行なっていくべきかなと私は思っています。 最後になりますが、 リクルートライフスタイルの開発チームやリクルートテクノロジーズの開発チームではフロントエンドエンジニア・モバイルアプリエンジニア・サーバサイドエンジニア・インフラエンジニア・機械学習エンジニア等々幅広く募集しています!!! 可児 潤也 (フロントエンドエンジニア) リクルートテクノロジーズ兼リクルートライフスタイルでフロントエンドをかじってます。
0 notes
Text
Gatsby.jsにreact-helmetを導入してhead要素(メタタグ)をカスタマイズする

Gatsby.jsにreact-helmetを導入してhead要素(メタタグ)をカスタマイズする
Posted: 2019.10.14 / Category: javascript / Tag: React
GatsbyでHTMLファイルを書き出すと、初期状態ではメタタグはおろかタイトルもないんですよね。 その辺のカスタマイズは「helmet」とというプラグイン使うと簡単らしいでご紹介します。
Sponsored Link
Gatsbyがはじめての方は下記の記事も参考にしてください。
React製静的サイトジェネレーターGatsby使ってみた
インストール
下記コマンドでプラグインをインストールします。 react-helmetはReactのコンポーネントですが、それをGatsbyのプラグインで利用できるようにしたのがgatsby-plugin-react-helmetですね。
$ npm install --save gatsby-plugin-react-helmet react-helmet
プロジェクトルートにあるgatsby-config.jsを編集してこのプラグインを使えるようにします。
gatsby-config.js
module.exports = { plugins: [`gatsby-plugin-react-helmet`] }
これで準備完了。
使ってみる
試しにindexページに設定してみましょう。
page/index.js
import React from 'react' import Helmet from "react-helmet" export default () => ( <div> <Helmet htmlAttributes= title="Gastbyサンプル" meta={[ { name: 'description', content: 'このページはGastbyサンプルです。' } ]} /> </div> )
Helmetの部分はこんな感じにタグっぽく書いてもOKです。
<Helmet> <title>Gastbyサンプル</title> <meta name="description" content="このページはGastbyサンプルです。" /> <html lang="ja" /> </Helmet>
外部コンポーネント化
head要素は各ページで共通で使用する部分もあるのでHelmetの部分は外部コンポーネントにした方がいいですね。 例えばsrc/components/head.jsを下記のように作成してみます。
src/components/head.js
import React from 'react' import Helmet from "react-helmet" export default (props) => ( <Helmet htmlAttributes= title={ (props.title ? props.title + ' | ' : '') + "サイトタイトル" } meta={[ { name: 'description', content: props.description || 'Gastbyサンプル' } ]} /> )
あとはコンポーネントをインポートして配置するだけで使えます。 index.jsを下記のように編集してみましょう。
src/page/index.js
import React from 'react' import Head from '../components/head' export default () => ( <div> <Head /> </div> )
下層ページではpropsを設定して、細かく調節できます。
<Head title="自己紹介" description="自己紹介ページです。" />
以上、react-helmetの基本的な使い方がわかったと思いますが、react-helmetはスターターデーマによっては最初から組み込まれているのがあるので、基本的にはそちらを使用した方がいいかと思います。
gatsby-plugin-react-helmet
0 notes
Photo

How to Write HTML, HTML5 Tags, HTML5 Attributes - Absolute For Beginners [Lecture-2] What we will Learn in this video? 1- How to create HTML file? 2- How to write HTML? 3- Understanding HTML elements. 4- HTML attributes. WATCH VIDEO https://youtu.be/UG83oFmSlvM SUBSCRIBE MY CHANNEL & PRESS BELL ICON TO NEVER MISS ANY VIDEO https://www.youtube.com/user/makqcga/ --- *Its FREE for all specially those who can't afford expensive institutions*, So be serious to build your career. YOU CAN HELP! Hurry up! SUBSCRIBE MY CHANNEL press bell icon to get regular updates. Continue watch my videos till end and drop like and share Don't for get to give feedback in comment section. Thanks & Regards! Mr. MAKQ - Code Injector Sponsored by Nix Pixelz #html #makq #mrmakq #codeinjector #websitedesign #learnwebsite #structure #injector #carer #editors #htmlEditor #html5Structure #htmltags #learnHTML #CSSTextAlign #TextAlignCenter #TextAlignHorizontal #TextAlignVertical #usingCSSTextAlign #HTMLCSSTutorial #BeginnerHTMLCss #NixPixelz #code #codes #learn #programming #webdesign #design #css #seo #javascript #html5Tags #htmlAttributes #htmlElements #htmlEditor (at Abu Dhabi, United Arab Emirates) https://www.instagram.com/p/BypyuanAc--/?igshid=1e3wcegmdplgf
#html#makq#mrmakq#codeinjector#websitedesign#learnwebsite#structure#injector#carer#editors#htmleditor#html5structure#htmltags#learnhtml#csstextalign#textaligncenter#textalignhorizontal#textalignvertical#usingcsstextalign#htmlcsstutorial#beginnerhtmlcss#nixpixelz#code#codes#learn#programming#webdesign#design#css#seo
0 notes
Text
MVC 5 with Entity Framework
@model TestApplication1001.Models.TestStudent@{ ViewBag.Title = "Details"; }<h2>Details</h2><div> <h4>TestStudent</h4> <hr /> <dl class="dl-horizontal"> <dt> @Html.DisplayNameFor(model => model.Name) </dt> <dd> @Html.DisplayFor(model => model.Name) </dd> <dt> @Html.DisplayNameFor(model => model.Age) </dt> <dd> @Html.DisplayFor(model => model.Age) </dd> <dt> @Html.DisplayNameFor(model => model.Gender) </dt> <dd> @Html.DisplayFor(model => model.Gender) </dd> <dt> @Html.DisplayNameFor(model => model.Head) </dt> <dd> @Html.DisplayFor(model => model.Head) </dd> <dt> @Html.DisplayNameFor(model => model.TestDesignation.Designation) </dt> <dd> @Html.DisplayFor(model => model.TestDesignation.Designation) </dd> </dl> </div> <p> @Html.ActionLink("Edit", "Edit", new { id = Model.Guid }) | @Html.ActionLink("Back to List", "GetStudent") </p> Controller Part
using System; using System.Collections.Generic; using System.Linq; using System.Web; using System.Web.Mvc; using TestApplication1001.Models;
namespace TestApplication1001.Controllers { public class StudentController : Controller { Student studentDetail = new Student();
// GET: Student public ActionResult GetStudent() { //studentDetail.GetStudent(); return View(studentDetail.GetStudent()); }
// GET: Student/Details/5 public ActionResult Details(string id) { var data = studentDetail.GetStudent(id); return View(data); }
// GET: Student/Create public ActionResult Create() {
ViewData["DesignationList"] = studentDetail.GetDesignation(); return View(); }
// POST: Student/Create [HttpPost] public ActionResult Create(TestStudent testStudent) { try { testStudent.Guid = Guid.NewGuid().ToString(); if (studentDetail.AddUpdateStudent(testStudent)) { return RedirectToAction("GetStudent"); } // TODO: Add insert logic here return RedirectToAction("Create"); } catch { return View(); } }
// GET: Student/Edit/5 public ActionResult Edit(string id) { var TestStudData = studentDetail.GetStudent(id); if (TestStudData!=null) { ViewData["DesignationList"] = studentDetail.GetDesignation(); return View(TestStudData); } else return RedirectToAction("GetStudent"); }
// POST: Student/Edit/5 [HttpPost] public ActionResult Edit(TestStudent testStudent) { try { if (studentDetail.AddUpdateStudent(testStudent, testStudent.Guid)) { return RedirectToAction("GetStudent"); } return View(); } catch { return View(); } }
// GET: Student/Delete/5 public ActionResult Delete(string id) { studentDetail.Delete(id); return RedirectToAction("GetStudent"); } } }
#View��
Display -
@model IEnumerable<TestApplication1001.Models.TestStudent>
@{ ViewBag.Title = "GetStudent"; }
<h2>GetStudent</h2>
<p> @Html.ActionLink("Create New", "Create") | @Html.ActionLink("Back to List", "GetStudent") </p> <table class="table"> <tr> <th> @Html.DisplayNameFor(model => model.Name) </th> <th> @Html.DisplayNameFor(model => model.Age) </th> <th> @Html.DisplayNameFor(model => model.Gender) </th> <th> @Html.DisplayNameFor(model => model.Head) </th> <th> @Html.DisplayNameFor(model => model.TestDesignation.Designation) </th> <th></th> </tr>
@foreach (var item in Model) { <tr> <td> @Html.DisplayFor(modelItem => item.Name) </td> <td> @Html.DisplayFor(modelItem => item.Age) </td> <td> @Html.DisplayFor(modelItem => item.Gender) </td> <td> @Html.DisplayFor(modelItem => item.Head) </td> <td> @Html.DisplayFor(modelItem => item.TestDesignation.Designation) </td> <td> @Html.ActionLink("Edit", "Edit", new { id=item.Guid }) | @Html.ActionLink("Details", "Details", new { id=item.Guid }) | @Html.ActionLink("Delete", "Delete", new { id=item.Guid }) </td> </tr> }
</table>
Detail Display -
@model TestApplication1001.Models.TestStudent
@{ ViewBag.Title = "Details"; }
<h2>Details</h2>
<div> <h4>TestStudent</h4> <hr /> <dl class="dl-horizontal"> <dt> @Html.DisplayNameFor(model => model.Name) </dt>
<dd> @Html.DisplayFor(model => model.Name) </dd>
<dt> @Html.DisplayNameFor(model => model.Age) </dt>
<dd> @Html.DisplayFor(model => model.Age) </dd>
<dt> @Html.DisplayNameFor(model => model.Gender) </dt>
<dd> @Html.DisplayFor(model => model.Gender) </dd>
<dt> @Html.DisplayNameFor(model => model.Head) </dt>
<dd> @Html.DisplayFor(model => model.Head) </dd>
<dt> @Html.DisplayNameFor(model => model.TestDesignation.Designation) </dt>
<dd> @Html.DisplayFor(model => model.TestDesignation.Designation) </dd>
</dl> </div> <p> @Html.ActionLink("Edit", "Edit", new { id = Model.Guid }) | @Html.ActionLink("Back to List", "GetStudent") </p>
Create -
@model TestApplication1001.Models.TestStudent
@{ ViewBag.Title = "Create"; }
<h2>Create</h2>
@using (Html.BeginForm()) { @Html.AntiForgeryToken()
<div class="form-horizontal"> <h4>TestStudent</h4> <hr /> @Html.ValidationSummary(true, "", new { @class = "text-danger" }) <div class="form-group"> @Html.LabelFor(model => model.Name, htmlAttributes: new { @class = "control-label col-md-2" }) <div class="col-md-10"> @Html.EditorFor(model => model.Name, new { htmlAttributes = new { @class = "form-control" } }) @Html.ValidationMessageFor(model => model.Name, "", new { @class = "text-danger" }) </div> </div>
<div class="form-group"> @Html.LabelFor(model => model.Age, htmlAttributes: new { @class = "control-label col-md-2" }) <div class="col-md-10"> @Html.EditorFor(model => model.Age, new { htmlAttributes = new { @class = "form-control" } }) @Html.ValidationMessageFor(model => model.Age, "", new { @class = "text-danger" }) </div> </div>
<div class="form-group"> @Html.LabelFor(model => model.Gender, htmlAttributes: new { @class = "control-label col-md-2" }) <div class="col-md-10"> @Html.RadioButtonFor(model => model.Gender, "M", new { htmlAttributes = new { @class = "form-control" } }) Male @Html.RadioButtonFor(model => model.Gender, "F", new { htmlAttributes = new { @class = "form-control" } }) Female @*@Html.EditorFor(model => model.Gender, new { htmlAttributes = new { @class = "form-control" } })*@ @Html.ValidationMessageFor(model => model.Gender, "", new { @class = "text-danger" }) </div> </div>
<div class="form-group"> @Html.LabelFor(model => model.Head, htmlAttributes: new { @class = "control-label col-md-2" }) <div class="col-md-10"> @Html.EditorFor(model => model.Head, new { htmlAttributes = new { @class = "form-control" } }) @Html.ValidationMessageFor(model => model.Head, "", new { @class = "text-danger" }) </div> </div>
<div class="form-group"> @Html.LabelFor(model => model.Designation, "Designation", htmlAttributes: new { @class = "control-label col-md-2" }) <div class="col-md-10"> @Html.DropDownListFor(model => model.Designation, new SelectList((System.Collections.IEnumerable)ViewData["DesignationList"], "id", "Designation"),"Select Role", new { @class = "form-control" }) @Html.ValidationMessageFor(model => model.Designation, "", new { @class = "text-danger" }) </div> </div>
<div class="form-group"> <div class="col-md-offset-2 col-md-10"> <input type="submit" value="Create" class="btn btn-default" /> </div> </div> </div> }
<div> @Html.ActionLink("Back to List", "GetStudent") </div>
@section Scripts { @Scripts.Render("~/bundles/jqueryval") }
Edit -
@model TestApplication1001.Models.TestStudent
@{ ViewBag.Title = "Edit"; }
<h2>Edit</h2>
@using (Html.BeginForm()) { @Html.AntiForgeryToken()
<div class="form-horizontal"> <h4>TestStudent</h4> <hr /> @Html.ValidationSummary(true, "", new { @class = "text-danger" }) @Html.HiddenFor(model => model.Guid)
<div class="form-group"> @Html.LabelFor(model => model.Name, htmlAttributes: new { @class = "control-label col-md-2" }) <div class="col-md-10"> @Html.EditorFor(model => model.Name, new { htmlAttributes = new { @class = "form-control" } }) @Html.ValidationMessageFor(model => model.Name, "", new { @class = "text-danger" }) </div> </div>
<div class="form-group"> @Html.LabelFor(model => model.Age, htmlAttributes: new { @class = "control-label col-md-2" }) <div class="col-md-10"> @Html.EditorFor(model => model.Age, new { htmlAttributes = new { @class = "form-control" } }) @Html.ValidationMessageFor(model => model.Age, "", new { @class = "text-danger" }) </div> </div> <div class="form-group"> @Html.LabelFor(model => model.Gender, htmlAttributes: new { @class = "control-label col-md-2" }) <div class="col-md-10"> @foreach (var item in Model.Gender.Trim()) { if (item == 'M') { @Html.RadioButtonFor(model => model.Gender, item, new { @checked = "checked" }) @Html.Label("Male") @Html.RadioButtonFor(model => model.Gender, "F") @Html.Label("Female") } else { @Html.RadioButtonFor(model => model.Gender, "M") @Html.Label("Male") @Html.RadioButtonFor(model => model.Gender, item, new { @checked = "checked" }) @Html.Label("Female") } } @Html.ValidationMessageFor(model => model.Gender, "", new { @class = "text-danger" }) </div> </div>
<div class="form-group"> @Html.LabelFor(model => model.Head, htmlAttributes: new { @class = "control-label col-md-2" }) <div class="col-md-10"> @Html.EditorFor(model => model.Head, new { htmlAttributes = new { @class = "form-control" } }) @Html.ValidationMessageFor(model => model.Head, "", new { @class = "text-danger" }) </div> </div>
<div class="form-group"> @Html.LabelFor(model => model.Designation, "Designation", htmlAttributes: new { @class = "control-label col-md-2" }) <div class="col-md-10"> @Html.DropDownListFor(model => model.Designation, new SelectList((System.Collections.IEnumerable)ViewData["DesignationList"], "id", "Designation"), "Select Role", new { @class = "form-control" }) @Html.ValidationMessageFor(model => model.Designation, "", new { @class = "text-danger" }) </div> </div>
<div class="form-group"> <div class="col-md-offset-2 col-md-10"> <input type="submit" value="Save" class="btn btn-default" /> </div> </div> </div> }
<div> @Html.ActionLink("Back to List", "GetStudent") </div>
@section Scripts { @Scripts.Render("~/bundles/jqueryval") }
Table Design -
/****** Script for SelectTopNRows command from SSMS ******/ SELECT [Guid] ,[Name] ,[Age] ,[Gender] ,[Head] ,[Designation] FROM [TestStudent]
/****** Script for SelectTopNRows command from SSMS ******/ SELECT [id] ,[Designation] FROM [TestDesignation]
0 notes
Text
🚀 Exciting News! New Articles on Front-End Development and Mastering HTML Series Released! 📝✨
🎉 We're thrilled to announce the release of our latest articles covering Front-End Development essentials and the Mastering HTML Series! Dive into the world of web development with our comprehensive guides and tutorials. Stay tuned for more exciting content coming your way soon!
#WebDevelopment#FrontEnd#HTML#CSS#JavaScript#Coding#Learning#Development#TechArticles#Programming#HTMLTags#HTMLAttributes#MasteringHTML#FrontEndDevelopment#CodeNewbie#TechEducation#WebDesign#DeveloperCommunity#SoftwareDevelopment#DigitalSkills
1 note
·
View note
Text
5 Ways to Export from ASP.NET to Word and PDF File
#kendo [developer.telerik.com]Html.Kendo().Editor() .Name("editor") .HtmlAttributes(new { style = "height:440px" }) .Tools(tools => tools .Clear() .ExportAs() .Import() ) .ExportAs(exportAs => exportAs .FileName("editor_content") .Proxy("Export", "EditorExport") ) .Import(import ...
0 notes
Text
youtube
In-depth Guide to HTML Tags and Attributes in Hindi | Learn HTML for Web Development
In this video, we dive deep into the world of HTML tags and attributes. We explore HTML tags such as html, head, body, div, span, and more, explaining their features and uses. We also cover HTML attributes like href, src, alt, title, style, and more. By the end of this video, you'll have a better understanding of these aspects of HTML and how to use them effectively in web development.
#HTML#HTMLTags#HTMLAttributes#WebDevelopment#LearnHTML#FrontEndDevelopment#HTMLTutorial#HTMLGuide#Coding#HTMLHindi#HTMLBasicsHindi#htmlforbeginner#htmlbasics#inhindi#hinditutorial#htmlattributes#Youtube
1 note
·
View note
Text
How to Perform Edit Operation In Asp.Net MVC
New Post has been published on https://is.gd/3ly1Dm
How to Perform Edit Operation In Asp.Net MVC

In this article we will understand How to Perform Edit Operation in Asp.Net MVC By Sagar Jaybhay.
How to Perform Edit Operation In Asp.Net MVC
Created Edit method in EmployeeController which is shown below and strongly typed EditView for this.
[HttpGet] public ActionResult Edit(string EmpID) var Employye = new BusinessLogic.Business().GetEmployee(EmpID); return View(Employye);
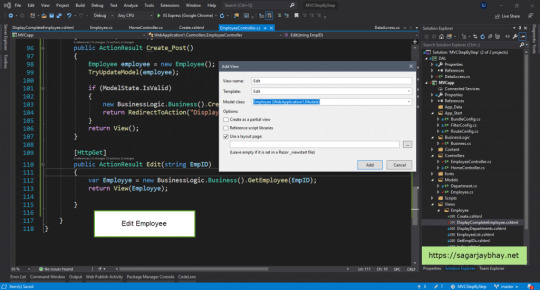
Edit Model In Asp.net MVC
Now after creating a view and click on edit link you will find below the window

Edit Employee In Asp.Net MVC
But if you see above image gender will display in textbox but we want dropdown list so we need to modify this as per our requirement. We modify our view, but in this, you should rename DropDownList Name to EmpGender as our model property is EmpGender so it will bind value directly.
@model WebApplication1.Models.Employee @ ViewBag.Title = "Edit"; <h2>Edit</h2> @using (Html.BeginForm()) @Html.AntiForgeryToken() <div class="form-horizontal"> <h4>Employee</h4> <hr /> @Html.ValidationSummary(true, "", new @class = "text-danger" ) <div class="form-group"> @Html.LabelFor(model => model.EmpID, htmlAttributes: new @class = "control-label col-md-2" ) <div class="col-md-10"> @Html.EditorFor(model => model.EmpID, new htmlAttributes = new @class = "form-control" ) @Html.ValidationMessageFor(model => model.EmpID, "", new @class = "text-danger" ) </div> </div> <div class="form-group"> @Html.LabelFor(model => model.EmpName, htmlAttributes: new @class = "control-label col-md-2" ) <div class="col-md-10"> @Html.EditorFor(model => model.EmpName, new htmlAttributes = new @class = "form-control" ) @Html.ValidationMessageFor(model => model.EmpName, "", new @class = "text-danger" ) </div> </div> <div class="form-group"> @Html.LabelFor(model => model.EmpSalary, htmlAttributes: new @class = "control-label col-md-2" ) <div class="col-md-10"> @Html.EditorFor(model => model.EmpSalary, new htmlAttributes = new @class = "form-control" ) @Html.ValidationMessageFor(model => model.EmpSalary, "", new @class = "text-danger" ) </div> </div> <div class="form-group"> @Html.LabelFor(model => model.EmpGender, htmlAttributes: new @class = "control-label col-md-2" ) <div class="col-md-10"> @Html.DropDownList("EmpGender", new List<SelectListItem> new SelectListItem Text="Male" ,Value="Male", new SelectListItem Text="Female" ,Value="female", "Select Gender") @Html.ValidationMessageFor(model => model.EmpGender, "", new @class = "text-danger" ) </div> </div> <div class="form-group"> @Html.LabelFor(model => model.EmpCity, htmlAttributes: new @class = "control-label col-md-2" ) <div class="col-md-10"> @Html.EditorFor(model => model.EmpCity, new htmlAttributes = new @class = "form-control" ) @Html.ValidationMessageFor(model => model.EmpCity, "", new @class = "text-danger" ) </div> </div> <div class="form-group"> @Html.LabelFor(model => model.EmpEmail, htmlAttributes: new @class = "control-label col-md-2" ) <div class="col-md-10"> @Html.EditorFor(model => model.EmpEmail, new htmlAttributes = new @class = "form-control" ) @Html.ValidationMessageFor(model => model.EmpEmail, "", new @class = "text-danger" ) </div> </div> <div class="form-group"> @Html.LabelFor(model => model.DepartmentID, htmlAttributes: new @class = "control-label col-md-2" ) <div class="col-md-10"> @Html.EditorFor(model => model.DepartmentID, new htmlAttributes = new @class = "form-control" ) @Html.ValidationMessageFor(model => model.DepartmentID, "", new @class = "text-danger" ) </div> </div> <div class="form-group"> <div class="col-md-offset-2 col-md-10"> <input type="submit" value="Save" class="btn btn-default" /> </div> </div> </div> <div> @Html.ActionLink("Back to List", "Index") </div>

Gender Edit Model
But when we click on the save button it will throw an error resource that can not found. Why because EmployeeController class does not have Edit Method which responds to Post a request for Edit. Below is an error is thrown when we click on the Save button.
Server Error in ‘/’ Application.
The resource cannot be found.
Description: HTTP 404. The resource you are looking for (or one of its dependencies) could have been removed, had its name changed, or is temporarily unavailable. Please review the following URL and make sure that it is spelled correctly. Requested URL: /Employee/Edit
Version Information: Microsoft .NET Framework Version:4.0.30319; ASP.NET Version:4.8.4075.0
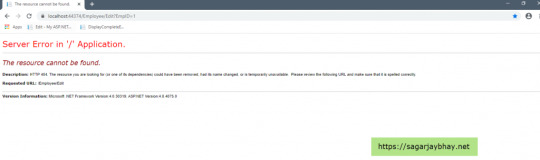
Error in Asp.Net MVC
To Update Employee, we create one stored procedure in our database which is below,
Create Procedure [dbo].[spUpdateEmployee] @emptid int, @name nvarchar(20), @salary float, @gender nvarchar(20), @city nvarchar(20), @email nvarchar(30), @deptid int as begin Update Employee set EmpEmail=@email,EmpName=@name,EmpSalary=@salary,EmpGender=@gender, DepartmentID=@deptid where EmpID=@emptid; End Now we need to call this Procedure in our database class the method is below public void UpdateEmployee(int EmpId, string Name, string Email, string Gender, double salary, int deptid, string city) using (var con = new SqlConnection(this._ConnectionString)) con.Open(); var cmd = new SqlCommand("spUpdateEmployee", con); cmd.CommandType = CommandType.StoredProcedure; cmd.Parameters.Add(new SqlParameter("name", SqlDbType.NVarChar, 20)); cmd.Parameters.Add(new SqlParameter("salary", SqlDbType.Float, 50)); cmd.Parameters.Add(new SqlParameter("gender", SqlDbType.NVarChar, 50)); cmd.Parameters.Add(new SqlParameter("city", SqlDbType.NVarChar, 50)); cmd.Parameters.Add(new SqlParameter("email", SqlDbType.NVarChar, 50)); cmd.Parameters.Add(new SqlParameter("deptid", SqlDbType.Int, 50)); cmd.Parameters.Add(new SqlParameter("emptid", SqlDbType.Int, 50)); cmd.Parameters["name"].Value = Name; cmd.Parameters["salary"].Value = salary; cmd.Parameters["gender"].Value = Gender; cmd.Parameters["city"].Value = city; cmd.Parameters["email"].Value = Email; cmd.Parameters["deptid"].Value = deptid; cmd.Parameters["emptid"].Value = EmpId; cmd.ExecuteNonQuery();
After this, we create a method in business class, which is shown below
public void UpdateEmployee(Employee employee) this.dataAccess.UpdateEmployee(employee.EmpID,employee.EmpName, employee.EmpEmail, employee.EmpGender, employee.EmpSalary, employee.DepartmentID, employee.EmpCity);
Now we create a method in our EmployeeController for handling post request of Edit method which is shown in below
[HttpPost] public ActionResult Edit(Employee employee) if (ModelState.IsValid) new BusinessLogic.Business().UpdateEmployee(employee); return RedirectToAction("DisplayCompleteEmployee"); return View(employee);
First, we see all Employee from our list and click on Edit link for this display all Employee UI looks like below
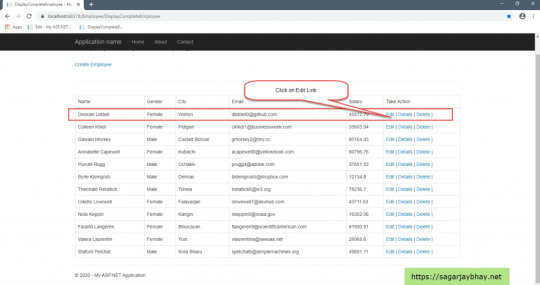
Edit Link Click In Asp.Net MVC
After clicking on edit we edit details Ui looks like below

Edit In Asp.net MVC
After clicking on Save we return to DisplayEmployee List and our updated values reflected on UI as expected.
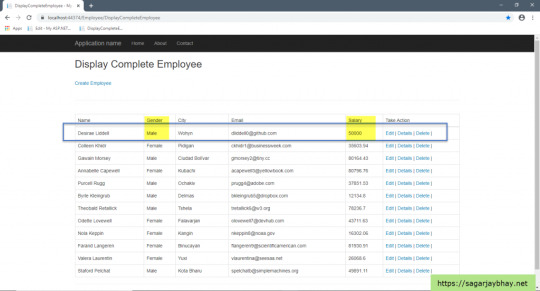
Completed Edit in Asp.Net MVC
Now our edit functionality is completed.
GitHub Pages :- https://github.com/Sagar-Jaybhay/AspNetRazor
0 notes
Text
CRUD Operations In MVC Sagar Jaybhay
New Post has been published on https://is.gd/o8JMrK
CRUD Operations In MVC Sagar Jaybhay

In series of this post you will able to understand CRUD Operations In MVC by Sagar Jaybhay.
CRUD Operations In MVC
In this, we have a scenario we need to display the top 25 employees and perform Edit, Display and Delete Operation on Employee.
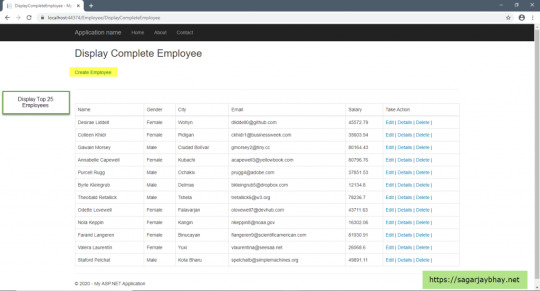
Display Employee List
To achieve above this we need to create a method in Business class to get the top 25 employees for that method is below.
public IEnumerable<Employee> GetEmployees() List<Employee> employees = new List<Employee>(); string Query = "select top 25 * from Employee"; var data = this.dataAccess.GetTable(Query); if(data!=null&&data.Rows.Count>0) foreach(DataRow dataRow in data.Rows) var emp = new Employee() EmpID = Convert.ToInt32(dataRow["EmpID"]), EmpCity = dataRow["EmpCity"].ToString(), EmpEmail = dataRow["EmpEmail"].ToString(), EmpGender = dataRow["EmpGender"].ToString(), EmpName = dataRow["EmpName"].ToString(), EmpSalary = Convert.ToDouble(dataRow["EmpSalary"].ToString()), DepartmentID = Convert.ToInt32(dataRow["DepartmentID"].ToString()) ; employees.Add(emp); return employees;
The above method will return the Employee enumerable list and this list we pass to our view. For that, we create an action method in our Employee Controller and the method is below.
public ActionResult DisplayCompleteEmployee() var emplist = new BusinessLogic.Business().GetEmployees(); return View(emplist);
Now we need to create a Strongly-typed model that takes Ienumberable<Employee> list. Now our view looks like below.
@model IEnumerable<WebApplication1.Models.Employee> @using WebApplication1.Models @ ViewBag.Title = "DisplayCompleteEmployee"; <h2>Display Complete Employee</h2> <br /> <div class="row" style="margin-left:0px !important"> @Html.ActionLink("Create Employee", "Create") </div> <br /> <hr /> <br /> <table class="table table-bordered table-responsive"> <thead> <tr> <td>Name</td> <td>Gender</td> <td>City</td> <td>Email</td> <td>Salary</td> <td>Take Action</td> </tr> </thead> <tbody> @foreach (var emp in Model) </td> </tr> </tbody> </table>
In the above code, we add action link create employee but we don’t have a method for that in our controller so we need to create this method which response to create get request.
Below the method, we add in our controller and that method mark with HttpGet attribute means it should respond only get create method.
[HttpGet] public ActionResult Create() return View();
Now below image is that we add a view which uses scaffolding template for create
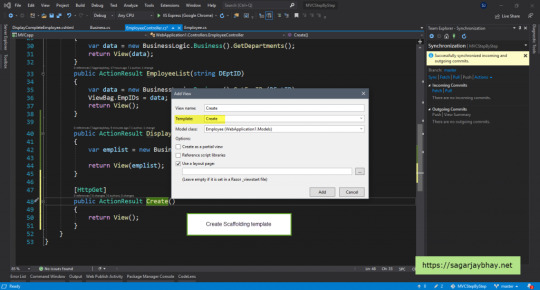
Add Create Employee View
When we run our application and click on create employee action link we got view which is shown below

Create Employee View
For the above view, we use the auto-generated code.
@model WebApplication1.Models.Employee @ ViewBag.Title = "Create"; <h2>Create</h2> @using (Html.BeginForm()) @Html.AntiForgeryToken() <div class="form-horizontal"> <h4>Employee</h4> <hr /> @Html.ValidationSummary(true, "", new @class = "text-danger" ) <div class="form-group"> @Html.LabelFor(model => model.EmpID, htmlAttributes: new @class = "control-label col-md-2" ) <div class="col-md-10"> @Html.EditorFor(model => model.EmpID, new htmlAttributes = new @class = "form-control" ) @Html.ValidationMessageFor(model => model.EmpID, "", new @class = "text-danger" ) </div> </div> <div class="form-group"> @Html.LabelFor(model => model.EmpName, htmlAttributes: new @class = "control-label col-md-2" ) <div class="col-md-10"> @Html.EditorFor(model => model.EmpName, new htmlAttributes = new @class = "form-control" ) @Html.ValidationMessageFor(model => model.EmpName, "", new @class = "text-danger" ) </div> </div> <div class="form-group"> @Html.LabelFor(model => model.EmpSalary, htmlAttributes: new @class = "control-label col-md-2" ) <div class="col-md-10"> @Html.EditorFor(model => model.EmpSalary, new htmlAttributes = new @class = "form-control" ) @Html.ValidationMessageFor(model => model.EmpSalary, "", new @class = "text-danger" ) </div> </div> <div class="form-group"> @Html.LabelFor(model => model.EmpGender, htmlAttributes: new @class = "control-label col-md-2" ) <div class="col-md-10"> @Html.EditorFor(model => model.EmpGender, new htmlAttributes = new @class = "form-control" ) @Html.ValidationMessageFor(model => model.EmpGender, "", new @class = "text-danger" ) </div> </div> <div class="form-group"> @Html.LabelFor(model => model.EmpCity, htmlAttributes: new @class = "control-label col-md-2" ) <div class="col-md-10"> @Html.EditorFor(model => model.EmpCity, new htmlAttributes = new @class = "form-control" ) @Html.ValidationMessageFor(model => model.EmpCity, "", new @class = "text-danger" ) </div> </div> <div class="form-group"> @Html.LabelFor(model => model.EmpEmail, htmlAttributes: new @class = "control-label col-md-2" ) <div class="col-md-10"> @Html.EditorFor(model => model.EmpEmail, new htmlAttributes = new @class = "form-control" ) @Html.ValidationMessageFor(model => model.EmpEmail, "", new @class = "text-danger" ) </div> </div> <div class="form-group"> @Html.LabelFor(model => model.DepartmentID, htmlAttributes: new @class = "control-label col-md-2" ) <div class="col-md-10"> @Html.EditorFor(model => model.DepartmentID, new htmlAttributes = new @class = "form-control" ) @Html.ValidationMessageFor(model => model.DepartmentID, "", new @class = "text-danger" ) </div> </div> <div class="form-group"> <div class="col-md-offset-2 col-md-10"> <input type="submit" value="Create" class="btn btn-default" /> </div> </div> </div> <div> @Html.ActionLink("Back to List", "Index") </div>
Attributes in MVC
But if you see the image it will generate textbox for gender column and we don’t want this. We need a dropdown list for that and also we seen in the above create an image that contains textbox name empid, empname this good for a developer but for end-user we need to change this so we use DisplayName attribute to change the display name of an employee.
Now our model class becomes
public class Employee [DisplayName("ID")] public int EmpID get; set; [DisplayName("Name")] public string EmpName get; set; [DisplayName("Salary")] public double EmpSalary get; set; [DisplayName("Gender")] public string EmpGender get; set; [DisplayName("City")] public string EmpCity get; set; [DisplayName("Email")] public string EmpEmail get; set; public int DepartmentID get; set;
To use DisplayName attribute we need to import using System.ComponentModel; This namespace in our class and our UI looks like this

Use Display Name Attribute
To change gender textbox we need to write below code instead of textbox for empgender.
@Html.DropDownList("Gender",new List<SelectListItem> new SelectListItem Text="Male" ,Value="Male", new SelectListItem Text="Female" ,Value="female","Select Gender") @Html.ValidationMessageFor(model => model.EmpGender, "", new @class = "text-danger" )

DropDownList in MVC
After doing the create form we have to Create a button on that form and if you click on that you will get a 404 error why because there is no method to respond post request in our EmployeeController.

Post Function Create Employee
To create first we need to Hide EmpId from create form because it is unique and needs to be dynamic so we will hide this from. We set to display: none property in style and from UI empid is not displayed. Now our UI looks like below

Complete Create Employee UI
To create employee we created a stored procedure for that and we call this stored procedure from our business class. So first we need to create a HttpPost enable create method in our controller, code for this is below.
Below is the method we created in business class and which in turn calls a method that is written in a database class.
public void CreateEmployee(Employee employee) this.dataAccess.ExecuteProcedure(employee.EmpName, employee.EmpEmail, employee.EmpGender, employee.EmpSalary, employee.DepartmentID, employee.EmpCity);
Below is the method in the Database class.
public void ExecuteProcedure(string Name,string Email,string Gender,double salary,int deptid,string city) using(var con=new SqlConnection(this._ConnectionString)) con.Open(); var cmd = new SqlCommand("spCreateEmployee", con); cmd.CommandType = CommandType.StoredProcedure; cmd.Parameters.Add(new SqlParameter("name", SqlDbType.NVarChar, 20)); cmd.Parameters.Add(new SqlParameter("salary", SqlDbType.Float, 50)); cmd.Parameters.Add(new SqlParameter("gender", SqlDbType.NVarChar, 50)); cmd.Parameters.Add(new SqlParameter("city", SqlDbType.NVarChar, 50)); cmd.Parameters.Add(new SqlParameter("email", SqlDbType.NVarChar, 50)); cmd.Parameters.Add(new SqlParameter("deptid", SqlDbType.Int, 50)); cmd.Parameters["name"].Value = Name; cmd.Parameters["salary"].Value = salary; cmd.Parameters["gender"].Value = Gender; cmd.Parameters["city"].Value = city; cmd.Parameters["email"].Value = Email; cmd.Parameters["deptid"].Value = deptid; cmd.ExecuteNonQuery();
For the above code, we have written a stored procedure in our SQL Server database which is below.
SET ANSI_NULLS ON GO SET QUOTED_IDENTIFIER ON GO Create Procedure [dbo].[spCreateEmployee] @name nvarchar(20), @salary float, @gender nvarchar(20), @city nvarchar(20), @email nvarchar(30), @deptid int as begin declare @empid int select @empid=count(*) from Employee set @empid=@empid+1 insert into Employee values(@empid,@name,@salary,@gender,@city,@email,@deptid) end GO
GitHub :- https://github.com/Sagar-Jaybhay/MVC5
0 notes
Video
youtube
How to Write HTML, HTML5 Tags, HTML5 Attributes - Absolute For Beginners [Lecture-2] What we will Learn in this video? 1- How to create HTML file? 2- How to write HTML? 3- Understanding HTML elements. 4- HTML attributes.
WATCH VIDEO https://youtu.be/UG83oFmSlvM
SUBSCRIBE MY CHANNEL & PRESS BELL ICON TO NEVER MISS ANY VIDEO https://www.youtube.com/user/makqcga/ --- Its FREE for all specially those who can't afford expensive institutions, So be serious to build your career.
YOU CAN HELP! Hurry up! SUBSCRIBE MY CHANNEL press bell icon to get regular updates. Continue watch my videos till end and drop like and share Don't for get to give feedback in comment section.
Thanks & Regards! Mr. MAKQ - Code Injector Sponsored by Nix Pixelz
#html #makq #mrmakq #codeinjector #websitedesign #learnwebsite #structure #injector #carer #editors #htmlEditor #html5Structure #htmltags #learnHTML #CSSTextAlign #TextAlignCenter #TextAlignHorizontal #TextAlignVertical #usingCSSTextAlign #HTMLCSSTutorial #BeginnerHTMLCss #NixPixelz #code #codes #learn #programming #webdesign #design #css #seo #javascript #html5Tags #htmlAttributes #htmlElements #htmlEditor
0 notes