#i beat the main game with 5 pokemon because i thought i'd be able to get volcarona earlier T_T
Text

chris' legitimate pokemon scarlet review broken down into categories for your viewing experience (spoilers duh)
CHARACTERS: love the guys in this game. all of team star are so delightful arven is great and nemona is a new fav rival. i wasn't expecting to like clavell as much as i did but he was super fun. gym leaders for what they are (they play very minor roles but thats just how pokemon is aside from bw1 where they show up at the team plasma castle) are super good i especially liked ryme she's awesome. i felt the character writing was a lot better than last gen and they balanced the 3 rivals a lot better tho this could partly just be because of the three split stories focusing on one each.
POKEMON DESIGNS: mixed bag. loved a lot of them like tinkaton the ancient paradox pokemon and tatsugiri. meowscarada quickly became one of my fav starters i love its design and personality. but some of them didn't really do it for me. especially the bugs
HUMAN DESIGNS: really nice. i'm glad pokemon is continuing to diversify the body types of its female cast. i love the women + girls in this game. mela, eri, geeta, sada, rika, katy (I LOVE HER!!!!) and ryme were especially standout designs for me. the guys have cool looks too. i like brassius' edgier take on a grass gym leader and atticus autism warrior!!!!!
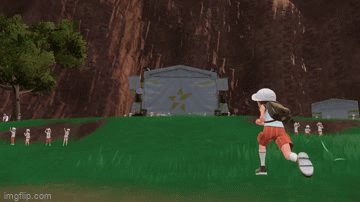
STORY: really good. i'm not kidding like god damn. i loved it in this game. it's easily in the big leagues with sun/moon, the gen 5 arc and pla for me (though i just like pla because it's rehashed pmd lol). the starfall street plotline was cheesy but i loved it , i love to see autism friend groups. they're very sweet. path of legends has an excellent motivator in 'your buddy's dog is sick' and like FUCK dude i'm not letting this guys dogy die!!!! arven is a very sweet character so it's nice to help him out. victory road is more standard fare but i liked the new take on the elite 4 (the interview and there being multiple champions). but obviously the closing act really sells it for me. i've seen people say it makes less sense in scarlet because sada is caveman themed, but i honestly think this made it more interesting. if i was playing violet i wouldve been like ohh yeah of course the guy in the glowy robot space suit is an android but the juxtaposition between ancient and futuristic stuff in scarlet makes it more impactful imo. i like how a futuristic ai can only function with the power of ancient crystals, ties it into both games nicely. plus sada sacrificing herself is a little sadder since i doubt there's more chargers in dinosaur times than the far future (she's double DEAD dead). i'm also just a sucker for evil ai and glitch effects anyway
MUSIC: gooooooood!!! there's been some mixed reception on the gym leader theme but it grew on me. penny's theme is one of my favs but all of the team star related ones are good. the area zero theme is genuinely incredible
GAMEPLAY: it sure is a pokemon game. i had some performance issues mainly loading times before/after battles and after cutscenes. i crashed randomly once during the orthworm mission when i went into its tunnel but nothing to the extent i've seen online (not to say it didn't happen). for what it's worth, i was playing it in handheld. but the basic pokemon battle formula always entertains me. the new gimmick is pretty so i like it.
VISUALS: it absolutely could be better but it's not distractingly bad. it's more just servicable. the updated textures (and sometimes models!) of pokemon look good and the humans look good too. definitely improved some animations (but i missed gloria's unique little tiptoe animation downstairs from swsh). the environment flops a lot, especially when it's not in towns.
#i finished the postgame bit excluding legendaries like an hour ago so here's my 2 cents#i beat the main game with 5 pokemon because i thought i'd be able to get volcarona earlier T_T#my final team was meowscarada tinkaton bellibolt volcarona tatsugiri and farigiraf#bellibolt is busted for npc battles btw. i recommend
18 notes
·
View notes
Text
Team Star for Pokemon Unite!

I've been working on Pokemon Unite posts for a while, and I've churned out multiple posts for multiple pokemon. However, I've never made up an entirely new Game Mode, but I figured I'd take a crack at it. And what better start than a mode featuring everyone's favorite group of delinquents?
I've had this idea sitting in the draft for a while, but with Pokemon Unite releasing a new Game Mode featuring Paldean Pokemon, I thought now would be a good time to put this idea out there for fans of Team Star.
The Reveal
The name of the battle mode is called Starfall Street, and it features all 5 Leaders of Team Star versus you and two other players. The battle map is a mostly linear arena where you and your teammates start off in an isolated corner and will have to fight your way through hordes of pokemon. And of course, the banger music is blasting for the entire round.
While you do battle and level up and evolve throughout the round, the fight is treated more like a Musou game where you are strong enough that you can defeat the weakling mobs with just one hit. The 'commanders' are the ones you'll have to worry about as they have more HP and require special conditions to defeat. Defeating them not only gives you a lot of EXP, but you will also gain a permanent stat boost that lasts until the end of the round. And trust me, you'll need it.
The last stretch of Starfall Street pits you and your allies against the Starmobile, a Revavroom modded into a massive vehicle, backed up by little Varooms around its body acting as turrets. Depending on which member of Team Star you've summoned, the Starmobile will use different attacks and have different effects and abilities. Successfully beating Starfall Street not only nets you some sweet loot, but also Star Points specific to the Leader you've defeated. Get enough of these medals and you'll be able to exchange them for prizes like maybe Holowear or a Unite License.
That's about the gist of the whole mode, but if you're interested in learning more about the specifics of Starfall Street, you'll find it under the 'Read More' section of this post. There, I'll explain the little nuances that set this fun little side mode apart from the main battles of Aeos Island. But be warned, there's a LOT to cover.
-
Battle Preparations
Since only three players can play in a round, this mode is only available in Quick Battles. Not only that, you and your allies are the only human players in the match, as all of your enemies are all bots.
That said, this mode is similar to Boss Battle mode where some items are less effective than others. Stacking items like Attack Weight and Sp. Attack Specs are useless as you cannot score a goal here, but other items are also not as effective due to the way the match plays out. Because there are always enemies on screen, Float Stone, Assault Vest, and Leftovers are similarly ineffective as you'll never have a moments rest during the game.
Aside from that, the Fluffy Tail item will be super useful as all opposing pokemon are Wild Pokemon. Full Heal will also be useful as it allows you to escape a certain KO a Wild Pokemon might try to trap you with.
As for which pokemon will be most effective, it really depends on the composition you have set up with your allies. Supporters aren't going to be as desperately needed as they were in Boss Battle, as you'll soon find out, but having a player being able to reliably hinder the enemy will be important later.
The Fight Begins
When the match starts, all players will be at Level 1, just like in every other mode. However, players will not get EXP from defeating the Wild Pokemon normally.
First off, you'll run into a bunch of weaklings as you travel throughout the map, which has some slight variations between rounds. The wild pokemon are all similarly weak and can be defeated easily with a few boosted basic attacks or instantly with a damaging move. If they do get close enough, they will use a basic attack, which is shockingly strong and can take a huge chunk of HP out of your frail Attackers if they aren't paying attention.
It should be noted that these 'Wild Pokemon' are actually all Team Star owned Grunts that are sent out to try and stop you from advancing into the map. Also, while they are 'easy mobs', you'll also be running into the pre-evolved forms of playable Pokemon, such as Gastly and Fletchinder.
It isn't advised to split up until you've accrued some decent boosts. While the weakling pokemon will be spawning endlessly, there are set spawns within the map that have 'Commanders' waiting for you. These 'Commanders' are much stronger than the Grunts you've been fighting and have their own gimmick. When you run into them, there will be an icon over their head that shows what kind of Commander they are and how to defeat them.
The Commanders
One type of Commander will have the Basic Attack Button icon over their head. This means that the mob can only be defeated by basic attacks, as any other type of damage dealt will be drastically reduced. On the other hand, there are Commanders with two circles over their heads, with 1 and 2 within them respectively. These Commanders can only receive damage by moves, which shuts out some pokemon from being able to defeat them entirely, like some Supporters. Another type of Commander has a Triple Star icon, which means they are resistant to all damage until they receive a Crowd Control Hindrance. Either Freeze or Stun or Incapacitation will open up their HP bar to damage, and they will become vulnerable for 4 whole seconds, regardless of the hindrance received. There's a Commander with an upwards pointing arrow that signifies that this pokemon can only be damaged heavily by a pokemon powered up by a boost. It could be any boost, not just X Attack, and these are available all over the map in the form of Liechi Berries and Salac Berries. And lastly, there's a Commander with an Evolution icon over its head, which means that only evolved pokemon can damage it. These can vary in a way that these Commanders will require either a 2 stage or a 3 stage pokemon to contend with them, and they will appear in the match if at least one player has a pokemon that can evolve (these will not appear if all players are playing Single Stage pokemon).
Defeating these Commanders is one of the few ways you and your teammates can gain EXP for this mode, as defeating all the weakling mobs won't get you any EXP. However, it isn't a waste of time to beat these pawns up.
The Colors of the Stars
Each Leader of Team Star specializes in a specific Type, and they will be all over the place throughout the match. However, the way luck works is that some Leaders won't be able to appear at all, as that's just how the RNG rolls. But since only one Leader will challenge you at the end of the mode, you can manipulate this by focusing on that Leader's Grunts. For instance, if you want to summon Mela, you'd be focused on defeating all of the Fire Types you see. If you want to fight Atticus, you and your team would need to beat up all the Poison Types you see.
In addition, each pokemon type you defeat gives you a permanent stat boost for the match, depending on the Type of pokemon it was. Defeating Mela's Fire Types powers up your Basic Attack Speed and HP. Defeating Atticus' Poison Types boosts your Movement Speed and improves your Hindrance Resistance. Giaccomo's Dark Types reduces the Cooldown of your Moves and increases the power and effects of your Unite Move when you defeat them. Overcome Eri's Fighting Types and your Defense and Sp. Defense stats are boosted. And lastly, Ortega's Fairy Types boost your Attack and Sp. Attack when defeated.
The weakling mobs give you a very weak boost when defeated, but defeating Commanders gives you a bigger boost to their respective stats while also granting you a lot of EXP. Defeating these pokemon fills up a Star Meter on the HUD which shows how many pokemon of that type you've defeated while also conveying the overall power you've built up from all of this fighting. There is one exception to this grind.
Regardless of which Star Leader is most likely to appear, there will always be Varooms and Revavrooms roaming the map. Varooms are fast little buggers that take reduced damage from basic attacks, but can be instantly defeated by any move. Successfully defeating one gives you some power and speed boosts as well as a mild EXP boost, not as much as a Commander, but is otherwise easy enough to deal with.
Revavrooms, on the other hand, are extremely dangerous and they will roam around the map at high speed. While they are Commanders, they do not stay in their set spawn for very long and start driving around. It's even possible to run into one within the first minute of the game. However, they are not hostile for the most part, and can only damage you by directly running into you. If you hit them for even 1 damage, though, they will turn aggressive and start to harass you relentlessly. They turn their cruise control into a demolition derby and hit for so much damage, you'll be taken out in 3 hits at the least.
The only way to safely defeat them is to bait their charge attack into a wall or obstacle, which is easier said than done. They like to charge up their attack while drifting, and are completely resilient to damage while doing so. If you manage to trick them into running into a barrier, they'll be stunned for the moment and will then take increased damage from all of your moves. Successfully defeating one nets you a boatload of EXP, increases all of your stats by a hefty amount permanently, and drastically increases your attack power and movement speed for a short while. These boosts can be shared with your teammates if they participated in the fight, but the player who aggro'd the Revavroom will get a bigger cut. You could coordinate with your team to patch up your EXP deficiency in this way if you run into a Revavroom, you know, before it runs into you.
One last thing, while Revavroom is part Poison, defeating it and the Varooms running around the map will not add to the possibility of Atticus showing up for the last minute of the fight. These little motors are meant to be big fat EXP buffers.
The Constellation Map
As I've stated before, the maps differ between matches, more specifically, there are 5 variations.
Variation 1 is a wide open field that is mildly circular, with tents and trees acting as obstacles. Variation 2 is a forest where the trees have split the map up into 3 lanes with slight openings between them. Variation 3 is a large oblong field where the Starting Point is set within the middle by the border. Variation 4 is a long stretch of land where most of the Commanders are set to spawn in small pockets off the path. And Variation 5 is a huge field where the only obstacle is the large tent in the middle of the arena.
If any of these maps sound familiar to you, I did base these off of the Base Raid you partake in when you storm the bases of Team Star. They're not totally accurate, as I can't quite remember what they looked like exactly, but I'm more interested in balance than accuracy here.
Something I should mention is that, all throughout these maps there are Vending Machines where you and your allies can run to for emergency healing. While these were free and infinite in Pokemon Scarlet and Violet, in this game mode for Pokemon Unite they will have limited uses. Some will only have 2 stocks before they run out while others may have 4.
As such, it is very important to maintain constant teamwork throughout the match, as not only are some pokemon better equipped to handle some of the Commanders, but they also have a greater need to power up their respective stats. An Attacker may call dibs on all the Fairy type mobs, but a Supporter may also need them to boost its Sp. Attack in order to increase the healing they can provide. Different pokemon have a greater need for specific stats, so it's important to recognize who needs what the most.
It's also really important that your team stays together until you have sufficiently powered up enough where an ally can safely venture off on their own. The more total pokemon you defeat, the greater the score, which increases your rewards at the end of the match.
The Stellar Admins
While the Grunts are everywhere and the Commanders can show up at any time, there's an even more powerful Wild Pokemon called an Admin that you can run into, and they're very dangerous.
Admins are playable pokemon that you can run into during a game, and each one has a modified playstyle and moves that make them drastically play differently from the bot versions you might run into. They hit very hard too, but thankfully they have a predictable pattern.
Mela's Stellar Admin is an opposing Talonflame that can only use two moves, Fly and Flame Sweep, which is its Unite Move. When the encounter begins, it will open up with Fly and will try to attack the weakest member of your team. After landing, it will then use Flame Sweep to target the healthiest ally. Whether it hits or misses, it will rinse and repeat with this attack pattern. Stellar Admin Talonflame is very tricky to fight as it's Fly and Flame Sweep hit hard and is difficult to counter, but it's HP is very low and requires a good clean hit to put down.
Giacomo's Stellar Admin is an opposing Zoroark. It will always spawn in with its Illusion ability active and can hold it indefinitely until it is attacked. Zoroark will disguise itself as a Grunt and patrol the map, but will not attack you and your allies and will always try to run away. If attacked, Zoroark will counter immediately with two different moves. A Melee attack will have Zoroark respond with Nightfall Daze, its Unite Move, and hit really hard. A Ranged attack prompts it to use Night Slash against the attacker perfectly. Both of these counterattacks hit really hard, but if you survive, the Zoroark will then run away. It will not counterattack again for 7 seconds, during which time it is vulnerable. But if it is allowed to move off-screen and out of sight of you and your allies, it will pop its Illusion ability and start the whole process over. If you suspect a wild Zoroark roaming about the map, be prepared for a tricky fight and try to open up with a powerful single hit to take care of Zoroark before it can retaliate.
Atticus's Stellar Admin is an opposing Gengar that starts every round with its Unite Move, Phantom Ambush, always active. When you and your allies are near, it will always circle one of you, with the purple wisp above your head your only hint that it's nearby. Then, it will begin to throw Shadow Balls indiscriminately, dealing heavy damage. Unlike Phantom Ambush as it's used by a player, Stellar Admin Gengar will become invisible again after throwing out a Shadow Ball, making it very hard to track down. It will never perform the final hit of Phantom Ambush, so that's one thing you and your team won't have to worry about. To fend off Gengar, you'll have to get lucky and hit it with an attack, or counter it's attack with a hindrance or a debuff. Stellar Admin Gengar will be forced to become visible if it is under the effects of a hindrance or a Damage-Over-Time effect, making it easier to deal with. It also moves about predictably, as it always circles the ally with the least amount of HP. As Gengar is a frail Speedster, a few lucky hits are just enough to bring it down.
Ortega's Stellar Admin is an opposing Wigglytuff that spends the entire match using Sing. It walks around at increased speed and its Cute Charm ability is always active, making it very difficult to keep your distance. When an enemy is put to Sleep, it stops Singing and uses Double Slap repeatedly. These hits are rigged in that they will constantly hit the highest amount of damage, which is annoying, but is still pretty weak. However, Sing can put you and your allies to Sleep for much longer than normal, which can be very terrifying if you get caught while at low HP. In order to deal with Wigglytuff, there's an exploit you'd have to take advantage of. If you wake up and run away, Wigglytuff will go back to using Sing indefinitely, but if you wake up and stay put, Wigglytuff will keep using Double Slap on the nearby ally, giving your team an opening to rush in and attack. This means that a bulky Defender or All-Rounder has to be the bait to deal with Wigglytuff, but it's the safest and easiest way to deal with Wigglytuff.
Lastly, Eri's Stellar Admin is an opposing Lucario which is extremely aggressive with Extreme Speed and Aura Cannon, it's Unite Move. It will always open up with a big hit in Aura Cannon, which is modified to have a shorter flight distance, but the Lucario will not let up and proceed to use Extreme Speed right after. This attack dashes for much farther than normal, but rather than attack enemies with it, Stellar Admin Lucario uses it to reposition to a better spot where it will immediately use Aura Cannon again. Because this combination is so fast, it's actually difficult to keep your distance and avoid Lucario's line of fire. Your best bet is to get up close and stay close, strafing to avoid Aura Cannon as it's used. The Unite Move slows down if Lucario is hit with a debuff or a hindrance, so it will take a team effort to put this Stellar Admin down.
There is one Stellar Admin per round that can show up and it can be any one of them in any map. Defeating it nets your whole team with a massive boost, even if they weren't in the fight, as well as a massive boost to the respective stat they provide. KO'ing the Stellar Admin also contributes greatly to the Team Star member showing up at the end of the fight, which is great, unless you and your team is grinding for a different Team Star leader's medals. However the fight goes, the boost and EXP you gain will be very helpful in the last minute of the fight.
The Starmobile Descends
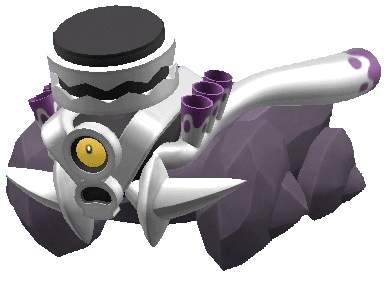
After you and your team have defeated enough pokemon, you and your allies are warped to a specific arena where the Starmobile appears. Which Starmobile it is depends on how many of a specific type you defeated during the game, and each one has their own tricks.
Firstly, each Starmobile, regardless of which Type, has the exact same setup. There's a Revavroom at the face of the contraption which receives the most damage from you and your attacks. There are also Varooms attached to what would be the wheels of the mobile, with each one operating independently of the body. These can be defeated and beaten off, reducing the attack power of the Starmobile as a whole. In addition, some Varoom will spawn and move about the field, operating as a distraction against you and your team, though if you take the bait, you gain EXP and a slight boost to all of your stats, which is a decent backup plan if you haven't fully leveled up enough for the fight.
When the fight begins, the Starmobile behaves as a Boss Pokemon, with visible attack ranges and information being displayed on the HUD. Though each Starmobile version has a different ability and differing moves, they all share a few techniques. Since the face receives the highest multiplying damage of the Starmobile's body, the Revavroom will counter with Lick, which Shoves and Stuns all players and gives it enough time to retaliate with a Torque move. It can also launch Sludge Bomb at far away enemies and will do this automatically if you and your teammates are huddled together attacking from afar. The sludge creates a damaging field that also slows you down. The Varooms on the side will also use Sludge and Poison Gas to fend off your attacks, and they can do this while the main body is attacking, making it very difficult to avoid damage in some cases.
The Starmobile is slow and predictable though, it's just difficult to take down, especially if your team isn't fully leveled up yet. It should also be noted that, before the final battle begins, getting KO'd sends you back to base with no respawn time, so it's very forgiving in that sense. But if you get knocked out during the fight against the Starmobile, you'll be warped back into the boss arena after a lengthy respawn timer, depending on your level. Even 5 seconds of respawn can be a death sentence for you and your team as you'll have even less time to defeat the Starmobile.
One last thing to note, each Starmobile has two unique moves that can change the course of the battle, depending on which Team Star Leader you're fighting. Giacomo's Starmobile can use Snarl, which attacks the entire arena with a raucous engine roar. It slows down and reduces everyone's attack power, but it only deals damage at the end of the move if it attacks uninterrupted. Deal loads of damage to the Starmobile to stop Snarl from finishing. Its other move is Wicked Torque, where the lights get shut out and the Starmobile retreats and leaves the arena. For 2 seconds, you can't damage the Starmobile as it's out of bounds, but it will appear randomly from outside the area with its LED lights beaming into the field. When this happens, it's about to charge in and run all of you over, so get out of the way. If you get hit, you'll be Stunned for 5 seconds, which can be really bad if you didn't pack a Full Heal.
Mela's Starmobile knows Overheat and Blazing Torque. When it uses Overheat, it's body becomes too hot to approach without taking damage. After 5 seconds, the body erupts in flames, damaging everyone nearby. This can happen while it's using another move, so watch out. Blazing Torque has it also reverse and leave the arena just like Wicked Torque, except it will always charge in from the left or right. It's not hard to dodge, but the problem starts with the burning trail left behind. The Starmobile will continue attacking while Blazing Torque is active, which can make its normal and easy to avoid moves difficult to evade damage. Atticus' Starmobile knows Smog and Noxious Torque, where Smog summons a poisonous cloud of gas that damages all enemies around it. It deals more damage than Mela's Overheat, but it doesn't explode and hitting the Starmobile shortens the duration of the attack. Noxious Torque has the Starmobile perform a hard drift around the arena and leaves behind a huge puddle of oil. The oil doesn't damage you or your teammates, but it slows you all down and prevents dashing moves from being used, so try to avoid the hazard.
Ortega's Starmobile knows Confuse Ray and Magical Torque. Confuse Ray has the LED lights of the Starmobile light up and flicker in a confusing pattern. If this light show is beamed directly at you or a teammate, that pokemon will be forced to approach the Starmobile slowly. You can fight it by tilting the control stick left or right, since the Starmobile can only shine the light in one direction, or you can aim and use a Dash move to escape the ray. It's also considered a hindrance, so Full Heal or Blissey's Safeguard can block the beam. Magical Torque has the Starmobile retreat and leave the arena, only to reappear moments later falling in from the sky and crashing down. This full body crash is random and can happen after 1 to 3 seconds of delay, so be on your toes.
Finally, Ori's Starmobile knows High Horsepower and Combat Torque. The Starmobile can use High Horsepower at any point during the match and can even interrupt its own moves to use High Horsepower. The move has the Starmobile perform a hard drift and crash into a wall with the entire side of its body, making it a damaging and difficult move to avoid. Combat Torque has the Starmobile pick a target and focus its aim on them. After a brief charge, the Starmobile drives forward and pushes them into the wall if they were hit. Afterwards, the player gets pinned down and receives increasing damage as the Starmobile revs and holds them down against the wall. The attack ends after 6 seconds but can be shortened if the rest of the team deals lots of damage to the Starmobile very quickly.
One last thing to note. The Starmobile is immune to hindrances and debuffs, but they will contribute to a Stun Meter just like in Boss Battle. However, the first hit of your Unite Move will fill the meter instantly, causing it to buckle and stall, which can interrupt its moves and force it to sit vulnerable for a brief moment. You can use this to deal loads of damage or to stop it from using a problematic move, so make sure you pick the perfect opportunity to pop it.
You Get a Gold Star
Once the match ends, you and your team will be graded on your performance. Each player is scored on damage dealt, damage received, HP recovered, and stun contribution. The number of pokemon defeated will also be shown, as well as the percentage of types they've taken down. Good players who understand the role of their pokemon will be focused on a specific pokemon type, like Defenders primarily gunning down Fighting Types, and it will show in a pie chart in that player's performance chart.
Your team will also be graded on the amount of time it took you all to beat the round. The less time you take, the better you score. The Difficulty also affects the score, with the best possible score coming from Extreme Difficulty.
Reach for the Stars!
Beating up specific Pokemon Types doesn't just get you stat boosts for the match, it also adds to a point voucher in the game's special item shop. For the duration of the game mode, you can earn Star Points based on your score after each round. You get Gold Stars for beating the mode, getting more the higher the difficulty you clear, but you'll also get colored stars from the pokemon types you beat up. Take out a lot of Fire Types and you'll come out of the game with a lot of Red Star Points. Fight a bunch of Fighting Types and you'll get Orange Star Points, and so on and so forth.
You'll get loads of these Star Points for beating the associated Team Star Leader, which is the easiest way to get a bunch of them all at once. And when you have a lot, you can then trade them in for special items in the Starfall Street Shop. Gold Stars can get you generic things like Team Star Stickers or Poses for your trainer card, as well as specific Team Star gear like Helmets and glasses, but specific colors can get you articles of clothing based on the Team Star Leaders. Yes, that means you can trade in a lot of Red Star Points to get Mela's Boots for your Trainer Customization.
Now, that's what would realistically happen if the shop items were made by the Unite Devs, but I would also add in special Holowear to the shop if I had things my way. I'd even include a special Unite License for Revavroom or something like that, assuming the pokemon is popular enough.
-
And that about does it for this post. I'm really enjoying the Panic Parade mode that's currently ongoing in Pokemon Unite, so I thought I'd take a crack at coming up with my own game mode. Now don't get it twisted, this idea has been sitting in my draft for quite a while, I just didn't have the time or energy to put the idea down and finalize it.
Now, there has yet to be a precedent for Pokemon Unite to make wild pokemon playable, especially ones from exclusive game modes like Panic Parade, so I hope that mold gets broken and we get not only the Tinkaton License, but also Flamigo and Bellibolt. Oh, and maybe Revavroom so that Starfall Street can come to Pokemon Unite.
Anyway, I'm still on break, so I hope this post tides you over. Stay tuned for the results of my Pikmin Poll.
6 notes
·
View notes
Text


This took longer than I thought it would. This is a list of all the Pokemon I've used throughout my entire Insurgence run. I tried to prioritize new forms over older Pokemon, but jesus this might just be the most I've rotated over a single game. Minus Mew- but he's our buddy so I feel like he has to be included.
Sort of a mini review under the cut- I enjoyed it, but I do feel like there's places where improvements could be made.
Insurgence feels like a classic "try-hard" edgy fan game, but in reality it hasn't been out for too long, at least since XY and ORAS though. Its a bit "3 Edgy 5 me" with all the cults and stuff, but I respect it for a very passion filled story, maps to explore (including mode7 for a soaring map, WOW, that's very cool), character customization, but probably my main draw was the Delta Pokemon- which were regional variants BEFORE regional variants came out, and are basically mutated or experimented Pokemon. Lots of creativity goes into each and every design, and the fakemon quality is immense. The designs are edgy, but I LOVE edgy designs.
The gameplay is very hard, even on easy mode, and you'll probably be doing a LOT of grinding- but its kind of rewarding when you either figure out a good strategy to beat an opponent or go through an anime training arc in a secret base with a guy with a bunch of masochistic Audino to gain some serious levels and steam roll the team that gave you trouble before.
The game has some neat options, including a difficulty level setting (mind you, again, easy is still hard but closer to a traditional Pokemon game for the most part. I played Normal until the Elite 4), and surprisingly an option to keep the story dark or to cut it back a tad. There's also character customization if you're into that- personally i liked most of the beginning options best, so I just kept my guy as is.
I have a few gripes- mainly that Delta Pokemon are so few and far between in comparison to the older Pokemon, or there's a bunch that are only available AFTER you've beaten the main game. Unlike variants, Deltas are usually one encounter captures- which don't get me wrong, most of the encounters all have some pretty great stories attached, but I would have enjoyed being able to build a team with more variety earlier on.
Still, what's here is great- In particularly I LOVE my Mega Delta Charizard and my Mega Delta Typhlosion- MDTy in particular feels like it gets a mega on top of its mega due to a form change it gets in darkness or rain. I also love all of the story rich post game content and new areas to explore, and being able to fight certain characters as well.
I know Azurite has kinda gone... Ghost? I guess? But apparently it's going to be a mostly fakemon focused followup made by a similar team. I wanna play it!
Overall a 7/10 experience.
Now... For the "Cool Club" Army- or the team.
No blurb about each team member because that'd take forever, but I'll go down in order of Hall of Fame, new species, then older ones
HOF- All Deltas
Mega Charizard/Ghoulzard, Ghost/Dragon
Mega Typhlosion/Sparky, Electric/Steel
Scizor/Sickle, Ice/Fighting
Crustle/Cake c:, Fairy/Normal
Haxorus/Anchor, Water/Steel
Metagross/Aureliag, Bug/Ground
Other important Members, all Deltas
Quagsire/Jacky, Grass/Fire
Muk/Crusty, Ground (Horsea minion form)
Hydreigon/N*Sync, Ground/Poison
Gallade/Electra, Electric/Ice
Ambipom/Tricky, Ghost/Normal
Non Deltas, in no particular order
Mew/MewMew
Lucario/Kyago
Feraligatr/Dundee
Typhlosion/Tindr
Butterfree/CantBelieve
Golem/Geoffany
Persian/Pen
Shiny Hydreigon/Da'Bee'Uls (pronounced "The Beetles" in a stereotypical Bri'ish accent)
Electivire/Thundervolt
Nidoking/Buddy
Anyways, I edited my sprite using official sprites to sort of match the MC (hence the purple hair).
The rest were pulled directly from the game files. Massive kudos to each and every artist involved in the fakemon production. I'd love to see these fakemon in a future project so I can use them some more.
1 note
·
View note
Last Seen Blogs

cardiagnostics
Untitled
damanpriest2023
? gets me!

thebandname
You're just as sane as I am.

bigpapijah
⚜️Ðïr†¥ J꧵§⚜️

zack-rabbit
Furry blog