#i just dowloaded tumblr again just to post this!!!
Text
Not?? My favorite voice actor?? With one of my favorite football players???

How will I live after these worlds collided??
#i just dowloaded tumblr again just to post this!!!#DONT ask me about Marios Gavrilis my (second) favorite voice actor!!#i WILL talk for hours!!#i saw him at the buchmesse leipzig and i still can't believe it it was so fucking cool i love him so much#i cant remember my tags lol#fc bayern#germany nt#fc bayer munich#fc bayern münchen#julian brandt#borussia bvb#bvb#borussia dortmund
7 notes
·
View notes
Text
Important Update for Best Kept Secret Readers !!!
because i didn't realize side blogs were not the same as main blogs (i had just dowloaded tumblr just to post bks and was struggling to understand) I am moving to @lincolndjarin !! this way i'll be better able to interact with y'all, im very sorry for this inconvenience but all future chapters will be posted to the new blog. i still haven't decided if I'm going to completely repost everything there or if I'm going to just reblog it but if anyone has advice it would be appreciated. thanks again for understanding and i'm sorry this happened in the first place
#luckbealincoln#best kept secret#din djarin fanfiction#din djarin x reader#din djarin/reader#mandalorian fanfic#mandalorian x reader#the mandalorian#din djarin
25 notes
·
View notes
Text
update
hello, yoko here.
so some of you may noticed that i changed my username, you can still call me as yoko but once the revamping is started, you will no longer call me by that name. i want to seperate myself from that name that made me known on the smg4 fandom.
this is a very long explanation so its under the cut, and note to people on tumblr around: it contains controversal stuffs happening on glitch productions
this change is because of the smg4 controversy that happened recently, with the main one being taris old va (celeste notley-smith) being replaced by a new one. which is okay at first because celeste is a mother and a teacher and needs to focus on other stuffs and yadda yadda, until you found out that she fired from glitch after 6 years.
6.
FUCKING
YEARS.
now picture this: you are one of the first voice actor/actress from a recently new company, only to get replaced by a new one after years of voicing a character that you dearly love. the new tari va (lottie baurne) almost sounds like her old va and thats okay, but this situation is awful. not only that, robyn (smg2s former voice actress) is stepping down from glitch because of that. she recently made a video about this controversy on her channel "anime america", so please make sure to watch it.
yeah yeah i know jasmine yang (the voice director) made an apology, but that… is just not that good. sometimes we always forget things, but her apology? this is meh. im hoping to see celestes respond about her apology so the situation will be calm once again (like it was used to be… back in the early years). im also looking forward for the lerdwichagul brothers' responds as well.
and about the other controversy, we got glassdoor ratings about employee mismanagement coming from ex-workers, thanks to the ceo… aka kevin. i dont understand why kevin was hated by everyone back then, but it turns out that they are right. kevin is a completely different person with cameras OFF. that one scene from the episode "smg4… are you okay?" where smg4 tortures toads into manipulation by making videos for his channel became more obvious with this one. the good side is we havent heard about luke (smg4) yet.
on the other hand, i will probably start a career as a utau producer once i have speakers for my pc, dowloaded utau, and practiced how to use that software (hence the "prod" on my url). there is a chance that kikyuune aiko will be my main. smg4 stuffs will still be around, however you will see less smg4 stuffs here due to the controversy and the fact that this is a multifandom account aside from my likes. buuuuut that does not mean ill stop working on pandemic love distortion. (for those who didnt know about this one, its a wip smg34 fanfic made by me that was put on developmental hiatus due to irl stuff)
and for those who havent heard of it already, i will permanently post all my future arts to @blueberry-arts, but previous arts from my main will still be here and remain. so if you want new arts from mine go to my other account pls 🙏
soooooo i guess that will be all. thank you for reading.
signed, yoko. 🫐
2 notes
·
View notes
Text
hi, I guess
I've just finished dowloading and transferring 40 songs to my phone via usb, all while I set up my first tumblr post, boy, it sure feels like 2014
Anyway, twitter has contained my real goblinoid form for so long (also the musky rich guy), so it's time to come back where I can be one with he cringe, let my hyerfixations run wild and unashamedly post about my ocs.
So, here I am, once again, be patient wih me (or no, you do you).
#about me#first post#i'm actually ridiculosly excited to be on tumblr again#like i'm back to my people#never forget one's origin: the tumblr void#swallow post
1 note
·
View note
Text

Warning: Image heavy
By popular demand, aka 2 people, here is a gif tutorial. This will include how I do screenshots and actually make the gif.
You will need:
Photoshop. I use the Photoshop CC 2021 version but that’s only because I’m paying for it. There are sites you can download Photoshop on but I prefer the legal way.
MPV player or any screencapping program that takes continuous screencaps.
IMPORTANT: As I have learned, the video file you use must be 1080p or else they will look like absolute crap. Always try to get a 1080p copy no matter how long it takes.
THE PROGRAM
As stated before, I use MVP player. That can be downloaded here. If you have a mac, I would move the app off of your desktop after downloading and to the applications folder. That way it is out of your iCloud and saves so much pain and frustration.
Try to download the 0.29.0 version because later versions on macs have a glitch where there are duplicate screenshots (according to @/kylos). I had to download the 0.29.1 version because the other version won’t open at all for me after the last apple update (fuck bug sur). Anyway, I’ll probably mess up explaining this part so you can find out how to get it working here and here.
To actually screencap, press option + s. The left and right arrow keys will help you move through the video. For more shortcuts, click here.
Once that is all downloaded, now you can begin the giffing process.
THE PROCESS
Load the film you want to gif into the program, which is just a simple drag and drop. Then go through and find the scene you want to screencap.

Once I find the scene, I pause and then press option + s as mentioned above and screencap the scene. Press option + s again to stop capturing.
Now you go open photoshop and go to File --> script --> load files into stack
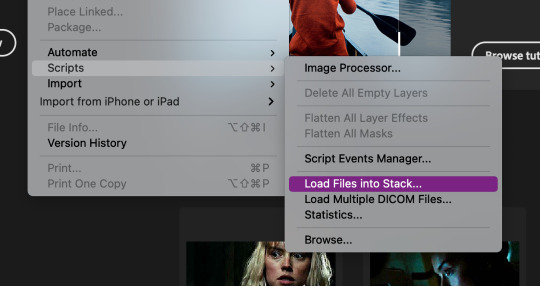

Then this will pop up. Hit browse...

Then open your folder with the screenshots, select the screenshots by dragging down, and then click open.
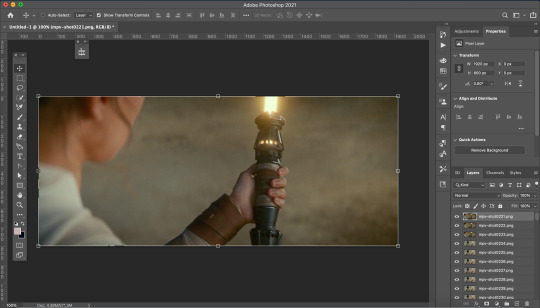
This is what it should look like. Now go through and delete the extra images you don’t need.
Now we need to crop the future gif. Click the cropping tool and at the top left there is a way to set the crop dimensions.
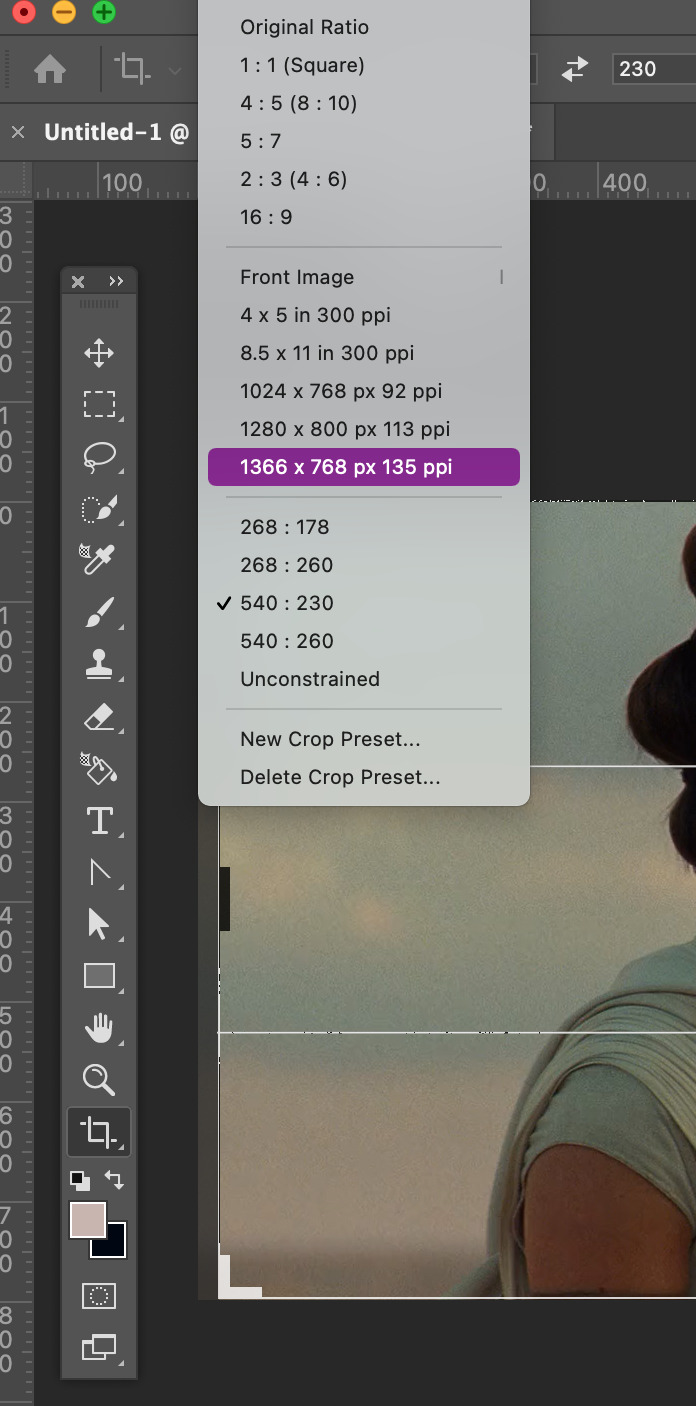
The ones I have saved are Tumblr’s dimension sizes. The height doesn’t matter as much as the width does. For Tumblr; 540px is for one post across, 268px is 2 posts across, and 178px is 3 across. When doing 3 across make the last one 177px or else the last one will be blurry. Click here for more info on sizing.
Today I’m going to make this 540:280. When you’re satisfied with the crop, click enter.
Here is where the fun begins! I downloaded @kylos gif action here. To activate it double click on it. To view your actions go to window --> actions. A window should pop up with your action.


There will be a folder in there called GIF ACTION. Open the folder and select the SELECT HERE!. With that selected click on the play button to activate the action.
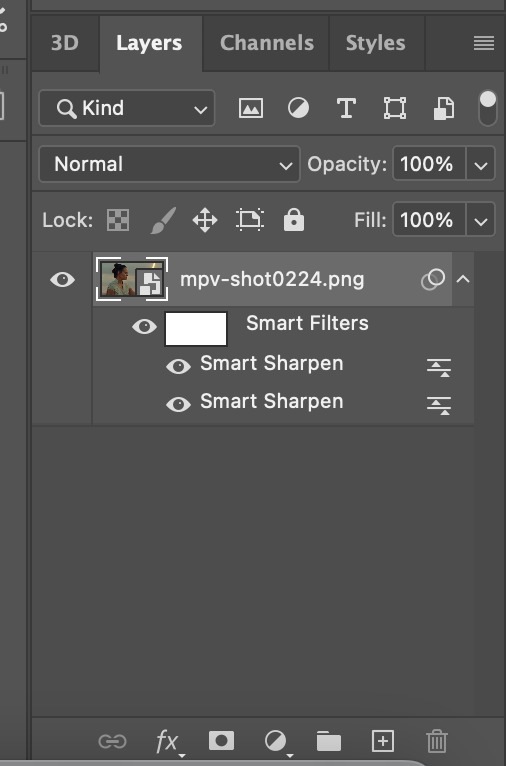
Just like magic, you now have a gif! Your layers panel should now look like this. Next we just need to resize the gif.

Go to Image --> Image size and this box will pop up.

Resize the image to your crop size and hit ok. Your image will now be a lot smaller.
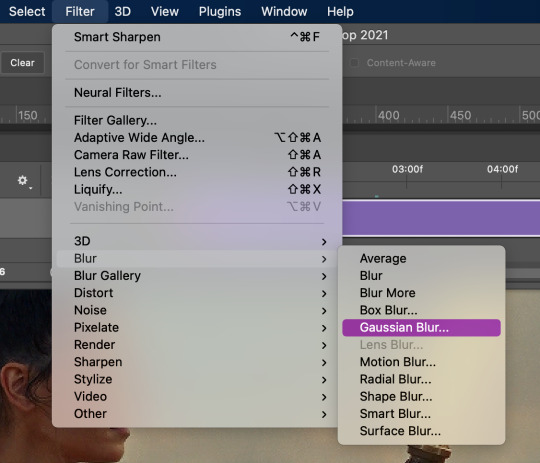
Next I go to Filter --> Blur --> Gaussian Blur. Set the blur to 1.0.

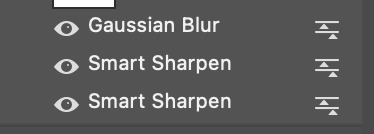
Now this will take away the sharpness when I just want it to be a bit softer. To fix this double-click on the lines next to the smart filter.
This will bring up another box to change the opacity of the blur. I change it to 20% or less. This one I’ll make 15%. Hit ok when done.

One last thing is I fix the radius of the sharpening. Click on the bottom sharpening layer. A box should open.


Change the radius to 0.4 and hit ok.
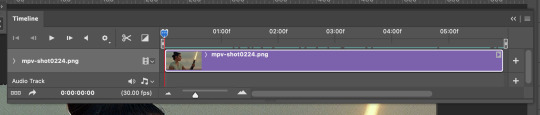
Before closing, open the timeline window by window --> timeline. If you want to cut down on the frames, grab either one of the grey bars on the beginning and end of the gif and drag to where you want it to start and end.
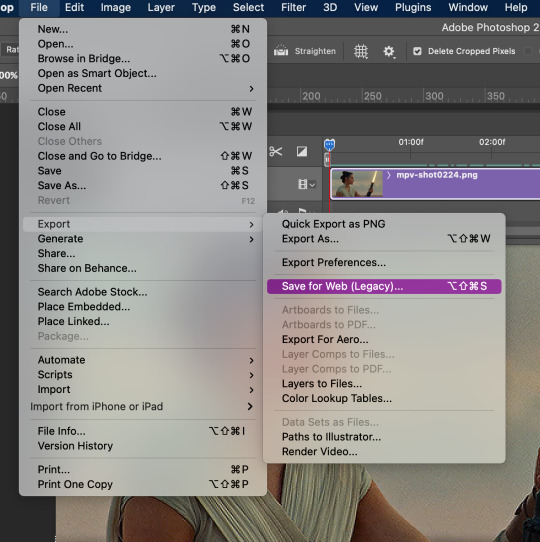
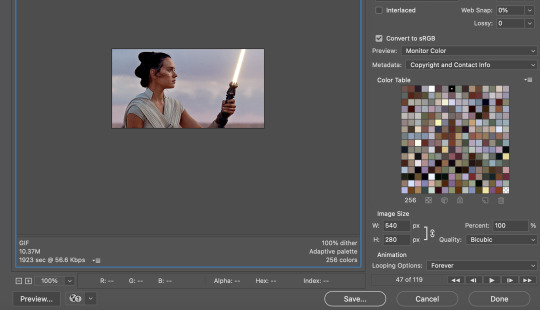
It’s now time to save. Go to File --> Export --> Save for Web (Legacy)...
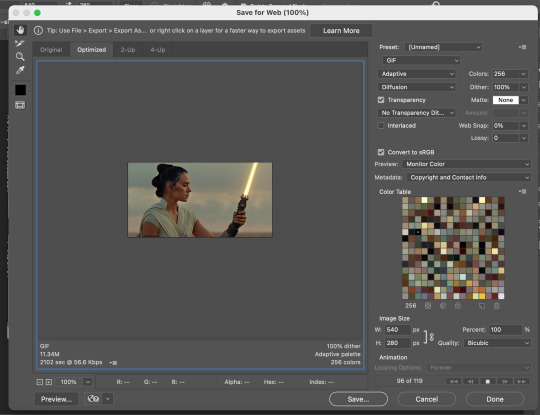
This will pop up. Here you can see how many frames you have and how big the file is. I usually start off as close to 10mb as I can get. There are multiple ways you can save it but here are my settings.

Then save your gif to wherever you want it. But we aren’t done yet.
Close the gif. You don’t have to save the psd but you can if you want to. Then reopen the gif in Photoshop. Everything you used before should still be open, aka the windows for actions and timeline.
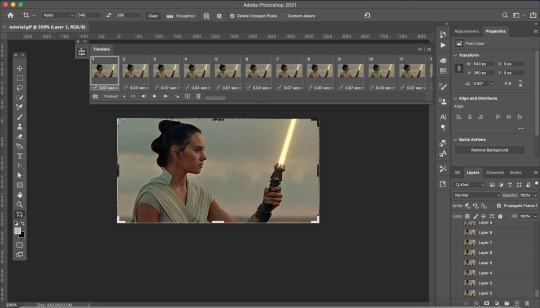
Your screen will look like this. As you may notice, the gif speed is all over the place. The best speed for gifs is 0.5. This guide is very helpful.
To get the gif to that speed, I dowloaded another action here. Add it to your actions as instructed above.

Open the Change to .05 folder and select the SELECT HERE!. With that selected click on the play button to activate the action, same as above.

And viola it is now the correct speed! But our gif doesn't look too great. It’s time to fix that up with some coloring.
COLORING

These are my coloring layers. Make sure they are on top of all of the layers.
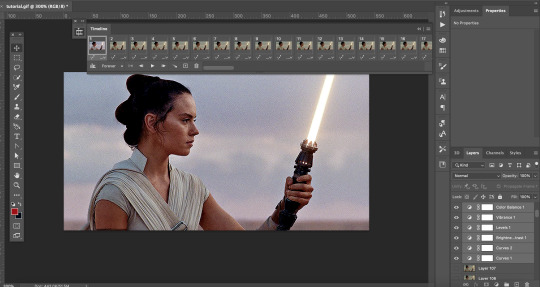
Here is what it looks like now after the coloring. You may notice the effect has only been added to one layer of the X amount of frames you have.
To fix this select the coloring layers and then go to the 3 lines at the top right of the box.
Click on this to open a dropdown box and click match layer across frames.


Make sure all the checks are marked and hit ok.
Now all the layers have the coloring layers applied.

Remember when we were saving the gif and it was over 10mb. Well now it’s time to fix that.
I like to go in and check the size after coloring because sometimes that can lower the gif size.
It did in this case so that creates less work. Close out of that and go back to your timeline. It’s time to delete some frames.
You can select multiple frames at once by holding down shift as you select. I typically click around 5 to 10 at a time and make sure you don’t miss a single frame. I’m going to select more towards to the end.

Then click delete (the trashcan icon).
Go back to export. If it is still too big delete some frames. In my case it was still too big so I have to delete more frames.
I now have it to around where I want it. It is less than 10 mb and sometimes that is better. So save your gif. I usually save it as [filename]final.
QUALITY
To check the quality of the gif I go to Tumblr and go to make a photo post.

DO NOT post. Instead save it as a draft. Go to your drafts and see how it looks from your dash. If it looks pixelated then go back into photoshop and delete fames. Repeat the following steps until it is to your liking.

And then you have your final product!
I hope this was helpful to you and I can’t wait to see what you create with this.
#tutorial#yeahps#completeresources#resources#gif tutorial#quirkyresources#hisources#my giffs#rey#star wars#swedit#starwarsedit#daylightresources#jessielynnposts#i struggled with this can't you tell lol
232 notes
·
View notes
Text
“GIFs don’t take more than 5 minutes to make”
For grins and giggles, I timed how long it took me to make a 8 GIF set of a Kdrama using Photoshop. This was a pretty straightforward set with not a lot of dialogue and minimal coloring/adjustments and it took me just over 60 minutes. Each GIF took between 7-10 minutes and this is only after the media is dowloaded and recorded. My process for one gif included:
downloading the media (episode or video)
recording the section or section I want to GIF
importing the frame section for the specific GIF
trimming down the frames/layers to get the right feel and stay within the GIF limit
realizing that you hate the section you chose and reimporting the layers
spending 3-5 minutes clipping off those few frames that just don’t work (ugh his eyes are closed...her mouth looks weird...and on and on...)
adjusting the color, vibrancy...etc. etc. (the set I did barely had any coloring)
adding text
exporting
testing it on Tumblr and noticing an error and having to fix it
starting it all over again
This set was for a kdrama and it was a simple set. For sets that include fight scenes, lots of dialogue or it’s a kpop set with dancing, I can double this time easily.
So when someone says ‘eh it takes 5 minutes shut up’ or it’s an easy process...it’s frustrating because it’s obviously way more work than that. For those of us who enjoy the end result, the process is worth it. I like seeing a quality set and I really want the sets I do to look good so I’ll spend time nitpicking the dumbest things. Plus, we don’t just make one GIF. We make a set. The minimum set I make is two which brings the time down to about 30 minutes - unless, again, it’s choreo-heavy or a lot of action. And I don’t use any additional programs (yet) like Avisynth or Vapoursynth which add time to the process.
When someone takes that work and reposts it as their own, it’s stealing. It doesn’t matter if I posted it on a ‘public site’. If someone takes that GIF, they’ve taken the work of another person - again...stealing. It’s very easy to reblog or ask permission to post and give credit to the original creator, not doing so is intentional and...you guessed it...stealing.
If you choose not to do that, you’re a thief. That’s not up for debate.
Thanks for coming to my TED talk.
19 notes
·
View notes
Text
Gif tutorial
Hey guys @vaelkyries asked me if I could give them some tips on gifmaking. I decided to make a post about it, so everyone could enjoy it :) This is how I make gifs, but there are many other ways. Feel free to message me if you’re having trouble or have questions.
I’m gonna show you how to make screencaps, how to load those into ps, how to make your base gif, how to sharpen, how to basic color and how to add subtitles.
! These are guidlines, please use your own creativity to create your gifs so don’t make exact copies of my gifs or others !
You’ll need:
Kmplayer
A video(s)
Photoshop ( I have cs5)
Patience
Psd (optional)
Action (optional)
Let’s get started. First of all we need to make screencaps of the scene we want to gif. Open your video using KMplayer (can be a youtube video or a movie/show). Right click > capture > frame: extract.

Make sure you have the same settings. Choose a folder you want to extract the screencaps to.

Then just click start on the frame extraction and press play on the video. If you have everything click stop.
Make sure all different scenes are in different folders. So say you’re making a gifset of 8 gifs. You should have 8 folders with screencaps.
Open PS Go to File > Scripts > Load multiple DICOM files > select the files you put your screencaps in.
Then you’ll have this. Make sure your actions, animation and layers are enabled to do that go to window and check ‘action; ‘animation’ and ‘layers’

At the bottom you have the animation. We have to convert to frame animation so click on the button with the 3 squares and then click on the button with the arrow and horizontal lines and select ‘make frames from layers’

The hold shift and click on the last frame to select them all. (Make sure you only have the frames you want, so if you have some extra frame from another scene delete them. You can do so by selecting them and clicking the little trash bin at the bottom. You can also delete the unwanted frames in the beginning of the proces in your folder on your pc)
If they’re all selected click the little black arrow on any of the frames (doesn’t matter which one) and click ‘other’. Here we’ll set the delay of the gif. That’s how fast or slow your gif will go. This various from which photoshop you have and can also be effected by sharpening and coloring I believe. So play around with that and see what fits best! I use 0.12 for the moment. If its a short gif I’ll use maybe 0.14 to make it look appear a bit longer.

Now we’re gonna cut our gif to size. Select the cut tool and here you can adjust the height and width. The dimensions are 540px; 268px; 177px. Height you can choose to your liking. Then drag your tool over your gif and select the part you want to cut (you can select the whole gif, then it will just resize!)

Make sure your precentage at the bottom left corner is on 100%. Select all your frames again. And select all your layers. In the righ bottom corner. Click on the button with the 3 squares again. Then go to filter > convert for smart filters

Now your base gif is done, with no coloring and sharpening!
Sharpening:
You can either sharpen en blur your gif yourself by going to filter > sharpen > smart sharpen and filter >blur >gaussian blur (to soften the sharpness otherwise it can get too much and it doesn’t look good)
or
You can use an action. You can find these on Tumblr, dowload them en load them into PS. I’m using an action but I tweaked a few things. So just select the first layer of your action and press the play button at the bottom. It automatically applies the filters the action has.

Now we have this.

Coloring:
There are soooo many ways to color your gif. I’m just gonna show you some basic stuff.
You can once again dowload a psd and use the coloring of that psd. But most of the time you’re still gonna have to tweak them cause every scene has different lighting, colors, etc.
I color my gifs myself. I don’t like dark pale gifs so I usually color them quite vibrant. Lately I’ve been using color balance and selective color but for someone who’s just beginning making gifs I recommend using psds or simple coloring of your own.
You go to adjustments and here you see al these little icons. We’re not gonna use them all. If you hover over them it’ll tell you what’s it called. We’re using: brightness/contrast; levels; curves, vibrance/saturation.

The first icon is brightness/contrast. You’ll have to play around with this to accomplish what you want. It’s better to use multiple layers with small adjustments then only one layer with a lot of adjustment. To go back to the adjustments “menu” just select the upper layer or your gif layer.

Levels and vibrance/saturation are pretty self explanitory. For curves just lift the curve a little to give your gif a little brightness.
Now say your gif is too yellow. Add an color balance layer and drag the handle to the blue side to neutralize your gif.

Now we have this:

Subtitles. Select the type tool drag a box and type in your text. Make sure the text layer is above the coloring layers. Drag the text to the desired potition.
I use Calibri, bold italic, sharp, 12p

Then right click on the text layer > blending option > check on drop shadow and stroke. These are the settings for blending. The settings for stroke are (size 1 & color black)

TADA your gif is ready

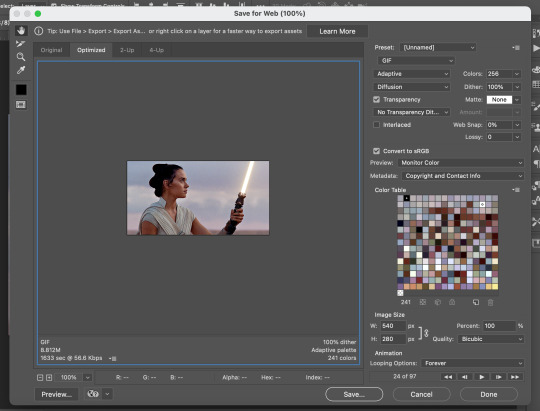
Now to save it go to file > save for web and devices and use these settings:

139 notes
·
View notes
Last Seen Blogs

httyd2lover222
Httyd

itsolutions4india
Elevate Your Marketing Game with Promotional SMS Services
i-padfootblack-things
Looking? Found someone, I would say
uncle-ecchi
Uncle Ecchi

noraalbertjohn
Untitled