#install moment in laravel
Explore tagged Tumblr posts
Visit Tumblr Blog
Explore Tumblr blogs with no restrictions, modern design and the best experience.
Last Seen Tumblr Blogs


Fun Fact
25% of US internet users with an annual income of $80-100K use Tumblr.
Text
Get Automated Daily Back Up
First To Market, "SafeShell" Innovation Supported Site Facilitating Stage To Flawlessly Host Limitless Sites and Areas On Super Quick and Gotten Servers For 99.99% Uptime Assurance With no Month to month Expenses Of all time!
With This In Your Showcasing Arms stockpile, Your Supporters Can Undoubtedly Express Farewell To Costly Facilitating Stages Like Hostgator, DreamHost, BlueHost, Hostinger And so on. Once and For All.
Your Clients Can Host Limitless Sites and Areas With No Restrictions With 99.99% Uptime Assurance and Get An Unequaled Client Experience That They've Never Seen.
Have Limitless Sites and Spaces
Top notch SafeShell Innovation Upheld Premium Facilitating
Introduce 50+ Premium Applications In Only 1 Snap
Limitless Transfer speed
Limitless Email Locations
Multi-Language Backing
Free SSL Certificat
Get Mechanized Day to day Back Up
Email Spam Assasin
Strong SSD/NVMe Stockpiling
Unparalleled Internet business Usefulness
A single Tick WordPress Introduce
PCI DSS Consistence
Web Application Firewal
100+ Expansions Index
Multi-PHP Administrator
Git Backing
PHP Arranger
Node.js Backing
Ruby on Rails
Postgresql
Expert WordPress Toolbox
Laravel Tool stash
Website optimization Toolbox
Site Consultant
Zero Regularly scheduled Installment Bothers
Simple To Utilize Control Board
Stage 1 - Login and Enter Space Subtleties
To begin, just login and enter area subtleties. Indeed, even move your current space or pick another one out of couple of taps of your mouse without any limitations.
Stage 2 - Arrangement and Host Limitless Sites
Presently arrangement and host limitless sites with the subtleties referenced in couple of snaps and get doing great for getting achievement.
Stage 3 - Distribute and Benefit
Incredible, you're good to go to create moment gains. Simply distribute your sites and give an extraordinary client experience like a genius.
0 notes
Text
How to Install and Use MomentJS in Laravel 9 Application
New Post has been published on https://www.codesolutionstuff.com/momentjs-in-laravel-9-application/
How to Install and Use MomentJS in Laravel 9 Application

This tutorial will show you how to use MomentJS in Laravel using examples. How to install Moment in Laravel Vue is explained step-by-step. We will assist you by providing a Laravel installation example. You may find a straightforward example of using MomentJS in Laravel in this article. In
#how to install moment in laravel vue#how to use moment js in laravel#install moment in laravel#install moment.js laravel#laravel mix moment js example#use moment in laravel blade#use moment js in laravel
0 notes
Text
Laravel 6.0: What You Should Know

Since the inception of Laravel 5.0 around 4.5 years ago, the Laravel ecosystem has blossomed into something that leaves users nothing to complain about, to say the least. Laravel Nova, Laravel Horizon, Laravel Echo, Laravel Scout, and Laravel Passport are just some of the tools that have been introduced since then. At the time of this writing, we’re on Laravel 5.8 and Taylor Otwell has decided to skip past 5.9 on to 6.0 on the 3rd of September. Previously, Taylor has stressed that this won’t be a major paradigm shift for Laravel and the most significant change will be the transition to semantic versioning. However, this doesn’t mean that there aren’t plenty of new features worth talking about.
Let’s dive into some of the smaller changes first.
The Smaller Things
Authorization

Authorization messages can now be made easier for users to understand. Before Laravel 6.0, the infrastructure wasn’t in place to easily give a specific response to a user when they were given an authorization-related error. The status code could be given fairly easily, but giving a custom error message was more complicated back then. Giving a custom messaged required the developer to create a new file and write their own exceptions.
Now, to get a customizable authorization response, you can simply use the Gate::inspect method when linking to the function that enables you to receive the response. Delivery of the message to the front-end is also easy to organize. Simply add $this->authorize or Gate::authorize to a suitable route or controller.
No More Default Front-End
The typical front-end setup you are given when you first start a Laravel project is now gone. This means the Vue and Bootstrap code you would usually see, would have now been removed. What it’s been replaced with is unknown. Perhaps, it hasn’t been replaced. Strangely, the make:auth command, used to provide the login system scaffolding is now not a part of the original Laravel install either. To be honest, the rationale behind this change is unclear to me. However, given Laravel’s versioning adjustment, it makes sense that third-party technologies like Vue and Bootstrap that haven’t recently undergone the same changes could cause conflict. Though, this is merely speculation.
If you want access to the old UI, you can extract a composer package that contains it with the CLI: composer require laravel/ui and php artisan ui vue --auth.
Lazy Collections

This is one of the more interesting additions. If you’re new to Laravel, Collections are tools that make it easier for you to manipulate arrays. Eloquent, one of the two main tools in Laravel used to communicate with databases, returns its queries as Collection instances. Check out the docs for Collections if you think you’re gonna lack context in a moment. https://laravel.com/docs/5.8/collections
So, what are Lazy Collections? Traditional Collections are often used for working with large amounts of data. When they run into data-heavy files, they’ll try and store all of that data at once. This may sound quick and convenient but the downside is that this is very memory-taxing. Lazy Collections solve this problem by only storing the part of the file they need, and thus, save memory usage and boost performance.
If you understand how lazy loading works then you’ll be familiar with my previous explanation. Lazy loading works the same way. When you make a request to the server with lazy loading implemented, the browser will only return the part of the web page it knows you’re going to use immediately. Then, when the user scrolls down the page or clicks on an internal link, the server will provide you the necessary content it knows you need. This way, only memory that is needed at that particular moment is being used. This method increases speed. Lazy Collections is kind of like lazy loading but with arrays from a database and not content on a webpage.
The Bigger Things
Laravel Ignition
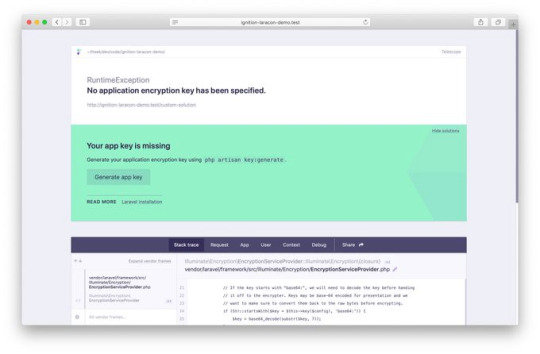
So yeah, the new error page for Laravel is called Ignition and it looks awesome. It’ll be the default error page for Laravel when 6.0 releases. However, if you don’t feel like making the switch to 6.0 just yet, that’s fine, you can still install Ignition on previous versions. Let’s talk about what Ignition brings to the table.
With Whoops (the current default Laravel error page), stack traces and relevant code snippets are shown in an error page, but this doesn’t always lead the developer to the solution. Worse, sometimes the stack traces just reference compiled paths. This can it make it difficult to find the necessary non-compiled files to fix because they aren’t listed anywhere on the error page. Thankfully, this isn’t a problem with Ignition, it can display to you the non-compiled file where the problem actually exists. By clicking on a pencil icon, you can go directly to the file in your chosen editor.
The second coolest feature of Ignition is that it can display potential solutions when displaying an error message. Most error pages just leave you with the error. For example, if the error is that you misspelled a property name, Ignition will tell you that the property has been misspelled and offer you the correct spelling. Solution suggestions can be way more sophisticated than this, I’ll link you to the source down below. Your suggestions are even customizable!
You wanna know the coolest feature? These solution suggestions are actually runnable!

Yes, really. Take a look at this short demo by one of the creators, Freek Van der Herten.
https://youtu.be/EZu0-CwTU9Q
Also, you can add your own runnable solutions too! This is great as Ignition is open source so people in the Laravel community will undoubtedly contribute their own solutions for everyone to use.
There’s a bunch of other cool features too such as creating your own tabs (yes Ignition has tabs) and sharing your error messages with other people. This is done using Flare, a tool that comes with Ignition.
For everything about Laravel Ignition and Flare, visit https://freek.dev/1441-ignition-a-new-error-page-for-laravel.
Laravel Vapor

Another big one. Laravel Vapor is a serverless deployment platform for Laravel. But wait, why do we need a deployment platform? We already have Laravel Forge, right? As beloved as Forge is amongst the Laravel community, it does have its limitations. It doesn’t have autoscaling to deal with large sudden increases in traffic that prevent your site from crashing. Also, configuration is required when OS or PHP updates occur. Vapor has autoscaling, so, you don’t have to worry about sudden spikes in your traffic causing website downtime. In addition, because of the serverless structure of Vapor, it also handles all the updates you may stress about when using Forge.
Vapor’s website is very clean looking and everything seems easy to find. When you deploy a project, you can see the different stages of the deployment process loading on the UI. I find this to be very reassuring and comforting. You can also rollback your application with a click of a button. Just click on “rollback” and it’ll do just that. Pretty neat. Same deal if you want your app to undergo maintenance. Just click on the “maintenance mode” button.
Another cool feature of Laravel Vapor is that you’re able to set alarms. What do I mean by that? For example, to know when your website traffic suddenly blows up, you can set a certain amount of HTTP requests per minute, and if your website hits that limit, the alarm will go off, informing you of the surge in traffic. Taylor Otwell showcases this and other conditionals in his Laravel Vapor demo which I’ll link to below.
There’s so much to cover with Laravel Vapor and the Laravel update itself. Because of this, I didn’t really want to dive into the complexities too much in this post. To learn more about the technical aspects of Laravel 6.0, you can take a look at the release notes here https://laravel.com/docs/6.0/releases. For more info on Laravel Vapor, visit this video by Taylor Otwell https://www.youtube.com/watch?v=XsPeWjKAUt0&t=362s.
1 note
·
View note
Text
How to Install and Use MomentJS in Laravel 9 Application - CodeSolutionStuff
#artificial intelligence#Programming#php#cloud#machine learning#laravel#codesolutionstuff#codesolution#JavaScript#DataScience#MachineLearning#Analytics#AI#ML#angular#Tech#Python#ReactJS#DataScientist#Coding#SQL#bot#Cloud#Typescript#Github#Data#BigData#DL#machinelearning
0 notes
Text
Skills of a PHP Developer
Now, it goes without saying that you must first grasp the fundamentals of PHP in order to be a good PHP developer. This obviously entails having a firm grasp of the PHP language and its processes, but after you've achieved that, you can boost your worth by becoming familiar with a variety of PHP apps and frameworks (such as Laravel, Zend, and Symfony). As even experienced PHP developers might not be as proficient with the most recent technology, it's also critical to stay up to date on upgrades and features. Due to a lack of resources, smaller firms and organisations frequently look for developers with a broad range of skills. As a result, it's always a good idea, even though you might desire to be an expert at some advanced PHP chores.

Skills of PHP Developer:
Understanding of additional programming languages
To succeed as a PHP developer in a cutthroat employment market, you'll need more than just a working knowledge of PHP code. To identify and fix any mistakes in the site design, a strong command of front-end programming languages like JavaScript, CSS, and HTML is required. Knowing these languages well will also enable you to comprehend how they impact user experience (UX), which is the aim of the majority of programming projects. Additionally, it's crucial to be familiar with databases (mainly MySQL but also common alternatives such as PostgreSQL and Oracle). The bottom line is that one key method to become a productive member of any development team is to build and maintain a broad range of technical skills.
Learn PHP design patterns and best practises.
All forms of software development, including PHP, benefit from design patterns. They can hasten development by providing reusable answers to frequent issues. As other developers will be able to recognise the patterns being utilised, they also help to improve code readability. There are many other design patterns to learn, but some of the most popular ones in PHP applications are Factory, Strategy, and Singleton. More broadly, you can save time by being familiar with the best practises for using several PHP frameworks. Take advantage of the language's long history and large user base to prevent repeating the mistakes made by those who came before you.
Be familiar with PHPUnit, PSR, and Composer
These are a few of the tools that will improve your PHP development skills. Your libraries, classes, and functions will be taken care of by Composer, a dependency management that makes it simple to install various iterations of each for each project. These libraries, also known as "packages," will be checked for new updates by Composer, which will then update them as necessary. A list of pre-made Composer-compatible packages is also available here. A PHP specification called the PHP Standard Recommendation (PSR) aims to standardise PHP programming principles and enhance the compatibility of PHP components and frameworks. The PHP Framework Interoperability Group (PHP-FIG) publishes it, and at the moment there are 13 recognised standards, each with its unique purpose, with more to come.
While PHPUnit is a well-liked framework for unit testing tiny pieces of code against expected outcomes. Any PHP developer would benefit from unit testing, which may be used in a Test Driven Development (TDD) methodology where tests are built up even before the code is created.
Solving issues
Being able to learn the "hard" technical skills is one requirement for becoming a high-level PHP developer, but without the appropriate complement of "soft" talents, success is doubtful. Problem-solving is one of these and is essential to any web development. You'll encounter unforeseen problems as a PHP developer, and how you handle them will greatly influence how valuable you are.
Excellent Interaction
Even if you are an expert at writing PHP code, you could find it difficult to collaborate effectively on a team project if you lack interpersonal skills. You must be able to communicate with customers, coworkers, and superiors in order to comprehend project or business goals, raise concerns, and explain how your job fits into the overall product. And keep in mind that effective communication requires conversing on the phone, via a video conference, in person, as well as through email and messaging applications, even if you feel most at ease doing so.
Adaptability
Finally, it's critical to remain flexible and open to learning. Like all coding languages, PHP is always evolving, therefore businesses are more inclined to recruit developers who are up to date with most recent software and language changes. There will always be things you can learn from others, even if you are confident in your PHP skills. Stay humble, stay curious, and you’ll keep moving forward.
Conclusion:
PHP is not just for usage by experts in web development. Additionally, IT administration expertise is not required. Like any other scripting language, PHP may appear challenging at first. But if you stick with it, you'll discover that this is a fascinating and approachable technology. It's also a useful approach to learn about the server-side world.
We can all access PHP thanks to tools like EasyPHP. The EasyPHP programme is a good place to start if you don't already have a PHP-enabled Web server, which is the essential first step in getting started with the technology. The Apache Web server and MySQL are both included in EasyPHP, so you won't have to spend much time getting them ready to use.
0 notes
Text
How to Install and Use MomentJS in Laravel 9 Application
This tutorial will show you how to use MomentJS in Laravel using examples. How to install Moment in Laravel Vue is explained step-by-step. We will assist you by providing a Laravel installation example. You may find a straightforward example of using MomentJS in Laravel in this article. In this example, I'll walk you through installing Moment in Laravel Mix step-by-step. I'll give you two illustrations of how to install a moment in Laravel. Laravel Mix will be used in one example, which will use the npm command, and CDN Js in the other. Moment is simple to utilize in versions of Laravel 6, Laravel 7, Laravel 8, and Laravel 9. So let's look at the technique below step by step.
Install Using Npm
first, we will install laravel fresh version. so let's run bellow command: composer create-project --prefer-dist laravel/laravel blog Now that we have a new Laravel application, we must install npm. Let's simply execute the following command. this command will create "mode_modules" folder in your root directory and store all npm module there. npm install Following that, we must install the Font Awesome library using the npm command below. Let's execute the command below: npm install moment Use in our app.js file after a successful install. Let's import then as follows: resources/js/app.js require('./bootstrap'); var moment = require('moment'); console.log(moment().format()); We can now execute the npm dev command by executing the following command: npm run dev Here, we will use the produced app.css file as seen below in our blade file: resources/views/welcome.blade.php
How to use moment js in Laravel? - CodeSolutionStuff.com
You can now launch your application and check the home page. You'll get the following output: 2020-06-10T19:58:17+05:30
Install Using CDNJS
Here, we'll utilize a cdn js file to add moment js, so take a look at the file code below: resources/views/welcome.blade.php
How to use moment js in Laravel? - CodeSolutionStuff.com
Read the full article
#howtoinstallmomentinlaravelvue#howtousemomentjsinlaravel#installmomentinlaravel#installmoment.jslaravel#laravelmixmomentjsexample#usemomentinlaravelblade#usemomentjsinlaravel
0 notes
Text
Differences between Laravel vs. django?
Laravel:
Laravel's libraries are not as strong as django and rails but are sufficient for making any kind of website. Also see Laravel framework architecture.
Bundles and composer provide number of bundle modular packaging system and dependencies.
Routing - The easiest to mange and abstract way of routing. It just makes everything hassle free and the abstraction provided takes out each and every complexity
Eloquent ORM support - Another service provided to abstract and automate the model part. Relationships and mapping of database with our application with a simple convention over configuration technique
Migrations - A way to version our database scripts in much elegant manner. No need to keep all the checks on migrations. A team working on a project can just pull the given migration and all is set and ready to go.
Queue management - To abstract the unnecessary tasks and get them queued behind the scenes and make user response time much faster.
Inhouse support for Redis. It can also be extended to memcached.
Dependency Injection - Easy testing and automating dependency loading
Artisan - Making command line apps in a moment
Django:
Django has very powerful library with following features:
The built in admin section, decorators and view classes are the strength of Django
The auto generated forms for models with validation makes is very easy
A caching framework which can use any of several cache methods.
Support for middleware classes which can intervene at various stages of request processing and carry out custom functions.
An internal dispatcher system which allows components of an application to communicate events to each other via pre-defined signals.
An internationalization system, including translations of Django's own components into a variety of languages.
A serialization system which can produce and read XML and/or JSON representations of Django model instances.
An interface to Python's built in unit test framework.
An extensible authentication system.
The dynamic administrative interface.
Tools for generating RSS and Atom syndication feeds.
A sites framework that allows one Django installation to run multiple websites, each with their own content and applications.
Tools for generating Google Sitemaps.
Built-in mitigation for cross-site request forgery, cross-site scripting, SQL injection, password cracking and other typical web attacks, most of them turned on by default.
A framework for creating GIS applications.
1 note
·
View note
Text
Top 5 Cryptocurrency Payment Gateways in 2020
You've settled on a shrewd choice to coordinate the digital currency installment entryway to your site.
These days, it is truly basic to have a crypto installment entryway alternative in the event that you are maintaining a business where exchanges are done locally or universally.
What Happens If You Use The Crypto Payment Gateway On Your Website?
Digital currency installment passages are networks permitting organizations to acknowledge crypto coins, for example, Bitcoin, Litecoin, Bitcoin Cash, and so on as an installment technique.
Clients from anyplace can buy items and administrations from a business that acknowledges crypto installments paying little heed to where it's situated far and wide.
In addition, shippers who acknowledge crypto installments can get facilitated from the troubles identified with customary installment modes, for example, high charges, obligatory ID methodology, and deferrals.
Investigate,

Why Crypto Payment Gateways Are Useful For Businesses?
There are a lot of points of interest to permitting your customers to pay with crypto coins. Some of them are recorded underneath:
To start with, it is secure and clients are in finished control of their exchanges.
Clients can exploit the new installment technique.
It will make your image believability as a ground breaking organization.
Dodge chargebacks that are connected to different types of installment.
Access new clients who need to pay for items and administrations with digital currencies.
Presently you have that it is so valuable to your business. It will take your business to the new level and pull in more clients.
Nonetheless, the inquiry is WHICH crypto installment door you ought to pick.
Here, we will feature the main five crypto installment entryways in 2020, and furthermore we'll recommend which one is the best for you.
Top Five Cryptocurrency Payment Gateways in 2020:
1. Coinremitter:
Coinremitter is extraordinary compared to other crypto installment door that offers quality types of assistance to Merchants and business customers internationally.
It has countless around 25000+ clients and has a nearby association with them.
Additionally, Coinremitter has just prepared 5000+ BTC and its exchanges happen each hour.
They acknowledge the most important digital currencies that are well known and safe, for example, Bitcoin, Litecoin, Dash Coin, Bitcoin Gold, and numerous others.
They uphold the most noticeable and amazing modules, for example, Laravel, CorePHP, WordPress, and the sky is the limit from there, with free API uphold.
The advantages of picking coinremitter is that there are no KYC measures, no ID or foundation confirmation required, and so on Everything is sans inconvenience.
What's more, they have numerous different functionalities, for example, advanced receipt, money trade, and the most noticeable is the least exchange charges just 0.23%.
That is the reason it is special from the other installment passages as it's worked to offer the simplest and fastest help.
2. Coingate:
CoinGate is one more Crypto installment entryway with incredible shipper choices.
It has an easy to understand interface that permits shippers to join and begin tolerating crypto installments right away.
The organization is assisting with building up a client driven checkout framework to make installment for crypto installments rapidly.
CoinGate permits traders and customers around the globe to appreciate and get digital money installments.
It underpins 40+ digital currencies, which means traders can altogether build the quantity of various installment techniques they give just by utilizing this crypto-installment door.
Coingate charges a 1% expense on all exchanges that regularly takes around 1 hour to finish.
3. Bitpay:
Bitpay is an American account innovation organization. It is a bitcoin installment framework that serves entrepreneurs from around the globe.
The organization utilizes innovation dependent on blockchain installment to allow merchants to acknowledge and pay with crypto coins. The installment framework is constrained by digital currency.
It helps dealers by serving their worldwide necessities and contacts a global crowd, even bitpay ensures its shippers against any sort of extortion.
On account of the worldwide blockchain framework, since organization enables venders with far reaching power over their resources. Bitpay gives its traders quick and inconvenience free conveyance.
The solitary drawback is that BitPay right now acknowledges direct bank stores in just 38 nations.
4. Coinpayments:
CoinPayments is another generally perceived digital currency entryway committed altogether to online traders. This makes moves less complex utilizing numerous coins like Bitcoin, Ripple, Bitcoin Cash, and Litecoin.
CoinPayments additionally permits moment installment moves and gives a wallet you can use to control your spending simpler by picking when to get to it.
You can likewise get to a multi-coin wallet that is fitted with first class security.
Dealers can not just urge their clients to utilize crypto coins to pay for items/benefits yet they can likewise buy blessing testaments.
CoinPayments has instant modules, for example, aMember Pro, Arastta, WordPress, Magento, OpenCart, Shopify, WooCommerce, and a few more.
The stage is open on the two iOS and Android so that the crypto upheaval isn't skipped.

5. GoURL:
GoURL is a monetary organization situated in the Commonwealth of Dominica. GoURL charges are unique in relation to free to 3.5%.
This crypto installment entryway is offering its dealers an amicable client experience zeroed in on an option in contrast to customary door innovation. The installment abandons diverting to outside sites.
The GoURL stage gives basic breakdowns of installments that make request the executives extremely clear. Installments are gotten inside 30 seconds of the exchange and are profoundly secure.
The beneficial thing about GoURL is that it permits shippers to make 1-click installments through their locales utilizing Monetiser Online.
Notwithstanding, the downside of GoURL is that the stage doesn't give direct bank moves which would be a failure for certain organizations.
Besides, charges are high when contrasted with other digital money installment entryways on this rundown.
To Sum Up:
It appears you have what to pick.
With these alternatives for the crypto-installment door, you can begin tolerating digital money installments for your organization.
This decision awards you the capacity to secure your assets, free of chargebacks and fringe limitations, in a cryptographically protected climate.
For More Info:- Accept Bitcoin Payments Wordpress
Visit Us For Social Media Update's:-
Twitter
0 notes
Text
PHP Laravel Programming
All that you have to think about the PHP Laravel structure
Laravel is a web application structure that is accessible to the PHP web developers under an open-source permit and is offered free of cost. This structure is for the most part intended to help the improvement of web applications dependent on the MVC (Model View Controller) model. It has been named as the most well known structure among the PHP developers, trailed by Symfony2, CodeIgniter, Phalcon and others. This system offers a wide scope of apparatuses and includes and is supported by a colossal network of developers and lovers.
Step by step instructions to introduce Laravel system
The procedure of this present system's establishment is a simple strategy that expects you to pursue some straightforward advances as it were. Since Laravel utilizes Composer for a simple administration of its conditions, so you have to download the 'composer.phar' document, which you can move to the registry 'usr/neighborhood/canister' for a worldwide use or held back in your venture's nearby catalog. Windows installer for the Composer is accessible for establishment of the system on Windows stage.
There are a few unique strategies accessible to pick the ideal one for introducing this structure as talked about underneath.
By means of Laravel Installer: Begin by downloading the PHAR document for the Laravel installer and afterward move the equivalent to the catalog '/usr/nearby/container'. After establishment, utilize the 'laravel new' order to make a new establishment in an ideal registry, for example, run the order 'laravel new blog' to utilize "blog" catalog. This technique is faster than the one utilizing the Composer.

By means of Composer Create-Project: To introduce this structure by means of the Composer, issue the direction 'make venture' in the terminal as "author make venture laravel/laravel – lean toward dist".
By means of Download: After getting the Composer introduced, get Laravel system's most recent form and concentrate every one of its substance on your server. Presently, in your Laravel application's root, execute the order "php composer.phar introduce" to introduce all the structure's conditions. For a fruitful culmination of the establishment, you have to introduce Git on the server. Notwithstanding, the direction "php composer.phar update" ought to be executed to refresh the system.
In this way, you can introduce the structure effectively by following any of the above talked about strategies, where no design is required to begin growing, yet you can arrange various alternatives to suit the necessities of your application.
Why Laravel system is viewed as the best?
Laravel has been seen as the most fantastic system for PHP developers when contrasted with others, where various reasons supporting this announcement are talked about underneath:
Arranger: The rendition 4 of this system is to a great extent subject to a few outer bundles to work appropriately, for which, Composer is utilized as the reliance administrator. Setting up another task is very simpler for novices, where there is no compelling reason to download a compress record and recollect a URL. You should simply to execute two or three directions to set up the extend just as get all the necessary conditions.
Craftsman: Since order line is an incredible instrument for developers, Artisan enables the utilization of direction line to execute a few assignments by extending the structure. You access different choices, when you type 'php craftsman' in the terminal window. In spite of the fact that lone a couple of directions are accessible, you can begin making customized order line devices to suit your needs.
Database Migrations and Seeds: Synchronization of database among various improvement machines is a rushed errand, where database relocations from Laravel make this procedure very simpler. The work keeps synchronized over all the improvement machines as long as it is kept in the relocations and seeds.
Peaceful Routing: This is one among the best reasons that supports Laravel, where the utilization of action words for steered is done in an exceptionally decent way.
These are just a couple of reasons that help Laravel structure for its tremendous fame and settle on it's the best decision for various applications. A few different reasons incorporate IoC, Eloquent, Blade Templates and Testing.
Highlights of Laravel Framework
Based on many develop and solid programming configuration designs, Laravel is given various highlights, where instinctive API is the principle fascination making its utilization a flat out delight.
A few highlights of this apparatus are recorded as underneath:
Momentous steering offices
Exquisite and one of its sort object-social mapper, Eloquent
Utilization of an incredible templating motor, Blade, for advantageous and simple templating with Laravel
Magnificent documentation and backing of a functioning network
Astounding testing offices to guarantee the ideal yield from applications
Author fueled particular design, permitting simple structure of less coupled and adaptable applications
Unshakable establishment that is worked with the premise of a few fight tried Symfony segments
An astonishing CLI of Laravel, Artisan assists with venture the executives, database relocations and the sky is the limit from there, including the production of customized directions also.
Amazing Websites dependent on the Laravel Framework
Laravel is a lovely instrument that has assisted numerous site proprietors with generating a striking on the web nearness. A rundown of not many of the destinations created utilizing this system is given underneath, alongside a concise portrayal for each.
Mack Hankins: Mack's own blog includes a smooth structure with a stunning sidebar and association of the webpage that depends on Laravel 4 system.
Laravel Tricks: Built on Laravel, this site is actually the way it should be, the place the alternative board and configuration add to the appeal, making it successful in a straightforward way.
MyRank: A full-scale site giving web based learning administrations in India, demonstrating the flexibility of Laravel system. The shared progression of plan components offers an incorporated usefulness of this site.
Sublimity: This site is worked with essential highlights utilizing this system, which portrays the capability of this apparatus to add adequacy and polished methodology to a basic plan.
Deltanet Travel: A goal the board site, based on Laravel, offers a smooth perusing and other viable highlights for its intended interest group in Greece.
Fate of Laravel Framework
PHP began as the main decision of web developers, which lost its prominence to Python and Ruby on Rails throughout the years. Being tastefully satisfying, their significant disadvantage lies in the usage of MVC, while PHP is a reasonable decision for entrepreneurs with emotional upgrades in its ongoing adaptations. Nonetheless, the test of finding the privilege MVC system finished when Laravel appeared. It has been named by Google Trends, leanpub.com and various overviews as the best system for PHP developers, guaranteeing a brilliant future for this structure.
On the off chance that you are paying special mind to getting a moderate administrations identified with Laravel system advancement, at that point connect with our PHP specialists to become familiar with the equivalent.
0 notes
Text
Will Android Features Impact Your Mobile Application?
Android 10 has been a large shift for Google from the Operating System environment. We didn't only eventually get to work round the long-awaited Dark manner and saw several significant changes occurring on the program permission , we saw the ending of an age.
Using Android 10, Google introduced its heritage to mention functioning systems behind desserts into a block. The very same principles have been performed over by Android 11 programmer preview today. While we're several months off from playing around the last construct, the current developer preview is a decent glimpse into where Google would like to select the operating system.
With each new upgrade, it isn't merely the Android program developers that get excited. The stakeholders on the opposite side of the coin -- that the program owners -- sit on the edge of the chairs every time across the middle of May, every time a new version is announced in the Google I/O occasions. Before we start looking to the manners Android 11 alters the program domain for those entrepreneurs that have Android programs, let's take a take a look to the new android characteristics which were introduced together with the Android 11 highlights.
Android 11 Characteristics Sets Multiple Improvements for multitasking
Going by the Android latest variant comprises, a great deal has been done to enhance the consumers' messaging expertise on Android. Here are the updates Which Have Been introduced:
Chat pockets -- Android 11 chat bubbles conceal all of the ongoing conversations in small bubbles on the side of the display. You are able to move the bubbles round and tap on them to show the particular conversations. To earn the procedure for getting messages real time, Android 11 has introduced a committed dialog section in the telling color, offering immediate access to all of the ongoing conversations you're having.
Together with the Android 11 theory it will now be possible to send pictures when responding to a message from alarms. One-Time Permission
Should you look back in Android 10, among those ebay things about it was the way that program permissions has been managed. Android 10 gave users a whole lot more control within the programs and what they can get. Android 11 retains the rail rolling.
Now, once the program asks for consent to utilize complex features, the consumers may grant access on a one time foundation. The program will utilize the consent through the moment you use the program. And the minute you stop the program, the consent will be revoked. Built-in Screen Recorder
Since the last couple of releases, the Android users are waiting for Google to integrate an integrated screen recorder. Even though the opportunities anyone would want it in a regular basis is quite slender but the purpose is really simple, so the wait for it to get integrated has been bothersome.
Android 11 upgrade will alter this. Developer Preview 2 revealed a display recorder, that was accompanied by a very polished UI and click on for recording the sound and revealing the bits in the recordingmode. Adaptation on Various Display Types
When there's 1 area where we could say that accurate advancements have occurred in the Android ecosystem, it's with respect to foldable devices. 2020 will see a great deal of new developments from the foldable smartphone marketplace -- all operating at different display resolutions and sizes.
The OS 11 has been created to operate on the foldable apparatus effortlessly.
Thus marketing the opportunity to begin working on foldable smartphones program development. Preparations for 5G
5G began making news from the next half of the final year and what's gone in 2020, together with coronavirus pandemic affecting lots of businesses and technology, the demand for 5G adoption has just grown on the planet. One which would enable smartphones to choose the comprehensive advantage establish which 5G brings.
After the API finds that you're linked to infinite 5G, you'll have the ability to get the greatest possible images and video's quality along with other intricacies that come adorned with all the 5G technology.
Now that we've looked in the Android new attributes & API, let's change the attention on these improvements would bring a change in the performance of your current program.
What Can Migrating Programs to Android 11 Mean On Your Own Android Program?
When you have a look at the Android 11 programmer preview documentation, you'll discover it is separated into three classes: Behaviour Changes, Privacy Characteristics, and New Features & APIs. Under most of the classes, you will find pointers that carry an effect on the program's performance.
Android 11 effect on programs
Whilst majorly your partnered android program development business will start looking into these changes, let's take a take a look to the situations which you ought to be at the top of. The consumers can limit when consent dialog appears If your customers click 'Deny' twice to get a particular consent, it might suggest'Do not request Again'. This translates to is you will need to clearly communicate and convince the rationale for requesting consent in your marketing and advertising procedures or via your MVP features. App utilization stats will be kept confidential
For better shielding the users information, Android 11 will save all of the users' program usage data in the credential encoded storage. Therefore, neither the program or some other system may get the information unless certain coding function is finished. Which, in turn, depends upon two conditions:
Users unlock their apparatus the very first time after system startup Users change to their accounts on the apparatus.
Therefore, until your programmer understands the workaround, you'll face difficulties in seeing the program usage statistics. Lowered data redundancy
In scenarios which demand media playback or system learning, the program may want to utilize the identical large dataset on a different program.
To reduce the data redundancy on disc along with the community, Android 11 enables the big datasets to get cached on apparatus using shared information blobs. Greater clarity on program procedure exit reasons
Android 11 has introduced a new attribute under which reports taking the factors for recent procedure terminations will be created. The program owners won't have the ability to assemble data around crash diagnostics in detail -- if a procedure was terminated due to memory problems, ANRs or other explanations.
Expediting incremental APK installment
Installing the big APKs on apparatus have a tendency to have quite a while, even when you made a little change. Seeing how program upgrades thing, Google has launched Incremental APK installment in Android 11. It hastens the process by installing a few of the APK required to launch the program while streaming the remaining information in the background. Greater aid for neural network programs Using its new Neural Networks API 1.3, Android is shooting efforts to generate your Machine Learning programs run easily on apparatus. It's time to deliver your AI project control procedure in line and create new use cases round the disruptive technologies.
An infrastructure to Profit from 5G
There are lots of advantages that 5G brings to mobile programs. Together with Android 11 now extending full support to the technologies, companies are now able to benefit from a larger streaming rate, quick file transfer, zero latency -- complete, improved user experience. Do Not Get Left Behind. Let Us Assist You. The period involving a brand new OS launch and also the time when firms begin preparing their program for the model is broad. And the businesses that wind up taking a great deal of time to receive their program prepared for another update often suffer with the outcome of cut-throat rivalry.
Our Android programmers have already begun perusing the Android 11 programmer preview record and experimentation around it on our evaluation software. This means, we'll be prepared to bring your program on Android 11 punctually of its launching.
Get in contact with our group of Android specialists to receive your aims of migrating your program on Android 11 shifting and reap the benefits of their very first mover advantage. However, before you do, get a quote of your android program development price
Author Bio:
Salman Ahmed is a Business Manager at Magneto IT Solutions – a Android application development company in Bahrain offers quality Iphone Application Development, Magento development,android app development, magento migration, mobile app development services. The company has experienced Laravel developers for hire at very affordable price. He is a firm believer in teamwork; for him, it is not just an idea, but also the team’s buy-in into the idea, that makes a campaign successful! He’s enthusiastic about all things marketing.
.
0 notes
Text
stellar infotech | HWINFOTECH
stellar infotech - At the moment, Laravel and Stellar Infotech are growing quickly in popularity. It is easy to see why, these platforms provide a fresh experience that is rich in features and has the ability to grow as your business grows. Laravel developer hourly rate is usually higher than Stellar Infotech and the rate can stay high or decline slightly after a certain point in time.Laravel developers are used to working with PHP applications and the knowledge and skills required to develop PHP applications and frameworks is usually needed to be a great developer. The more advanced PHP developers often choose to use the Lumen framework which provides them with great development tools and the ability to build a complete application with ease. But being an expert PHP developer doesn't mean you need to have to use Lumen.The Lumen framework was originally created for the Lumen CMS, the number one PHP development platform that is used by the majority of websites today. There are many popular open source frameworks available today, however, there is little difference between the major ones. In fact, Lumen is able to provide the same functionality, but comes with some advantages over the other open source PHP development platforms.The first advantage to using Lumen is the organization of code. Lumen makes it easy to maintain your code, because all of the "junk" code is centralized in a single repository. This makes it much easier to track down and fix errors as you add new features to your website.Another advantage to using Lumen is the ability to use PHP projects to create two different versions of your website at the same time. Another popular PHP framework called Phalcon is used to build a separate, developer-friendly version of your website. This version is easy to understand and is ideal for users who need a website that is more like a blog. These are the two most popular options for creating a PHP developer, however, there are also other options available.Lumen is able to automatically integrate with all the popular PHP frameworks. Because of this, it is possible to keep both your Lumen and Phalcon developers working together without any modifications to the code. This means that you can develop a website with two versions of your site available at the same time, using one programming language.Lumen also makes it easy to add the latest developments to your website. Each update to Lumen is released on a continuous basis, so you are always receiving the newest and greatest developments from the community. Another benefit to using Lumen is the easy management of your database, meaning that you can add, delete, and update all of your data easily from a single dashboard.The benefits of using Lumen are not limited to just your database, either. Other Laravel developer features include static pages, programming features, and blog functions. Adding and upgrading a theme is also easy thanks to the framework's capability to read themes.When using Lumen, you can make changes without having to learn another programming language. Your website is automatically updated with the most recent code. It is also compatible with other programming languages including JavaScript, Ajax, and PHP.While many of the popular PHP frameworks, including Lumen, are web-based, they also allow you to build PHP applications directly from within your website. By simply installing Lumen, it is possible to build web applications and themes on your own. The best part is that you can use your own code and customize it to fit your needs and also meet your design specifications.When building a new Lumen site, you will have full control over the way the template looks and feels. If you don't like the default template, you can edit it to suit your own needs. Creating Lumen sites means you can focus on making your websites instead of learning another programming language.When looking for Lumen developer jobs, try to remember that Lumen is one of the most advanced PHP development platforms available today. Whether you want to be an expert in designing and building blogs, or developing real-time web applications, Lumen will give you everything you need to be successful.
stellar infotech - https://www.hwinfotech.com/web-development-company-in-india/
For Free Demo and other Price regarding details visit https://www.hwinfotech.com/
I hope this article would help you but if you need any more explanation then feel free to ask me.
If you want more knowledge to build your own website or mobile application then visit my profile or visit https://www.hwinfotech.com/
If you like the article please follow me for more articles like these.
Thank you
For more info - [email protected]
0 notes
Text
Building An E-Commerce Site With October CMS And Shopaholic
About The Author
Leonardo Losoviz is a freelance developer and writer, with an ongoing quest to integrate innovative paradigms (Serverless PHP, server-side components, GraphQL) … More about Leonardo …
The Laravel-powered October CMS enables to extend the functionality of the application through the use of plugins. In this article, we will learn how to create an e-commerce site through one of October’s most popular plugins, Shopaholic.
October CMS is flourishing: With over 9000 stars in its GitHub repo, 2000 forks and 300 contributors, it is becoming a major force in the CMS space. It won the popular vote as the Best Flat-File CMS from 2018, new plugins are published on its marketplace almost daily (covering most of the developer needs), and its network of partners is expanding worldwide. Let’s see what it is all about.
Built in PHP and powered by Laravel (one of the most powerful and developer-friendly PHP frameworks), October CMS is a free open-source Content Management System (CMS). It benefits from Laravel’s clean code and sound architecture to provide a great developer experience, over which it adds simple and flexible CMS functionality to provide a great user experience. This combination makes it possible to launch new projects in a matter of minutes, without having to build the project from scratch. Due to all these features, October can minimize the costs of developing and maintaining websites, making it particularly valuable to businesses and digital agencies.
Yet, in spite of its power, October CMS is very easy to use. Since its inception, October has strived to be “as simple as possible, but not simpler”. For this reason, it is based on one of the simplest stacks for the web: PHP to render HTML, plus CSS and JS assets. In the words of its creators, October’s mission is to prove that “web development is not rocket science”.
In this article, we will do a tour around October CMS: We will first see how to install it, then check some of its coding and usability features in a bit more detail, and finally get our hands dirty implementing an e-commerce website through one of its most popular plugins, Shopaholic.
Recommended YouTube Channel
Are you looking to learn more about e-commerce development? You can do so with the help of live streams that explain the main aspects of the development process based on the Shopaholic platform for October CMS. Watch →
Installing October CMS
Since October CMS runs on PHP, it requires to have a web server running on the computer (if we don’t have one yet, MAMP can provide one for free, allowing to choose between Apache and Nginx, and it works for both Windows and macOS) and a MySQL server to store the database (which can also be provided by MAMP).
The installation through October’s wizard doesn’t take more than a few minutes: We create a new MySQL database, download and unpack the installer files to our target directory for the website (which must be granted writing permission, and which must be set as document root in the web server for the chosen domain, such as localhost), and then invoke the script file from the web browser. From that moment on the wizard takes over, guiding us through the installation process. The wizard will:
Validate if the web server satisfies all the requirements (at least PHP 7.0, and others):
System check (Large preview)
Ask for database and site configuration values, and user credentials:
Configuration (Large preview)
Ask how to set-up the site: From scratch, already installing a specific theme, or using our own existing project (from which our chosen theme and plugins can be automatically installed):
Initial setup (Large preview)
Next, we click on “Install!”, and in a few seconds (depending on our Internet connection speed) the website will be installed and ready to use:
Site installed (Large preview)
In this case, I chose to install it from scratch, under http://localhost. Browsing to this URL on the browser, we can encounter the October starter demo theme:
Browsing the starter demo theme (Large preview)
Navigating to http://localhost/backend (unless we changed this URL during the installation process) we can log into the administration panel:
Browsing the admin panel (Large preview)
Finally, we delete the installer files from the folder. And voilà, in just a few minutes we have a fully functioning site (well, we still need to enhance it with plugins… we will do that in a while).
Alternatively, we can also install October from the command-line interface, by executing:
$ curl -s https://octobercms.com/api/installer | php
This method is faster (it can take as little as 10 seconds to install) because it doesn’t require to input the database configuration. Hence, it is particularly useful for setting-up October CMS as a flat-file system, i.e. a CMS fully set-up through files stored in the local disk, and without a database.
Installing October CMS through the CLI takes no time. (Large preview)
Templating System
October CMS has a robust templating system to implement layouts, re-use chunks of code and enable dynamic functionality. Its most important elements are the following ones:
Pages are the most basic structure for storing content. These are readily available, since they are shipped as part of the core (blog posts, on the other hand, must be installed through a plugin). Pages are based on Twig, which is a modern template engine for PHP (devised by the creators of Symfony), and compiled to plain optimized PHP code, so they execute very fast.
Partials contain reusable chunks of code that can be used all throughout the website, as to avoid duplicating code on the different pages or layouts. They are particularly useful for navigation menus, testimonials, calls to action, and other common elements.
Layouts define the scaffolding, or structure, of the page. They define the <html> and <body> HTML elements, and are useful for creating the frame of the site, including the header, footer and sidebars. The actual content in the body is injected by the page.
Components are the mechanism to extend functionality in October CMS. Any page, partial or layout can have attached any number of components, which are most commonly provided through plugins, and which are fully configurable. In addition to rendering HTML code on the page, components can also provide services, such as form validation, security check-up, control of user permissions, or others.
Configuring a component attached to a page. (Large preview)
These elements are all implemented through files living in the website’s folder in the local hard drive. As such, it is possible to edit them not only through October CMS’ built-in editor, but also from the developer’s preferred text editor (Sublime, VS Code, PHPStorm, etc).
We can edit elements either through the October CMS’ built-in editor or in an external text editor. (Large preview)
Similarly, the October CMS project can be perfectly managed through any version control system, and it can be easily adapted to any existing workflows. For instance, a project can be set-up through continuous integration, deploying it automatically to the server after new code is pushed to the Git repo.
October can be easily managed with Git. (Large preview)
October CMS Marketplace
October CMS has a marketplace for themes (which allow to change the site’s look and feel) and plugins (which allow to extend the site’s functionalities), providing both free and paid offerings. By providing themes which can be used to quickly establish and then configure the design of the site, and plugins each of which implements some required functionality for the site, the marketplace ultimately leads to lower costs for creating our projects and reduced time to launch them.
The marketplace has been getting bigger! Following October’s growing popularity, its marketplace has received a constant stream of new offerings: It currently boasts 915 plugins, comprising most of the functionalities required for our websites (blogging, SEO Company, e-commerce, analytics, email, galleries, maps, security, social, user management, and others), and 150+ themes. Both themes and plugins can be submitted to the marketplace by any independent 3rd party developer, company or agency, and they must adhere to quality guidelines, which ensures that they are performant and secure.
Creating An E-Commerce Site Through Shopaholic
Let’s get our hands dirty and implement a real-life use case: An e-commerce website! For this, we will install Shopaholic, the most popular plugin to add e-commerce functionality to October CMS, and the free theme Bootstrap theme for Shopaholic to quickly bootstrap the site (which will be made to look like this demo site). Shopaholic is ideal for our needs because it provides a comprehensive e-commerce solution, which includes an ecosystem of extensions (both free and paid ones) to further enhance it. In addition, we can install the core experience for free and only make a one-time payment for the extensions that we need, which will be cheaper than using cloud solutions which have a recurring fee to use. And finally, because we are the full owners of our own on-premise e-commerce website, we can customize it as much as we need to and we own all the data, which is not possible with cloud solutions.
Because of the October marketplace dependency management system, we need only install the theme (the Shopaholic plugin is added as a dependency). Let’s proceed to install the theme then: Inside the October CMS admin, we click in the “Front-end theme” section in the Settings, and then click on “Find more themes”:
Front-end theme manager. (Large preview)
Then, we search for theme “Bootstrap theme for Shopaholic” and, upon clicking on the result in the dropdown, it will install the theme and all its dependencies. Once installed, we go back to the Front-end theme manager page and click on the Activate button on the new theme:
Activating the new theme. (Large preview)
After installing the theme and plugins, we will notice a new element “Catalog” on the top menu bar. Clicking on it, we can manage the items in our e-commerce catalog, namely products, categories and brands (these are the core elements; other elements, such as coupons, can be added through extensions). Initially, our catalog will be empty:
Catalog comprising products, categories and brands. (Large preview)
Let’s fill it up with some data. We can either create the items one by one or, quite conveniently, import data through CSV and XML files (which allows us to manage a large set of records with Excel or other tools). In our case, since we are creating a demo site for testing purposes, let’s install plugin Fake Data for Shopaholic which provides large sets of mock data and an easy way to import these records to the system. To do this, follow these steps:
Head to Settings => Updates & Plugins in October CMS backend, and install plugin “Fake Data for Shopaholic”.
Head to Dashboard, and click on Manage widgets and then Add widget.
Select widget “Fake data for Shopaholic”, and click on Add.
In the newly added widget, clicking on Generate under section “Generate fake data ” will run the process to import the fake data.
The last step will ask how many times should the insertion be repeated (as to create bulk and be able to test the performance of the site when loading many records) and which data set (clothes or sneakers):
Generating fake data through Laravel’s artisan command. (Large preview)
After running this process, our catalog will look better stocked:
Catalog with some mock data. (Large preview)
The next step is to create some promotions. To do this, we click on Promotions on the top menu, then on the Create button, and fill the required information. Once each promotion is created, we must edit it again to add products to it. After creating a few of them, our promotion list will look like this:
Creating some promotions. (Large preview)
Now that we have some data, we can finish customizing how our front page will look like. For that, we go to section Settings => Front-end theme => Customize and we complete the information for all tabs (Header, Footer, Social, Main slider, Index page). Once this is ready, our e-commerce site will now be ready:
Our e-commerce site is ready! (Large preview)
Clicking on a product, we can see how its page looks like:
Product page. (Large preview)
Auditing The Speed And Reliability Of The E-Commerce Solution
Because we want to sell our products, speed and a good SEO Company are mandatory, so let’s make an audit using Google Chrome’s Lighthouse on the product page to make sure it runs fast and that it will score high with search engines. Running the audit against the live demo site, it returns the following report:
Lighthouse report of the product page. (Large preview)
Equally important is that the site can withstand heavy load, so that if our product becomes successful and attracts plenty of traffic the server doesn’t crash. For this, we can use the Load Impact tool to run a load test. Running the test using 50 virtual users for 12 minutes against the live demo site (which is hosted on DigitalOcean with a droplet configuration of Standard 2CPU/4 GB RAM) produced the following results:
LoadImpact report of a test load using 50 virtual users during 12 minutes. (Large preview)
As can be seen, the website was able to sustain an acceptable response time throughout the load test, giving us the confidence that we can trust the e-commerce plugin when we need it the most: When it’s time to sell the product.
Finally, we can also feel confident of the reliability of the software, since it is covered by unit tests.
Adding Extensions To Shopaholic
So far so good. However, as it can be seen on the screenshots from our website, there is still no way for the visitor to buy a product. Let’s add this functionality by installing the following free extensions for Shopaholic: Orders, to allow to add products to a cart and make orders, and Omnipay, to process the payment. (For the other Shopaholic extensions, if they are not free and authored by LOVATA, you can use coupon “WELCOME” to get a 50% discount the first time you buy them.) To install these extensions, we head to Settings => Updates & Plugins, search for the plugin names, and click on the results to have them installed.
Searching for ‘Shopaholic’ displays its plugins. (Large preview)
Once installed, we will see a new item Orders in the top navigation, where all orders will be stored, and items Payment methods and Shipping types in the Settings page, to configure the payment gateways (card, cash, etc) and how to deliver the product (by post, etc). We configure these and load again the product page. Now it shows an “Add to cart” button, allowing the user to place an order:
Product page with cart enabled. (Large preview)
After adding several items to the cart, we can proceed to the check-out and complete the order:
Completing the order. (Large preview)
Once the user submits the order, the inventory will be automatically taken care of, updating the number of items for each product in stock, and we will receive an email informing us of the new order (if configured to do so). In section Orders on the admin panel, we can find all the information for the order (products sold, buyer information, method of payment and total, and others), and we can complete the transaction.
All the information from the order is here. (Large preview)
The basic work is done: In barely a few hours we managed to have a fully functional e-commerce sith with October CMS and Shopaholic.
Creating Our Own Extension
If none of the several extensions to Shopaholic on the October marketplace provides the functionality needed, we can also create our own extensions.
To do this, if you are comfortable with Object-Oriented Programming and PHP and, more specifically, with Laravel, then you are ready to do it. The documentation explains how to add an extension, step by step. For instance, following this tutorial, with barely a few lines of code we can add a custom field “rating” to our products:
Adding a custom field to the product. (Large preview)
We can then retrieve the new “rating” field from the product and display it in the product template:
Displaying a custom field in the product page. (Large preview)
Extending Shopaholic is not difficult and enables us to fully implement our own e-commerce requirements, and personalize the site to suit our brand.
Conclusion
October CMS is a great candidate for building powerful sites in a very simple manner (showing that “web development is not rocket science”). It delivers the great developer experience granted by Laravel, and its marketplace (which is growing daily) provides a large number of ready-to-use themes and plugins, allowing us to build websites very quickly. One such plugin is Shopaholic, which converts the site into a full-fledged e-commerce platform.
Because of these reasons, building a site with October can be very cost-effective. As a result, it has gained some reputation (by winning the popular vote as best flat-file CMS from 2018) and has increasingly become a tool of choice for businesses and digital agencies crafting sites for their clients.
To find out more from the October community, be welcome to join the October CMS Slack workspace, which is where the creators of themes and plugins published in the marketplace hang out, so you can conveniently chat with them to get their help and advice.
Give October a try (it’s free!), and let us know how it goes.
(ra, yk, il)
Website Design & SEO Delray Beach by DBL07.co
Delray Beach SEO
source http://www.scpie.org/building-an-e-commerce-site-with-october-cms-and-shopaholic/ source https://scpie.tumblr.com/post/612281391220162560
0 notes
Text
Building An E-Commerce Site With October CMS And Shopaholic
About The Author
Leonardo Losoviz is a freelance developer and writer, with an ongoing quest to integrate innovative paradigms (Serverless PHP, server-side components, GraphQL) … More about Leonardo …
The Laravel-powered October CMS enables to extend the functionality of the application through the use of plugins. In this article, we will learn how to create an e-commerce site through one of October’s most popular plugins, Shopaholic.
October CMS is flourishing: With over 9000 stars in its GitHub repo, 2000 forks and 300 contributors, it is becoming a major force in the CMS space. It won the popular vote as the Best Flat-File CMS from 2018, new plugins are published on its marketplace almost daily (covering most of the developer needs), and its network of partners is expanding worldwide. Let’s see what it is all about.
Built in PHP and powered by Laravel (one of the most powerful and developer-friendly PHP frameworks), October CMS is a free open-source Content Management System (CMS). It benefits from Laravel’s clean code and sound architecture to provide a great developer experience, over which it adds simple and flexible CMS functionality to provide a great user experience. This combination makes it possible to launch new projects in a matter of minutes, without having to build the project from scratch. Due to all these features, October can minimize the costs of developing and maintaining websites, making it particularly valuable to businesses and digital agencies.
Yet, in spite of its power, October CMS is very easy to use. Since its inception, October has strived to be “as simple as possible, but not simpler”. For this reason, it is based on one of the simplest stacks for the web: PHP to render HTML, plus CSS and JS assets. In the words of its creators, October’s mission is to prove that “web development is not rocket science”.
In this article, we will do a tour around October CMS: We will first see how to install it, then check some of its coding and usability features in a bit more detail, and finally get our hands dirty implementing an e-commerce website through one of its most popular plugins, Shopaholic.
Recommended YouTube Channel
Are you looking to learn more about e-commerce development? You can do so with the help of live streams that explain the main aspects of the development process based on the Shopaholic platform for October CMS. Watch →
Installing October CMS
Since October CMS runs on PHP, it requires to have a web server running on the computer (if we don’t have one yet, MAMP can provide one for free, allowing to choose between Apache and Nginx, and it works for both Windows and macOS) and a MySQL server to store the database (which can also be provided by MAMP).
The installation through October’s wizard doesn’t take more than a few minutes: We create a new MySQL database, download and unpack the installer files to our target directory for the website (which must be granted writing permission, and which must be set as document root in the web server for the chosen domain, such as localhost), and then invoke the script file from the web browser. From that moment on the wizard takes over, guiding us through the installation process. The wizard will:
Validate if the web server satisfies all the requirements (at least PHP 7.0, and others):
System check (Large preview)
Ask for database and site configuration values, and user credentials:
Configuration (Large preview)
Ask how to set-up the site: From scratch, already installing a specific theme, or using our own existing project (from which our chosen theme and plugins can be automatically installed):
Initial setup (Large preview)
Next, we click on “Install!”, and in a few seconds (depending on our Internet connection speed) the website will be installed and ready to use:
Site installed (Large preview)
In this case, I chose to install it from scratch, under http://localhost. Browsing to this URL on the browser, we can encounter the October starter demo theme:
Browsing the starter demo theme (Large preview)
Navigating to http://localhost/backend (unless we changed this URL during the installation process) we can log into the administration panel:
Browsing the admin panel (Large preview)
Finally, we delete the installer files from the folder. And voilà, in just a few minutes we have a fully functioning site (well, we still need to enhance it with plugins… we will do that in a while).
Alternatively, we can also install October from the command-line interface, by executing:
$ curl -s https://octobercms.com/api/installer | php
This method is faster (it can take as little as 10 seconds to install) because it doesn’t require to input the database configuration. Hence, it is particularly useful for setting-up October CMS as a flat-file system, i.e. a CMS fully set-up through files stored in the local disk, and without a database.
Installing October CMS through the CLI takes no time. (Large preview)
Templating System
October CMS has a robust templating system to implement layouts, re-use chunks of code and enable dynamic functionality. Its most important elements are the following ones:
Pages are the most basic structure for storing content. These are readily available, since they are shipped as part of the core (blog posts, on the other hand, must be installed through a plugin). Pages are based on Twig, which is a modern template engine for PHP (devised by the creators of Symfony), and compiled to plain optimized PHP code, so they execute very fast.
Partials contain reusable chunks of code that can be used all throughout the website, as to avoid duplicating code on the different pages or layouts. They are particularly useful for navigation menus, testimonials, calls to action, and other common elements.
Layouts define the scaffolding, or structure, of the page. They define the <html> and <body> HTML elements, and are useful for creating the frame of the site, including the header, footer and sidebars. The actual content in the body is injected by the page.
Components are the mechanism to extend functionality in October CMS. Any page, partial or layout can have attached any number of components, which are most commonly provided through plugins, and which are fully configurable. In addition to rendering HTML code on the page, components can also provide services, such as form validation, security check-up, control of user permissions, or others.
Configuring a component attached to a page. (Large preview)
These elements are all implemented through files living in the website’s folder in the local hard drive. As such, it is possible to edit them not only through October CMS’ built-in editor, but also from the developer’s preferred text editor (Sublime, VS Code, PHPStorm, etc).
We can edit elements either through the October CMS’ built-in editor or in an external text editor. (Large preview)
Similarly, the October CMS project can be perfectly managed through any version control system, and it can be easily adapted to any existing workflows. For instance, a project can be set-up through continuous integration, deploying it automatically to the server after new code is pushed to the Git repo.
October can be easily managed with Git. (Large preview)
October CMS Marketplace
October CMS has a marketplace for themes (which allow to change the site’s look and feel) and plugins (which allow to extend the site’s functionalities), providing both free and paid offerings. By providing themes which can be used to quickly establish and then configure the design of the site, and plugins each of which implements some required functionality for the site, the marketplace ultimately leads to lower costs for creating our projects and reduced time to launch them.
The marketplace has been getting bigger! Following October’s growing popularity, its marketplace has received a constant stream of new offerings: It currently boasts 915 plugins, comprising most of the functionalities required for our websites (blogging, SEO Company, e-commerce, analytics, email, galleries, maps, security, social, user management, and others), and 150+ themes. Both themes and plugins can be submitted to the marketplace by any independent 3rd party developer, company or agency, and they must adhere to quality guidelines, which ensures that they are performant and secure.
Creating An E-Commerce Site Through Shopaholic
Let’s get our hands dirty and implement a real-life use case: An e-commerce website! For this, we will install Shopaholic, the most popular plugin to add e-commerce functionality to October CMS, and the free theme Bootstrap theme for Shopaholic to quickly bootstrap the site (which will be made to look like this demo site). Shopaholic is ideal for our needs because it provides a comprehensive e-commerce solution, which includes an ecosystem of extensions (both free and paid ones) to further enhance it. In addition, we can install the core experience for free and only make a one-time payment for the extensions that we need, which will be cheaper than using cloud solutions which have a recurring fee to use. And finally, because we are the full owners of our own on-premise e-commerce website, we can customize it as much as we need to and we own all the data, which is not possible with cloud solutions.
Because of the October marketplace dependency management system, we need only install the theme (the Shopaholic plugin is added as a dependency). Let’s proceed to install the theme then: Inside the October CMS admin, we click in the “Front-end theme” section in the Settings, and then click on “Find more themes”:
Front-end theme manager. (Large preview)
Then, we search for theme “Bootstrap theme for Shopaholic” and, upon clicking on the result in the dropdown, it will install the theme and all its dependencies. Once installed, we go back to the Front-end theme manager page and click on the Activate button on the new theme:
Activating the new theme. (Large preview)
After installing the theme and plugins, we will notice a new element “Catalog” on the top menu bar. Clicking on it, we can manage the items in our e-commerce catalog, namely products, categories and brands (these are the core elements; other elements, such as coupons, can be added through extensions). Initially, our catalog will be empty:
Catalog comprising products, categories and brands. (Large preview)
Let’s fill it up with some data. We can either create the items one by one or, quite conveniently, import data through CSV and XML files (which allows us to manage a large set of records with Excel or other tools). In our case, since we are creating a demo site for testing purposes, let’s install plugin Fake Data for Shopaholic which provides large sets of mock data and an easy way to import these records to the system. To do this, follow these steps:
Head to Settings => Updates & Plugins in October CMS backend, and install plugin “Fake Data for Shopaholic”.
Head to Dashboard, and click on Manage widgets and then Add widget.
Select widget “Fake data for Shopaholic”, and click on Add.
In the newly added widget, clicking on Generate under section “Generate fake data ” will run the process to import the fake data.
The last step will ask how many times should the insertion be repeated (as to create bulk and be able to test the performance of the site when loading many records) and which data set (clothes or sneakers):
Generating fake data through Laravel’s artisan command. (Large preview)
After running this process, our catalog will look better stocked:
Catalog with some mock data. (Large preview)
The next step is to create some promotions. To do this, we click on Promotions on the top menu, then on the Create button, and fill the required information. Once each promotion is created, we must edit it again to add products to it. After creating a few of them, our promotion list will look like this:
Creating some promotions. (Large preview)
Now that we have some data, we can finish customizing how our front page will look like. For that, we go to section Settings => Front-end theme => Customize and we complete the information for all tabs (Header, Footer, Social, Main slider, Index page). Once this is ready, our e-commerce site will now be ready:
Our e-commerce site is ready! (Large preview)
Clicking on a product, we can see how its page looks like:
Product page. (Large preview)
Auditing The Speed And Reliability Of The E-Commerce Solution
Because we want to sell our products, speed and a good SEO Company are mandatory, so let’s make an audit using Google Chrome’s Lighthouse on the product page to make sure it runs fast and that it will score high with search engines. Running the audit against the live demo site, it returns the following report:
Lighthouse report of the product page. (Large preview)
Equally important is that the site can withstand heavy load, so that if our product becomes successful and attracts plenty of traffic the server doesn’t crash. For this, we can use the Load Impact tool to run a load test. Running the test using 50 virtual users for 12 minutes against the live demo site (which is hosted on DigitalOcean with a droplet configuration of Standard 2CPU/4 GB RAM) produced the following results:
LoadImpact report of a test load using 50 virtual users during 12 minutes. (Large preview)
As can be seen, the website was able to sustain an acceptable response time throughout the load test, giving us the confidence that we can trust the e-commerce plugin when we need it the most: When it’s time to sell the product.
Finally, we can also feel confident of the reliability of the software, since it is covered by unit tests.
Adding Extensions To Shopaholic
So far so good. However, as it can be seen on the screenshots from our website, there is still no way for the visitor to buy a product. Let’s add this functionality by installing the following free extensions for Shopaholic: Orders, to allow to add products to a cart and make orders, and Omnipay, to process the payment. (For the other Shopaholic extensions, if they are not free and authored by LOVATA, you can use coupon “WELCOME” to get a 50% discount the first time you buy them.) To install these extensions, we head to Settings => Updates & Plugins, search for the plugin names, and click on the results to have them installed.
Searching for ‘Shopaholic’ displays its plugins. (Large preview)
Once installed, we will see a new item Orders in the top navigation, where all orders will be stored, and items Payment methods and Shipping types in the Settings page, to configure the payment gateways (card, cash, etc) and how to deliver the product (by post, etc). We configure these and load again the product page. Now it shows an “Add to cart” button, allowing the user to place an order:
Product page with cart enabled. (Large preview)
After adding several items to the cart, we can proceed to the check-out and complete the order:
Completing the order. (Large preview)
Once the user submits the order, the inventory will be automatically taken care of, updating the number of items for each product in stock, and we will receive an email informing us of the new order (if configured to do so). In section Orders on the admin panel, we can find all the information for the order (products sold, buyer information, method of payment and total, and others), and we can complete the transaction.
All the information from the order is here. (Large preview)
The basic work is done: In barely a few hours we managed to have a fully functional e-commerce sith with October CMS and Shopaholic.
Creating Our Own Extension
If none of the several extensions to Shopaholic on the October marketplace provides the functionality needed, we can also create our own extensions.
To do this, if you are comfortable with Object-Oriented Programming and PHP and, more specifically, with Laravel, then you are ready to do it. The documentation explains how to add an extension, step by step. For instance, following this tutorial, with barely a few lines of code we can add a custom field “rating” to our products:
Adding a custom field to the product. (Large preview)
We can then retrieve the new “rating” field from the product and display it in the product template:
Displaying a custom field in the product page. (Large preview)
Extending Shopaholic is not difficult and enables us to fully implement our own e-commerce requirements, and personalize the site to suit our brand.
Conclusion
October CMS is a great candidate for building powerful sites in a very simple manner (showing that “web development is not rocket science”). It delivers the great developer experience granted by Laravel, and its marketplace (which is growing daily) provides a large number of ready-to-use themes and plugins, allowing us to build websites very quickly. One such plugin is Shopaholic, which converts the site into a full-fledged e-commerce platform.
Because of these reasons, building a site with October can be very cost-effective. As a result, it has gained some reputation (by winning the popular vote as best flat-file CMS from 2018) and has increasingly become a tool of choice for businesses and digital agencies crafting sites for their clients.
To find out more from the October community, be welcome to join the October CMS Slack workspace, which is where the creators of themes and plugins published in the marketplace hang out, so you can conveniently chat with them to get their help and advice.
Give October a try (it’s free!), and let us know how it goes.
(ra, yk, il)
Website Design & SEO Delray Beach by DBL07.co
Delray Beach SEO
source http://www.scpie.org/building-an-e-commerce-site-with-october-cms-and-shopaholic/
0 notes
Text
Building An E-Commerce Site With October CMS And Shopaholic
About The Author
Leonardo Losoviz is a freelance developer and writer, with an ongoing quest to integrate innovative paradigms (Serverless PHP, server-side components, GraphQL) … More about Leonardo …
The Laravel-powered October CMS enables to extend the functionality of the application through the use of plugins. In this article, we will learn how to create an e-commerce site through one of October’s most popular plugins, Shopaholic.
October CMS is flourishing: With over 9000 stars in its GitHub repo, 2000 forks and 300 contributors, it is becoming a major force in the CMS space. It won the popular vote as the Best Flat-File CMS from 2018, new plugins are published on its marketplace almost daily (covering most of the developer needs), and its network of partners is expanding worldwide. Let’s see what it is all about.
Built in PHP and powered by Laravel (one of the most powerful and developer-friendly PHP frameworks), October CMS is a free open-source Content Management System (CMS). It benefits from Laravel’s clean code and sound architecture to provide a great developer experience, over which it adds simple and flexible CMS functionality to provide a great user experience. This combination makes it possible to launch new projects in a matter of minutes, without having to build the project from scratch. Due to all these features, October can minimize the costs of developing and maintaining websites, making it particularly valuable to businesses and digital agencies.
Yet, in spite of its power, October CMS is very easy to use. Since its inception, October has strived to be “as simple as possible, but not simpler”. For this reason, it is based on one of the simplest stacks for the web: PHP to render HTML, plus CSS and JS assets. In the words of its creators, October’s mission is to prove that “web development is not rocket science”.
In this article, we will do a tour around October CMS: We will first see how to install it, then check some of its coding and usability features in a bit more detail, and finally get our hands dirty implementing an e-commerce website through one of its most popular plugins, Shopaholic.
Recommended YouTube Channel
Are you looking to learn more about e-commerce development? You can do so with the help of live streams that explain the main aspects of the development process based on the Shopaholic platform for October CMS. Watch →
Installing October CMS
Since October CMS runs on PHP, it requires to have a web server running on the computer (if we don’t have one yet, MAMP can provide one for free, allowing to choose between Apache and Nginx, and it works for both Windows and macOS) and a MySQL server to store the database (which can also be provided by MAMP).
The installation through October’s wizard doesn’t take more than a few minutes: We create a new MySQL database, download and unpack the installer files to our target directory for the website (which must be granted writing permission, and which must be set as document root in the web server for the chosen domain, such as localhost), and then invoke the script file from the web browser. From that moment on the wizard takes over, guiding us through the installation process. The wizard will:
Validate if the web server satisfies all the requirements (at least PHP 7.0, and others):
System check (Large preview)
Ask for database and site configuration values, and user credentials:
Configuration (Large preview)
Ask how to set-up the site: From scratch, already installing a specific theme, or using our own existing project (from which our chosen theme and plugins can be automatically installed):
Initial setup (Large preview)
Next, we click on “Install!”, and in a few seconds (depending on our Internet connection speed) the website will be installed and ready to use:
Site installed (Large preview)
In this case, I chose to install it from scratch, under http://localhost. Browsing to this URL on the browser, we can encounter the October starter demo theme:
Browsing the starter demo theme (Large preview)
Navigating to http://localhost/backend (unless we changed this URL during the installation process) we can log into the administration panel:
Browsing the admin panel (Large preview)
Finally, we delete the installer files from the folder. And voilà, in just a few minutes we have a fully functioning site (well, we still need to enhance it with plugins… we will do that in a while).
Alternatively, we can also install October from the command-line interface, by executing:
$ curl -s https://octobercms.com/api/installer | php
This method is faster (it can take as little as 10 seconds to install) because it doesn’t require to input the database configuration. Hence, it is particularly useful for setting-up October CMS as a flat-file system, i.e. a CMS fully set-up through files stored in the local disk, and without a database.
Installing October CMS through the CLI takes no time. (Large preview)
Templating System
October CMS has a robust templating system to implement layouts, re-use chunks of code and enable dynamic functionality. Its most important elements are the following ones:
Pages are the most basic structure for storing content. These are readily available, since they are shipped as part of the core (blog posts, on the other hand, must be installed through a plugin). Pages are based on Twig, which is a modern template engine for PHP (devised by the creators of Symfony), and compiled to plain optimized PHP code, so they execute very fast.
Partials contain reusable chunks of code that can be used all throughout the website, as to avoid duplicating code on the different pages or layouts. They are particularly useful for navigation menus, testimonials, calls to action, and other common elements.
Layouts define the scaffolding, or structure, of the page. They define the <html> and <body> HTML elements, and are useful for creating the frame of the site, including the header, footer and sidebars. The actual content in the body is injected by the page.
Components are the mechanism to extend functionality in October CMS. Any page, partial or layout can have attached any number of components, which are most commonly provided through plugins, and which are fully configurable. In addition to rendering HTML code on the page, components can also provide services, such as form validation, security check-up, control of user permissions, or others.
Configuring a component attached to a page. (Large preview)
These elements are all implemented through files living in the website’s folder in the local hard drive. As such, it is possible to edit them not only through October CMS’ built-in editor, but also from the developer’s preferred text editor (Sublime, VS Code, PHPStorm, etc).
We can edit elements either through the October CMS’ built-in editor or in an external text editor. (Large preview)
Similarly, the October CMS project can be perfectly managed through any version control system, and it can be easily adapted to any existing workflows. For instance, a project can be set-up through continuous integration, deploying it automatically to the server after new code is pushed to the Git repo.
October can be easily managed with Git. (Large preview)
October CMS Marketplace
October CMS has a marketplace for themes (which allow to change the site’s look and feel) and plugins (which allow to extend the site’s functionalities), providing both free and paid offerings. By providing themes which can be used to quickly establish and then configure the design of the site, and plugins each of which implements some required functionality for the site, the marketplace ultimately leads to lower costs for creating our projects and reduced time to launch them.
The marketplace has been getting bigger! Following October’s growing popularity, its marketplace has received a constant stream of new offerings: It currently boasts 915 plugins, comprising most of the functionalities required for our websites (blogging, SEO Company, e-commerce, analytics, email, galleries, maps, security, social, user management, and others), and 150+ themes. Both themes and plugins can be submitted to the marketplace by any independent 3rd party developer, company or agency, and they must adhere to quality guidelines, which ensures that they are performant and secure.
Creating An E-Commerce Site Through Shopaholic
Let’s get our hands dirty and implement a real-life use case: An e-commerce website! For this, we will install Shopaholic, the most popular plugin to add e-commerce functionality to October CMS, and the free theme Bootstrap theme for Shopaholic to quickly bootstrap the site (which will be made to look like this demo site). Shopaholic is ideal for our needs because it provides a comprehensive e-commerce solution, which includes an ecosystem of extensions (both free and paid ones) to further enhance it. In addition, we can install the core experience for free and only make a one-time payment for the extensions that we need, which will be cheaper than using cloud solutions which have a recurring fee to use. And finally, because we are the full owners of our own on-premise e-commerce website, we can customize it as much as we need to and we own all the data, which is not possible with cloud solutions.
Because of the October marketplace dependency management system, we need only install the theme (the Shopaholic plugin is added as a dependency). Let’s proceed to install the theme then: Inside the October CMS admin, we click in the “Front-end theme” section in the Settings, and then click on “Find more themes”:
Front-end theme manager. (Large preview)
Then, we search for theme “Bootstrap theme for Shopaholic” and, upon clicking on the result in the dropdown, it will install the theme and all its dependencies. Once installed, we go back to the Front-end theme manager page and click on the Activate button on the new theme:
Activating the new theme. (Large preview)
After installing the theme and plugins, we will notice a new element “Catalog” on the top menu bar. Clicking on it, we can manage the items in our e-commerce catalog, namely products, categories and brands (these are the core elements; other elements, such as coupons, can be added through extensions). Initially, our catalog will be empty:
Catalog comprising products, categories and brands. (Large preview)
Let’s fill it up with some data. We can either create the items one by one or, quite conveniently, import data through CSV and XML files (which allows us to manage a large set of records with Excel or other tools). In our case, since we are creating a demo site for testing purposes, let’s install plugin Fake Data for Shopaholic which provides large sets of mock data and an easy way to import these records to the system. To do this, follow these steps:
Head to Settings => Updates & Plugins in October CMS backend, and install plugin “Fake Data for Shopaholic”.
Head to Dashboard, and click on Manage widgets and then Add widget.
Select widget “Fake data for Shopaholic”, and click on Add.
In the newly added widget, clicking on Generate under section “Generate fake data ” will run the process to import the fake data.
The last step will ask how many times should the insertion be repeated (as to create bulk and be able to test the performance of the site when loading many records) and which data set (clothes or sneakers):
Generating fake data through Laravel’s artisan command. (Large preview)
After running this process, our catalog will look better stocked:
Catalog with some mock data. (Large preview)
The next step is to create some promotions. To do this, we click on Promotions on the top menu, then on the Create button, and fill the required information. Once each promotion is created, we must edit it again to add products to it. After creating a few of them, our promotion list will look like this:
Creating some promotions. (Large preview)
Now that we have some data, we can finish customizing how our front page will look like. For that, we go to section Settings => Front-end theme => Customize and we complete the information for all tabs (Header, Footer, Social, Main slider, Index page). Once this is ready, our e-commerce site will now be ready:
Our e-commerce site is ready! (Large preview)
Clicking on a product, we can see how its page looks like:
Product page. (Large preview)
Auditing The Speed And Reliability Of The E-Commerce Solution
Because we want to sell our products, speed and a good SEO Company are mandatory, so let’s make an audit using Google Chrome’s Lighthouse on the product page to make sure it runs fast and that it will score high with search engines. Running the audit against the live demo site, it returns the following report:
Lighthouse report of the product page. (Large preview)
Equally important is that the site can withstand heavy load, so that if our product becomes successful and attracts plenty of traffic the server doesn’t crash. For this, we can use the Load Impact tool to run a load test. Running the test using 50 virtual users for 12 minutes against the live demo site (which is hosted on DigitalOcean with a droplet configuration of Standard 2CPU/4 GB RAM) produced the following results:
LoadImpact report of a test load using 50 virtual users during 12 minutes. (Large preview)
As can be seen, the website was able to sustain an acceptable response time throughout the load test, giving us the confidence that we can trust the e-commerce plugin when we need it the most: When it’s time to sell the product.
Finally, we can also feel confident of the reliability of the software, since it is covered by unit tests.
Adding Extensions To Shopaholic
So far so good. However, as it can be seen on the screenshots from our website, there is still no way for the visitor to buy a product. Let’s add this functionality by installing the following free extensions for Shopaholic: Orders, to allow to add products to a cart and make orders, and Omnipay, to process the payment. (For the other Shopaholic extensions, if they are not free and authored by LOVATA, you can use coupon “WELCOME” to get a 50% discount the first time you buy them.) To install these extensions, we head to Settings => Updates & Plugins, search for the plugin names, and click on the results to have them installed.
Searching for ‘Shopaholic’ displays its plugins. (Large preview)
Once installed, we will see a new item Orders in the top navigation, where all orders will be stored, and items Payment methods and Shipping types in the Settings page, to configure the payment gateways (card, cash, etc) and how to deliver the product (by post, etc). We configure these and load again the product page. Now it shows an “Add to cart” button, allowing the user to place an order:
Product page with cart enabled. (Large preview)
After adding several items to the cart, we can proceed to the check-out and complete the order:
Completing the order. (Large preview)
Once the user submits the order, the inventory will be automatically taken care of, updating the number of items for each product in stock, and we will receive an email informing us of the new order (if configured to do so). In section Orders on the admin panel, we can find all the information for the order (products sold, buyer information, method of payment and total, and others), and we can complete the transaction.
All the information from the order is here. (Large preview)
The basic work is done: In barely a few hours we managed to have a fully functional e-commerce sith with October CMS and Shopaholic.
Creating Our Own Extension
If none of the several extensions to Shopaholic on the October marketplace provides the functionality needed, we can also create our own extensions.
To do this, if you are comfortable with Object-Oriented Programming and PHP and, more specifically, with Laravel, then you are ready to do it. The documentation explains how to add an extension, step by step. For instance, following this tutorial, with barely a few lines of code we can add a custom field “rating” to our products:
Adding a custom field to the product. (Large preview)
We can then retrieve the new “rating” field from the product and display it in the product template:
Displaying a custom field in the product page. (Large preview)
Extending Shopaholic is not difficult and enables us to fully implement our own e-commerce requirements, and personalize the site to suit our brand.
Conclusion
October CMS is a great candidate for building powerful sites in a very simple manner (showing that “web development is not rocket science”). It delivers the great developer experience granted by Laravel, and its marketplace (which is growing daily) provides a large number of ready-to-use themes and plugins, allowing us to build websites very quickly. One such plugin is Shopaholic, which converts the site into a full-fledged e-commerce platform.
Because of these reasons, building a site with October can be very cost-effective. As a result, it has gained some reputation (by winning the popular vote as best flat-file CMS from 2018) and has increasingly become a tool of choice for businesses and digital agencies crafting sites for their clients.
To find out more from the October community, be welcome to join the October CMS Slack workspace, which is where the creators of themes and plugins published in the marketplace hang out, so you can conveniently chat with them to get their help and advice.
Give October a try (it’s free!), and let us know how it goes.
(ra, yk, il)
Website Design & SEO Delray Beach by DBL07.co
Delray Beach SEO
source http://www.scpie.org/building-an-e-commerce-site-with-october-cms-and-shopaholic/ source https://scpie1.blogspot.com/2020/03/building-e-commerce-site-with-october.html
0 notes
Text
Building An E-Commerce Site With October CMS And Shopaholic
About The Author
Leonardo Losoviz is a freelance developer and writer, with an ongoing quest to integrate innovative paradigms (Serverless PHP, server-side components, GraphQL) … More about Leonardo …
The Laravel-powered October CMS enables to extend the functionality of the application through the use of plugins. In this article, we will learn how to create an e-commerce site through one of October’s most popular plugins, Shopaholic.
October CMS is flourishing: With over 9000 stars in its GitHub repo, 2000 forks and 300 contributors, it is becoming a major force in the CMS space. It won the popular vote as the Best Flat-File CMS from 2018, new plugins are published on its marketplace almost daily (covering most of the developer needs), and its network of partners is expanding worldwide. Let’s see what it is all about.
Built in PHP and powered by Laravel (one of the most powerful and developer-friendly PHP frameworks), October CMS is a free open-source Content Management System (CMS). It benefits from Laravel’s clean code and sound architecture to provide a great developer experience, over which it adds simple and flexible CMS functionality to provide a great user experience. This combination makes it possible to launch new projects in a matter of minutes, without having to build the project from scratch. Due to all these features, October can minimize the costs of developing and maintaining websites, making it particularly valuable to businesses and digital agencies.
Yet, in spite of its power, October CMS is very easy to use. Since its inception, October has strived to be “as simple as possible, but not simpler”. For this reason, it is based on one of the simplest stacks for the web: PHP to render HTML, plus CSS and JS assets. In the words of its creators, October’s mission is to prove that “web development is not rocket science”.
In this article, we will do a tour around October CMS: We will first see how to install it, then check some of its coding and usability features in a bit more detail, and finally get our hands dirty implementing an e-commerce website through one of its most popular plugins, Shopaholic.
Recommended YouTube Channel
Are you looking to learn more about e-commerce development? You can do so with the help of live streams that explain the main aspects of the development process based on the Shopaholic platform for October CMS. Watch →
Installing October CMS
Since October CMS runs on PHP, it requires to have a web server running on the computer (if we don’t have one yet, MAMP can provide one for free, allowing to choose between Apache and Nginx, and it works for both Windows and macOS) and a MySQL server to store the database (which can also be provided by MAMP).
The installation through October’s wizard doesn’t take more than a few minutes: We create a new MySQL database, download and unpack the installer files to our target directory for the website (which must be granted writing permission, and which must be set as document root in the web server for the chosen domain, such as localhost), and then invoke the script file from the web browser. From that moment on the wizard takes over, guiding us through the installation process. The wizard will:
Validate if the web server satisfies all the requirements (at least PHP 7.0, and others):
System check (Large preview)
Ask for database and site configuration values, and user credentials:
Configuration (Large preview)
Ask how to set-up the site: From scratch, already installing a specific theme, or using our own existing project (from which our chosen theme and plugins can be automatically installed):
Initial setup (Large preview)
Next, we click on “Install!”, and in a few seconds (depending on our Internet connection speed) the website will be installed and ready to use:
Site installed (Large preview)
In this case, I chose to install it from scratch, under http://localhost. Browsing to this URL on the browser, we can encounter the October starter demo theme:
Browsing the starter demo theme (Large preview)
Navigating to http://localhost/backend (unless we changed this URL during the installation process) we can log into the administration panel:
Browsing the admin panel (Large preview)
Finally, we delete the installer files from the folder. And voilà, in just a few minutes we have a fully functioning site (well, we still need to enhance it with plugins… we will do that in a while).
Alternatively, we can also install October from the command-line interface, by executing:
$ curl -s https://octobercms.com/api/installer | php
This method is faster (it can take as little as 10 seconds to install) because it doesn’t require to input the database configuration. Hence, it is particularly useful for setting-up October CMS as a flat-file system, i.e. a CMS fully set-up through files stored in the local disk, and without a database.
Installing October CMS through the CLI takes no time. (Large preview)
Templating System
October CMS has a robust templating system to implement layouts, re-use chunks of code and enable dynamic functionality. Its most important elements are the following ones:
Pages are the most basic structure for storing content. These are readily available, since they are shipped as part of the core (blog posts, on the other hand, must be installed through a plugin). Pages are based on Twig, which is a modern template engine for PHP (devised by the creators of Symfony), and compiled to plain optimized PHP code, so they execute very fast.
Partials contain reusable chunks of code that can be used all throughout the website, as to avoid duplicating code on the different pages or layouts. They are particularly useful for navigation menus, testimonials, calls to action, and other common elements.
Layouts define the scaffolding, or structure, of the page. They define the <html> and <body> HTML elements, and are useful for creating the frame of the site, including the header, footer and sidebars. The actual content in the body is injected by the page.
Components are the mechanism to extend functionality in October CMS. Any page, partial or layout can have attached any number of components, which are most commonly provided through plugins, and which are fully configurable. In addition to rendering HTML code on the page, components can also provide services, such as form validation, security check-up, control of user permissions, or others.
Configuring a component attached to a page. (Large preview)
These elements are all implemented through files living in the website’s folder in the local hard drive. As such, it is possible to edit them not only through October CMS’ built-in editor, but also from the developer’s preferred text editor (Sublime, VS Code, PHPStorm, etc).
We can edit elements either through the October CMS’ built-in editor or in an external text editor. (Large preview)
Similarly, the October CMS project can be perfectly managed through any version control system, and it can be easily adapted to any existing workflows. For instance, a project can be set-up through continuous integration, deploying it automatically to the server after new code is pushed to the Git repo.
October can be easily managed with Git. (Large preview)
October CMS Marketplace
October CMS has a marketplace for themes (which allow to change the site’s look and feel) and plugins (which allow to extend the site’s functionalities), providing both free and paid offerings. By providing themes which can be used to quickly establish and then configure the design of the site, and plugins each of which implements some required functionality for the site, the marketplace ultimately leads to lower costs for creating our projects and reduced time to launch them.
The marketplace has been getting bigger! Following October’s growing popularity, its marketplace has received a constant stream of new offerings: It currently boasts 915 plugins, comprising most of the functionalities required for our websites (blogging, SEO Company, e-commerce, analytics, email, galleries, maps, security, social, user management, and others), and 150+ themes. Both themes and plugins can be submitted to the marketplace by any independent 3rd party developer, company or agency, and they must adhere to quality guidelines, which ensures that they are performant and secure.
Creating An E-Commerce Site Through Shopaholic
Let’s get our hands dirty and implement a real-life use case: An e-commerce website! For this, we will install Shopaholic, the most popular plugin to add e-commerce functionality to October CMS, and the free theme Bootstrap theme for Shopaholic to quickly bootstrap the site (which will be made to look like this demo site). Shopaholic is ideal for our needs because it provides a comprehensive e-commerce solution, which includes an ecosystem of extensions (both free and paid ones) to further enhance it. In addition, we can install the core experience for free and only make a one-time payment for the extensions that we need, which will be cheaper than using cloud solutions which have a recurring fee to use. And finally, because we are the full owners of our own on-premise e-commerce website, we can customize it as much as we need to and we own all the data, which is not possible with cloud solutions.
Because of the October marketplace dependency management system, we need only install the theme (the Shopaholic plugin is added as a dependency). Let’s proceed to install the theme then: Inside the October CMS admin, we click in the “Front-end theme” section in the Settings, and then click on “Find more themes”:
Front-end theme manager. (Large preview)
Then, we search for theme “Bootstrap theme for Shopaholic” and, upon clicking on the result in the dropdown, it will install the theme and all its dependencies. Once installed, we go back to the Front-end theme manager page and click on the Activate button on the new theme:
Activating the new theme. (Large preview)
After installing the theme and plugins, we will notice a new element “Catalog” on the top menu bar. Clicking on it, we can manage the items in our e-commerce catalog, namely products, categories and brands (these are the core elements; other elements, such as coupons, can be added through extensions). Initially, our catalog will be empty:
Catalog comprising products, categories and brands. (Large preview)
Let’s fill it up with some data. We can either create the items one by one or, quite conveniently, import data through CSV and XML files (which allows us to manage a large set of records with Excel or other tools). In our case, since we are creating a demo site for testing purposes, let’s install plugin Fake Data for Shopaholic which provides large sets of mock data and an easy way to import these records to the system. To do this, follow these steps:
Head to Settings => Updates & Plugins in October CMS backend, and install plugin “Fake Data for Shopaholic”.
Head to Dashboard, and click on Manage widgets and then Add widget.
Select widget “Fake data for Shopaholic”, and click on Add.
In the newly added widget, clicking on Generate under section “Generate fake data ” will run the process to import the fake data.
The last step will ask how many times should the insertion be repeated (as to create bulk and be able to test the performance of the site when loading many records) and which data set (clothes or sneakers):
Generating fake data through Laravel’s artisan command. (Large preview)
After running this process, our catalog will look better stocked:
Catalog with some mock data. (Large preview)
The next step is to create some promotions. To do this, we click on Promotions on the top menu, then on the Create button, and fill the required information. Once each promotion is created, we must edit it again to add products to it. After creating a few of them, our promotion list will look like this:
Creating some promotions. (Large preview)
Now that we have some data, we can finish customizing how our front page will look like. For that, we go to section Settings => Front-end theme => Customize and we complete the information for all tabs (Header, Footer, Social, Main slider, Index page). Once this is ready, our e-commerce site will now be ready:
Our e-commerce site is ready! (Large preview)
Clicking on a product, we can see how its page looks like:
Product page. (Large preview)
Auditing The Speed And Reliability Of The E-Commerce Solution
Because we want to sell our products, speed and a good SEO Company are mandatory, so let’s make an audit using Google Chrome’s Lighthouse on the product page to make sure it runs fast and that it will score high with search engines. Running the audit against the live demo site, it returns the following report:
Lighthouse report of the product page. (Large preview)
Equally important is that the site can withstand heavy load, so that if our product becomes successful and attracts plenty of traffic the server doesn’t crash. For this, we can use the Load Impact tool to run a load test. Running the test using 50 virtual users for 12 minutes against the live demo site (which is hosted on DigitalOcean with a droplet configuration of Standard 2CPU/4 GB RAM) produced the following results:
LoadImpact report of a test load using 50 virtual users during 12 minutes. (Large preview)
As can be seen, the website was able to sustain an acceptable response time throughout the load test, giving us the confidence that we can trust the e-commerce plugin when we need it the most: When it’s time to sell the product.
Finally, we can also feel confident of the reliability of the software, since it is covered by unit tests.
Adding Extensions To Shopaholic
So far so good. However, as it can be seen on the screenshots from our website, there is still no way for the visitor to buy a product. Let’s add this functionality by installing the following free extensions for Shopaholic: Orders, to allow to add products to a cart and make orders, and Omnipay, to process the payment. (For the other Shopaholic extensions, if they are not free and authored by LOVATA, you can use coupon “WELCOME” to get a 50% discount the first time you buy them.) To install these extensions, we head to Settings => Updates & Plugins, search for the plugin names, and click on the results to have them installed.
Searching for ‘Shopaholic’ displays its plugins. (Large preview)
Once installed, we will see a new item Orders in the top navigation, where all orders will be stored, and items Payment methods and Shipping types in the Settings page, to configure the payment gateways (card, cash, etc) and how to deliver the product (by post, etc). We configure these and load again the product page. Now it shows an “Add to cart” button, allowing the user to place an order:
Product page with cart enabled. (Large preview)
After adding several items to the cart, we can proceed to the check-out and complete the order:
Completing the order. (Large preview)
Once the user submits the order, the inventory will be automatically taken care of, updating the number of items for each product in stock, and we will receive an email informing us of the new order (if configured to do so). In section Orders on the admin panel, we can find all the information for the order (products sold, buyer information, method of payment and total, and others), and we can complete the transaction.
All the information from the order is here. (Large preview)
The basic work is done: In barely a few hours we managed to have a fully functional e-commerce sith with October CMS and Shopaholic.
Creating Our Own Extension
If none of the several extensions to Shopaholic on the October marketplace provides the functionality needed, we can also create our own extensions.
To do this, if you are comfortable with Object-Oriented Programming and PHP and, more specifically, with Laravel, then you are ready to do it. The documentation explains how to add an extension, step by step. For instance, following this tutorial, with barely a few lines of code we can add a custom field “rating” to our products:
Adding a custom field to the product. (Large preview)
We can then retrieve the new “rating” field from the product and display it in the product template:
Displaying a custom field in the product page. (Large preview)
Extending Shopaholic is not difficult and enables us to fully implement our own e-commerce requirements, and personalize the site to suit our brand.
Conclusion
October CMS is a great candidate for building powerful sites in a very simple manner (showing that “web development is not rocket science”). It delivers the great developer experience granted by Laravel, and its marketplace (which is growing daily) provides a large number of ready-to-use themes and plugins, allowing us to build websites very quickly. One such plugin is Shopaholic, which converts the site into a full-fledged e-commerce platform.
Because of these reasons, building a site with October can be very cost-effective. As a result, it has gained some reputation (by winning the popular vote as best flat-file CMS from 2018) and has increasingly become a tool of choice for businesses and digital agencies crafting sites for their clients.
To find out more from the October community, be welcome to join the October CMS Slack workspace, which is where the creators of themes and plugins published in the marketplace hang out, so you can conveniently chat with them to get their help and advice.
Give October a try (it’s free!), and let us know how it goes.
(ra, yk, il)
Website Design & SEO Delray Beach by DBL07.co
Delray Beach SEO
Via http://www.scpie.org/building-an-e-commerce-site-with-october-cms-and-shopaholic/
source https://scpie.weebly.com/blog/building-an-e-commerce-site-with-october-cms-and-shopaholic
0 notes
Text
VueJs - Mengubah Format Tanggal Menggunakan Moment
VueJs – Mengubah Format Tanggal Menggunakan Moment
Mengganti format tanggal dari format default seperti yyyy-mm-dd hh mm ss ke format lain sangatlah mudah dengan plugin moment. moment js sangat popular digunakan pemformatan tanggal termasuk timezone.
Untuk menggunakan moment js perlu menginstal package dahulu.
npm install moment
Setelah itu import package di main.js atau app.js untuk di laravel.
src/main.js
import Vue from 'vue' import App from…
View On WordPress
0 notes