#how to install moment in laravel vue
Explore tagged Tumblr posts
Visit Tumblr Blog
Explore Tumblr blogs with no restrictions, modern design and the best experience.
Last Seen Tumblr Blogs


Fun Fact
The KCSC sent more than 20K requests to delete posts related to prostitution and porn to Tumblr from January to June 2017.
Text
How to Install and Use MomentJS in Laravel 9 Application
New Post has been published on https://www.codesolutionstuff.com/momentjs-in-laravel-9-application/
How to Install and Use MomentJS in Laravel 9 Application

This tutorial will show you how to use MomentJS in Laravel using examples. How to install Moment in Laravel Vue is explained step-by-step. We will assist you by providing a Laravel installation example. You may find a straightforward example of using MomentJS in Laravel in this article. In
#how to install moment in laravel vue#how to use moment js in laravel#install moment in laravel#install moment.js laravel#laravel mix moment js example#use moment in laravel blade#use moment js in laravel
0 notes
Text
Laravel 6.0: What You Should Know

Since the inception of Laravel 5.0 around 4.5 years ago, the Laravel ecosystem has blossomed into something that leaves users nothing to complain about, to say the least. Laravel Nova, Laravel Horizon, Laravel Echo, Laravel Scout, and Laravel Passport are just some of the tools that have been introduced since then. At the time of this writing, we’re on Laravel 5.8 and Taylor Otwell has decided to skip past 5.9 on to 6.0 on the 3rd of September. Previously, Taylor has stressed that this won’t be a major paradigm shift for Laravel and the most significant change will be the transition to semantic versioning. However, this doesn’t mean that there aren’t plenty of new features worth talking about.
Let’s dive into some of the smaller changes first.
The Smaller Things
Authorization

Authorization messages can now be made easier for users to understand. Before Laravel 6.0, the infrastructure wasn’t in place to easily give a specific response to a user when they were given an authorization-related error. The status code could be given fairly easily, but giving a custom error message was more complicated back then. Giving a custom messaged required the developer to create a new file and write their own exceptions.
Now, to get a customizable authorization response, you can simply use the Gate::inspect method when linking to the function that enables you to receive the response. Delivery of the message to the front-end is also easy to organize. Simply add $this->authorize or Gate::authorize to a suitable route or controller.
No More Default Front-End

The typical front-end setup you are given when you first start a Laravel project is now gone. This means the Vue and Bootstrap code you would usually see, would have now been removed. What it’s been replaced with is unknown. Perhaps, it hasn’t been replaced. Strangely, the make:auth command, used to provide the login system scaffolding is now not a part of the original Laravel install either. To be honest, the rationale behind this change is unclear to me. However, given Laravel’s versioning adjustment, it makes sense that third-party technologies like Vue and Bootstrap that haven’t recently undergone the same changes could cause conflict. Though, this is merely speculation.
If you want access to the old UI, you can extract a composer package that contains it with the CLI: composer require laravel/ui and php artisan ui vue --auth.
Lazy Collections

This is one of the more interesting additions. If you’re new to Laravel, Collections are tools that make it easier for you to manipulate arrays. Eloquent, one of the two main tools in Laravel used to communicate with databases, returns its queries as Collection instances. Check out the docs for Collections if you think you’re gonna lack context in a moment. https://laravel.com/docs/5.8/collections
So, what are Lazy Collections? Traditional Collections are often used for working with large amounts of data. When they run into data-heavy files, they’ll try and store all of that data at once. This may sound quick and convenient but the downside is that this is very memory-taxing. Lazy Collections solve this problem by only storing the part of the file they need, and thus, save memory usage and boost performance.
If you understand how lazy loading works then you’ll be familiar with my previous explanation. Lazy loading works the same way. When you make a request to the server with lazy loading implemented, the browser will only return the part of the web page it knows you’re going to use immediately. Then, when the user scrolls down the page or clicks on an internal link, the server will provide you the necessary content it knows you need. This way, only memory that is needed at that particular moment is being used. This method increases speed. Lazy Collections is kind of like lazy loading but with arrays from a database and not content on a webpage.
The Bigger Things
Laravel Ignition
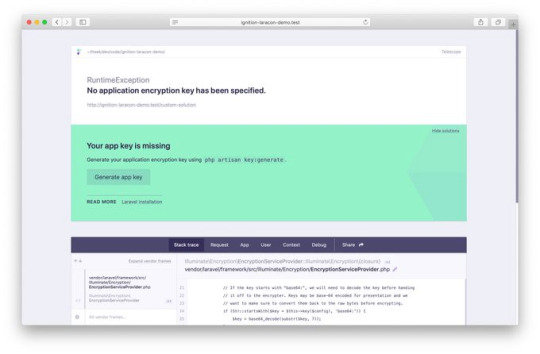
So yeah, the new error page for Laravel is called Ignition and it looks awesome. It’ll be the default error page for Laravel when 6.0 releases. However, if you don’t feel like making the switch to 6.0 just yet, that’s fine, you can still install Ignition on previous versions. Let’s talk about what Ignition brings to the table.
With Whoops (the current default Laravel error page), stack traces and relevant code snippets are shown in an error page, but this doesn’t always lead the developer to the solution. Worse, sometimes the stack traces just reference compiled paths. This can it make it difficult to find the necessary non-compiled files to fix because they aren’t listed anywhere on the error page. Thankfully, this isn’t a problem with Ignition, it can display to you the non-compiled file where the problem actually exists. By clicking on a pencil icon, you can go directly to the file in your chosen editor.
The second coolest feature of Ignition is that it can display potential solutions when displaying an error message. Most error pages just leave you with the error. For example, if the error is that you misspelled a property name, Ignition will tell you that the property has been misspelled and offer you the correct spelling. Solution suggestions can be way more sophisticated than this, I’ll link you to the source down below. Your suggestions are even customizable!
You wanna know the coolest feature? These solution suggestions are actually runnable!

Yes, really. Take a look at this short demo by one of the creators, Freek Van der Herten.
https://youtu.be/EZu0-CwTU9Q
Also, you can add your own runnable solutions too! This is great as Ignition is open source so people in the Laravel community will undoubtedly contribute their own solutions for everyone to use.
There’s a bunch of other cool features too such as creating your own tabs (yes Ignition has tabs) and sharing your error messages with other people. This is done using Flare, a tool that comes with Ignition.
For everything about Laravel Ignition and Flare, visit https://freek.dev/1441-ignition-a-new-error-page-for-laravel.
Laravel Vapor

Another big one. Laravel Vapor is a serverless deployment platform for Laravel. But wait, why do we need a deployment platform? We already have Laravel Forge, right? As beloved as Forge is amongst the Laravel community, it does have its limitations. It doesn’t have autoscaling to deal with large sudden increases in traffic that prevent your site from crashing. Also, configuration is required when OS or PHP updates occur. Vapor has autoscaling, so, you don’t have to worry about sudden spikes in your traffic causing website downtime. In addition, because of the serverless structure of Vapor, it also handles all the updates you may stress about when using Forge.
Vapor’s website is very clean looking and everything seems easy to find. When you deploy a project, you can see the different stages of the deployment process loading on the UI. I find this to be very reassuring and comforting. You can also rollback your application with a click of a button. Just click on “rollback” and it’ll do just that. Pretty neat. Same deal if you want your app to undergo maintenance. Just click on the “maintenance mode” button.
Another cool feature of Laravel Vapor is that you’re able to set alarms. What do I mean by that? For example, to know when your website traffic suddenly blows up, you can set a certain amount of HTTP requests per minute, and if your website hits that limit, the alarm will go off, informing you of the surge in traffic. Taylor Otwell showcases this and other conditionals in his Laravel Vapor demo which I’ll link to below.
There’s so much to cover with Laravel Vapor and the Laravel update itself. Because of this, I didn’t really want to dive into the complexities too much in this post. To learn more about the technical aspects of Laravel 6.0, you can take a look at the release notes here https://laravel.com/docs/6.0/releases. For more info on Laravel Vapor, visit this video by Taylor Otwell https://www.youtube.com/watch?v=XsPeWjKAUt0&t=362s.
1 note
·
View note
Text
How to Install and Use MomentJS in Laravel 9 Application - CodeSolutionStuff
#artificial intelligence#Programming#php#cloud#machine learning#laravel#codesolutionstuff#codesolution#JavaScript#DataScience#MachineLearning#Analytics#AI#ML#angular#Tech#Python#ReactJS#DataScientist#Coding#SQL#bot#Cloud#Typescript#Github#Data#BigData#DL#machinelearning
0 notes
Text
How to Install and Use MomentJS in Laravel 9 Application

This tutorial will show you how to use MomentJS in Laravel using examples. How to install Moment in Laravel Vue is explained step-by-step. We will assist you by providing a Laravel installation example. You may find a straightforward example of using MomentJS in Laravel in this article. In this example, I'll walk you through installing Moment in Laravel Mix step-by-step. I'll give you two illustrations of how to install a moment in Laravel. Laravel Mix will be used in one example, which will use the npm command, and CDN Js in the other. Moment is simple to utilize in versions of Laravel 6, Laravel 7, Laravel 8, and Laravel 9. So let's look at the technique below step by step.
Install Using Npm
first, we will install laravel fresh version. so let's run bellow command: composer create-project --prefer-dist laravel/laravel blog Now that we have a new Laravel application, we must install npm. Let's simply execute the following command. this command will create "mode_modules" folder in your root directory and store all npm module there. npm install Following that, we must install the Font Awesome library using the npm command below. Let's execute the command below: npm install moment Use in our app.js file after a successful install. Let's import then as follows: resources/js/app.js require('./bootstrap'); var moment = require('moment'); console.log(moment().format()); We can now execute the npm dev command by executing the following command: npm run dev Here, we will use the produced app.css file as seen below in our blade file: resources/views/welcome.blade.php
How to use moment js in Laravel? - CodeSolutionStuff.com
You can now launch your application and check the home page. You'll get the following output: 2020-06-10T19:58:17+05:30
Install Using CDNJS
Here, we'll utilize a cdn js file to add moment js, so take a look at the file code below: resources/views/welcome.blade.php
How to use moment js in Laravel? - CodeSolutionStuff.com
Read the full article
#howtoinstallmomentinlaravelvue#howtousemomentjsinlaravel#installmomentinlaravel#installmoment.jslaravel#laravelmixmomentjsexample#usemomentinlaravelblade#usemomentjsinlaravel
0 notes
Text
Build a Realtime CRUD App with Vue & deepstream
Vue is the JavaScript UI tool that parades itself as progressive because it is approachable so one can get started in just a day. On the other hand, it has every feature to cater for your front-end needs, making it versatile.
Realtime technologies are gradually taking a new shape; realtime servers now serve as an abstraction for handling realtime related tasks. deepstream is an open, free and blazingly fast realtime server that you can install on your machine.
This article demonstrates who we can build realtime apps using deepstream and Vue as our front end tool. The image below is a GIF of what we are up to:
Before we get dirty with codes, let's have a reason to do so.
Why Vue
Vue is so far, in my humble opinion, the simplest UI library out in the wild to get your hands dirty with. It is easy to get started and handles most of the tough concepts that come in mind when considering a UI library. These includes: data binding, server-side rendering, state management.
Vue acts on the complexity of the existing UI library and simplifies those complexities to make our lives less frustrating as software engineers. It also has been backed by one of our favorite backend tool, Laravel -- making integration straightforward. This of course does NOT mean you cannot integrate with any other backend platform.
Why deepstream
deepstream is a standalone server -- faster than most of the our realtime solutions -- that allows you to provision realtime server using persisted state as Data Sync, pub/sub pattern as events or request/response pattern as RPCs.
With these varieties of options, you are assured that deepstream can integrate in whatever nature of app you are building. Including chats, realtime news updates, stock information, CRUD/CMS apps, data visualization, data monitoring, etc.
Setup Vue and deepstream
Installing both Vue and deepstream is quite a straightforward process; few commands on your CLI and you're good to go.
deepstream can be installed on Linux, Windows, and OSX; it can also be installed using Docker and npm. For this article, we will download deepstream for our OS. Unzip the file and run the following command on the unzipped directory to start the server:
./deepstream
vue-cli is a CLI tool that makes scaffolding a Vue project easy and fast. We need to install this CLI tool then we can use the tool to create a new project for our demo app:
npm install -g vue-cli
The CLI tool is installed globally so we can access it from anywhere in our machine. Vue project scaffolds come in different templates, we need something simple and the following command will do just that for us:
vue init webpack my-project
Just CRUD with Vue
Before we attempt a realtime app, let's create a platform for that first. A CRUD (Create, Read Update and Delete) app for managing books will be a good idea.
Creating
The App.vue file in the src folder is our main and only component which is enough for what we are trying to build. Open the file and create a simple form:
<!-- ./src/App.vue --> <template> <div id="app"> <h1> </h1> <h3>New Book</h3> <form v-on:submit.prevent="onSubmit"> <div> <input name="title" type="text" placeholder="title" v-model="book.title" /> </div> <div> <input name="year" type="text" placeholder="year" v-model="book.year" /> </div> <div> <input name="author" type="text" placeholder="author" v-model="book.author" /> </div> <div> <label for="read">Read?</label> <input type="checkbox" v-model="book.read" id="read" name="read" /> </div> <button v-if="updating">Update</button> <button v-else>Add</button> </form> </div> </template> <script> export default { name: 'app', data () { return { title: 'My Books Manager', updating: false, book: { title: '', year: '', author: '', read: false } } } } </script>
The file App.vue is known as Vue's Single File Component which is a great strategy from structuring Vue apps by allowing each component to be stored in a file while its template, style, and logic live in the file.
We have a basic form with Vue bindings. Each of the form control is bound to a property (using v-model) in the book object returned by Vue's data method. The method also returns a title which we use as the app's header and an updating flag which we use to toggle Add and Update buttons in the form. The toggle is achieved using Vue's v-if...v-else directives.
When the button(s) is clicked, an onSubmit method will be called because that is what the form's submit event binding is bound to. We need to create this method:
export default { name: 'app', data () { return { // . . . updateIndex: 0, books: [], book: { title: '', year: '', author: '', read: false } } }, methods: { onSubmit() { if(this.updating) { this.onUpdate(); return; } this.books.push(this.book); this.book = { title: '', year: '', author: '', read: false } } } }
onSubmit will check if we are updating or not. If we are updating, it would delegate to another method, onUpdate, to handle updating. Otherwise, it would push the new values to the books array.
Reading
The books array can be iterated and its values printed using a table. The iteration is achievable using the v-for Vue directive as show:
<template> <div id="app"> <h1> </h1> <h3>New Book</h3> <!-- For markup truncated --> <h3>All Books</h3> <table> <tr> <th>Title</th> <th>Year</th> <th>Author</th> <th>Read</th> <td>Update</td> <td>Delete</td> </tr> <tr v-for="(b, index) in books"> <td></td> <td></td> <td></td> <td v-if="b.read">✓</td> <td v-else> </td> <td v-on:click.prevent="onEdit(index)"><a>✎</a></td> <td v-on:click.prevent="onDelete(index)"><a>✗</a></td> </tr> </table> </div> </template>
Something extra to the table's data rows -- two links to handle editing (not updating) and deleting a record. Each of them calls the onEdit and onDelete methods respectively. You can start using the form and see the results appear in the table:
Updating
Updating takes two stages -- selecting the record from the table that we need to update which will make it appear in the form and mutating the array to update the value.
The onEdit handler is responsible for the first stage:
data () { return { updating: false, updateIndex: 0, books: [], book: { title: '', year: '', author: '', read: false } } }, methods: { // . . . onEdit(index) { this.updating = true; this.updateIndex = index; this.book = this.books[index]; }, }
onEdit first raises the updating flag, then sets updateIndex to the index being edited and the replaces the book model with the record found in the index being updated.
updateIndex is used to keep track of what is being updated when onUpdate is called:
onUpdate() { this.updating = false; this.books[this.updateIndex] = this.book; this.book = { title: '', year: '', author: '', read: false } },
onUpdate now resets the updating flag, mutates the array to update the book and then empties the book model.
Deleting
This is the simplest; we utilize the array splice method to remove an item from the array based on there index:
onDelete(index) { // Remove one item starting at // the specified index this.books.splice(index, 1) }
Going Realtime with deepstream
We have just built a working app, but that was not the goal. We need to let all connected clients know when a record is added, updated and deleted by updating the table holding these records. This is where deepstream steps in to help out. At the moment, if we try such, other connected clients stays dumb:
deepstream Clients, Records & Lists
In the beginning of this post, we setup a deepstream server and left it running. In fact, the server is running on localhost at a given port, 6020. This server is just idle hoping for a client to connect and start exchanging data.
A deepstream client can come in any form, ranging from web, desktop, mobile and to even IoT. Our concern is Web for today, so we need to use deepstream's JS SDK to connect to the listening server. You can install the SDK by running:
npm install --save deepstream.io-client-js
Records in deepstream are like records in any other form of representing data. It is a single entity and store a given information item. The only difference is that deepstream records are live which means that data stored on records can be subscribed to by clients and the clients will be notified with payload at the slightest change.
Lists, on the other hand, help group records so they can be treated like a collection. Lists are as well live so they can be subscribed to for realtime changes and updates. We will utilize these deepstream features in our app to make the app realtime.
Authentication
Authentication just like in every other situation allows you to confirm that a user is actually who she claims to be. Your regular HTTP authentication differ a little from the how deepstream will handle authentication. However, the good thing is, it is easy to hook them together.
For every deepstream connecting client, an authentication is required. This does not necessarily mean that a credential must be provided; performing a login can just be anonymous and that applies to our case at the moment.
import * as ds from 'deepstream.io-client-js'; export default { name: 'app', data () { return { ds: ds('localhost:6020'), books$$: null // . . . } }, created () { this.ds.login({}, () => { console.log('logged in'); }); }, methods: {/* . . .*/} }
First we import the installed client, then we create a member variable ds to hold a reference to the deepstream while passing in the server's URL.
The created function is a lifecycle method which is called by Vue when the component is ready. This makes created a good candidate to handle deepstreawm authentication. Authentication is performed by calling deepstream.login method which receives a credential and a callback.
The books$$ property will keep a reference to the deepstream list we are yet to create.
We will revisit the CRUD process and update them with respect to deepstream but before that, we need to make all the connected clients listen to value changes so they can update accordingly
List and Records Subscriptions
created () { this.ds.login({}, () => { console.log('logged in'); }); this.books$$ = this.ds.record.getList('books'); /* * Entry added */ this.books$$.on('entry-added', (recordName, index) => { this.ds.record.getRecord(recordName).whenReady(record => { // The scond paramaeter, // a boolean, is a flag to specify whether // the callback should be invoked immediatly // with the current value record.subscribe(data => { if(!data.id) { if(data.title) { data.id = record.name; this.books.push(data); } } else { this.books = this.books.map(b => { if(data.id == b.id) { b = data; } console.log(b) return b; }); } }, true) }); }); /* * Entry removed */ this.books$$.on('entry-removed', (recordName, index) => { this.ds.record.getRecord(recordName).whenReady(record => { record.subscribe(data => { this.books.splice(this.books.indexOf(data, 1)); }, true) }); }); },
Lists and records API live on the record object. To create or retrieve an existing list, we use the getList method passing in, a name of our choice.
entry-added event listens to record addition to the created list. So when a record is added to the list, the event is triggered.
When a record is added, whenReady ensures the record is ready before we subscribe to it using the subscribe method.
subscribe takes a callback which checks if the data exists and updates it. If the record's data does not exist, it updates the record with the incoming data while setting the data's id to the record name (id). The books array is updated as data comes in.
entry-removed is the opposite of what we saw. It listens for when we remove a record so as to remove the record's data from the books array.
Creating
The onSubmit method will have to take a new shape. We won't be pushing data to books directly because that's already being done by the subscription. We just need to call a method that creates a record with data and adds the record to the list we created:
onSubmit() { const recordName = this.book.id || 'book/' + this.ds.getUid(); this.ds.record.has(recordName, (err, has) => { if(has){ this.onUpdate(); return; } else { const bookRecord = this.ds.record.getRecord(recordName); bookRecord.set(this.book); this.books$$.addEntry(recordName) this.book = { title: '', year: '', author: '', read: false } } }) },
We create/get a record using a UUID or the Id attached to data if data exists. The had method is used to check if the record exists or not. If it exists, we call the onUpdate method, else, we set the record to the new book and update the books$$ list with addEntry.
Updating
onUpdate() { const recordName = this.books[this.updateIndex].id; const bookRecord = this.ds.record.getRecord(recordName); bookRecord.set(this.book); this.book = { title: '', year: '', author: '', read: false } this.updating = false; }
onSubmit delegates updating to the onUpdate if the record name in question exists.
onUpdate retrieves the record name from the books array using the updateIndex. We get the record that the record name belongs to and the update the record with the book changes. No need to do anything on the list, it will behave accordingly.
Deleting
The onDelete method just calls removeEntry from the list to remove a record:
onDelete(index) { this.books$$.removeEntry(this.books[index].id); }
Conclusion
Building realtime apps keeps getting better with advent of more advanced solutions. You can as well perform HTTP auth or JWT auth as well as connect your database to deepstream when you need to persist data.
It's fascinating how we could build better UI apps using two simple to integrate platforms, Vue and deepstream. Vue is not just the only kid welcomed to the party. You can integrate deepstream with any other UI library out there using the same strategy of initialization and authentication.
via Scotch.io http://ift.tt/2lr7SdO
0 notes