#mcafeecomdellactivation
Explore tagged Tumblr posts
Visit Tumblr Blog
Explore Tumblr blogs with no restrictions, modern design and the best experience.
Last Seen Tumblr Blogs


Fun Fact
If you dial 1-866-584-6757, you can leave an audio post for your followers.
Text
A Complete Guide on Fixing the “program not responding” Error on Windows 10
When you are trying to open any program on Windows 10, and after some time, it freezes, then suddenly the “Program Not Responding” appears on your screen. You cannot shut the screen in this situation and cannot use any options. Many users are complaining about this error and struggling to find its solutions. Here are some instructions provided below.
Update your Windows 10 to Fix the Programming Error on Windows 10
If you wish to update Windows 10 to resolve this error, you need to execute the effective solutions below:
Navigate to the Windows Search section on your PC.
Then input ‘windows update’ and select the OK button to launch the screen.
You should click on the ‘Automatic’ option through the drop-down menu of Startup Type, whether that is not already chosen.
Now, hit the Apply and then OK buttons to verify the fresh settings.

Perform System File Checker to Fix the Programming Error on Windows 10
If you are attempting to execute the system file checker but you can’t, try the directions given below:
Hold the Windows and X buttons simultaneously on the keyboard to invoke the Win + X menu.
Thereafter, insert ‘sfc /scannow’ and select the OK button to start the scan process.
This process takes a minimum of 15 minutes, and once finish the scan process, the Command Prompt screen might state, ‘Windows Resource Protection found corrupt files and successfully repaired them.’
Now, shut the Command Prompt, then reboot the Windows.
Run DISM Scan to Fix the Programming Error on Windows 10
If you perform a DISM scan on your device, check out the quick resolutions below:
Open the Command Prompt as administrator on the system.
Thereafter, insert the pursuing line and hit the Enter button: DISM /Online /Cleanup-Image /RestoreHealth.
Now, the DISM scan will begin. The scan takes a minimum of 20 minutes.
After completing the DISM scan, check whether the issue still shows.
End Windows Desktop Manager Task to Fix the Programming Error on Windows 10
If you would like to end the Windows Desktop Manager task, continue with the possible instructions below:
Hold the ‘Ctrl + Shift + Esc’ keys simultaneously on the keyboard to invoke the Task Manager.
Once the Task Manager launches, find the ‘Windows Desktop Manager process,’ right-click on it, then pick the End Task through the menu.
Make Changes to the Registry to Fix the Programming Error on Windows 10
If you are trying to make changes to the registry, go through the effective solutions stated below:
Hold the Windows and R buttons simultaneously on the keyboard to launch the Run section.
After that, input ‘regedit’ into it, select the OK button and hit the Enter key.
Navigate to the File option and then choose the Export option.
You should change ‘Export range’ to All.
Then input the preferred name of a file and select the button of Save.
Once you have done, you will have a backup of the registry ready
If anything goes incorrect after changing the registry, perform the backup file to restore the registry to the default state.
Select the Edit option and then go to the Find option.
Type ‘CoreParking’ or ‘54533251-82be-4824-96c1-47b60b740d00’ then select the Next button.
Now, remove the buttons associated with CoreParking.
Redo the 4th and 5th steps to locate each button associated with CoreParking and remove them.
Visit: mcafee.com/dellactivation
Source: https://mcafeedellactivation.co.uk/a-complete-guide-on-fixing-the-program-not-responding-error-on-windows-10/
2 notes
·
View notes
Text
Hands Down, this was our Favorite Tech device of 2022
It’s been an incredible year for the tech industry, with amazing Android phones that have flipped and folded. As a stylish accessory, Samsung’s chic Z 3 stands out, making a strong statement and leaving its mark on the world. We’ve seen the huge Z Fold 3 equipped with S Pen Pro grab its place from a practical perspective.
Do not forget some other awesome launches such as Google Pixel 6 series, Amazon Echo Show 15, the Sony WF-1000XM3 earbuds. Pre-existing features were finessed, and newly discovered technologies made their debut. From all the outstanding latest devices, we’ve seen this year; Onyx Boox Nova3 Color caught my eyes.
The Onyx Boox Nova3 Color does what it is meant to do with grace
The Nova3 Color carries a huge array of file formats, including CBZ, CBR, and ePub – one of the most famous formats not supported by Kindle. You can install Third-party eBooks apps and libraries like Comixology, Dark Horse Comics, Scribd, Webtoon, DC Universe. The Onyx Boox device is simple and direct and can be shared in e-books. Also, you can download books from your email or anywhere on the internet.
We can play videos and animations in Nova3 Color, but it does an incredible job. You can get plenty of drawing, Wacom Stylus, and writing apps and features, but the best drawing tablets in pale comparison. However, this is simply forgivable in my eyes.
For me, getting every Onyx Boox Nova3 Color at $400 is a bargain, as against to getting a similar place e-reader like a Wacom tablet and a Kindle separately because I am an enthusiast, not a professional. Even experts have tools to trade. This item fills in a specific niche. After an e-reader is a base function, none is important per se. But the reality that it can attach to a set of play video content, Bluetooth earphones or speakers, work as a note-taking device, sideload Android apps, browse the interweb, and display everything in color is so beautiful.
For me, Onyx Boox Nova3 Color is a very functional, capable, and exciting e-reader. It is not trying to excel at everything, but it goes higher and beyond in the areas that matter. When I’m feeling inactive to go and get my main device, I can simply check my email or read a report on the internet on the Nova3 Color. That’s why the colorful E Ink tablet from Onyx Boox is one of my favorite tech devices of 2022.

Specs of Onyx Boox Nova3
The tech industry has become fastest-paced, and we continuously see the excited latest specs obliterating the barriers that we thought to be our upper limits. Before ten years, we didn’t expect of having a 100MP camera or 128GB of storage in Android phones.
With the huge numbers of all commotion and this constant need to show on-paper specs, we forget the point of those stylish features and specifications. Primary roles fulfilling as tools of sharing data and communication, tablets are an add-on, everything else in smartphones. Still, we prioritize taking photos or listening to music, and browsing social media because that’s an individual choice. Personal taste, preference, and style dictate what kind of technology we lean towards. At present, smart gadgets and devices have become so affordable. We have the power of buying and the ability to choose from a galaxy of exciting items. Broader categories are available with more detailed, those categories within zoomed-in sub-groups.
Visit: mcafee.com/dellactivation
Source: https://mcafeedellactivation.co.uk/hands-down-this-was-our-favorite-tech-device-of-2022/
0 notes
Text
How to Solve the Google Maps Issues on your Windows 10 Device
When you see that your camera is not operating on your Windows 10 system, it might be missing camera drivers once you update your system. The antivirus software is also likely blocking your system’s camera. Privacy settings do not let camera access for some applications or an issue with the application you wish to use. Perform the effective and quick solutions stated below.
Update the Drivers to Repair the Camera App Issue on Windows 10
If you don’t know how to update the drivers on your Windows 10 system, then check out the simple instructions stated below:
Navigate to the Windows Search bar on your system.
Afterward, insert ‘device manager’ into it and press the Enter button.
Select the imaging devices and extend that appear list once the Device Manager screen is launched.
You should select the camera drivers and right-click on them.
Then hit the Uninstall device option.
Finally, select the Action button and click on the ‘Check for hardware changes’ button to install the newest drivers.
Update the System to Repair the Camera App Issue on Windows 10
Remember that you are performing the newest updates; for that, enter the ‘Windows Update’ screen. You should select the ‘Check for updates’ tab and install the present updates.
Remove the Picture Folder from Libraries to Repair the Camera App Issue on Windows 10
If you can’t remove the picture folder and libraries, then pursue the quick directions below:
First, reach the Libraries option inside the File Explorer.
If you can’t see that option, you will locate it inside the Favourites > Desktop > Libraries.
You should launch the Libraries location.
Select the Picture folder, right-click on it, and then choose Delete.
Get return and select the Libraries folder, then right-click on it.
Then, you should click on the “Restore Default Libraries” command.

Scan the System for Malware to Repair the Camera App Issue on Windows 10
If you still face this issue, perform an in-depth antivirus scan. If any threat gets control of the camera, it may describe why you cannot capture any pictures. Utilize a durable antivirus resolution to scan the PC. You can also download and install a dedicated antivirus to check that nothing could escape the scan.
Perform the In-built Troubleshooter to Repair the Camera App Issue on Windows 10
One in-built troubleshooter could assist in solving this problem: the Windows Store Apps troubleshooter. To open it, select the Settings option. Then click on the ‘Update and Security’ option. Once you do that, select the Troubleshoot option and choose and perform the troubleshooter.
Modify Camera Privacy Settings to Repair the Camera App Issue on Windows 10
Windows allows you to operate which applications and programs can control the camera. If you cannot use the Windows 10 camera application while utilizing other applications and software, remember that the respective applications have access to the camera. For that, follow the quick directions mentioned below:
Navigate to the Settings option and click on it.
Thereafter, choose the Privacy option.
Reach the Camera option and switch the toggle of ‘Let apps use my camera’ to enable it.
Now, choose which applications can access it.
Visit: mcafee.com/dellactivation
Source: https://mcafeedellactivation.co.uk/how-to-solve-the-google-maps-issues-on-your-windows-10-device/
0 notes
Text
McAfee.com/dellactivation
McAfee.com/dellactivation helps you activate your McAfee Multi-Device Security antivirus product on your Dell device. After visiting this link, you just need to enter your McAfee product key, and then you’ll be ready to download and install your security product. Go to this link today and redeem your activation code now.

0 notes
Text
How to Turn Off the Keyboard Vibration on Your Android Device
Whether it’s an Android smartphone or a tablet, all Android devices have become much popular among millions of users now. They are easy to use for performing any task. All of the Android devices come with a lot of excellent options and features that you can easily use to have the best experience. Also, to improvise the experience of the users, Android OS updates are released from time to time. Using any Android device is pretty simple for anyone. Also, all of the smart gadgets come with some pre-loaded functionalities and tools. And most keyboard apps that you use on your Android devices have subtle vibrations, also known as “Haptic Feedback.” This vibration effect helps to make the typing on the touchscreen feel more tactile. However, if you want, you can turn off the keyboard vibration on your Android smartphone or tablet.
Do you know what you will have to do to turn off the keyboard vibration on your Android device? To do so, you need to follow the proper procedure. In the following article, you will see the method that you can easily follow to turn off the keyboard vibration on your Android device. So, please take a look at this whole post.
Turning off the keyboard vibration on Android Device
It is a much easier task to perform for anyone to disable the keyboard vibration on an Android device. Even though keyboard sound and vibration are essential when you type with the touch keyboard on your Android device. It acts more than just a regular keyboard. But sometimes, you might feel that the keyboard vibration sound might not be necessary on your Android device. And if that is the case, you are advised to turn off the keyboard vibration on your Android device. To do so, you will have to follow the technique that we have mentioned here. You will need to follow some simple steps. So, it’s finally time to get started with the task.

Instructions to turn off the keyboard vibration on Android Device
Follow the instructions to turn off the keyboard vibration on your Android device:
To get started with the task, first, you will have to unlock your Android device and then head to the Settings menu.
To get to the Settings screen, you will have to scroll down the notification panel and then tap the gear icon.
When you finally get to the Settings window, swipe down to find the option of “Language and Input.” And when you see the option, tap on it.
On the next screen that appears, tap on the current keyboard. And when a menu appears on your screen, tap on the option of “Preferences.”
You will now have to tap the toggle switch given next to the option of “Vibrate on Keypress” to turn off the keyboard vibration on your Android device.
If at any time, you wish to re-enable the keyboard vibration, you will just have to tap the slider again and turn it on. And that’s it. Your touch keyboard on your device will no longer vibrate while using the keyboard.
Turning off the keyboard sound and vibration on Swift keyboard
If you use the Swift keyboard on your device, follow the below-mentioned steps to turn off the keyboard sound and vibration:
First of all, you will launch the Settings screen on your Android device. For this, you will have to tap the gear icon from the notification panel.
From the Settings screen, scroll down and tap on the option of “Language and Input.
Now, you will have to select the option of Swift keyboard from the appearing list.
After you get to the Swift keyboard settings screen, you will head to the “Typing” section and then select the option of “Sound and Vibration.”
You will now have to locate the option that says “Use the Android default vibration.” And once you find this option, uncheck the box given next to it. And that’s it.
So, this is all about turning off the keyboard vibration and sound on an Android device. And this is all from us for now. Try the methods right away if you also want to turn off the keyboard vibration on your device. And please keep visiting our official website to stay updated.
Visit: mcafee.com/dellactivation
Source: https://ellisinfotechpeoplehelps.wordpress.com/2021/12/28/how-to-turn-off-the-keyboard-vibration-on-your-android-device/
0 notes
Text
How To Use Google Chromecast On Your IPhone Or Android Device
The Google Chromecast offers you a better stream experience because you can see the contents from the smartphone directly on your TV. You should connect via Chromecast player and cast on your TV. But you will require an account to stream content from any service provider. So, here are the instructions on how to use Google Chromecast on iOS and Android devices.
Configure the Google Chromecast on iPhone or Android Device
To configure the Google Chromecast on iPhone or Android device, you must pursue the whole procedure stated below:
Firstly, connect the dongle of Chromecast into the port of HDMI on your TV.
Then attach the USB cord to the supportable port on your power outlet.
Reach the Apple Store or Google Play Store on the smartphone and download the Google Home application.
Thereafter, switch on the TV and reach Google Home.
You should click on the devices situated on the upper right side.
This application will continue to reach the relevant instructions to configure Chromecast.
Once you finish the setup procedure, it will be a code over the application and TV.
If both codes match, then choose Yes.
Reach the Next page, select a name for the Google Chromecast.
You should attach the Google Chromecast to the network of the Internet.
Then receive a password through the smartphone or input manually.
Cast Content to Google Chromecast with iPhone or Android Device
In order to cast content to Google Chromecast with Android or iPhone devices, go through the full procedure provided below:
Firstly, launch the Google Home application and reach the option of ‘media or audio streaming provider’ you would like to use.
Then click on the content you would like to listen to or watch.
Click on the Cast button to continue.
If you are using variable casting devices, ensure that you have selected the right casting device to watch the content.
After casting the content on your TV, through the smartphone as a remote for a control volume, starting the audio or video or additional.
If you want to prevent watching the content, select the cast option once more, and choose disconnect.
Mirroring the iOS Device to the TV through Google Chromecast
By following the process to mirror the iOS device to the TV using Google Chromecast:
You should link the Google Chromecast, smartphone, and system to a similar Wi-Fi connection.
Then install an ‘AirPlay receiver’ application onto the system.
Thereafter, open Google Chrome and select the Cast option.
You have to reach the arrow beside the ‘Cast to’ option.
Click on the ‘Cast desktop’ then click on the ‘name of your Chromecast.’
Launch the ‘AirPlay receiver’ you downloaded when you mirror the smartphone.
Go to the iOS device, reach the Control Center, and select the ‘Airplay Mirroring.’
Now, click on the ‘AirPlay receiver’ to begin the screen mirroring.
Conclusion
The article is about the ‘Use Google Chromecast on iOS and Android Devices.’ Through the medium of this article, we will help the users fix ‘Use Google Chromecast on iOS and Android Devices.’ The information about making this workaround has come through the internet, and we are extremely grateful for it. We hope you will avail of this article and find it helpful. It is advisable to be aware while reading the article to avoid any mistakes while implementing these guidelines.
Visit: mcafee.com/dellactivation
Source: https://marcowebportal.wordpress.com/2021/12/15/how-to-use-google-chromecast-on-your-iphone-or-android-device/
0 notes
Text
A Complete Guide to Disable Start up Sound on a Windows 11 PC
Microsoft has always worked to provide its customers with the best product and services. Recently, the tech giant has rolled out Windows 11, which is a major Windows update, including multiple excellent features and options. Windows 11 enables its users to easily perform any computing task on their devices. A majority of Windows users have already downloaded and installed this updated version of the operating system on their PCs and desktops. If you are also running Windows 11 OS on your device, you must have noticed some of the significant changes that it includes. For instance, the position of the Start Menu and taskbar has changed, and with that, the live tiles and Cortana have also been removed from the OS. While there are a lot of new things to explore in the recently updated Windows version, there are still some functionalities that remain the same.
For example, when you start your Windows computer, it makes a beautiful soothing start up sound. While most people like this sound, there can be some Windows users who might want to disable it on their devices. And fortunately, it is much straightforward for anyone to disable the startup sound on a Windows 11 PC. Are you also a user of a Windows 11 computer? Want to disable the startup tone on your device but don’t know how to do so? If this is the case, there is no need to go anywhere now. In the following post, you will be able to get the method following which you can easily disable the startup tone on your Windows 11 PC. So, make sure to go through this whole post to get every detail.
Disabling the startup sound on a Windows 11 PC
Any Windows 11 user can easily turn off the startup sound on their device. There are multiple methods that you can follow for this. You can turn off the start-up sounds by going to the Windows Settings, or you can do so via the Group Policy Editor. Here we have mentioned both of these methods that you can easily follow. So, it’s finally time to get to the first method now.
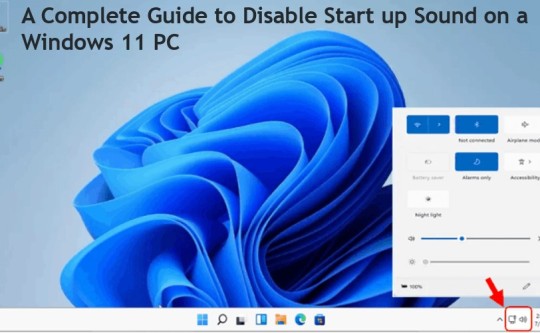
Method 1: Turning off start-up sounds via the Settings app on Windows 11
Follow the steps to disable the startup sounds on your Windows 11 computer using the Settings app:
To get started, you will first launch the Settings app on your Windows 11 device. To do so, you can use a keyboard shortcut, which is “Windows + I.”
Alternatively, you can go to the Settings screen by using the Windows search option.
And once you get to the main window, go to the left navigation panel and click on the “Personalization” category.
Next, you will have to come to the right side of the screen and scroll down to click the “Themes” tab.
After you get to the Themes section, you will click the Sounds option placed next to the system’s image.
When a pop-up appears on your screen, you will uncheck the box given next to the option of “Play Windows Start up Sounds.”
At last, click on the “Apply” option and then hit the “Ok” button to save the changes. And that’s it.
You have successfully turned off the startup tone on your Windows 11 computer.
Method 2: Instructions to turn off the startup tone using Local Group Policy Editor in Windows 11
One can also disable the startup sound on their Windows 11 computer via the Local Group Policy Editor tool. Here’s how this method works:
First of all, you will launch the Run window on your Windows 11 device. For this, you will press the “Windows + R” keys from your keyboard.
In the Run dialogue box, you will type “gpedit.msc” to launch the Group Policy Editor tool, and then use the enter key.
When the main window appears on your screen, you will go to “Computer Configuration>Administrative Templates>System>Logon.”
Next, you will double-click on the “Turn Off Windows Startup Sound to open the policy.”
After the next window shows up, choose the option of “Enabled.”
And at last, click on the “Apply” option and then save the changes by clicking on the “Ok” button. And that’s all you will have to do to disable the startup sounds on your Windows 11 PC.
So, these are the two methods that you can use to disable the startup sounds on your Windows 11 PC. Try any of the techniques right away and visit our official website to stay updated.
Visit: mcafee.com/dellactivation
Source:https://globalsofthelp.wordpress.com/2021/12/06/a-complete-guide-to-disable-start-up-sound-on-a-windows-11-pc/
0 notes
Text
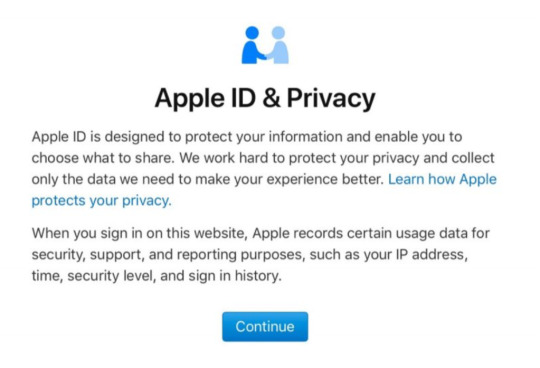
A Complete Guide to Apple’s New Data Privacy Portal
Apple is openly supportive of people’s security and privacy as it offers plenty of features that enhance privacy and the security of its users’ data. The CEO of Apple, Tim Cook, says that privacy is one of the essential human rights. On Apple’s data and online privacy platform, you can see what Apple has arranged for its users to safeguard their privacy and data. You could also access the portal to modify your details saved by Apple, including removing your Apple ID as well as your data associated with it. Users can also download a copy of their data reports.
How to Access the Data and Privacy Portal of Apple?
Follow the explained guidelines mentioned below to access the data and privacy portal of Apple:
If you wish to hold control over your private data or just want to know about what Apple has stored in their server about you, then do follow the steps mentioned down:
Open your web browser and then visit ‘privacy.apple.com’, and you will land directly on Apple’s Data and Privacy website platform.
Now sign in to your Apple account along with your Apple ID and your password.
If asked to type into a two-factor authentication code, press on Continue.
From there, you will be required to choose whether you wish to modify your private data saved by Apple, and in case you wish to delete your Apple ID and the data it contains, you can do so from there.
How to Change Your Account Details via Apple’s Data and Privacy Portal?
Follow the explained guidelines mentioned below to change the account details using Apple’s data and privacy portal:
On a web browser, go to ‘privacy.apple.com.’ Next, enter your account ID and password.
When prompted, type in the two-factor authentication code.
Tap on the Continue option.
Head to the Get Started option located below to the Correct Your Data heading.
Now, look at the sections to use and modify your Apple ID details and information related to the Apple Store transactions.
To manage and optimize your Apple ID account details, visit appleid.apple.com.
To manage the transaction of your Apple Store, shipping preferences, and billing details. You can also change details like the iPhone Upgrade Program and other things from there.
How to Delete Apple ID Account via Apple’s Data and Privacy Portal?
Follow the explained guidelines mentioned below to remove the Apple ID account using Apple’s data and privacy portal:
Head to privacy.apple.com and log in to your account.
Then, use the two authentication codes to complete the process.
Press on Continue to get in.
Next, navigate to Get started.
Examine the details related to the removal of your account.
Apple should now confirm your deletion requests and speak that the course might take seven days to finish.
Now obey Apple’s recommended prompts (like backing up user data and logging out of all devices.) prior to deleting the account.
Select a reason for account deletion by accessing the pull-down options.
Press on Continue.
Now, go through the details related to your account deletion once more.
Head to the Continue option.
Read the Terms and Conditions of the Deletion and tick the checkbox to verify that you have read and accepted the conditions.
Tap on Continue.
Select a contact mode, which would be for telling your account status updates.
Press on Continue.
Type or print the unique access code you got.
That could be used for confirming your identity in case you want to reach Apple Support.
The code will be used for canceling your process of account deletion.
Write down your access code to verify it is you.
Tap on Continue.
Go to the Delete account to remove your Apple ID account as well as your data in it.
Soon, Apple will begin the confirming procedure prior to removing your account.
The account would remain in life during the process of verification.
That can consume up to 7 days at max to get done.
Visit: mcafee.com/dellactivation
Source:https://globalsofthelp.wordpress.com/2021/12/03/a-complete-guide-to-apples-new-data-privacy-portal/
0 notes