#nanokey2
Text

A wish of happiness for all of you.
[In the pic: KORG nanoKEY2 & Wappy Dog]
https://www.instagram.com/gracefulchamber/p/C1PNrPHCZ8D/
#korg#nanokey2#midi#midi controller#music studio#music lab#wappy dog#robot dog#nintendo ds#gaming room#ambient music#dark ambient artist#toy collector#game collector#gracefulchamber#aseptic void#winter#christmas#bedroom#chill#pink#cute
7 notes
·
View notes
Text
Launchcontrol change octaves

#Launchcontrol change octaves full#
#Launchcontrol change octaves software#
The Korg nanoKey2 Controller comes to mind (see below). For portability, there are super small controllers that can literally fit in your back pocket. In that instance, the more keys the better. There is also the possibility of creating mapped key sets in which different ranges of the keyboard will be used to trigger different sound sources. Of course, you can always reprogram these key switches as needed. So having more keys in this instance is nice.
#Launchcontrol change octaves full#
Many orchestral sampling instruments have key switches to affect articulation choices that are located at the very bottom of the full range. These can still send out the full range of MIDI notes, but you will need to adjust the octave switches on the devices to change the currently available range, so you will not have access to all the notes at once. Other common configurations are 61, 49 and 25 key devices. Of course, more is not always better if your space is limited. If you play fluently or even passably with two hands, or if you plan to trigger instrument libraries that require the full range like piano or orchestral ensembles, then 88 might be the right choice. How many you require is in part a function of your piano skills. The number of keys can range anywhere from a single octave to the full piano range of 88 keys. The Key questions (sorry for pun again … can’t help myself) are how many keys, what size, and what type of action. Bluetooth MIDI has also come on strong lately for smaller devices and iOS control. The MIDI THRU connection is not always present, but sometimes the OUT can be configured as a THRU via internal switching on the device. Modern keyboard controllers have USB MIDI connections and often MIDI DIN connections as well.
#Launchcontrol change octaves software#
It allows you to communicate pitch information either internally (if it has its own sounds) or to software or other hardware devices. The Keyboard is probably the most common type of MIDI controller for obvious reasons. I hope to clarify the main considerations in choosing a MIDI controller in this article so that the reader can avoid the pitfalls of over-buying or under-buying, both of which may cost you more money and create frustration down the line. are all important things to consider when choosing a controller. The devices and software that inhabit your studio or make up your rig, the type of audio production or music creation you’re engaged in, your needs for portability, your skills as an instrumentalist, etc. With the recent introduction of MIDI 2.0 and in particular, the new MPE (MIDI Polyphonic Expression) capability of a growing number of devices and software instruments, it is clear that MIDI as a means of inter-device and inter-application communication in music is a rock solid component that will be around for years to come. It was a good system that stood the test of time relatively unaltered. The THRU output allows messages received via MIDI IN to be sent through unchanged so that multiple devices can be daisy-chained. The connections were made via DIN-style connectors with IN, OUT and THRU connections being typical. MIDI controllers have been around since the protocol was developed by Dave Smith and Ikutaru Kakehashi in the early 80’s ( source).
0 notes
Text
Korg ma-2 manual
KORG MA-2 MANUAL >> DOWNLOAD LINK
vk.cc/c7jKeU
KORG MA-2 MANUAL >> READ ONLINE
bit.do/fSmfG
korg ma-1
korg metronom kdm-2
métronome korg ma-30 notice
korg metronom ma-30
korg n222korg kdm-3
korg tuner
korg ma-2 bedienungsanleitung deutsch
1. Press the Metronome switch so that the LCD indicates “TAP TEMPO.” 2. Press the △ switch several times in time with the desired tempo Ansicht Und Herunterladen Korg Kdm-2 Bedienungsanleitung Online. Digital Metronome. Kdm-2 Zubehör Für Musikinstrumente Pdf Anleitung Herunterladen. Korg MA-2 Owner's Manual Manualzz provides technical documentation library and question & answer platform.Its a community-based project which helps to repair SERVICE MANUAL. WAVESTATION. CONTENTS. 1. SPECIFICATIONS. 2. 1 2 5. 8. 9. 10. 23. 31. 40. 45. 56. 1. İ. KORG Udskiftning má kun ske med batteri. Glasklar leserlich und hörbar. Das MA-2 ist das Metronom, das man als Orchestermusiker einfach braucht. View and Download Korg MA-30 owner's manual online. DIGITAL METRONOME. MA-30 musical instrument pdf manual download. Colour sheme: black / red. Specs: Color: Multi-Colored; LED Display: no; Type: Metronome; Theme: Accessories. Instruction manual:. Thank you for purchasing the Korg nanoKEY2 slim-line USB keyboard. To help you get the most out of your new instrument, please read this manual carefully. InUser Manual for korg korg ma 1 solo metronome blue ma1bl b h photo video 165510 user manual. Match case. Limit results 1 per page
https://penofifajixi.tumblr.com/post/694174863268675584/vaillant-vcw-194-2-bedienungsanleitung-panasonic, https://neqopovaci.tumblr.com/post/694175053254885376/siemens-cpu-1214c-handbuch-der, https://penofifajixi.tumblr.com/post/694174920457994240/mcr-1016-bt-bedienungsanleitung-brother, https://neqopovaci.tumblr.com/post/694174123550801920/fachhandbuch-trasse-extra, https://mehiqahojaha.tumblr.com/post/694174226454904832/toshiba-42vl863g-handbuch.
0 notes
Photo

Finally beginning to get some order back in my new study - well, my Sai and #korg Nanokey 2 are on my desk again . #nanokey2 #deskgoals #werk (at Aqua Park, Tzaneen) https://www.instagram.com/p/CNVIunYgTqX/?igshid=1xnl31zy7z01z
0 notes
Photo

Back in studio! https://song.link/it/i/1369767587 @korgofficial @korg_inc #korg #nanokey2 #keyboard #keyboards #studio #skeleton #skull #tastiere (presso Italy Turin) https://www.instagram.com/p/B2UZSpFCJPD/?igshid=7fgg7y2v86i4
0 notes
Photo

Só mais umazinha #geraldojunior #groovebox #nanokey2 #Launchpad #gadgets (em Vila Madalena)
2 notes
·
View notes
Text
I wanna start making music, but the stuff I need is mad expensive.
#im getting a korg nanokey2 hopefully soon#and im looking at software to use w it and everything is for ipads or its dogshit#id be willing to spend money on good software#i just wanna be able to make music again
1 note
·
View note
Photo

新色。 #korg #nanokey2 #blyl #ipad #garageband #alchemy https://www.instagram.com/p/BpPT8NtH4Cy/?utm_source=ig_tumblr_share&igshid=1k5rnhsdnotx5
0 notes

Photo

Korg nanoKEY2 Slim-Line USB Keyboard in Black The nanoKEY2 features an advanced and up-to-date design. By combining the great-feeling “touch” that Korg has developed for its professional MIDI keyboards and the low-profile “thinness” of recent computer keyboard innovations, the nanoKEY2 provides a superior keyboard response for its class and size.
0 notes
Text
Korg nanoKEY2 Slim-Line USB Keyboard in Black
Korg nanoKEY2 Slim-Line USB Keyboard in Black
Korg nanoKEY2 Slim-Line USB Keyboard in Black
Low-profile, 25-key USB-MIDI keyboard, ideal for use with laptop and netbook computers
Advanced-design keybed offers improved accuracy and velocity-sensitive keys.
Sustain button – ideal for entering piano parts!
The nanoKEY2 features an advanced and up-to-date design. By combining the great-feeling “touch” that Korg has developed for its…
View On WordPress
0 notes
Photo

for Korg Nano Slim Line MIDI Keyboard/DJ Drum Pad/USB Controller Hard Case fits nanoKEY2 nanoPAD2 nanoKONTROL2 by CO2CRERA
0 notes
Text
my list of links
(I'll put this under a read more when I get home)
https://youtu.be/Z-FzzaEB4bg
https://www.korg.com/us/products/computergear/nanokey2/
https://youtu.be/X-sn-w-NNXQ
0 notes
Link
I just added this listing on Poshmark: Korg NANOKEY2 USB Keyboard Controller.
0 notes
Text
Dip Your Toes Into Hardware With WebMIDI
Did you know there is a well-supported browser API that allows you to interface with interesting and even custom-built hardware using a mature protocol that predates the web? Let me introduce you to MIDI and the WebMIDI API and show you how it presents a unique opportunity for front-end developers to break outside the browser and dabble in the world of hardware programming without leaving the relative comfort of JavaScript and the DOM.
What are MIDI and WebMIDI exactly?
MIDI is a niche protocol designed for musical instruments to communicate with each other. It was standardized in 1983 and is maintained to this day by an organization consisting of music industry companies and representatives. It's not wildly different than how the W3C dictates and preserves web standards, in some sense.

Photo by Jiroe on Unsplash
The WebMIDI API is the browser-based implementation of this protocol and allows our web applications to "speak" MIDI and communicate with any MIDI-capable hardware that might be connected to a user's device.
Not a musician? Don't worry! We'll discover very quickly that this simple protocol designed for electronic musical instruments can be used to build fun, interactive, and completely non-musical things.
Why would I want to do this?
Great question. The shortest answer: because it’s fun!
If that answer isn't satisfying enough for you I'll offer this: Creating something that straddles the line between the physical world and virtual world we spend most of our days building things for is a good exercise in thinking differently. It's an opportunity for creative tinkering and for considering and creating new user interfaces and experiences to navigate. I truly think this kind of playful exploration helps make us use different parts of our brains and makes us better developers in the long-haul.
What kind of things can I build?
youtube
Cellular Automata on a MIDI controller
youtube
Playing Go
youtube
Whack-a-mole
youtube
Mixing colors with hand motions
What do I need to get started?
Here are the prerequisites to start experimenting with WebMIDI:
A MIDI controller
This might be the trickiest part. You'll need to procure a MIDI-capable piece of hardware to experiment with. You might be able to find something cheap on Craigslist, Amazon or AliExpress. Or — if you're really ambitious and have an Arduino available — you can build your own (see the end of this article for more information about this).
A WebMIDI-capable browser
This browser support data is from Caniuse, which has more detail. A number indicates that browser supports the feature at that version and up.
Desktop
ChromeOperaFirefoxIEEdgeSafari4330NoNo76No
Mobile / Tablet
iOS SafariOpera MobileOpera MiniAndroidAndroid ChromeAndroid FirefoxNo46No7678No
As of this writing, according to caniuse.com it's supported by approximately 73% of browsers, though most of the heavy-lifting is done by Chromium. Any Chromium-based browser will support WebMIDI—that includes Electron apps and the newer Chromium-based Microsoft Edge. It's also supported on Opera and the Samsung Internet Browser. On Firefox it's still being discussed but hopefully coming sooner than later.
Hello, WebMIDI
Once you've procured both of those things we can start writing some code! Working with the WebMIDI is not terribly different than working with other browser APIs like the Geolocation or MediaDevices APIs, if you're familiar with either of those.
The high-level flow looks like this:
We detect availability of the WebMIDI API in the browser.
If detected, we request permission from the user to access it.
Once we're granted permission, we now have access to additional methods to detect and communicate with any connected MIDI devices.
Let's see that in action:
if ("requestMIDIAccess" in navigator) { // The Web MIDI API is available to us! }
Now, assuming we're in a WebMIDI-capable browser, let's request access:
navigator.requestMIDIAccess() .then((access) => { // The user gave us permission. Now we can // access the MIDI-capable devices connected // to the user's machine. }) .catch((error) => { // Permission was not granted. :( });
If the user gives us permission, we should now have access to the MIDIAccess interface. This helps us build a list of the devices that we can receive MIDI input from and send MIDI output to.
Let's do that next. This is the code that goes inside the function we're passing into then from the previous code snippet:
const inputs = access.inputs; const outputs = access.outputs; // Iterate through each connected MIDI input device inputs.forEach((midiInput) => { // Do something with the MIDI input device }); // Iterate through each connected MIDI output device outputs.forEach((midioutput) => { // Do something with the MIDI output device });
You might be wondering what the difference is between a MIDI input and output device. Some devices are setup to only send MIDI information to the computer (these will be listed as inputs) and others can receive information from the computer (these will appear as outputs). It's not uncommon that a device can be send and receive, so you will find it listed under both.
Now that we have code that can iterate through all the connected MIDI devices, there are basically only two things we'll want to do;
If it's an input device, we'll want to listen for any incoming MIDI messages emitting from it.
If it's an output device, we might want to send MIDI message to it.
The code for setting up an event listener to respond to any incoming MIDI messages from our input devices looks very similar to an event listener you might setup for other DOM events, except in this case, the event we're listening for is the midimessage event:
input.addEventListener('midimessage', (event) => { // the <code>event object will have a data property // that contains an array of 3 numbers. For examples: // [144, 63, 127] })
If we want to send a MIDI message to an output device the code we can do so like this;
outputsend([144, 63, 127]);
Here is a CodePen demo with most of this put together for you. It will let you know about all of the MIDI inputs and output devices connected to your system and show you incoming MIDI messages as they happen:
See the Pen
WebMIDI Basic Test by George Mandis (@georgemandis)
on CodePen.

WebMIDI Test demo screenshot highlighting which MIDI input and output devices were found

WebMIDI Test demo screenshot highlighting MIDI messages received by one of the MIDI input devices. In this case, we’re seeing when a key on the MIDI keyboard is pressed.

WebMIDI Test demo screenshot highlighting MIDI messages received by one of the MIDI input devices. In this case, we’re seeing when a key on the MIDI keyboard is released.
You might be wondering a couple things at this point:
When you're listening for the midimessage event, how do I make heads or tails of that three number array in event.data?
Why did you send an array of three numbers to your MIDI output device and why did you send those specific numbers?
The answer to both of these questions lies in further exploring and understanding how the MIDI protocol works and the problems it was designed to solve.
Anatomy of a MIDI message
When a MIDI controller "speaks" to another MIDI-capable device or computer, they are sending and receiving MIDI messages with one another. The protocol underlying this communication is fairly simple in practice but a little verbose when explained. Still, I'll try.
Every MIDI message consists of three bytes consisting of 8-bits (0-255). Represented in binary, a message might look like this:
10010000 | 00111100 | 01111111
There are only two types of MIDI messages: Status and data. Every message will consist of one status byte and two data bytes.
The status byte is intended to communicate what kind of message is being delivered, including things like:
Note On
Note Off
Pitch Bend Change
Control/Mode Change
Program Change
...and many others.
If you're coming at this from a non-musical background, these status messages might seem kind of strange, but don't worry too much about it. The data byte is intended to provide more information and context to the status. To give an example, if I have a MIDI piano plugged into my machine and press a key to play a note, it would send a "Note On" status byte accompanied by data bytes indicating which note I played, and perhaps how hard I pressed it.
A status byte will always begin with the number 1 and data bytes with the number 0.
1x0010000 | 0x0111100 | 0x1111111 ^status ^data1 ^data2
For data bytes that leaves 7-bits to express the data in that byte. That gives us an integer range of 0-127.
For status bytes, the next 3-bits after the first describe the type of status message while the remaining 4-bits describe the channel. To break down our binary representation:
1x001x0000
How this translates into WebMIDI and JavaScript
As you may have guessed from the code samples earlier, with the WebMIDI API, we seldom have to deal with these binary representations directly. When we send and receive these messages in JavaScript we simply use arrays like this:
[144, 63, 127]
If you're working with existing musical hardware, it's helpful to have this deeper understanding of how and why the messages are structured the way they are. It's helpful to know that receiving a 144 in your first byte means a note is being turned on in the first channel and that a 128 would indicate that a note is being turned off.
However, if we're building non-musical experiences and creating our own hardware, these numbers can be repurposed to represent whatever you want!
What kind of hardware can I use?
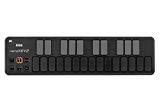
Any MIDI-capable device that can be connected to your computer should also be accessible through the WebMIDI API. Devices that are capable of sending MIDI data to another MIDI-capable device are often called MIDI controllers. A common example would be a simple, piano-style keyboard like this Korg nanoKey2:

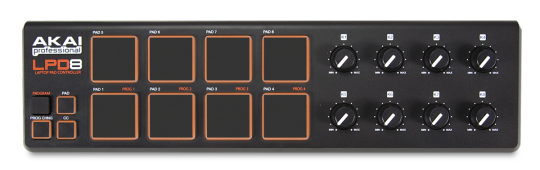
But they can vary widely in appearance and modes of interaction. Buttons are certainly common, but you might also find some that incorporate dials or pressure-sensitive pads like the AKAI LPD8:
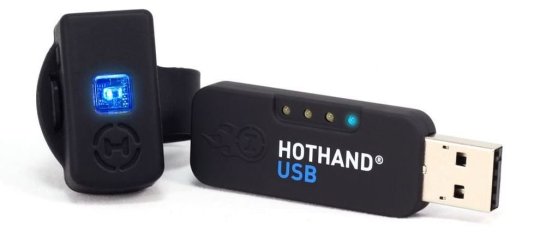
Others use more abstract and interesting modes of interaction, including mapping motion or breath to MIDI signals. For example, this controller (The Hothand from Source Audio) uses three accelerometers to map hand gestures to MIDI messages:
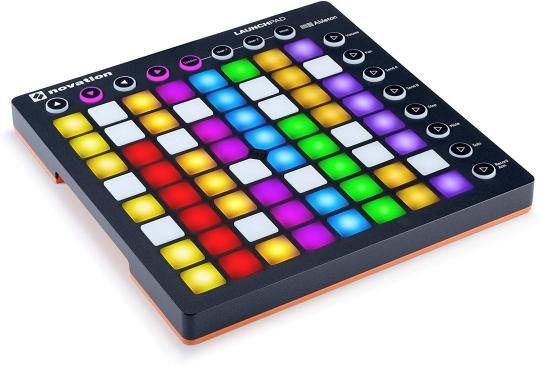
Some controllers can both send and receive MIDI messages, allowing for you to have a true two-way conversation with the physical world. The Novation Launchpad is a classic example — buttons can be pressed to send messages and messages can also be received to dynamically change colors on the device:
Can I build my own hardware?
It turns out they're not terribly difficult to build and you can find a lot of home-brewed MIDI controllers out in the wild. They can get much more elaborate in a hurry. Some can be downright bananas:

Bananas connected by wires to an Adafruit Circuit Playground programmed to function as a MIDI instrument
Building your own MIDI controller will take you a bit outside the world of JavaScript, but it’s still surprisingly accessible if you’re familiar with or interested in the Arduino platform. The Circuit Playground Classic from Adafruit is a great device to get started with and you can find starter code to flash to the device and make it into a multi-faceted MIDI controller here on GitHub.
Summary
The WebMIDI API is a low-barrier-to-entry way for front-end developers to start experimenting with basic hardware and software interactions. The implementation is relatively straightforward compared to some other hardware web APIs (like Bluetooth) and the MIDI standard is well-documented. There are lots of existing MIDI-capable devices out there to experiment or build cool things with, and if you really want to go all-out and start building your own custom MIDI hardware for your project, you can do that too.
Go out there and make something!
The post Dip Your Toes Into Hardware With WebMIDI appeared first on CSS-Tricks.
via CSS-Tricks https://ift.tt/2EakgJJ
0 notes
Last Seen Blogs

kosegruppie
Kosegruppie

captainamericadrama
Captain America Drama
somos-bruto
Bruto

urbancurrents-blog
Urban Currents®

sx2020
Unbetitelt