#nc111 tutorials and studies
Explore tagged Tumblr posts
Visit Tumblr Blog
Explore Tumblr blogs with no restrictions, modern design and the best experience.
Last Seen Tumblr Blogs


Fun Fact
Users from the US are the majority of Tumblr visitors.
Note
The way you color is absolutely phenomenal! Looking at your latest Naruto piece I’m just absolutely astonished by how the colors all work together. If you could give any recommendations for tutorials for a fellow artist I’d so appreciate it!
Keep up the amazing work 💕
~pudding 🍮
Wow, thank you so much!!! That’s so kind! I’m very happy you like it! To be entirely honest I’m still learning how to colour—a lot of what my process is right now for colouring is just… vibes. I play around with it until my brain is like ‘I like this’, and I haven’t really watched many tutorials for colouring (I should…) so my best point of reference is to see how an artist you likes does colour and experiment on your own canvas to see how they achieve that. Studying and experimenting is a huge part of the learning process, and finding what works for you specifically.
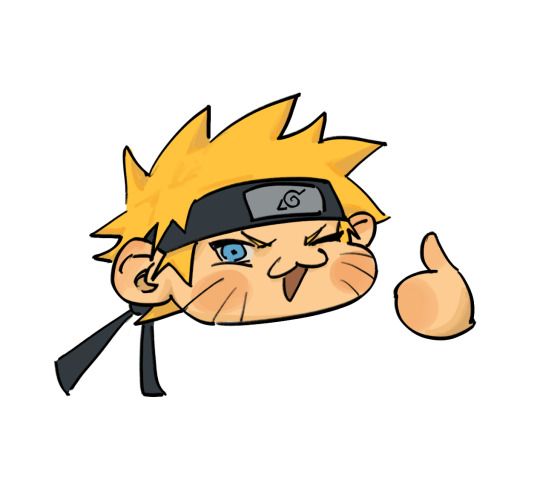
The simplified version of my process is that I paint with colours that act as the general idea of what the base colours are, and then play with curves to lower contrast + darken. I did a very quick example of what that looks like with this Naruto chibi:

This is what curve setting I use on procreate (it’ll look a little different when I do it on clip studio or photoshop, but the points remain the same. First dot is brought down a little, second dot is brought down a little, lol):

(usually I play around with curve settings a lot depending on the piece, but again the variation is based purely on what itches my brain. I just try to maintain that the curves, for me, lower contrast and darken the colours.)
For shading I will often desaturate+darken the flat colour, but I 1000% go in with a more saturated tone in between the shading and the flat colour, and over the course of painting and colour picking, it just ends up being this amalgamation of colours that work together since they are MOSTLY within an analogous range. Does that make sense?! I’m a terrible teacher, LOL!
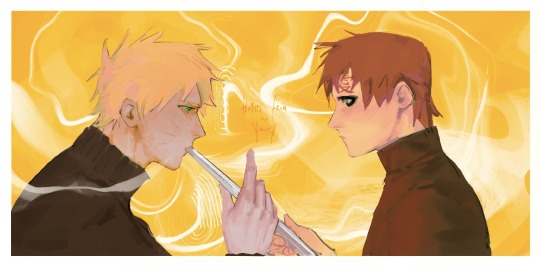
If you’re interested in slightly more details of my process, I will say that when I do have a background, that colour is usually the first thing I put down onto my canvas. I will fill in the lineart with a darker version of that colour and then start getting a basic idea of shading down before doing any colouring and rendering just to see how the general composition will feel. With the narugaa piece you mentioned, it looked like this (ignore all the white around them, this was going to be more type-heavy before I realised I hate doing text LOL):
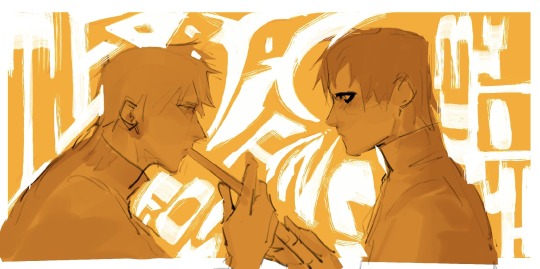
It’s not quite just shading, but the goal is to find the values that I would be happy with seeing throughout the piece and on this hue+value of background. Also, at this point, I’m drawing with the assumption that if I were to do this completely monochromatic, the values would look like this, ya know. And then afterwards, like I depicted in the simplified version way above, I lay down flat colours. In this case, my colours were laid down on a layer that was on the “hard light” blend mode, but I think you should just do whatever blend mode gives you the colours you like best. From here, if you combine layers so that it’s a normal layer, then just playing with the curves should get you the effect that I usually work with, but this is what those base colours looked like in my case:
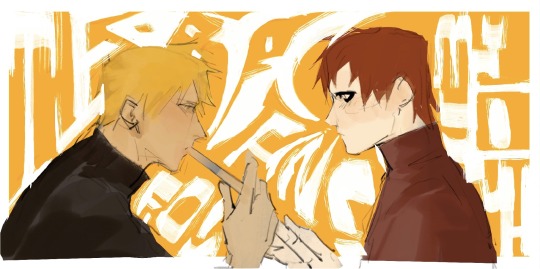
You can skip this part if you feel you’re good enough at colour picking, but it helped me personally with laying down colours. I did curve adjustments + new blend mode (pin light) so that I could play with complimentary colours in a way that would add some “flavour” to the drawing later. In this case it was this greenish+reddish colour for Gaara and yellowish+purple/bluish colour for Naruto (I know his skin looks more pink/red than anything but it’s significantly more cool toned, which is what I was considering for colour harmony/relationship):
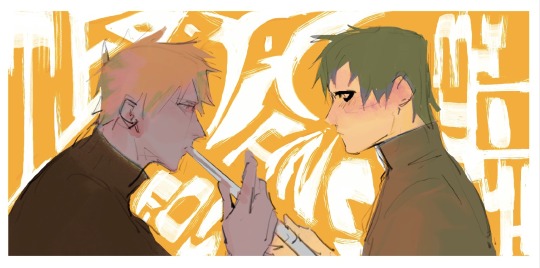
I did most of the painting over these colours before using a lasso tool to pick out specific areas and change the curves to be the Actual colours of the characters, but you can mostly tell what sort of colours I maintained from the previous version vs which ones I changed. I really do think this made for more interesting visuals, but I also think it’s sort of a convoluted process that you can just do from the get go if you have a better grasp of colour theory than I do. Unfortunately I’m not knowledgeable enough about colour to get colour harmony just by picking out the colour from a wheel. This is why I love curves so much!!! Anyway, this is what it came out to:
And then I duplicate the canvas so I can merge all the layers into a single one, and then do the final curve adjustment to make everything feel cohesive. I mostly used the curve adjustments that I showed in the very beginning of this post, but because so many of the colours in this piece felt analogous, I actually valued slightly more contrast in this piece than I would want for most other pieces. Posting the final piece here for convenience:
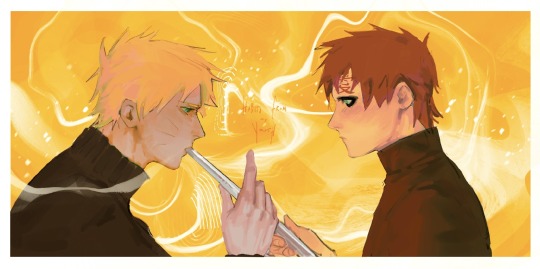
And that’s it!!! I’m super mega sorry for how long and convoluted this probably is LOL but this is my process……. I’m certain other artists have better tutorials and I will always recommend Sinix Design on YouTube for ANY art tutorial that you might need, but if I’m being entirely honest, anything I know of colour is entirely just me consuming a lot of art over the years and going ‘oh, I like that’ or ‘oh, this is a pattern between these two artists, so it must be right’ or ‘oh, this random artist posted a tutorial and it looked good, let me glance at this and hope it somehow subconsciously sticks’ LOL. There are definitely fundamental rules that would help to know (shadows will usually be less saturated, deciding between high key vs low key composition as far as your value scale goes, what sort of emotion each colour combination/scheme evokes, the power of tints and shades) but a simple google search on basic colour theory will already explain most of this to you. Passively implementing these practices into your drawings, in my experience, helps make a lot of these rules second nature when you’re drawing. Above all though I think you should just do whatever itches your brain LOL. I have a huge reference library that I often refer to—I recommend any artist to do the same :3
#nc111 tutorials and studies#thanks again for the kind words#to be complimented on my colouring… I am floating in heaven
42 notes
·
View notes
Note
i love your drawings so much<333 your art is so perfect like the anatomy looks so beautiful!!!! how did you learn to draw that anatomically correct? like do you use a lot of references or do you just know how to draw bodies atp? bc im struggling with anatomy lmaoo
Wahhhhh!!! 🥹 Thank you so much!!! I'm holding this praise very close to my heart right now!!!! I've spent a lot of time over the years doing studies and having images of muscle group diagrams open while drawing, so I'm super happy to hear it paid off!
So I don't really use references anymore when I start drawing and composing the pose, but I absolutely still reference diagrams of muscle groups when I find myself hesitating with the way certain parts of the body may appear. Something like this, for example:
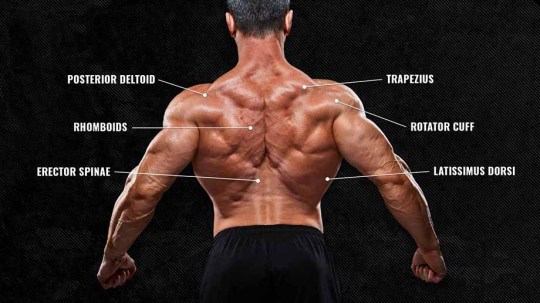
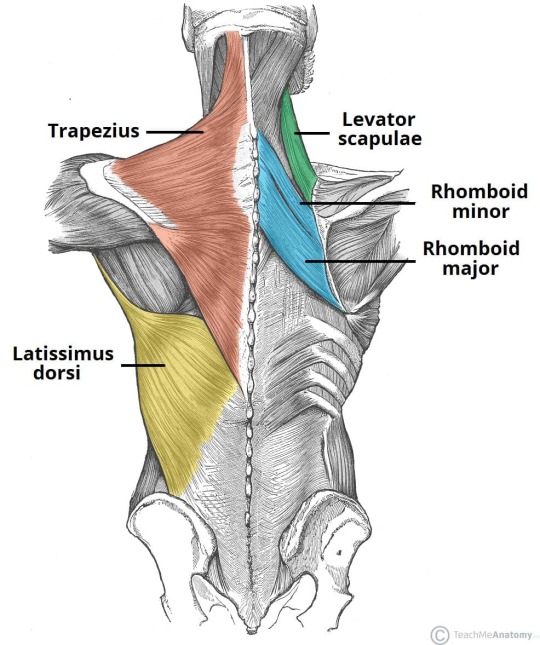
Something that gives me an exaggerated idea of what that part of the body looks like so I can soften it to my liking. My main goal when using reference isn't to do a 1:1 replica, but rather understand What I'm Drawing while I'm drawing it. At this point of my art journey, I'd prefer having more practise in manipulating these muscles than just practising drawing what I can see.
(Worth mentioning I absolutely still practise observational drawing, and it undoubtedly aids this aspect of my drawing, too. I used to use fanart specifically to practise it, but this year I've taken to separating my fanart from my study art because I find that it allows me to be less miserable when it doesn't come out good LOL now I just do oil painting which helps me focus more on general shapes and values)
Using these types of categorised diagrams has also helped me simplify that initial structure of the body when I'm sketching. Having general markers of what muscle goes where definitely helps me set the position of the body in the long run.
I very, very highly encourage the use of references always, but especially when still learning to get more confident with anatomy!!!! Me not using references for poses is very much at the cost of having anatomy that could be even More accurate LOL I merely know where to place the lines to make things look Passably believable. Buuuttt that's also just the process of improving. Imagination is a muscle that has to be trained too. What's been helping me find a happy middle nowadays is drawing with references that cover small parts instead of using the reference for the whole illustration. FOR EXAMPLE!!!

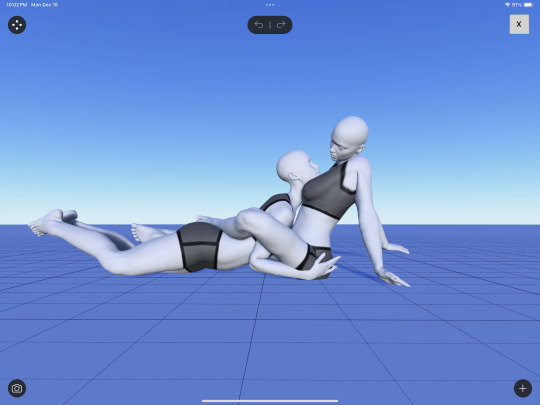
I had drawn this much of the catlaila I recently posted without a reference before I was like.. Huh. I can't really figure out what I want to with the arms, but I also don't know what is Physically Possible to do with the arms here, so I'll experiment with my 3D poser (WHICH BTW I LOVE AND USED TO USE RELIGIOUSLY FOR EVEEERYTHING SO!! GO DOWNLOAD LOL it's called MagicPoser) and I had adjusted the models up to this point before being like, ok yeah this is enough for me to go off of as something that is physically feasible. So the posing of the rest of the models is whatever because I just needed to know what Laila's arms would look like. This was the final linework:
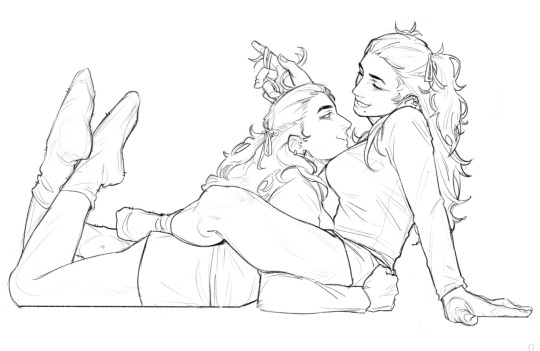
Like, it's still not a 1:1 with the reference, but it's just enough that it seems feasible !! My personal opinion is that sometimes reference doesn't capture the Shapes that I want it to, even if it's more realistic, so it's ok to break rules and just go with your flow lol... It's shocking how many times I've thought references of real human bodies look unrealistic and ridiculous HAHA Hence focusing more on learning the muscle groups/shapes so that I can adjust to my liking without sacrificing the integrity of the anatomy...
Also, not necessarily on anatomy, but I use plenty of references when I need to see things like how tight shirts stretch over breasts, or how cloth sits at a certain angle, or, honestly, hands. I almost always draw hands by looking at my own. I cannot stress enough: I use plenty of references. I am not a magician and I don't have perfect memory, even after four/five years of studied drawing x)))
Anyway. I've yapped so much. I try to be detailed in my explanation of anatomy because god knows how much I struggled with it!!! I STILL do. If you ever catch the link to it, I often stream these drawings and you'll see how many times I duplicate these layers so I can erase whole sections and try again, or how often I'll attempt the position of a leg over and over before I feel its right. The final product is so quick to digest but the process is frustratingly finicky, I promise, LMAO.
I hope this wasn't too convoluted and long, and I wish you the super best on your anatomy journey! If you ever need help and catch me at the right time, I'm totally open to giving any work a second opinion ! :3c
45 notes
·
View notes
Note
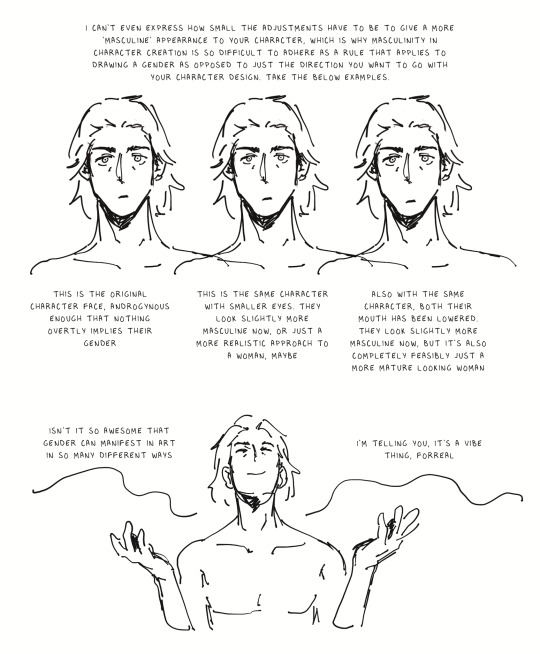
I love the way you draw male characters. I have always had trouble drawing male and male-presenting characters. Do you have any advice for or could you explain your process of drawing male characters?
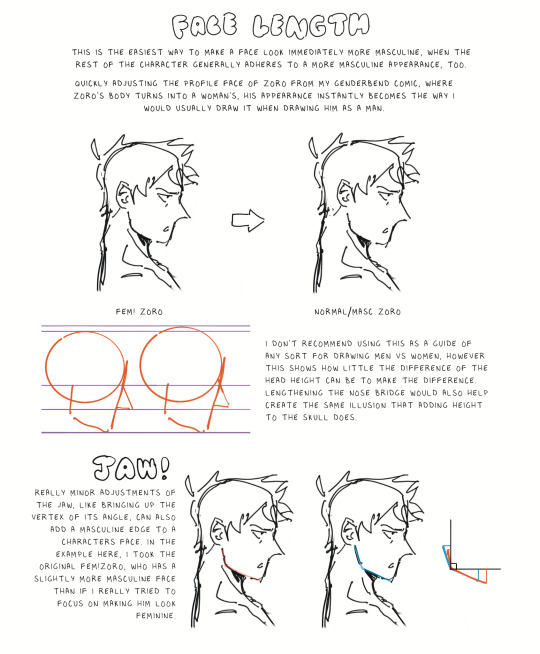
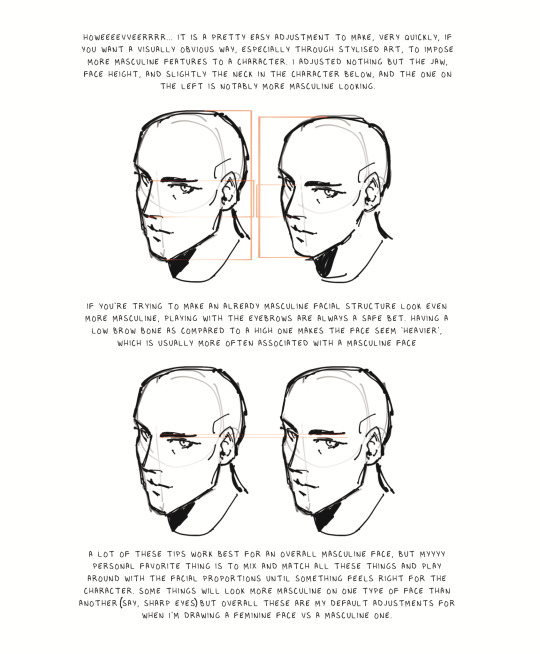
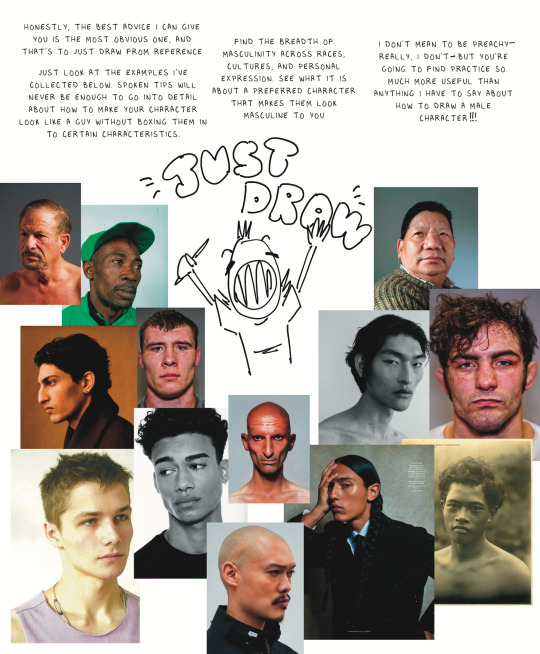
Thanks so much! Oh man, this is a difficult question… I tried to illustrate my process below but I’m going to TLDR it as well: use reference for the type of masculinity you want to go for. I totally get what you’re asking for, so I tried to focus on that for this “tutorial”, but really I would just focus on portrait studies so you don’t get pigeon-holed into drawing male characters under “rules” of male character design. Male character design shouldn’t exist - good character design should. Focus on the latter! :3c


#nc111 tutorials and studies#nc111qna#it’s soooo hard to do a tutorial or give advice on this sort of thing#because again - I totally get what you’re asking anon#but any visually directive advice I can give is not actually conducive to great character design#you should absolutely make the adjustments that I talk about in this ‘tutorial’ for girls characters as well#it’s exceptionally important that you don’t think men have an inherent visual quality that you couldn’t absolutely apply to women as well#or any gender#you get what I mean. a face is a face before it’s a gender#ya know?#and of course there’s a general presentation of gender that makes for faster association than others#but in art that’s not that important#ANYWAY I don’t mean to be preachy I just think this is such a difficult topic to earnestly give advice on whilst also trying to tell you#not to actually take Objective Advice on this#there is no objective advice for how to draw the face outside of literal anatomical proportions that biology abides by#but not in a gender way just. in a human way LMFAO#ok anyway I’m done yapping. please anyone feel free to add or correct anything they deem needs to be mentioned
205 notes
·
View notes
Text
I wrote this on twitter but I thought I'd put it here too, since I occasionally get asks on how I draw/any tips I might have. On twitter I also made the caveat that I don't feel I'm qualified to give anyone tips, LOL, but I was drawing today for an assignment and felt like this is worth noting to any beginner artists who have a tendency of clinging onto sketches that they feel like they finally got right! (A.K.A, a habit I still have years later HA!) This isn't so much of a tutorial as expressing my thought process in this discovery of how to draw more dynamic pieces. I found it to be satisfying on my end, seeing it unravel, so hopefully it can help someone who may be struggling with the same thing I am.
MAKING MORE DYNAMIC PIECES, A PERSONAL STUDY!:
I wasn't upset by this drawing, but I could tell there was something stagnant about it so I ended up pushing it and redrawing it a million times to see if I could somehow make it look more dynamic.

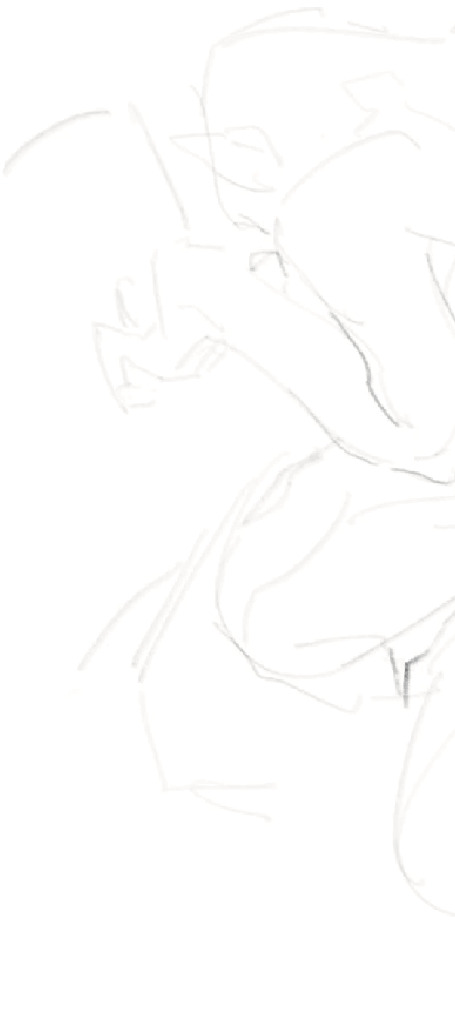
Here's one part of the timelapse - I'm clearly adamant on trying to make this pose/composition work but while the sketch itself may look better, the stagnation hasn't changed. Perhaps this works for some people, but anyone seeking a dynamic visual will be able to spot that this simply isn't working as anything more than a semi-decent anatomy study attempting to be applied.
I changed the position of both arms, I tried to play around with the angle of the head, I tried to just the hips forward more so that the spine had increased curvature, but the main issue, really, was that the initial composition lacked the dynamism in general. It prioritised dramaticism over dynamism. Both can exist in the same piece - it did not, in this one.
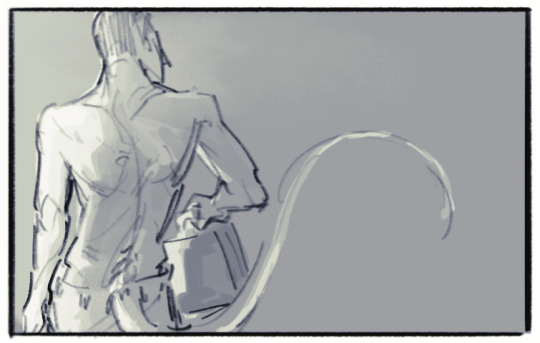
This was the new sketch I started with. Less rigid base to go off of. Just getting down the general shape I wanted to score - make the spine and tail take a sort of mid-whip path, shoulders hunched, hips cant forwards, as if he's curling in on himself. I think for a dynamic piece, it's more helpful that your initial sketch uses the body as a general marker as opposed to something to do lineart over (granted, I don't really do lineart anyway, my sketch is usually the extent of my "lineart", but since this is just looking at creating a more dynamic composition, I think it still applies!)

Here it's the same principle. For the left image (the legs) I've established where the knee of the right leg goes, and where the hip that precedes the left leg will sit. These are just base anatomical structures that help me figure out 1. Whether or not the mere idea of this composition will work, and 2. where I have to stop once I start drawing. For me, having some sort of limitation for the body helps me stay within range of proportionate anatomy (not that I particularly care for the anatomy to be realistic, just proportionate to the style I'm drawing in)
On the right image is also the same principle. Establishing the movement of the arm, the elbow/arm bend, and the hand. (If you see the full sketch before the two above, I established the hand in that one too - it really is helpful figuring out the placement of the hand ahead of time.) If it looks atrocious afterwards I always have the lasso tool/eraser to save me.
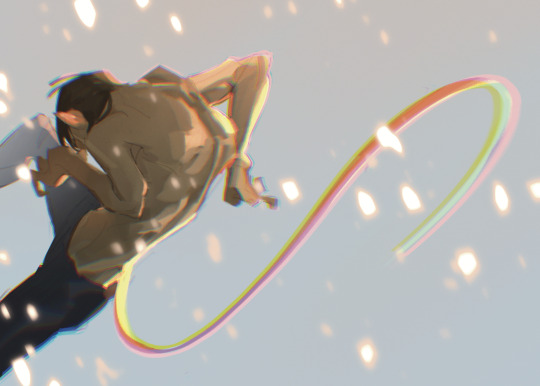
The new attempt brings me to this. While preference in art is subjective, I do think I'd be staying in SOME realm of objectivity when I say this is more dynamic than my initial sketch, LOL. Of course, lighting/rendering choices help push the composition a little more, but this achieves what I couldn't do with that first sketch. I had a general idea, but it's important to know when to let go of something that clearly isn't working.
Would love for anyone to add their own tips or ideas to this post - I'm not particularly known for dynamic pieces so I'm always looking to learn. This was a really valuable study for me so I wanted to share it, but everyone has their own method and what works for me may not work for the next person!
There's a few other asks that asked me for tips on general anatomy, and more specifically legs (oh dear god, I'M going to need to study for that before writing out any sort of resource guide for that, lol) that I hope to get around to doing in the near future. Thank you for your guys' vote of confidence, haha! ❤️
#nc111 tutorials and studies#sketch#art tips#art help#study#I had a lot of fun with this piece so while part of this was definitely to passively respond to my inbox requests#a big part was also just me wanting to talk about my brain expanding as I realised how to Push A Composition#I can't wait to try more things in the future to try and get more dynamic compositions#let me know if this was helpful let me know if it was utterly useless#I'm not a great teacher but I used to tutor my neighbours 7 year old daughter and she found my methods boring but hey she got better
68 notes
·
View notes