#nest cam troubleshooting
Explore tagged Tumblr posts
Visit Tumblr Blog
Explore Tumblr blogs with no restrictions, modern design and the best experience.
Last Seen Tumblr Blogs


Fun Fact
Post activity is at the highest at 4:00 pm EDT; notes peak at 10:00 pm EDT.
Text
Quick Steps For Nest Cam Troubleshooting
Several issues could arise with your Nest camera. If the Nest isn’t working properly, you must check the power source and ensure it is working. Otherwise, you must plug the camera into another power source. Also, ensure the camera has a stable connection with the WiFi, as it will not function otherwise. You can also try power cycling the camera to fix any minor glitches, as it’s an effective Nest camera troubleshooting method. Contact us to know more.
0 notes
Text
Unlock Precision and Speed with Expert Laser Cutting Machine Manufacturers
Boundless Innovation in Each Cut with the Best Laser Cutting Machine Manufacturers.
Discover our dual-pallet laser cutting machines, engineered for high-speed production and reduced downtime. As reliable Laser Cutting Machine Manufacturers, we ensure that our machines come with simultaneous load/unload features to streamline workflow without sacrificing top cut quality. Optimized nesting software provides precision, burr-free cuts up to 50mm thickness, with no warping or tapering.
Key Performance Features of your most trusted Laser Cutting Machine Manufacturers.
As premier Laser Cutting Machine Manufacturers, we provide high-performance systems for efficiency, accuracy and flexibility. Our machines include a double pallet system, enabling quick job changing with simultaneous loading and unloading to increase throughput.
With micron-grade precision, they are ideal for fine detailing and precise contour cutting. Higher cutting speeds utilizing high-speed fibre lasers and motion control units allow greater productivity for various applications. The capacity to cut multi-materials is assured to deliver clean and precise cuts in mild steel, stainless steel, aluminium, copper and others.
A streamlined, user-friendly interface constantly improved by software updates and user input guarantees usability. Heavy-duty construction delivers vibration-free stability, even in continuous working situations and power-saving fibre lasers reduce long-term operating expenses.
Integrated safety solutions, such as emergency stop functionality and safety enclosures, guarantee safe operation. Available in configurations with different laser powers and table sizes, our equipment fulfils unique workflow needs.
Cut quality is sustained at high velocities with Fly Cut technology and our end-to-end support features technical support, web-based troubleshooting and predictive maintenance software.
Technical Specifications of the best Laser Cutting Machine Manufacturers at a Glance.
The Winarc two-pallet fibre laser sheet cutting machine is designed to deal with an extensive series of sheet sizes with a work length from 3000 mm to 8000 mm and a width from 1500 mm to 3000 mm. It has an axis speed up to 120 meters per minute, yet at the same time achieves a delicate positional accuracy of ±0.03 mm, which is ideal for bulk precision processing.
Driven by Ethercat networking, it provides real-time responsiveness for precise and efficient functioning. The machine accommodates laser powers ranging from 2 kw to 20 kw, with the flexibility to cut materials of different thicknesses. It is also fully integrated with CypNest, Radan and SigmaNest CAD-CAM software to enable precise nesting, seamless programming and optimum material utilization.
Winmaster dual-pallet laser cutting machines are equipped with globally recognized components to ensure maximum durability, accuracy and productivity in demanding industrial environments.
Fibre Laser Source
Brands: Raycus, IPG, Max, Trumpf
These best-in-class sources provide superior beam quality, low maintenance and reliable performance across metals.
CNC Control System
Brands: Cypcut, Eckelmann
User-friendly interfaces paired with high-speed processing allow for responsive and precise control.
Linear Guides & Bearings
Brands: Hiwin, CPC
Engineered for precision motion and long-lasting stability, ensuring high accuracy with every cut.
Servo Motors & Drives
Brand: Yaskawa
Renowned for fast acceleration and pinpoint control, boosting both speed and reliability.
Cooling Unit
Brands: Hanli, Hexacool, S&A
Ensures thermal stability, safeguards core components and extends service life.
Laser Cutting Head
Brands: Precited, Ray tools, WSX, Bochu
Designed for clean, efficient cutting with adaptive focusing and edge sharpness across material types.
0 notes
Text
0 notes
Text
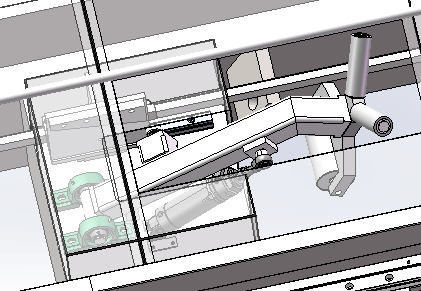
Remcor Apollo BK series three chuck tube fiber laser cutting machine can cut all types of metal tubes, from mild steel to stainless and also non-ferrous metals. It is also valid for cutting some reflective metals like aluminum, brass and copper, etc. The thickness of the metal can be anywhere up to 30 mm. The diameters can be up to Ø 350mm tubes. Can cut different shapes on the surface of square tubes, oval tubes, U tubes or rectangular tubes or other special shape tube products. The most outstanding feature of our BK system is that can realize the real Zero-tailing cutting. And our automatic loading system freedom operator from the hard and heavy pipe loading problem.
Apollo BK Three-chuck Tube Laser Cutting Machine 1000w-6000w Features
Different shapes & Different sizes
1. All kinds of pipe processing, no need to change clamping scheme.
2. Match the three-dimension head to solve all kinds of the pipe inflection points.
3. CNC and CAM can calculate complex profile sections. Φ8-Φ440 mm range.
Max weight
600kgs load and unload maximum length up to 12M.
Raw material waste
Unique 3 chucks technology, zero tailing, high pipe utilization Average material can reduce up to 30%.
Labor cost
Real time, high precision, fast troubleshooting servo motor control automatic and semi load can be chosen.
Environment pollution
Dust collection box included full sealing chuck to prevent dust into chuck to have a longer lifetime.
Low efficiency
1. Simple to operate, new upgraded system with servo motor to realize the high automation and simplication.
2. High-precision chuck to make sure high speed, stability, high quality cutting.
3. Automatic loading and unloading to improve efficiency.
Apollo BK Three-chuck Tube Laser Cutting Machine 1000w-6000w Parameter Details
Item
6020-BK
7025-BK
9025-BK
9034-BK
Power range
1500-6000W
Chuck structure
3 chucks
Tube size
Round Type: Φ15-200mm
Round Type: Φ15-245mm
Round Type: Φ15-245mm
Round Type: Φ15-330mm
Square Type:15-140mm
Square Type:15-175mm
Square Type:15-175mm
Square Type:15-230mm
Positioning accuracy of x& y
±0.05mm/m
Max positioning speed x&y
100m/min
80m/min
Max cutting length
6000mm
7000mm
9000mm
9000mm
Tail length
≥ 0mm
Max weight single tube
135KG
260KG
260KG
500KG
Max loading length
6000mm
7000mm
9000mm
9000mm
Fully Annealed Table
The bed body adapts the segmented rectangular tube welding bed with fully annealed treatment at over 600⁰. After tempering, the strength, rigidity and stability are guaranteed, the precision would be tested and debugged which can make sure the precision can be maintained for a long time. The table is equipped with automatic lubrication device, which ensure the moving parts operate in good condition and improve the service life of guide rails, gears and rack.
Follower Support
The follower support device will be optional. The follower support is mainly to assist in controlling the excessive deformation of cutting longer pipes (pipes with smaller diameter), and the servo motor drives the up and down movement of the pallet assembly. When the chuck moves to the corresponding position, the auxiliary support automatically drops for avoidance.
Smart Auto Focus Laser Head
Standard auto focus function, no need focus adjustment while changing sheet; Automatic tracking and accurately adjusting the focus according to the material thickness to ensure the best cutting effect of the whole board. Shorter perforation time, better perforation quality, high-speed cutting, saving time.
Intelligent CNC Operating System
tube laser cutting machine intelligent cnc operating system
It simplifies complex CNC machine operation and integrates CAD, Nest and CAM modules in one. From drawing, nesting to workpiece cutting all can be finished by a few clicks on big IPAD Screen. Realize the intelligent diagnosis, multi-threading operation, three-level perforation, laser energy control, adaptive edge-finding, automatic corner acceleration and deceleration, flight cutting, switching worktables, mechanical accuracy compensation etc.
Pneumatic Clamp Chucks
Pneumatic clamp design on both sides. The dual-chucks help reduce tube vibration to a minimum, guaranteeing high accuracy in even complex tube configurations at high cutting speed. Suitable for cutting a range of tube diameters from Ø20 mm to Ø220 mm and various wall thicknesses.
Front chuck
tube laser cutting machine front chuck
Back chuck
tube laser cutting machine back chuck
Fractional Automatic Support Technology
Applies the intelligent tube support design, which can solve the deformation problems in the process of long tube cutting.
Equipped with two sets of variable-diameter support structures, which are automatically lifted by the cylinder to avoid the rear chuck in processing. When processing profiles with different diameters, manually turn the variable-diameter wheels to achieve fit and support for different-sized profiles. The variable-diameter wheels It can be supported every two degrees of rotation to reduce the diameter of the circumscribed circular tube by 2mm

0 notes
Text
Simple Guide: How To Connect A Nest Camera To WiFi
Nest cameras are amazing and simple to use. Today, I will tell you how to connect a Nest Camera to WiFi. The process takes only a few steps.
What is a Nest Camera? A Nest Camera lets you monitor your home remotely via a mobile app. It has night vision and motion detection. To use these features, you must link your Nest camera to WiFi. The process is easy, whether you have a Nest Cam Indoor, Outdoor, IQ, or Hello. Read on to find out.

How To Connect A Nest Camera To WiFi
Step 1: Unboxing and Preparing Your Nest Camera
Unbox your Nest camera and check that all of the parts are present before using it. The camera itself, a power adapter, a USB cable, and any other necessary accessories should be located. Set your camera so it can see the desired region.
Step 2: Powering On Your Nest Camera
Use the included USB connection to connect the Nest Camera to WiFi the power supply. Connect the power adapter. A light on the front or back of the device will start to flash as your camera begins the initialization process.
Step 3: Install the Nest App
Nest is on Android’s Google Play Store and App Store. Install the app and log in or create a Nest account.
Step 4: Adding Your Nest Camera to WiFi the Nest App
Step 5: Connecting Your Nest Camera to Wi-Fi
Set up your camera’s Wi-Fi with the app. Verify that the Wi-Fi network your Nest camera will utilize is also linked to your smartphone or tablet. Choose your network from the list of Wi-Fi networks accessible in the app, then input the password when required. Nest will connect to your Wi-Fi network after that.
Step 6: Camera Placement and Testing
The Wi-Fi-connected camera must be carefully positioned for the best coverage. You may move the camera’s location as necessary using the Nest app, which offers a live view of the device. Make sure the camera gives a good view and captures the required region.
Step 7: Additional Nest Camera Settings
To alter the features of your camera, go through the Nest app’s numerous options. You may turn on functions like notifications, night vision, and motion detection. You may modify the camera’s behavior using these options to meet your unique needs.
Step 8: Secure Your Nest Camera
Protecting your Nest camera from unwanted access is essential since it holds valuable data. Consider two-factor authentication and a strong Nest account password for added security. To make sure you get the most recent security updates, often upgrade the firmware on your Nest camera and app.
Step 9: Troubleshooting Tips
The Nest app offers help resources and troubleshooting instructions in case you run into problems during installation or use. For further information, see the community forums or the Nest website.
In conclusion, you can safely watch your home by connecting your Nest Camera to WiFi network. The Nest camera’s seamless interaction with the Nest app enhances smart home control and customization. Always use secure passwords and update your camera’s firmware. Enjoy your Nest camera’s ease and security.
FAQ About How To Connect A Nest Camera To WiFi
How come my Nest camera won’t connect to Wi-Fi?
Your Nest camera may not connect to Wi-Fi for many reasons. A weak Wi-Fi signal, incorrect network credentials, or camera firmware problems could cause it. Verify your network name and password and Wi-Fi signal. If the issue persists, reboot your camera and router, or contact Nest customer support.
Why is Nest’s doorbell not connecting to WiFi?
The Nest doorbell may not connect to WiFi due to various factors. It could be a bad router, a congested network, incompatible settings, a low battery, or corrupted firmware. To troubleshoot, move the router closer and check the network’s speed and bandwidth. Check the doorbell’s battery, reset the router, and update the firmware if needed.
If none of these steps work, Nest Support may be able to help. For more troubleshooting advice, visit their website.
Can I reconnect my Nest doorbell to WiFi?
How do I connect a Nest Cam to a new WiFi network?
Connect your Nest Cam to a new WiFi network.
1. Open the Google Home app
2. Tap on the camera icon.
3. Access the settings menu,
4. Tap on Wi-Fi, change the network,
5. Select the new network,
6. Wait for the app to verify the password.
The front light shows the camera’s Wi-Fi status. Which may illuminate green, yellow, or green. implies your Nest Cam can’t communicate.
READ ALSO: Solar Powered Security Light: How To Stay Safe And Eco-Friendly With Solar Security Light?
How do I change my Nest WiFi?
You can use the Google Home app on your phone or tablet to change Nest WiFi settings like the network name, password, and DNS. Follow these steps: 1. Open Google Home and press the Settings button next to your Nest WiFi network. 2. Touch Wi-Fi and then the gear icon in the upper right. 3. Nest WiFi settings include Network name, Network password, Privacy, DNS, and Advanced networking. 4. Select the option to modify and follow the screen instructions. 5. Tap Save to save your changes. Note: Some changes may require you to reconnect devices to the network or restart your router and points.
How do I set up a Nest camera without a QR code?
How do I install a Google Nest camera outdoors?
Following these steps makes outdoor Google Nest camera installation easy:
1. Choose a camera location near a power outlet with a good view. Before mounting, use the Nest app to test the camera’s video and Wi-Fi signal. 2. Use the wall plate and screws in the box to mount the camera base. Check the wall plate’s stability. If needed, you can adjust the camera angle with the wedge. 3. Connect the camera’s power adapter to the outlet. You may need a weatherproof power outlet cover or an outdoor extension cord. 4. Use the box’s cable clips to secure the power cable along the wall. 5. Add your camera and customize its settings in the Nest app.
A Google Nest camera installed offers live video streaming, alerts, and night vision.
How does a Nest camera change WiFi without a QR code?
To change your Nest camera’s WiFi network without a QR code, follow these steps:
Open the Google Home app, tap on the camera, access settings, tap on WiFi connection, disconnect, connect to a new network, and confirm. Repeat for other Nest cameras.
Read Also: Light Bulb Security Camera Reviews- Here’s Everything You Need To Know
0 notes
Text
Several issues could arise with your Nest camera. If the Nest isn’t working properly, you must check the power source and ensure its working. Otherwise, you must plug the camera into another power source. Also, ensure the camera has a stable connection with the WiFi, as it will not function otherwise. You can also try power cycling the camera to fix any minor glitches, as it’s an effective Nest camera troubleshooting method. Contact us to know more.
0 notes
Link
For the Netgear new router setup, you have to use the web-browser method. Simply, connect a PC to your router with an Ethernet cable and launch a browser on it. Type the default gateway routerlogin.net in the address field of the browser. If you need further instructions, call us on our toll-free number.
1 note
·
View note
Link
We are living in a world where the internet is going to be everything. We are continuously being introduced to devices that are controlled by the internet and are making our lives much easier. You...
0 notes
Link
These systems are no gimmicky tech but actually provide the security and helped many courts in punishing the convicts. Nest cam setup is one of such systems that will you in monitoring your property from many angles and views.
0 notes
Link
Check what is the NestCam LED status is saying to you from the blog out here.
0 notes
Link
Are you trying to log into Nest camera and Nest camera setup? and still getting Nest camera login issues, then it is recommended to Nest camera change wifi network or go for a password change. Also, cross check the password, maybe you are using an incorrect password that let you face Nest login issues. For more info regarding the Nest camera, you can contact us.
#nest camera setup#nest camera login#nest outdoor camera setup#nest camera login issues#nest cam setup#Nest Cam Troubleshooting Guide#nest setup#nest login
1 note
·
View note
Text
0 notes
Text
Nest 1080p HD security camera
Hey guys what’s up! From my couple of days of research, I have found that many of you are looking for the features of Nest 1080p HD security camera. And still now if you are looking for the same thing then you are at the right post. Because in this article we are going to discuss each and everything about Nest 1080p HD security camera and Nest Protect smoke + CO alarm.
Features of Nest 1080p HD security camera
• It is the best camera for the Indoor purpose.
• The price of this camera is near about $199.
• This camera is designed in such a way that even when you are not at home you can look after your family and house.
• On this camera, you will get 24/7 live streaming as well as versatile magnetic stand as well as person alerts with Nest Aware.
• Many of the security cameras are rely on batteries so they only start recording when they sense motion. That is why many time it misses some recording. But this Nest 1080p HD security camera work for 24/7. This camera can provide record up to 30 days of footage securely in the cloud.
• you will be able to see the photos of activity from the last 3 hours for free in the Nest app.
• Get a special alert if Nest Cam Indoor sees a human
This is some features of Nest 1080p HD security camera. If you have been benefited after reading this article then share this article. Follow us for more update.
#login dropcam#Nest Thermostat Installation#Nest Thermostat settings#Nest Camera login#Nest Cam login#Nest Cam configuration#Nest Cam troubleshooting
0 notes
Text
Mac restart camera

Mac restart camera download#
You’ll need a small unfolded paperclip or thumbtack. To remove it from the app, open the app, tap on the device, then tap Settings Remove device Confirm.īefore you begin, you’ll need to be near your camera so you can press the reset button.You can’t perform a factory reset in the Nest app.At 12 seconds, the status light will be steady, solid yellow while the camera starts the factory reset, and you’ll hear a confirmation tone.Tip: The reset button on the Nest Cam (battery) is located on the back of the camera head. Locate the reset button on the back of the camera.Tip: To help restore your settings after resetting your camera, write down or take a screenshot of your camera settings.There are two ways to factory reset your Nest Cam (battery) or Nest Cam Floodlight: Nest Cam (battery) or Nest Cam with Floodlight After the factory reset, your camera will appear as “Offline” in the app until you remove it.Your camera will restore to its factory settings. When the camera begins resetting, you’ll hear a confirmation tone. At 12 seconds, the status light will be solid yellow.At 10 seconds, the status light will blink yellow four times, and you’ll hear a countdown tone.Insert a paper clip, thumbtack or similar into the hole.It’s between the power cord and the camera neck. Locate the reset hole on the bottom of the camera head.If you want to reconnect your camera to the app, simply go through camera setup in the app again. If you’re giving your camera to someone else, you’re done.Tip: To help restore your settings after resetting your camera, write down or take a screenshot of your camera settings.Note: Your camera needs to be connected to Wi-Fi for it to be removed from the app and factory reset. If you plan to continue using your camera or doorbell with the same account, you do not need to cancel the subscription before you factory reset. Canceling the subscription will remove subscription-only features like Activity Zones and delete the entire video history. If your camera has a 1st gen Nest Aware subscription and you plan to get rid of your camera or add it to a new account, cancel your subscription before you factory reset. Your camera will forget the Wi-Fi network name and password, and will be “Offline” in the app.įor cameras with 1st gen Nest Aware subscriptions.
Mac restart camera download#
Note: If you want to save any video footage before you perform the factory reset, create video clips or timelapses and download the files to your phone or computer. Once your video history and snapshots are deleted, they’re gone forever. Your camera’s entire video history and snapshots will be deleted.Your camera’s personalized settings will revert to default settings.Here’s what’ll happen after you factory reset your camera or doorbell: Important: Because a factory reset permanently erases the items listed below, we don’t recommend doing it until you’ve tried restarting your camera and other troubleshooting options. Plug the power adaptor back into a socket.Disconnect your doorbell from power by unplugging the power adaptor from the electrical socket.If your doorbell is connected to the power adapter: Tip: The hole for this button is located near the top. Use the release tool to hold down the button on the back of your doorbell for about 10 seconds.Tip: Don’t unscrew the wires attached to the back of your doorbell. You can also use a paper clip or thumbtack. Insert the release tool into the hole at the bottom of your doorbell to remove it from its base.If your doorbell is connected to your home’s doorbell wires:
0 notes
Link
We are living in a world where the internet is going to be everything. We are continuously being introduced to devices that are controlled by the internet and are making our lives much easier. You...
0 notes