#ngForm
Explore tagged Tumblr posts
Visit Tumblr Blog
Explore Tumblr blogs with no restrictions, modern design and the best experience.
Last Seen Tumblr Blogs


Fun Fact
Tumblr was attacked by a cross-site scripting worm deployed by the Internet troll group GNAA on Dec 3, 2012.
Photo

New Post has been published on https://codebriefly.com/angular-19-forms-and-validation/
Angular 19 Forms and Validation
Forms are an essential part of any web application, enabling user interaction and data submission. Angular 19 brings enhanced features for building and validating forms with improved performance and flexibility. In this article, we will explore the fundamentals of Angular 19 forms, including template-driven and reactive forms, validation techniques, and best practices.
Table of Contents
Toggle
Why Forms and Validation Matter in Angular 19
Types of Forms in Angular 19
Comparison: Template-Driven vs. Reactive Forms
Template-Driven Forms in Angular 19
Setting Up a Template-Driven Form
Handling Form Submission
Validating Template-Driven Forms
Example of Validation
Reactive Forms in Angular 19
Setting Up a Reactive Form
Reactive Form Template
Custom Validation in Angular 19
Creating a Custom Validator
Using the Custom Validator
Best Practices for Angular 19 Forms
Final Thoughts
Why Forms and Validation Matter in Angular 19
Efficient and accurate form handling is crucial for creating robust applications. With Angular 19, developers can build forms that are easy to manage, validate, and maintain. Improved form handling ensures a smooth user experience and reduces the chances of submitting incorrect data.
Types of Forms in Angular 19
Angular 19 supports two primary types of forms:
Template-Driven Forms: Ideal for simple forms and based on Angular templates.
Reactive Forms: Suitable for complex and dynamic forms with greater control and scalability.
Comparison: Template-Driven vs. Reactive Forms
Feature Template-Driven Forms Reactive Forms Setup Complexity Simple Moderate Form Control Limited Extensive Validation Declarative Programmatic Performance for Large Forms Moderate High
Template-Driven Forms in Angular 19
Template-driven forms are easier to set up and are useful for simpler form requirements. These forms rely heavily on Angular directives and are defined directly in the HTML template.
Setting Up a Template-Driven Form
<form #userForm="ngForm" (ngSubmit)="onSubmit(userForm)"> <label for="name">Name:</label> <input type="text" id="name" name="name" ngModel required /> <label for="email">Email:</label> <input type="email" id="email" name="email" ngModel required /> <button type="submit">Submit</button> </form>
Handling Form Submission
onSubmit(form: NgForm) console.log('Form Submitted', form.value);
Validating Template-Driven Forms
Validation in template-driven forms is done using Angular directives such as required, minlength, and pattern.
Example of Validation
<input type="text" name="username" ngModel required minlength="4" #username="ngModel" /> <div *ngIf="username.invalid && username.touched"> Username must be at least 4 characters long. </div>
Reactive Forms in Angular 19
Reactive forms are highly flexible and suited for more complex scenarios. They use a model-driven approach and provide robust validation features.
Setting Up a Reactive Form
First, import the required modules:
import FormGroup, FormControl, Validators from '@angular/forms'; export class UserFormComponent userForm = new FormGroup( name: new FormControl('', [Validators.required]), email: new FormControl('', [Validators.required, Validators.email]), ); onSubmit() console.log(this.userForm.value);
Reactive Form Template
<form [formGroup]="userForm" (ngSubmit)="onSubmit()"> <label for="name">Name:</label> <input id="name" formControlName="name" /> <div *ngIf="userForm.controls.name.invalid && userForm.controls.name.touched"> Name is required. </div> <label for="email">Email:</label> <input id="email" formControlName="email" /> <div *ngIf="userForm.controls.email.invalid && userForm.controls.email.touched"> Enter a valid email. </div> <button type="submit">Submit</button> </form>
Custom Validation in Angular 19
Custom validators allow developers to implement validation logic that suits specific requirements.
Creating a Custom Validator
import AbstractControl, ValidationErrors from '@angular/forms'; export function usernameValidator(control: AbstractControl): ValidationErrors | null const forbidden = /admin/.test(control.value); return forbidden ? forbiddenName: value: control.value : null;
Using the Custom Validator
name: new FormControl('', [Validators.required, usernameValidator])
Best Practices for Angular 19 Forms
Use Reactive Forms for Complex Scenarios: Provides better scalability and maintainability.
Implement Custom Validators: Address unique business logic.
Utilize Angular Directives: Simplify form handling.
Always Sanitize and Validate User Input: To prevent security vulnerabilities.
Test Form Behavior: Ensure form validation works as expected.
Final Thoughts
Angular 19 forms and validation offer robust features that enable developers to build efficient and secure web applications. Whether using template-driven or reactive forms, mastering form handling techniques will significantly enhance your development process.
Keep learning & stay safe 😉
You may like:
Introduction to Angular 19
Angular 19 Fundamentals
Advanced Concepts and Features in Angular 19
0 notes
Text
Mastering Angular Forms: Best Practices and Tips

Angular is a popular JavaScript framework that allows developers to build dynamic and interactive web applications. One of the fundamental aspects of web development is handling forms, which play a crucial role in user interactions. Mastering Angular forms is essential for creating robust and user-friendly applications. In this article, we will explore the best practices and tips to enhance your Angular form development skills and create efficient, secure, and engaging forms. Mastering Angular Forms: Best Practices and Tips Understanding Angular Forms Angular provides two types of forms: Template-driven forms and Reactive forms. Template-driven forms are simpler and rely on directives in the template to build and validate the form. Reactive forms, on the other hand, are more flexible and allow you to manage form control programmatically. Understanding the differences between these two forms is essential for choosing the right approach for your project. Setting Up Angular Forms Before diving into form development, you need to set up Angular and create the necessary modules and components. Follow these steps to get started: - Install Node.js and Angular CLI if you haven't already. - Create a new Angular project using the Angular CLI. - Generate components for your forms and set up routing if needed. LSI Keywords and Their Importance LSI (Latent Semantic Indexing) keywords are related terms that search engines use to understand the context of your content. By incorporating LSI keywords into your headings and content, you can improve your search engine rankings and reach a broader audience. Let's explore some LSI keywords relevant to Angular forms: - Angular form validation - Angular reactive forms - Angular form controls - Angular form builder - Angular form submission - Angular form events Creating Template-Driven Forms Template-driven forms are quick to implement, making them suitable for simple use cases. Follow these steps to create a template-driven form: - Use the ngForm directive to create a form element. - Add form controls using ngModel directive with two-way data binding. - Implement form validation using Angular's built-in validators. - Customize error messages for better user experience. - Handle form submission using the (ngSubmit) event. Building Reactive Forms Reactive forms offer more control and flexibility, making them ideal for complex forms. Follow these steps to build reactive forms: - Create a form group using FormBuilder and add form controls with validators. - Implement custom validators for advanced form validation. - Use form control events to respond to user interactions. - Disable form submit until the form is valid. - Dynamically update form controls based on user input. Handling Form Validation Proper form validation is crucial for ensuring data accuracy and preventing security vulnerabilities. Angular provides various validators to enforce validation rules. Some essential validation practices include: - Required field validation for mandatory inputs. - Pattern validation for enforcing specific input formats. - Min and Max validation for numeric fields. - Custom validation for complex business logic. Securing Forms Against Attacks Web forms are vulnerable to security attacks like XSS (Cross-Site Scripting) and CSRF (Cross-Site Request Forgery). To secure your Angular forms, consider the following measures: - Implement server-side validation and sanitization. - Use Angular's built-in mechanisms to prevent XSS attacks. - Add CSRF tokens to protect against CSRF attacks. Enhancing User Experience Creating a smooth and intuitive user experience is vital for increasing user engagement. Here are some tips to enhance your Angular forms' user experience: - Use client-side validation for instant feedback. - Add tooltips and hints for form fields. - Implement real-time form validation as users type. - Use animations for a visually appealing experience. Optimizing Form Performance Optimizing form performance is essential, especially for large-scale applications. Follow these tips to ensure optimal form performance: - Use lazy loading to load forms when needed. - Limit the number of form fields to reduce rendering time. - Minimize the use of watchers for better performance. Testing Angular Forms Thorough testing is essential to ensure the reliability and correctness of your forms. Angular provides robust testing tools that help you test both template-driven and reactive forms. Write unit tests and end-to-end tests to cover all form functionalities. Integrating Third-Party Libraries Angular offers various third-party libraries that can enhance your form development process. Some popular ones include: - ng-select: A customizable select box component. - ngx-mask: A library for input masking and formatting. - ngx-translate: A tool for multi-language support. Common Mistakes to Avoid While mastering Angular forms, developers often make some common mistakes. Here are some pitfalls to avoid: - Overcomplicating forms when a simpler approach suffices. - Neglecting form accessibility for users with disabilities. - Ignoring browser compatibility issues. Frequently Asked Questions (FAQs) - Q: What is the difference between template-driven forms and reactive forms?A: Template-driven forms rely on directives in the template, while reactive forms allow programmatic control over form elements. - Q: How can I validate user input in Angular forms?A: You can use Angular's built-in validators or create custom validators to validate user input. - Q: Is it necessary to implement security measures in Angular forms?A: Yes, implementing security measures like input validation and CSRF protection is crucial to prevent attacks. - Q: What are some best practices for optimizing form performance?A: Use lazy loading, limit the number of form fields, and minimize the use of watchers. - Q: Can I integrate third-party libraries to enhance form functionalities?A: Yes, Angular supports the integration of third-party libraries like ng-select and ngx-mask. - Q: How can I ensure the accessibility of Angular forms?A: Use proper semantic elements and provide alternative text for form elements to enhance accessibility. Conclusion Mastering Angular forms is an essential skill for every web developer. By following best practices and implementing tips from this article, you can create efficient, secure, and user-friendly forms for your Angular applications. Remember to optimize form performance, test thoroughly, and prioritize security to deliver a seamless user experience. Read the full article
0 notes
Photo

Build an Example Angular 10 Form: ngForm/ngModel vs FormGroup/FormBuilder ☞ https://morioh.com/p/525a9deed308?f=5c21fb01c16e2556b555ab32
#morioh #angular #webdevelopment
1 note
·
View note
Video
Angular 9 Tutorial: Part 18 - NgForm and Form Validation
0 notes
Text
Forms in AngularJS
Forms can be readily developed with AngularJS using the ngForm directive and data from forms can be quickly tied to $scope variables using the ngModel directive.
0 notes
Text
Common Mat Table
table { width: 100%; }
.textWrap { word-break: break-word; }
.table-cell-padding { padding: 5px; }
html
table mat-table id="mt" [dataSource]="mtDataSource" matSort class="table table-striped table-hover force-style-gcweb-4-0-29" [attr.aria-label]="ariaLabel"
ng-container *ngFor="let col of columnDefinitionList" [matColumnDef]="col.matColumnDef" th mat-header-cell *matHeaderCellDef mat-sort-header [ngClass]="col.cssClass" span translate{{col.headerText}}/span /th td mat-cell *matCellDef="let element" [ngClass]="col.cssClass"{{element[col.matColumnDef]}}/td /ng-container tr mat-header-row *matHeaderRowDef="columnsToDisplay"/tr tr tabindex="0" mat-row *matRowDef="let row; columns: columnsToDisplay" (click)="onDataRowClick(row)"/tr tr class="mat-row" *cdkNoDataRow td class="mat-cell" colspan="9999"{{noRecordsFoundMessage}}/td /tr /table
ts
import { CcColumnDef } from './../../model/common-components/cc-column-def'; import {Component, EventEmitter, Input, OnInit, Output, ViewChild } from '@angular/core'; import { MatSort } from '@angular/material/sort'; import { MatTableDataSource} from '@angular/material/table';
@Component({ selector: 'app-table', templateUrl: './table.component.html', styleUrls: [''] }) export class TableComponent implements OnInit, AfterViewInit {
mtDataSource = new MatTableDataSourceany(); @ViewChild(MatSort) matSort: MatSort;
private _dataSource: Arrayany = []; get dataSource():Arrayany{ return this._dataSource; } @Input() set dataSource(value: Arrayany){ this._dataSource=value; this.mtDataSource.data=this.dataSource; }
private _columnsToDisplay: string[]; get columnsToDisplay():string[]{ return this._columnsToDisplay; } @Input() set columnsToDisplay(value:string[]){ this._columnsToDisplay=value; }
private _columnDefinitionList: ArrayCcColumnDef; get columnDefinitionList():ArrayCcColumnDef{ return this._columnDefinitionList; } @Input() set columnDefinitionList(value:ArrayCcColumnDef){ this._columnDefinitionList=value; }
@Input() ariaLabel:string; @Input() noRecordsFoundMessage:string;
@Output() tableRowClick: EventEmitterany = new EventEmitterany()
constructor() { } ngAfterViewInit(): void { this.mtDataSource.sort=this.matSort; }
ngOnInit(): void { }
onDataRowClick(data:Event){ this.tableRowClick.next(data); } }
Client
div *ngIf=" caseDetail && caseDetail.phase && participantSessionStorage && filteredCaseTypes && filteredCaseTypes.length 0 " class="container"
h1 tabindex="0" {{ participantSessionStorage?.participantName }} - {{ participantSessionStorage?.displayedCaseId }} /h1 div class="panel panel-default force-style-gcweb-4-0-29" header class="panel-heading" h6 class="panel-title" div *ngIf="caseDetail" span tabindex="0" {{ "phase" | translate }}: {{ caseDetail.phase | titlecase }}/span span tabindex="0" *ngIf="caseDetail.rss" class="pull-right" {{ "assignedRss" | translate }}: {{ caseDetail.rss.firstName }} {{ caseDetail.rss.lastName }}/span /div /h6 /header div class="panel-body" div class="wb-frmvld mrgn-tp-md" form-error [validateForm]="casePageForm" [appFormErrors]="appFormErrors" /form-error form #casePageForm="ngForm" class="form-inline" div class="form-group input-group col-md-9 mrgn-bttm-md" label tabindex="0" for="caseType" class="required" span class="field-name"{{ "caseType" | translate }}/span strong class="required" ({{ "required" | translate }})/strong /label select ngModel #caseType="ngModel" class="form-control" id="caseType" name="caseType" autocomplete="honorific-prefix" required="required" (change)="onCaseTypeSelection($event)" option value=""Select/option option class="case-options" *ngFor="let caseType of filteredCaseTypes" [value]="getCaseType(caseType)" [selected]="selectedCase.displayText === caseType.displayText" {{ caseType.displayText }} /option /select /div div class="table-responsive table table-striped table-hover force-style-gcweb-4-0-29" ng-container *ngIf="selectedCase?.value !== ''" app-simple-table [columnDefinitionList]="columnDefinitions" [columnsToDisplay]="displayedColumns" [dataSource]="mappedDS" [ariaLabel]="ariaLabelInfo" [noRecordsFoundMessage]="noRecordsFoundMessage" (tableRowClick)="onTableRowClick($event)" /app-simple-table /ng-container !-- Need to remove this if condition once the pagination is done for all case types (BE)-- app-pagination *ngIf="selectedCase?.value === 'caseNotes'|| selectedCase?.value === 'assessments' || selectedCase?.value === 'serviceRequests'" [index]="page" [data]="mappedDS" [pageSize]="pageSize" [totalCount]="totalCount" [rulerSize]="ruleSize" (pageChange)="paginate($event)" /app-pagination /div div *ngIf="selectedCase?.value === CASE_NOTES" class="input-group col-md-12 caseNotesTextSection" label for="caseNotesText" class="required" span class="field-name" {{ "addNote" | translate }} /span strong class="required"(required)/strong/label textarea title="{{ 'addCaseNoteHere' | translate }}" id="caseNotesText" name="caseNotesText" (input)="onCaseNotesInput($event)" #caseNotesText="ngModel" [(ngModel)]="caseNotes" required [ng-maxlength]="maxCaseNoteLength" [maxlength]="maxCaseNoteLength + 1" placeholder="{{ 'addCaseNoteHere' | translate }}" class="form-control case-note-text-area" [class]="{ 'case-note-text-area-error': !caseNotesText.valid && caseNotesText.dirty }" /textarea /div div span{{ caseNotes ? caseNotes.length + "/" + maxCaseNoteLength : "" }}/span /div /form /div /div footer *ngIf="selectedCase?.value === CASE_NOTES" class="panel-footer" a href="#" (click)="openAddNoteConfirmation($event)" class="wb-lbx btn btn-primary" {{ "addNote" | translate }}/a /footer
/div /div
ts
import { Sort } from '@angular/material/sort'; import { AppFormError } from './../../common-components/app-form-error/model/app-form-error'; import { ModalDialogComponent, ModalActionButton, ModalActionTypeEnum, ModalAlertCssEnum } from 'src/app/common-components' import { ActivatedRoute, Router } from '@angular/router'; import { Component, OnDestroy, OnInit, ViewChild } from "@angular/core";
// Note : Do not change the order of the contents of JSON file "CaseTypesJson" below import CaseTypesJson from "../../../assets/dropdowns/case-types.json"; import { MatDialog } from "@angular/material/dialog"; import { ModalDialogConfig } from "src/app/common-components/modal-dialog/modal-dialog-config"; import { Subject, takeUntil } from "rxjs"; import { NgForm, FormGroup } from "@angular/forms"; import { CaseTypesRequest, CaseType, CcColumnDef, } from "src/app/model"; @Component({ selector: "app-case", templateUrl: "./case.component.html", styleUrls: [ "./case.component.css", ], })
export class CaseComponent implements OnInit, OnDestroy { noRecordsFoundMessage = ""; ariaLabelInfo: string; CASE_NOTES = CaseTypesJson[11].value; // Case notes dropdown value maxCaseNoteLength = AppSettings.CASE_NOTE_MAX_LENGTH; caseNotes = ""; caseDetail: CaseDetail; //breadcrumbs displayCaseId: string = ""; participantSessionStorage: ParticipantInfoSessionStorage; // Data for "Drop down" originalCaseTypes: Array = CaseTypesJson; filteredCaseTypes: Array = []; selectedCase: CaseType = ModelUtil.getDefaultModelForCaseType(); columnDefinitions: Array = [];
currentSort: Sort; pageSize: number = AppSettings.DEFAULT_PAGE_SIZE; page = 1; pageIndex: number = 1; ruleSize: number = AppSettings.RULE_SIZE; totalCount: number = 0; paginationDetails = { PageNumber: AppSettings.DEFAULT_PAGE_NUMBER, PageSize: AppSettings.DEFAULT_PAGE_SIZE, };
//#region "Object Properties" displayedColumns: string[]; apiOriginalData: Array; mappedDS: Array = []; //#endregion "Object Properties"
//#region App form erros get appFormErrors(): AppFormError[] { return this.getErrorMessages(); } //#endregion
private readonly _destroying$ = new Subject();
@ViewChild("caseNotesText") caseNotesText: NgForm; @ViewChild("casePageForm") casePageForm: FormGroup;
private roles: string[] = [];
constructor( private router: Router, private route: ActivatedRoute, ) { }
ngOnInit(): void { this.subscribeToLanguageChange(); this.setUpCaseTypes();// get participant session storage this.participantSessionStorage = JSON.parse( this.sessionStorageSrv.getItem( SessionStorageKeys.PARTICIPANT_INFO_SESSION_STORAGE ) ); if (this.participantSessionStorage) { //setting a value for breadcrumbs label this.displayCaseId = this.participantSessionStorage.displayedCaseId; this.breadcrumbService.set("@displayCaseId", this.displayCaseId); // get case detail this.caseService .getCaseDetail(this.participantSessionStorage.caseId) .subscribe({ next: (res) => { if (res) { this.caseDetail = res; } }, error: (error: Error) => { //TODO : Error Handling console.log("test", error); }, }); }
}
ngOnDestroy(): void { this._destroying$.next(undefined); this._destroying$.complete(); }
onCaseTypeSelection(event: Event) { let selectedStringValue = (event.target as HTMLSelectElement).value;if (selectedStringValue === "") { this.resetCaseTypeControl(); } else { this.selectedCase = JSON.parse(selectedStringValue); this.caseNotes = ""; this.loadDataWithSelectedCaseType(); }
}
getCaseType(type: CaseType) { return JSON.stringify(type); }
loadDataWithSelectedCaseType() { switch (this.selectedCase.value) { // "value": "claims" case CaseTypesJson[0].value: { this.setupModelsForClaims(); break; } // "value": "assessments" case CaseTypesJson[2].value: { this.setupModelsForAssessments(); break; } // "value": "rehabilitationPlans" case CaseTypesJson[3].value: { this.setupModelsForRehabilitationPlan(); break; } // "value": "vocationalTrainingPlans" case CaseTypesJson[4].value: { this.setupModelsForVocationalTrainingPlan(); break; } // "value": "progressUpdates" case CaseTypesJson[5].value: { this.setupModelsForPrgUpdates(); break; } // "value": "serviceRequests" case CaseTypesJson[7].value: { this.setupModelsForSrvRequests(); break; } // "value": "closureRequests" case CaseTypesJson[8].value: { this.setupModelsForClosureRequests(); break; } // "value": "authorizationTravelRequests" case CaseTypesJson[10].value: { this.setupModelsForAuthTrvRequests(); break; } // "value": "caseNotes" case CaseTypesJson[11].value: { this.setupModelsForCaseNotes(); break; } // "value": "participantExperienceFeedback" case CaseTypesJson[12].value: { this.setupModelsForPartExpFeedback(); break; } // "value": "referralToRSP" case CaseTypesJson[13].value: { this.setupModelsForReferralToRSP(); break; } // TODO : This would need some thought // when "Select" is selected default: { // this.resetCaseTypeControl(); break; } }
}
resetCaseTypeControl() { this.mappedDS = []; this.ariaLabelInfo = ""; this.noRecordsFoundMessage = ""; this.displayedColumns = []; this.selectedCase = ModelUtil.getDefaultModelForCaseType(); this.caseNotes = ""; }
setNoRecordsFoundMessage(mappedDS: Array) { if (mappedDS && mappedDS.length === 0) { this.noRecordsFoundMessage = this.translateFilter.transform("casePage.noDataRow"); } }
setAriaPropertyForCases(displayText: string) { if (displayText) { this.ariaLabelInfo = displayText; } }
setupModelsForAssessments() { this.columnDefinitions = CaseTypeAssessmentUtil.getColumnDefinitionListForAssessments(); if (this.columnDefinitions) { this.displayedColumns = this.columnDefinitions.map((c) => c.columnName); }if (this.displayedColumns && this.displayedColumns.length > 0) { this.mappedDS = []; // TODO: need to remove hardcoded case id, once we are ready to point to real CMS endpoint for assemments this.caseService .getCaseDetailByType( "8709a1d6-d3a6-41b7-615b-08da433495bd", "assessment", this.paginationDetails ) .subscribe({ next: (res: any) => { if (res && res.data && res.data.length > 0) { this.mappedDS = CaseTypeAssessmentUtil.transformDSForAssessment( res.data ); this.pageSize = res.pageSize; this.totalCount = res.totalRecords; this.paginate(this.pageIndex); } this.setNoRecordsFoundMessage(this.mappedDS); this.setAriaPropertyForCases(CaseTypesJson[2].displayText); }, error: (error: Error) => { //TODO : Error Handling console.log("test", error); }, }); }
}
util
import { DateTimeUtil } from 'src/app//utils/datetime-util'; import { CcColumnDef } from 'src/app/model'; export class CaseTypeAssessmentUtil{// TODO: need to remove this once BE integration is done static getData() { return [{ "requestNumber": 'RQ-001', "service": 'IVA', "referralDate": DateTimeUtil.isoToYYYY_MM_DD(new Date()), "reports": 'TBD'},{ "requestNumber": 'RQ-002', "service": 'IVA', "referralDate": DateTimeUtil.isoToYYYY_MM_DD(new Date()), "reports": 'TBD' }]; } static getColumnDefinitionListForAssessments(): Array<CcColumnDef>{ return [ { "cssClass": "widthFlex1", "matColumnDef": "requestNumber", "headerText": "caseTypeAssessmentTable.requestNumber", "columnName": "requestNumber" }, { "cssClass": "widthFlex1", "matColumnDef": "service", "headerText": "caseTypeAssessmentTable.service", "columnName": "service" }, { "cssClass": "widthFlex1", "matColumnDef": "referralDate", "headerText": "caseTypeAssessmentTable.referralDate", "columnName": "referralDate" }, { "cssClass": "widthFlex1", "matColumnDef": "reports", "headerText": "caseTypeAssessmentTable.reports", "columnName": "reports" } ]; } static transformDSForAssessment(apiOriginalData:Array<any>) : Array<any>{ let dataArray:Array<any>=[]; if(apiOriginalData && apiOriginalData.length>0){ dataArray = apiOriginalData.map((row) => { return { "requestNumber": row.requestNumber, "service": row.service, "referralDate": DateTimeUtil.isoToYYYY_MM_DD(new Date(row.referralDate)), "reports": row.reports, "assessmentId": row.assessmentId }; }); } return dataArray; }
}
int
export interface CcColumnDef { cssClass: string; matColumnDef:string; headerText?:string; columnName: string; }
export interface CaseType { displayText: string; value: string; enableOption?:boolean; }
0 notes
Text
TEMPLATE DRIVEN FORMS IN ANGULAR #quicke

Angular reads the html template, and see the form tag as a special case
We want angular to handle the submit of the form which will be triggered by the button of type ‘submit’ present inside the form
We listen to that event by placing (ngSubmit) on the form selector.
A reference with the hash symbol can be placed on the form selector, to create a reference to the form.
That reference should be set to ngForm.
The created reference can be passed for processing inside theTypsecript code, by mentioning it as an argument to the function which is bind to ngSubmit event like :
<form (ngSubmit)=“submitFunction(formRef)” #formRef=“ngForm”>
Above form object can also be referenced inside typescript code using Viewchild.
@ViewChild(’formRef’) formRef:NgForm
The controls present inside the form which angular should consider as part of the form object must have ngModel as a directive.
[ngModel] can be used to assign a default value to the controls inside the form.
[(ngModel)] can be used to create two way binding.
The properties in the form object will have name as that of the value specified by ‘name’ attribute of html elements.
The properties can be grouped inside a form object using ngModelGroup
The reference to the html elemnents can be created, like below
<input type=“text” name=“username” ngModel #username=“ngModel”>
The reference for the model groups can be created as below
<div ngModelGroup #someModelGroup=“ngModelGroup”> <input type=“text” name=“username”/> <input type=“text” name=“firstName”/> </div>
The form, elements which are have ngModel directive and the groups, all have properties like touched, dirty, valid, invalid, which can help in validating the form
For enabling HTML5 validations which might be disabled by default, place ngNativeValidate on form.
setValue method of ngForm can be user to set the value of complete form and it is directly available on ngForm object.
pathValue can be used to update the partial value of the form and it is available on form property of the ngForm object,(not directly on ngForm)
reset() function on the ngForm can be used to reset the form, which will clear everything.
If reset means setting default value, one can use patch value for the same
0 notes
Photo

Build an Example Angular 10 Form: ngForm/ngModel vs FormGroup/FormBuilder ☞ https://bit.ly/3bGLK89 #angular #javascript
0 notes
Photo

Build an Example Angular 10 Form: ngForm/ngModel vs FormGroup/FormBuilder ☞ https://bit.ly/3bGLK89 #angular #javascript
0 notes
Photo

Build an Example Angular 10 Form: ngForm/ngModel vs FormGroup/FormBuilder ☞ https://bit.ly/3bGLK89 #angular #javascript
0 notes
Text
What’s new in Angular 9..?
For months now the Angular Development team had been waiting for the release for updates and new features in Angular. And finally, the wait is over as Angular 9.0.0 has been officially released. It has been a major release due to the changes to the ecosystem.
What’s new in Angular 9?
Below are the major aspects introduced in Angular 9:
Ivy Compiler
The outstanding change is the Ivy. Ivy is the default compiler and runtime with the release of Angular 9. Ivy has some gripping features like it improves the bundle size, adds improved type checking, allows for better debugging, agile testing, by default enables AOT compiler on and improves CSS class and style binding.
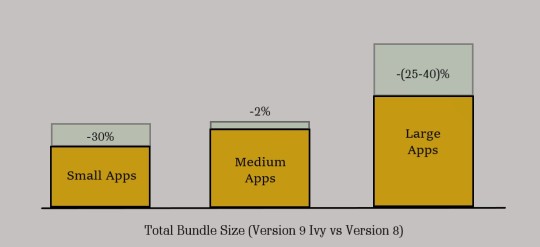
Smaller Bundles and Performance
The previous Angular versions had the problem of the filesize for the created JavaScript bundles i.e. app. The framework in Angular is much larger when compared to other libraries like React and Vue.js.
Though angular runtime is great, loading can take longer, you may not feel the difference while running. Ivy helps both small and large apps to improve bundle size savings which eliminate dead code.
Changes with Angular Forms
With this new angular version, there are some modifications in the form. Previously, < ngForm > was a valid selector that will no longer be used when An Angular form is referenced. Instead the < ng-form > can be used. You can now directly use the FormsModule. Instead of FormsModule.withConfig used previously.
Need for Faster Mobile Apps
In the era of smartphones, desktops contribute a very little percentage of the website traffic. Smartphones require more ‘mobile-friendly’ kinds of stuff by eliminating the downloadable resources for better user experience. To help out the Angular Developers in this scenario we have the Ivy engine that speeds up the application in multiple folds and enhances application load speed by reducing the size of Javascript classes.
Angular Component Updates
The components will not be imported via @angular / material in Angular 9. It uses secondary entrance points such as @angular/material/button.
i18n Improvements
Angular being a JavaScript platform has been embraced worldwide, and Angular CLI helps you to implement basic codes that are helpful in creating converter files in order to write applications in multiple languages. The Angular team further restructured the method on Ivy to make the implementation of compile-time inline easier.
Dependency Injection Changes in Core
There is slight improvisation for dependency injections in the new version of Angular. Though not a big change but support for the providedIn value section has been added.
@Injectable({ providedIn: ‘platform’ }) class MyService {…}
There have been an addition to the value library for the providedIn property like Platform-like scopes and any.
Features of Angular 9:
By default, Ivy is used for compilation.
The new version of TypeScript is available i.e. TypeScript 3.7.
AOT mode by default compiles the CLI apps.
Bazel: ts_library targets are supported for ng_package as entry-points.
tslib is listed as peer dependency and not as direct dependency.
ngtsc diagnostics are converted all to ts.Diagnostics.
ivy: new benchmark focusing on template creation is added.
ivy: add ngIf-like directive to the ng_template benchmark.
ivy: avoid native node retrieval from LView.
ivy: avoid repeated native node retrieval and patching.
ivy: avoid repeated tNode.initialInputs reads.
ivy: move local references into consts array, closes.
language-service: On TypeScriptHost it enable logging.
language-service: For invalid templateUrls it provides diagnostics.
language-service: For invalid styleUrls it provides diagnostics.
Some important facts about upgrading to Angular 9:
Updating to Angular 9 is automatic with ng update script if your application uses CLI:
npm install –no-save @angular/cli@^ 8.3.15
ng update @angular/cli @angular/core –next
Update your local ‘@angular/cli’ to version 8.3.15 or later 8.x version before updating for a better experience.
It is mandatory to include –next command line flag during the RC period.
It has been a long journey for the contributors! So, as of now, one journey has started, and another must begin. What will be Angular 10 like?
0 notes
Text
Mastering Angular Forms: Best Practices and Tips

Angular is a popular JavaScript framework that allows developers to build dynamic and interactive web applications. One of the fundamental aspects of web development is handling forms, which play a crucial role in user interactions. Mastering Angular forms is essential for creating robust and user-friendly applications. In this article, we will explore the best practices and tips to enhance your Angular form development skills and create efficient, secure, and engaging forms. Mastering Angular Forms: Best Practices and Tips Understanding Angular Forms Angular provides two types of forms: Template-driven forms and Reactive forms. Template-driven forms are simpler and rely on directives in the template to build and validate the form. Reactive forms, on the other hand, are more flexible and allow you to manage form control programmatically. Understanding the differences between these two forms is essential for choosing the right approach for your project. Setting Up Angular Forms Before diving into form development, you need to set up Angular and create the necessary modules and components. Follow these steps to get started: - Install Node.js and Angular CLI if you haven't already. - Create a new Angular project using the Angular CLI. - Generate components for your forms and set up routing if needed. LSI Keywords and Their Importance LSI (Latent Semantic Indexing) keywords are related terms that search engines use to understand the context of your content. By incorporating LSI keywords into your headings and content, you can improve your search engine rankings and reach a broader audience. Let's explore some LSI keywords relevant to Angular forms: - Angular form validation - Angular reactive forms - Angular form controls - Angular form builder - Angular form submission - Angular form events Creating Template-Driven Forms Template-driven forms are quick to implement, making them suitable for simple use cases. Follow these steps to create a template-driven form: - Use the ngForm directive to create a form element. - Add form controls using ngModel directive with two-way data binding. - Implement form validation using Angular's built-in validators. - Customize error messages for better user experience. - Handle form submission using the (ngSubmit) event. Building Reactive Forms Reactive forms offer more control and flexibility, making them ideal for complex forms. Follow these steps to build reactive forms: - Create a form group using FormBuilder and add form controls with validators. - Implement custom validators for advanced form validation. - Use form control events to respond to user interactions. - Disable form submit until the form is valid. - Dynamically update form controls based on user input. Handling Form Validation Proper form validation is crucial for ensuring data accuracy and preventing security vulnerabilities. Angular provides various validators to enforce validation rules. Some essential validation practices include: - Required field validation for mandatory inputs. - Pattern validation for enforcing specific input formats. - Min and Max validation for numeric fields. - Custom validation for complex business logic. Securing Forms Against Attacks Web forms are vulnerable to security attacks like XSS (Cross-Site Scripting) and CSRF (Cross-Site Request Forgery). To secure your Angular forms, consider the following measures: - Implement server-side validation and sanitization. - Use Angular's built-in mechanisms to prevent XSS attacks. - Add CSRF tokens to protect against CSRF attacks. Enhancing User Experience Creating a smooth and intuitive user experience is vital for increasing user engagement. Here are some tips to enhance your Angular forms' user experience: - Use client-side validation for instant feedback. - Add tooltips and hints for form fields. - Implement real-time form validation as users type. - Use animations for a visually appealing experience. Optimizing Form Performance Optimizing form performance is essential, especially for large-scale applications. Follow these tips to ensure optimal form performance: - Use lazy loading to load forms when needed. - Limit the number of form fields to reduce rendering time. - Minimize the use of watchers for better performance. Testing Angular Forms Thorough testing is essential to ensure the reliability and correctness of your forms. Angular provides robust testing tools that help you test both template-driven and reactive forms. Write unit tests and end-to-end tests to cover all form functionalities. Integrating Third-Party Libraries Angular offers various third-party libraries that can enhance your form development process. Some popular ones include: - ng-select: A customizable select box component. - ngx-mask: A library for input masking and formatting. - ngx-translate: A tool for multi-language support. Common Mistakes to Avoid While mastering Angular forms, developers often make some common mistakes. Here are some pitfalls to avoid: - Overcomplicating forms when a simpler approach suffices. - Neglecting form accessibility for users with disabilities. - Ignoring browser compatibility issues. Frequently Asked Questions (FAQs) - Q: What is the difference between template-driven forms and reactive forms?A: Template-driven forms rely on directives in the template, while reactive forms allow programmatic control over form elements. - Q: How can I validate user input in Angular forms?A: You can use Angular's built-in validators or create custom validators to validate user input. - Q: Is it necessary to implement security measures in Angular forms?A: Yes, implementing security measures like input validation and CSRF protection is crucial to prevent attacks. - Q: What are some best practices for optimizing form performance?A: Use lazy loading, limit the number of form fields, and minimize the use of watchers. - Q: Can I integrate third-party libraries to enhance form functionalities?A: Yes, Angular supports the integration of third-party libraries like ng-select and ngx-mask. - Q: How can I ensure the accessibility of Angular forms?A: Use proper semantic elements and provide alternative text for form elements to enhance accessibility. Conclusion Mastering Angular forms is an essential skill for every web developer. By following best practices and implementing tips from this article, you can create efficient, secure, and user-friendly forms for your Angular applications. Remember to optimize form performance, test thoroughly, and prioritize security to deliver a seamless user experience. Read the full article
0 notes
Text
Learn about all the new features of Angular 9

Google-driven Java Script has added to its glory yet another framework that is set to embolden the developer’s efforts to create applications. The Angular 9 Beta version was stated to release between the October and November 2019 time frame, but the beta stage has been released and has given a unique tool to improvise further before the actual Angular 9 hits the market.
Do you know what the best part about this successor is? Yes, you guessed it right! Here, Ivy generation compilation and rendering pipeline have become the default feature. Earlier it had to be enforced by the developers but now with Ivy Compiler becoming a default factor, it is all set to make things easier for developers.
Angular and Angular-based applications have become one of the most popular frameworks of Google which has given an all-new meaning to the web, mobile, and desktop applications. It has more than 55,000 stars on Github and has always been under the supervision and scrutiny of Google’s team of community members. The RC version or the release candidate version has all the qualities of making it big.
Let us discover its prime offerings.
Angular Ivy
Many users access web pages from their mobiles even when there is poor connectivity. This could be due to the size of downloadable assets. Developers provide incessant efforts to reduce the size of downloadable assets but it can prove to be an expensive affair. Now with smaller sizes of JavaScript bundles, Ivy is a welcome permanent addition to the family of Angular 9.
Angular based applications built with Ivy will be agile and adept considering Ivy compiler was discretionary in the previous versions. he new Ivy compiler will finally be the default, so Angular apps built with Ivy will be faster and more efficient.tsconfig.json file in the project folder as seen earlier.
Once it had been added, Angular developers had to run the compiler by performing the NGC command in the project folder as given below.
node_modules/.bin/ngc
But now in the new version implementing the enable ivy option in the tsconfig.json file, is not required as Ivy renderer has become the default.

Safer than the previous versions
In the previous versions of Angular development, for testing of API’s a function called TestBed.get() had to be provided. After version 8 the intake of string values also ceases. This led to the Angular developer community extricate the safety issue. In this new version now, the team came up with TestBed.inject() and remonstrate the get function.
TestBed.get(ChangeDetectorRef) // any
TestBed.inject(ChangeDetectorRef) // ChangeDetectorRef
With the improvements in TestBed API, the inject function will do what the get does along with being type-safe concurrently.
Module with Providers
Again another enriching feature is the Module with providers that makes immense sense and value to library owners. In the previous versions if you have used ModuleWithProviders then Angular developers would type it stringently or will not type at all. But with the new version Angular developers have to constantly adopt the across-the-board ModuleWithProviders<T> type to display the module type. Initially, the declaration would look like the below-given illustration:
@NgModule({ ...}) export class MyModule { static forRoot(config: SomeConfig): ModuleWithProviders {
return {
ngModule: SomeModule,
providers: [{ provide: SomeConfig, useValue: config }]
};
}
}
After the changes, the declaration would look like:
@NgModule({ ...})
export class MyModule {
static forRoot(config: SomeConfig): ModuleWithProviders<**SomeModule**>
{
return {
ngModule: SomeModule,
providers: [{ provide: SomeConfig, use value: config }]
};
}
}
In the new version, the codebase will be migrated axiomatically after you give the command
Ng update
Advancement in Angular Forms
For prime Angular based applications, the 9th version of Angular has arrived with few form changes. The <ngForm></ngForm> is not a functional selector now for referencing an Angular form. Now with the new version <ng-form></ng-form> is used. The warning that was given for using removed form tags has been removed in the new version. In this version, you can also utilize FormsModule rather than FormsModule.withConfig.
Selector-less Decrees
You will not find this in the Angular 8 Ivy display. The capability to use selector-less directives as base-class is the new feature of Angular 9. It has been added so as to ensure that Angular developers can benefit from Angular compilation.
Internalization
Angular CLI can be utilized to accomplish the standard code which is important to create files for translators. This is done to ensure that publishing in the Angular based application happens in varied languages.
For instance, take into consideration an application with the mentioned HTML title in the English language.
<h1>Hello Good morning!</h1>
You can add the i18n attribute to mark “Hello Good morning!” as a translatable text. I18b is the short form of internalization here. The addition would appear like:
<h1 i18n>Hello Good morning!</h1>
Once the angular developers have configured Angular based applications you can run the xi18n command to derive localizable text into a file.
You can see a smidgen of generated messages. xlffile below:
<trans-unit id="a05c3a315a6ee3e6ad4733a1f72e8d16775810ca" datatype="Html">
<source>Hello Good Morning!</source>
<target/>
</trans-unit>
You can then copy the messages.xlf files to the messages.es.xlf file as given below and reframe it to construct the app for Spanish accepting locations along with the translated composition.
<trans-unit id="a05c3a315a6ee3e6ad4733a1f72e8d16775810ca" datatype="Html">
<source>Hello Good morning!</source>
<target>¿Hola Buenos Dias?</target>
</trans-unit>
Dependency Injection changes
Angular Core has some aggressive upgradations that will allure a major chunk of Angular developers. In order to see how Angular 9 adds dependency interjection support for PorvidedIn value, we need to this illustration below:
@Injectable({
providedIn: 'platform'
})
class MyService {...}
Language service improvements
Thanks to the new version, service support for infused ecosystems like the VS Code and WebStorm has gone a complete rejuvenation. The definition of links with the new version will become more stable. The interpretation of style-based URLs will now be checked-off as template URLs. URLs that do not refer to the actual project file will also be distinguished.
TypeScriptHost enhancements also will be able to make out severity logging by debugging various mistakes and methods. For better testing of scripts a convenience script also has been added to the Angular V9.
Updates of the Angular components
For the CDK, there is an update about Hammer.js, which aids in supplementing gesture support and was essential to use CDK. In the new version, it is optional. If you want to import it you can do so with the given command:
import `HammerModule` from [@angular/platform-browser]
Parting words
Angular 9 Beta version is a great way to understand it thoroughly and provide preferred changes so that the actual version will come with the updated changes. The feedback gives and takes are going to be the most aggressive during this phase. Original Source
0 notes
Text
Forms,Form-validation,FormControl & FromGroup
New Post has been published on https://is.gd/oDoCXw
Forms,Form-validation,FormControl & FromGroup

How to Build a Form,Validation,FormControl,FormGroup in Angular?
Now in our application, we want to create the contact form so we use below ng-cli command to generate all component related data once.
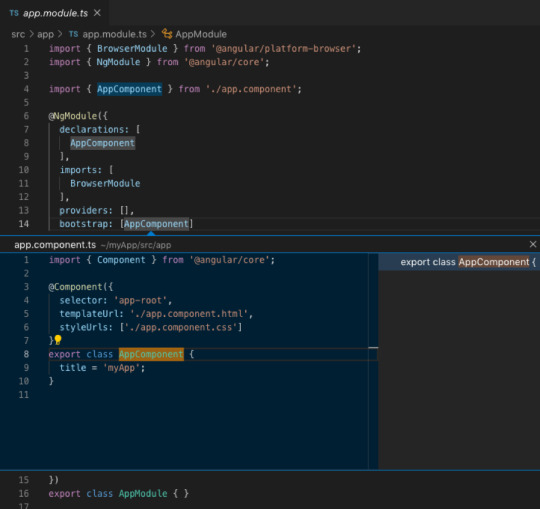
D:\Target Dec-2019\Angular_Application\hello-sagar-jaybhay>ng g c contact-form CREATE src/app/contact-form/contact-form.component.html (27 bytes) CREATE src/app/contact-form/contact-form.component.spec.ts (664 bytes) CREATE src/app/contact-form/contact-form.component.ts (292 bytes) CREATE src/app/contact-form/contact-form.component.css (0 bytes) UPDATE src/app/app.module.ts (1307 bytes)
These are files created by using cli command and added a reference to app.module.ts file.
Now first we build contact form with bootstrap CSS.
<p>contact-form works!</p> <div class="container-fluid" style="width: 50%"> <form> <div class="form-group"> <label for="firstName">First Name</label> <input id="firstName" type="text" class="form-control"> </div> <div class="form-group"> <label for="comment">Comment</label> <textarea id="comment" col=30 rows="10" type="textare" class="form-control"></textarea> </div> <div class="form-group"> <button class="btn btn-primary form-control" >Submit</button> </div> </form> </div>
FormControl
Now we need to add validation for our form elements, so in angular, we have FormControl class by using this we will check the value of field,also field is touched or not touched,is value is dirty or not, is value pristine means value is not changed. So for each input field in the form we need control object.
Tracks the value and validation status of an individual form control. In this FormControl class is inherited from AbstractControl class. This is one of the three fundamental building blocks of Angular forms, along with FormGroup and FormArray. It extends the AbstractControl class that implements most of the base functionality for accessing the value, validation status, user interactions, and events.
FormGroup
All the property of formcontrol class are available to FormGroup class means dirty,value,touched,untouched like properties are present in FormGroup.
A FormGroup aggregates the values of each child FormControl into one object, with each control name as the key. It calculates its status by reducing the status values of its children. For example, if one of the controls in a group is invalid, the entire group becomes invalid.
FormGroup is one of the three fundamental building blocks used to define forms in Angular, along with FormControl and FormArray.
When instantiating a FormGroup, pass in a collection of child controls as the first argument. The key for each child registers the name for the control.
It will send the value is valid or not if all the elements in form are valid else it will give not valid. So accessing properties of FormGroup are easier than accessing all the elements properties are present on that form.

Difference between Reactive Forms in Angular and Template-Driven forms in Angular?
Reactive Forms Template Driven Forms Here we have more control over validation logic. Simple Validation present It is also good for complex forms. It is good for simple forms. It is good for the Unit Test. It is easier to create Less code is required
ngModel
In angular ngModel directive creates the FormControl instance and it will track value, user interaction and also validation status of that respective control. It will keep view sync with the model.
<input ngModel id="firstName" type="text" class="form-control">
It accepts a domain model as an optional Input. If you have a one-way binding to ngModel with [] syntax, changing the value of the domain model in the component class sets the value in the view. If you have a two-way binding with [()] syntax (also known as ‘banana-box syntax’), the value in the UI always syncs back to the domain model in your class.
Now remember ngModel requires name attribute. If you can’t specify the name attribute it will throw an error.

So to avoid this error we simply put name attribute like below.
<input ngModel name="firstName" id="firstName" type="text" class="form-control">
When we add ngModel with name directive on control then angular automatically create an instance of FormControl class and associate with that control.
Now we are going to add change event and for this, we add change event to this input field.
<input ngModel name="firstName" id="firstName" #firstName="ngModel" type="text" (change)="log(firstName)" class="form-control">
To inspect the properties of the associated FormControl (like validity state), export the directive into a local template variable using ngModel as the key (ex: #myVar="ngModel").
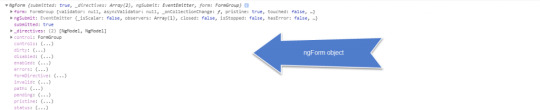
#firstName=”ngModel” this is called template variable.
Now you can see below image on change event we get NgModel object.
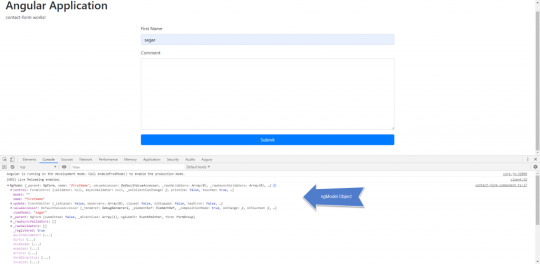
NgModel is an object and below are the properties of that object. And NgModel is the instance of FormControl class.
1. NgModel _parent: NgForm, name: "firstName", valueAccessor: DefaultValueAccessor, _rawValidators: Array(0), _rawAsyncValidators: Array(0), … 1. control: FormControl validator: null, asyncValidator: null, _onCollectionChange: ƒ, pristine: false, touched: true, … 2. model: "" 3. name: "firstName" 4. update: EventEmitter _isScalar: false, observers: Array(0), closed: false, isStopped: false, hasError: false, … 5. valueAccessor: DefaultValueAccessor _renderer: DebugRenderer2, _elementRef: ElementRef, _compositionMode: true, onChange: ƒ, onTouched: ƒ, … 6. viewModel: "sagar" 7. _parent: NgForm submitted: false, _directives: Array(1), ngSubmit: EventEmitter, form: FormGroup 8. _rawAsyncValidators: [] 9. _rawValidators: [] 10. _registered: true 11. asyncValidator: (...) 12. dirty: (...) 13. disabled: (...) 14. enabled: (...) 15. errors: (...) 16. formDirective: (...) 17. invalid: (...) 18. path: (...) 19. pending: (...) 20. pristine: (...) 21. status: (...) 22. statusChanges: (...) 23. touched: (...) 24. untouched: (...) 25. valid: (...) 26. validator: (...) 27. value: (...) 28. valueChanges: (...) 29. __proto__: NgControl
More info on this link-https://angular.io/api/forms/NgModel
Validation Of Input Element
Now if we want to add multiple validation on input field we are added like below.
<label for="firstName">First Name</label> <input minlength="3" required pattern="sagar" ngModel name="firstNames" id="firstName" #firstNames="ngModel" type="text" (change)="log(firstNames)" class="form-control"> <div *ngIf="firstNames.errors?.required">First Name Should required</div> <div *ngIf="firstNames.errors?.minlength">First Name minimum length 3 is required</div> <div *ngIf="firstNames.errors?.pattern">Pattern should match</div> <div class="alert alert-danger" *ngIf="firstNames.touched && !firstNames.valid">First Name is Not Valid</div>
And if validation not matched the output is like below image.

In this we apply html inbuilt validation on control and it is applicable in angular also. So by using errors object we can check the respective validation.
<div *ngIf="firstNames.errors?.required">First Name Should required</div>
So in the above tag in *ngIf we are using firstNames as a template variable and by using that template variable we use errors property of FormControl instance because it creates formcontrol instance why bcoz we use ngModel with name property. If the errors object is not null then it will check the required subfield of that errors object.
Now you want to red the inputbox border to do this we check the CSS and if that all CSS present on that formcontrol we apply style so
.form-control.ng-invalid.ng-touched border: 1px solid red;
This is the style by which we apply red border on input text box. The output of this like below.

Form tag in angular
When angular see <form> tag in Html then angular automatically add ngForm directive to that form.
Ngform have output property ngSubmit. In below html of contact form.
<form #f="ngForm" (ngSubmit)="Submit(f)"> <div class="form-group"> <label for="firstName">First Name</label> <input minlength="3" required pattern="sagar" ngModel name="firstNames" id="firstName" #firstNames="ngModel" type="text" (change)="log(firstNames)" class="form-control"> <div *ngIf="firstNames.errors?.required">First Name Should required</div> <div *ngIf="firstNames.errors?.minlength">First Name minimum length 3 is required</div> <div *ngIf="firstNames.errors?.pattern">Pattern should match</div> <div class="alert alert-danger" *ngIf="firstNames.touched && !firstNames.valid">First Name is Not Valid</div> </div> <div class="form-group"> <label for="comment">Comment</label> <textarea id="comment" ngModel name="comment" #comment="ngModel" col=30 rows="10" type="textare" class="form-control"></textarea> </div> <div class="form-group"> <button class="btn btn-primary form-control" >Submit</button> </div> </form> </div>
In a form tag, we create #f is a template variable and of that form tag we use ngSubmit event for generating the output. Now you can see if we submit that button present on the form the output on a console we get.
1. NgForm submitted: true, _directives: Array(2), ngSubmit: EventEmitter, form: FormGroup 1. form: FormGroup validator: null, asyncValidator: null, _onCollectionChange: ƒ, pristine: true, touched: false, … 2. ngSubmit: EventEmitter _isScalar: false, observers: Array(1), closed: false, isStopped: false, hasError: false, … 3. submitted: true 4. _directives: (2) [NgModel, NgModel] 5. control: FormGroup 6. controls: (...) 7. dirty: (...) 8. disabled: (...) 9. enabled: (...) 10. errors: (...) 11. formDirective: (...) 12. invalid: (...) 13. path: (...) 14. pending: (...) 15. pristine: (...) 16. status: (...) 17. statusChanges: (...) 18. touched: (...) 19. untouched: (...) 20. valid: (...) 21. value: (...) 22. valueChanges: (...) 23. __proto__: ControlContainer
This is the form object of FormGroup class and has some same properties as the FormControl instance object like ngModel.
In this form object value is JSON object by which we can get value from our form and it is a key-value representation of that form element. Also remember the name we assign is taken into consideration while getting the value.
NgModelGroup
This directive can only be used as a child of NgForm (within <form> tags).
Use this directive to validate a sub-group of your form separately from the rest of your form, or if some values in your domain model make more sense to consume together in a nested object.
Provide a name for the sub-group and it will become the key for the sub-group in the form’s full value. If you need direct access, export the directive into a local template variable using ngModelGroup (ex: #myGroup="ngModelGroup").
In angular, we have two classes to check state of input field and their validity.
FormControl
FormGroup
FormControl:- it will check only one input field like input text box, textarea like that. When we apply ngModel to input field angular create instance of FormControl and associate that with this input field.
FormGroup:- It is used to represent the entire form and also an option we have to make a group within a form. ngForm directive automatically apply to all form element. So this will automatically create formgroup object and associate that with that form. By using this formgroup object we can check the state changes of that form and its validity.
What is the difference between ngModelGroup and ngForm?
In this ngForm have output property ngSubmit by using this we able to submit the form and this property is not present in the ngModelGroup. So ngModelGroup not able to submit the value as a part of a form.
How to disable button till form is completely filled or valid?
<button class="btn btn-primary form-control" [disabled]="!f.valid">Submit</button>
In the above code, we use disabled attribute and in this we check form is valid or not. F is template variable of respective form and it is used to check the validation of all control at once.
ngValue is used to select a complete object.
<option *ngFor="let m of contactMethods" [value]="m.id" [ngValue]="m">m.name</option>
0 notes
Quote
Features of Angular 9
Mobiloitte
Angular was finally launched for the first time in 2009, And it is the latest version of Angular 9 that is releasing on February 7th, 2020. Angular is one of the most popular Javascript frameworks, mainly responsible for developing front-end framework web application or single-page applications, giving rise to every AngularJS Development Company in the world. Sponsors by Google, Angular has evolved over the years into a fully extended and well-developed platform.
For developers across the world, Angular is the first choice for front-end development. It is becoming highly major for the team to fix bugs and modify the already existing framework. Angular has followed a new major version of Angular releasing every six months. The Angular team has worked thoughtfully so that the API has not changed from Angular 1 to 2. This is a good thing, it keeps things up-to-date with the latest best practices and latest features supported by JavaScript.
So, what new in Angular v9? In this new update, Angular v9 is smaller and faster to use, and it will be making Angular development benefit from high-performance applications and better development experience. Developers also now have clear syntax errors and clear project structure. A key feature of Angular v9 is to make the Ivy compile available for all applications.
Some Features Of Angular v9
1. Angular Ivy: Angular Ivy is the internet website traffic is captured by smartphone and Android phone users on a global scale. Out of these users, many access to web pages from their mobiles from locations that do not have good internet connectivity.
Angular developers can renovate the Angular based applications to reduce the size of the download assets and enhance the mobile user experience, but now with the smaller size of Javascript bundles, Ivy is surely a good feature by developers who are doing everything by the book to accelerate by Angular based applications.
2. Solve the Safety Problem: In this version of Angular development is one of the API for testing the Angular based applications, it had to provide a function called TestBed.get(). After Version 8 stop, a string-based developer community wanted to release the type of safety issue. With the improvement of TestBed API, the function will do what they get to be alone with being the type-safe concurrently.
3. Advancement in Angular Forms: The advantages of angular applications, is Angular 9 has come with a few forms of changes. The <ngForm></ngForm> is not a functional selection of the refreshing Angular form. Now with the new version of <ng-form></ng-form> is used.
4. Internalization: The Angular v9 can be used to achieve standard code applied to create files for translations activity so that they get published in the apps in various languages.
5. Language service improvements: this new version of Angular v9, service for distributive platforms like VS Code and WebStorm has gone completely. The new version links will become more stable. With the definition of style-based URLs and check-off as template URLs. In the future terms of the languages, service application will be better directive properties and common logic.
Conclusions
The newest version of Angular v9 is a great way to fully understand so, that the actual version of arrives it will follow to the changes. We are a premium Angular development company that has been working closely with Angular developers to ensure the Ivy compiler so that we can get their Angular based applications created with Angular v9. With the newest versions of the community to benefits of Angular v9 is smaller and superior performance based applications that will towards a better developer experience.
#angular.jsdevelopment#angularv9#web developing company#webdevelopment#angular9#newupdate#mobiloitte#usa
0 notes
Text
Forms in Angular - Template-Driven vs Model-Driven or Reactive Forms

As we most certainly know, HTML forms are one of the most important and delicate aspects of any business application. Nowadays, forms are used to fulfill almost any task involving user-submitted data, such as registering or logging in to a website, issuing a payment, reserving a hotel room, ordering a product, performing and retrieving search results, and more. If we were asked to define a form from a developer's perspective, we would come out with the statement "a form is an UI-based interface that allows authorized users to enter data that will be sent to a server for processing". The moment we accept this definition, two additional considerations should come into mind: Each form should provide a data-entry experience good enough to efficiently guide our users through the expected workflow, otherwise they won't be able to properly use it. Each form, as long as it brings potentially unsecure data to the server, can have a major security impact in terms of data integrity, data security and system security, unless the developer possess the required know-how to adopt and implement the appropriate countermeasures.
Forms in Angular
Since it's version 2 major rewrite, Angular provides us a couple of alternative strategies to deal with these common form-related scenarios: Template-Driven Forms and Model-Driven (or Reactive) Forms. Both of them are thigh-coupled with the framework and thus extremely viable; they both belong to the @angular/forms library and also share a common set of form control classes. However, they also have their own specific sets of features, along with their pros and cons, that can ultimately lead us to choose one of them: in this post we'll do our best to summarize these differences.
Template-Driven forms
If you come from AngularJS, there's an high chance that the Template-Driven approach will ring a bell or two. As the name implies, template-driven forms host most of the logic in the template code; working with a template-driven forms means to build the form in the .html template file, to data-bind the various input fields to a ngModel instance, and use a dedicated ngForm object, related to the whole form and containing all the inputs, each one of them being accessible through their name, to perform the required validity checks. To better understand it, here's how a template-driven form looks: As we can see, we can access any element, including the form itself, with some convenient aliases--the attributes with the # sign--and check for their current states to create our own validation workflow. These "states" are provided by the framework and will change in real time depending on various things; touched, for example, becomes TRUE when the control has been visited at least once, dirty, as opposite of pristine, means that the control value has changed, and so on. We used both of them in the preceding example, because we want our validation message to be shown only if the user moves his focus to the and then goes away, leaving it blank by either deleting its value or not setting it. These are template-driven forms in a nutshell; let's try to summarize the pros and cons of this approach. The pros Template-Driven Forms are very easy to write. We can recycle most of our HTML knowledge (assuming that we have any); on top of that, if we came from AngularJS, we already know how well we can make them work once we've mastered the technique. They are also rather easy to read and understand, at least from an HTML point of view; we have a plain, understandable HTML structure containing all the input fields and validators, one after another. Each element will have a name, a two-way binding with the underlying ngModel, and (possibly) a template-driven logic built upon aliases hooked to other elements that we can also see, or to the form itself. The cons Template-Driven forms require a lot of HTML code, which can be rather difficult to maintain and is generally more error-prone than pure TypeScript. For the same reason, these forms cannot be unit tested. We have no way to test their validators or to ensure that the logic we implemented will work, other than running an end-to-end test with our browser, which is hardly ideal for complex forms. Their readability will quickly drop as we add more and more validators and input tags; keeping all their logic within the template might be fine for small forms, but it doesn't scale well when dealing with complex data items. Ultimately, we can say that template-driven forms might be the way to go when we need to build small forms with simple data validation rules, where we can benefit more from their simplicity. On top of that, they are quite similar to the template code we already have in place; we can replace our container DIVs with elements, decorate our input fields with aliases, throw in some validators handled by *ngIf statements, and we will be set in (almost) no time. However, the lack of unit testing and the HTML code bloat that they will eventually produce will eventually lead us toward the alternative approach. For additional information on Template-Driven forms, we highly recommend you to read the official Angular documentation at https://angular.io/guide/forms.
Model-Driven / Reactive forms
The Model-Driven approach was specifically added in Angular 2+ to address the known limitations of the Template-Driven Forms; the forms implemented with this alternative method are known as Model-Driven Forms or Reactive Forms. The main difference here is that (almost) nothing happens in the template, which acts as a mere reference of a TypeScript object--the form model--that gets instantiated and configured programmatically within the component class. To better understand the overall concept, let's try to rewrite the previous form in a Model-Driven / Reactive way (the relevant parts are highlighted): Here's the underlying form model that we will define in the component class file (the relevant parts are highlighted): Let's try to understand what's happening here: The form property is an instance of FormGroup and represents the form itself. FormGroup, as the name suggests, is a container of form controls sharing the same purpose; as we can see, the form itself acts as a FormGroup, which means that we can nest FormGroup objects inside other FormGroups (we didn't do that in our sample, though). Each data input element in the form template--in the preceding code, name--is represented by an instance of FormControl. Each FormControl instance encapsulates the related control's current state, such as valid, invalid, touched, and dirty, including its actual value. Each FormGroup instance encapsulates the state of each child control, meaning that it will be valid only if/when all its children are also valid. Also note that we have no way to access the FormControls directly, like we were doing in Template-Driven forms; we have to retrieve them using the .get() method of the main FormGroup, which is the form itself. At first glance, the Model-Driven template doesn't seem much different from the Template-Driven one; we still have a form element, an input element hooked to a span validator, and a submit button; on top of that, checking the state of the input elements takes a bigger amount of source code, as they have no aliases we can use. Where's the real deal? To help us visualize the difference, let's look at the following diagrams; here's a scheme depicting how Template-Driven Forms work:

If we look at the arrows we can easily see that, in Template-Driven Forms, everything happens in the template; the HTML form elements are directly bound to the component data model represented by a property filled with an asynchronous HTML request to the web server. That data model will get updated as soon as the user changes something, unless some validator prevents them from doing that. If we think about it, we can easily understand how there isn't a single part of the whole workflow that happens to be under our control; Angular handles everything by itself, using the information found in the data bindings defined within our template. This is what Template-Driven actually means. Let's now take a look at the Model-Driven Forms (or Reactive Forms) approach:

As we can see, the arrows depicting the Model-Driven Forms workflow tell a whole different story. They show how the data flows between the component data model--which we get from the web server--and a UI-oriented form model that retains the states and the values of the HTML form (and its children input elements) presented to the user. This means that we'll be able to get in the middle between the data and the form control objects and perform a number of tasks firsthand: push and pull data, detect and react to user changes, implement our own validation logic, perform unit tests, and so on. Instead of being superseeded by a template that's not under our control, we can track and influence the workflow programmatically, since the form model that calls the shots is also a TypeScript class; that's what Model-Driven is about. This also explains why they are also called Reactive Forms - an explicit reference to the reactive programming style that favors explicit data handling and change management throughout the workflow. For additional information on Model-Driven / Reactive Forms, we highly recommend you to read the official Angular documentation at https://angular.io/guide/reactive-forms. This article is part of the ASP.NET Core 2 and Angular 5 book, available as paperback, e-book and as a 26-lessons video-course. Promo Code: ASPCA50 to get it with a 50% discount! Read the full article
0 notes