#node_js
Explore tagged Tumblr posts
Visit Tumblr Blog
Explore Tumblr blogs with no restrictions, modern design and the best experience.
Last Seen Tumblr Blogs


Fun Fact
Tumblr Inc. is funded by 13 investors.
Text
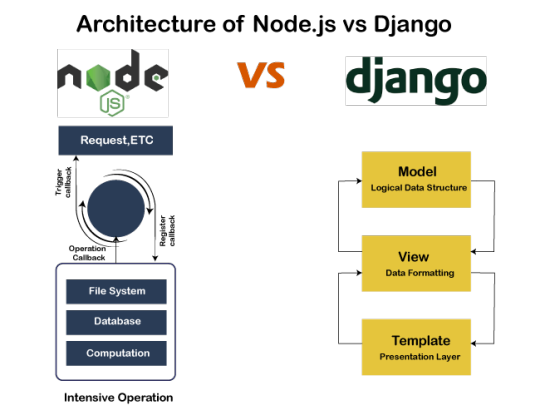
Django is a high-level web framework that permits the user to develop secure and maintainable websites. It is written in the Python programming language.
0 notes
Photo

Searching For Top Web Development Company
Ksolves is one of the Best Web Development Company in USA that helps you to get good website design services. With the help of us, you can design and develop a website using web application development. We are known as the Best ROR Web Development Company in USA and Best Node js development Company in USA. Welcome to our platform now. visit the website today:
https://www.ksolves.com/web-development
#web#development#web_development#web_development_company#website_design#ror#node_js#dallas#react#usa#texas#uk#native#hybrid
0 notes
Link
Learn demanding #skills like Node JS with #Internkro and design attractive social media #website and mini games through #JavaScript. Drop your CV @ [email protected] Call Now: 8744999111

0 notes
Photo

#PHP, #Java, #Computer_Science, #Node_js, #Angular, #Laravel, #DBMS And more... Top Best Interview Questions Answers visit a website to prepare the next Interview.
1 note
·
View note
Photo

#Node_JS Demo Classes on Thursday @ RitePros, CA Office Call for Free Demo: 866-748-3411 (Toll Free Number) (or) Whats App : 650-608-5234 Address : 2292 Walsh Ave, Santa Clara, CA 95050 @RitePros Inc www.ritepros.com Emaill: [email protected]
0 notes
Text
Data Engineer Nanodegree Program | Udacity
NANODEGREE PROGRAM | Become a Data Engineer
Data Engineering is the foundation for the new world of Big Data. Enrol now to build production-ready data infrastructure, an essential skill for advancing your data career.
Learn to design data models, build data warehouses and data lakes, automate data pipelines, and work with massive datasets. At the end of the program, you’ll combine your new skills by completing a capstone project.
#certificates_hub #mobile #android #ios #technologies #javascript #python #mobileapps #webdevelopment #html #build #skills #css #learn #php #success #design #pythonprogramminglanguage #programming #technologies #application #python #develop #databases #data #robotics #learning #top #howto #digital #udemy #interested #construct #electronic #learn #learning #ros #Free #Online #WebDevelopment #Courses #FreeCodeCamp #HTML #CSS #Javascript #React_js #Node_js #MongoDB #Introduction_to_Computer_Science #Python, #Javascript, #SQL #computer #Programming #Ruby #communicate #results #university #learndatascience #learndatascience #datasets #questions #machinelearning #science #learn #computers #graphicdesign #completed #process #professional #project #marketing #nanodegree #udacity
0 notes
Text
ERROR INSTALANDO APTANA STUDIO 3
ERROR INSTALANDO APTANA STUDIO 3
http://www.aptana.com/
Sitio oficial para descargar Aptana Studio 3:
https://github.com/aptana/studio3/releases
Aptana en su ultima version 3,7 muestra a veces que no permite instalar el programa por un error que indica que no encuentra paquetes git y/o paquetes de node_js
SOLUCION, forzar la instalación en terminal.
1) Entrar a la terminal como Administrador 2) Ir hasta el directorio donde este…
View On WordPress
0 notes
Text
Angular 2, Travis CI, Coveralls and Open Sauce
In this post, we are going to see how we can make an Angular 2 app work with Travis CI, Coveralls and Open Sauce.
In a previous post, we saw how to set up a PHP project using Travis CI, StyleCI and Codecov. We are now going to do quite the same, but with a small Angular 2 app. Our purpose here is to test our app under multiple environments on each commit.
So the first thing we need to do is to sign up for a GitHub account, then we will have access to Coveralls with that same account. The next thing is to open another account on Open Sauce. We are now ready to begin! Let's create our repository, commit and push!
To achieve our goal, it is important that our project runs with angular-cli. We are going to assume that is the case and that Git is also installed.
Dependencies
For a start, we need to install several dependencies with NPM. Let's do it like so in the terminal:
npm install karma-coverage karma-coveralls karma-firefox-launcher angular-cli-ghpages --save-dev
Install dependencies
With that last command, we installed karma-coverage that is responsible for code instrumentation and coverage reporting. karma-coveralls will help us to transmit the report to Coveralls. karma-firefox-launcher is a Karma plugin that will help us with our tests. Finally, angular-cli-ghpages will help us to deploy our app on GitHub Pages.
Karma
Now we need to set a few things in the karma.conf.js file that is included in the root of our folder. The file will look like so:
module.exports = function (config) { config.set({ basePath: '', frameworks: ['jasmine', '@angular/cli'], plugins: [ require('karma-jasmine'), require('karma-chrome-launcher'), require('karma-firefox-launcher'), require('@angular/cli/plugins/karma'), require('karma-coverage') ], client:{ clearContext: false // leave Jasmine Spec Runner output visible in browser }, files: [ { pattern: './src/test.ts', watched: false } ], preprocessors: { 'dist/app/**/!(*spec).js': ['coverage'], './src/test.ts': ['@angular/cli'] }, mime: { 'text/x-typescript': ['ts','tsx'] }, coverageReporter: { dir : 'coverage/', reporters: [ { type: 'html' }, { type: 'lcov' } ] }, angularCli: { config: './angular-cli.json', codeCoverage: 'coverage', environment: 'dev' }, reporters: config.angularCli && config.angularCli.codeCoverage ? ['progress', 'coverage'] : ['progress'], port: 9876, colors: true, logLevel: config.LOG_INFO, autoWatch: true, browsers: ['Chrome', 'Firefox'], singleRun: false }); };
karma.conf.js file
Karma is a test runner that is ideal for writing and running unit tests while developing the application.
Protractor
We are now going to configure Protractor for e2e testing. There is already a file for that in the root of our folder, but is only suitable for local tests with a single browser. Let's create a new one a folder called config. We will name that file protractor.sauce.conf.js and it will be like the following:
var SpecReporter = require('jasmine-spec-reporter').SpecReporter; var buildNumber = 'travis-build#'+process.env.TRAVIS_BUILD_NUMBER; exports.config = { sauceUser: process.env.SAUCE_USERNAME, sauceKey: process.env.SAUCE_ACCESS_KEY, allScriptsTimeout: 72000, getPageTimeout: 72000, specs: [ '../dist/out-tsc-e2e/**/*.e2e-spec.js', '../dist/out-tsc-e2e/**/*.po.js' ], multiCapabilities: [ { browserName: 'safari', platform: 'macOS 10.12', name: "safari-osx-tests", shardTestFiles: true, maxInstances: 5 }, { browserName: 'chrome', platform: 'Linux', name: "chrome-linux-tests", shardTestFiles: true, maxInstances: 5 }, { browserName: 'chrome', platform: 'macOS 10.12', name: "chrome-macos-tests", shardTestFiles: true, maxInstances: 5 }, { browserName: 'chrome', platform: 'Windows 10', name: "chrome-latest-windows-tests", shardTestFiles: true, maxInstances: 5 }, { browserName: 'firefox', platform: 'Linux', name: "firefox-linux-tests", shardTestFiles: true, maxInstances: 5 }, { browserName: 'firefox', platform: 'macOS 10.12', name: "firefox-macos-tests", shardTestFiles: true, maxInstances: 5 }, { browserName: 'firefox', platform: 'Windows 10', name: "firefox-latest-windows-tests", shardTestFiles: true, maxInstances: 5 }, { browserName: 'internet explorer', platform: 'Windows 10', name: "ie-latest-windows-tests", shardTestFiles: true, maxInstances: 5 }, { browserName: 'MicrosoftEdge', platform: 'Windows 10', name: "edge-latest-windows-tests", shardTestFiles: true, maxInstances: 5 } ], sauceBuild: buildNumber, directConnect: false, baseUrl: 'YOUR_GITHUB_PAGE', framework: 'jasmine', jasmineNodeOpts: { showColors: true, defaultTimeoutInterval: 360000, print: function() {} }, useAllAngular2AppRoots: true, beforeLaunch: function() { require('ts-node').register({ project: 'e2e' }); }, onPrepare: function() { jasmine.getEnv().addReporter(new SpecReporter()); } };
protractor.sauce.conf.js file
We can notice that there are two environment values: SAUCE_USERNAME and SAUCE_ACCESS_KEY. We can set theses values in our Travis CI account in the settings sections of our project. The information can be found in our Sauce Labs account settings.
Protractor is an end-to-end test framework for Angular. Protractor runs tests against our application running in a real browser, interacting with it as a user would.
e2e configuration
In the e2e folder of our application, we need to place a file called tsconfig.json.
{ "compileOnSave": false, "compilerOptions": { "declaration": false, "emitDecoratorMetadata": true, "experimentalDecorators": true, "module": "commonjs", "moduleResolution": "node", "outDir": "../dist/out-tsc-e2e", "sourceMap": true, "target": "es5", "typeRoots": [ "../node_modules/@types" ] } }
tsconfig.json file in e2e folder
We also need to place a similar file at the root of our application.
{ "compileOnSave": false, "compilerOptions": { "outDir": "./dist/out-tsc", "baseUrl": "src", "sourceMap": true, "declaration": false, "moduleResolution": "node", "emitDecoratorMetadata": true, "experimentalDecorators": true, "target": "es5", "typeRoots": [ "node_modules/@types" ], "lib": [ "es2016", "dom" ] } }
tsconfig.json file
End-to-end (e2e) tests explore the application as users experience it. In e2e testing, one process runs the real application and a second process runs Protractor tests that simulate user behavior and assert that the application respond in the browser as expected.
Coveralls
In our folder, we are now going to create a file called .coverall.yml with the token corresponding to our respository that can be found in our Coveralls account.
repo_token: YOUR_TOKEN
.coverall.yml file
Travis CI
Now it is time to tell Travis CI what to do with our files. Let's create a file called .travis.yml and fill it like so:
language: node_js sudo: true dist: trusty node_js: - '6' branches: only: - master env: global: - CHROME_BIN=/usr/bin/google-chrome - DISPLAY=:99.0 cache: directories: - node_modules before_install: - ./scripts/install-dependencies.sh - ./scripts/setup-github-access.sh after_success: - ./scripts/delete-gh-pages.sh - git status - npm run build-gh-pages - npm run deploy-gh-pages - git checkout master - sleep 10 - tsc -p e2e - npm run e2e ./config/protractor.sauce.conf.js notifications: email: false
.travis.yml file
GitHub Token
Before we go any further, we need to create an access token on our GitHub account. We can do that in the settings of our account.
Scripts
In the previous section, we told Travis CI to use three bash scripts: install-dependencies.sh, setup-github-access.sh and delete-gh-pages.sh. We are now going to create a folder called scripts and create those three different scripts like so:
The first script, as its name lets us figure out, just install our dependencies.
#!/bin/bash export CHROME_BIN=/usr/bin/google-chrome export DISPLAY=:99.0 #Install chrome stable version sh -e /etc/init.d/xvfb start sudo apt-get update sudo apt-get install -y libappindicator1 fonts-liberation wget https://dl.google.com/linux/direct/google-chrome-stable_current_amd64.deb sudo dpkg -i google-chrome*.deb rm -f google-chrome-stable_current_amd64.deb
install-dependencies.sh file
The second script ensures that we can access to our GitHub repository during the build. We can see in this script that a variable called $GH_TOKEN is used. This environment variable can be set in Travis CI by clicking on Settings in our repositories list.
#!/bin/bash set -e echo "machine github.com" >> ~/.netrc echo "login [email protected]" >> ~/.netrc echo "password $GITHUB_TOKEN" >> ~/.netrc
setup-github-access.sh file
The last script deletes the branch gh-pages to let us deploy our app on GitHub Pages (we can't do it if the branch is already here).
#!/bin/bash set -e git ls-remote --heads | grep gh-pages > /dev/null if [ "$?" == "0" ]; then git push origin --delete gh-pages fi
delete-gh-pages.sh file
Now, we need to tell GitHub and Travis CI that these files are executable. We can do that with the following command:
chmod +x the_file
Git command to change chmod
Perhaps the following command may also be needed:
git update-index --chmod=+x the_file
Git command to update index
package.json
We now have to make a few adjustments in our package.json file, more specifically, in the scripts section. We can see that use once again the $GH_TOKEN variable.
"scripts": { "ng": "ng", "start": "ng serve", "build": "ng build", "test": "ng test --code-coverage true --watch false && cat ./coverage/*/lcov.info | ./node_modules/coveralls/bin/coveralls.js", "lint": "ng lint", "pree2e": "webdriver-manager update --standalone false --gecko false", "e2e": "protractor", "build-gh-pages": "ng build --prod --base-href \"/YOUR_REPOSITORY/\"", "deploy-gh-pages": "angular-cli-ghpages --repo=https://[email protected]/YOUR_USERNAME/YOUR_REPOSITORY.git --name=YOUR_USERNAME --email=YOUR_EMAIL" }
package.json file
app.po.ts
We need to make one last adjustment in the file called app.po.ts that we can find in the e2e folder. Let's make it like so:
import { browser, element, by } from 'protractor'; export class BookreaderPage { navigateTo() { browser.ignoreSynchronization = true; return browser.get(browser.baseUrl); } getParagraphText() { return element(by.css('app-root h1')).getText(); } }
app.po.ts file
Here we go!
Now, we can push (again) our files and, if everything is alright, the magic will happen! We just have to check Travis CI, Coveralls and Sauce Labs.
0 notes
Text
Continuous Integration
In the previous posts we wrote about Testing the APIs, E2E Testing and Code Coverage. We wrote about why they are relevant and why they plays a central role in a serious software development cycle, helping developers to discover bugs early and to deliver high quality code.
In this post we briefly explain how to complete and to automate the development cycle adopting a Continuous Integration flow, and we provide a brief list of tools we are using to do that.
Thus, about Continuous Integration... from Wikipedia:
In software engineering, continuous integration (CI) is the practice of merging all developer working copies to a shared mainline several times a day.
[…]
Continuous integration involves integrating early and often, so as to avoid the pitfalls of "integration hell". The practice aims to reduce rework and thus reduce cost and time. A complementary practice to CI is that before submitting work, each programmer must do a complete build and run (and pass) all unit tests. Integration tests are usually run automatically on a CI server when it detects a new commit.
From our point-of-view, a feasible software development cycle, which includes the Continuous Integration practice, can be represented as in the next figure.

Briefly:
during Fast Development Cycle (FDC), each developer works on his/her copy of the code base in fast iterations: writes code and tests, runs tests locally and checks Code Coverage, then iterates.
At the end of each significative reached result in FDC, developers Commit changes and push code to the shared repository.
The latter event triggers the Continuous Integration (CI) tool, which: checkouts the updated code from repository, builds it and runs all the tests; if all tests passed and Code Coverage thresholds are fulfilled then it increases the version of the code using Semantic Versioning. Finally, depending on the adopted company’s software delivery strategy, the CI tool can also make a new release, publish or deploy it to production servers.
In this way, the code is always updated, built, tested and merged in a consistent way, all the written integration tests are run over and over again at the end of each Fast Development Cycle.
Tools
Some tools we are using in Node.js-based flows at Vivocha Labs, include:
Istanbul/nyc: code coverage tool;
husky: git hooks, prevent bad commits and pushes. Executes pre-commit and pre-push tasks;
commitizen: commiting with commitizen, prompts you to fill out any required commit info fields at commit time, like commit type (new feature, bug fix, refactoring, etc…), description of the commit and so on...
semantic-release: automates node packages publishing to NPM, setting a version related to the git commit type and strictly following the SemVer specification. After every successful Continuous Integration build of your branch, it publish the new version for you to the repos.
Travis CI: continuous integration service, free for opensource projects. Triggered by a git push in a repository, it executes builds/testing retrieving code from a git repository and running tasks configured in your .travis.yml configuration file. You configure Travis with GitHub and NPM access tokens to allow it to publish and release new versions of your code to the repositories, through semantic-release tool.
Coveralls: Code coverage reporting service; it shows which parts of your code aren’t covered by your test suite. Also, it produces reports like nyc does, but they can be read online through Coveralls website in a nice layout.
Configuring the project
For a Node.js project, in addition to (obviously) installing all the dev dependencies for the modules mentioned above, the package.json scripts section could be configured as follows:
"scripts": { "test": "./node_modules/.bin/mocha -t 20000", "cover": "./node_modules/.bin/nyc --reporter=lcov --reporter=text npm test", "check-coverage": "./node_modules/.bin/nyc check-coverage --statements 100 --branches 100 --functions 100 --lines 100", "precommit": "npm run cover && npm run check-coverage", "commit": "./node_modules/.bin/git-cz", "semantic-release": "semantic-release pre && npm publish && semantic-release post", "report-coverage": "cat ./coverage/lcov.info | ./node_modules/coveralls/bin/coveralls.js" }
This configuration enables performing Fast Development Cycles + Commit activities, through the following steps:
Write Code & Tests;
npm run precommit;
If OK, git add files;
npm run commit;
git push.
The git push command triggers a build event on the configured Travis CI repository, which runs our tasks as configured in the project .travis.yml file. A .travis.yml configuration can be written as follows:
language: node_js cache: directories: - node_modules branches: only: - master notifications: email: false node_js: - '7' before_script: - npm prune script: - npm run cover - npm run check-coverage after_success: - npm run report-coverage - npm run semantic-release
This configuration drives the following , automatic, CI process:
Run all Tests and do Code Coverage;
Check Code Coverage against the defined thresholds
If successful:
Send Code Coverage results to Coveralls
Publish the new version of the software in the NPM registry
Create a new release in the git repository.
Adopting a Continuous Integration practice in your software development cycle closes the development/release loop, automating all the testing steps and also running integration tests every time an update in the code base is committed and pushed to the repository. The proposed methodology can also contribute to speed up a Continuous Delivery strategy, releasing software faster, more frequently and in a more secure way.
0 notes
Link
node.js の helloworld から、併用出来る socket.io や express の紹介など
5 notes
·
View notes
Photo

Searching For Top Web Development Company in USA
Ksolves is one of the Best Web Development Company in USA that helps you to get good website design services. With the help of us, you can design and develop a website using web application development. We are known as the Best ROR Web Development Company in USA and Best Node js development Company in USA. Welcome to our platform now. visit the website today:
https://www.ksolves.com/web-development
#web#development#usa#web_development#web_development_company#website_design#ror#node_js#dallas#react#react_js#native#hybrid
0 notes
Photo

#Node_JS Free Demo Classes
Call for Free Demo:866-748-3411 (Toll Free Number) (or) Whats App : 650-608-5234
Address : 2292 Walsh Ave, Santa Clara, CA 95050
@RitePros Inc
www.ritepros.com
Emaill: [email protected]
0 notes
Photo

#Node_JS Free Demo Classes Call for Free Demo: 866-748-3411 (Toll Free Number) (or) Whats App : 650-608-5234 Address : 2292 Walsh Ave, Santa Clara, CA 95050 RitePros Inc www.ritepros.com Emaill: [email protected]
0 notes
Photo

#Node_JS Demo Classes On Feb.20th, 2020 (Thursday) Call for Free Demo: 866-748-3411 (Toll Free Number) (or) Whats App : 650-608-5234 Address : 2292 Walsh Ave, Santa Clara, CA 95050 @RitePros Inc www.ritepros.com Emaill: [email protected]
0 notes
Photo

#Node_JS Demo Classes On Feb.13th, 2020 (Thursday) Call for Free Demo: 866-748-3411 (Toll Free Number) (or) Whats App : 650-608-5234 Address : 2292 Walsh Ave, Santa Clara, CA 95050 @RitePros Inc www.ritepros.com Emaill: [email protected]
0 notes
Photo

#Node_JS | #React_JS | #Angular_JS Live Demo SessionCall: 866 RITE 411 (Toll Free Number) or Whats App : 650-608-5234Address : 2292 Walsh Ave, Santa Clara, CA 95050@RitePros Incwww.ritepros.comEmaill: [email protected]
0 notes