#nodejs application in docker container
Explore tagged Tumblr posts
Visit Tumblr Blog
Explore Tumblr blogs with no restrictions, modern design and the best experience.
Last Seen Tumblr Blogs


Fun Fact
Mobile Tumblr US users spend an average of 4.04 minutes per session on the app.
Text
youtube
#youtube#video#codeonedigest#microservices#microservice#nodejs tutorial#nodejs express#node js development company#node js#nodejs#node#node js training#node js express#node js development services#node js application#redis cache#redis#docker image#dockerhub#docker container#docker tutorial#docker course
0 notes
Photo

Spin up a lightweight Nodejs docker container running your application ☞ http://bit.ly/2NuYrd2 #nodejs #javascript
1 note
·
View note
Photo

Spin up a lightweight Nodejs docker container running your application ☞ http://bit.ly/2NuYrd2 #nodejs #javascript
1 note
·
View note
Text
Docker: How to get a Node.js application into a Docker Container
Introduction
The goal of this article is to show you an example of dockerizing a Node js application. Where you can have a basic understanding of Docker. It will help you to set up the Node js application and docker installation.
What is Docker?
Docker is an open-source platform for developing, shipping, and running applications. Docker enables you to separate your applications from your infrastructure so you can deliver software quickly. With Docker, you can manage your infrastructure in the same ways you manage your applications. By taking advantage of Docker’s methodologies for shipping, testing, and deploying code quickly, you can significantly reduce the delay between writing code and running it in production.
Why Docker?
Developing apps today requires so much more than writing code. Multiple languages, frameworks, architectures, and discontinuous interfaces between tools for each lifecycle stage create enormous complexity. Docker simplifies and accelerates your workflow while giving developers the freedom to innovate with their choice of tools. The day which comes in every developer’s life that application is working on our system, but It’s not working on the client’s system. To prevent this type of situation, we use Docker.
How can we use Docker with Nodejs?
Before starting, I am assuming that you have a working Docker installation and a basic understanding of how a Node.js application is structured.
In the first part of this video, we will create a simple web application in Node.js, then we will build a Docker image for that application, and lastly, we will instantiate a container from that image.
Setup Nodejs Server
Run command npm init and add the required details for your project
Install express in the project using npm I express
Then, create a server.js file that defines a web app using the Express.js framework:
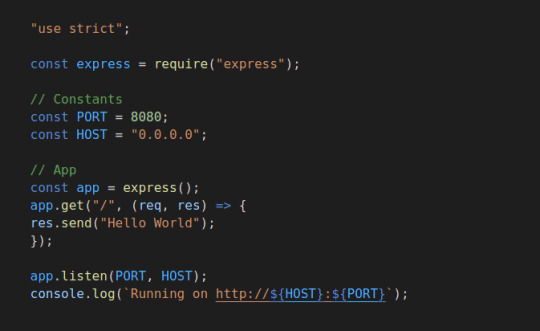
Now we can test the node server, and start the application using node server.js. Let’s try to hit the URL http://localhost:8080/ and check the response

In the next steps, we’ll look at how you can run this app inside a Docker container using the official Docker image. First, you’ll need to create a docker file, Where we are going to add some commands.
#Dockerfile
Create a docker file in the root directory of the project using the touch command.

Edit the docker file using any editor and write the below instructions into the docker file.

Initially, we need to pick a node image that will run on a container, and here I am using the latest stable version of the node.

Next, we need to create a directory for the application. Here we can add all the project files.

This image comes with Node.js and NPM already installed, so the next thing we need to do is install your app dependencies using the npm install. So I am going to copy the package. JSON file.

To bundle your app’s source code inside the Docker image, use the COPY instruction:

Your app binds to port 8080 so you’ll use the EXPOSE instruction to have it mapped by the docker daemon:

Lastly, we are going to run the application using the CMD, which will execute node server.js
To see the final outputs please click here
0 notes
Text
If this is not one of the most robust, free, rich and informative era ever then I cannot think of any other time in history adorned with the wealth of technology as this one. If you would wish to accomplish anything, this era wields the most virile grounds to nourish, nurture and aid the sprouting, the growth and the maturity of your dreams. You can literaly learn to be what you would wish to be in this age. That being said, this disquisition takes on a quest to get you into setting up something similar to Heroku on your own environment. We shall get to know what Heroku is then get off the dock and sail off towards our goal of having such an environment. The proliferation of cloud technologies brought with it many opportunities in terms of service offerings. First and foremost, users had the ability to get as much infrastructure as they could afford. Users can spawn servers, storage and network resources ad libitum which is popularly known as Infrastructure as a service. Then comes the second layer that sits on the infrastructure. It could be anything, cloud identity service, cloud monitoring server et cetera. This layer provides ready made solutions to people who might need them. This is known as software as a service. I hope we are flowing together this far. In addition to that there is another incredible layer that is the focus of this guide. It is a layer that targets developers majorly by making their lives easier on the cloud. In this layer , developers only concentrate on writing code and when they are ready to deploy, they only need to commit their ready project in a source control platform like GitHub/GitLab and the rest is done for them automatically. This layer provides a serverless layer to the developers since they do not have to touch the messy server side stuff. This layer as you might already have guessed is known as Platform as a Service (PaaS). Heroku is one of the solutions that sits on this layer. In this guide, are going to setup a platform that is similar to Heroku on your own infrastructure. As you know, you cannot download and install Heroku on your server. It is an online cloud service that you subscribe to. We will use Caprover to setup our own private Platform as a service (PaaS). CapRover is an extremely easy to use app/database deployment & web server manager for your NodeJS, Python, PHP, ASP.NET, Ruby, MySQL, MongoDB, Postgres, WordPress and even more applications. Features of Caprover CLI for automation and scripting Web GUI for ease of access and convenience No lock-in! Remove CapRover and your apps keep working! Docker Swarm under the hood for containerization and clustering Nginx (fully customizable template) under the hood for load-balancing Let’s Encrypt under the hood for free SSL (HTTPS) One-Click Apps: Deploying one-click apps is a matter of seconds! MongoDB, Parse, MySQL, WordPress, Postgres and many more. Fully Customizable: Optionally fully customizable nginx config allowing you to enable HTTP2, specific caching logic, custom SSL certs and etc Cluster Ready: Attach more nodes and create a cluster in seconds! CapRover automatically configures nginx to load balance. Increase Productivity: Focus on your apps! Not the bells and whistles just to run your apps! Easy Deploy: Many ways to deploy. You can upload your source from dashboard, use command line caprover deploy, use webhooks and build upon git push Caprover Pre-requisites Caprover runs as a container in your server which can be any that supports containerization. Depending on your preferences, you can use Podman or Docker to pull and run Caprover image. For this example, we are going to use Docker. In case you do not have Docker installed, the following guides listed below will be there to help you set it up as fast as possible. Install Docker and Docker Compose on Debian Setup Docker CE & Docker Compose on CentOS 8 | RHEL 8 How To Install Docker on RHEL 7 / CentOS 7
How To Install Docker CE on Ubuntu Once Docker Engine has been installed, add your user account to docker group: sudo usermod -aG docker $USER newgrp docker Another pre-requisite is a wildcard domain name pointed to the IP of your server where Caprover Server will be running. Setup your Heroku PaaS using CapRover Once the pre-requisites are out of the way, the only task remaining now is to set up our Caprover and poke around its rooms just to see what it has to offer. The following steps will be invaluable as you try to get it up and running. Step 1: Prepare your server Once Docker is installed, you can install all of the applications you need during your stay in the server. They include an editor and such kind of stuff. ##On CentOS sudo yum update sudo yum install vim git curl ##On Ubuntu sudo apt update sudo apt install vim git curl That was straingtforward. Next, let us pull Caprover image to set the stone rolling Step 2: Pull and execute Caprover Image We are going to cover the installation of Caprover depending on where your server sits. Scenario 1: Installation on a local server without Public IP Install dnsmasq After all, as mentioned in the pre-requisites section, we shall need a small DNS server to resolve domain names since Caprover is so particular with it. In case you have a local DNS server that supports wildcard domains, then you are good to go. You can skip the DNS setup part. In case you do not have it, install lightweight dnsmasq as follows: sudo yum -y install dnsmasq After dnsmasq is successfully installed, start and enable the service. sudo systemctl start dnsmasq sudo systemctl enable dnsmasq Add Wildcard DNS Recod Once dnsmasq is running as expected, we can go ahead and add the configs and wildcard domain name as shown below: $ sudo vim /etc/dnsmasq.conf listen-address=::1,127.0.0.1,172.20.192.38 domain=example.com server=8.8.8.8 address=/caprover.example.com/172.20.192.38 Replace the IPs therein with yours accordingly. Then restart dnsmasq sudo systemctl restart dnsmasq Test if it works We shall use the dig utility to test if our configuration works $ dig @127.0.0.1 test.caprover.example.com ; DiG 9.11.20-RedHat-9.11.20-5.el8 @127.0.0.1 test.caprover.example.com ; (1 server found) ;; global options: +cmd ;; Got answer: ;; ->>HEADER> Checking System Compatibility > Checking System Compatibility
0 notes
Text
What you'll learn How to create a complete SMS booking system using Twilio and NodeHow to send SMSesHow to receive SMSesHow to use Twilio to send SMSHow to use NodeJs to manage send and receive SMSTwilio the world's leading cloud communications platform as a service (CPaaS) that enables you to develop SMS solutions, WhatsApp, Voice, Video, email, and even IoT. Twilio powers communications for more than 190,000 businesses and enables nearly 932 billion human interactions every year.This course will leverage some of those capabilities to create a fully functional SMS booking system. Here is how it works, the customer interested in booking an appointment send an SMS to a Twilio number; our Node.JS backend application understand the message and send an SMS back to the customer saying:Hi, do you want to book an appointment to: see the gym book a personal trainer book a massageAfter that, we wait for a user reply, such as:I want to book a massageAfter that, our Node application will send an SMS to the user asking:What date do you want to see the masseurThe customer will reply with a preferred day, such as:Monday, pleaseIn this case, we will reply with the valid times available on MondayDo you want to book it on Monday: 10 am, 11 am, 1 pm or 4 pmAfter the customer selects the best time for the booking, they will reply saying:At 11 am is good for meAfter collecting all the data, the NodeJS application will send a confirmation to the customer saying:Your appointment is booked to see the masseur on Monday at 11 am. See you than Please note all the data above is fictional and hardcoded to the application. The course focuses on sending and receiving the SMSes, leaving all the logic of checking the actual dates and times and finalizing the booking for you to implement.Said that new Chapters are coming, and as a student, you can help me decide what comes next. So far few ideas I have on a road map are: Add the logic to read/write on the database been able to validate bookings and available times.Add a relational database to the application as a Docker container and add the current application to a container with easier development and deployment.Add an option to cancel a booking.Add an option to make a payment via SMS using stripe.Move the NodeJS code to a Serverless function and host it in Twilio.Any amazing idea you may have. Enjoy the course!Who this course is for:Developers of all levels that want to learn new thingsDevelopers that want add SMS capabilities to they applications
0 notes
Text
Sixteen Steps To Become a DevOps Professional
The DevOps ecosystem is growing fast since the past few years but I’ve always seen the same question that is somehow hard to answer in some lines: How to become a DevOps engineer?
so, i have decided to write this article which will help you to become a successful DevOps Engineer.So,with out wasting any time go through the blog.

Here are the 16 steps to follow,
1. Start By Learning About Culture
2. Learn A Programming Language
3. Learn How To Manage Servers
4. Learn Networking and Security Basics
5. Learn Scripting
6. Learn How To Install & Configure Middleware’s
7. Learn How To Deploy Software
8. Learn GIT
9. Learn How To Build Software
10. Learn How To Automate Your Software Factory
11. Learn Configuration Management
12. Learn Infrastructure As Code
13. Learn How To Monitor Software & Infrastructure
14. Learn About Containers & Orchestration
15. Learn How To Deploy & Manage Server less Applications.
16. Read Technical Article related to devops stuff from blogs like,
DevOps.com, DzoneDevOps, the XebiaLabs DevOps, DevOps Guys
1. Start By Learning about the Culture:
DevOps is a movement and a culture before being a job this is why cultural aspects are very important.
2. Learn A Programming Language:
In my experience, a good DevOps engineer is someone who has skills in development and operations. Python, Go, Nodejs .you have a large choice! You don’t necessarily need to learn the same main language that your company use but programming skills are really nice to have.
3. Learn How To Manage Servers:
One of the principal tasks that a DevOps professional do, is managing servers. Knowing how servers work is a must-know and to do this, some good knowledge about the hardware (CPU, architecture, memory ...) is needed. The other thing to learn is operating systems and especially Linux. You can start by choosing a distribution like Ubuntu.
If you are really beginning with Linux, you can try it first in your laptop/desktop and start playing with in order to learn.
You can also use DigitalOcean, Amazon Lightsail or Linode to start a cheap server and start learning Linux.
4. Learn Networking & Security Basics
You may probably say that these are skills for network and security engineers. No! Knowing how HTTP, DNS, FTP and other protocols work, securing your deployed software, anticipating security flaws in the code and configuring your infrastructure network are things that you should know. Using Kali Linux could be a good way to learn networking and security.
5. Learn Scripting
Even with the growing number of tools that could be an alternative to creating your own scripts, scripting is a must-know and you will need it for sure. In my experience, Bash is one of the most used scripting languages. Python is also a good scripting language that could be used to go fast while writing less code.
6. Learn How to install & Configure Middleware’s
Apache and Nginx are the most used middleware in the DevOps industry and knowing how to install and configure things like virtual hosts, reverse proxies, domain names and SSL will help you a lot in your daily tasks. Start by deploying Nginx as a web server for a WordPress blog then, as a load balancer for two backend servers.
7. Learn How to Deploy Software
Once you know how to deploy and configure Nginx, you need to know how to deploy applications to a production server.
Create a “hello world” applications using Python, Nodejs and PHP. Deploy these 3 applications. You can use Nginx as a reverse proxy for all of them.
8. Learn GIT
GIT is one of the versioning systems being used in the IT industry. You don’t need to be a GIT expert but this is a technology that will follow you through all of your DevOps experiences.
GIT basics are well explained in the official documentation.
“Pro Git” is the book you really need to read if you want to learn GIT.
9. Learn How to Build Software
Building comes before running. Building software is generally about running a procedure of creating a software release that could run in a production server. A DevOps professional need to know about this important part of the software lifecycle.
Create an application in the language of your choice and check the different ways to install its dependencies and build your code.
10. Learn How to Automate Your Software Factory
DevOps is not about automation, but automation is one of the pillars of the DevOps business transformation. Once you learned how to build software, you can use tools like Jenkins to automate builds and connect your code to the code repository. If you are not familiar with all of this, read about Continuous Integration and Continuous Delivery.
11. Learn Configuration Management
Once things become more complex and once you will need to manage multiple environments and configurations, learning a configuration management tool will make your life easier.
There are a lot of CM tools like Saltstack , Ansible, Chef, Puppet ..Etc. and you can find online resource that compares these tools. In function of what you need, choose a CM tool and start learning it.
12. Learn Infrastructure as Code
IaC is absolutely important to automate your infrastructure and provision your environments with simple scripts or alternative tools. DevOps is about reducing the time to market while keeping a good software quality and IaC will help you on this.
Choose a cloud provider (AWS, GCP ..Etc.) and you will find a lot of free online resources to start your infrastructure. You can also learn how to use “cloud managers” technologies, some CM tools like Saltstack could help you provision infrastructure on AWS or GCP, otherwise, if you need more go for technologies like Terraform.
13. Learn How to Monitor Software & Infrastructure
A software deployed in production and the infrastructure hosting it should be monitored. Monitoring and alerting are one of the important skills you need to know.
Zabbix, Icinga, Sensu, prometheus.. There are a lot of tools you can learn but start by comparing these tools and choose the one that fits your requirements. You can also consider learning how to deploy and use an ELK stack.
14. Learn About Containers & Orchestration
Containers like Docker are becoming a must-know skill! You need to have good skills creating, building, deploying and managing containers in development and production environments.
15. Learn How to Deploy & Manage Serverless Applications
Serverless is one of the most buzzing technologies of 2017 and sooner it will become a requirement in many job descriptions.
AWS Lambda, Azure Functions, Google Cloud Functions, IBM OpenWhisk, or Auth0 WebTask, you have the choice to start learning one of them.
16. Read Technical Article related to devops stuff
from blogs like,
DevOps.com, DzoneDevOps, the XebiaLabs DevOps, DevOps Guys
2 notes
·
View notes
Video
youtube
Nodejs Microservice with MongoDB in Docker Container | Learn Express Mon... Full Video Link https://youtu.be/_3u7H6Hu7n0 Hello friends, new #video on #nodejs #microservices with #mongodb in #docker #container #tutorial for #api #developer #programmers with #examples is published on #codeonedigest #youtube channel. @java #java #aws #awscloud @awscloud @AWSCloudIndia #salesforce #Cloud #CloudComputing @YouTube #youtube #azure #msazure #docker #nodejs #dockertutorial #learndocker #dockercontainer #nodejsmicroservice #nodejsmicroservicestutorial #nodejsmicroservicearchitecture #nodejsmicroserviceproject #nodejsmicroservicearchitectureexample #nodejsmicroservicearchitecturegithub #mongodbdocker #mongodbtutorial #mongodbinstall #mongodbfullcourse #dockertutorialforbeginners #dockercontainertutorialforbeginners #mongoimagedockercompose #mongoimage #mongodbimage #mongodbatlas #nodejsmicroservice #nodejsmicroservicestutorial #nodejsmicroservicearchitecture #nodejsmicroserviceproject #nodejsmicroserviceexample #nodejsmicroservicesinterviewquestions #nodejsmicroserviceframework #mongodb #nodejsmongodbtutorial #nodejsmongoose #nodejsmongooseconnection #nodejsmongooseexpress #nodejsmongooseschema #nodejsmongodb #nodejsmongodb #nodejsexpress #nodejsexpressapitutorial #nodejsexpressproject #nodejsexpressapi #nodejsexpressapiproject #nodejsexpresstutorial #nodejsexpresscourse #nodejsexpressrestapi #nodejsexpresscrashcourse #nodejsexpressapplication
#youtube#node js microservices#nodejs#node js development services#node js training#node js application#node js development company#node js#mongodb#docker#docker container#docker image#dockerfile#dockerimage
1 note
·
View note
Text
Containerize SpringBoot Node Express Apps & Deploy on Azure
Containerize SpringBoot Node Express Apps & Deploy on Azure
Learn everything about Docker & run your Springboot, NodeJS apps inside containers using Docker on Azure cloud. Following are the topics that you will learn in this course: What is the need to run applications inside the container What is Docker What is Image What is Container What is Docker hub What is Dockerfile Benefits of using Docker and running applications inside a container How to…
View On WordPress
0 notes
Text
Ms Sql Server For Mac

Sql Server Studio Mac
Ms Sql Server Management Studio For Mac
Ms Sql Server 2019 For Mac
Ms Sql Server Download For Mac
Here I’ll show you how to get SQL Server up and running on your Mac in less than half an hour. And the best part is, you’ll have SQL Server running locally without needing any virtualization software.
Prior to SQL Server 2017, if you wanted to run SQL Server on your Mac, you first had to create a virtual machine (using VirtualBox, Parallels Desktop, VMware Fusion, or Bootcamp), then install Windows onto that VM, then finally SQL Server. This is still a valid option depending on your requirements (here’s how to install SQL Server on a Mac with VirtualBox if you’d like to try that method). Zip unlocker online.
My employer produces a simple, proof-of-concept HTML5-based SQL client which can be used against any ODBC data source on the web-browser host machine, through the HTML5 WebDB-to-ODBC Bridge we also produce. These components are free, for Mac, Windows, and more. Applicable to many of the other answers here - the Type 1 JDBC-to-ODBC Bridge that most are referring to is the one Sun built in to. Microsoft sql server 2008 free download - Microsoft Office 2008 update, Actual ODBC SQL Server driver, MySQL Database Server, and many more programs. There are some suggestions on SQL Server on Mac to run SQL Server in a VM. However what is interesting is that earlier this year MS announced SQL Server to run on Linux. Announcing SQL Server on Linux. Public preview of the next release of SQL Server. And also instructions for installing SQL Server via Docker.
Starting with SQL Server 2017, you can now install SQL Server directly on to a Linux machine. And because macOS is Unix based (and Linux is Unix based), you can run SQL Server for Linux on your Mac. The way to do this is to run SQL Server on Docker.
So let’s go ahead and install Docker. Then we’ll download and install SQL Server.
Sql Server Studio Mac
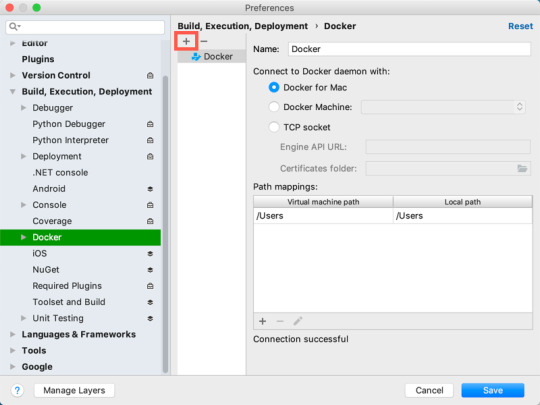
Install Docker
Download the (free) Docker Community Edition for Mac (unless you’ve already got it installed on your system). This will enable you to run SQL Server from within a Docker container.
To download, visit the Docker CE for Mac download page and click Get Docker.
To install, double-click on the .dmg file and then drag the Docker.app icon to your Application folder.
What is Docker?
Docker is a platform that enables software to run in its own isolated environment. SQL Server (from 2017) can be run on Docker in its own isolated container. Once Docker is installed, you simply download — or “pull” — the SQL Server on Linux Docker Image to your Mac, then run it as a Docker container. This container is an isolated environment that contains everything SQL Server needs to run.
Launch Docker
Launch Docker the same way you’d launch any other application (eg, via the Applications folder, the Launchpad, etc).
When you open Docker, you might be prompted for your password so that Docker can install its networking components and links to the Docker apps. Go ahead and provide your password, as Docker needs this to run.
Increase the Memory
By default, Docker will have 2GB of memory allocated to it. SQL Server needs at least 3.25GB. To be safe, increase it to 4GB if you can.
To do this:
Select Preferences from the little Docker icon in the top menu
Slide the memory slider up to at least 4GB
Click Apply & Restart
Download SQL Server
Now that Docker is installed and its memory has been increased, we can download and install SQL Server for Linux.
Open a Terminal window and run the following command.
This downloads the latest SQL Server 2019 for Linux Docker image to your computer.
You can also check for the latest container version on the Docker website if you wish.
Update: When I first wrote this article, I used the following image:
Which downloaded SQL Server 2017. Therefore, the examples below reflect that version.
Launch the Docker Image
Run the following command to launch an instance of the Docker image you just downloaded: Free sims download for mac.
But of course, use your own name and password. Also, if you downloaded a different Docker image, replace microsoft/mssql-server-linux with the one you downloaded.
Here’s an explanation of the parameters:
-dThis optional parameter launches the Docker container in daemon mode. This means that it runs in the background and doesn’t need its own Terminal window open. You can omit this parameter to have the container run in its own Terminal window.--name sql_server_demoAnother optional parameter. This parameter allows you to name the container. This can be handy when stopping and starting your container from the Terminal.-e 'ACCEPT_EULA=Y'The Y shows that you agree with the EULA (End User Licence Agreement). This is required in order to have SQL Server for Linux run on your Mac.-e 'SA_PASSWORD=reallyStrongPwd123'Required parameter that sets the sa database password.-p 1433:1433This maps the local port 1433 to port 1433 on the container. This is the default TCP port that SQL Server uses to listen for connections.microsoft/mssql-server-linuxThis tells Docker which image to use. If you downloaded a different one, use it instead.
Password Strength
If you get the following error at this step, try again, but with a stronger password.
I received this error when using reallyStrongPwd as the password (but of course, it’s not a really strong password!). I was able to overcome this by adding some numbers to the end. However, if it wasn’t just a demo I’d definitely make it stronger than a few dictionary words and numbers.
Check the Docker container (optional)
You can type the following command to check that the Docker container is running.
If it’s up and running, it should return something like this:
Install sql-cli (unless already installed)
Run the following command to install the sql-cli command line tool. This tool allows you to run queries and other commands against your SQL Server instance.
This assumes you have NodeJs installed. If you don’t, download it from Nodejs.org first. Installing NodeJs will automatically install npm which is what we use in this command to install sql-cli.
Permissions Error?
If you get an error, and part of it reads something like Please try running this command again as root/Administrator, try again, but this time prepend sudo to your command:
Connect to SQL Server
Now that sql-cli is installed, we can start working with SQL Server via the Terminal window on our Mac.
Connect to SQL Server using the mssql command, followed by the username and password parameters.
You should see something like this:
This means you’ve successfully connected to your instance of SQL Server.
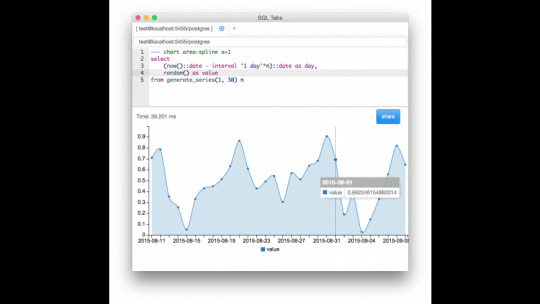
Run a Quick Test
Run a quick test to check that SQL Server is up and running and you can query it.
For example, you can run the following command to see which version of SQL Server your running:
If it’s running, you should see something like this (but of course, this will depend on which version you’re running):
If you see a message like this, congratulations — SQL Server is now up and running on your Mac!
A SQL Server GUI for your Mac – Azure Data Studio
Azure Data Studio (formerly SQL Operations Studio) is a free GUI management tool that you can use to manage SQL Server on your Mac. You can use it to create and manage databases, write queries, backup and restore databases, and more.
BS.Player - the best multimedia player (WebM, HD and AVC video, movie, audio, DVD, YouTube) in the world!BS.Player ™ is used by more than 70 million multi media users throughout the world and it has been translated into more than 90 languages worldwide. Now, you can finally enjoy the playback of HD DVD and AVCHD movies of the highest quality with minimal system requirements. Because it does not use much of the CPU processing resources for multimedia playback it is suitable for all those who use slightly less capable computers. All downloaded versions of our FREE version exceed the sum of all downloads of competitive media players and payable WebM or DVD players. Download bs player for mac. BS.Player can playback any YouTube movie directly from the internet and save it to local disk.Most importantly, BS.Player ™, a free media movie player, is a product for the world multi media market and is therefore equipped with advanced subtitle options which enable the users to watch video content with subtitles from many popular subtitle formats (MicroDVD.sub, VobSub.sub +.idx, SubViewer.sub, (Advanced) SubStation Alpha.ssa or.ass, SubRip.srt, VPlayer.txt.).
Azure Data Studio is available on Windows, Mac and Linux.
Here are some articles/tutorials I’ve written for Azure Data Studio:
Another Free SQL Server GUI – DBeaver
Another SQL Server GUI tool that you can use on your Mac (and Windows/Linux/Solaris) is DBeaver.
DBeaver is a free, open source database management tool that can be used on most database management systems (such as MySQL, PostgreSQL, MariaDB, SQLite, Oracle, DB2, SQL Server, Sybase, Microsoft Access, Teradata, Firebird, Derby, and more).
Ms Sql Server Management Studio For Mac
I wrote a little introduction to DBeaver, or you can go straight to the DBeaver download page and try it out with your new SQL Server installation.
Ms Sql Server 2019 For Mac


Limitations of SQL Server for Linux/Mac
Ms Sql Server Download For Mac
SQL Server for Linux does have some limitations when compared to the Windows editions (although this could change over time). The Linux release doesn’t include many of the extra services that are available in the Windows release, such as Analysis Services, Reporting Services, etc. Here’s a list of what’s available and what’s not on SQL Server 2017 for Linux and here’s Microsoft’s list of Editions and supported features of SQL Server 2019 on Linux.
Another limitation is that SQL Server Management Studio is not available on Mac or Linux. SSMS a full-blown GUI management for SQL Server, and it provides many more features than Azure Data Studio and DBeaver (at least at the time of writing). You can still use SSMS on a Windows machine to connect to SQL Server on a Linux or Mac machine, but you just can’t install it locally on the Linux or Mac machine.
If you need any of the features not supported in SQL Server for Linux, you’ll need SQL Server for Windows. However, you can still run SQL Server for Windows on your Mac by using virtualization software. Here’s how to install SQL Server for Windows on a Mac using VirtualBox.
0 notes
Text
Podman is a tool designed for managing containers and pods without requiring a container daemon as common in Docker world. All the containers and Pods are created as child processes of the Podman tool. The Podman’s CLI (podman) is based on the Docker CLI. In this guide we’ll show you how to create and publish/push Docker images to Docker Hub using Podman. If you want to build a private container registry with podman, check our guide below: Install Secure Container registry with Podman Before you begin, ensure you have podman installed in your system. Here are the guides you can refer to: How To Install Podman on Debian How To Install Podman on Arch Linux / Manjaro How To Install Podman on CentOS & Fedora Install Podman on Ubuntu How To Install and Use Podman on CentOS 8 / RHEL 8 Create your Docker image. For this I’ll create a simple Node.js Application. mkdir ~/docker-images/demo/ cd ~/docker-images/demo/ Here is my app.js file. $ vim app.js const http = require('http'); const os = require('os'); console.log("Node server starting..."); var handler = function(request, response) console.log("Received request from " + request.connection.remoteAddress); response.writeHead(200); response.end("You've hit " + os.hostname() + "\n"); ; var www = http.createServer(handler); www.listen(8080); Create Dockerfile. $ vim Dockerfile FROM node ADD app.js /app.js ENTRYPOINT ["node", "app.js"] Build image with a tag. $ podman build -t docker.io/jmutai/nodejs-demo:v1 . STEP 1: FROM node STEP 2: ADD app.js /app.js afbd0b73b68748a693427c1ed7bf4a40d293632691b385a565a40d0d1092b4de STEP 3: ENTRYPOINT ["node", "app.js"] STEP 4: COMMIT docker.io/jmutai/nodejs-demo:v1 ffe0449e93f36fddecc71e701a6011dbbfa0cfcdf6565209c84b845bfca60bae Replace docker.io/jmutai/nodejs-demo:v1 with the tag for your application. Login to Docker hub $ podman login docker.io Username: jmutai Password: Login Succeeded! Since I had tagged the image at build in format required by Docker Hub, I can just push it. $ podman push docker.io/jmutai/nodejs-demo:v1 Pulling Docker image from Docker Hub with podman You can then pull image on other machines by running: ### Using docker client ### docker pull docker.io/jmutai/nodejs-demo:v1 docker pull jmutai/nodejs-demo:v1 ### Using podman ### podman pull docker.io/jmutai/nodejs-demo:v1 podman pull jmutai/nodejs-demo:v1 Run a test container: ### With podman ### $ podman run --name nodejs-demo -p 8080:8080 -d docker.io/jmutai/nodejs-demo:v1 d1a669579a39580fd1dfa19aaeed2c7a29aa28a1324d87c301d20f41e30e014f ### With Docker ### $ docker run --name nodejs-demo -p 8080:8080 -d docker.io/jmutai/nodejs-demo:v1 Now try to access your application at http://localhost:8080 (Replace localhost with the hostname or IP of the Docker host if necessary): $ curl localhost:8080 You've hit d1a669579a39 Confirm container ID to validate the output $ podman ps CONTAINER ID IMAGE COMMAND CREATED STATUS PORTS NAMES d1a669579a39 docker.io/jmutai/nodejs-demo:v1 About a minute ago Up About a minute ago 0.0.0.0:8080->8080/tcp nodejs-demo Clean your environment: $ podman rm -f d1a669579a39 $ docker rm -f d1a669579a39 Enjoy using Podman to run container images. For more on Podman check: How To run Docker Containers using Podman and Libpod
0 notes
Video
youtube
Run Nestjs Microservices & Mongo Database in Docker Containers | #docker...Full Video Link - https://youtu.be/g3pRQZSP1rU Check out new video about Running Nestjs #Microservices in Docker Container with #Mongo DB on the #CodeOneDigest YouTube channel! Learn to setup #nestjs project with dependencies. Learn to create #docker image of nestjs project. Learn to connect nestjs application with mongo database. #mongodb #dockerimage #dockerfile@nestframework @nodejs @typescript @Docker @MongoDB @JavaScript @dotenvx @npmjs @vscodetips @getpostman #nestjs
1 note
·
View note
Text
Automating Hyperledger Fabric chaincode deployment on Amazon Managed Blockchain using AWS CodePipeline
Amazon Managed Blockchain is a fully managed service that makes it easy to create and manage blockchain networks using the open-source blockchain framework Hyperledger Fabric. In this post, we explore how to use AWS CodePipeline and related services to automate the deployment of chaincode. Chaincode is a program that typically handles business logic agreed to by members of the network and is sometimes called a smart contract. To install and instantiate chaincode on the blockchain network, you use the open-source Hyperledger Fabric CLI or SDK with the endpoints exposed on your Hyperledger Fabric resources. Chaincode runs in an isolated Docker container and can interact with the ledger by submitting transactions to the fabric network. Unlike other blockchain platforms, chaincode isn’t written in a domain specific language (DSL). It’s written in Go, NodeJS, or Java (or languages running on those respective platforms, such as Typescript or Scala). This enables you to use standard test and build tools with chaincode as part of a CI/CD process. By doing so, we can make chaincode deployments automated and consistent. In this post, we examine how to use tools such as CodePipeline, AWS CodeBuild, and AWS Lambda to perform automated testing and deployment of chaincode to Managed Blockchain. Solution overview The following architecture diagram describes our solution. A developer first commits their chaincode program to AWS CodeCommit. This commit triggers a pipeline in CodePipeline. Within the pipeline, CodeBuild is sent the chaincode that was committed to CodeCommit and performs a series of tests. If the tests pass, it zips up the code and stores it as a build artifact. CodePipeline invokes a Lambda function that retrieves the build artifact, extracts it, and deploys it to Managed Blockchain. AWS Secrets Manager stores the credentials required to authenticate with Hyperledger Fabric and tracks the current version number of the chaincode. The solution is hosted in the following GitHub repo. Although our Lambda function is written in NodeJS, the Fabric libraries that it uses include native code. All native code libraries must be compiled in an Amazon Linux environment. The easiest way to do this is to use an AWS Cloud9 instance or an Amazon Elastic Compute Cloud (Amazon EC2) instance running Amazon Linux. In this environment, clone the code for this post: git clone https://github.com/aws-samples/amazon-managed-blockchain-cicd-sample The solution is provided as an AWS Cloud Development Kit (AWS CDK) application. The cdk folder contains the app. This app creates the architecture described earlier. It also creates AWS Identity and Access Management (IAM) resources for this architecture. For more information about the AWS CDK, see Getting started with the AWS CDK. Prerequisites This walkthrough assumes you have already set up the following: A Hyperledger Fabric network on Managed Blockchain. For instructions on creating a Fabric network, see Create the Network and First Member and Part 1 of Build and deploy an application for Hyperledger Fabric on Amazon Managed Blockchain. A VPC with at least two private subnets and the Managed Blockchain VPC endpoints. For instructions, see Create an Interface VPC Endpoint to Connect to Managed Blockchain Network Resources. A Fabric client node from which to interact with your Fabric network and an AWS Cloud9 instance or Amazon Linux EC2 instance. For instructions, see Create an Amazon EC2 Instance and Set Up the Hyperledger Fabric Client. When you have the prerequisites installed, you can proceed to the next step. Examining the Lambda function The Lambda function reads the location of the chaincode build artifact from the event passed from CodePipeline, obtains Fabric credentials from Secrets Manager, and installs the chaincode to Fabric. It is written in NodeJS and is in the lambda directory. Downloading dependencies Prior to deploying our solution, we have to download the dependencies for our Lambda function. Change to the lambda directory within the solution and then enter the following code: npm install Uploading certificates The Lambda function needs an admin identity in order to install chaincode to the Fabric network. To provide this, we upload Fabric credentials to Secrets Manager using the AWS Command Line Interface (AWS CLI). The Lambda function accesses the secrets and uses them to authenticate with Fabric and deploy chaincode. To upload the credentials to Secrets Manager, run the following commands on your Fabric client node. Provide the name of your Fabric member as $MEMBERNAME, and substitute the path for the correct location of your admin-msp: aws secretsmanager create-secret --name "dev/fabricOrgs/$MEMBERNAME/admin/pk" - secret-string "`cat /home/ec2-user/admin-msp/keystore/*`" --region us-east-1 aws secretsmanager create-secret --name "dev/fabricOrgs/$MEMBERNAME/admin/signcert" --secret-string "`cat /home/ec2-user/admin-msp/signcerts/*`" --region us-east-1 Providing a connection profile A connection profile is a YAML file that provides the URL endpoints for the peer, ordering service, CA, and other details required for your Lambda function to connect to your Fabric network. The gen-connection-profile.sh script can generate a connection profile from shell variables. Alternatively, you can manually generate a connection profile. For instructions, see fabric-client: How to use a common connection profile. You can obtain the information necessary to populate the connection profile from the Managed Blockchain console. Name your connection profile connection-profile.yaml and place it in the lambda directory. Downloading Managed Blockchain certs We need to obtain the latest version of the Managed Blockchain PEM file and place it in the certs directory within the Lambda function source. To do so, run the following command in the lambda folder. Replace MyRegion with the AWS Region you’re using—for example, us-east-1: aws s3 cp s3:// MyRegion.managedblockchain/etc/managedblockchain-tls-chain.pem ~/certs Deploying the AWS CDK app You need to change several variables in the cdk.ts file prior to deploying the app: CA endpoint Peer endpoint Order endpoint MSP ID Member name VPC ID You can find the details pertinent to Managed Blockchain from the client node or from your blockchain network details on the Managed Blockchain console. The VPC ID is the ID for the VPC (for example, vpc-12345) that you created earlier. Modify the variables to reflect your environment. When the variables are up to date, in the cdk folder, run the following: cdk deploy You receive the following prompt: Do you wish to deploy these changes (y/n)? Accept the changes and the solution is deployed via AWS CloudFormation. After the solution is deployed, navigate to the CodePipeline console and you can see that a new pipeline has been created. This pipeline has three stages: source, build, and deploy, and correlates to the architecture diagram from earlier. We return to the first stage soon to start the pipeline, but first let’s examine the build and deploy stages. Testing chaincode with CodeBuild The chaincode for this solution resides in the chaincode folder. It’s a very simple golang program named forex, which you can use to get and set foreign exchange rates, such as (“USD:CAD”, 0.75). We test this chaincode and then deploy it to Fabric. CodeBuild uses a YAML buildspec file to run a build for this chaincode. The buildspec file for our solution is in the chaincode folder, which is included inline in the following code: version: 0.2 env: variables: PACKAGE: "forex" phases: install: runtime-versions: golang: 1.13 commands: # Download the appropriate version of the Fabric Shim - wget https://github.com/hyperledger/fabric/archive/v1.4.2.tar.gz - tar xvzf v1.4.2.tar.gz - mkdir -p /go/src/github.com/hyperledger - mv fabric-1.4.2 /go/src/github.com/hyperledger/fabric - rm v1.4.2.tar.gz # Install golint - go get -u github.com/golang/lint/golint build: commands: - mkdir -p /go/src/${PACKAGE} - ls /go/src/forex - ls ${CODEBUILD_SRC_DIR} - cp -r ${CODEBUILD_SRC_DIR}/* /go/src/${PACKAGE}/ - cd /go/src/${PACKAGE} - go get -t . # Lint our Chaincode - golint -set_exit_status # Check the Go code for common problems with 'go vet' - go vet . # Run unit tests using Mockshim to test our chaicode - go test . - zip -r /go/src/${PACKAGE}/forex.zip "/go/src/${PACKAGE}" artifacts: files: - /go/src/${PACKAGE}/forex.zip This differs from a traditional golang build in a significant way: the end artifact isn’t a binary. Rather, it’s a .zip file of our chaincode. The reason for this is that the chaincode is compiled as part of the installation process. Instead, this buildspec file runs tests against the chaincode and produces a .zip file that you can use to install the chaincode on your Fabric network. The buildspec defines the following steps: GoLint – Detects style mistakes GoVet – Detects common go problems such as inappropriate calls to printf or improper pointer passing Go test – Runs our test suite based around shimtest The first two steps are agnostic to the chaincode; they simply treat the code as standard go code. Our test suite, however, uses shimtest to perform unit tests against our chaincode. shimtest provides a mock version of the shim.ChainCodeStubInterface and can simulate much of the interactions between our chaincode and Hyperledger Fabric. We can use shimtest to ensure that our chaincode implements the correct business logic and that the appropriate state changes are written to the ledger. This allows us to validate the correctness of our chaincode without having to deploy the chaincode to Fabric. This approach is fully compatible with traditional unit testing, and allows you to use standard tools to run individual tests. Because our chaincode is written in golang, we can make use of the golang testing and assert packages to orchestrate our tests using shimtest. This allows us to test the chaincode with the following code: go test Instead of running the test manually, we use CodeBuild. Before we proceed, let’s examine the simple test that we run on our chaincode. In the chaincode folder, the forex_test.go file contains a simple function for testing our chaincode using MockStub. The following line creates a mock instantiation of our chaincode, which allows us to perform mock invocations: stub := shim.NewMockStub("forex", new(ForexChaincode)) The following lines run the invocation and use the assert library to confirm that the result is accurate: response = stub.MockInvoke(uuid, args) assert.EqualValues(t, shim.OK, response.GetStatus(), "failed to execute invocation") Committing chaincode and starting the pipeline To use the pipeline, we have to commit the contents of the chaincode directory to the CodeCommit repository. You can find the name and URL of the CodeCommit repo from the AWS CDK stack outputs or the CodeCommit console. You can commit to the repo with either a Git client or the AWS CLI. For instructions, see Create a commit in AWS CodeCommit. Committing to the CodeCommit repo triggers the pipeline. The chaincode should successfully pass testing, after which the Lambda function installs the chaincode to Managed Blockchain. The CodePipeline console should show a result similar to the following screenshot. If you inspect the logs for CodeBuild, you should see a successful run where the chaincode passed linting, go vet, and testing. Likewise, the Lambda logs should show that it has successfully installed the chaincode to the Fabric network. You can confirm that the installation completed successfully by listing the installed chaincodes from a Fabric client node: peer chaincode list --installed You should see something resembling the following code: Name: forex, Version: 1, Path: forex, Id … Subsequently, you can instantiate the chaincode by running the following command on your fabric client: docker exec -e "CORE_PEER_TLS_ENABLED=true" -e "CORE_PEER_TLS_ROOTCERT_FILE=/opt/home/managedblockchain-tls-chain.pem" -e "CORE_PEER_LOCALMSPID=$MSP" -e "CORE_PEER_MSPCONFIGPATH=$MSP_PATH" -e "CORE_PEER_ADDRESS=$PEER" cli peer chaincode install -n $FOREXCHAINCODENAME -v v0 -p forex/cmd Clean Up When you have completed the solution, you can delete the AWS CDK stack with the following code: cdk destroy If you created a new VPC, AWS Cloud9 instance, or other resources, you can also delete those. Summary In this post, we explored how to use CodePipline and Managed Blockchain to automated the testing and deployment of chaincode to a Hyperledger Fabric network. You could extend this solution further through additional Lambda functions to instantiate chaincode, create channels, perform integration testing, and other activities as part of the pipeline. About the Author Dr. Jonathan Shapiro-Ward is a Principal Solutions Architect at AWS based in Toronto. Jonathan has been with AWS for 3.5 years and in that time has worked helping customers solve problems including petabyte scale analytics and the adoption of ML, serverless, and blockchain. He has spoken at events across the world where he focused on areas of emerging technology. Jonathan has previously worked in a number of industries including gaming and fintech and has a background in academic research. He holds a PhD in distributed systems from the University of St Andrews. https://aws.amazon.com/blogs/database/automating-hyperledger-fabric-chaincode-deployment-on-amazon-managed-blockchain-using-aws-codepipeline/
0 notes
Video
youtube
Run Nestjs Microservices in Docker Container with Postgresql Database Full Video Link - https://youtu.be/HPvpxzagsNg Check out this new video about Running Nesjs Microservices in Docker Container with Postgresql DB on the CodeOneDigest YouTube channel! Learn to setup nestjs project with dependencies. Learn to create docker image of nestjs project. Learn to connect nestjs application with postgresql database. #postgresql #nestjs #docker #dockerfile #microservices #codeonedigest@nestframework @nodejs @typescript @Docker @PostgreSQL @typeormjs @JavaScript @dotenvx @npmjs @vscodetips @getpostman
#youtube#nestjs microservice#nestjs tutorial#nestjs full tutorial#nestjs complete course#nestjs microservice with postgres#run nestjs microservice project in docker#nestjs docker postgres#nestjs postgresql
1 note
·
View note