#nestjs full tutorial
Explore tagged Tumblr posts
Visit Tumblr Blog
Explore Tumblr blogs with no restrictions, modern design and the best experience.
Last Seen Tumblr Blogs


Fun Fact
In Q3 of 2020, 31% of US users access the Tumblr app daily.
Video
youtube
Run Nestjs Microservices in Docker Container with Postgresql Database Full Video Link - https://youtu.be/HPvpxzagsNg Check out this new video about Running Nesjs Microservices in Docker Container with Postgresql DB on the CodeOneDigest YouTube channel! Learn to setup nestjs project with dependencies. Learn to create docker image of nestjs project. Learn to connect nestjs application with postgresql database. #postgresql #nestjs #docker #dockerfile #microservices #codeonedigest@nestframework @nodejs @typescript @Docker @PostgreSQL @typeormjs @JavaScript @dotenvx @npmjs @vscodetips @getpostman
#youtube#nestjs microservice#nestjs tutorial#nestjs full tutorial#nestjs complete course#nestjs microservice with postgres#run nestjs microservice project in docker#nestjs docker postgres#nestjs postgresql
1 note
·
View note
Text
Full-Stack TypeScript with Ionic, Angular, and NestJS Part 2
Welcome to part two of the Full-stack TypeScript with Ionic and NestJS series!
In part one of the series, we went over the benefits of using TypeScript on both the client and server, shared an introduction to NestJS, and built a simple app, that’s already up and running, called GoSpaceRanger.
So far in GoSpaceRanger, we have a simple list screen showing a list of missions our space rangers can go on:

In this second part of our series, we are going to dive deeper into building out the Nest backend service, including adding a database to store missions and using some Nest features to keep our code clean and reusable.
Getting Back Into the Project
If you followed along in part one, go back into the main project folder, open up the gsr-client (the Ionic project) and gsr-server (the Nest project) folders.
If you would like to start fresh in part two, clone the project repo from [email protected]:ionic-team/demo-ionic-nest-tutorial.git, and go to the part2-start branch, which leaves you at the same place as if you had completed part one.
Open up each of the projects in your favorite code editor and run ionic serve in the gsr-client folder to kick off the Ionic development server, and npm run start:dev in the gsr-server folder to start the Nest server.
Friends of Nest
To help build out the backend, we will look into a few additional libraries to use within the Nest service.
The following libraries are NPM packages that provide additional functionality in the Nest backend. Like Nest, they are written in TypeScript and take advantage of TypeScript features—like decorators and type meta-data—to provide a cleaner, more declarative coding experience.
TypeORM
TypeORM is an ORM (object relational mapper), which helps manage and interact with databases. TypeORM uses a code-first methodology, which means you create your classes, and TypeORM automatically generates the tables and columns in your database for you. TypeORM is heavily influenced by other enterprise-grade ORMs, such as Entity Framework, and provides a performant, scalable, and easy to use data access library.
TypeORM supports the most common relational databases: such as MySql, PostgreSQL, SQLite, MS SQL, and more. Setting up your database instance is outside the scope of this tutorial, so please reference the database vendor’s documentation if you need assistance there. In this tutorial, I am going to use PostgreSQL, but feel free to stick with whatever database you have available—the only part that should change with the code is the connection info to the database.
To install TypeORM (and a couple of additional helper libraries) run the following command in the gsr-server folder:
npm install @nestjs/typeorm typeorm pg
Note: pg is the PostgreSQL driver for Node. If you use a different database, install the appropriate driver.
Class Transformer
Class Transformer is a powerful library that helps with the serialization from everyday JavaScript objects into classes, as well as classes back to plain JavaScript. This library helps convert data coming in from requests to the proper class type.
Install class-transformer via npm in the gsr-server folder:
npm install class-transformer
Adding a Database
First, we need to register the TypeORM library with Nest and provide it with the connection information to our database.
In the server’s app module, add TypeOrmModule to the list of imports like so:
gsr-server/src/app.module.ts:
imports: [ TypeOrmModule.forRoot({ type: 'postgres', host: 'localhost', port: 5432, username: 'mydbuser', // Update to your db username password: 'mydbpassword', // Update to your db password database: 'gospaceranger', entities: [__dirname + '/**/*.entity{.ts,.js}'], synchronize: true, }) ],
Import TypeOrmModule from ‘@nestjs/typeorm’
Note: The synchronize property keeps your database schema up to date with your models, which helps during development, but make sure to disable this in production.
Additionally, you’ll want to make sure to update the connection details (username, password, database, etc.) to your actual setup. The database that you will connect to needs to be a blank database, TypeORM will automatically create the schema for you based on the model definitions.
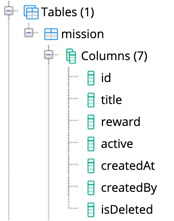
Now that TypeORM is set up, we need a database entity to represent our missions. We already have the mission model, so let’s use that.
Open up Mission and replace what is currently defined for the model with the following:
gsr-server/src/models/mission.model.ts:
import { Entity, PrimaryGeneratedColumn, Column } from 'typeorm'; @Entity() export class Mission { @PrimaryGeneratedColumn() id?: number; @Column({ length: 50 }) title: string; @Column() reward: number; @Column() active: boolean; @Column() createdAt: Date = new Date(); @Column() createdBy: string = 'user'; @Column() isDeleted: boolean = false; }
Here our model has decorators applied to the class and its properties imported from TypeORM.
At the class level, the @Entity decorators inform TypeORM that this class represents an entity in the database. TypeORM will create a table based on this model and associated all data for this model in that table. By default, it names the table based on the model’s name, but you could override that by passing in a string to @Entity.
The @PrimaryGeneratedColumn decorator specifies that our id property will be the primary key for the missions table and that the value of it will be generated by the database.
The rest of the properties have @Column decorators, which instructs TypeORM to created columns for each of these fields. The data type for the column will be derived from the properties TypeScript type.
There are three additional fields on this mission model that wasn’t on the original. The createdAt, and createdBy fields store when the record was created and by whom. The isDeleted field gives us soft delete support, in which when a user deletes a record we mark it as deleted, but we keep the original around for our records.
These additional meta-data fields only belong to the database entity, and shouldn’t be returned to the front end app. We will add the logic in the MissionsService to not returned deleted missions when fetched.
When the Nest server restarts, TypeORM analyzes all the entities and constructs the database schema on it. You should see a schema similar to the following now in your database:
Before we try to pull back any data, we will add a mission manually using SQL. Run this SQL statement in your database’s query tool to insert a single mission:
INSERT INTO public.mission( title, reward, active, "createdAt", "createdBy", "isDeleted") VALUES ('Rescue cat stuck in asteroid', 500, true, '4/20/2019', 'user', false);
Retrieve Missions from the Database
TypeORM uses the Repository pattern, in which all your data interaction for a particular entity is handled through an object called a repository. The repository has methods to retrieve, create, update, and delete data for that particular entity. TypeORM provides these repositories for us, and we need to register them with Nest.
Go back into the server AppModule, and append TypeOrmModule.forFeature([Mission]) to the list of imports:
gsr-server/src/app.module.ts:
imports: [ TypeOrmModule.forRoot(...), TypeOrmModule.forFeature([Mission]) ]
This import registers the Mission entity with both TypeORM and Nest and provides us a repository that we can now inject.
Open up MissionsService, and update the class to the following:
gsr-server/src/missions/missions.service.ts:
export class MissionsService { constructor( @InjectRepository(Mission) private missionsRepository: Repository<Mission>, ) {} async getMissions(): Promise<Mission[]> { return this.missionsRepository.find({isDeleted: false}); } }
Import InjectRepository from ‘@nestjs/typeorm’ and Repository from ‘typeorm’.
We inject a Mission repository in the constructor of the class using TypeORM’s generic Repository class. If you are not familiar with generics, they are a TypeScript language feature that allows you to use a base class but have it work with a variety of different types, without having to write that class for each of those types. In our case, we have a base Repository class, but by passing in the Mission as a generic parameter (via Repository<Mission>, we set up this repository to work with the Mission type.
The getMissions method was updated to return data from the repository instead of the hard-coded array that we also removed. In the method, the repository’s find method is called, and we specify that we only want to return missions that are not deleted.
With the service updated, we should now be able to retrieve all the missions stored in the database, and since the interface of the API hasn’t changed, the Ionic client should now show live data.
However, if you take a look at the HTTP request, you will see that the data being returned has the meta-data fields (createdAt, createdBy, and isDeleted) returned as well. Ideally, we would want to exclude these properties as the client does not need them.
We utilize the class-transformer library we introduced above to do just that. The library has an @Exclude decorator, which when ran through class-transformer, will exclude any members decorated with it.
Add the @Exclude decorator to those members from the Mission model:
gsr-server/src/models/mission.model.ts:
@Exclude() @Column() createdAt: Date = new Date(); @Exclude() @Column() createdBy: string = 'user'; @Exclude() @Column() isDeleted: boolean = false;
To exclude the properties, we run them through the classToPlain function from the class-transformer library. We could do this in the controller like so:
@Get() async getMissions() { const missionEntities = await this.missionsService.getMissions(); const missions = classToPlain(missionEntities); return missions; }
However, this adds some cruft to our controller methods. We would have to repeat this code everywhere we return a mission, and repeating code violates the DRY (don’t repeat yourself) principle.
Fortunately, Nest provides a mechanism called interceptors that allow manipulation of data before being returned in the request. Let’s take a look at building one next.
Nest Interceptors

Interceptors are a piece of Nest middleware that gets access to both the start of the request (before the controller), and then again before the response is sent out (after the controller is done). Interceptors are an ideal fit for any data manipulation that needs to be done before a request is sent out.
In our case, we will build an interceptor to call the plainToClass function from class-transformer on the data the controller returns, that way any transformations we set up on the models get applied.
Run the following command in the gsr-server folder to create a new interceptor using the Nest CLI:
nest g interceptor util/data
Update the DataInterceptor class with the following:
gsr-server/src/util/data.interceptor.ts:
import { classToPlain } from 'class-transformer'; import { Observable } from 'rxjs'; import { map } from 'rxjs/operators'; import { CallHandler, ExecutionContext, Injectable, NestInterceptor, } from '@nestjs/common'; @Injectable() export class DataInterceptor implements NestInterceptor { intercept(context: ExecutionContext, next: CallHandler): Observable<any> { return next.handle().pipe( map(data => { return classToPlain(data); }), ); } }
The next.handle() method is an observable stream that you can interact with like any other observable. Here, we use the map operator from RXJS to transform the output from one object to another. Specifically, we are using classToPlain to apply any transformations added to our models (like we did with Exclude in Mission).
To use the DataInterceptor, Nest provides a few different options to bind it to a request. We can use the @UseInterceptors decorator and either put it on a class if we want it to apply to the entire controller like so:
@UseInterceptors(DataInterceptor) @Controller('missions') export class MissionsController { ... }
Alternatively, we can be more selective and put it only on the route handlers we want:
@UseInterceptors(DataInterceptor) @Get() async getMissions() { ... }
A third option allows us to apply the interceptor to run globally by specifying it in the app module:
gsr-server/src/app.module.ts:
@Module({ providers: [ { provide: APP_INTERCEPTOR, useClass: DataInterceptor, }, ], }) export class AppModule {}
Import APP_INTERCEPTOR from ‘@nestjs/core’ and DataInterceptor from ‘./util/data.interceptor’.
This method is the one we will we use, so go ahead and add this to the list of providers in AppModule.
Once saved, hit the /missions endpoint again and you should see the list of missions minus the createdAt, createdBy, and isDeleted members.
Retrieve a Single Mission
We are now returning a list of missions, so next, let us see how we can specify the id of the mission in the URL to return a particular mission and display the mission in the app.
Starting in the MissionService, the call to get the mission from the repository is fairly straight forward:
gsr-server/src/missions/missions.service.ts:
async getMission(id: number): Promise<Mission | undefined> { return this.missionsRepository.findOne(id, { where: { isDeleted: false, }, }); }
The findOne method on the repository takes the id of the object being looked for. If found, it returns the object, and if not, returns undefined. We also make sure not to return a mission if it is marked as deleted.
Update the MissionController to call into this new service method:
gsr-server/src/missions/missions.controller.ts:
@Get(':id') async getMission(@Param('id') id: number) { return this.missionsService.getMission(id); }
The Get() decorator here takes in a route parameter named id, and in the getMission method, we extract that parameter out using the new @Param decorator, which in turn assigns the value to id.
If you request http://localhost:3000/missions/1, you should notice that nothing comes back. Why? Parameters are passed in as strings, but we expect the id to be a number, and the repo does not find the mission because of it. In the params to getMission, id is of type number, but, unfortunately, we are practically lying to TypeScript that the value is coming in as a number.
We could parse the string value of id into a number manually inside the controller method before calling into the service, but once again this muddies our controller code with duplicated logic throughout. It would be nice to have a facility to do this for us automatically.
Nest comes to the rescue again!
Nest Pipes
Fortunately, we can use another facet of Nest, called Pipes, to manipulate data that comes in from the request before it reaches the controller. Pipes are another type of Nest middleware, but unlike interceptors, they can transform the data before they reach the controller.

Because we are using TypeScript, Pipes know all the little details about your controller methods, including all the parameters, and the types of those parameters. We can take advantage of this information and use class-transformer library again to convert a plain object into something of a specific type. Let’s see how to do that.
Use the Nest CLI in the gsr-server folder to generate a new pipe:
nest g pipe util/data
Then open up the DataPipe and update its transform method to:
gsr-server/src/util/data.pipe.ts:
transform(value: any, metadata: ArgumentMetadata) { const { metatype } = metadata; if (!metatype) { return value; } const convertedValue = plainToClass(metatype, value); return convertedValue; }
Import plainToClass from ‘class-transformer’.
The transform method takes two arguments. The first is the original value of the parameter, and the second one is all the meta-data provided by TypeScript about the parameter.
The plainToClass method can use this type information to convert the value into the particular type. In our use case, it takes the type of the id parameter, a number, and then converts the string parameter that gets passed in from the URL.
Bind the DataPipe in the AppModule providers like so:
gsr-server/src/util/data.pipe.ts:
{ provide: APP_PIPE, useClass: DataPipe, }
Import APP_PIPE from ‘@nestjs/core’ and DataPipe from ‘./util/data.pipe’.
Now, parameters passed into all controller handlers have their types converted automatically. Make a call to http://localhost:3000/missions/1, and you should see a single mission come back.
Wrapping Up
In part two of this series, we spent the majority of time replacing the hard-coded Missions array we had in the MissionsService with a real database backend. We used a library called TypeORM to manage our database access. TypeORM is an excellent companion library to Nest; they are both built with TypeScript and offer the same declarative style programming.
Then, we explored Interceptors and Pipes, a couple of the Nest building blocks that allow you to extract common logic into reusable components and apply them in various ways to your Nest controllers.
In the next post, we will finish building out the rest of GoSpaceRanger, including creating, updating, and deleting missions.
Happy coding!

via The Ionic Blog http://bit.ly/2L1yNxD
0 notes
Link
NestJS: Node + Typescript al estilo Angular para crear APIS ##100%FREEUdemyDiscountCoupons ##Udacity #al #Angular #APIs #crear #estilo #NestJS #Node #para #TypeScript NestJS: Node + Typescript al estilo Angular para crear APIS ¿QUE ES NESTJS? Es un framework para crear aplicaciones del lado del servidor (Backend) a través de NodeJS. Es modular y resuelve problemas de escalabilidad y estructuración de proyectos. Soporta Arquitectura monolítica y de microservicios, MVC, Websockets y GraphQL. ¿POR QUÉ NESTJS? Soporta Typescript y Javascript + Babel. Es Multiparadigma: Programación Orientada a Objetos (OOP), Programación Funcional (FP) y Programación Reactiva Funcional (FRP). Integra con diferentes bases de datos: MySQL, PostgreSQL, SQLite, MongoDB… Extremadamente sencillo de usar. Arquitectura, convenciones y estructura de proyecto igual que Angular. BENEFICIOS DE USAR NESTJS Si aprendes a usar NestJS, aprenderás Angular de forma natural e inconsciente. Si sabes Angular pero crees que no sabes backend, con NestJS te darás cuenta que si sabes. Framework moderno que usa las últimas y mejores librerías y herramientas. Experiencia de desarrollo divertida y altamente productiva. COMUNIDAD, CRECIMIENTO Y DOCUMENTACIÓN - Proyecto Open Source, de libre uso y gratuito. - Apoyado por m��s de 13.000 desarrolladores en GitHub. - Activo y en constante crecimiento. - Extensa documentación, clara y llena de ejemplos. APÚNTATE AL CURSO... - Tanto si sabes Angular, como si no. - Tanto si sabes de backend, como si no. - Tanto si has usado Typescript, como si no. Si quieres aprender a crear servicios webs API, guardar datos en base de datos en tiempo record y de forma sencilla, este curso es para ti. Conseguirás crear una sencilla app de backend que se conecta a MySQL y consumir sus datos por REST API en este curso, APÚNTATE AHORA. Who this course is for: Desarrolladores de Angular que quieran aprender APIs en el Backend Desarrolladores de Typescript que quieran aprender APIs en el Backend Desarrolladores de Javascript que quieran crear servicios webs - APIs para el Backend Desarrolladores de Node que quieran aprender a crear servicios webs con NestJS Programadores Front end que quieran aprender Full Stack Desarrolladores que quieran empezar a crear apps con NodeJS Aprende a instalar VSCode y Postman como herramientas 👉 Activate Udemy Coupon 👈 Free Tutorials Udemy Review Real Discount Udemy Free Courses Udemy Coupon Udemy Francais Coupon Udemy gratuit Coursera and Edx ELearningFree Course Free Online Training Udemy Udemy Free Coupons Udemy Free Discount Coupons Udemy Online Course Udemy Online Training 100% FREE Udemy Discount Coupons https://www.couponudemy.com/blog/nestjs-node-typescript-al-estilo-angular-para-crear-apis/
0 notes
Video
youtube
Nestjs MVC Project Tutorial for JavaScript Beginners| Model View Controller Full Video Link - https://youtu.be/-2tjBg2C0BM Check out this new video about Nestjs MVC Project on the CodeOneDigest YouTube channel! Learn nestjs project setup with dependencies to create MVC application. Create MVC web application in nestjs framework. #mvc #nestjs #modelviewcontroller #microservices #api #nodejs #javascript #codeonedigest #mvc @java @awscloud @AWSCloudIndia @YouTube @nodejs @nestframework @JavaScript @codeonedigest
0 notes
Video
youtube
Nestjs Mongo Database Microservice Project Tutorial for Beginners Full Video Link - https://youtu.be/lmo8n9WujdQ Check out this new video about Nestjs mongo db microservice project on the CodeOneDigest YouTube channel! Learn nestjs project setup with dependencies and mongo database. Create microservices in nestjs framework with mongoose orm #mongodb #nestjs #mongoose #microservice #api #nodejs #javascript #codeonedigest@YouTube @codeonedigest @nestframework @MongoDB @typescript @JavaScript @java @awscloud @nodejs
#youtube#nestjs#nestjs microservices#nestjs mongodb#mongo database#nestjs mongo db#nestjs mongo database#nestjs microservices mongodb
0 notes
Video
youtube
Nestjs Middleware Tutorial with Coding Example for Beginners | Functiona... Full Video Link - https://youtu.be/3-l7fk1CFQ8 Check out this new video on the CodeOneDigest YouTube channel! Learn nestjs middleware with example. Learn how to create middleware, what is functional & global middleware #nestjsmiddleware #nestjs #nestjstutorial #middleware #dependencyinjection #nodejs #javascript #codeonedigest@java @awscloud @AWSCloudIndia @YouTube @codeonedigest @nestframework @typescript @Shopify @springboot @nodejs @JavaScript
1 note
·
View note
Video
Nestjs MVC Project Tutorial for JavaScript Beginners| Model View Controller Full Video Link - https://youtu.be/UDR57jw38LA Check out this new video about Nestjs MVC Project on the CodeOneDigest YouTube channel! Learn nestjs project setup with dependencies to create MVC application. Create MVC web application in nestjs framework. #mvc #nestjs #modelviewcontroller #microservices #api #nodejs #javascript #codeonedigest #mvc
1 note
·
View note
Video
youtube
Nestjs Module Tutorial with Example for JavaScript Developers | Global &... Full Video Link - https://youtu.be/ZefUyfLvLRc Check out this new video on the CodeOneDigest YouTube channel! Learn nestjs module with example. Learn how to create module, what is dependency injection #nestjsmodule #nestjs #module #dependencyinjection #nodejs #javascript #codeonedigest @java @awscloud @AWSCloudIndia @YouTube @codeonedigest #typescript #javascript #nestjs #nestjstutorial #javascript #nest #nestjsmicroservices #nestjsproject #nestjsmodules #nestjsmodulereference #nestjsmodulesexplained #dynamicmoduleinnestjs #nestjsmoduleexample #nestjsfulltutorial #nestjscreatemodule #moduleinnestjs #nestjsglobalmodule #nestjsdynamicmodule #nestjssharedmodule #nestjsmoduleexplained #nestjsmoduleexample #nestjsimportmodule #sharedmoduleinnestjs #globalmoduleinnestjs #nestjscourse
1 note
·
View note
Video
youtube
Nestjs Provider Tutorial with Example for JavaScript Developers | Depend... Full Video Link - https://youtu.be/Ld2q1ilsilo Check out this new video on the CodeOneDigest YouTube channel! Learn nestjs provider with example. Learn how to create provider, what is dependency injection & IOC #providers #nestjs #ioc #dependencyinjection #nodejs #javascript #codeonedigest@java @awscloud @AWSCloudIndia @YouTube @codeonedigest #typescript #javascript #nestjs nestjs,javascript,nestjs tutorial,nest,nestjs microservices,nestjs providers,nestjs dynamic provider,nestjs project,nest js full tutorial,nest js full course,nestjs framework,nest js for beginners,nest js provider tutorial,nestjs provider tutorial,nestjs example project,next js explained,nest js tutorial playlist,nestjs controller,nestjs modules,nestjs module,dependency injection,dependency injection nestjs,inversion of control,dependency injection nest
1 note
·
View note
Video
youtube
Nestjs Controller Tutorial with Example for JavaScript Developers | #nes... Full Video Link - https://youtu.be/Ui4PXXbY1P8 Check out this new video on the CodeOneDigest YouTube channel! Learn nestjs controller with example. Learn how to create controller route, access request object, status code etc. #video #nestjs #controller #nodejs #javascript #codeonedigest@java @awscloud @AWSCloudIndia @YouTube @codeonedigest #typescript #javascript #nestjs #javascript #node #nestjs #nestjstutorial #javascript #nestjsmicroservices #nestjscontroller #nestjscontrollertest #nestjscontroller #nestjscreatecontroller #nestjsfulltutorial #nestjsfullcourse #nestjsproject #nestjsrouting #nestjstipsandtricks #nestjsroutingincontroller #nestjsprojecttutorial #nestjsprojectfromscratch #nestjsexampleproject #nestjstesting #nestjsprojectsetup #nestjscontrollertest #nestjscontrollerproject #nestjscontrollerrouting
#youtube#nestjs#nestjs controller#nestjs routing#nestjs controller routing#nestjs route#nestjs controller explained#nestjs tutorial
0 notes
Video
youtube
Nestjs Framework Installation & Project Setup Tutorial for JavaScript De... Full Video Link - https://youtu.be/TZeIqdlLOUQ Check out this new video on the CodeOneDigest YouTube channel! Install Nestjs framework & setup project. Learn how to install Nest framework & setup nestjs project. #video #nestjs #typescript #nodejs #javascript #codeonedigest@java @awscloud @AWSCloudIndia @YouTube @codeonedigest #typescript #javascript #nestjs #javascript #node #nestjstutorial #nestjsmicroservices #nestjsvsexpress #nestjsinstallation #nestjsproject #nestjsprojectsetup #nestjstutorialforbeginners #nestjsexplained #nestjsexampleproject #nestjsmodulesexplained #nestjscontroller #nestjsproviders #nestjsmicroservicestcp #nestjsapplication #nestframeworktutorial #nestjsframework #nestjsfulltutorial #nestjsfullcourse #nestjsproject #nestjsprojecttutorial #nestjsconcepts #nestjs
1 note
·
View note
Text
Building an Authentication System with Ionic 4 and NestJS
Whether you celebrate Christmas or not, today is your happy day as I’ve prepared this special for all Devdactic followers!
Since I wanted to give back something to all the loyal followers of this blog, I created a little gift on one of the basics that you’ll hopefully enjoy!
Todays post is not really a tutorial, but a description of the code template that contains both a NestJS backend and also an Ionic app. As a result, once you run both parts you will have a full working authentication template ready for your next app!
You can get the whole gift package by entering your email in the box below.
Let’s talk about how and why it works, and what you need to set up upfront.
Prerequisite
It’s a good idea for both parts of the template to install Ionic and the Nest CLI locally to later build out the projects like this:
npm i -g @nestjs/cli npm i -g ionic
Of course you could also simply install the dependencies inside the project, but having both of them globally is anyway a good idea.
Also, the backend needs a MongoDB for holding the users. Therefore, install MongoDB on your local machine and while you are at it, I recommend to get a good GUI tool for managing your database like Studio 3T.
The Nest Backend
Before you run the backend you need to set a few values, and for this you have to rename the dummy.env file to .env which is the environment used for the application.
In there you can specify the port, the URI to the MongoDB (which should work like it is, the database will automatically be created) and finally a secret for the JWT authentication.
You need to make sure to have your MongoDB up and running now, and then you can go ahead and install all dependencies and run the backend like this:
cd ./api npm install nest start --watch
You should see some logging about the routes being set up, and if everything works your fresh API is now running at port 5000!
The routes of the API are also included in the HolidayGift.postman_collection which you can simply import to Postman to now test your API.
The routes are:
The API contains everything to register users, to login, get user data and delete accounts. Basically all CRUD operations for the user domain plus a login functionality.
In terms of code, you can find all the routes inside the src/users/users.controller.ts:
import { UserDto } from './dto/user.dto'; import { UsersService } from './users.service'; import { Controller, Get, Res, HttpStatus, Post, Body, Put, NotFoundException, Delete, Param, UseGuards } from '@nestjs/common'; import { AuthGuard } from '@nestjs/passport'; @Controller('users') export class UsersController { constructor(private userService: UsersService) {} @Post() async addUser(@Res() res, @Body() createUserDto: UserDto) { try { const user = await this.userService.addUser(createUserDto); return res.status(HttpStatus.OK).json({ msg: 'User has been created successfully', user }); } catch (e) { return res.status(HttpStatus.CONFLICT).json({ msg: 'User already exists' }); } } @UseGuards(AuthGuard()) @Get(':userID') async getUser(@Res() res, @Param('userID') userID) { const user = await this.userService.getUser(userID); if (!user) throw new NotFoundException('User does not exist!'); return res.status(HttpStatus.OK).json(user); } @UseGuards(AuthGuard()) @Put(':userID') async updateUser( @Res() res, @Param('userID') userID, @Body() createUserDto: UserDto, ) { const user = await this.userService.updateUser(userID, createUserDto); if (!user) throw new NotFoundException('User does not exist!'); return res.status(HttpStatus.OK).json({ msg: 'User has been successfully updated', user, }); } @UseGuards(AuthGuard()) @Delete(':userID') async deleteUser(@Res() res, @Param('userID') userID) { const user = await this.userService.deleteUser(userID); if (!user) throw new NotFoundException('User does not exist'); return res.status(HttpStatus.OK).json({ msg: 'User has been deleted', user, }); } @UseGuards(AuthGuard()) @Get() async getAllUser(@Res() res) { const users = await this.userService.getAllUser(); return res.status(HttpStatus.OK).json(users); } }
As you can see, all routes are also protected with a guard, and we are using JWT authentication in this API.
The logic for authentication can also be seen inside the src/authauth/users.service.ts:
import { Injectable } from '@nestjs/common'; import { JwtService } from '@nestjs/jwt'; import { LoginUserDto } from '../users/dto/login-user.dto'; import { UsersService } from '../users/users.service'; import { JwtPayload } from './interfaces/jwt-payload.interface'; @Injectable() export class AuthService { constructor(private usersService: UsersService, private jwtService: JwtService){ } async validateUserByPassword(loginAttempt: LoginUserDto): Promise<any> { let userToAttempt: any = await this.usersService.findOneByEmail(loginAttempt.email); return new Promise((resolve) => { if (!userToAttempt) { resolve({success: false, msg: 'User not found'}); } userToAttempt.checkPassword(loginAttempt.password, (err, isMatch) => { if(err) resolve({success: false, msg: 'Unexpected error. Please try again later.'}); if(isMatch){ resolve({success: true, data: this.createJwtPayload(userToAttempt)}); } else { resolve({success: false, msg: 'Wrong password'}) } }); }); } createJwtPayload(user){ let data: JwtPayload = { id: user._id, email: user.email }; let jwt = this.jwtService.sign(data); return { exp: 36000, token: jwt } } async validateUser(payload: JwtPayload): Promise<any> { return await this.usersService.getUser(payload.id); } }
So you can register without a JWT of course, but all other routes are protected and you need to add the Authorization filed to your header with a value of “Bearer yourJWT”.
The Ionic App
There’s not much to say about the Ionic app, simply install the dependencies like always and then run it:
cd ./app npm install ionic serve
Inside your src/environments/environment.ts you can configure which backend will be used, and by default it will use my Heroku deployment – you should change this soon to your own local backend!
The logic of the app includes a login and register page, and a protected inside area that only users can enter because it’s protected by the auth-guard. Additionally there is another guard that is applied to all pages that are not protected in order to automatically log in users if they were authenticated before!
The code is a pretty simple check, and because it’s a guard you won’t see a page until we really receive the authentication state from the storage. You can find it inside the src/guards/auto-login.guard.ts:
import { Injectable } from '@angular/core'; import { CanActivate, Router } from '@angular/router'; import { Observable } from 'rxjs'; import { ApiService } from '../services/api.service'; import { take, map } from 'rxjs/operators'; @Injectable({ providedIn: 'root' }) export class AutoLoginGuard implements CanActivate { constructor(private api: ApiService, private router: Router) { } canActivate(): Observable<boolean> { return this.api.user.pipe( take(1), map(user => { if (!user) { return true; } else { this.router.navigateByUrl('/app'); return false; } }) ) } }
Besides that, all API interaction takes place inside the src/services/api.service.ts including the management of the JWT, for which we use once again the @auth0/angular-jwt package:
import { environment } from './../../environments/environment'; import { Platform } from '@ionic/angular'; import { Injectable } from '@angular/core'; import { Storage } from '@ionic/storage'; import { BehaviorSubject, Observable, from } from 'rxjs'; import { take, map, switchMap } from 'rxjs/operators'; import { JwtHelperService } from "@auth0/angular-jwt"; import { HttpClient } from '@angular/common/http'; import { Router } from '@angular/router'; const helper = new JwtHelperService(); export const TOKEN_KEY = 'jwt-token'; export interface User { first_name: string; last_name: string; email: string; avatar: string; bio: string; createdAt: string; _id: string; expanded?: boolean; } @Injectable({ providedIn: 'root' }) export class ApiService { public user: Observable<any>; private userData = new BehaviorSubject(null); constructor(private storage: Storage, private http: HttpClient, private plt: Platform, private router: Router) { this.loadStoredToken(); } loadStoredToken() { let platformObs = from(this.plt.ready()); this.user = platformObs.pipe( switchMap(() => { return from(this.storage.get(TOKEN_KEY)); }), map(token => { if (token) { let decoded = helper.decodeToken(token); this.userData.next(decoded); return true; } else { return null; } }) ); } login(credentials: {email: string, password: string }) { return this.http.post(`${environment.apiUrl}/auth`, credentials).pipe( take(1), map(res => { // Extract the JWT return res['token']; }), switchMap(token => { let decoded = helper.decodeToken(token); this.userData.next(decoded); let storageObs = from(this.storage.set(TOKEN_KEY, token)); return storageObs; }) ); } register(credentials: {email: string, password: string }) { return this.http.post(`${environment.apiUrl}/users`, credentials).pipe( take(1), switchMap(res => { console.log('result: ', res); return this.login(credentials); }) ); } getUserToken() { return this.userData.getValue(); } getUserData() { const id = this.getUserToken()['id']; return this.http.get<User>(`${environment.apiUrl}/users/${id}`).pipe( take(1) ); } getAllUsers(): Observable<User[]> { return this.http.get<User[]>(`${environment.apiUrl}/users`).pipe( take(1) ); } updateUser(id, data) { return this.http.put(`${environment.apiUrl}/users/${id}`, data).pipe( take(1) ); } removeUser(id) { return this.http.delete(`${environment.apiUrl}/users/${id}`).pipe( take(1) ); } logout() { this.storage.remove(TOKEN_KEY).then(() => { this.router.navigateByUrl('/'); this.userData.next(null); }); } }
As a final word: The JWT package needs to whitelist domains for which the JWT will be injected into HTTP calls. If you follow the next step and deploy your API somewhere, you need to make sure that you add your new backend URL inside the src/app/app.module.ts:
import { NgModule } from '@angular/core'; import { BrowserModule } from '@angular/platform-browser'; import { RouteReuseStrategy } from '@angular/router'; import { IonicModule, IonicRouteStrategy } from '@ionic/angular'; import { SplashScreen } from '@ionic-native/splash-screen/ngx'; import { StatusBar } from '@ionic-native/status-bar/ngx'; import { AppComponent } from './app.component'; import { AppRoutingModule } from './app-routing.module'; import { IonicStorageModule, Storage } from '@ionic/storage'; import { HttpClientModule } from '@angular/common/http'; import { TOKEN_KEY } from './services/api.service'; import { JwtModule, JWT_OPTIONS } from '@auth0/angular-jwt'; export function jwtOptionsFactory(storage) { return { tokenGetter: () => { return storage.get(TOKEN_KEY); }, whitelistedDomains: ['localhost:5000', 'holidaygift.herokuapp.com'] // Add your Heroku URL in here! } } @NgModule({ declarations: [AppComponent], entryComponents: [], imports: [BrowserModule, IonicModule.forRoot(), AppRoutingModule, IonicStorageModule.forRoot(), HttpClientModule, JwtModule.forRoot({ jwtOptionsProvider: { provide: JWT_OPTIONS, useFactory: jwtOptionsFactory, deps: [Storage] } })], providers: [ StatusBar, SplashScreen, { provide: RouteReuseStrategy, useClass: IonicRouteStrategy } ], bootstrap: [AppComponent] }) export class AppModule {}
Now let’s see how you can deploy the backend.
Deployment
For the dummy deployment I used Heroku, and you can use it as well to quickly get your API up and running not only on your local machine.
You can basically follow the official Heroku guide to create a new app and push your code to it.
In addition you need to perform 2 further steps.
Add the mLab integration
The API needs a database, and you can easily add a cloud hosted MongoDB to your Heroku app inside the resources tab like this:
Environment Variables
The database will autoamtically write a variable like we did with our local environment file, but you also need to add the value for the JWT_SECRET which you can do inside the settings tab:
Over to You
Now you can use the Heroku URL and use it in your Ionic app, and you have a full blown authentication app in your hands.
Hopefully this is the starting point for your next project, and perhaps you already had some plans for the holiday season?
Definitely let me know if you enjoy the template by tweeting at me or tag me on Instagram!
I would love to see the template in action. You can also find a short video explanation of the authentication template in the video below.
Thanks for all your support and see you again next year, Simon
youtube
The post Building an Authentication System with Ionic 4 and NestJS appeared first on Devdactic.
via Devdactic https://ift.tt/2sk2PUH
0 notes
Text
Sending Data with POST Requests to a NestJS Backend
In the previous tutorial, we focused on making a GET request from an Ionic application to a NestJS backend. A GET request is generally pretty simple, as all we are doing is making a generic request to a specific URL which will then return a response.
In this tutorial, we are going to cover how we can send data from our Ionic application to the NestJS backend by using a POST request. Unlike a GET request, a POST request allows us to send a data payload along with the request, which we can then do whatever we like with it on the backend.
The example we have been building on involves a service that allows us to retrieve messages/quotes. We are going to continue on with that theme in this tutorial, and extend our server to allow us to (hypothetically) add our own new messages/quotes. We will not actually be storing the messages that the server receives in this example, we will just be focusing on what is required to send the data to the server (we will cover storing server-side data in a future tutorial).
Before We Get Started
Last updated for NestJS 5.0.0
This tutorial continues on from the previous two tutorials:
An Introduction to NestJS for Ionic Developers
Using Providers and HTTP Requests in a NestJS Backend
These tutorials covered setting up a basic Ionic application using NestJS as the backend and making use of services/providers in NestJS to fetch data from an API with an HTTP request.
Although these tutorials focus on integrating with an Ionic/Angular application, you do not necessarily need to use Ionic/Angular in order to understand these tutorials – you would just need to modify the steps for integrating the front-end with the NestJS back-end. You also do not have to have read the previous tutorials to understand the concepts we will be covering in this tutorial, however, if you want to follow along with the examples used then you will need to complete the previous tutorials.
1. Create a Data Transfer Object (DTO) Schema for Adding Messages
In order for our NestJS server to accept data via a POST request, we need to define a Data Transfer Object Schema. It probably sounds a lot more complex than it is – basically, we just need to create a class or interface that describes the structure of the data we want to send.
You can create a DTO either through defining a class:
export class ExampleDto { title: string; description: string; rating: number; }
or through defining an interface:
export interface ExampleDto { title: string; description: string; rating: number; }
The NestJS documentation recommends that classes are used for defining DTOs, so you may as well just stick with that. If you are already familiar with types/interfaces, then the examples above should look very familiar. All we are saying is that the data we are sending will be an object that contains a title that is a string, a description that is a string, and a rating that is a number. Let’s create our DTO.
Create a file at src/messages/message.dto.ts and add the following:
export class MessageDto { content: string; submittedBy: string; }
For our example message, we are just going to send an object that contains a content property and a submittedBy property.
2. Add a POST Handler to the Messages Controller
With the structure of our data defined, we can now set up the POST handler in our Messages controller. If you recall, we already have the following GET handler set up:
@Get() getMessages(){ return this.quotesService.getQuotes(); }
Since this is inside of the messages controller, when we make a GET request to:
http://localhost:3000/messages
The handler above will be triggered. However, we are building a RESTful API, where the type of request we make to a particular endpoint determines the result we get. That means that we can also define a POST handler that is triggered when we hit:
http://localhost:3000/messages
with a POST request, and the result will be different to the GET handler. Let’s add that now.
Add the following imports to src/messages/messages.controller.ts:
import { Controller, Get, Post, Body, Param } from '@nestjs/common'; import { MessageDto } from './message.dto';
Notice that we have added Post and Body as well as our MessageDto.
Add the following handler to src/messages/messages.controller.ts:
@Post() createMessage(@Body() message: MessageDto){ console.log(message); return message; }
This handler will be activated whenever we make a POST request to /messages. When we make that POST request, we send a “payload” or “body” along with that request which contains all of the data we are sending. We grab this by using @Body inside of our parameters for the handler, and we assign it to message which is given a type of the DTO that we created.
Inside of this function, we will then be able to access the data that was sent from the application through the message variable – which would contain both the content and the submittedBy properties. We can do whatever we like with the data at this stage, and typically we would store it in a database somewhere. However, for this example, we are just going full circle and sending the same data that was submitted back as a response (just so that we can see that it is all working as expected).
3. Make the POST Request
Now we just need to update the front end of our application to send a POST request to:
http://localhost:3000/messages
which contains data that matches our message DTO. As I mentioned, we are using Ionic/Angular for this example, but you could execute this POST request using anything.
Add the following method to src/app/services/message.service.ts:
createMessage(message): Observable<Object> { return this.http.post('http://localhost:3000/messages', { content: message.content, submittedBy: message.submittedBy }); }
This is very similar to the GET request, except that we have an additional parameter as well as the URL which defines the data that we are sending along with the request. In this case, that is an object with a content property and a submittedBy property (which conforms to our message DTO).
Now we just need to trigger that method.
Modify src/app/home/home.page.ts to reflect the following:
import { Component, OnInit } from '@angular/core'; import { MessagesService } from '../services/messages.service'; @Component({ selector: 'app-home', templateUrl: 'home.page.html', styleUrls: ['home.page.scss'], }) export class HomePage implements OnInit { constructor(private messages: MessagesService){ } ngOnInit(){ let testMessage = { content: 'Hello!', submittedBy: 'Josh' }; this.messages.createMessage(testMessage).subscribe((res) => { console.log(res); }); } }
This will launch the POST request as soon as the home page is intialised. Since we are just logging out the response, once you launch the application you should see something like this in the console:
So, we have successfully managed to send some data from our Ionic application to our NestJS server, and then we were able to send that data back again to the Ionic application.
Summary
In a more realistic example, rather than just parroting the data back to the Ionic application we would perhaps add that data into some kind of database on the backend and then return some kind of success response to the user. As I mentioned, we will do something like this in a future tutorial, but the example we have gone through in this tutorial is an effective demonstration of how we can send data to a NestJS server.
via joshmorony - Learn Ionic & Build Mobile Apps with Web Tech https://ift.tt/2RDihmG
0 notes