#p600
Text

1440mmのネオ一で。
高倍率は良いけど、もう少し重量がないと、微妙に動いてしまい決まらない。
昔ながらの光学メーカーなら、考える以前に分かるはずだけどなぁ。

81 notes
·
View notes
Text


3 notes
·
View notes
Text


Avignon (Catedral Notre Dame des Doms). Fotografiado con una Nikon P600.
》 Instagram
#avignon#france#catedral#notre dame des doms#photographers on tumblr#fotografia#photography#nikon coolpix#nikon p600
0 notes
Text
Advanced Platinum Series P600 Review - Is It Worth Buying?

With the explosion of hydroponics, indoor growing, and the LED grow light industry, it's not surprising that there are a lot of brands on the market at this moment.
It's a bit overwhelming to figure out all these brands springing up and figure out which are the best ones for your specific requirements in the garden. In this way, I've chosen to dive deep and review probably the most well-known LED grow light brand available.
The present review is for Platinum LED, an American LED grow light company focused on the very high quality market. In this article, I will investigate the Advanced Platinum LED P600 and give my review from start to finish.
Advanced Platinum Series P600: Overview
The Advanced Platinum Series P600 is one of the many models delivered by Platinum LED. This organization is notable for the creation of LED grow lights that have the highest levels of photosynthesis-active radiation per watt available.
The Platinum Group integrates the most recent LED technology into all their grow lights. Every individual LED on the P600 gives out a light intensity multiple times that of a standard LED while utilizing undeniably less power than a customary 600W stowed away. With good inclusion and a few magnificent highlights, the P600 is the perfect device for medium-sized, growing projects.
While their costs are surely exceptionally high, they legitimize this by offering a combination of three 3-watt diodes, every one of them 12- or 14-band LEDs. This is the "secret" to Platinum LED, joining an ideal mix of 12 to 14 distinct bands as far as possible from the profundities of UV to the upper IR, among numerous different highlights.
Power Consumption and Output
There are two phases in the growth of a plant, and the makers of the P600 LED grower thought about that and devised the bloom and vegetative settings. A definitive power saver, the Advanced Platinum P600, can supplant traditional 800W HPS, drawing 368W during flowering and 184 watts during vegetation mode.

The best advantage of LED grow lights is the savings you get compared with standard HPS bulbs since they utilize 40% less energy. You also need less cooling because they run cooler while producing more light in the right spectrum for plant growth.
PAR Output
As you definitely know, the intensity of light emission is estimated using PAR values. The higher the PAR, the more light is presumably accessible to plants for assimilation. Furthermore, more retention of light means better growth and strength in plants.
With fresher innovation, LED lights have the highest PAR/LUMEN output per watt compared to any grow light, and not just that, they have 2-3x the intensity of any grow light.
Platinum P600 LED grow lights offer 1140 PAR for each watt of electricity at a level of 24′′ from the canopy. At 18 inches, it provides 1535 PAR for every watt of electricity. These values are the best outcomes gotten by a LED grow light, assuming that we compare it to some other grow light.
Light Spectrum
However, while there are some purported full spectrum LED lights, none can beat this Platinum LED P600 in spectrum capacities. It has true spectrum capabilities that mimic natural sunlight.
Platinum LED P600 can deliver full-spectrum light with the assistance of 200 US-made LEDs of 3 W each. Platinum LED P600 provides surprisingly effective 12-band full spectrum light to your plants.
In the event that you're worried about the scope of the spectrum in Platinum P600, it's running somewhere in the range of 360nm and 760nm. A wide reach covers ultraviolet rays, blue light, red light, green light, and infrared light.
Coverage Area
With exceptional light and yield per watt of power, this grow light also provides the best coverage in the segment.
During vegetation, the most extreme coverage you'll get from 18 to 24 inches away from the canopy is 6 feet by 3.75 feet. During blooming, you'll get the greatest coverage of 5 feet by 2 to 2.5 feet from 18 inches away from the canopy.
At the point when cannabis plants arrive at the bloom stage, they need all the more light to photosynthesize and foster buds. Utilizing the 90-degree centering focal points is not difficult to do and permits you to give light to the entire of your plant, in addition to the upper canopy.
Material and Design
The Advanced Platinum LED P600 is based on top-quality materials that make it a very durable LED compared with its rivals.
In the event that you're worried about the structure element of this astounding grow light, the structure component of the Platinum LED P600 is 36′′ X 8′′ X 3′′ and it weighs around 24 lbs.
The Platinum LED P600 is furnished with US-made Bridgelux and CREE LEDs. It is likewise furnished with a Zener diode, which safeguards the panel from disappointment when any of the LEDs quit working.
Platinum LED P600 panel is outfitted with Advanced Platinum's auto-exchanging 110v/220v LED drivers, which keep input and output adjusted.
Heat Emission
The heat emissions from grow lights have for some time been an issue for the majority of indoor growers. This is an issue on the grounds that an excess of heat in the growing climate of your plants could obstruct legitimate growth and yield.

Be that as it may, with the P600 Drove grow light, it's anything but an issue. Actually, there is no heat emission, as this light has inbuilt fans that assist in controlling the heat. The panel has four enormous, super-calm fans that attract air from the sides and out the top to guarantee the panel stays cool to the touch.
Warranty
The P600 has a lifespan of 50,000 to 100,000 hours, a warranty of 5 years, and a 90-day unconditional promise. That is an awesome deal, and not too many grow light organizations can give this sort of warranty. It simply demonstrates that the organization is sure about the nature of the item that they have made.
Final Words
In the event that your essential concern is growing plentiful plants, you need to get the P600. There's simply no other LED available right now that can match the Platinum P600 for light intensity, flexibility, or bud growth.
The strong Platinum P600 conveys your ideal outcomes. Notwithstanding the output of the spectrum, it makes for ideal circumstances for the lovely growth of your plants.
It's the ideal grow light to purchase for serious indoor plant growers. The 5-year confirmation ensures that you won't ever supplant it. In this way, assuming you really need your cannabis, vegetables, or blossoms to grow to their greatest potential, you need to get the Advanced Platinum P600.
#led grow light#grow light#platinum led grow lights#platinum p600#led lights for cannabis#cannabis grow lights
0 notes
Text
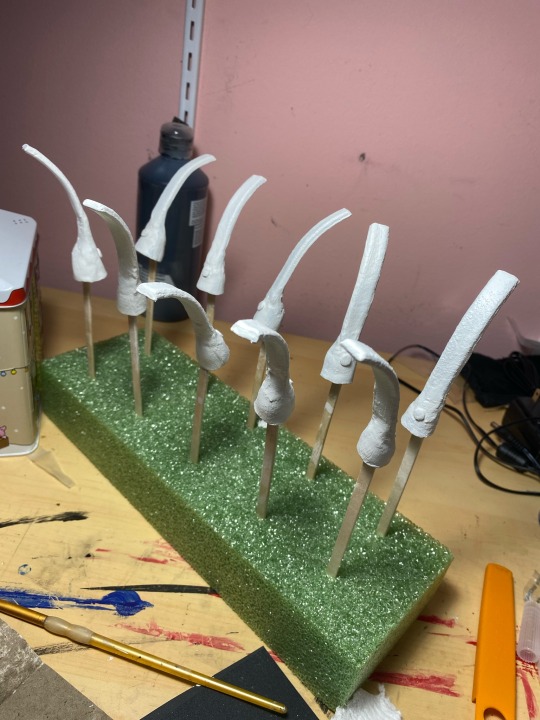
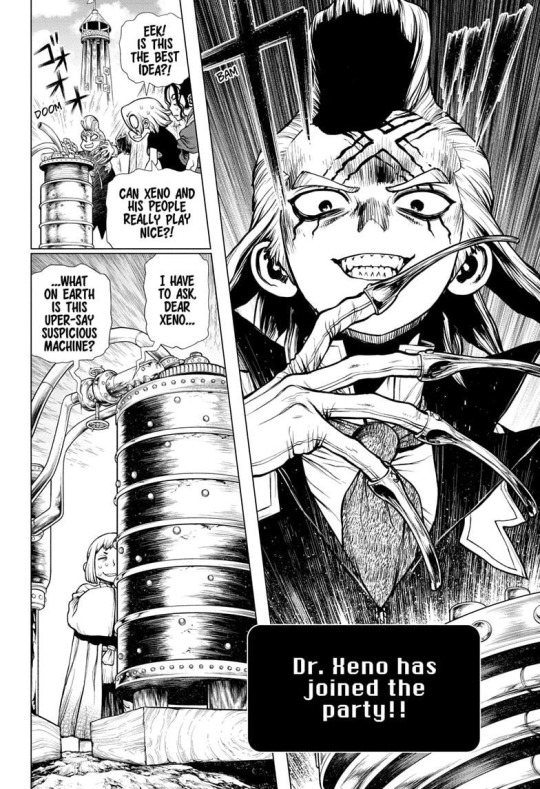
How i made xenos nails!!
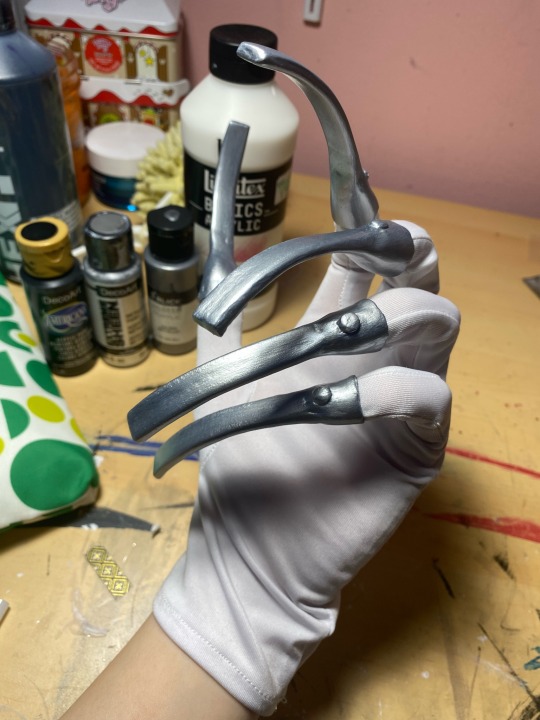
Materials
-worbla
-2mm eva foam
-scissors
-heat gun
-soldering iron (technically optional but helps A LOT)
-gesso (i used regular gesso, but if you can id buy heavy body gesso)
-P400+P600 sand paper
-acyrlic paint (just silver is ok, but black will help)
-white gloves
-hot glue
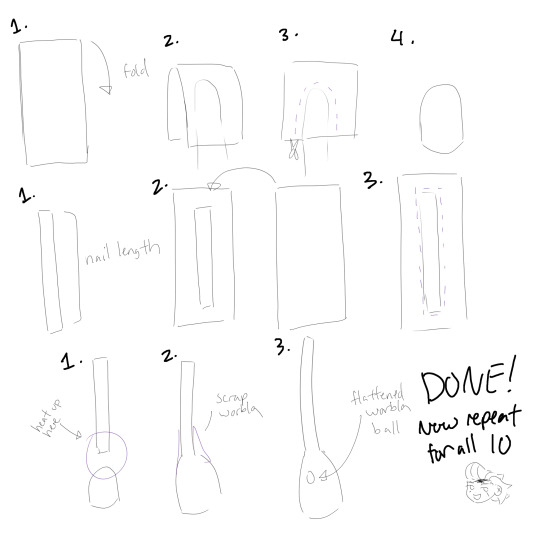
PART 1- forming the base
This part is VERY hard to explain so hopefully the diagram helps- ill explain every step here
Finger tips
1. Cut out a piece of worbla thats double the length of the finger tip you want + a little extra.
2. Heat it slightly and fold that piece of worbla in half around your finger.
3. Form it slightly around your finger, leaving a little extra space for the glove material, then cut it out with good scissors. (NOTE- if you try to form it on your finger while wearing gloves, the worbla MAY stick to the gloves. Id recommend just doing it on your bare finger)
4. Heat it up again until its very soft and round out the shape, making sure the sides stick together. If its too small when you test fit it around the glove, try to push out the walls a bit more.
Nails
Watch this video before starting this part-
youtube
1. Find a good length for your nails- mine are approx. 3 inches. Make a template and then cut the shape out of eva foam.
2. Cut out TWO pieces of worbla a little bigger then the nail strip and heat one up, sticky side up (the sticky side is shiny). Put the eva foam strip in the middle. Heat up the second piece of worbla and put it on top, sandwiching the eva foam.
3. Score all around the eva strip then cut AS CLOSE as possible to the edge.
Attaching the pieces
1. Heat up the finger tip and half of the nail. Attach the nail to the finger tip while wearing it to make sure it doesnt cave in. Use a picture from the manga as reference while doing this part
2. Once again, using a manga reference, use scrap worbla to fill out the sides and smooth everything down. This is the part where you can use a soldering iron to smooth everything out- be careful though, because you can easily burn the worbla.
2.5. I forgot to make a diagram but dont forget to curve the nails! I used a little metal dome to get a consistent curve for all of them.
3. Make little worbla balls, flatten them with something flat, then attach them to the nails while still hot.
Now repeat ALL these steps for all 10 nails! Yay!
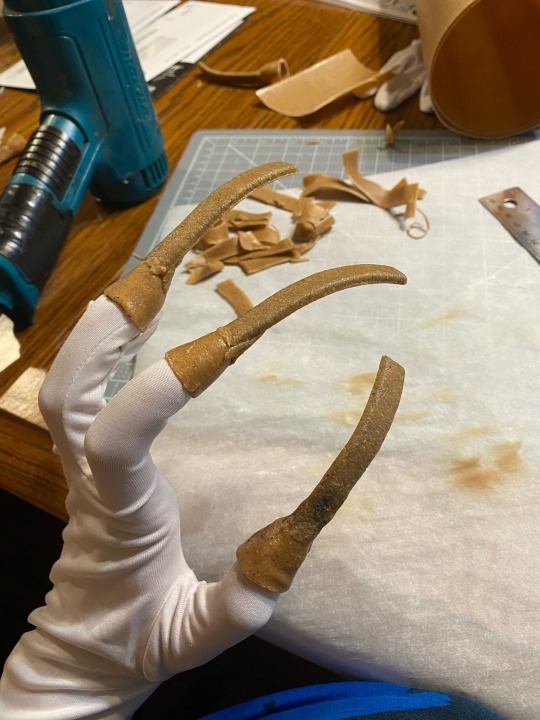
PART 2- priming

For priming i used regular gesso because I was impatient, but if you have plenty of time I recommend heavy body gesso. It took me 12 layers to get everything decently smooth, but if you used heavy body it would probably take 3-5 layers.
I also used floral foam, craft sticks, and sticky tack for my painting setup- if you can think of a better method without sticky tack id recommend trying something else- just because i had to pick out the sticky tack with tweezers, and it took forever lol
Two things to note about gesso-
1. It doesnt self level so you need to sand it smooth
2. DO NOT DRY SAND!! Always wet sand gesso
My exact steps were this-
4 layers of gesso -> sand with P400 -> 4 layers of gesso -> sand with P400 -> 4 layers of gesso -> sand with P600
This part is very time consuming if you use regular gesso, but its definitely worth it for the smooth finish.
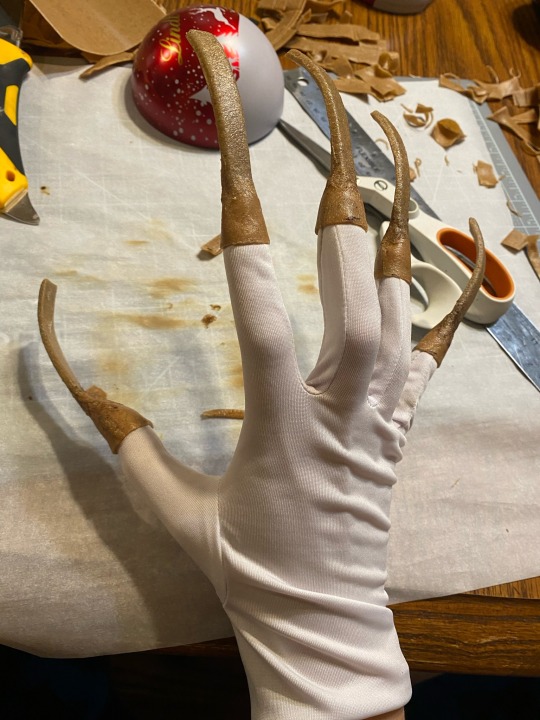
PART 3- painting
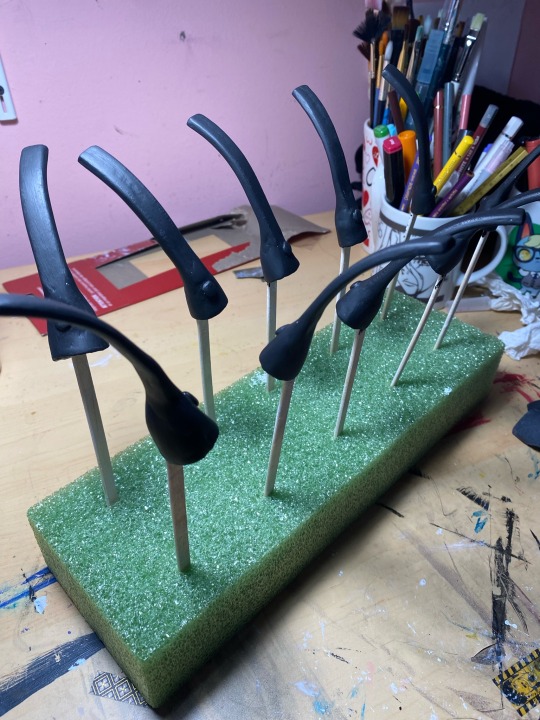
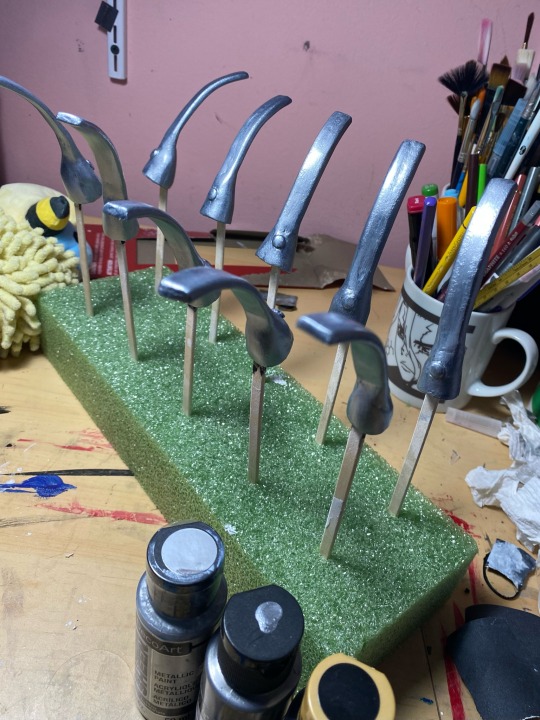
Before adding silver, I threw down a quick matte black layer. It tends to make metals look much better and it wont take long to dry, so I highly recommend it.
For the silver, i used decoart extreme sheen in silver, which i highly recommend. Relatively cheap and can be found in any craft store
Id also recommend having all your brush strokes go vertically if you can- it looks much cleaner.
PART 4 (final part)- attachment
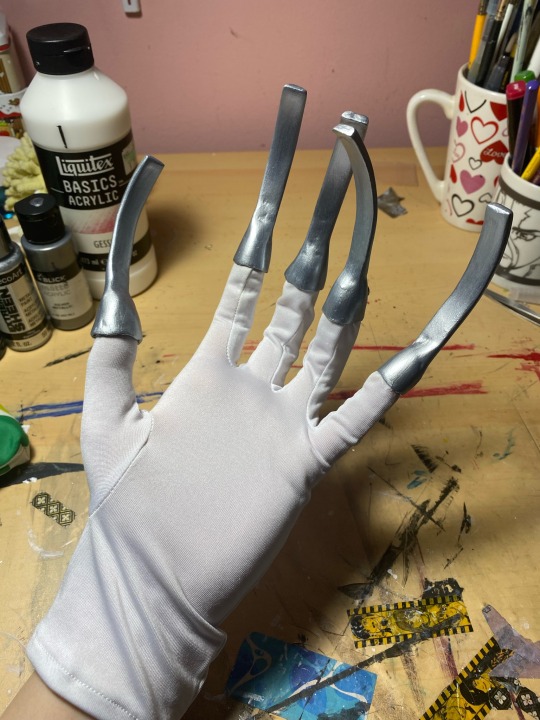
I used a pair of white gloves i bought a while back at spirit halloween, but you can make them or buy them- doesnt matter as long as you like them.
This part is kinda dumb but I genuinely dont know if theres a better method… i put hot glue in the nails, let it cool for a couple of seconds, then put them ON MY FINGERS while wearing the gloves. It gets you the best fit possible but also burns a little so watch out.
And thats it! Thats all there is to it. Let me know if you found this helpful, and if anything was confusing leave a comment and ill try to help you.
As a bonus heres a picture that works very well for reference
#dcst#dr stone#cosplay#cosplay tutorial#worbla#xeno houston wingfield#xeno cosplay#xeno dr stone#xeno#Youtube
69 notes
·
View notes
Text


100 days of productivity // day 56
📚 i re-read some short stories i love to try and deconstruct what i find effective about them
🧶 worked a little on my knitting while watching doctor who (the new episode is a storytelling masterclass)
💓 language lesson! worked on grammar, vocab and pronunciation
✨ edited my partner's job application (i do this for a lot of people in my life and it's one of my favourite things to do. so rewarding, especially when they get an interview!)
📖 reached p600 of the morning star
finish your draft challenge // day 1 of 15
today i worked on a couple things: trying to imbue my story with the almost apocalyptic imagery of when it is very sunny and very rainy at the same time, and trying to successfully execute a weird little fourth-wall breaking moment towards the end of my story.
i think it went well today! i made lots of edits to my draft.
my goal for this challenge is to finish my 3 stories to a point i'd be happy to submit them in 15 days. all 3 are written, they just need tweaks, a couple of things rethinking, and some edits.
4 notes
·
View notes
Text
Forget it. Anyways im building a PC.
Parts so far:
ATX PC Case,5 PWM ARGB Fans Pre-Installed,360MM RAD Support,Type-C Gaming 270°
MSI B550 Gaming GEN3 Gaming Motherboard (AMD AM4, DDR4, PCIe 3.0, SATA 6Gb/s, M.2, USB 3.2 Gen 1, HDMI, ATX, AMD Ryzen 5000/4000 Series Processors)
AMD Ryzen™ 5 5500 6-Core, 12-Thread Unlocked Desktop Processor with Wraith Stealth Cooler
32 GB DDR4 RAM
1TB P600 M.2 SSD NVMe PCle Gen3.0X4 Solid State Drive
750W Power Supply
Somebody suggest a graphic card thats preferably white.
3 notes
·
View notes
Text
the correct response to "your pronouns are too hard" is not "pronouns are easy"
its "please do this for me. please put in the effort."
there is literal linguistic evidence that processing singular "they" takes more effort for people, including people who embrace the use of singular "they"
like theyve studied peoples brain activity during sentence parsing and the 26 people who judged singular they as grammatically acceptable experienced the same P600 response as the 44 who judged it as wrong. the P600 is what your brain does when something about a sentence catches you off guard and makes you redo some of the processing youve already done.
there is scientific evidence that pronouns are difficult, even for allies.
you are worth that effort. you do not have to claim that every task which helps you is easy.
16 notes
·
View notes
Text


2 notes
·
View notes
Text
Say Ivory/Vicor sells 1,000 vinyls at P1,900 apiece, this earns them P1.9M in album sales. Meanwhile, Wolfgang, which according to Basti Artadi is to receive P2.40 per record sold, gets its P2,400 royalty cut. This means the three remaining members will receive P600 each, while the children of the band's late bassist will share his P600.
A cover band playing once a week makes more performing "Halik Ni Hudas" reimagined with "Jai Ho" post-solo.
0 notes
Text


Landscape.
Fotografiado con una Nikon P600.
》 Instagram
#Landscape#Paisaje#Naturaleza#Nature#Photography#Fotografia#photographers on tumblr#nikon photography#nikon coolpix#chambery#francia#france
3 notes
·
View notes
Text
Pilihan Terbaik untuk Hasil Optimal
Bisnis photobooth semakin populer di berbagai acara, mulai dari pernikahan hingga pesta ulang tahun. Salah satu elemen kunci yang menentukan kualitas layanan photobooth adalah printer yang digunakan. Printer yang tepat dapat menghasilkan foto berkualitas tinggi dengan cepat, sehingga meningkatkan kepuasan pelanggan. Dalam artikel ini, kami akan membahas jenis-jenis printer photobooth yang populer, serta tips memilih printer yang sesuai dengan kebutuhan bisnis Anda.
1. Jenis-jenis Printer Photobooth
Ada beberapa jenis printer yang biasa digunakan dalam bisnis photobooth, yaitu:
a. Dye-Sublimation Printer
Printer dye-sublimation adalah pilihan paling umum untuk bisnis photobooth. Teknologi ini menggunakan proses pemanasan untuk mentransfer tinta ke kertas foto, menghasilkan gambar dengan kualitas warna yang sangat baik dan tahan lama. Kecepatan cetak yang tinggi dan biaya operasional yang relatif rendah menjadikan printer ini pilihan favorit. Contoh produk yang populer adalah DNP DS620A dan HiTi P525L.
b. Inkjet Printer
Inkjet printer lebih sering digunakan untuk keperluan rumahan atau bisnis kecil, tetapi ada beberapa model yang cocok untuk photobooth. Printer ini menggunakan tinta cair yang disemprotkan ke kertas untuk mencetak gambar. Inkjet printer dapat menghasilkan foto dengan kualitas tinggi, namun biasanya lebih lambat dan lebih mahal dalam hal biaya per cetak dibandingkan dye-sublimation. Contoh model yang digunakan adalah Epson SureColor P600.
c. Laser Printer
Laser printer umumnya digunakan untuk mencetak dokumen teks, tetapi beberapa model dengan resolusi tinggi dapat digunakan untuk mencetak foto. Meski kecepatan cetaknya tinggi, kualitas foto yang dihasilkan sering kali tidak sebaik dye-sublimation atau inkjet. Printer ini lebih cocok untuk mencetak materi promosi atau dekorasi photobooth daripada foto pelanggan.
2. Tips Memilih Printer Photobooth
Memilih printer yang tepat adalah kunci keberhasilan bisnis photobooth Anda. Berikut adalah beberapa faktor yang perlu dipertimbangkan:
a. Kecepatan Cetak
Kecepatan cetak sangat penting, terutama saat menangani acara besar dengan banyak tamu. Pastikan printer Anda dapat mencetak foto dalam hitungan detik untuk menghindari antrian panjang dan memastikan kepuasan pelanggan.
b. Kualitas Cetak
Kualitas cetak adalah aspek kritis yang akan mempengaruhi kepuasan pelanggan. Pilih printer yang mampu menghasilkan gambar tajam dengan warna yang akurat dan tahan lama. Dye-sublimation biasanya unggul dalam hal ini.
c. Biaya Operasional
Perhatikan biaya tinta atau kartrid, kertas, dan perawatan printer. Meskipun harga printer awal mungkin terjangkau, biaya operasional yang tinggi dapat mengurangi margin keuntungan Anda.
d. Portabilitas dan Ukuran
Jika Anda sering berpindah tempat untuk melayani acara, pertimbangkan untuk memilih printer yang portabel dan mudah diatur. Ukuran dan berat printer dapat mempengaruhi kemudahan transportasi dan instalasi.
3. Rekomendasi Printer Terbaik untuk Photobooth
Setelah mempertimbangkan berbagai faktor di atas, berikut beberapa rekomendasi printer yang cocok untuk bisnis photobooth:
DNP DS620A: Pilihan terbaik untuk kecepatan dan kualitas cetak.
HiTi P525L: Ideal untuk bisnis kecil hingga menengah dengan anggaran terbatas.
Epson SureColor P600: Cocok untuk kebutuhan cetak foto berkualitas tinggi dengan warna akurat.
Kesimpulan
Memilih printer yang tepat untuk bisnis photobooth adalah langkah penting untuk memastikan kepuasan pelanggan dan kesuksesan bisnis Anda. Dengan mempertimbangkan kecepatan cetak, kualitas gambar, biaya operasional, serta portabilitas, Anda dapat menemukan printer yang sesuai dengan kebutuhan Anda. Pastikan untuk melakukan riset mendalam dan mempertimbangkan faktor-faktor di atas sebelum membuat keputusan akhir.
0 notes
Text
Leica Pradovit P600 / IR
Die letzte top Serie mit den anspruchsvollen Leica Projektion ist die LEICA PRADOVIT P600/IR/PC Serie. Die Modelle eignen sich für den Diavortrag zu Hause wie auch vor großem Publikum. Die hohe optische Leistung macht die Vorführung in jedem Fall zum Erlebnis.
Ausgestattet sind die jüngsten Pradovit’s mit Kabelfernbedienung oder IR und Einzeldiabetrachtung. Diese Modelle schlucken die…

View On WordPress
0 notes
Text
Get a 💍 MARRY ME CHICKEN Thighs Recipe
MARCEDRIC KIRBY FOUNDER CEO.
MARCEDRIC.KIRBY INC.
THE VALLEY OF THE VAMPIRES
0 notes
Last Seen Blogs

twilight-0
Somebody

rodrigorealstatebroker
Sem título

rmphysio1jw
Untitled
corcovamusica
International Music School
corcovamusica
International Music School