#paintingmodern
Text


Large Sky-view of Blue Ocean with Gold Clouds Floating Acrylic Abstract Painting on Canvas
FREE Global Shipping Available, Purchase Here
#artists on tumblr#art#abstract painting#artist on tumblr#artoftheday#today on tumblr#today i learned
1 note
·
View note
Text
Watch "Modern Flower Painting |Abstract Flower painting| Acrylic Painting |Step by Step Painting tutorial" on YouTube

#art#artists on tumblr#my art#artistic#painting#flowers#nature#beautiful flowers#abstract#modern flower painting#modern painting#modern art#abstract painting#positive vibes#floral#monocromatic#lovely art
0 notes
Text
Exterior & Interior Painting Service
Transform Your Home with Modern Home Painting

Modern looking new paint job can transform your home into an oasis of peace and tranquility; bringing light and openness to an otherwise dark and dated room.
Connect with us today for beautiful interior and exterior painting needs!
#Painting#Painting Services#Modern Painting Services#Interior Painting#Exterior Painting#Home Painting Service
1 note
·
View note
Photo
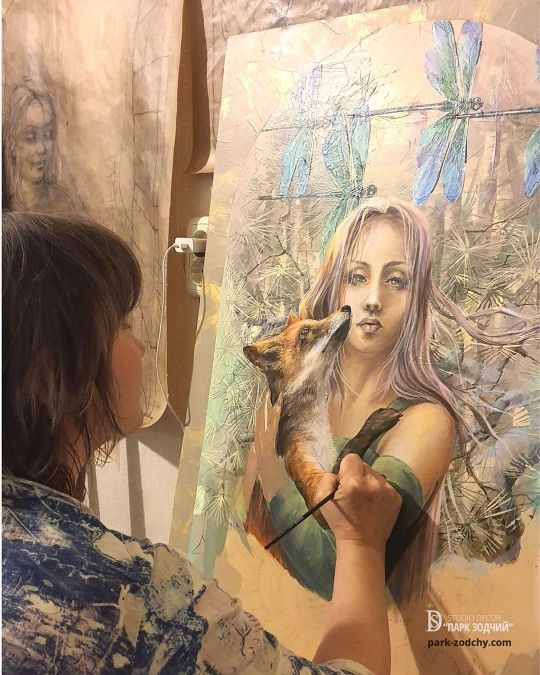
Художница студии Елена Рекорд выполняет роспись фрагмента в стиле модерн. #роспись #художник #модерн #росписьстен #росписьмодерн Studio artist Elena Record paints a fragment in the Art Nouveau style. #painting #artist #modern #paintingwall #paintingmodern https://www.instagram.com/p/B8ttea_qaUX/?igshid=ny28qva6hd6w
#роспись#художник#модерн#росписьстен#росписьмодерн#painting#artist#modern#paintingwall#paintingmodern
0 notes
Text
Penkraft | Learn Certified Online Warli Painting Course
Penkraft proudly offers its Online Warli Painting course that guides the art enthusiasts and hobbyists to learn the art of creating Warli Painting designs
Visit - www.penkraftonline.in/WarliPainting
1 note
·
View note
Note
The main 6 reactions to watching Bob Ross?
🖼Main 6 + The Joy Of Painting
modern AU, but oh could you imagine
Asra grew up on PBS and has a collection of Bob Ross quotes hung on his wall (possibly even one tattooed). He puts on an episode or two when he’s having a bad day, and his favorites are river scenes.
Julian watches reruns at four am after long hospital shifts, allegedly to help himself fall asleep. Instead, he stays up eating rice cakes and crying over “everyone needs a friend”.
Nadia actually puts it on to paint along, and she’ll re-watch episodes when she feels like touching up a painting. She doesn’t show them off or try to sell them; she just hangs them around her house.
Muriel has every season on DVD, but never binges it. He only puts it on to nostalgia-watch with Asra, or when he’s drawing or carving and wants a little encouragement.
Portia likes having background noise while she does chores, and it’s her favorite to have on while she’s folding laundry. She goes nuts over the episodes with rescue animals.
Lucio thinks it’s boring and won’t put it on himself, but if it’s on (and other people are watching), he’s asleep after ten minutes, every time. He’ll never admit it, but he likes the warm winter scenes with mountains. ☕
Requests Are Open | Ko-Fi | My AO3
#the arcana#the arcana game#the arcana game headcanons#the arcana game main 6#the arcana asra#asra the arcana#asra the magician#asra alnazar#julian the arcana#the arcana julian#julian devorak#ilya devorak#nadia the arcana#the arcana nadia#nadia satrinava#countess nadia#muriel the arcana#the arcana muriel#portia the arcana#the arcana portia#portia devorak#pasha devorak#lucio the arcana#the arcana lucio#lucio morgasson#count lucio#my headcanons#my requests#bob ross
197 notes
·
View notes
Text
Hauran Modern Minimalist Living Room Decorative Painting,modern Home Decorations Wall Art Set of 3 Each Is 50*50cm Without Framed
size:50cm*50cm=3 pieces Material: canvas cloth Packing: rolled up into the barrel Pure color clear picture. Adds vitality and aesthetic for your home,These is a specially designed CANVAS for archival fine art prints.Giclee print will come on a very high quality flat Canvas sheet, looking like Read more at http://homedekore.com/hauran-modern-minimalist-living-room-decorative-paintingmodern-home-decorations-wall-art-set-of-3-each-is-5050cm-without-framed/
0 notes
Link
How to: Change EA Painting Image & Default Patterns & Add New Images by orangemittens
What this tutorial covers:
1. Change the default image on an EA painting.
2. Change the default pattern settings on an EA painting frame.
3. Add new images to the painting for a painting with multiple images.
4. Create a new painting with your images based on a custom content painting.
There is no meshing involved in any of these processes. The same steps described here can be used on objects other than paintings.
What you will need:
1. s3oc - Get it here: http://www.simlogical.com/ContentUploadsRemote/uploads/190/index.htm Pick the Easy Installer Version and install according to the directions.
2. Texture Tweaker Tool (TTT) - Get it here in the third post in the thread: http://www.simlogical.com/ContentUploadsRemote/uploads/625/index.htm Install according to the directions.
3. An image editor of your choice. I use Paint Shop Pro but Photoshop, GIMP, Paint.NET and others will work just as well. This tutorial assumes you know how to use your image editor to save images as .dds.
Cloning the Painting
1. Open S3oc and click Cloning in upper left corner. Choose Normal objects from the drop down menu.
2. Once the list assembles scroll down until you find PaintingModern and then left click on it so a blue line shows up across it.
3. Click the Clone or Fix button on the lower right side of the screen.
4. On the right hand side fill in the new catalog name and description you want for your painting and change the price if you want. Leave the other boxes alone and do NOT click the Replace button by the thumbnail.
5. On the left hand side make sure your Renumber/rename internally box and your Enable compression box are both checked. Change the Unique name of the painting to something...well...unique. Most people use their creator name followed by the type of object it is and the name of it. To be extra safe you could add the date. Once you've finished click the Start button. When the pop-up box shows up, navigate to your working folder and click the Save button. Close s3oc.
Changing the Painting Image
1. Open up the Texture Tweaker Tool(TTT) and in the upper left corner click File and choose Open from the drop-down menu. Navigate to where you saved your painting and double click on it to open it. Your screen should now look like this:
Select the CASt presets tab:
and the upper left portion of your screen should now look like this:
2. Click the blue pencil that is to the right of the word Overlay. Click on the Export to edit button when the pop-up box appears. Navigate to your working folder and save the IMG .dds there. You can name it whatever you want. Click Ok in the pop-up box to close it. Close or minimize TTT.
3. Open the IMG .dds in the image editor of your choice. Figure out the size of the EA painting image by cutting out the part you want to replace. In this case the size is 189 x 263.
4. Resize your image so it is the exact same size and paste it onto the .dds. Move it so it lies directly over the EA painting image.
5. Merge all layers and save as a .dds interpolated alpha (DXT5)
6. Open or bring up the minimized TTT. Click on the box over the EA painting image to get the pop-up box again. This time select the Import to overwrite box. Select your saved, edited .dds and click Ok on the new box that pops up. Then click the OK button in the lower right corner of the pop-up box.
7. Click the Commit button and then File and Save.
Now you can either move on to changing the default frame pattern or put your painting in your mods folder and check it in the game.
Changing a Default Pattern
1. Open up TTT and then open the painting .package as before. If you haven't closed TTT after changing the image you can simply proceed to step 2.
2. Click on the preset you would like to change in the upper left hand corner. Preset 0 is the one you see when you buy the painting without making a specific selection of frame. For this tutorial we're going to change Preset 1 which is the second choice of frame pattern in Buy mode. To do this first left-click the arrow next to the words Preset 0 and left-click on Preset 1.
3. Over on the right side you will notice that the wood square has changed color. Click on the little box to the right of it that has 3 dots in it.
4. A large pop-up box will appear. Left click on the box that says Pick on it.
5. The ComplatePicker pop-up will appear and has all the EA patterns you can choose from listed on it. If you want to browse by category you can click the Category button. If you prefer an alphabetical list you can click the Name button. To pick a pattern you left click on it and hit the OK button.
6. The ComplatePicker pop-up will then close and the larger pop-up shows the new pattern. If you don't like it repeat step 5 to find one you want. If you would like to change the color you can play around with the HueShift, SatShift, and ValShift numbers until you get one you like. You must click out of the box you've changed to see what color results from your change. It will be reflected on the square pattern swatch to the left of the numbers you're changing.
Note: some of the patterns have a number in the Color box instead of in the HueShift, SatShift, and ValShift boxes. To change these colors you must left click on the Color number and pick a new color or create a custom color using the Color popup box.
7. When you have the pattern you want in the color(s) you want it in click Done in the upper right corner. The large pop-up will close and you will see your new pattern has replaced the EA default pattern that was there. Before making any other changes click the Commit button and then click File and Save. If you do not Commit before moving on to another pattern choice your work will be lost. In the case of this painting there is only one default pattern per Colorway. Other items will have up to 4 default patterns you can change.
8. After saving all your pattern changes close the TTT and check your painting in game.
Adding Multiple Images to a Painting
1. Open Texture Tweaker (TTT) and open the tutorial painting you made using the first painting tutorial.
2. In the upper left corner, click the down arrow next to the word Preset 0 to get a drop-down menu. From that menu select Preset 1 and then click the blue pencil to the right of the word Overlay as you did in the steps above.
3. The image editor pop-up will appear. First click Use Copy then, right after that, click Export image to edit as before. Navigate to your working folder and save the .dds there using a different name than you used in the first tutorial. Something like Second_Image works.
4. Open the freshly saved .dds in your image editor. Paste your new image on it and slide it into place so it completely covers your old image.
5. Merge the layers and save as DXT5 - Interpolated Alpha.
6. Bring up TTT again and make sure you have Preset 1 open. Click on the number above the image again and select Import to overwrite. Navigate to where you saved the image in step 3 and open that image. Click ok when the message box pops up and then click OK in the lower right corner of the Image Editor pop-up box.
7. Click Commit. If you don't do this, and go on to add another image, the work you've done will be lost. If you plan to add more images move on to step 8. If this is the only new image you add click File and choose Save.
8. Repeat steps 2-7 for Preset 2 making sure you Commit between each change you make to a Preset. Remember, if you don't Commit you will lose your work. Now all three of the painting selections in Buy mode have been changed. Click File in the upper left corner and choose Save to save the changes you've made. You can stop here or continue to add even more image choices to the painting by going on to step 9.
9. Go back to Preset 0 and click the Duplicate button.
10. Go to the Preset drop-down again and select Preset 3 which has now been added to your package. Click on the number above the image and select Use copy as you did for the previous Preset changes. Then select Export image to edit and name the image something like Fourth_Image.
11. Edit the image in your image editor as before. Then, back in TTT, click on the number above the image and choose Import to overwrite as you did before.
12. You can add more images to the painting by following steps 9-11. Be sure to name the exported image something different if you're putting it in the same folder as you put the other images in. Make sure to click Commit between each image you add.
Test in-game to see your new painting with multiple images.
What If I Want To Recolor A Custom Content Painting?
*Before you share a painting made this way be sure the person who made the mesh allows their meshes to be shared.*
Note: To the best of my knowledge, this method will not work directly on objects made with TSRW.
1. Make a copy of the custom item by right clicking on it and choosing copy. Paste the copy in your working folder.
2. Right click on the copy and rename it to what you want your new painting name to be.
3. Open s3oc and choose File in the upper left hand corner. Choose Open Package in the dropdown menu which appears. Navigate to your working folder and open your renamed painting .package.
Note: you'll notice the old name on the left hand side. Don't worry about this because you will change that.
4. On the right hand side click the button that says Clone or Fix.
5. The screen will change. On the right hand side you can change the Catalog Name, Catalog Description, and the Price as shown in the picture below.
6. Once you're done making those changes:
1. click the Renumber/rename internally box on the left hand side of the screen. This will cause the Unique name field to turn white.
2. Change the name there to something unique. Most people use their creator name followed by the type of object and the object's name. To add even more uniqueness you can add the date.
3. Then hit the start button.
7. Give the cloner time to update your package and then click Ok in the box that pops up. Close the cloner.
8. Now open the Texture Tweaker tool and open your new painting. Proceed to change the images as described above for the EA painting.
What if I want to add non-tiling textures to objects that don't have them?
To do this you clone the object as usual and export the empty overlay. You can edit this one and the put your edited version in the .package the same way you put your new painting image into the painting .package. If you want to add others you'll need to be sure to take the checkmarks out of the little boxes over each stencil overlay. This will disenable the stencils. If you don't do this your object will continue to show the first new image you added rather than the additions you put in after that.
If you have any questions about portions of this tutorial please post them in the thread
Click here to go to original support thread...
0 notes
Text
Watch "Modern Flower Painting |Abstract Flower painting| Acrylic Painting |Step by Step Painting tutorial" on YouTub

#art#artists on tumblr#my art#artistic#painting#positive vibes#flowers#nature#beautiful flowers#modern flower painting#modern art#acrylic painting#impasto#abstract flower painting#yellow flower#autumn#spring#beautiful nature
1 note
·
View note
Text
Modern Flower Painting |Abstract Flower painting| Acrylic Painting |Step...
#art#artists on tumblr#my art#artistic#painting#positive vibes#nature#beautiful flowers#abstract#flowers#abstract art#modern flower design#modern art#abstract flower painting#therapeutic art#art therapy#soothing#relaxing
0 notes
Text
Modern Flower Painting |Abstract Flower painting| Acrylic Painting |Step...
#art#artists on tumblr#my art#artistic#painting#positive vibes#flowers#nature#beautiful flowers#abstract#modern flower design#modern painting#modern floral design#modern art#abstract flower painting
1 note
·
View note
Link

0 notes
Text
Penkraft| Learn Online Live & Become Penkraft Certified Teacher- Warli Painting
With Penkraft, Learn From Online Live Teacher Training course - Warli Painting and Become a Penkraft Certified Teacher with 24 X 7 X 365 marketing support. Work from home.
Visit - www.penkraftonline.in/LiveWarliPaintingTraining
0 notes
Text
Penkraft| Learn Online & Become Penkraft Certified Teacher- Warli Painting
With Penkraft, Learn From Online Teacher Training course - Warli Painting and Become a Penkraft Certified Teacher with 24 X 7 X 365 marketing support. Work from home.
Visit - www.penkraftonline.in/WarliPaintingTraining
0 notes
Text
Penkraft | Learn Certified Online Live Warli Painting Course
Penkraft proudly offers its Online Live Warli Painting course that guides the art enthusiasts and hobbyists to learn the art of creating Warli Painting designs.
Visit - www.penkraftonline.in/LiveWarliPainting
0 notes
Photo

Penkraft| Learn Online Live & Become Penkraft Certified Teacher- Warli Painting
With Penkraft, Learn From Online Live Teacher Training course - Warli Painting and Become a Penkraft Certified Teacher with 24 X 7 X 365 marketing support. Work from home.
Visit - www.penkraftonline.in/LiveWarliPaintingTraining
0 notes
Last Seen Blogs

burntvenus
love is love is love is love

grottobound
grottobound

insidebarbiescloset
Inside Barbie's Closet

damisnap
will the whole world know your name when we dance with destiny?

ineffablebookstore
live go2 reaction blogging