#php json decode string
Explore tagged Tumblr posts
Visit Tumblr Blog
Explore Tumblr blogs with no restrictions, modern design and the best experience.
Last Seen Tumblr Blogs


Fun Fact
Tumblr has been providing a Korean-language service since 2013.
Text
Decoding Data in PHP: The Ultimate Guide to Reading File Stream Data to String in 2025 Reading file content into a string is one of the most common tasks in PHP development. Whether you're parsing configuration files like JSON or INI, processing uploaded documents, or consuming data from streams and APIs, being able to efficiently and correctly read file data into a string is essential. With PHP 8.x, developers have access to mature, robust file handling functions, but choosing the right one—and understanding how to handle character encoding, memory efficiency, and errors—is key to writing performant and reliable code. In this comprehensive guide, we’ll walk through the best ways to read file stream data into a string in PHP as of 2025, complete with modern practices, working code, and real-world insights. Why Read File Stream Data to String in PHP? There are many scenarios in PHP applications where you need to convert a file's contents into a string: Parsing Configuration Files: Formats like JSON, INI, and YAML are typically read as strings before being parsed into arrays or objects. Reading Text Documents: Applications often need to display or analyze user-uploaded documents. Processing Network Streams: APIs or socket streams may provide data that needs to be read and handled as strings. General File Processing: Logging, data import/export, and command-line tools often require reading file data as text. Methods for Reading and Converting File Stream Data to String in PHP 1. Using file_get_contents() This is the simplest and most widely used method to read an entire file into a string. ✅ How it works: It takes a filename (or URL) and returns the file content as a string. 📄 Code Example: phpCopyEdit 📌 Pros: Very concise. Ideal for small to medium-sized files. ⚠️ Cons: Loads the entire file into memory—can be problematic with large files. Error handling must be explicitly added (@ or try/catch via wrappers). 2. Using fread() with fopen() This method provides more control, allowing you to read file contents in chunks or all at once. 📄 Code Example: phpCopyEdit 📌 Pros: Greater control over how much data is read. Better for handling large files in chunks. ⚠️ Cons: Requires manual file handling. filesize() may not be reliable for network streams or special files. 3. Reading Line-by-Line Using fgets() Useful when you want to process large files without loading them entirely into memory. 📄 Code Example: phpCopyEdit 📌 Pros: Memory-efficient. Great for log processing or large data files. ⚠️ Cons: Slower than reading in one go. More code required to build the final string. 4. Using stream_get_contents() Works well with generic stream resources (e.g., file streams, network connections). 📄 Code Example: phpCopyEdit 📌 Pros: Works with open file or network streams. Less verbose than fread() in some contexts. ⚠️ Cons: Still reads entire file into memory. Not ideal for very large data sets. 5. Reading Binary Data as a String To read raw binary data, use binary mode 'rb' and understand the data's encoding. 📄 Code Example: phpCopyEdit 📌 Pros: Necessary for binary/text hybrids. Ensures data integrity with explicit encoding. ⚠️ Cons: You must know the original encoding. Risk of misinterpreting binary data as text. Handling Character Encoding in PHP Handling character encoding properly is crucial when working with file data, especially in multilingual or international applications. 🔧 Best Practices: Use UTF-8 wherever possible—it is the most compatible encoding. Check the encoding of files before reading using tools like file or mb_detect_encoding(). Use mb_convert_encoding() to convert encodings explicitly: phpCopyEdit$content = mb_convert_encoding($content, 'UTF-8', 'ISO-8859-1'); Set default encoding in php.ini:
iniCopyEditdefault_charset = "UTF-8" Be cautious when outputting string data to browsers or databases—set correct headers (Content-Type: text/html; charset=UTF-8). Error Handling in PHP File Operations Proper error handling ensures your application fails gracefully. ✅ Tips: Always check return values (fopen(), fread(), file_get_contents()). Use try...catch blocks if using stream wrappers that support exceptions. Log or report errors clearly for debugging. 📄 Basic Error Check Example: phpCopyEdit Best Practices for Reading File Stream Data to String in PHP ✅ Use file_get_contents() for small files and quick reads. ✅ Use fread()/fgets() for large files or when you need precise control. ✅ Close file handles with fclose() to free system resources. ✅ Check and convert character encoding as needed. ✅ Implement error handling using conditionals or exceptions. ✅ Avoid reading huge files all at once—use chunked or line-by-line methods. ✅ Use streams for remote sources (e.g., php://input, php://memory). Conclusion Reading file stream data into a string is a foundational PHP skill that underpins many applications—from file processing to configuration management and beyond. PHP 8.x offers a robust set of functions to handle this task with flexibility and precision. Whether you’re using file_get_contents() for quick reads, fgets() for memory-efficient processing, or stream_get_contents() for stream-based applications, the key is understanding the trade-offs and ensuring proper character encoding and error handling. Mastering these techniques will help you write cleaner, safer, and more efficient PHP code—an essential skill for every modern PHP developer. 📘 External Resources: PHP: file_get_contents() - Manual PHP: fread() - Manual PHP: stream_get_contents() - Manual
0 notes
Text
What Exactly Are Yii2 Helpers Indicate?

Yii2's Helper classes play a pivotal role in simplifying routine coding tasks like string or array manipulation and HTML code generation. They are organized within the Yii helpers namespace as static classes, indicating that they should not be instantiated but rather accessed through static properties and methods.
In the Yii releases, several fundamental Helper classes prove indispensable for developers. Notable among them are:
ArrayHelper
Console
FileHelper
FormatConverter
Html
HtmlPurifier
Imagine (provided by yii2-imagine extension)
Inflector
Json
Markdown
StringHelper
Url
VarDumper
In this tutorial, we'll delve into a deep explanation of Yii2 Helper Libraries, showcasing their thematically targeted coding support modules. Here's a glimpse of some of the Helper classes included with Yii2:
ArrayHelper: Facilitates easier array handling with functions like safe value retrieval, mapping, and merging.
Console: Aids command-line functionality, input processing, and colorful text output.
FileHelper: Expands PHP's fundamental file management capabilities.
FormatConverter: Transforms a variety of formats, with a primary focus on dates.
Html: Dynamically generates commonly used HTML tags.
HtmlPurifier: Improves security by cleaning up user-input text.
Imagine (yii2-imagine plugin): Adds image manipulation capabilities to Imagine.
Inflector: Provides handy string methods for typical transformations.
Json: Encodes and decodes JSON data.
Markdown to HTML: Converts markdown content to HTML.
As a practical demonstration, we'll guide you through creating a helper in Meeting Planner, the focus of our Envato Tuts+ startup series.
In conclusion, our Yii experts, passionate about designing innovative and feature-rich web applications, including scalable enterprise web apps, are at your service. Consider hiring our virtual developers to handle your projects with expertise and creativity.
If you're looking for a one-stop destination for Yii development services, look no further than XcelTec. As a leading provider in Yii2 Development USA, XcelTec offers a comprehensive range of services to meet your needs. Their expertise covers all aspects of Yii development, ensuring that you receive top-notch solutions tailored to your requirements.
0 notes
Text
PHP JSON Decode Example
PHP JSON decode. In this tutorial, we will discuss json_decode () function syntax, defination, parameters, and an examples.
In this tutorial, we will take examples using the json_decode () function. Like, convert JSON strings to PHP arrays, convert JSON strings to multidimensional PHP and JSON arrays decode and access object value PHP.
PHP JSON Decode Function
Definition: – The PHP json_decode ()…
View On WordPress
#php json decode#php json decode array#php json decode error#php json decode file#php json decode into array#php json decode not working#php json decode returns null#php json decode string#php json decode syntax error#php json decode to class
0 notes
Text
Php json decode unicode

PHP JSON DECODE UNICODE GENERATOR
PHP JSON DECODE UNICODE UPDATE
Specifies a bitmask (JSON_BIGINT_AS_STRING, Object will be converted into an associative array. Json_decode( string, assoc, depth, options) Parameter Values Parameter PHP Examples PHP Examples PHP Compiler PHP Quiz PHP Exercises PHP Certificate PHP - AJAX AJAX Intro AJAX PHP AJAX Database AJAX XML AJAX Live Search AJAX Poll PHP XML PHP XML Parsers PHP SimpleXML Parser PHP SimpleXML - Get PHP XML Expat PHP XML DOM
PHP JSON DECODE UNICODE UPDATE
MySQL Database MySQL Database MySQL Connect MySQL Create DB MySQL Create Table MySQL Insert Data MySQL Get Last ID MySQL Insert Multiple MySQL Prepared MySQL Select Data MySQL Where MySQL Order By MySQL Delete Data MySQL Update Data MySQL Limit Data PHP OOP PHP What is OOP PHP Classes/Objects PHP Constructor PHP Destructor PHP Access Modifiers PHP Inheritance PHP Constants PHP Abstract Classes PHP Interfaces PHP Traits PHP Static Methods PHP Static Properties PHP Namespaces PHP Iterables PHP Advanced PHP Date and Time PHP Include PHP File Handling PHP File Open/Read PHP File Create/Write PHP File Upload PHP Cookies PHP Sessions PHP Filters PHP Filters Advanced PHP Callback Functions PHP JSON PHP Exceptions PHP Forms PHP Form Handling PHP Form Validation PHP Form Required PHP Form URL/E-mail PHP Form Complete Store the expression in a $json2 variable and echo it.Superglobals $GLOBALS $_SERVER $_REQUEST $_POST $_GET PHP RegEx Use the decoded JSON object as the first parameter to the json_encode() function and the JSON_PRETTY_PRINT option as the second parameter. Then, use the json_decode() function on the variable $json1. Create a variable $json1 and store a raw JSON object in it. We will take the JSON object and decode it using the json_decode() function and then will encode it with the json_encode() function along with the JSON_PRETTY_PRINT option.įor example, set the Content-Type to application/json as we did in the method above. We will prettify a JSON object in the following example. We also use the header() function like in the second method to notify the browser about the JSON format. We can use the json_encode() function with the json_decode() function and the JSON_PRETTY_PRINT as the parameters to prettify the JSON string in PHP. Use the json_encode() and json_decode() Functions to Prettify the JSON String in PHP Header('Content-Type: application/json') Įcho json_encode($age, JSON_PRETTY_PRINT) As a result, we will get a prettified version of JSON data in each new line.Įxample Code: $age = array("Marcus"=>23, "Mason"=>19, "Jadon"=>20) In the next line, use the json_encode() function with the JSON_PRETTY_PRINT option on the array as we did in the first method. We can use the json_encode() function as in the first method.įor example, write the header() function and set the Content-Type to application/json. We will use the same associative array for the demonstration. We can use the JSON_PRETTY_PRINT option as in the first method to prettify the string. We can use the header() function to set the Content-Type to application/json to notify the browser type. Use the application/json and JSON_PRETTY_PRINT Options to Prettify the JSON String in PHP $json_pretty = json_encode($age, JSON_PRETTY_PRINT) Then, echo the variable enclosing it with the HTML tag.Įxample Code: $age = array("Marcus"=>23, "Mason"=>19, "Jadon"=>20) Next, use the json_encode() function on the $age variable and write the option JSON_PRETTY_PRINT as the second parameter and store the expression in $json_pretty variable. Write the keys Marcus, Mason, and Jadon and the values 23, 19, and 20.
PHP JSON DECODE UNICODE GENERATOR
QR Code Generator in PHP with Source Code 2021 | freeload | PHP Projects with Source Code 2021įor example, create an associative array in the variable $age. The tag preserves the line break after each key-value pair in the string. We will prettify an associative array in the example below. However, we can use the HTML tags to indent the strings to the new line. It will add some spaces between the characters and makes the string looks better. We can specify the string to be prettified and then the option in the json_encode() function. The json_encode() function has a option JSON_PRETTY_PRINT which prettifies the JSON string. We can encode indexed array, associative array, and objects to the JSON format. We can use the json_encode() function to convert a value to a JSON format. Use the HTML Tag and the JSON_PRETTY_PRINT Option to Prettify the JSON String in PHP This article will introduce different methods to prettify the raw JSON string in PHP.
Use the json_encode() and json_decode() Functions to Prettify the JSON String in PHP.
Use the application/json and JSON_PRETTY_PRINT Options to Prettify the JSON String in PHP.
Use the HTML Tag and the JSON_PRETTY_PRINT Option to Prettify the JSON String in PHP.
0 notes
Text
Php json decode as object

#Php json decode as object how to#
Let’s take the first example, here we will convert the JSON string to PHP array using the json_decode() function. Reviver method object can be passed in JSON.parse() to return a modified object of JSON in case of custom logic requires to add and return the different.
options: It includes bitmask of JSON_OBJECT_AS_ARRAY, JSON_BIGINT_AS_STRING, JSON_THROW_ON_ERROR.
#Php json decode as object how to#
Let’s see how to do it in practice with a few examples. There exist specific built-in functions that allow encoding and decoding JSON data. The data structures of JSON are identical to PHP arrays. Follow the steps and you’ll manage to meet your goal easily. Chapter 2 JSON encoding Creating a JSON object with PHP is simple: You just need to use the jsonencode () function. In this snippet, you can find a step-by-step guide on how to create and parse JSON data with PHP. depth: It states the recursion depth specified by user. Decode a JSON object received by your PHP script.If it is true then objects returned will be converted into associative arrays. Normally, jsondecode() will return an object of stdClass if the top level item in the JSON object is a dictionary or an indexed array if the JSON object. It only works with UTF-8 encoded strings. json: It holds the JSON string which need to be decode.The syntax of JSON decode function is:- json_decode(string, assoc, depth=500, options) Parameters of json_decode() function PHP: json_decode() | How to decode json to array in PHPĭefination:- The PHP json_decode() function, which is used to decode or convert a JSON object to a PHP object. An optional Assoc boolean to instruct whether to bypass conversion to an object and to produce an associative array. The decode function has the following parameters. It basically accepts three parameters, but you will usually only need the first one, i.e. Now jsondecode() on the other hand, has a completely different goal, which is to only attempt to convert a JSON string to a PHP object or array. will decode the json string as array For some reason I’m able to extract the json string as array but when I try it to do it as object it breaks. Like, convert JSON string to array PHP, convert JSON string to multidimensional array PHP and JSON decode and access object value PHP. You can also turn your own data into a well-formatted JSON string in PHP with the help of the jsonencode () function. Be wary that associative arrays in PHP can be a 'list' or 'object' when converted to/from JSON, depending on the keys (of absence of them). When decoding that string with jsondecode, 10,000 arrays (objects) is created in memory and then the result is returned. In this tutorial, we will take examples using the json_decode() function. JSON can be decoded to PHP arrays by using the associative true option. Efficient, easy-to-use, and fast PHP JSON stream parser - GitHub - halaxa/json-machine: Efficient, easy-to-use, and fast PHP JSON stream parser. PHP JSON decode In this tutorial, we will discuss about php json_decode() function syntax, defination, parameters with examples.
0 notes
Text
What Exactly Are Yii2 Helpers Indicate?

In the series "Programming With Yii2," we walk readers through the Yii2 Framework for PHP. In this tutorial, we will provide a brief overview of helpers. Helpers are simple-to-extend modules in Yii that group together frequently used libraries for managing things like text, files, images, URLs, and HTML.
Additionally, we'll demonstrate how to create a helper in Meeting Planner, the topic of our Envato Tuts+ startup series.
Numerous Yii classes simplify common coding operations like manipulating strings or arrays, creating HTML code, and other similar activities. The Yii helpers namespace contains these static helper classes that are all organised (meaning they contain only static properties and methods and should not be instantiated).
In the Yii releases, you'll find the following fundamental helper classes:
ArrayHelper
Console
FileHelper
FormatConverter
Html
HtmlPurifier
Imagine (provided by yii2-imagine extension)
Inflector
Json
Markdown
StringHelper
Url
VarDumper
Let's move forward to the deep explanation of Helper Libraries for Yii2
Helpers are simply coding help modules with a specific theme. The helpers that come with Yii2 are listed here; this list is currently a little more recent than the documentation and menus:
With features like safely locating values online, mapping, merging, and more, ArrayHelper makes working with arrays simpler.
Input, output, and command-line functionality are all supported by the console.
The essential file management features of PHP are expanded by FileHelper.
Among the formats that FormatConverter translates, dates are currently its main focus.
Frequently used HTML tags are dynamically generated by HTML.
By removing user-input text, HtmlPurifier increases security.
Imagine now has the ability to manipulate images thanks to the yii2-imagine plugin.
Inflector offers practical string methods that are useful for common transformations.
A programme called JSON is used to encode and decode JSON data.
A conversion tool for markdown is called Markdown to HTML.
Conclusion
Our Yii professionals are exceptionally talented and passionate about creating cutting-edge and feature-rich web applications, including ascendable enterprise web apps, using this special framework. To handle your projects, hire virtual developers.
Visit to explore more on What Exactly Are Yii2 Helpers Indicate?
Get in touch with us for more!
Contact us on:- +91 987 979 9459 | +1 919 400 9200
Email us at:- [email protected]
#yii development company#yii2 development#yii2 development services#latest technologies in yii2#Yii development#Yii2 development services#PHP frameworks
0 notes
Text
Laravel VII: Abbreviated | Web Development - Yudiz Solutions Pvt. Ltd.
Overview:
Hello there. As we all know the Laracon Online 2020, the largest online Laravel conference, took place on 26 February 2020. Our developer happened to attend a Laracon Online Viewing Party and according to his experience we are going to share with you the highlights. We’re going to focus on Laravel 7 here. Yes, it’s here and stick till the end to know all about it.

So as most of you might know Taylor Otwell was one of the speakers at the event. He gave us a complete walkthrough for Laravel VII and we are going to cover most of it here.
What is Laravel Airlock?
Airlock is a lightweight Token Generation and verification tool (Provides Authentication) mostly for SPAs (Single Page Applications), where users can generate multiple API tokens and like passport, we can set the roles for particular auth token.
AirLock will work with Laravel 6.x, but everyone recommends using it with Laravel 7.x and you also need to use Laravel UI 2.x for UI files.
We can set allowed domain in config file, so if a request comes from that particular server then and only then that request gets served. So we can say airlock is a similar kind of structure like a passport but it’s for SPA.
For better understanding,we can compare AirLock mechanism with Node/Angular project where frontend API will use AuthToken. Authtoken is similar kind of personal access token which we are used in the passport for mobile authentication
Key features of AirLock:
EncryptCookies
AddQueuedCookiesToResponse
StartSession
VerifyCsrfToken
Laravel Custom Casts:
In Laravel VII, we can create our own casting for an eloquent model, there are two methods, “get()” and “set()”
“get()” method is used to convert raw data into casted data.
“set()” method is used to convert casted data into raw data value.
For example, if we need to decode data when we receive it and encode data when we save details, we can use these methods like this:
Syntax for “get()” method:
public function get($model, $key, $value, $attributes) {
return json_decode($value, true);
}
Syntax for “set()” method:
public function set($model, $key, $value, $attributes) {
return json_encode($value, true);
}
For eloquent we need to define detail as:
protected $casts = [
'column_name' => Json::class,
];
So now every time we fetch data of a column, we get JSON decoded data and when the data is saved to the column it will get encoded.
HTTP Client:
HTTP Client is used for making an HTTP request from one website to another website or web application. For HTTP client you have to install guzzlehttp/guzzle package into your project. We can make any request along with header through the HTTP Client, also we get the details of response and other params directly, like if we want the main body of the response, then just write down $response->body() this will return the body. If we need to check the status of the response then just need to call $response->status().
Likewise, we can use the following details:
$response->body();
$response->json();
$response->status();
$response->ok();
$response->successful();
$response->serverError();
$response->clientError();
$response->header($header);
$response->headers();
And for the routes we have to write details like:
$response = Http::withHeaders([
'accept' => 'application/json',
])->post('http://domain.com/users/list', [
'name' => 'User',
]);
So now onwards we can fire the API from the web routes along with the Headers. We can also pass the Bearer Token by just adding:
$response = Http::withToken('token')->post('http://www.domain.com', ['name' => 'User']);
Fluent String Operations:
We can all agree how useful string operations are as they help us manipulate strings easily and without much hassle. Thanks to Laravel VII, some new and useful string operations were added in this version. String operations such as trim(), replace(‘x’, ‘y’), after(), before(), words() and many more now will be available in Laravel VII.
CORS Support:
Laravel VII also came with the fresh first-party package “CORS” along with options, so now no need to create custom middleware for the same, just configure the config files and use CORS services.
Stub Customization:
This is one of the best updates of Laravel. This will help us to boost up the speed of development. For example, whenever we create a new Model, we will write protected $guarded = [*] in all the models, it becomes a bit time consuming if you see it on a larger picture. So now, we can create our own stub for these kinds of changes, So, if we added protected $guarded = [*] into stub then whenever we create a new model, this line will be added automatically. For example, in all tables we need one default column $table->string(‘custom_id’), in all the migrates, so we will publish the stub and customize it.
Route Model Binding:
This is one of the most interesting features of Laravel 7. In the older version, we can bind any model to route, for example:
Route::get('user/{user}', function(User $user) {
dd($user);
});
// domain.com/user/1
Here we’ll get the user’s personal details like we applied dependency injection of the User model. In Laravel 7, there is support for Implicit Model Binding, such as if I want to get the user’s details based on the user’s name then I’ll get details by adding simple “:” after model’s name.
Route::get('user/{user:username}', function(User $user){
return $user;
});
// domain.com/user/kmjadeja
We can also add custom keys and scoping for the Route Model Binding, it’s a very useful thing which can help us to generate SEO friendly URLs.
Custom Keys and Scope:
Sometimes, we need to bind multiple models to the single route and second binding param is dependent on the first building param like we need to get product details that are available under one specific category.
For example, we get all the lists of all the mobile devices which are available under the android category, So now we can do this with simple Route Model Binding
Route::get('category/{category:type}/device/{device:type}',
function (Category $category, Device $device) {
return $device;
});
// domain.com/category/mobile/device/android
One more simple example:
Route::get('user/{user}/posts/{post:slug}',
function (User $user, Post $post) {
return $post;
});
// domain.com/user/1/posts/upcoming-events
Laravel Query Cast:
· Query cast is used to “cast” a column while executing the query.
· Let’s take an example : In the database we save user’s ID, System IP, create_at and updated_at details when user LoggedIn to the system. Now we want to know the last login date of particular user in that case my code will be:
$users = User::select([
'users.*',
'last_logged_in_at' => UserLog::selectRaw('MAX(created_at)')
->whereColumn('user_id', 'users.id')
])->where('id', 1)->withCasts([
'last_logged_in_at' => 'date'
])->get();
So here we get the user’s last loggedIn details in “data”, not in the timestamp, we cast the user’s create_at column to date.
Improve email template design:
In Laravel 7 they have simply improved the email template, made the email template simpler and finer.
Queue Configuration:
Currently, if any queue or job is throwing an exception, each time the job will get executed and throw the exception. In Laravel 7, we can set maxExceptions for jobs. If we set the value equal to 3, in that case, if the job gets the exception more than 3 times, the queue stops automatically. #noExtraExecution
Speed improvements for route-cache:
Laravel 7 have 2x speed improvement for routes, it is mostly used with 800+ routes (big projects), php artisan route:cache is used to cache the routes.
Conclusion:
So that’s all for this blog but that’s not all for Laravel 7 and our discussion on it. Stick with us for the next blog regarding some of the features along with their demo codes. Till then, get started with the master document. You can read the master document here.
Hope, you have liked & enjoyed this blog. If you like this blog then follow us for more such interesting articles on the latest technologies.
0 notes
Photo


This is an online learning platform that can be used as a way to improve or learn job skills. There are plenty of free programming courses such as Android, PHP, CodeIgniter, WordPress, Drupal, CakePHP, Magento, JavaScript. We are providing tools i.e., Run PHP code Online, Parse JSON Online, String Manipulation, MD5 Encryption, Random String, Remove Special Charecters, URL Encode Decode.
0 notes
Text
How to Incorporate External APIs in Your WordPress Theme or Plugin
APIs can help you to add functionality to your WordPress plugins and themes. In this tutorial I will show you how to use any API (whether it be from Flickr, Google, Twitter, and so on) with WordPress. You will learn how to connect, collect data, store and render–everything you need to know to extend your plugin or theme with new functionality!
We will use Flickr as an example, creating a simple widget that displays the latest Flickr images in order of username.
Wait, What’s an API?
“API” stands for Application Programming Interface; an intermediary between applications, allowing them to communicate, sending information back and forth in real time. We’ll be using a Web API, one which uses HTTP to fetch data from a remote location on the internet somewhere.
“APIs are used by software applications in much the same way that interfaces for apps and other software are used by humans.” – David Berlind, ProgrammableWeb
If you want to get an even clearer idea of what APIs are before we dive into our tutorial, here are some more resources to help you:
News
The Increasing Importance of APIs in Web Development
Janet Wagner
WordPress
Use the WooCommerce API to Customize Your Online Store
Rachel McCollin
API WordPress Plugins on Envato Market
If you’d like to see what other WordPress developers are building with APIs, check out this collection of plugins on Envato Market–plenty of API goodness to get stuck into!
API WordPress plugins on Envato Market
1. Organize Your Working Environment
Let’s begin by organizing our working environment. Start by downloading the Postman app, which provides an API development environment that makes it easy to connect, test, and develop any API. For individuals and small teams it’s completely free.
We’re going to build a widget in a simple WordPress plugin, so make sure you have WordPress installed.
2. Code the Plugin Basics
To start let’s create a simple plugin called flickr-widget. Create a folder with that name and create a flickr-widget.php file in it. At the top of the file place the following code (feel free to change the Author and URIs with your own details):
/* Plugin Name: Flickr widget Plugin URI: https://www.enovathemes.com Description: Display recent Flickr images Author: Enovathemes Version: 1.0 Author URI: http://enovathemes.com */ if ( ! defined( 'ABSPATH' ) ) { exit; // Exit if accessed directly }
Note: this is rudimentary plugin, so I won’t load a language file or create any additional parameters.
Put the freshly created plugin folder inside your WordPress install: wp-content > plugins. You can now activate it from within the WordPress admin dashboard > plugins. You won’t see any changes to your WordPress because we haven’t actually added any functional code.
A Note on Using APIs
Before we go any further, let me quickly mention API use. Any service whose API you want to use will have documentation; I highly recommend you look closely at it. You can use APIs with all kinds of development languages and often get data back in any format you need: PHP, JSON, Java etc. Good documentation will contain detailed information on how to connect to the API, with instructions for each language, and also the main API endpoints (an endpoint is one end of a communication channel).
Web APIs are typically categorized as being either SOAP or REST. SOAP relies solely on XML to provide messaging services, while REST offers a more lightweight method, using URLs in most cases to receive or send information. In our example we will use a REST API.
Programming Fundamentals
What Does REST Mean?
Matthew Machuga
3. Configure and Test API with Postman
So, here is our plan:
Configure and test API with Postman
Connect, collect, and format data from Flickr REST API
Cache the data with WordPress transients
Let’s refer to the Flickr API documentation. Under the Request Formats section you have REST, XML-RPC, SOAP. We need the REST. Click it and you will see an example of a general Flickr REST API Endpoint: https://www.flickr.com/services/rest/.
With the Flickr REST API we can GET, POST, and DELETE any Flickr data we want. Copy the sample endpoint and paste it into Postman (make sure your request type is set to GET).
Click the Send button and... error!
The sample request included the compulsory Flickr API method, but we didn’t specify the API key that is required in order to connect (keys are used to track and control how an API is being used, for example to prevent malicious use or abuse of the API as defined perhaps by terms of service).
4. Get API Key
Having established that we need an API key, let’s go and get one. In order to create one you will first need to have a Flickr/Yahoo account. Once you’ve entered the API dashboard click on the link create your first:
After that click on the Request an API Key. Many API providers have their own specific terms on API usage. Some limit access, others have light and pro versions, or commercial and non-commercial. Sometimes API keys are provided after manual approval; it depends entirely on the API provider. I have chosen Flickr, because it has simple API requirements. For example, Twitter requires a detailed description of the app you want to build before providing an API key, and this is then reviewed by the review team.
That said, click on the Apply for a non-commercial key button and provide some basic info on the app name.
Once you’ve submitted the request you will get the API key (which identifies you) and secret code (which proves you are who you say you are) immediately. Keep these details safe!
5. Set the Request Parameters
Now we will need a method to request data. From the Flickr API documentation we can see that Flickr has tons to choose from. Some methods, like image posting, or deleting, require authentication. Flickr uses OAuth for this; an open, simple, and secure protocol that enables applications to authenticate users and interact with API providers on their behalf. The end user’s information is securely transferred without revealing the identity of the user.
For now, we’ll use simple methods that don’t require oAuth. Click on flickr.photos.getRecent method to see what’s required. This method does not need authentication, but it does take several arguments: api_key (required), extras, per_page, page. Let’s make a simple request in Postman using our parameters:
API general endpoint - https://flickr.com/services/rest
API key - f49df4a290d8f224ecd56536af51FF77 (this is a sample API key which you’ll need to replace with your own)
Method - flickr.photos.getRecent
It will look like this:
https://www.flickr.com/services/rest/?api_key=f49df4a290d8f224ecd56536af51FF77&method=flickr.photos.getRecent
This will return the list of recent public images from Flickr in XML format.
XML format
I always set data format to auto to let Postman decide what format the data is. With Postman you have several data format options: JSON (my favorite), XML, HTML and Text. Flickr returns data in XML format, but this is not a problem for us, as we can add an additional parameter to get data in JSON &format=json:
JSON format
6. Connect, Collect, and Format Data
Now we know how to request data using the REST API, let’s build our WordPress Flickr widget. In the plugin’s main PHP file paste the widget code. I won’t cover the specifics of WordPress widget creation in this tutorial as our focus is different. We have a learning guide Introduction to Creating Your First WordPress Widget by Rachel McCollin which should get you up to speed if you need it.
In the WordPress admin navigate to Appearance > Widgets and add the “Photos from Flickr” widget to a widget area. Now if you go to the front-end you will see the widget title, but no results just yet.
Back in our plugin PHP file, here we render the widget output itself. We have our API key, and the method, and the format we’re looking for. Now we will need to make sure the Flickr user id is provided, and the number of photos the user wants to fetch. These are are gathered from the widget settings.
Note: to get a Flickr user id use this service. I am using envato as the username, and the id is 52617155@N08. Enter the following code inside IF statement:
$url = 'https://www.flickr.com/services/rest/'; $arguments = array( 'api_key' => 'f49df4a290d8f224ecd56536af51FF77', 'method' => 'flickr.people.getPublicPhotos', 'format' => 'json', 'user_id' => $user_id, 'per_page'=> $photos_number, ); $url_parameters = array(); foreach ($arguments as $key => $value){ $url_parameters[] = $key.'='.$value; } $url = $url.implode('&', $url_parameters);
At this point we can knit together the final REST API endpoint url with all the arguments we’ve collected.
Now we’ll make an API request with the file_get_contents() php function:
$response = file_get_contents($url); if ($response) { print_r($response); }
If you now go to the front-end you will something like this outputted:
jsonFlickrApi({"photos":{"page":1,"pages":1033,"perpage":1,"total":"1033","photo":[{"id":"15647274066","owner":"52617155@N08","secret":"2ee48c3fe9","server":"3940","farm":4,"title":"Halloween 2014 at Envato in Melbourne","ispublic":1,"isfriend":0,"isfamily":0}]},"stat":"ok"})
Our request was successful and returned useful data, so now let’s decode and format it. We’ll begin by cleaning up the JSON string–first by removing the wrapper (jsonFlickrApi({...});) with a str_replace. Then we’ll decode the JSON url:
$response = str_replace('jsonFlickrApi(', '', $response); $response = str_replace('})', '}', $response); $response = json_decode($response,true);
Now if we print our results we will see an associative array with data. When we’re ready we can loop through that array and create the data output structure. But first, take a closer look at the small parameter stat. According to the Flickr documentation this indicates the response status. So, before creating the structure of the widget let’s use this status to make sure we have the correct data. Add an IF statement:
if ($response['stat'] == 'ok') { // code here… }
Create an empty array before the IF statement. This array will then be used to contain the collected data:
$response_results = array();
Your foreach loop should now look like this:
if ($response['stat'] == 'ok') { foreach ($response['photos']['photo'] as $photo) { $response_results[$photo['id']]['link'] = esc_url('//flickr.com/photos/'.$photo["owner"].'/'.$photo["id"]); $response_results[$photo['id']]['url'] = esc_url('//farm'.$photo["farm"].'.staticflickr.com/'.$photo["server"].'/'.$photo["id"].'_'.$photo["secret"].'_s.jpg'); $response_results[$photo['id']]['alt'] = esc_attr($photo["title"]); } }
Here we loop through each photo object in the photos array from our response data. Our widget needs the following information to function properly:
Image absolute URL
Image link to Flickr
Image description/alt text
Examine this page and you will understand why I used the given structure. Here you will find the detailed information on how to create the image path and image link.
Create Widget Output
Now our $response_results array contains the exact data we need to create our widget:
if (!empty($response_results)) { $output = ''; $output .= '<ul class="widget-flickr-list">'; foreach ($response_results as $photo) { $output .= '<li>'; $output .= '<a href="'.$photo['link'].'" target="_blank">'; $output .= '<img src="'.$photo['url'].'" alt="'.$photo['alt'].'" />'; $output .= '</a>'; $output .= '</li>'; } $output .= '</ul>'; echo $output; }
We begin by making sure our response is not empty. After that we create an unordered list, storing it in $output, then loop through each image, adding a wrapper link, all the other details, and finally outputting the whole thing with echo;.
If you now go to the site front-end you will see a list of images!
Let’s add some basic styling with CSS to make it look better.
Create an empty flickr-widget.css file in the root plugin folder. In the top of the plugin file paste the following code:
if ( ! defined( 'ABSPATH' ) ) { exit; // Exit if accessed directly } function register_script(){ wp_register_style('widget-flickr', plugins_url('/widget-flickr.css', __FILE__ )); } add_action( 'wp_enqueue_scripts', 'register_script' );
Then, inside the IF statement at the very top add the code:
if (!empty($response_results)) { wp_enqueue_style('widget-flickr');
Inside the css file add basic styling:
.widget-flickr-list { list-style: none; margin:0 -4px 0 -4px; padding: 0; } .widget-flickr-list:after { content: ""; clear: both; } .widget-flickr-list li { display: block; float: left; width: 25%; margin:0; padding: 4px; }
Now it looks much better!
Bonus: Cache the Data with WordPress Transients
At this stage we’ve finished the widget, but there is one more little thing that will take our development to the next level: caching.
Any API request uses your site’s resources and increases load time. Each browser reload will send an API request, which could be multiple users at the same time. What if for some reason your API provider host is down? Your site will suffer load difficulties. The solution is to cache the results and update at a give time interval. So the first time a user visits our page the API request will be sent, but the next time, or with another user, we won’t need to send an API request but instead fetch the results from our site cache.
Let’s modify the widget code to cache results:
if (!empty($flickr_id)) { $api_key = 'f49df4a290d8f224ecd56536af51FF77'; $transient_prefix = esc_attr($flickr_id . $api_key); if (false === ($response_results = get_transient('flickr-widget-' . $transient_prefix))) { $url = 'https://www.flickr.com/services/rest/'; $arguments = array( 'api_key' => $api_key, 'method' => 'flickr.people.getPublicPhotos', 'format' => 'json', 'user_id' => $flickr_id, 'per_page' => $photos_number, ); $url_parameters = array(); foreach ($arguments as $key => $value) { $url_parameters[] = $key . '=' . $value; } $url .= '?' . implode('&', $url_parameters); $response = file_get_contents($url); if ($response) { $response = str_replace('jsonFlickrApi(', '', $response); $response = str_replace('})', '}', $response); $response = json_decode($response, true); $response_results = array(); if ($response['stat'] == 'ok') { foreach ($response['photos']['photo'] as $photo) { $response_results[$photo['id']]['link'] = esc_url('//flickr.com/photos/' . $photo["owner"] . '/' . $photo["id"]); $response_results[$photo['id']]['url'] = esc_url('//farm' . $photo["farm"] . '.staticflickr.com/' . $photo["server"] . '/' . $photo["id"] . '_' . $photo["secret"] . '_s.jpg'); $response_results[$photo['id']]['alt'] = esc_attr($photo["title"]); } if (!empty($response_results)) { $response_results = base64_encode(serialize($response_results)); set_transient('flickr-widget-' . $transient_prefix, $response_results, apply_filters('null_flickr_cache_time', HOUR_IN_SECONDS * 2)); } } } else { return new WP_Error('flickr_error', esc_html__('Could not get data', 'your-text-domain')); } } if (!empty($response_results)) { $response_results = unserialize(base64_decode($response_results)); wp_enqueue_style('widget-flickr'); $output = ''; $output .= '<ul class="widget-flickr-list">'; foreach ($response_results as $photo) { $output .= '<li>'; $output .= '<a href="' . $photo['link'] . '" target="_blank">'; $output .= '<img src="' . $photo['url'] . '" alt="' . $photo['alt'] . '" />'; $output .= '</a>'; $output .= '</li>'; } $output .= '</ul>'; echo $output; } }
I won’t describe what the transient is and how it works, just what it does. Any time the widget is rendered we first check if the transient is in place; if it is present we fetch results from transient, but if not, we make an API request. And each two hours our transient expires, in order to keep our latest Flickr images actual and up to date.
With the WordPress plugin Transients Manager you can even see what your cached Flickr API request results look like:
And the final touch here is to remove transient for every widget update. For example, if you want to change the number of images displayed, or change the username, you’d need to make a new API request. This can be done with the widget_update_callback WordPress filter, or the widget class public function update:
public function update($new_instance, $old_instance) { $instance = $old_instance; $instance['title'] = strip_tags($new_instance['title']); $instance['photos_number'] = strip_tags($new_instance['photos_number']); $instance['flickr_id'] = strip_tags($new_instance['flickr_id']); $api_key = 'f49df4a290d8f224ecd56536af51FF77'; $transient_name = 'flickr-widget-' . esc_attr($instance['flickr_id'] . $api_key); delete_transient($transient_name); return $instance; }
Conclusion
That was a lot of effort, but now you know how to work with WordPress and APIs! If you enjoyed this post and would like to see additional tutorials on APIs or transients, let me know in the comments section.
To grab the widget sample files head over to the GitHub repository.
0 notes
Text
XenForo 2.0.12 - Upgrade
XenForo 2.0.12 is now available for all licensed customers to download. We recommend that all customers running previous versions of XenForo 2.0 upgrade to this release to benefit from increased stability. This version makes a number of changes to improve compatibility with PHP 7.3.0. However, at this time, we do not recommend using PHP 7.3.0 in production due to a bug that can cause code to execute incorrectly, potentially leading to data loss. We believe this bug will be resolved in PHP 7.3.1 when it's released. Download XenForo 2.0.12 Some of the changes in XF 2.0.12 include: Improve PHP 7.3 compatibility. If available and different from the server version, grab a more detailed version for the Server environment report. If the $_SERVER['SERVER_SOFTWARE'] value isn't available or valid then just don't display that entry in the report, because it's mostly not essential. Adds some additional phrases for the "Server environment report" Fix an issue which affects building add-on releases on Windows where local paths included a leading slash. Incrementally update the job state of the Sitemap job so that a fatal error shouldn't disrupt the process and introduce corrupted/duplicate items. Adjust error message given when attempting to edit a user's permissions for a content type without a valid user_id. Standardize the locale information used by PHP. Use a different approach to loading icons on the add-ons list in the Admin CP. To avoid issues with multiple database connections, the icon image data is instead converted to a data URI. User upgrades should not check canPurchase() before processing a payment that has been received, as this method is really only for limiting the UI/purchase setup. Add some additional trusted IP ranges for Google. Ensure 'nullable' entity property is reflected in generated code Ensure node navigation entries use their assigned title Ignore custom field errors during admin edit and include custom field title with errors Convert warning notes field to structured text Correctly apply admin user message leave options Prevent new messages being duplicated in Firefox Ensure multi quote quotes are inserted into the correct editor Hide 'Start a new conversation' link if visitor doesn't have permission to start conversations. Allow permanent redirects to be stickied and unstickied. Remove extra save call when ignoring member Remove UTC check from server environment report and link PHP version to phpinfo page Prevent loading of Setup.php if addon.json requirements aren't met Make xf-dev:entity-class-properties CLI command correctly handle subdirectories Return 'complete' response from UserGroupPromotion job if no active promotions are found. Ensure 'From name' and 'From email' fields are applied when batch emailing users Hide editor draft menu from guests Ensure cron entries run at zero valued time units if multiple time values are selected. Check for missing hash in IPSForums3x authentication handler. Add missing hint parameter to discouraged checkbox on user edit page Remove invalid relation from SpamTriggerLog entity Use content type phrase when rebuilding the search index Fix incorrect URL on conversation message likes list Fix broken 'Delay duration' option for floating notices Allow invalid users to be unfollowed Re-add explain text in the user_edit form to clarify non-valid user states behaviour. Include table name in message for any exception occurring in SchemaManager methods. Implement custom stack trace builder to mask passwords in method arguments Add deleted item styling to news feed items When restoring spam cleaned threads, ensure threads which were originally moved are restored back to the correct forum. Return an error phrase upon invalid callback validation when performing spam clean actions. Note that the method name switches to ucfirst(\XF\Util\Php::camelCase($action)) in XF 2.1 but remains as ucfirst($action) in XF 2.0. When handling a Stripe webhook that is missing required metadata, when attempting to find a previous related log, ensure said log actually contains a purchase_request_key. Improve BB code parsing of incomplete tags within plain-child tags. Migrate user field criteria during upgrade from XF 1.x to 2.x By default, do not allow cookies to be retrieved as arrays to prevent unexpected behavior. (Array support can now be opted into explicitly.) Prevent an error when trying to delete a payment profile when there is an invalid purchasable definition. Track when a preview is pending to prevent multiple simultaneous preview loads. Prevent a PHP notice when deleting a poll for a thread started by a guest Include breadcrumb in edit history view and compare templates. Pass unused $ellipsis variable into wholeWordTrim. Prevent long select options from causing overflow on iOS. Enable the HTML to BB code simplification process to handle additional situations Resolve some situations where the new messages indications while composing a reply wouldn't take you to the expected location. Validate advertisement html before saving. Prevent tel/sms links being converted to bbcode Remove the insert icode option when extended text formatting is disabled. Allow end user modification to the "allow this BB code in signatures" option on add-on-defined custom BB codes. Call the canPurchase method instead of can_purchase in UserUpgrade::getFilteredUserUpgradesForList. Correctly combine multiple custom field-related limits to the user and thread searchers. Correctly apply the "not in secondary groups" user search condition (users cannot be in any of the listed groups). When building a release and testing a JSON, only consider an error if decoding the build.json does not return an array. When submitting spammers to StopForumSpam, convert binary IP address to readable string. When saving style templates through the admin UI, force version/last_edit_date to be updated like XF 1.x When merging threads, always redirect to the target thread. Fix currency code for Belarusian Ruble (BYR => BYN) No longer cache the preview container object in the PreviewClick handler. If there are multiple handlers per page, the cached container becomes incorrect if using different handlers. When form filling, if the control is a textarea with a textarea-handler, trigger its update method to ensure the textarea is resized appropriately. Prevent an array-to-string conversion when throwing a bulkInsert exception if a missing column is detected. Ensure that the user following cache cannot include your own user ID. Add missing mod_log.thread_poll_reset phrase. Attempt to exclude dot files/directories from our vendor dependencies. Number boxes are too wide and cause units to overflow their container, fixed with max-width. Add "Please do not reply to this message" text to outgoing conversation emails. Reassign user group changes when merging users Ensure PasswordChange service errors on any UserAuth error. Fetch more threads for new threads widget Ensure exceptions in sub-processes stop execution, and always exit with non-zero error code on error. Make Disabler system compatible with select options. Ensure FieldAdder handles Disabler elements correctly Ensure prefix of destination thread is shown in moved post alert. Trigger change event on select when prefix selected Remove the "mixed" stuff from CodeMirror's PHP mode so that the opening tag is no longer required. Update broken link to Apple support in cookie help page text (and in XF 1.5). Adjust top border radii of blocks within overlays. Allow non-user selectable styles to be used for the email style. Also, add several email-related style properties to allow email colors to be overridden more directly, without creating a new style. Implement a "notice watcher" system for bottom fixed notices. This calculates the total visible notice height in the bottom fix location and adds a footer margin to the same value so that no content can be covered by the notice(s). Adjust how we parse search query modifiers to be more strict. (- and + require whitespace before and none after, | requires whitespace on both sides. Don't parse doubled up modifiers.) Adjust trophies phrase capitalization Include no_date_limit in the rel=canonical link for forums when needed Attempt to reduce cases where conversation reply_count values could potentially get out of sync. Allow the reply count and other parts to be rebuilt via the conversation rebuild tool. By default, reject email addresses as invalid if there are no dots in the domain part. Add a bit of left padding on contentRow-suffix elements. Include the forum a thread is in in the RSS feeds (only for global feeds) Fix add-on development data not being removed as expected when the last entry of a type has been removed. (The metadata JSON file must still exist.) Relax URL validation a tiny bit, notably don't block adjacent path separators in the path section. Ensure phrase is escaped in HTML attribute. Ensure usage of phrase within HTML attribute is escaped. In the AbstractSearcher ensure that the day end value is converted properly to the end of the day. Never allow the XF add-on to appear in add-on lists. Handle avatar deletes via the spam cleaner for gravatars too. Make add-on action finalization more robust when uninstalling legacy add-ons. When importing dev output, ignore any invalid columns. Add some block border radius to the member header block so that it fits within its parent block. Ensure permissions are rebuilt on add-on active change. Update child navigation entries directly when the parent ID changes to ensure dev output is written correctly. Use the correct maxlength value for the public navigation structure. Additionally, bump AdminNavigation ID lengths up to 50 from 25. Add support for partial indexes to schema manager conflict resolution system Fix multiple issues that make it hard to use XF\Import\Data\AbstractEntityData Consistently use code paths which result in the canView method of the report entity (rather than the handler) being used. The following public templates have had changes: account_upgrades core_contentrow.less core_input.less core_overlay.less editor_base.less edit_history_compare edit_history_view forum_view PAGE_CONTAINER quick_reply_macros thread_save_draft warning_info Where necessary, the merge system within the "outdated templates" page should be used to integrate these changes. As always, new releases of XenForo are free to download for all customers with active licenses, who may now grab the new version from the customer area. Note: add-ons, customizations and styles made for XenForo 1.x are not compatible with XenForo 2.x. If your site relies upon these for essential functionality, ensure that a XenForo 2 version exists before you start to upgrade. We strongly recommend you make a backup before attempting an upgrade. Current Requirements Please note that XenForo 2.0.x has higher system requirements than XenForo 1.x. The forthcoming XenForo 2.1.x release will have higher system requirements again (PHP 5.6). The following are minimum requirements: PHP 5.4 or newer (PHP 7.2 recommended) MySQL 5.5 and newer (Also compatible with MariaDB/Percona etc.) All of the official add-ons require XenForo 2.0. Enhanced Search requires at least Elasticsearch 2.0. Installation and Upgrade Instructions for XenForo 2.0 Full details of how to install and upgrade XenForo can be found in the XenForo 2 Manual. Note that when upgrading from XenForo 1.x, all add-ons will be disabled and style customizations will not be maintained. New versions of add-ons will need to be installed and customizations will need to be redone. We strongly recommended that you make a backup before attempting an upgrade. Once upgraded, you will not be able to downgrade without restoring from a backup.
xenforo_2.0.12_upgrade.zip
source https://xenforoleaks.com/topic/308-xenforo-2012-upgrade/
0 notes
Text
Online JSON Tools Review
If you’re a savvy web developer, you have definitely searched on Google for tools like “url decode json” or “convert json to text”. And what do you usually get? You get garbage websites filled with ads, popups, blinking download buttons and tools that don’t really work.
The same problem was faced by Peter K. Rumins from Browserling. He decided to solve this problem once and for all by building a network of tools websites. These sites consist of thousands of simple tools that help to work with JSON, XML, CSV, YAML, PNG, JPG, Strings and even Mathematics. These tools are ads free, there are no configuration options and no ads.
OnlineJSONtools.com is one such website in the network and it helps developers to work with JSON data structures in the browser. The tools are so easy to use that all you have to do is enter JSON input and you instantly get the result you are looking for.
Currently Supported JSON Tools
Below is the list of all the tools that are currently available. Apart from that Browserling team is constantly working to add more tools such as JSON to BSON.
JSON Highlighter tool: JSON highlighter will give each token a different color. Values, keywords, brackets and also to special characters (like newlines, tabs, etc) get special colors. Let’s see a working version of JSON highlighter in an example:
You can see strings, object values and keys are in yellow color, blue color for numerical values, white color for arrays and objects, and grey color for invisible special characters.
It has some additional features that let you control highlighting of JSON:
Shows special characters, as in above example new line is represented by a “downstairs symbol”.
It will care about your matching brackets, it also highlights matching brackets if the cursor is near one.
It also shows the active line in gray color so that you can see more easily on which line the cursor is.
It also tells user not only the line number where is the error but also what is the error by highlighting it as shown in below example.
JSON Prettifier Tool: So here word “prettifier” itself describing this tool. This makes your JSON code well formatted with proper indentation. It will convert an ugly code to beautiful code.
Let’s see the use of the tool on a given problem where you have minified JSON input:
You can see from the above program the code in left block is not indented and not aligned but after using JSON prettifier it aligns the code in proper indentation and you can quickly understand it.
We can also define by the “number of spaces” and “number of tabs” to indent output with spaces and with tabs as shown below.
JSON Minifier Tool: It is a tool which removes all whitespaces and gives a JSON code that takes least space. It’s effective for transmitting less data and making faster web page load time.
JSON Validator Tool: This is an important tool that let you write a valid JSON code. It will point out where is the error and tell the programmer what the error is.
JSON Escaper Tool: JSON escaper helps the programmer to embed JSON in a string as it escapes all special symbols. So now you don’t need to worry about if you forget escape sequence code of any special character, because JSON escaper is here to help you.
JSON Unescaper Tool: JSON unescaper just reverse of the JSON escaper. It will return you a valid JSON object from a string version of JSON object.
JSON to XML Convertor Tool: This tool helps you to easily convert your JSON data into an XML documents and also allow us to make change in indentation for easier reading.
XML to JSON Convertor Tool: This tool gives us a very easy solution of converting an XML data into JSON documents.
JSON to YAML Convertor Tool: It let us convert our JSON structure to its equivalent YAML config file.
YAML to JSON Convertor Tool: A reverse version of JSON to YAML that transpiles YAML data to JSON config.
JSON to TSV Convertor Tool: The main feature of this tool is that it quickly converts our JSON code into text in tab separated values format.
TSV to JSON Convertor Tool: This tool let us do reverse action of previous and convert TSV columns into JSON objects.
JSON to CSV Convertor Tool: JSON to CSV convertor is similar to JSON to TSV but here the output is column separated values.
CSV to JSON Convertor Tool: This tool helps us convert CSV back to JSON in a just one click without installing any application or following any instructions.
JSON to BSON Convertor Tool: This tool helps us to represent our JSON code in binary-encoded format. This increases the efficiency in binary applications.
BSON to JSON Convertor Tool: It allow us to convert BSON, which is binary encoded JSON back to JSON format.
JSON to Image Convertor Tool: It helps to transforms our JSON code into a JPEG, PNG, GIF, BMP image. It basically screenshots the JSON code and gives you back a downloadable image.
JSON to Base64 Tool: It not only allows us to encode our JSON data to base64 code that’s used in webapps.
Base64 to JSON Tool: Simple and easy tool that decodes base64 data back to JSON format.
URL-encode JSON Tool: This is a fantastic tool that encodes our JSON objects into URL-encoding format by escaping all URL characters to percent-number-number format.
URL-decode JSON Tool: This tool transform our data back to JSON format from URL-encoded data by unescaping all URL-encoded sequences to regular characters.
JSON to Plain Text: The main feature of this tool is that it extracts plain text data from JSON code by removing all special JSON symbols and operators.
JSON Editor Tool: It provides us a clear interface in the browser to edit JSON in syntax-highlighted editor.
Upcoming JSON Tools
Mr. Rumins and his team at Browserling is also working on more new JSON tools. Here is the list of tools that will be available soon on the site:
Display JSON Statistics: Provide statistics about JSON objects and their complexity.
Flatten JSON: Flatten deep JSON structures into flat single depth objects.
Obfuscate JSON: Convert JSON to unrecognizable but still valid data.
Convert JSON to a HTML: Create HTML webpage from a JSON code.
Convert JSON to a Bencode: Convert JSON objects to B-encoded data that’s used in bittorrent protocol.
Convert JSON to a Latex Table: Create a Latex table code from a JSON data structure.
Truncate JSON: Cut off excessively large JSON data and make JSON the required length.
Convert JSON to Data URI: Encode JSON so that it can be used in URLs.
Convert JSON To a PHP Array: Create PHP code from JSON code.
Compare Two JSON Files: Compare two JSON files in the browser and find their differences.
If you found JSON tools useful and you would like to have more tools and new JSON features then please tell us know by commenting below.
I would like to thank whole Browserling team for building such handy online tools that is making the work easier for programmers like me and many others. A million and one thanks!
The post Online JSON Tools Review appeared first on The Crazy Programmer.
0 notes
Text
10 Important Features of Advanced PHP

PHP or Hypertext Preprocessor is a programming language which deals with all the functions on the server-side. PHP is free to use, very easy, and simple to learn. It is the best choice to make websites dynamic with the help of its outstanding features.
It is developed by Rasmus Lerdorf a Danish-Canadian programmer. It is a dynamic type language so there is no need to declare the data type of the variable and all the variables can be used with a symbol $. There are much more features of PHP which should be known by you. So let us start to know about the features of world’s most popular server-side language.
Features of Advanced PHP
1. Database Connectivity
Rather than having your database association settings scattered all over the place, for what reason not simply make one ace record that contains its settings, and afterward incorporate it in your PHP contents? In the event that you have to change subtle elements, later on, you can do it in one record rather than a few documents. This is additionally extremely helpful when you have to utilize different constants and capacities all through various contents. You will always sanitize Data That will go into your Database.
2. Web Services
A web service is a product framework intended for interoperable collaboration over a system. A web service is characterized by a WSDL (Web Services Description Language) report, and different frameworks associated with the web services utilizing SOAP messages, exchanged utilizing HTTP with an XML serialization. A web service is a theoretical asset that gives an arrangement of capacities and is actualized by an operator, which sends and gets messages.
3. APIs
API extends for "Application Programming Interface".It is a set or decides that enables one bit of programming application to converse with another. Those "rules" includes CRUD operations. Application Programming Interface is a need since this is the lightest method to make, read, refresh or erase data between various applications over the web or HTTP convention. This data is displayed to the client in a moment particularly on the off chance that you utilize JavaScript to render the information on a site page.
4. SPL (Standard PHP Library)
The Standard PHP Library (SPL) is a group of classes and interfaces that are planned to solve the regular issues.
SPL gives an arrangement of standard information structure, an arrangement of iterators to cross over items, an arrangement of interfaces, an arrangement of standard Exceptions, various classes to work with records and it gives an arrangement of capacities like spl_autoload_register()
5. Sessions
Sessions are a straightforward method to store information for singular clients against a one of a kind session ID. This can be utilized to continue state data between page demands. Session IDs are typically sent to the program by means of session treats and the ID is utilized to recover existing session information.
6. Exception handling
Exceptions can be handled by using some keywords in PHP. Keywords for handling all the exceptions. We can use multiple catches for a try block but cannot use multiple tries with a single catch statement. When an exception occurs it creates an object of exception type and throws it to catch statement. Catch statement catch that object and handle it and helps to continue the normal execution of the program. One more keyword is used to handle the exceptions and i.e. throw.
7. Regular Expressions
Regular expressions is a pattern or sequence of characters itself. They give the establishment for pattern-matching functionality. You can search a substring inside another string by using a regular expression, also you can easily replace string by another string and can split a string into substrings. There are two types of Regular Expressions:
POSIX Regular Expressions
PERL Style Regular Expressions
8. Bugs Debugging
There are different ways by which we can display error messages and debug the bugs of the program. To display an error message in the browser, set the property named display_errors configuration directive to On. To send errors to the web server, set the property log_errors to On. If you want to display the error messages in both places then you can set them both to On.
PHP provides some constants to set the value of error_reporting such that errors of certain types get reported: E_PARSE (parse errors), E_ERROR (fatal errors), E_ALL (for all errors except strict notices), E_WARNING (warnings), E_NOTICE (notices), and E_STRICT (strict notices).
9. PHP & AJAX
Like HTML, you can embed AJAX in PHP to extract the information from the database easily. It is used for fast interactive communication website with a database.
10. JSON Encoding and Decoding
To encode the JSON, json_encode() function is used in PHP. This function represents the data in JSON format and returns a value on success and failure on FALSE. A function named as json_decode() is used for decoding the JSON format in PHP. It returns the value decoded from JSON to PHP type which is appropriate.
Although most of the essential features of PHP are covered in this article but still there is more to explore for you. Web development is a vast sphere where PHP has a significant position. To understand the web development more clearly you need to understand PHP first since it is the backbone of website development. If you have the desire to master this amazing programming language then joining an ideal training institute is truly advisable.
There are many more features of core and advance PHP, so to know more features of PHP in details, you should take classes from ADMEC Multimedia Institute which is one of the reputed PHP training institutes in North Delhi offers advanced PHP training in Rohini by experienced trainers. Come and explore all the courses to make a bright career in web development with us.
Souurce:- http://admec-multimedia-institute.blogspot.in/2018/05/10-important-features-of-advanced-php.html
0 notes
Text
Personalize UX with Ipstack’s Free Geolocation
The holy grail of web development is personalized content; meaning that instead of publishing a generic, one-size-fits-all website, you deliver a bespoke experience to each and every user.
Personalized content, and the bespoke user experiences it enables, means that instead of peddling marketing, you’re building relationships; your users become long-term customers, and even advocates for your brand.
On a web with a new-found obsession with privacy, it’s increasingly hard to personalize a site; at the same time, users’ high-expectations for service mean a generic experience doesn’t cut the mustard.
One solution, is to deliver content based on location; and the simplest way to test for location is with ipstack’s geolocation service.
Using a database of over 2,000,000 unique locations worldwide drawn from large-scale ISPs, and covering more than 200,000 cities, ipstack’s data enables you to quickly determine the location of your user, and adapt your content accordingly.
ipstack’s data enables you to quickly determine the location of your user, and adapt your content accordingly
The intuitive API is incredibly simple to use, and delivers results in JSON or XML format.
Best of all, ipstack’s API is free to use for up to 10,000 requests per month. If you need to scale beyond 10,000 requests, then there’s tiered pricing plans, but 10,000 is more than enough for most small to medium sites.
If you opt for a paid plan, then there are extra features, like currency, time zone, and security modules to dig into, but the core location module is what will interest most web designers.
There’s a ton of cool stuff you can do when you know a user’s location. For example, how about using their longitude and latitude to pinpoint the distance between them and your nearest store? How about changing the area code on your published phone number to match the user’s location? You could even develop promotions tied to local sports teams.
Getting Started
To use ipstack, the first thing you’re going to want to do is register your details for a free API key (no credit card is required).
The API key is a long string of numbers and letters that stops anyone else from accessing data with your account and using up your quota.
ipstack’s basic lookup function is really simple: We just access the API, append the IP address we want to look up, and finally add a query string with the value pair “access_key” and your own API key, like this:
http://api.ipstack.com/111.222.333.444?access_key=0a9b8c7d6e5f4g3h2i1j
ipstack then returns a whole host of data for you to use, ranging from the user’s country, city, and even a handy link to an SVG file of the user’s national flag.
Enhancing UX with Geolocation
Let’s say you’re selling online, and you want to offer different shipping rates. Most importantly you want to offer US-based customers free domestic shipping, and international customers cheap worldwide shipping. With ipstack it’s simple to detect which offer to show your users.
We’re going to set up a really quick PHP query, to detect which message we should show the current user.
First, we open the PHP file and build the query:
<?php // Record my API key, and the URL to send the query to $API_KEY = "0a9b8c7d6e5f4g3h2i1j"; // <— CHANGE THIS TO YOUR API KEY $API_URL = "http://api.ipstack.com/"; // Detect the user’s IP address $USER_IP = $_SERVER["REMOTE_ADDR"]; // Build the API URL (url + ip address + api key) $IPSTACK_QUERY = $API_URL . $USER_IP . "?access_key=" . $API_KEY;
Next we run the query and save the result:
// Init CURL $ch = curl_init($IPSTACK_QUERY); curl_setopt($ch, CURLOPT_RETURNTRANSFER, true); // Grab the data that’s returned $jd = curl_exec($ch); // Clean Up curl_close($ch); // Decode the data ipstack returned $result = json_decode($jd, true);
Finally we pull the country code out of the query, compare it to the country code for the US (which is, unsurprisingly ‘us’), then output a different message depending on the result:
// Find the user’s country $user_country = $result["country_code"]; // Check if the user’s country is the United States $isUS = strtolower($result["country_code"]) === "us"; // Output the result if($isUS) { // Offer free shipping echo "Shipping is FREE within the USA!"; } else { // Offer international shipping echo "We ship worldwide for just $25!"; } ?>
It really is that simple.
How ipstack Stacks Up
ipstack is one of the simplest geolocation services we’ve used. It offers an incredibly fast way to get started detecting where your users are.
We would like to see a little more security; many geolocation services require you to register your domain and block other sites, which means that it’s safe to expose your API key—as it stands, you can’t use ipstack in JavaScript without risking exposing your API key. However, if you’re working in server-side code (as above) then ipstack is as secure as any other provider, and far quicker than most to implement.
ipstack is one of the best geolocation services currently available
Based on our testing, ipstack is one of the fastest providers out there. Results were returned in milliseconds, and from a human perspective queries appeared to be returned instantaneously.
Perhaps our favorite feature of ipstack is how much data it returns. Some services offer a country code lookup, then charge extra for region, or city lookups. ipstack’s policy is to deliver all of the information you could ever need, so you can work with data however it benefits your users.
Conclusion
For simplicity, speed, scalability, and depth of information, we think ipstack is one of the best geolocation services currently available.
Our testing was very limited, and we didn’t run any large-scale, intensive applications; however, the companies that do choose ipstack—notably, Microsoft, Samsung, and Airbnb—are handling huge volumes of users with no apparent issues.
The potential enhancements to UX that knowing your user’s location allows, opens the door to much greater customer engagement. When you can have all of this for free, it seems crazy not to take advantage of it.
Add Realistic Chalk and Sketch Lettering Effects with Sketch’it – only $5!
Source from Webdesigner Depot https://ift.tt/2H9SJMk from Blogger https://ift.tt/2JVeeOG
0 notes
Text
Personalize UX with Ipstack’s Free Geolocation
The holy grail of web development is personalized content; meaning that instead of publishing a generic, one-size-fits-all website, you deliver a bespoke experience to each and every user.
Personalized content, and the bespoke user experiences it enables, means that instead of peddling marketing, you’re building relationships; your users become long-term customers, and even advocates for your brand.
On a web with a new-found obsession with privacy, it’s increasingly hard to personalize a site; at the same time, users’ high-expectations for service mean a generic experience doesn’t cut the mustard.
One solution, is to deliver content based on location; and the simplest way to test for location is with ipstack’s geolocation service.
Using a database of over 2,000,000 unique locations worldwide drawn from large-scale ISPs, and covering more than 200,000 cities, ipstack’s data enables you to quickly determine the location of your user, and adapt your content accordingly.
ipstack’s data enables you to quickly determine the location of your user, and adapt your content accordingly
The intuitive API is incredibly simple to use, and delivers results in JSON or XML format.
Best of all, ipstack’s API is free to use for up to 10,000 requests per month. If you need to scale beyond 10,000 requests, then there’s tiered pricing plans, but 10,000 is more than enough for most small to medium sites.
If you opt for a paid plan, then there are extra features, like currency, time zone, and security modules to dig into, but the core location module is what will interest most web designers.
There’s a ton of cool stuff you can do when you know a user’s location. For example, how about using their longitude and latitude to pinpoint the distance between them and your nearest store? How about changing the area code on your published phone number to match the user’s location? You could even develop promotions tied to local sports teams.
Getting Started
To use ipstack, the first thing you’re going to want to do is register your details for a free API key (no credit card is required).
The API key is a long string of numbers and letters that stops anyone else from accessing data with your account and using up your quota.
ipstack’s basic lookup function is really simple: We just access the API, append the IP address we want to look up, and finally add a query string with the value pair “access_key” and your own API key, like this:
http://api.ipstack.com/111.222.333.444?access_key=0a9b8c7d6e5f4g3h2i1j
ipstack then returns a whole host of data for you to use, ranging from the user’s country, city, and even a handy link to an SVG file of the user’s national flag.
Enhancing UX with Geolocation
Let’s say you’re selling online, and you want to offer different shipping rates. Most importantly you want to offer US-based customers free domestic shipping, and international customers cheap worldwide shipping. With ipstack it’s simple to detect which offer to show your users.
We’re going to set up a really quick PHP query, to detect which message we should show the current user.
First, we open the PHP file and build the query:
<?php // Record my API key, and the URL to send the query to $API_KEY = "0a9b8c7d6e5f4g3h2i1j"; // <— CHANGE THIS TO YOUR API KEY $API_URL = "http://api.ipstack.com/"; // Detect the user’s IP address $USER_IP = $_SERVER["REMOTE_ADDR"]; // Build the API URL (url + ip address + api key) $IPSTACK_QUERY = $API_URL . $USER_IP . "?access_key=" . $API_KEY;
Next we run the query and save the result:
// Init CURL $ch = curl_init($IPSTACK_QUERY); curl_setopt($ch, CURLOPT_RETURNTRANSFER, true); // Grab the data that’s returned $jd = curl_exec($ch); // Clean Up curl_close($ch); // Decode the data ipstack returned $result = json_decode($jd, true);
Finally we pull the country code out of the query, compare it to the country code for the US (which is, unsurprisingly ‘us’), then output a different message depending on the result:
// Find the user’s country $user_country = $result["country_code"]; // Check if the user’s country is the United States $isUS = strtolower($result["country_code"]) === "us"; // Output the result if($isUS) { // Offer free shipping echo "Shipping is FREE within the USA!"; } else { // Offer international shipping echo "We ship worldwide for just $25!"; } ?>
It really is that simple.
How ipstack Stacks Up
ipstack is one of the simplest geolocation services we’ve used. It offers an incredibly fast way to get started detecting where your users are.
We would like to see a little more security; many geolocation services require you to register your domain and block other sites, which means that it’s safe to expose your API key—as it stands, you can’t use ipstack in JavaScript without risking exposing your API key. However, if you’re working in server-side code (as above) then ipstack is as secure as any other provider, and far quicker than most to implement.
ipstack is one of the best geolocation services currently available
Based on our testing, ipstack is one of the fastest providers out there. Results were returned in milliseconds, and from a human perspective queries appeared to be returned instantaneously.
Perhaps our favorite feature of ipstack is how much data it returns. Some services offer a country code lookup, then charge extra for region, or city lookups. ipstack’s policy is to deliver all of the information you could ever need, so you can work with data however it benefits your users.
Conclusion
For simplicity, speed, scalability, and depth of information, we think ipstack is one of the best geolocation services currently available.
Our testing was very limited, and we didn’t run any large-scale, intensive applications; however, the companies that do choose ipstack—notably, Microsoft, Samsung, and Airbnb—are handling huge volumes of users with no apparent issues.
The potential enhancements to UX that knowing your user’s location allows, opens the door to much greater customer engagement. When you can have all of this for free, it seems crazy not to take advantage of it.
Add Realistic Chalk and Sketch Lettering Effects with Sketch’it – only $5!
Source p img {display:inline-block; margin-right:10px;} .alignleft {float:left;} p.showcase {clear:both;} body#browserfriendly p, body#podcast p, div#emailbody p{margin:0;} Personalize UX with Ipstack’s Free Geolocation published first on https://medium.com/@koresol
0 notes
Text
Some must try cool PHP tricks!
PHP involves a series of cool tricks to be practiced. Though the concepts are nothing new yet are easily missed by many. A deeply nested object could be converted to a deeply nested associative array by using it as a substitute on the behaviour of the JSON encode/decode functions.
There are number of tricky trials available in PHP which could make not only the happenings of the event more easy but at the same time it helps in maintaining accuracy.
You can specifically check the accuracy and the fallacy of the project dealt in with. The best part in PHP is that it uses ‘==’ internally almost every time (see ‘in_array’ and ‘switch’ statements below). A trick worth knowing!
1. $foo = 0
2. switch ($foo) {
3. case ‘infinity’ :
4. eco ‘lol php’ ;
5. break ;
6. Default:
7. eco ‘php’ is great ;
8. }
Guess the output!
A number of websites are available for documenting these kind of tricks, only thing you need to do is to google anything like “lol php”. Meanwhile, ‘tricks’, will not be going to benefit you in any ways present in any language. But for it will only annoy people reading or working around you and put them to sufferings.
Apart from these negative elements, long time ago there where some tricks which were actually bind to be good, by some developers having crazy hardware constraints but it was way long ago. Minimize for code readability and in the case of PHP Development Services USA avoid subtle bugs like the ones above and everything related to it will be altogether right.
You should be careful while using ‘get_class()’, or you might end up with results beyond expectation. It has gone to be mostly kind and funny as at the time of need, it is well documented along with everything. Thus it becomes easy to ‘create function()’ and programming on it. These tricks might be unpleasant for the people working on same codebase.
Though you might be knowing a number of PHP tricks, it won’t make you a better developer, since in reality having the knowledge of such tricks would not help you in the improvement or quality of your software. Instead it could also be taken as an opportunity by using it for the decoration of $foo with default values and to replace missing array properties with null arrays. PHP introduces with various amazing string functions, like if you wanted to check the
Accuracy in spellings of common words:
Levenshtein — Manual
Find words sounding in the same way:
Soundex — Manual
Check if the text is similar:
Similar_text — Manual
Another cool part is that you can collapse your pieces of code without putting a break in it. You can individually validate Email Address before doing any effort work. It is featured by a built in function called checkdnsrr() which will specify an email address and check if it resolves as an IP address. This would be a cool act which save your much time, efforts, server resources and just making things very clear and precise, where you could actually able to see the domain and the coexistence of your email address. Rather you can also Switch Off Error Reporting.
When you move into production on your website, you must kill the error reporting. You need not to put all those warning and errors out from there for all mankind to see. Simply set error reporting(0); and rest of all in the world would be absolutely alright.
You should comment your code. If you are not doing so, no one is going to take you seriously as a developer until you act in the same way and must validate all inputs and outputs as this part should be mandatory.
For any queries and doubts regarding the above mentioned tips and tricks, feel free to get in touch with the ready to help support team at Laitkor.
After the following, Lithium Framework is another emerging framework in this category, represented exclusively for PHP 5.3. This one is designed by the original developers of CakePHP who decided to start the newer more advanced framework from scratch. It include the heavily uses of the new features in PHP 5.3, including namespaces, closures, and late static binding and its appearance seemed to be more interesting from the designs perspective. This framework is highly recommended to be dealt in with even for the learning matter or goods coding purpose. It is also having its own database abstraction layer similar to ActiveRecord.
These were some of the frameworks having MVC, templating and database abstraction layer, most among them are based on standard PHP Database Object (PDO) library that comes with PHP. Even if you do not use any of the frameworks, you can generally practice PDO for database access as it helps in improving the readability and portability of your code with fairly modest overhead.
We at Laitkor aim to help our clients in every possible way and in case you get stuck at choosing the right framework for you according to your project, our expert panel can always be there to help you out.
Source: https://www.laitkor.com/some-mus...
0 notes
Photo


DECO7180 Week7 Journal
1. In the paper prototyping exercise, we got a lot of feedback, including the functionality, interface and the interaction. Functionality: We can add the information about the café or restaurant around the library for users. Try to think about how to utilize the comments on the Twitter or Google Map. Add the google reviews about the library into the library information Interface: Reduce the windows of pop up. Twitter API: Twitter comments on the map is confusing and distracting.
2. We ask testers to do a survey for us and we also have an interview with them to ask some detailed suggestions or their preference.
3. We have both web and phone size prototypes for users to test. So we need to get different feedback according to different sizes. In general, our prototype was well prepared but still had some problems need to be improved. e.g Twitter on the map is confusing and distracting a) Looks like the libraries, so people get mistaken b) Hides the map and information behind it Almost all the testers do not understand the function of the Twitter comments, so they may not give a suggestive feedback.
4. After testing other people’s prototypes, I got inspirations of how to improve the interface and interaction of our website. Some group intend to build a game website, but it can be a little difficult for me to understand the rules and the concept of the game. Some other interesting prototypes are very attractive, which makes me to think about how to make our website to be more attractive to users.
After testing the paper prototype, I made some changes of the interface of our website.
1.I changed the pop-out of the searching window to a drop down menu. And we also added a searching choice called ’opening now’ to choose whether the library is open when users are searching.

2. The detailed info page of the library was also changed from pop-out to a full page. And comments from Twitter and Google Map were also added to this page.

3.We added the ‘Favorites’ to the menu bar and changed the pop-out window to a full page.All the libraries could be added or removed from the favorites page.

I also learned some knowledge about HTML and CSS. The images below are some notes I made. The knowledge about HTML I learned this week included HTML Elements, HTML Attributes,Headings, Paragraphs,Tables, Lists and HTML Styles.


The knowledge I learned in this week’s workshop
PHP Templating
1.Use the include() function to bring call each slice back into index.php.
a. <?php include(‘header.php’); ?>
b. <?php include(‘sidebar.php’); ?>
c. <?php include(‘footer.php’); ?>
d. <?php include(‘contact.php’); ?>
2.Add an active class to the current page list item in the menu.
$activePage = basename($_SERVER['SCRIPT_FILENAME'], '.php');

And I searched the usage of basename() function(https://www.w3schools.com/php/func_filesystem_basename.asp)
Definition and Usage: The basename() function returns the filename from a path.
Syntax: basename(path,suffix)


3.$_SERVER(https://www.w3schools.com/PhP/php_superglobals.asp)
$_SERVER is a PHP super global variable which holds information about headers, paths, and script locations.
$_SERVER['SCRIPT_FILENAME'] --Returns the absolute pathname of the currently executing script
4.In the nav element , there are inline conditional statements that check if $activePage is the same as the current menu item. If it is, add the class attribute with a value of active to add visible context to the menu.

APIs and PHP
1.Compile an API URL.Inside, use the file_get_contents() PHP function to get data from your API call.
$data = file_get_contents($api_url);

2.$data will be a string of JSON, so we need to convert it to an array to work with it by decoding the JSON:a. $data = json_decode($data, true);

The array is like the image below.

3.Setup variables for key data:
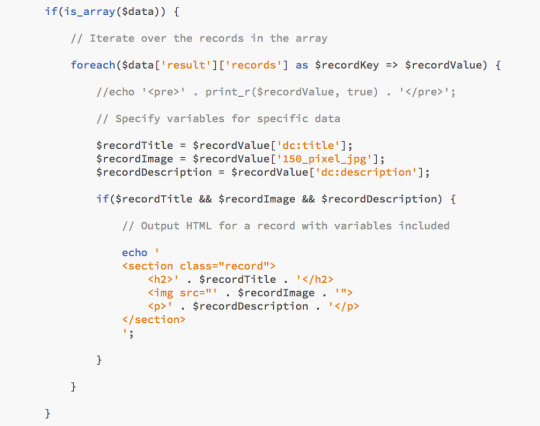
Then print the data like this:
This method is very useful for me to build the favorites page in our website, because the name and the images of libraries that users added are necessary to be shown in the favorites page.The images of the library may be called from Flickr API.
0 notes