#please reblog from source when possible (click ... and view previous post).
Explore tagged Tumblr posts
Visit Tumblr Blog
Explore Tumblr blogs with no restrictions, modern design and the best experience.
Last Seen Tumblr Blogs


Fun Fact
If you dial 1-866-584-6757, you can leave an audio post for your followers.
Text

𝖈𝖊𝖒𝖊𝖙𝖗𝖞𝖘𝖌𝖎𝖗𝖑 ... 𝘢 21+ 𝘪𝘯𝘥𝘦𝘱𝘦𝘯𝘥𝘦𝘯𝘵 𝘳𝘰𝘭𝘦𝘱𝘭𝘢𝘺 𝘢𝘤𝘤𝘰𝘶𝘯𝘵 𝘥𝘦𝘥𝘪𝘤𝘢𝘵𝘦𝘥 𝘵𝘰 𝘵𝘩𝘦 𝘰𝘳𝘪𝘨𝘪𝘯𝘢𝘭 𝘤𝘩𝘢𝘳𝘢𝘤𝘵𝘦𝘳 𝘴𝘩𝘪𝘯 𝘴𝘢𝘴𝘩𝘢 𝘴𝘢𝘯𝘨-𝘮𝘪. 𝘢 𝘴𝘵𝘶𝘥𝘺 𝘪𝘯 𝘴𝘦𝘹, 𝘣𝘭𝘰𝘰𝘥, 𝘢𝘯𝘥 𝘥𝘺𝘪𝘯𝘨. 𝘧𝘦𝘢𝘵𝘶𝘳𝘪𝘯𝘨 𝘮𝘢𝘵𝘶𝘳𝘦, 𝘥𝘢𝘳𝘬 𝘢𝘯𝘥 𝘵𝘳𝘪𝘨𝘨𝘦𝘳𝘪𝘯𝘨 𝘵𝘩𝘦𝘮𝘦𝘴. 𝘱𝘦𝘯𝘯𝘦𝘥 𝘣𝘺 𝘤𝘰𝘳𝘯.
𝘤𝘢𝘳𝘳𝘥. 𝘤𝘰𝘥𝘦𝘹. 𝘱𝘭𝘰𝘵 𝘪𝘯𝘴𝘱𝘰. 𝘰𝘱𝘦𝘯𝘴.
2 notes
·
View notes
Note
Hi, in regards to the public api, will 3rd party apps be affected in any way by upcoming changes ? The one I use - multitab Tumblr - is primarily for mass media browsing, so when I click on the "via" blog username attached to a post , it takes me straight to the blog, instead of the previous reblog.
This is obviously unrelated to what anyone is saying about viewing parent reblogs, since that's for conversations, reading previous tags and removed comments. My use case is just for the sake of finding blogs that act as human driven curated collections of media interconnected by this "via" feature. So empty reblogs are incredibly useful to me. But I'm worried they'll get pushed under the rug if this whole system gets redesigned and plastered across the public api.
To make it clear, the user being able to traverse the entire stretch of the via chain isn't important for this particular use case. Simply one via per post - the blog which this post was reblogged from, the blog directly before. So the entire via chain still needs to exist for any via to exist - but it doesn't need to be readily available to traverse by tapping the via. Essentially, if the via acts as it currently does in multitab Tumblr, and the android app I believe - ie tapping it takes me to the via blog of the post I'm viewing, as opposed to the via reblog of the post I'm viewing - that would be perfect.
Maybe I'm asking all this a little too early since I'm still not fully sure how this new post redesign will work. But multitab Tumblr seems to have adopted all the new post and reblog interface redesigns that the default Tumblr app has employed so far. Reblogs are no longer displayed as stacked and indented username lists with lines like they used to be in the old school tumblr textpost screenshots that float around the internet. So the posts have already had a redesign from their original design. and I'm not sure if this new design will be steamrolled over the current one over there too, through API changes. I'm not sure if the multitab Tumblr developers chose to change it, or if they had no choice because the api changed.
Closing thoughts: if Tumblr does end up looking and acting like twitter, that's fine because I like twitter and its many clones, I think it's kinda nicely coded and I like the modularity of posts and threads and how everything links together to facilitate conversation. And it's intuitive, which is why it's popular. However, Tumblr is and always has been the best site for human driven content curation in my opinion, because of the via blog being easily accessible in every post that is a reblog. So by all means , make it flashy and modern and twitter-like, but please don't remove the via blog, at least keep it in the public api.
Tumblr has a media focus, an archive view, pagination by date and post count through the API.... All these things which separate it from twitter in that its focus isn't entirely on conversations, but also media and curation and mass browsing. Essentially Tumblr = twitter + are.na + magic (the via). Please keep it that way. It's such a sweetspot between all these things. And this new post redesign could make it even better if only the via stays.
I suppose it's a niche ask? But a lot of people I'm sure find new blogs they like through clicking on the via instead of the source. I really think it makes tumblr what it is for people. Some blogs are so interconnected and I can see that they've clearly used the via to find a new blog to reblog from, again and again. It just makes everything so interconnected. Thank you times a million. I hope everything is as clear as possible hence the lengthy ask.
hey, yeah, there are no planned changes with the public API. if anything, myself and others on staff are continuously campaigning to open it up more and more, it's just difficult to prioritize that among the many things we have to do. i agree with basically everything you've said here!
"Tumblr = twitter + are.na + magic" is a fun way to put it.
13 notes
·
View notes
Photo

✧ TEXTURES – A TUTORIAL BY EVANSYHELP.
In this (long and image-heavy) tutorial, I’ll be showing you how I make textures, as requested by a very kind anon. I use Photoshop CC 2019 but you should be able to replicate my methods on most editing software. Please like or reblog this post if you find this helpful!
Index.
Ethically Sourcing Your Images.
Finding The Right Image.
Making Your Texture.
Other Tricks I Use.
Quick Recap.
Making Textures Without Images: Speedrun.
Outro.
Ethically Sourcing Your Images.
I will be explaining a couple quick ways to make textures without any images at the end of the tutorial, but since my personal favourite way involves images and that’s specifically what the anon requested, that’s what the majority of the tutorial will be focused on.
The first step, naturally, is finding an image to use. My personal favourite site is Unsplash, but there are plenty of options out there.
What you need to keep in mind is what kind of license the images have. Unsplash is free for personal and commercial use with no attribution required, which makes it perfect for things like this. There are more sites like this in my free for commercial use masterlist (linked at the end of the post), but unless you’re using them in products you’re selling (like graphic commissions), the commercial aspect isn’t something you need to worry about. Just check the site/photographer’s rules to make sure you’re allowed to edit the images for personal use, and whether attribution (credit) is required.
Another important thing to keep in mind is that these sites typically never allow you to redistribute the images as they are. That means you can’t just go to Unsplash’s texture category, save the images without any changes, and reupload them in a texture pack on Tumblr. That’s stealing. We don’t do that.
Finding The Right Image.
Knowing what kinds of images will make good textures is a learning curve. My first couple texture packs are rough compared to what I make now, because I basically taught myself with no guidance and learned through trial and error. But with practice, I learned what worked and what didn’t.
You want your images to be HQ, either with no ‘subject’ (ie. a person) or with a large background. Higher contrast is better but not super necessary. You should hopefully be able to envision what kind of texture you want to make before you even touch the image.
Making Your Texture.
For the majority of the tutorial, this is the image I’ll be working with. Credits can be found in the link at the end of the post.

Open your canvas. You can make specialised textures, like 100px for icons or 540px for Tumblr graphics, but I personally prefer to make them large for versatility. I’m using 800px in this tutorial. Once you’ve chosen your size, upload your full-size image into the canvas. This is where the fun begins!
Drag the image around into a nice position. Or use Edit > Transform to rotate, flip, and warp the image in different ways. Or use Edit > Free Transform (Ctrl+T) to change the size or the angle more precisely. Or probably some combination of all three! With Free Transform, make sure this aspect ratio anchor is selected so you don’t butcher the quality of the image, unless you’re warping it intentionally:

This is all very individual to each image you use. You might want to flip one, shrink another, put another at a 30 degree angle. Just experiment until you end up with something you think would look awesome as a texture. For the sake of providing a good example, I flipped this image vertically, shrunk it to 80% its original size, and rotated it until it looked like the smoke/cloud was coming from the bottom right corner. This is what we have:
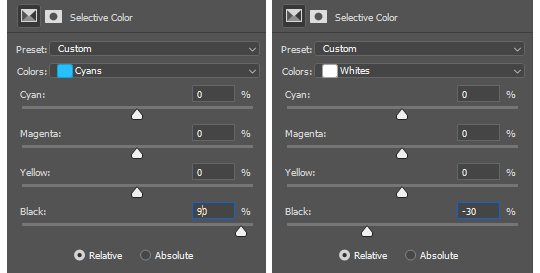
Then we move onto enhancing. Textures work best when there’s a lot of contrast because it’s easier to manipulate the blending modes. So if your image isn’t already high contrast, these adjustment layers (Brightness/Contrast, Levels, and Selective Colour) are your new best friends:

If you don’t see this on your Photoshop, go to Window > Adjustments and it should pop up. Again, just experiment, because different images will require different things. Essentially, you want to make the darks darker and the lights lighter. Something I like to do is add a Selective Colour layer and use the Black slider. Pick out the primary colour of the image, and then Whites, in the drop-down menu, and move the bottom slider (left to lighten, right to darken) until you’re satisfied. Like so:
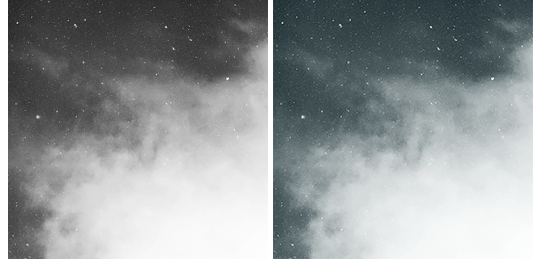
So with those Selective Colour settings and the following Levels settings, here’s the before and after of my image.


Much better contrast! If you want to end here, you can, but I personally prefer grayscale textures a lot of the time because it makes it more versatile. Instead of being forced to make a blue graphic because this image is blue, I can make any colour graphic I want with one simple black and white Gradient layer. Photoshop does have a default Black & White adjustment feature, but I prefer using Gradients.
Pro tip: if your image doesn’t have a pure black, you can keep the darkest parts of your image dark by using the left slider, shown below.


A lot of the time, I’ll also decrease the opacity of that Gradient layer, to somewhere between 80% and 95%, so just a hint of the original colour comes through. This gives it more dimension in my opinion, while still keeping it mostly neutral. Here’s 100% vs. 85%:
You may find that you want to add a little more contrast after. With this texture, I decided to grab another Selective Colour layer, pick ‘Black’ in the drop-down menu, and pull the Black slider up to +40. I also settled on 95% opacity for the Gradient. And here’s the final product!

Other Tricks I Use.
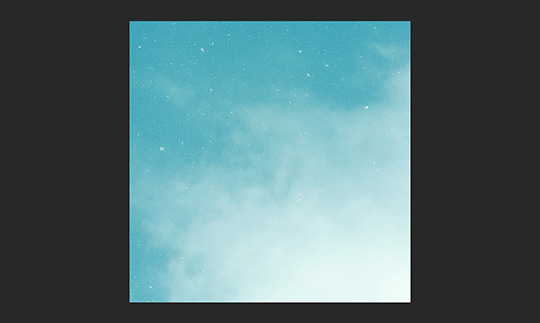
That covers how I make a lot of my easier textures, but here’s a quick run-through of other, slightly more complex tricks. I’ll be working with this image (again, credit at the end of the post):
This, of course, is not as obviously texture-worthy as the previous example, but I love textures with strong lines, so here’s how the magic happens! I wanted to get rid of the detail on the bottom half, so I used the Polygonal Lasso tool to select it:

Then I used the eyedropper tool (the 4th symbol under the polygonal lasso in the image above) to select the blue of the sky and, on a new layer, painted that selection completely blue. I decreased the opacity to 90% just so it wasn’t a total block colour, but not enough that you can really see the lines. I repeated this process for the sky, so it looked more consistent with the bottom half.
Then, using the eyedropper tool again and making a new layer for every colour, I went in with a small soft paintbrush and painted out the harsh vertical lines on each segment of the stripes. I didn’t want to make them totally perfect, but I painted over the bulkiest interruptions.
I added a black and white Gradient layer, using the slider tool I showed you before to darken the darks and lighten the lights, and decreased it to 50% so that it wasn’t totally black and white but still more neutral than the original. Here’s the result:
Another fun way to shake things up, which unfortunately will require Photoshop (CS6 should be fine, not sure about earlier versions), is the Filter Gallery. Go to Filter > Filter Gallery, and you’ll find a TON of effects that change your image drastically. Most of the default settings are nightmarish, but you can play around with the settings panel on the right.

Here’s just a few results that are possible with the Filter Gallery, labelled for convenience. You can view the HQ versions in the link at the end of the post.

Quick Recap.
So you don’t have to reread this obnoxiously large tutorial every time you want to reference it in the future:
Choose a HQ image.
Resize, rotate, flip, and/or warp.
Enhance the contrast.
Black and white!
Paint over problem areas!
Filter > Filter Gallery.
Making Textures Without Images: Speedrun.
We’re almost done! There are some tools built directly into Photoshop that can allow you to make textures completely from scratch, and I’ll briefly cover my favourites here.
The first is pattern fill layers. I spent too many years not appreciating the patterns feature in Photoshop, but they’re great. Go to Layer > New Fill Layer > Pattern, click ‘OK’ on the box that pops up, and another box will pop up to let you choose your pattern.
By themselves, they are UGLY. It can take a while to figure out how to use them. But if you change the scale, change the blending mode, and change the opacity, you have thousands of textures at your fingertips. And if you add two or three together? Billions of possibilities. I can do a more in-depth tutorial on patterns if y’all are interested, but here’s two examples I just whipped up in a matter of minutes, using two patterns on each:

The next feature is gradient fill layers, and the gradient tool. Go to Layer > New Fill Layer > Gradient… to select a gradient (or make your own!) and an angle, OR use the gradient tool (featured below) to drag the gradient across your canvas manually. On its own, boom, that’s a gradient texture. Paired with a pattern or put through the Filter Gallery? Even better!


The last is brushes. Brushes can be great for textures because there are so many kinds. You want to make a paint splatter texture? Paint splatter brush sets are everywhere! You want to make a smoky texture? You can get brushes that look like smoke! Smudged? Scratchy? Grunge? Halftone? Light leaks? Torn paper? Brushes have your back.

With all of these features (and things like actions, too!), your saving grace is going to be this little cog wheel shown below, and the list you’ll find under the Reset/Save/Load section. There are SO many more options built directly into Photoshop that you don’t even see right away, because you have to add them manually from this little cog wheel.

And you can download countless more patterns, gradients, and brushes from sites like Brusheezy and DeviantART. A couple tutorials on downloading and installing them can be found in the link at the end of the post, but remember, download these things ethically. If you want to sell products that use a custom brush, it’s your responsibility to find brushes that are free for commercial use. If you don’t want to credit the creator, it’s your responsibility to find resources that don’t require attribution.
Outro.
I think that’s everything, guys! If you found this tutorial helpful or otherwise enjoy my content, please consider supporting me on Ko-fi! I offer exclusive rewards, like custom graphics, to everyone who donates.
Due to Tumblr’s latest rules about links, you can find the credits list, the promised bonus tutorials, other important links, and the full-size HQ versions of the textures made in this tutorial over here.
Thanks for reading!
#rph#allresources#completeresources#itsphotoshop#chaoticresources#photoshop tutorial#photoshop resources#photoshop help#ps resources#ps tutorial#eh#eh: tutorial#tutorial#ps help#texture#*100#*250
371 notes
·
View notes
Text
Hockey-Playing Trump Supporters: A Sourced List in Progress
This post is the actual list, unlike my previous post which, as I should have said more clearly, was meant more as a signal boost/information gathering sort of thing. Thanks to everyone who’s helped so far!
IMPORTANT: This list is still in progress, and will be updated consistently. Always trust the version of the post that you see when you click back to my blog, not older/outdated versions you might see from reblogs or comments. If you have newer/better info please send it to me here, at my sideblog, or on this anonymous SurveyMonkey poll, with links or screenshots included if at all possible. Thanks a million to @highstik , who gave me tons of great info, as well as everyone else who’s chipped in!
I have erred on the side of caution in putting people on this list. I don’t want this to be a witch hunt of people whose political beliefs are different from mine-- I think there’s a lot of space to disagree on political issues, but loudly supporting Donald Trump in spite of his racist, xenophobic, misogynist, Islamophobic, ableist views just because his policies will benefit you personally is not something that’s acceptable to me. However, to avoid casting the net too wide I’m not going to include people who have solely liked pro-Trump posts or followed pro-Trump people-- those are both things that people could do for a variety of reasons, and I think it’s risky to make assumptions about people’s political beliefs based on them. The same holds true for people whose spouses support Trump.
I’m also not going to include people who I can’t find receipts for on the main list-- if someone was cowed enough to delete pro-Trump stuff because of public outcry I have no way of knowing whether they had a genuine change of heart or they just didn’t want to deal with the fallout, so again I’m erring on the side of caution. Here’s the TL;DR version of the list of definite Trump supporters; links, sources, and borderline supporters/mythbusted supporters are below the cut.
TL;DR list, sorted alphabetically by last name: Logan Brown [OHL], Tony DeAngelo [AHL], Max Domi [ARI], Jack Eichel [BUF], Nathan Gerbe [SNL], Scott Hartnell [CBJ], Robin Lehner [BUF], Rebecca Russo [NWHL], Teemu Selanne, Kelli Stack [NWHL], James Wisniewski [AHL]
People I’ve seen on unsourced lists who I’m still researching (please send links if you have them!): Mark Arcobello, Laurent Broissoit, Alex Debrincat, Patrick Eaves, Alex Goligoski, Ryan Miller, Derek Ryan, Cam Talbot, James Van Riemsdyk
Active NHL Players
Max Domi [ARI]: "Game day socks [with Trump’s face on them]. Make America Great again." Check the second source for another family member saying that it was “a joke,” and that Tie and Max “don't know anything about politics nor do they care cuz we are Canadian.” His snapchat is also apparently pretty Trumpy according to one anon (x), (x)
Jack Eichel [BUF]: [RT] “I'm big on "to each his own" if you disagree that's completely fine.But whoever is President I respect and root for because he is our leader” (x), various gross likes
Scott Hartnell [CBJ]: “ Mr. Trump-your plane is landing in 45 mins in Columbus and some of the #CBJ fellas would love to meet ya!! #legend (x)
Eddie Lack [CAR]: I don’t have a great translation of it, but he basically said that he wouldn’t have wanted to vote for either candidate, but would have “leaned towards” voting for Trump (x)
Robin Lehner [BUF]: wore a goalie mask with Trump’s name/face on it, expressed support for his anti-immigrant policies (x), (x)
NWHL/CWHL:
Dru Burns, CWHL, Boston Blades: she retweets a lot of openly pro-Trump stuff on Twitter, like this (x)
Rebecca Russo, NWHL, NYRivs: wore a Trump shirt on Instagram (x)
Kelli Stack, NWHL, CTWhale: “First Lady Melania Trump sounds better than First Lady Bill Clinton,” blocked someone for calling her out (x)
Former Players/Non-NHL Men:
Logan Brown, OHL: [RT] “TODAY WE MAKE AMERICA GREAT AGAIN”, various awful likes (x)
Tony DeAngelo, AHL: “Tough time streaming it on the plane but it was nice to get to watch the inauguration! Loved it! #MAGA,” also his entire social media presence basically (x)
Nathan Gerbe, Swiss National League: “The people have spoken [US flag]” (x), MAGA sign on his dogs’ Instagram (x)
Brendan Lemieux, AHL: [RT] “TODAY WE MAKE AMERICA GREAT AGAIN” (x)
Tyler Parsons, OHL: “TODAY WE MAKE AMERICA GREAT AGAIN” (x)
Steve Racine, ECHL: posted this picture of himself with a cutout of Trump with the caption “Proud to be an American” (x)
Teemu Selanne: "Trump was the better option for America right now. He was the lesser of two evils." (x)
James Wisniewski, AHL: “Congrats, Mr. President!! Bring your broom cuz, it’s a mess!” (x) Players who may be quiet Trump supporters, or who don’t meet the threshold for the main list but may exceed your threshold for awfulness:
Brent Burns [SJS]: I said this list wouldn’t include people who are just following shitty people, and he hasn’t publicly tweeted about politics, but I’m making an exception for him because he follows basically no liberals and every horrible conservative in the book, including Trump, Kellyanne Conway, Tomi Lahren, Hannity, O’Reilly, Pence, and several others
Ian Cole [PIT]: has liked at least some shitty things on Twitter (one vaguely pro-Trump, the others just nasty conservative stuff), retweeted a mealy-mouthed “we should all respect the new president” thing but then deleted it (x) Erik Johnson [COL]: [RT] “FORD INVESTS IN AMERICA: Cancels 1.6B Mexico factory; $700M to Michigan”, liked a Trump tweet, follows Trump (x), (x)
Seth Jones [CBJ]: follows Trump and Tomi Lahren, and liked an IG post that said “I’m voting Trump/Pence” (x)
TJ Oshie [WSH]: from an interview with Modern Luxury DC, “Oshie has already played Trump National and Congressional Country Club. "I felt like a superfan, taking pictures at the clubhouse," he says, laughing.” (x) [Note: I moved Oshie down to this part of the list because that article is from November 2015, before Trump really ramped up the awfulness. Feel free to disagree!]
Tyler Seguin [DAL]: said he would like to have pizza with Donald Trump (to talk about Tom Brady???), but I’m sort of inclined to think it’s more because he’s a moron than because he holds any actual political opinions. Watch the vid and decide for yourself, I suppose. (x) He also follows Tomi Lahren on Twitter.
Alex Tuch: liked this post (x), follows Trump, dressed as a border patrol agent for Halloween
Ryan Whitney: “The 45th president in our nations history will be sworn into office and I will support him because he is our leader and I love our country.” (x), (x) People who have appeared on Tumblr pro-Trump lists for whom I’ve found no evidence or questionable/minimal evidence (e.g. following Trump with no other political indicators, liking but not sharing pro-Trump stuff): -Jordie Benn (liked an IG post that said “"Yesterday made history and so did I staying up until 3 am for politics. Our nation has spoken: President Donald J. Trump #MakeAmericaGreatAgain #Trump" (x)) -Nick Bonino -Robert Bortuzzo (follows Trump) -Tyler Bozak (liked Mark Cuban’s tweet that said "We all need to give President-Elect Trump a chance. Support the good. Lobby against what we disagree on. No one is bigger than us all." (x)) -Courtney Burke [NWHL] (liked some anti-Kaepernick/BLM stuff, but nothing explicitly Trumpy) -Andrew Copp (liked a transphobic Tomi Lahren tweet (x)) -Brandon Dubinsky (follows Trump) -Aaron Ekblad (follows Trump, stayed at a Trump Hotel? That’s all I got, folks) -Micheal Ferland -Thomas Greiss (liked but then unliked a post likening Hillary Clinton to Hitler, per this German news article (x)) -Noah Hanifin (is probably someone I disagree with on a fundamental level, but has kept politics in his likes) -Stephen Johns (follows Trump, one person told me he retweeted a pro-Trump election day thing but has since deleted it) -Seth Jones (follows Trump, Tomi Lahren) -Hillary Knight (I’m getting conflicting reports about her having liked/shared pro-Trump stuff, but if there was anything there she’s since deleted it, and she was also photographed with a pro-HRC thing, so make of it what you will) -Auston Matthews (liked Ryan Whitney’s "I'm big on "to each his own" if you disagree that's completely fine. But whoever is President I respect and root for because he is our leader” (x) ETA: more recently liked this post criticizing Trump’s immigration policies (x)) -James Neal (follows Trump) -Alex Nylander (liked this post (x)) -Brett Pesce (follows Tomi Lahren, FOX News) -Dylan Strome (followed but then unfollowed within a few days several Trumpy people on Twitter, according to one anon person) -Ryan Strome (follows Trump) - Matthew Tkachuk (Liked a tweet that said “there’s one Donald Trump viewpoint we can all agree with,” but the vid in question was Trump talking about Zoolander, so I don’t think this counts as a political statement)
397 notes
·
View notes