#python – How do I get the full path of the current files directory?
Explore tagged Tumblr posts
Visit Tumblr Blog
Explore Tumblr blogs with no restrictions, modern design and the best experience.
Last Seen Tumblr Blogs


Fun Fact
Users from the US are the majority of Tumblr visitors.
Text
python – How do I get the full path of the current files directory?
The special variable __file__ contains the path to the current file. From that we can get the directory using either Pathlib or the os.path module.
Python 3
For the directory of the script being run:
0 notes
Text
Version 335
youtube
windows
zip
exe
os x
app
linux
tar.gz
source
tar.gz
When I first made this release, Github's file upload was not working right, and I used Mediafire instead. Github is now working and I have updated the links above.
I had a great four weeks updating hydrus to python 3. The update went well, and the releases today are ready for all users, but there are special update instructions just for this week.
python 3
The client and server now run completely and exclusively on python 3, updating from python 2. The new version has a variety of benefits, mostly in better unicode vs. data handling, but for hydrus it also runs a little faster, uses less idle CPU and significantly less memory, and has a little less ui-jank.
I am pleased with the update. None of it was extremely difficult, but there was a lot to do, a few headaches, and some new stuff to learn. I am glad I took the four weeks. I also appreciate the users who tested the preview releases in the past couple of weeks.
I have squashed a ton of little bugs, and everything normal like file downloading and browsing seems to work completely fine, but there are likely a couple of small issues still out there. If a dialog breaks for you and you get some popups about some datatype being mishandled, please send it to me and I'll get it fixed up for v336!
some notes
Unfortunately, for technically difficult reasons, I could not compile 'debug' versions of the executables, so these are gone this week. I will revisit this, but the original debug builds were a bit hacky and may no longer be practically possible in py3.
Also, I am not certain if the database menu's 'set a password' will have kept correct password data for unusual keyboards, so if you use this function, the client will, just for this v335, forgive incorrect passwords! If this happens to you, the client will give you a popup with more information and tell you how to try to fix it. I would appreciate feedback here, if you encounter it.
Due to a natural library update unrelated to py3, your hydrus sessions will likely be wiped (this also happened to some running-from-source users a little while ago), which means Hydrus will have to re-login to any sites you have logins set up for. If you have special cookies you need to save or re-import from your browser, get set up before you update!
Now, because py2 and py3 are incompatible, the new version cannot be run in a folder that still has old .dll files hanging around. Please follow the following to update:
update instructions for windows installer
Just for this week, I have added a routine to the installer to delete the old files (but obviously saving your db directory where your database and files are stored!), so you shouldn't have to do anything. I nonetheless recommend you still make a backup before you update. Backups are great, and if you don't make one yet, this week is a great time to start.
If you are a particularly long-time user and the installer fails to clear everything out, you may need to delete the old files yourself, like the extract users will have to:
update instructions for windows and linux extract
You will have to perform a clean install, which means deleting everything in your install folder except the db directory before extracting as normal. This is simple, but do not get it wrong. Do not delete your db directory--this is where your database and files are stored.
As always, if you have a recent backup, you don't have to worry about any possible accident, so make sure you have one.
update instructions for os x
Due to technical limitations, the OS X release is now App only. Furthermore, this App release will no longer store the db inside itself! The default location for your db is now ~/Library/Hydrus (i.e. /Users/[you]/Library/Hydrus). This also means that the future update process will be as simple as replacing the existing Hydrus Network App in Applications, just one action. I apologise that this important change has taken so long to come out, but we got there in the end.
If you are updating this week, you will need to make the Hydrus folder under your Library yourself and move your existing db there so the new Hydrus can pick up where you left off. If you use the tar.gz, you'll be moving the contents of your install_dir/db, and if you use the App, you'll want to right-click->Show Package Contents on your old py2 App and navigate to Hydrus Network/Contents/MacOS/db. You want the contents of db, not the db folder itself, so the path to your new client.db file should be ~/Library/Hydrus/client.db, for instance.
If you cannot see your Library folder, check this: https://www.macworld.com/article/2057221/how-to-view-the-library-folder-in-mavericks.html
If you have trouble with this, please let me know and we'll figure it out together.
update instructions for running from source
You'll need to make a new py3 venv and make new shortcuts. I now use pycryptodome instead of pycrypto and dropped some libraries, so I recommend you go to the 'running from source' help page again and just paste the new pip line(s) to get set up.
I don't think 3.4 will work, but 3.5, 3.6, and 3.7 all seem ok. Obviously contact me if you run into trouble. I'm also interested in success stories!
full list
important:
hydrus now runs completely and exclusively on python 3!
for users who are updating, the client has special install instructions for just this week:
if you are a windows or linux user who extracts to install, you will have to delete your old install's files (but keep your db folder!!!) before installing/extracting the new version so there are no 2/3 dll/so conflicts (don't delete your db folder!)
if you use the windows installer to install, this v335 installer will do the clean install for you! there is absolutely no way this could go wrong, so no need to make a backup beforehand :^)
if you are an os x user, I am now only releasing the client in the app. furthermore, the default app db location is now ~/Library/Hydrus (i.e. /Users/[you]/Library/Hydrus). you will have to move your existing db to this location to update, and thereafter you'll just be replacing the app in Applications!
if you try to boot a non-clean mixed 2/3 install, the client will try to recognise that and give an error and dump out
please check the release post for more detailed instructions here
.
semi-important:
the db password feature may be one-time broken for unusual keyboard languages, so failures this version will be forgiven with an appropriate error message explaining the situation. feedback from чики брики lads appreciated
I may have fixed the issue some linux/os x users were having launching external programs, including OS ffmpeg (it was a child process environment issue related to pyinstaller)
although I did most of my devving here on py 3.6, the client seems to run ok on 3.5. I doubt 3.4 will do it, if you mean to run from source
I moved from the old pycrypto to the new pycryptodome, so users who run from source will want to get this. I also dropped some libraries
.
misc bug fixes:
fixed the 'load one of the default options' button on manage tag import options when a set of default options is orphaned by a deleted url class
removed some popup flicker related to long error messages
fixed some parsing testing ui error handling
cleared up some bad text ctrl event handling that could sometimes cause a recursive loop
listctrls should now sort text that includes numbers in the human-friendly 2 < 10 fashion
cleaned up some bad external process calling code and improved how child process environment is set up
finally figured out the basic problem of a long-time nested dialog event handling error that could sometimes freeze the ui. I may have fixed it in one case and will keep working on this
.
boring details:
ran 2to3 to auto-convert what could be done
updated environment to python 3
went over a whole ton of unicode encoding/decoding manually to update it to python 3
removed all the old tobytestring/tounicode calls in favour of new python 3 handling
fixed all the file io to do bytes/str as appropriate
corrected a bunch of / vs // int/float stuff
fixed up twisted, which has some str/bytes stuff going on
fixed all the listctrls to deal with column sorting None values amongst ints/strs
fixed png export/import, which had some fun bytes/bytearray/int/str issues
updated the swf header parsing code to py3 (more str/bytes stuff)
misc float/int fixes
fixed up some http.cookies handling, which has changed in py3
improved some ancient loopback connection code that was only really checking to see if ports were in use
cleaned up a bunch of now-invalid parameter tuples that 2to3 helpfully marked
numerous misc other refactoring and so on
updated the new network engine to now decode non-utf-8 responses correctly based on actual response header
removed some old py2 manual http multipart code
removed the old py2 'matroska or webm' parsing py, replacing it with some direct ffmpeg format inspection
replaced all % formatting with the new .format system. I will slowly move to this rather than the current endless concatenation mess
deleted some more misc old code
tightened up some spammy network error reporting
converted all /r/n to /n in my environment project, ha ha ha
the ui seems to better support rarer unicode characters like 🔊
updated some of the install/update/backup help for all this, and some misc other stuff as well
fixed misc bugs
next week
A lot of small stuff piled up over the holiday. I will spend a week or two trying to catch up and also planning out the client API, which will be my first big job of the year.
I hope you had a good Christmas and New Year. Mine were great, and I am looking forward to 2019. Let's keep pushing and see if we can do some fun stuff. Thank you for your support!
1 note
·
View note
Text
Backup Tumblr Blogs - 2017
There are a lot of methods here. I’ve used the wordpress method but with that you get EVERYTHING after days of waiting with not much control. The method that gives the most control (and is so far the fastest) is tumblr-utils by bbolli on github. It can be daunting for those who aren’t familiar with command line, however. They do have a Windows guide (tumblr_backup_for_beginners) which walks you through step by step on setting it up and getting it started.
Below is my version of the guide with some helpful tips not mentioned in the original guide. Under read more for length.
1. Install Python
Key step do NOT skip, even if you already have python you may be using an outdated version and it requires 2.6 or 2.7 to run.) If you are using Windows, download the x86 MSI installer (unless you KNOW you have a x64 system that can handle that version. If you’re unsure, stick with x86)..
You may need to check “Copy Python” when installing in Windows or step 4 will not work.
Note: there are downloads for Mac OS. I don’t have a Mac to test this on, but it should work just as well as on Windows.
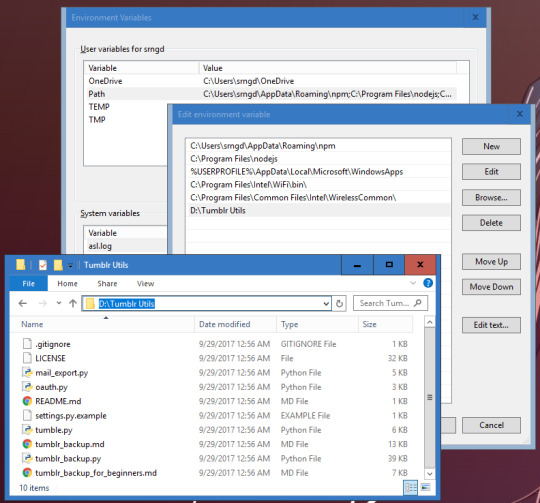
2. Download tumblr-utils.zip
Extract it somewhere safe that you know will not accidentally delete it. Do NOT extract it to Desktop or Downloads as directed in the original guide, especially if you like to clean your download folder every now and then. I installed it on my D:/ drive but you can probably get away with putting it in your Documents somewhere. Just remember where you put it.
3. Set up the PATH variable (optional but recommended)
The reason we set up the PATH is to make it more convenient to run the backup code in command line. If the path isn’t set, you have to type in the full address to the script file every time you run it. With the path, all you need to do is specify the file itself and your computer will know where it’s at.
If you’re running this on a Mac, you don’t need to specify PATH (although you can) All you need to do is drop tumblr_backup.py into /usr/local/bin using Finder and it should do the same thing.
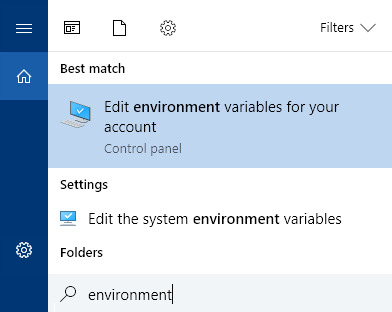
For Windows 10, use the taskbar search “environment” and click on “Edit the system environment variables”. Click on “Path” and click “Edit...” add a New variable and type in the path to wherever you extracted tumblr-utils.
Note: You can easily grab the url path from windows explorer by clicking on the address bar and copy/pasting.
If you’re not running Windows 8 or 10, there’s a guide here for getting to the PATH environment variable. For Windows 7 / Vista / XP, make sure you separate existing information in the PATH from your new address with a semicolon. (see the first window in the screenshot above).
4. Create Your Backup Folder
I would suggest making a new folder called “Tumblr Backups” on a separate drive from C (D, etc, or even better on a flashdrive or external), but feel free to put it somewhere you have easy access to or will remember well (such as in your My Document’s folder). Again you’ll want to remember the address to it and how to get there from windows explorer. You can always move or copy this folder somewhere else after you’ve backed it up.
5. Navigate to Tumblr Backups in Command Line
For the next step we need to use Command Prompt (or Terminal on Mac/Linux). To open up Command Prompt in Windows 10 you can simply hit the Windows button + X and then C for Command prompt or search for it via taskbar (Here is a guide for opening it on other Windows versions). On a Mac, you open Terminal with Ctrl+Alt+T. You shouldn’t need admin privileges for what you’re about to do. In fact, it’s probably better if you don’t.
When you open command prompt in Windows it will be set to C:\Users\[your username] (the same place Windows Explorer automatically opens to). We want to navigate to where you want to store your backup. If it’s in Documents, then type:
cd Documents/Tumblr Backups
hit enter and the prompt (the text in front of your cursor) will change to that directory. If you want to go up a folder type:
cd ../
If you set it up on a different drive in Windows, type the drive letter (capitalized), followed by a colon and hit enter and then change directory using cd

On a Mac, you also use the cd command to change directory in Terminal, but to change drives, all you need to do is type:
cd /Volumes/
ls
The ls command (LS lowercase) lists all the files and folders within the directory you’ve currently navigated to. The /Volumes/ directory is where all your drives are located and you can navigate from there to your Tumblr Backups folder. NOTE use quotation marks around files/folders that have spaces!
cd ‘Tumblr Backups’
6. Run tumblr_backup.py
Once you’re in your Tumblr Backups directory, you’re ready to backup your posts!
If you want a complete backup of your blog as-is, type the following (replacing yourblog with the blog you want to backup) and hit enter:
tumblr_backup.py yourblog
It may take some time, but even for 18,000+ posts it should take no longer than 30 minutes depending on connection speed. On the next line it will give you a real-time update of how far it is to completing the backup. If it is interrupted, it will process what it’s pulled so far and generate a backup folder anyway. Note that you can backup multiple blogs at the same time by adding more than one blog name at the end, separated by spaces.
Don’t worry about pulling posts twice or accidentally doing the same command. It won’t add any duplicates.
This also works for side blogs and for backing up blogs run by others that you wish to keep in case it gets purged or leaves Tumblr.
If you only want your own content:
tumblr_backup.py --no-reblog yourblog
--no-reblog (that’s two dashes in front) tells it to only backup posts that you’ve made yourself, including reblogs where you’ve added new content.
If you’re only interested in backing up photo posts:
tumblr_backup.py -T photo yourblog
-T photo tells the script to only backup photo posts. Make sure to capitalize the T!
If you only want to backup posts with specific tags:
tumblr_backup.py -t tag1,another_tag_with_spaces yourblog
Separate each tag with a comma. Tags with spaces use underscores instead. Make sure the -t is lowercase!
If you have an unstable internet connection, break it up into multiple requests.
tumblr_backup.py -n 100 yourblog
tumblr_backup.py -n 100 -s 100 yourblog
tumblr_backup.py -n 100 -s 200 yourblog
-n 100 tells it to only count 100 posts, starting from the last post you made. -s 100 tells it to skip the first 100 posts or checks (which are the last posts you made).
You can find many more flag filters in the documentation that can help you fine tune your backup depending on what you want to keep and how you want the backup to be displayed. You can also get information on these options by running tumblr_backup.py --help (with two dashes).
If you are getting image missing errors, don’t worry. It’s usually just avatar images of deleted blogs that are no longer accessible.
If you get 503 messages and aren’t pulling posts, it could be you’re requesting too frequently and the server locked you out. I’ve had that happen with my stats project while testing. In that case you just have to walk away for a bit and wait it out Double-check that you spelled the blog name you want to pull from right and maybe try again in a couple hours or so.
7. Profit

If you look into Tumblr Backups afterwards, you should find a folder with your blog name. In it is a website hierarchy with each post in the posts folder modified by the originally posted date with all of your tags included. Images are in media, monthly archives in archive, and there is an index.html that allows you to navigate and view everything via your favorite browser.

If you want to use a custom CSS file, call it custom.css, put it in the backup folder and do a complete backup. This forces the pages to all use the new styling.
The CSS of your blog’s original theme css and avatar is always saved in theme/style.css.. Note that it does not save any javascript you may have had on your theme and you should back that up separately. This also does NOT backup pages.
801 notes
·
View notes
Text
Sdk For Mac Download

The 13.3.0 version of Parallels Virtualization SDK for Mac is provided as a free download on our software library. The application lies within Developer Tools, more precisely IDE. This free Mac app is an intellectual property of Parallels International GmbH.
Software Description: Hikvision Card Windows SDK V6.0 supports to develop software for DS-4200, DS-4100 & DS-4000 series card under the Windows environment. It contains SDK.
Bonjour, also known as zero-configuration networking, enables automatic discovery of devices and services on a local network using industry standard IP protocols. Bonjour makes it easy to discover, publish, and resolve network services with a sophisticated, easy-to-use programming interface that is accessible from Cocoa, Ruby, Python, and other languages.
The Dart SDK has the libraries and command-line tools that you need to develop Dart command-line, server, and non-Flutter web apps. For details, see the Dart SDK overview. As of Flutter 1.21, the Flutter SDK includes the full Dart SDK. So if you have Flutter installed, you might not need to explicitly download the Dart SDK.
-->
In this article, you'll learn how to install .NET Core on macOS. .NET Core is made up of the runtime and the SDK. The runtime is used to run a .NET Core app and may or may not be included with the app. The SDK is used to create .NET Core apps and libraries. The .NET Core runtime is always installed with the SDK.
The latest version of .NET Core is 3.1.
Supported releases
The following table is a list of currently supported .NET Core releases and the versions of macOS they're supported on. These versions remain supported either the version of .NET Core reaches end-of-support.
A ✔️ indicates that the version of .NET Core is still supported.
A ❌ indicates that the version of .NET Core isn't supported.
Operating System.NET Core 2.1.NET Core 3.1.NET 5 PreviewmacOS 10.15 'Catalina'✔️ 2.1 (Release notes)✔️ 3.1 (Release notes)✔️ 5.0 Preview (Release notes)macOS 10.14 'Mojave'✔️ 2.1 (Release notes)✔️ 3.1 (Release notes)✔️ 5.0 Preview (Release notes)macOS 10.13 'High Sierra'✔️ 2.1 (Release notes)✔️ 3.1 (Release notes)✔️ 5.0 Preview (Release notes)macOS 10.12 'Sierra'✔️ 2.1 (Release notes)❌ 3.1 (Release notes)❌ 5.0 Preview (Release notes)

Unsupported releases
The following versions of .NET Core are ❌ no longer supported. The downloads for these still remain published:
3.0 (Release notes)
2.2 (Release notes)
2.0 (Release notes)
Runtime information
The runtime is used to run apps created with .NET Core. When an app author publishes an app, they can include the runtime with their app. If they don't include the runtime, it's up to the user to install the runtime.
There are three different runtimes you can install on macOS:
ASP.NET Core runtime Microsoft expression media for mac. Runs ASP.NET Core apps. Includes the .NET Core runtime.
.NET Core runtime This runtime is the simplest runtime and doesn't include any other runtime. It's highly recommended that you install ASP.NET Core runtime for the best compatibility with .NET Core apps.
SDK information
The SDK is used to build and publish .NET Core apps and libraries. Installing the SDK includes both runtimes: ASP.NET Core and .NET Core.
Dependencies
.NET Core is supported on the following macOS releases:
.NET Core VersionmacOSArchitectures3.1High Sierra (10.13+)x64More information3.0High Sierra (10.13+)x64More information2.2Sierra (10.12+)x64More information2.1Sierra (10.12+)x64More information

Beginning with macOS Catalina (version 10.15), all software built after June 1, 2019 that is distributed with Developer ID, must be notarized. This requirement applies to the .NET Core runtime, .NET Core SDK, and software created with .NET Core.
The installers for .NET Core (both runtime and SDK) versions 3.1, 3.0, and 2.1, have been notarized since February 18, 2020. Prior released versions aren't notarized. If you run a non-notarized app, you'll see an error similar to the following image:
For more information about how enforced-notarization affects .NET Core (and your .NET Core apps), see Working with macOS Catalina Notarization.
libgdiplus

.NET Core applications that use the System.Drawing.Common assembly require libgdiplus to be installed.
An easy way to obtain libgdiplus is by using the Homebrew ('brew') package manager for macOS. After installing brew, install libgdiplus by executing the following commands at a Terminal (command) prompt:
Install with an installer
Android Sdk Download Mac
macOS has standalone installers that can be used to install the .NET Core 3.1 SDK:
Download and manually install
As an alternative to the macOS installers for .NET Core, you can download and manually install the SDK and runtime. Manual install is usually performed as part of continuous integration testing. For a developer or user, it's generally better to use an installer.
If you install .NET Core SDK, you don't need to install the corresponding runtime. First, download a binary release for either the SDK or the runtime from one of the following sites:
Quick tip about Basilisk II if you do not have a real old Mac: it even reads high density Mac floppy disks using a normal PC floppy drive! I salvaged many old files using it while 5 different Windows apps failed at the task. I highly recommend backing up all your floppy disks using Basilisk II before it's too late! Non-profit organization serving the online community by providing old versions of various programs. Download latest (newest) and older versions of free software. OldApps is the largest software archive. Safe and fast downloads for Windows, Mac and Linux apps. If you’re looking for old Mac software, there are a number of sites on the interwebs that are worth checking out: Macintosh Garden – great site for old Mac games, system software and abandoned applications Rescue My Classic Mac – old Macintosh boot floppies and applications available for purchase Macintosh Repository – a sanctuary for old software of the classic Mac OS era. https://fancytravelerkryptonite.tumblr.com/post/642762066932924417/old-app-for-mac. OldVersion.com provides free. software downloads for old versions of programs, drivers and games. So why not downgrade to the version you love? Because newer is not always bett.
✔️ .NET 5.0 preview downloads
✔️ .NET Core 3.1 downloads
✔️ .NET Core 2.1 downloads
Next, extract the downloaded file and use the export command to set variables used by .NET Core and then ensure .NET Core is in PATH.

To extract the runtime and make the .NET Core CLI commands available at the terminal, first download a .NET Core binary release. Then, open a terminal and run the following commands from the directory where the file was saved. The archive file name may be different depending on what you downloaded.
Use the following command to extract the runtime:
Use the following command to extract the SDK:
Tip
The preceding export commands only make the .NET Core CLI commands available for the terminal session in which it was run.
You can edit your shell profile to permanently add the commands. There are a number of different shells available for Linux and each has a different profile. For example:
Bash Shell: ~/.bash_profile, ~/.bashrc
Korn Shell: ~/.kshrc or .profile
Z Shell: ~/.zshrc or .zprofile
Edit the appropriate source file for your shell and add :$HOME/dotnet to the end of the existing PATH statement. If no PATH statement is included, add a new line with export PATH=$PATH:$HOME/dotnet.
Also, add export DOTNET_ROOT=$HOME/dotnet to the end of the file.
This approach lets you install different versions into separate locations and choose explicitly which one to use by which application.
Install with Visual Studio for Mac
Visual Studio for Mac installs the .NET Core SDK when the .NET Core workload is selected. To get started with .NET Core development on macOS, see Install Visual Studio 2019 for Mac. For the latest release, .NET Core 3.1, you must use the Visual Studio for Mac 8.4.
Install alongside Visual Studio Code
Visual Studio Code is a powerful and lightweight source code editor that runs on your desktop. Visual Studio Code is available for Windows, macOS, and Linux.
While Visual Studio Code doesn't come with an automated .NET Core installer like Visual Studio does, adding .NET Core support is simple.
Download and install Visual Studio Code.
Download and install the .NET Core SDK.
Install the C# extension from the Visual Studio Code marketplace.
Install with bash automation
The dotnet-install scripts are used for automation and non-admin installs of the runtime. You can download the script from the dotnet-install script reference page.
The script defaults to installing the latest long term support (LTS) version, which is .NET Core 3.1. You can choose a specific release by specifying the current switch. Include the runtime switch to install a runtime. Otherwise, the script installs the SDK.
Android Sdk Download Zip
Note
The command above installs the ASP.NET Core runtime for maximum compatability. The ASP.NET Core runtime also includes the standard .NET Core runtime.
Android Sdk For Mac
Docker
Containers provide a lightweight way to isolate your application from the rest of the host system. Containers on the same machine share just the kernel and use resources given to your application.
.NET Core can run in a Docker container. Official .NET Core Docker images are published to the Microsoft Container Registry (MCR) and are discoverable at the Microsoft .NET Core Docker Hub repository. Each repository contains images for different combinations of the .NET (SDK or Runtime) and OS that you can use.
Microsoft provides images that are tailored for specific scenarios. For example, the ASP.NET Core repository provides images that are built for running ASP.NET Core apps in production.
For more information about using .NET Core in a Docker container, see Introduction to .NET and Docker and Samples.
Android Sdk For Mac Download
Next steps
Android Sdk Mac Os
How to check if .NET Core is already installed.
Working with macOS Catalina notarization.
Tutorial: Get started on macOS.
Tutorial: Create a new app with Visual Studio Code.
Tutorial: Containerize a .NET Core app.
0 notes
Text
Iproxy Download

Languages: English • français • ไทย
Download and Run checkra1n on your device. Open two terminal tabs. One: iproxy 2222 44 device udid Two: ssh root@localhost -p 2222. Mount -o rw,union,update /. Welcome to Proxy-List.Download. We provide great lists of free public proxy servers with different protocols to unblock contents, bypass restrictions or surf anonymously. Enjoy the unique features that only our page have on all the internet. 35648 Proxies available. 13552 HTTP Proxies. Download iproxy for free. Kubernetes Cluster Explorer gives you full visibility—and peace of mind.
1SSH over USB using usbmuxd
1.1Using binary
SSH over USB using usbmuxd
You can either download a binary and run that or use a python script. The python script is a lot slower than the binary version. On Linux the python method is mostly deprecated, use the binary version provided by libimobiledevice. There is also a newer solution called gandalf.
Using binary
On Windows, ensure iTunes is installed, then download itunnel_mux_rev71.zip from Google Code. Unzip to a directory of choice.
On OS X and Linux, install usbmuxd from your package manager.
Then:
X-Proxy 6.2.0.4 add to watchlist send us an update. 4 screenshots: runs on: Windows 10 32/64 bit Windows 8 32/64 bit Windows 7 32/64 bit.
Windows: Run path/to/itunnel_mux.exe --iport 22 --lport 2222
OS X/Linux: iproxy 2222 22
Connect to localhost -p 2222 as you would over wifi.
If you have multiple devices connected, it may be useful to run multiple instances, specifying UDIDs and ports like so:
Making iproxy run automatically in the background on OS X
Install it with Homebrew (brew install libimobiledevice).
Create the file ~/Library/LaunchAgents/com.usbmux.iproxy.plist with the contents:
Run launchctl load ~/Library/LaunchAgents/com.usbmux.iproxy.plist.
You now don't have to run the iproxy binary every time you want to SSH over USB as the iproxy software is always running in the background.
If you have several devices you can create a daemon with a specific port for each one.
Create a file in ~/Library/LaunchAgents/ but name it using the device UDID, name or an identifier of your choice (like com.usbmux.iproxy.iPhone7,2.plist).
Replace UDID_HERE in the following snippet with the device UDID. The label should be unique and is best to match the filename you used.
Run launchctl load ~/Library/LaunchAgents/FILE_NAME_OF_YOUR_CHOICE.
You now don't have to run the iproxy binary every time you want to SSH over USB as the iproxy software is always running in the background.
Using python
Tested on OS X and Windows.
You will need to have Python installed on your system.
Get usbmuxd source package and unpack. (Or if the linked usbmuxd package doesn't work, try libusbmuxd.)
Go into folder python-client
chmod +x tcprelay.py
Run ./tcprelay.py -t 22:2222
Now you can log into your device via ssh mobile@localhost -p 2222
The -t switch tells tcprelay to run threaded and allow more than one ssh over the same port.
Proxy Download For Google Chrome
See ./tcprelay.py --help for further options.
Using gandalf
Tested on OS X and Linux, each with up to 29 devices connected at the same time. The advantage of using gandalf is that it is written in a functional programming language, which practically means that it won't give you seg faults and it is actively maintained https://github.com/onlinemediagroup/ocaml-usbmux
Installation
You need to have opam installed, it is OCaml's package manager.
On OS X you can do:
(If on Linux, then get opam via your package manager, details available https://opam.ocaml.org/doc/Install.html, Ubuntu users please pay attention, need to use a ppa for opam). It is important that your compiler is up to date, you cancheck with opam switch, make sure its at least >= 4.02.0
then
This will install the command line tool gandalf and an OCamllibrary.
gandalf usage.

The following are a series of usages of gandalf, all short formarguments have long-forms as well and -v can be added at any time.
1) See with realtime updates what devices are connected
This will start up gandalf in listen mode, that is it will printout whenever a device connects or disconnects and more crucially it will print out the UDID of each device.
2) Start with a mapping file which is of the form
So an example mapping file would be:
and the gandalf invocation is:
2.1) You can also daemonize gandalf with the -d flag. *NOTE*: You might need to end up doing that under sudo as gandalf needs tomake a pid file under /var/run.
3) To see a pretty JSON representation of devices and their ports that are currently connected, do:
4) To reload gandalf with a new set of mappings, do:
This will cancel all running threads and reload from the originalmappings file, so make your changes there.
5) To cleanly exit gandalf, do: *NOTE* This might require super user permissions.
Check out the man page, accessible with:
or
Simple invocation:
Important Notes and Catches
1) If you are running this on Linux, then you might get issues withusbmuxd having issues when more than around 7 devices are pluggedin. This is because multiple threads are trying to call variouslibxml2 freeing functions. I have a forked version of libplistthat usbmuxd uses, sans the memory freeing calls. Its availablehere. Compile and install that, then compile and install usbmuxdfrom source. This will leak memory but its not that much at all andI believe it to be a fixed amount.
2) Another issue you might have is USB3.0. The Linux kernel might crapout on you after 13 devices. This is a combination of the kernelnot giving enough resources and the host controller on yourmotherboard being crappy. The solution to this problem is todisable USB3.0 in your BIOS. To verify that USB3.0 isn't workingcheck with lsusb
SSH over USB using the iFunBox GUI (Windows only)
This feature only exists in the Windows build of iFunBox.
Get the latest Windows build of iFunBox and install it.
Click on 'Quick Toolbox,' then 'USB Tunnel.'
Assign ports as you see fit.
SSH over USB using iPhoneTunnel Menu Bar Application (macOS only)
Turn Tunnel On
Tools -> SSH
Theos usage
Export the following variables in your shell in order to deploy builds to the connected device:
export THEOS_DEVICE_IP=localhost
export THEOS_DEVICE_PORT=2222
SSH without password
Run the following commands one time and you will not be asked to type your password again.
You must create an SSH key with ssh-keygen if you have not created one. A passphrase isn’t required but still recommended. You can use ssh-agentas described here to keep the passphrase in memory and not be prompted for it constantly.
Then run the following command:ssh-copy-id root@DEVICE_IP
On OS X, ssh-copy-id will need to be installed with brew install ssh-copy-id.
Retrieved from 'https://iphonedevwiki.net/index.php?title=SSH_Over_USB&oldid=5201'

Q: What is checkra1n? A: checkra1n is a community project to provide a high-quality semi-tethered jailbreak to all, based on the ‘checkm8’ bootrom exploit.
Iproxy Download
Q: How does it work? A: Magic hax.
Proxy Download For Pc
Q: Why was the beta release delayed? A: We didn't want the release quality to end up like iOS 13.2, you deserve better.
Q: wen eta? A: bruh we're past that.
Q: How do I use it? A: Open the checkra1n app, and follow the instructions to put your device into DFU mode. Hax happens auto-magically from that point and the device will boot into jailbroken mode. If you reboot the device without checkra1n, it will revert to stock iOS, and you will not be able to use any 3rd party software installed until you enter DFU and checkra1n the device again.
Q: Ugh, I don't like GUI? A: Ok, you can use './checkra1n.app/Contents/MacOS/checkra1n -c' from the console, or download a Linux CLI build.
Q: Is it safe to jailbreak? Can it harm my device / wipe my data? A: We believe jailbreaking is safe and take precautions to avoid data loss. However, as with any software, bugs can happen and *no warranty is provided*. We do recommend you backup your device before running checkra1n.
Q: I have a problem or issue to report after jailbreaking. A: Many problems and bootloops can be caused by buggy or incompatible tweaks. Remember many tweaks never saw iOS 13 in the pre-checkra1n era. If you suspect a recently installed tweak, you may attempt to enter no-substrate mode by holding vol-up during boot (starting with Apple logo until boot completes). If the issue goes away, a bad tweak is very likely the culprit, and you should contact the tweak developers.
Q: I have a problem or issue to report and I don't think it's related to a bad tweak. A: Please check here and follow the bug report template.
Proxy Download For Free
Q: I lost my passcode. Can checkra1n decrypt my data or get access to a locked device? A: No.
Q: Can I ssh into my device? A: Yes! An SSH server is deployed on port 44 on localhost only. You can expose it on your local machine using iproxy via USB.
Q: I love the project! Can I donate? A: Thanks, we love it too! The project does not currently take any donations. If anyone asks for donations, it's a scam.
Iproxy Download Mac
Q: Where are the sources? I want to write a dark-mode theme and publish the jailbreak as my own. A: checkra1n is released in binary form only at this stage. We plan to open-source later in 2020.
Proxy Download Roblox
Q: When is Windows support coming? A: We need to write a kernel driver to support Windows (which is a very complex piece of code!) which will take time. Rest assured however, we are working hard on it.
0 notes
Text
How to Get All Your Search Console Data from the API (Plus, Learn How to Use Python)
Posted by Dom-Woodman
What will you learn from this post?
How to get lots of Search Console data quickly and easily
How to run a Python script
And who can do it? Hopefully, it should be accessible to any beginner.
Why do we use the API to get Search Console data?
At Distilled, we often want to use Google Search Console data, but getting it from the interface is incredibly clunky:
You’re limited to the top 1,000 queries
You have to apply each filter one at a time
The interface is slow
And if you want to do this regularly, you have to repeat this process often.
We can get around that by using the API. Now we can get up to 5,000 queries at a time, we can apply multiple filters instantly, and we can run multiple queries quickly and easily.
We do this with Python.
Why is it useful to be able to run Python scripts?
Being able to run scripts is incredibly valuable. There are lots of amazing scripts out there, both on Github and written by other people in the industry; using them, you can pull down data more quickly and faster than you otherwise could.
We’ll be using Python for this tutorial because it’s a very popular language, particularly when working with large amounts of data.
Crucially, you don’t need to be able to write in Python to use the scripts — you just need to understand some basics about how to use them.
With APIs you can pull data from all sorts of exciting places, far more quickly than through the user interface. You can also often get more data.
How do we run Python?
If you’re on a Mac or a PC, I’d recommend downloading Anaconda. That will get you set up and running with Python 3, and save a lot of fiddling around.
If you need administrator permission to install things on your work computer, then make sure you only install Anaconda for your user, not all users. If you try and install for all users, then you’ll need administrator permission.
Then we’re going to need a good shell (a command line interface, the place where you can run the script from). Mac has Terminal installed by default; on Windows, I would recommend Cmder.
Go ahead and install that.
(The rest of this tutorial is shown in Windows, but the same basic steps should be fine for a Mac!)
Double-check that Python has installed correctly
First open up the shell, type in python and hit enter.
Exit python by typing in exit().
Download our example script
For this example we’ll be using the search console script, written by one of our consultants, Stephan.
You can download it from his Github here. I’m not going to include a full tutorial on Git in this (although it’s a very useful tool for coding), so if you’re unsure how to clone a repository, just download the zip file:
Running our example script
Once we’ve downloaded the example script (and unzipped the folder, if necessary), we need to navigate in our shell to the folder where we just downloaded the script..
The command line functions like the Windows File Explorer or Finder that you normally use. Just like file explorer has a specific folder open, so does the command line, so we need to navigate to the folder where we have the script downloaded.
A command line shell functions a lot like a file explorer, only everything happens through text. You don’t get a mouse or a GUI.
Some command line basics
To change folders you’ll need some command line basics, most notably these two super-important commands:
cd [path]
ls -g
The first navigates you to the path given. (Or, if you use .. as your path, takes you a step backwards “cd ..”)
The second lists all the files and folders in the directory you’re currently in.
That’s all you need, but to make yourself faster there are two other things that are useful to know:
Hitting tab will cause the shell to try and complete the path you’re typing.
Suppose you’re in a folder with two files:
Moz_1990_ranking_data.txt
Moz_180_rankings.txt
180_rankings.txt
If you type:
180 and hit tab: It will autocomplete to 180_rankings.txt
Moz and hit tab: It will autocomplete to Moz_
Secondly, hitting the up key goes through all the commands you’ve used. The reason a lot of people enjoy using the shell is they find it quicker than using a file explorer — and those two commands are a large part of that.
Congrats — now you’re ready to run the script. Next we need to get permission for the Google Search Console (GSC) API.
Turning on the API
In the same way you have to log in to see Search Console data, you need permission to use the API. Otherwise, anyone could get your data.
We also need to check whether the API is turned on — by default, it isn’t.
All the Google APIs live in the same place; Google Analytics is there, too. You can find them all at:
http://ift.tt/2oGba1q
You'll need to sign in (making sure to use the Gmail account with access to your Search Console data). Then you can search for the Search Console API.
Once it’s selected, if it says "Enable here," you’ll need to enable it.
Once that's done we need to download an API key (which is equivalent to our password when signing into Search Console). A single API key gives you access to all of the Google services, in the same way that you use the same Gmail address to sign into Google Analytics and Search Console.
What is an API key? Different APIs have different types of keys. Sometimes it will just be a text string like "AHNSKDSJKS434SDJ"; other times it's a file. The most common Google API key is a file.
So how do we get our Google API key? Once we’ve enabled the API, we select the "Credentials" tab and then create credentials. The three main kinds of API key are a basic text key, user OAuth credentials, and service account keys.
The first is quick and simple, the second is more secure and intended for users who will authenticate with a login, the third for automated data pulling.
There are some subtleties around permissions with these that we don't really want to delve into here. The script is set up to use the second, so we’ll use that.
Go ahead and create an OAuth Client ID:
Ignore the pop-up and download the file from the credentials screen:
Move it to the same folder as your script. For ease of use, we’ll also rename it "credentials.json," which is what the script is expecting the API key to be called. (A script will tell you what it’s expecting the API key to be called when you run it, or will have this in the documentation... assuming it’s well-written, of course).
Crucial note: By default, most versions of Windows will hide file extensions. Rather than naming the file "credentials.json," you'll accidentally name it "credentials.json.json."
Because the file is already a JSON file, you can just name it "credentials" and check that the type is JSON. You can also turn on file extensions (instructions here) and then name it "credentials.json."
In the screenshot below, I have file extensions visible. I’m afraid I don’t know if something equivalent exists in Mac — if you do, drop it in the comments!
Running our script
And we’re ready to go!
Hopefully now you’ve navigated to the folder with the script in using cd:
Now we try and run the script:
We get a module missing error. Normally you can solve this by running:
pip install missing_module — or, in our case,
pip install httplib2
And because we’ll get several of these errors, we need to install a couple modules.
pip install oauth2client
pip install --user --upgrade google-api-python-client
Interesting side point: It’s worth noting that the flag "--user" is the "pip" command line equivalent to the choice you often see when installing programs on a computer to install for all users or just you. (We saw this with Anaconda earlier.) If you do see permissions errors appearing in the command line with pip, try adding --user. And back to our script.
Now that we’ve installed all the things the script needs, we can try again (remember, you can just press up to see the previous command). Now we should get the script help, which will tell us how to run it. Any well-documented script should return something like this:
First, pay attention to the last line. Which arguments are required?
property_uri
start_date
end_date
Our script needs to have these 3 arguments first in that order. Which looks like:
python search_console_query.py <a href="http://ift.tt/1bzVptN">http://ift.tt/2o0o8nP; 2017-02-05 2017-02-06
Run that command and remember to change the URL to a property you have access to!
Your browser will open up and you’ll need to log in and authenticate the script (because it’s the first time we’re running the script):
You should be taken to a page that doesn’t load. If you look at the script, it's now asking for an authentication code.
This is in the URL of the page, everything from the = up to the hash, which you’ll need to copy and paste back into the script and hit enter.
Check your folder where you saved the script and it should now look something like this:
The permission we gave the script is now saved in webmaster_credentials.dat. Each of our days of Search Console data we asked for sits in those CSV files. The script is designed to pull data for each day individually.
If we look back at our script options:
We can see some of the other options this script takes that we can use. This is where we can filter the results, change the country, device, etc.
"Pages" takes a file of pages to individually query (example file)
By default, it pulls for the entire property.
"Devices" takes a space-separated list
By default, it queries mobile, desktop, and tablet.
Countries
By default, it does worldwide. Takes a space-separated list of country codes.
By default the script will pull 100 rows of data per day. The API allows a limit of up to 5,000.
Here are some example queries using those options and what they do:
#get top queries for the search console property
python search_console_query.py http://ift.tt/1bzVptN 2017-02-05 2017-02-06
#get top queries for multiple pages stored in file_of_pages and aggregate together
python search_console_query.py http://ift.tt/1bzVptN 2017-02-05 2017-02-06 --pages file_of_pages
#get top queries for the property from desktop and mobile
python search_console_query.py http://ift.tt/1bzVptN 2017-02-05 2017-02-06 --devices desktop mobile
#get the top queries for the property from the US & the UK
python search_console_query.py http://ift.tt/1bzVptN 2017-02-05 2017-02-06 --countries USA GBR
#get the 5000 top queries for the property
python search_console_query.py http://ift.tt/1bzVptN 2017-02-05 2017-02-06 --max-rows-per-day 5000
Sign up for The Moz Top 10, a semimonthly mailer updating you on the top ten hottest pieces of SEO news, tips, and rad links uncovered by the Moz team. Think of it as your exclusive digest of stuff you don't have time to hunt down but want to read!
via Blogger http://ift.tt/2nNftnC
0 notes
Text
How to Get All Your Search Console Data from the API (Plus, Learn How to Use Python)
Posted by Dom-Woodman
What will you learn from this post?
How to get lots of Search Console data quickly and easily
How to run a Python script
And who can do it? Hopefully, it should be accessible to any beginner.
Why do we use the API to get Search Console data?
At Distilled, we often want to use Google Search Console data, but getting it from the interface is incredibly clunky:
You’re limited to the top 1,000 queries
You have to apply each filter one at a time
The interface is slow
And if you want to do this regularly, you have to repeat this process often.
We can get around that by using the API. Now we can get up to 5,000 queries at a time, we can apply multiple filters instantly, and we can run multiple queries quickly and easily.
We do this with Python.
Why is it useful to be able to run Python scripts?
Being able to run scripts is incredibly valuable. There are lots of amazing scripts out there, both on Github and written by other people in the industry; using them, you can pull down data more quickly and faster than you otherwise could.
We’ll be using Python for this tutorial because it’s a very popular language, particularly when working with large amounts of data.
Crucially, you don’t need to be able to write in Python to use the scripts — you just need to understand some basics about how to use them.
With APIs you can pull data from all sorts of exciting places, far more quickly than through the user interface. You can also often get more data.
How do we run Python?
If you’re on a Mac or a PC, I’d recommend downloading Anaconda. That will get you set up and running with Python 3, and save a lot of fiddling around.
If you need administrator permission to install things on your work computer, then make sure you only install Anaconda for your user, not all users. If you try and install for all users, then you’ll need administrator permission.
Then we’re going to need a good shell (a command line interface, the place where you can run the script from). Mac has Terminal installed by default; on Windows, I would recommend Cmder.
Go ahead and install that.
(The rest of this tutorial is shown in Windows, but the same basic steps should be fine for a Mac!)
Double-check that Python has installed correctly
First open up the shell, type in python and hit enter.
Exit python by typing in exit().
Download our example script
For this example we’ll be using the search console script, written by one of our consultants, Stephan.
You can download it from his Github here. I’m not going to include a full tutorial on Git in this (although it’s a very useful tool for coding), so if you’re unsure how to clone a repository, just download the zip file:
Running our example script
Once we’ve downloaded the example script (and unzipped the folder, if necessary), we need to navigate in our shell to the folder where we just downloaded the script..
The command line functions like the Windows File Explorer or Finder that you normally use. Just like file explorer has a specific folder open, so does the command line, so we need to navigate to the folder where we have the script downloaded.
A command line shell functions a lot like a file explorer, only everything happens through text. You don’t get a mouse or a GUI.
Some command line basics
To change folders you’ll need some command line basics, most notably these two super-important commands:
cd [path]
ls -g
The first navigates you to the path given. (Or, if you use .. as your path, takes you a step backwards “cd ..”)
The second lists all the files and folders in the directory you’re currently in.
That’s all you need, but to make yourself faster there are two other things that are useful to know:
Hitting tab will cause the shell to try and complete the path you’re typing.
Suppose you’re in a folder with two files:
Moz_1990_ranking_data.txt
Moz_180_rankings.txt
180_rankings.txt
If you type:
180 and hit tab: It will autocomplete to 180_rankings.txt
Moz and hit tab: It will autocomplete to Moz_
Secondly, hitting the up key goes through all the commands you’ve used. The reason a lot of people enjoy using the shell is they find it quicker than using a file explorer — and those two commands are a large part of that.
Congrats — now you’re ready to run the script. Next we need to get permission for the Google Search Console (GSC) API.
Turning on the API
In the same way you have to log in to see Search Console data, you need permission to use the API. Otherwise, anyone could get your data.
We also need to check whether the API is turned on — by default, it isn’t.
All the Google APIs live in the same place; Google Analytics is there, too. You can find them all at:
http://ift.tt/2oGba1q
You'll need to sign in (making sure to use the Gmail account with access to your Search Console data). Then you can search for the Search Console API.
Once it’s selected, if it says "Enable here," you’ll need to enable it.
Once that's done we need to download an API key (which is equivalent to our password when signing into Search Console). A single API key gives you access to all of the Google services, in the same way that you use the same Gmail address to sign into Google Analytics and Search Console.
What is an API key? Different APIs have different types of keys. Sometimes it will just be a text string like "AHNSKDSJKS434SDJ"; other times it's a file. The most common Google API key is a file.
So how do we get our Google API key? Once we’ve enabled the API, we select the "Credentials" tab and then create credentials. The three main kinds of API key are a basic text key, user OAuth credentials, and service account keys.
The first is quick and simple, the second is more secure and intended for users who will authenticate with a login, the third for automated data pulling.
There are some subtleties around permissions with these that we don't really want to delve into here. The script is set up to use the second, so we’ll use that.
Go ahead and create an OAuth Client ID:
Ignore the pop-up and download the file from the credentials screen:
Move it to the same folder as your script. For ease of use, we’ll also rename it "credentials.json," which is what the script is expecting the API key to be called. (A script will tell you what it’s expecting the API key to be called when you run it, or will have this in the documentation... assuming it’s well-written, of course).
Crucial note: By default, most versions of Windows will hide file extensions. Rather than naming the file "credentials.json," you'll accidentally name it "credentials.json.json."
Because the file is already a JSON file, you can just name it "credentials" and check that the type is JSON. You can also turn on file extensions (instructions here) and then name it "credentials.json."
In the screenshot below, I have file extensions visible. I’m afraid I don’t know if something equivalent exists in Mac — if you do, drop it in the comments!
Running our script
And we’re ready to go!
Hopefully now you’ve navigated to the folder with the script in using cd:
Now we try and run the script:
We get a module missing error. Normally you can solve this by running:
pip install missing_module — or, in our case,
pip install httplib2
And because we’ll get several of these errors, we need to install a couple modules.
pip install oauth2client
pip install --user --upgrade google-api-python-client
Interesting side point: It’s worth noting that the flag "--user" is the "pip" command line equivalent to the choice you often see when installing programs on a computer to install for all users or just you. (We saw this with Anaconda earlier.) If you do see permissions errors appearing in the command line with pip, try adding --user. And back to our script.
Now that we’ve installed all the things the script needs, we can try again (remember, you can just press up to see the previous command). Now we should get the script help, which will tell us how to run it. Any well-documented script should return something like this:
First, pay attention to the last line. Which arguments are required?
property_uri
start_date
end_date
Our script needs to have these 3 arguments first in that order. Which looks like:
python search_console_query.py <a href="http://ift.tt/1bzVptN">http://ift.tt/2o0o8nP; 2017-02-05 2017-02-06
Run that command and remember to change the URL to a property you have access to!
Your browser will open up and you’ll need to log in and authenticate the script (because it’s the first time we’re running the script):
You should be taken to a page that doesn’t load. If you look at the script, it's now asking for an authentication code.
This is in the URL of the page, everything from the = up to the hash, which you’ll need to copy and paste back into the script and hit enter.
Check your folder where you saved the script and it should now look something like this:
The permission we gave the script is now saved in webmaster_credentials.dat. Each of our days of Search Console data we asked for sits in those CSV files. The script is designed to pull data for each day individually.
If we look back at our script options:
We can see some of the other options this script takes that we can use. This is where we can filter the results, change the country, device, etc.
"Pages" takes a file of pages to individually query (example file)
By default, it pulls for the entire property.
"Devices" takes a space-separated list
By default, it queries mobile, desktop, and tablet.
Countries
By default, it does worldwide. Takes a space-separated list of country codes.
By default the script will pull 100 rows of data per day. The API allows a limit of up to 5,000.
Here are some example queries using those options and what they do:
#get top queries for the search console property
python search_console_query.py http://ift.tt/1bzVptN 2017-02-05 2017-02-06
#get top queries for multiple pages stored in file_of_pages and aggregate together
python search_console_query.py http://ift.tt/1bzVptN 2017-02-05 2017-02-06 --pages file_of_pages
#get top queries for the property from desktop and mobile
python search_console_query.py http://ift.tt/1bzVptN 2017-02-05 2017-02-06 --devices desktop mobile
#get the top queries for the property from the US & the UK
python search_console_query.py http://ift.tt/1bzVptN 2017-02-05 2017-02-06 --countries USA GBR
#get the 5000 top queries for the property
python search_console_query.py http://ift.tt/1bzVptN 2017-02-05 2017-02-06 --max-rows-per-day 5000
Sign up for The Moz Top 10, a semimonthly mailer updating you on the top ten hottest pieces of SEO news, tips, and rad links uncovered by the Moz team. Think of it as your exclusive digest of stuff you don't have time to hunt down but want to read!
0 notes
Text
How to Get All Your Search Console Data from the API (Plus, Learn How to Use Python)
Posted by Dom-Woodman
What will you learn from this post?
How to get lots of Search Console data quickly and easily
How to run a Python script
And who can do it? Hopefully, it should be accessible to any beginner.
Why do we use the API to get Search Console data?
At Distilled, we often want to use Google Search Console data, but getting it from the interface is incredibly clunky:
You’re limited to the top 1,000 queries
You have to apply each filter one at a time
The interface is slow
And if you want to do this regularly, you have to repeat this process often.
We can get around that by using the API. Now we can get up to 5,000 queries at a time, we can apply multiple filters instantly, and we can run multiple queries quickly and easily.
We do this with Python.
Why is it useful to be able to run Python scripts?
Being able to run scripts is incredibly valuable. There are lots of amazing scripts out there, both on Github and written by other people in the industry; using them, you can pull down data more quickly and faster than you otherwise could.
We’ll be using Python for this tutorial because it’s a very popular language, particularly when working with large amounts of data.
Crucially, you don’t need to be able to write in Python to use the scripts — you just need to understand some basics about how to use them.
With APIs you can pull data from all sorts of exciting places, far more quickly than through the user interface. You can also often get more data.
How do we run Python?
If you’re on a Mac or a PC, I’d recommend downloading Anaconda. That will get you set up and running with Python 3, and save a lot of fiddling around.
If you need administrator permission to install things on your work computer, then make sure you only install Anaconda for your user, not all users. If you try and install for all users, then you’ll need administrator permission.
Then we’re going to need a good shell (a command line interface, the place where you can run the script from). Mac has Terminal installed by default; on Windows, I would recommend Cmder.
Go ahead and install that.
(The rest of this tutorial is shown in Windows, but the same basic steps should be fine for a Mac!)
Double-check that Python has installed correctly
First open up the shell, type in python and hit enter.
Exit python by typing in exit().
Download our example script
For this example we’ll be using the search console script, written by one of our consultants, Stephan.
You can download it from his Github here. I’m not going to include a full tutorial on Git in this (although it’s a very useful tool for coding), so if you’re unsure how to clone a repository, just download the zip file:
Running our example script
Once we’ve downloaded the example script (and unzipped the folder, if necessary), we need to navigate in our shell to the folder where we just downloaded the script..
The command line functions like the Windows File Explorer or Finder that you normally use. Just like file explorer has a specific folder open, so does the command line, so we need to navigate to the folder where we have the script downloaded.
A command line shell functions a lot like a file explorer, only everything happens through text. You don’t get a mouse or a GUI.
Some command line basics
To change folders you’ll need some command line basics, most notably these two super-important commands:
cd [path]
ls -g
The first navigates you to the path given. (Or, if you use .. as your path, takes you a step backwards “cd ..”)
The second lists all the files and folders in the directory you’re currently in.
That’s all you need, but to make yourself faster there are two other things that are useful to know:
Hitting tab will cause the shell to try and complete the path you’re typing.
Suppose you’re in a folder with two files:
Moz_1990_ranking_data.txt
Moz_180_rankings.txt
180_rankings.txt
If you type:
180 and hit tab: It will autocomplete to 180_rankings.txt
Moz and hit tab: It will autocomplete to Moz_
Secondly, hitting the up key goes through all the commands you’ve used. The reason a lot of people enjoy using the shell is they find it quicker than using a file explorer — and those two commands are a large part of that.
Congrats — now you’re ready to run the script. Next we need to get permission for the Google Search Console (GSC) API.
Turning on the API
In the same way you have to log in to see Search Console data, you need permission to use the API. Otherwise, anyone could get your data.
We also need to check whether the API is turned on — by default, it isn’t.
All the Google APIs live in the same place; Google Analytics is there, too. You can find them all at:
https://console.cloud.google.com/apis/
You'll need to sign in (making sure to use the Gmail account with access to your Search Console data). Then you can search for the Search Console API.
Once it’s selected, if it says "Enable here," you’ll need to enable it.
Once that's done we need to download an API key (which is equivalent to our password when signing into Search Console). A single API key gives you access to all of the Google services, in the same way that you use the same Gmail address to sign into Google Analytics and Search Console.
What is an API key? Different APIs have different types of keys. Sometimes it will just be a text string like "AHNSKDSJKS434SDJ"; other times it's a file. The most common Google API key is a file.
So how do we get our Google API key? Once we’ve enabled the API, we select the "Credentials" tab and then create credentials. The three main kinds of API key are a basic text key, user OAuth credentials, and service account keys.
The first is quick and simple, the second is more secure and intended for users who will authenticate with a login, the third for automated data pulling.
There are some subtleties around permissions with these that we don't really want to delve into here. The script is set up to use the second, so we’ll use that.
Go ahead and create an OAuth Client ID:
Ignore the pop-up and download the file from the credentials screen:
Move it to the same folder as your script. For ease of use, we’ll also rename it "credentials.json," which is what the script is expecting the API key to be called. (A script will tell you what it’s expecting the API key to be called when you run it, or will have this in the documentation... assuming it’s well-written, of course).
Crucial note: By default, most versions of Windows will hide file extensions. Rather than naming the file "credentials.json," you'll accidentally name it "credentials.json.json."
Because the file is already a JSON file, you can just name it "credentials" and check that the type is JSON. You can also turn on file extensions (instructions here) and then name it "credentials.json."
In the screenshot below, I have file extensions visible. I’m afraid I don’t know if something equivalent exists in Mac — if you do, drop it in the comments!
Running our script
And we’re ready to go!
Hopefully now you’ve navigated to the folder with the script in using cd:
Now we try and run the script:
We get a module missing error. Normally you can solve this by running:
pip install missing_module — or, in our case,
pip install httplib2
And because we’ll get several of these errors, we need to install a couple modules.
pip install oauth2client
pip install --user --upgrade google-api-python-client
Interesting side point: It’s worth noting that the flag "--user" is the "pip" command line equivalent to the choice you often see when installing programs on a computer to install for all users or just you. (We saw this with Anaconda earlier.) If you do see permissions errors appearing in the command line with pip, try adding --user. And back to our script.
Now that we’ve installed all the things the script needs, we can try again (remember, you can just press up to see the previous command). Now we should get the script help, which will tell us how to run it. Any well-documented script should return something like this:
First, pay attention to the last line. Which arguments are required?
property_uri
start_date
end_date
Our script needs to have these 3 arguments first in that order. Which looks like:
python search_console_query.py <a href="https://www.distilled.net/">https://www.distilled.net/</a> 2017-02-05 2017-02-06
Run that command and remember to change the URL to a property you have access to!
Your browser will open up and you’ll need to log in and authenticate the script (because it’s the first time we’re running the script):
You should be taken to a page that doesn’t load. If you look at the script, it's now asking for an authentication code.
This is in the URL of the page, everything from the = up to the hash, which you’ll need to copy and paste back into the script and hit enter.
Check your folder where you saved the script and it should now look something like this:
The permission we gave the script is now saved in webmaster_credentials.dat. Each of our days of Search Console data we asked for sits in those CSV files. The script is designed to pull data for each day individually.
If we look back at our script options:
We can see some of the other options this script takes that we can use. This is where we can filter the results, change the country, device, etc.
"Pages" takes a file of pages to individually query (example file)
By default, it pulls for the entire property.
"Devices" takes a space-separated list
By default, it queries mobile, desktop, and tablet.
Countries
By default, it does worldwide. Takes a space-separated list of country codes.
By default the script will pull 100 rows of data per day. The API allows a limit of up to 5,000.
Here are some example queries using those options and what they do:
#get top queries for the search console property
python search_console_query.py https://www.distilled.net/ 2017-02-05 2017-02-06
#get top queries for multiple pages stored in file_of_pages and aggregate together
python search_console_query.py https://www.distilled.net/ 2017-02-05 2017-02-06 --pages file_of_pages
#get top queries for the property from desktop and mobile
python search_console_query.py https://www.distilled.net/ 2017-02-05 2017-02-06 --devices desktop mobile
#get the top queries for the property from the US & the UK
python search_console_query.py https://www.distilled.net/ 2017-02-05 2017-02-06 --countries USA GBR
#get the 5000 top queries for the property
python search_console_query.py https://www.distilled.net/ 2017-02-05 2017-02-06 --max-rows-per-day 5000
Sign up for The Moz Top 10, a semimonthly mailer updating you on the top ten hottest pieces of SEO news, tips, and rad links uncovered by the Moz team. Think of it as your exclusive digest of stuff you don't have time to hunt down but want to read!
0 notes
Text
How to Get All Your Search Console Data from the API (Plus, Learn How to Use Python)
Posted by Dom-Woodman
What will you learn from this post?
How to get lots of Search Console data quickly and easily
How to run a Python script
And who can do it? Hopefully, it should be accessible to any beginner.
Why do we use the API to get Search Console data?
At Distilled, we often want to use Google Search Console data, but getting it from the interface is incredibly clunky:
You’re limited to the top 1,000 queries
You have to apply each filter one at a time
The interface is slow
And if you want to do this regularly, you have to repeat this process often.
We can get around that by using the API. Now we can get up to 5,000 queries at a time, we can apply multiple filters instantly, and we can run multiple queries quickly and easily.
We do this with Python.
Why is it useful to be able to run Python scripts?
Being able to run scripts is incredibly valuable. There are lots of amazing scripts out there, both on Github and written by other people in the industry; using them, you can pull down data more quickly and faster than you otherwise could.
We’ll be using Python for this tutorial because it’s a very popular language, particularly when working with large amounts of data.
Crucially, you don’t need to be able to write in Python to use the scripts — you just need to understand some basics about how to use them.
With APIs you can pull data from all sorts of exciting places, far more quickly than through the user interface. You can also often get more data.
How do we run Python?
If you’re on a Mac or a PC, I’d recommend downloading Anaconda. That will get you set up and running with Python 3, and save a lot of fiddling around.
If you need administrator permission to install things on your work computer, then make sure you only install Anaconda for your user, not all users. If you try and install for all users, then you’ll need administrator permission.
Then we’re going to need a good shell (a command line interface, the place where you can run the script from). Mac has Terminal installed by default; on Windows, I would recommend Cmder.
Go ahead and install that.
(The rest of this tutorial is shown in Windows, but the same basic steps should be fine for a Mac!)
Double-check that Python has installed correctly
First open up the shell, type in python and hit enter.
Exit python by typing in exit().
Download our example script
For this example we’ll be using the search console script, written by one of our consultants, Stephan.
You can download it from his Github here. I’m not going to include a full tutorial on Git in this (although it’s a very useful tool for coding), so if you’re unsure how to clone a repository, just download the zip file:
Running our example script
Once we’ve downloaded the example script (and unzipped the folder, if necessary), we need to navigate in our shell to the folder where we just downloaded the script..
The command line functions like the Windows File Explorer or Finder that you normally use. Just like file explorer has a specific folder open, so does the command line, so we need to navigate to the folder where we have the script downloaded.
A command line shell functions a lot like a file explorer, only everything happens through text. You don’t get a mouse or a GUI.
Some command line basics
To change folders you’ll need some command line basics, most notably these two super-important commands:
cd [path]
ls -g
The first navigates you to the path given. (Or, if you use .. as your path, takes you a step backwards “cd ..”)
The second lists all the files and folders in the directory you’re currently in.
That’s all you need, but to make yourself faster there are two other things that are useful to know:
Hitting tab will cause the shell to try and complete the path you’re typing.
Suppose you’re in a folder with two files:
Moz_1990_ranking_data.txt
Moz_180_rankings.txt
180_rankings.txt
If you type:
180 and hit tab: It will autocomplete to 180_rankings.txt
Moz and hit tab: It will autocomplete to Moz_
Secondly, hitting the up key goes through all the commands you’ve used. The reason a lot of people enjoy using the shell is they find it quicker than using a file explorer — and those two commands are a large part of that.
Congrats — now you’re ready to run the script. Next we need to get permission for the Google Search Console (GSC) API.
Turning on the API
In the same way you have to log in to see Search Console data, you need permission to use the API. Otherwise, anyone could get your data.
We also need to check whether the API is turned on — by default, it isn’t.
All the Google APIs live in the same place; Google Analytics is there, too. You can find them all at:
http://ift.tt/2oGba1q
You'll need to sign in (making sure to use the Gmail account with access to your Search Console data). Then you can search for the Search Console API.
Once it’s selected, if it says "Enable here," you’ll need to enable it.
Once that's done we need to download an API key (which is equivalent to our password when signing into Search Console). A single API key gives you access to all of the Google services, in the same way that you use the same Gmail address to sign into Google Analytics and Search Console.
What is an API key? Different APIs have different types of keys. Sometimes it will just be a text string like "AHNSKDSJKS434SDJ"; other times it's a file. The most common Google API key is a file.
So how do we get our Google API key? Once we’ve enabled the API, we select the "Credentials" tab and then create credentials. The three main kinds of API key are a basic text key, user OAuth credentials, and service account keys.
The first is quick and simple, the second is more secure and intended for users who will authenticate with a login, the third for automated data pulling.
There are some subtleties around permissions with these that we don't really want to delve into here. The script is set up to use the second, so we’ll use that.
Go ahead and create an OAuth Client ID:
Ignore the pop-up and download the file from the credentials screen:
Move it to the same folder as your script. For ease of use, we’ll also rename it "credentials.json," which is what the script is expecting the API key to be called. (A script will tell you what it’s expecting the API key to be called when you run it, or will have this in the documentation... assuming it’s well-written, of course).
Crucial note: By default, most versions of Windows will hide file extensions. Rather than naming the file "credentials.json," you'll accidentally name it "credentials.json.json."
Because the file is already a JSON file, you can just name it "credentials" and check that the type is JSON. You can also turn on file extensions (instructions here) and then name it "credentials.json."
In the screenshot below, I have file extensions visible. I’m afraid I don’t know if something equivalent exists in Mac — if you do, drop it in the comments!
Running our script
And we’re ready to go!
Hopefully now you’ve navigated to the folder with the script in using cd:
Now we try and run the script:
We get a module missing error. Normally you can solve this by running:
pip install missing_module — or, in our case,
pip install httplib2
And because we’ll get several of these errors, we need to install a couple modules.
pip install oauth2client
pip install --user --upgrade google-api-python-client
Interesting side point: It’s worth noting that the flag "--user" is the "pip" command line equivalent to the choice you often see when installing programs on a computer to install for all users or just you. (We saw this with Anaconda earlier.) If you do see permissions errors appearing in the command line with pip, try adding --user. And back to our script.
Now that we’ve installed all the things the script needs, we can try again (remember, you can just press up to see the previous command). Now we should get the script help, which will tell us how to run it. Any well-documented script should return something like this:
First, pay attention to the last line. Which arguments are required?
property_uri
start_date
end_date
Our script needs to have these 3 arguments first in that order. Which looks like:
python search_console_query.py <a href="http://ift.tt/1bzVptN">http://ift.tt/2o0o8nP; 2017-02-05 2017-02-06
Run that command and remember to change the URL to a property you have access to!
Your browser will open up and you’ll need to log in and authenticate the script (because it’s the first time we’re running the script):
You should be taken to a page that doesn’t load. If you look at the script, it's now asking for an authentication code.
This is in the URL of the page, everything from the = up to the hash, which you’ll need to copy and paste back into the script and hit enter.
Check your folder where you saved the script and it should now look something like this:
The permission we gave the script is now saved in webmaster_credentials.dat. Each of our days of Search Console data we asked for sits in those CSV files. The script is designed to pull data for each day individually.
If we look back at our script options:
We can see some of the other options this script takes that we can use. This is where we can filter the results, change the country, device, etc.
"Pages" takes a file of pages to individually query (example file)
By default, it pulls for the entire property.
"Devices" takes a space-separated list
By default, it queries mobile, desktop, and tablet.
Countries
By default, it does worldwide. Takes a space-separated list of country codes.
By default the script will pull 100 rows of data per day. The API allows a limit of up to 5,000.
Here are some example queries using those options and what they do:
#get top queries for the search console property
python search_console_query.py http://ift.tt/1bzVptN 2017-02-05 2017-02-06
#get top queries for multiple pages stored in file_of_pages and aggregate together
python search_console_query.py http://ift.tt/1bzVptN 2017-02-05 2017-02-06 --pages file_of_pages
#get top queries for the property from desktop and mobile
python search_console_query.py http://ift.tt/1bzVptN 2017-02-05 2017-02-06 --devices desktop mobile
#get the top queries for the property from the US & the UK
python search_console_query.py http://ift.tt/1bzVptN 2017-02-05 2017-02-06 --countries USA GBR
#get the 5000 top queries for the property
python search_console_query.py http://ift.tt/1bzVptN 2017-02-05 2017-02-06 --max-rows-per-day 5000
Sign up for The Moz Top 10, a semimonthly mailer updating you on the top ten hottest pieces of SEO news, tips, and rad links uncovered by the Moz team. Think of it as your exclusive digest of stuff you don't have time to hunt down but want to read!
0 notes