#raid1
Explore tagged Tumblr posts
Visit Tumblr Blog
Explore Tumblr blogs with no restrictions, modern design and the best experience.
Last Seen Tumblr Blogs


Fun Fact
Tumblr.com is the 103rd most visited website in the world.
Text


- Next
2 notes
·
View notes
Text
I'm slowly reading up on building a NAS so that when I want to look at my photos I don't have to do slapstick shit with a stack of hard drives and HDD pricing is bizarre. 12, 14, and 16TB drives are all nearly identical prices. Some cool Toshiba drives out there. Haven't thought about Toshiba in a while.
I was going to do 2×12TB because while RAID isn't backup, having to restore from a cloud backup is a pain in the ass on slow internet if I can just restore from a RAID mirror and verify against hashes. I guess I'll probably end up at 2×16TB? That would really put me well beyond my Mission Time target (10 years) since I figure I generate at most like 300GB of photos a year. I guess I can get my brother to upload the family photo archive as well.
I considered doing 3×8TB but that requires me to actually consider a real PC build and not just jamming it in an old Lenovo Thinkcentre or whatever and also the pricing shakes out pretty similarly. At work I recently adopted a forgotten RAID1 server (read, old 2-bay WD MyCloud running debian) that finally had a drive failure after 11 years so I figure, 2 drives is. plenty.
31 notes
·
View notes
Quote
プロフィール 33歳。女。発達障害(自閉スペクトラム症・ADHD)と双極性障害2型。ただし、この話に理解のある彼くんは登場しないので、安心して読んでほしい。家族構成 家族は父のみ。母は自殺した。兄弟はいない。 父は、一流企業を定年退職した後、趣味で一流大学や一流大学院に通っている。私なんかを養ってくれている。 しかし私が、私を含む社会的弱者、例えばホームレスなどに���情的な発言をしてしまうと、「お前は馬鹿だからパヨクに騙されてるんだ!」と怒鳴り散らす。選挙になると、私を選挙会場に連れていき、この候補に投票しろと命令する。 母は、私が発達障害で、理想的な娘ではなかったため、統合失調症になり、自殺した。母には毎日、よく殴ら���、よく蹴られていた。 悲しかったのは、高3の夏に、両親が、私が飼っていた水色のマメルリハインコを殺してしまったことだ。鳥籠を室外機の上に置いて蒸し焼きにした。同じ高校のみんなが旧帝大の医学部を目指している中、MARCHの文系でさえ危うかった私を勉強させるためだと言っていた。日付だって覚えている。2008年7月19日だ。それまでは、親の人間性を信じていた。親に殴られたり蹴られたり死ねと言われたり自殺しろと言われたりしても、いくらなんでも小さな小鳥の命まで粗末に扱うとは思っていなかった。就労移行支援と基本情報技術者 B型作業所に通っていたが、去年の5月から就労移行支援に通うことになった。職員に、障害者雇用で働くには何が何でも週5フルタイムで動かなければいけないと言われて、夜眠れなくてふらふらでも、レッドブルやモンスターエナジーなどのエナジードリンクを何本も飲んで通ってきた。 月〜金曜日は就労移行支援、土曜日は基本情報技術者の講座に通った。 去年の10月に基本情報技術者には受かった。今はJava SE Bronzeの勉強をしている。肺の腫瘍 実は、去年の6月頃から咳がひどく、咳の勢いで吐いてしまうので、去年11月にようやく病院に行った。すると、町の内科、市民病院、大学病院と、病院がどんどんランクアップし、肺の腫瘍が見つかり、全身麻酔で肺の腫瘍を切除されるはめになってしまった。2月下旬に良性か悪性かの告知がある。 何がいけなかったのかと考えれば、全部がまずかった気がして、どこから手を付けたらいいのか分からなくなる。良性でも悪性でも、今後どう動くか考えなければならない。今後 良性だったら、このまま就活をがんばって、障害者雇用でどこかの企業に雇われるこ��。障害者雇用の相場を考えるとかなり無茶な話だが、手取り14万円以上もらうこと。東京都の精神障害者の生活保護費がそれくらいと聞いた。それさえあれば生活できる。 悪性だったら、どうしようかな、生活保護でがんの治療って受けられるのだろうか。追記(02/08/15:30) たくさんの反応ありがとう。力になった。 病院には早く行った方が良かった。幸い、PET-CTの結果、全く転移はしていないそうだ。 基本情報のこと、認めてもらえて嬉しい。本番でRAID0とRAID1を間違えるという初歩的なミスをしてしまったけど、なんとか合格できたよ。 2年前に別の増田に書いた、超有能な相談支援専門員とはまだ繋がっているし、今の就労移行の職員も、親身に話を聞いてくれる。また、オンラインカウンセリングでいい公認心理師を見つけて、定期的に話を聞いてもらっている。 あと、精神障害でも障害基礎年金をもらいながら働けるの?身体や知的の人だけだと思ってた。本当なら、生きることが完全に怖くなくなるなぁ。
無理していたら腫瘍ができた(追記あり)
3 notes
·
View notes
Text
How to replace dead hdd in software raid woth mdadm
Lets say you have RAID1 array created with mdadm and you want to replace disk sdb with new one.
To view raid devices:
cat /prod/mdstat
Then remove associated partitions with md devices:
mdadm /dev/md0 --remove /dev/sdb2 mdadm /dev/md1 --remove /dev/sdb3
If it gives error that it cant be removed, then before removing make them failed:
mdadm /dev/md0 -f /dev/sdb2 mdadm /dev/md1 -f /dev/sdb3
Then insert new disk and copy partitions from working disk sda to new disk sdb:
sfdisk -d /dev/sda | sfdisk /dev/sdb
Then add new drive to arrays:
mdadm /dev/md0 --add /dev/sdb2 mdadm /dev/md1 --add /dev/sdb3
And finally install grub to new disk:
grub-install /dev/sdb
0 notes
Text
If you've ever wondered how to afford building your own library 🏴☠️ eBay is great not just for sata drives, but also you can for 15$ buy a SAS controller card and buy discounted enterprise SAS drives for like dirt cheap, they will have a higher failure rate than new drives, but if you use RAID1 or RAID10 you won't lose anything if they die
0 notes
Text
Itt valaki hamarosan megszomorodik
[Thu May 2 15:45:54 2024] sd 41:0:0:1: [sdo] tag#0 FAILED Result: hostbyte=DID_OK driverbyte=DRIVER_OK cmd_age=12s [Thu May 2 15:45:54 2024] sd 41:0:0:1: [sdo] tag#0 Sense Key : Aborted Command [current] [Thu May 2 15:45:54 2024] sd 41:0:0:1: [sdo] tag#0 Add. Sense: No additional sense information [Thu May 2 15:45:54 2024] sd 41:0:0:1: [sdo] tag#0 CDB: Read(10) 28 00 22 84 56 10 00 00 f0 00 [Thu May 2 15:45:54 2024] blk_update_request: I/O error, dev sdo, sector 579098128 op 0x0:(READ) flags 0x0 phys_seg 30 prio class 0 [Thu May 2 15:45:54 2024] md/raid1:md4: sdo: rescheduling sector 578833936 [Thu May 2 15:45:54 2024] md/raid1:md4: redirecting sector 578833936 to other mirror: sdn
Ahhoz képest nagyon jól bírta, hogy a kérdéses HDD-t egy éve úgy tettem be, hogy bizonytalan, mert egy másik gépben már bohóckodott.
Most se mindig problémázik, csak akkor amikor tele van írva. Meglátjuk, meddig bírja még.
0 notes
Text

QNAP TS-h1277XU-RPを購入
OSがQTSでも満足してたんだけどQuTS heroがどうしても使ってみたかったんじゃ。ZFS使いたいならお高いマシン買わずにTrueNASでも使っておけ!的な気もするけど、そっちはDELLのラックマウント鯖に使用済みなのでQNAP謹製のOSで使ってみたかったんだ。
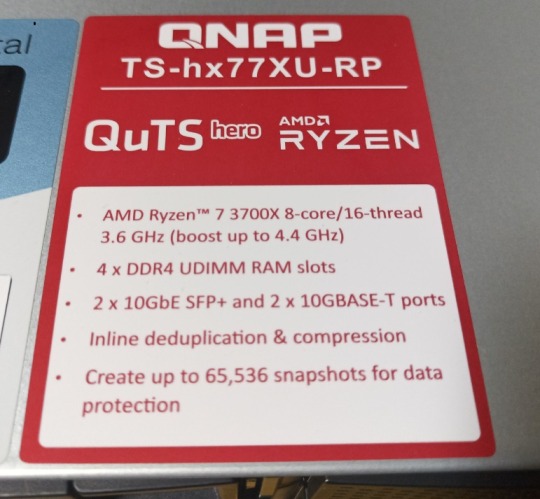
TS-h1277XU-RP
マシンスッペクは、AMD Ryzen7 3700Xで自宅のメインマシンのAMD Ryzen7 5700Xの前任となる。それなりに最新CPU。AMD系が残念なのは省電力版が同じソケットでは出ていないことかな。そのため省電力版への換装は無理となる。
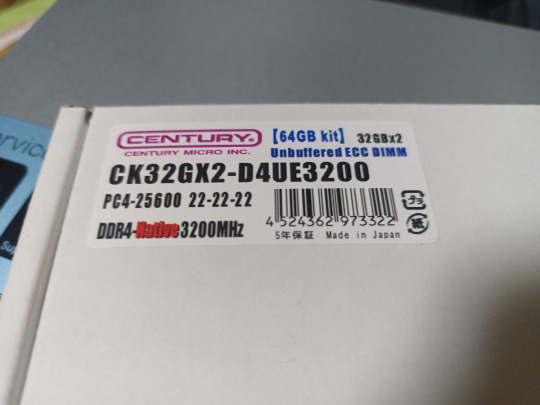
CK32GX2-D4UE3200
メモリは格安モデルなので、16GB×2の32GB。スロットに空きがあるので、32GB×2の64GBを追加でご用意。ちゃんとECC付のを選んでみた。全てのHDDドライブ埋めても自宅で使うにはそのままでも十だろうけど、せっかくなので増強。これで32GB+64GBで96GBに。
最新モデルだとマザーボードにNVMeスロットがあるんだけど、このモデル搭載するには追加のカードを挿さないとならない。システム用のドライブはSSD以上を推奨なので、SSDでraid1組むと2ドライブ消費することになってしまう。

QNAP QDA-A2AR
そこでSSD×2をraid1で3.5インチドライブに収納できるこれが活きる時がきた。これにシステムを入れれば1ドライブの消費で済むし、raid1も組める。しかもQNAP純正でOS側からもraid1と認識してくれる優れもの。

バックアップやファイル移動の際に必要かとも思ったので10TBのHDDも追加購入。

TVS-1282のファイルを追加したHDDやほかのNASに移動させてHDDを引っこ抜く。8TBをほぼメインで組んでいたので、すべてのHDDをraid6で組む設定で起動させる。順調に引っ越しが済んだら10TBのHDDもraid6に組み込む。

QNAP QM2-2P-384A
キャッシュ用にSSD拡張カードもお引越し。MVMeが4枚乗るやつだとシステムとキャッシュそれぞれでraid1が組めたんだろうけどお高いので使いまわし。仕方ないね。
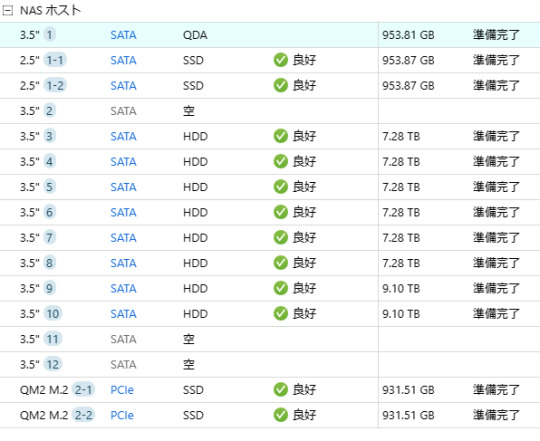
現状はこんな感じ。8TBは7TB弱、10TBは9TB弱と1割天使に持っていかれる。しかもraid6を組むにあたり8TBがあるのために10TBは8TBとして認識。それでも40TBの1ドライブには夢があるね。そして空きドライブがまだ3つ。1ドライブはホットスペア入れるとしても2ドライブ余る余裕の仕様。
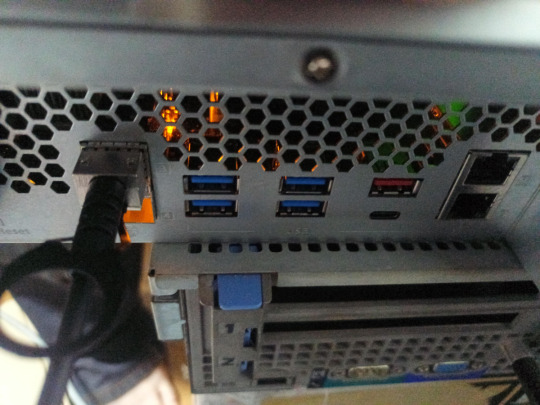
標準でSFP+が2つあるのもありがたい。

QNAP RAIL-B02
ラックレールを取り付けてラックへ納品。

ラッキング終わって満足。常時稼働時の騒音はあるけど、以前下にあるDELLの鯖が常時稼働してる時よりは静かなので気にする程でもないかな。ちゃんと温度管理できればファンの回転数も下がるので夏場をどうするかだけ考えよう。
0 notes
Text
關於磁碟陣列和資料備份
在個人或家用的電腦或筆電使用情境上,一般人會將重要資料放系統磁碟區以外的地方如D槽、其他磁區甚至獨立的硬碟等,更有甚者會將資料再上傳一份到雲端以避免資料遺失。 以下就資料遺失風險的高至低來說明: 與系統在同一顆硬碟上:系統碟是使用頻度最高的地方,因此耗損和失效風險也是最高的。一般的筆電或是品牌主機基本都是這樣的配置。 獨立的硬碟:相較於系統碟,只有在需要資料時才會用到,因此耗損和失效風險也相對較低。 主機板內建的軟體磁碟陣列RAID1:幾乎絕大部分主機板所用的晶片組都有內建磁碟陣列的功能,需搭配Windows作業系統的驅動程式來運作,且磁碟之內的移轉上需使用相同廠牌的晶片組,如Intel所建立的磁碟陣列只能移轉到Intel主機板上,AMD晶片組所建立的磁碟陣列亦同。 Windows作業系統的軟體磁碟陣列(動態磁碟映射模式):通常資料存取速度較主機板內建的軟體磁碟陣列來得差一寫,…

View On WordPress
0 notes
Text
.@debian @debian @xfceofficial @ubuntu @cnet @techpowerup @wired @pcwelt @tomshardware ithink that load modules raid1 dmraid dm-mirror dm-mod in #initramfs conf either etc initramfs and usr share initrams may solve the problems of initramf stools without changing to mdadm and recreating all raid arrays new sofarsobad sofarsogood notsure if now a kernel switch breaks theboot as suspected itryit with a default kernel tomorrow eventually maybe theproblem persists missing dmraid modules in xorg conf and initramfstools conf hmmm likely not automatically loaded in the switch from bullseye to bo okworm
.@debian @debian @xfceofficial @ubuntu @cnet @techpowerup @wired @pcwelt @tomshardware ithink that load modules raid1 dmraid dm-mirror dm-mod in #initramfs conf either etc initramfs and usr share initrams may solve the problems of initramfstools without changing to mdadm and recreating all raid arrays new sofarsobad sofarsogood notsure if now a kernel switch breaks theboot as suspected itryit…
View On WordPress
0 notes
Link
Based on Core i5-12650H Minisforum, known primarily for its mini-PCs, has released its first standalone motherboard. And this board is very unusual. [caption id="attachment_53260" align="aligncenter" width="780"] Minisforum Eyertec AD650i[/caption] Mini-ITX motherboard that allows you to install five drives. Minisforum Eyertec AD650i introduced The model is called Eyertec AD650i. This is a Mini-ITX board with a soldered CPU, but it has its own MXM board, which allows you to install three M.2 SSDs with a PCIe 3.0 interface. The expansion card supports a range of RAID configurations, including RAID0, RAID1, and RAID5, to create a compact home server. In addition, the motherboard itself has two SATA connectors for installing additional drives. The company had to sacrifice a PCIe x16 slot for a graphics card, so you have to be content with an integrated solution. By the way, it is based on a mobile CPU Intel Core i5-12650H. There is also room for two RAM modules. In China, they are asking $354 for a new product.
#AD650i#compact_PC#Computer_Technology#computing#desktop_computer#Eyertec_AD650i#mini_desktop#mini_pc#Minisforum#Minisforum_PC#PC_Hardware#small_form_factor_PC
0 notes
Photo

🚀 Vuoi elevare il tuo sistema di archiviazione al livello successivo? 😮 Confuso tra le configurazioni RAID 0, 1, 5, 6, 10 e JBOD? 🤔 Noi di G Tech Group abbiamo preparato una guida dettagliata che spiega le differenze tra queste configurazioni! 📘 ✅ Scopri la velocità di RAID 0 ✅ Esplora la sicurezza di RAID 1 ✅ Trova l'equilibrio con RAID 5 e 6 ✅ Massimizza la capacità con JBOD Dai un'occhiata al nostro articolo e fai la scelta giusta per il tuo business! 💼👩💼👨💼 👉 https://gtechgroup.it/raid-0-1-5-6-10-jbod-spieghiamo-le-differenze-tra-le-configurazioni/ 🎯 #RAID #ConfigurazioniRAID #RAID0 #RAID1 #RAID5 #RAID6 #RAID10 #JBOD #Sicurezza #Prestazioni #Velocità #Capacità #Archiviazione #GuidaRAID #Tecnologia #Business #IT #GTechGroup #HelpMePost #SoluzioniIT #Sistema #Hardware Questo post è stato pubblicato con #HelpMePost, provalo anche tu su helpmepost.com! 🚀
0 notes
Text
モノづくり塾用サーバーのバックアップ
注文していたSATA3ケーブルが届いたので早速2台目のHDDを取り付けました。 当初ソフトウェアRAID (RAID1) でディスクの冗長化をしようと思っていましたが、考えを変えてrsyncで日次バックアップすることにしました。 バックアップを取るときだけ2台目HDDをマウントして、バックアップが終わったらアンマウントしてHDDを止めてしまう。データの一貫性は日次で維持できれば良い。RAID1による性能低下がない方が良い。そんな風に考えました。 バックアップコマンドは rsync -a --delete コピー元ディレクトリ コピー先ディレクトリ みたいな感じでミラーモードです。
View On WordPress
0 notes
Text
NASのHDDにST8000DM004を使ってるけど、書き込みが遅すぎていい加減嫌気が差してきた。
130GBのメイン機のバックアップイメージの転送が3時間過ぎてもまだ半分ほどだ。
NASはHDD2台のraid1で冗長性を取っていて、さらに使うHDDを別メーカーにして同時に故障するリスクを軽減している。
ST8000DM004とWD80EAZZでraid1を組んでるけど、書き込みが遅い。
原因はST8000DM004の書き込み方式のSMRだと思われるので、 WD80EAZZをもう1台買って置き換えることにした。
同一製品でも製造月が違うだろうから同時に故障するリスクは低いでしょう。
今月はPC関係の出費が多い。
グラフィックカードも中古のRTX3600Tiを買っちゃったし。
0 notes
Text
What is RAID and what are the different RAID modes?
About RAID
RAID is an acronym for Redundant Array of Independent Disks.
RAID is a data storage virtualization technology that combines multiple physical disk drive components into one or more logical units for the purposes of data redundancy, performance improvement, or both.
Data is distributed across the drives in one of several ways, referred to as RAID levels, depending on the required level of redundancy and performance. The different schemes, or data distribution layouts, are named by the word "RAID" followed by a number, for example RAID 0 or RAID 1. Each scheme, or RAID level, provides a different balance among the key goals: reliability, availability, performance, and capacity. RAID levels greater than RAID 0 provide protection against unrecoverable sector read errors, as well as against failures of whole physical drives.
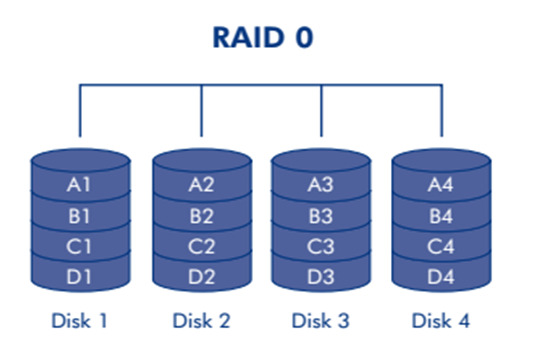
RAID 0 - The fastest transmission speed
RAID 0 consists of striping, but no mirroring or parity.
The capacity of a RAID 0 volume is the same; it is the sum of the capacities of the drives in the set. But because striping distributes the contents of each file among all drives in the set, the failure of any drive causes the entire RAID 0 volume and all files to be lost.
The benefit of RAID 0 is that the throughput of read and write operations to any file is multiplied by the number of drives because, reads and writes are done concurrently.
The cost is increased vulnerability to drive failures—since any drive in a RAID 0 setup failing causes the entire volume to be lost, the average failure rate of the volume rises with the number of attached drives.
RAID 0 does not provide data redundancy but does provide the best performance of any RAID levels.

RAID 1 - Data protection is the safest
RAID1 is data protection mode (Mirrored Mode). Half of the capacity is used to store your data and half is used for a duplicate copy. RAID 1 consists of data mirroring, without parity or striping. Data is written identically to two or more drives,If one drive goes down your data is protected because it's duplicated. The array continues to operate as long as at least one drive is functioning.
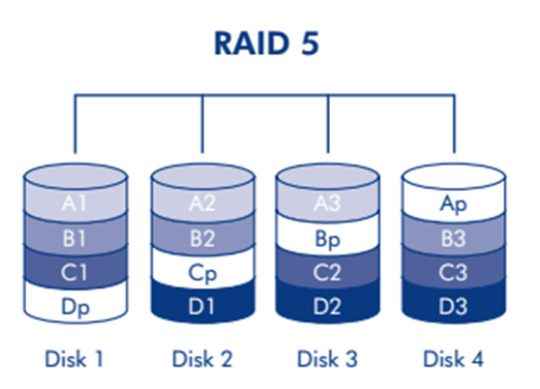
RAID 5 - Best fit Data protection and transmission
RAID 5 consists of block-level striping with distributed parity.
RAID 5 requires at least three disks. In systems with four drives we recommend that you set the system to RAID 5. This gives you the best of both worlds: fast performance by striping data across all drives; data protection by dedicating a quarter of each drive in a four drive system to fault tolerance leaving three quarters of the system capacity available for data storage.
Upon failure of a single drive, subsequent reads can be calculated from the distributed parity such that no data is lost.
The risk is that rebuilding an array requires reading all data from all disks, opening a chance for a second drive failure and the loss of the entire array.

RAID 6 - Large-capacity secure storage RAID6 is more suitable
RAID 6 consists of block-level striping with double distributed parity. Double parity provides fault tolerance up to two failed drives.
RAID 6 requires a minimum of four disks. As with RAID 5, a single drive failure results in reduced performance of the entire array until the failed drive has been replaced.
With a RAID 6 array, using drives from multiple sources and manufacturers, it is possible to mitigate most of the problems associated with RAID 5. The larger the drive capacities and the larger the array size, the more important it becomes to choose RAID 6 instead of RAID 5.
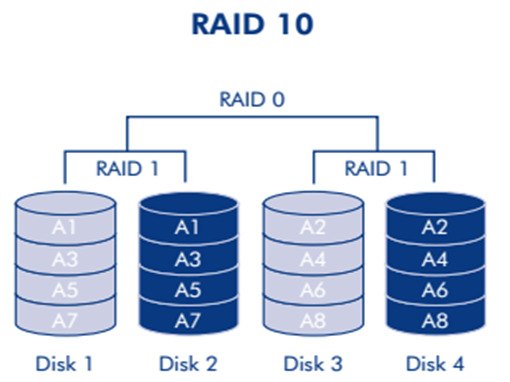
RAID 10 - High reliability and performance
RAID 10, also called RAID 1+0 . RAID 10 is a stripe of mirrors.
Arrays of more than four disks are also possible. A system set to RAID 10 yields half the total capacity of all the drives in the array.
RAID 10 provides better throughput and latency than all other RAID levels except RAID 0. This RAID mode is good for business critical database management solutions that require maximum performance and high fault tolerance. Thus, it is the preferable RAID level for I/O-intensive applications such as database, email, and web servers, as well as for any other use requiring high disk performance.
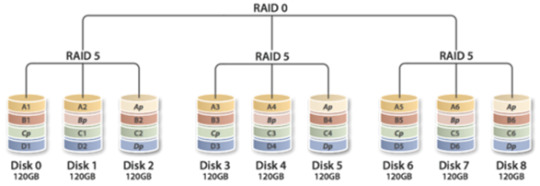
RAID 50 - High reliability and performance
RAID 50, also called RAID 5+0, combines the straight block-level striping of RAID 0 with the distributed parity of RAID 5. As a RAID 0 array striped across RAID 5 elements, minimal RAID 50 configuration requires six drives.
One drive from each of the RAID 5 sets could fail without loss of data; for example, a RAID 50 configuration including three RAID 5 sets can tolerate three maximum potential simultaneous drive failures (but only one per RAID 5 set).
RAID 50 improves upon the performance of RAID 5 particularly during writes, and provides better fault tolerance than a single RAID level does. This level is recommended for applications that require high fault tolerance, capacity and random access performance.
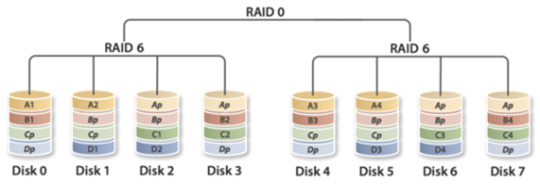
RAID 60 - High reliability and performance
RAID 60, also called RAID 6+0, combines the straight block-level striping of RAID 0 with the distributed double parity of RAID 6, resulting in a RAID 0 array striped across RAID 6 elements. It requires at least eight disks.
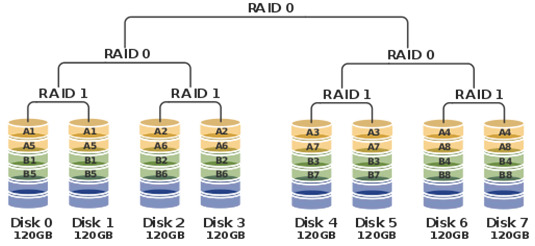
RAID 100 - High reliability and performance
RAID 100, sometimes also called RAID 10+0, is a stripe of RAID 10s. This is logically equivalent to a wider RAID 10 array, but is generally implemented using software RAID 0 over hardware RAID 10. Being "striped two ways", RAID 100 is described as a "plaid RAID".
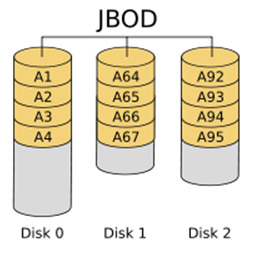
JBOD (Just a Bunch Of Disks)
JBOD (abbreviated from "Just a Bunch Of Disks",also is known as "None RAID") is an architecture using multiple hard drives exposed as individual devices. Hard drives may be treated independently or may be combined into one or more logical volumes using a volume manager like LVM or mdadm, or a device-spanning filesystem like btrfs; such volumes are usually called SPAN or BIG.
A spanned volume provides no redundancy, so failure of a single hard drive amounts to failure of the whole logical volume.
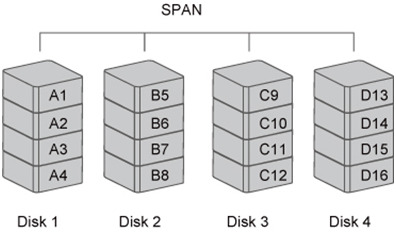
Concatenation (SPAN, BIG, LARGE)
Concatenation or spanning of drives is not one of the numbered RAID levels, but it is a popular method for combining multiple physical disk drives into a single logical disk. It provides no data redundancy.
Spanning provides another maximum capacity solution, which some call it as "Big/Large". Spanning combines multiple hard drives into a single logical unit. Unlike Striping, Spanning writes data to the first physical drive until it reaches full capacity. When the first disk reaches full capacity, data is written to the second physical disk. Spanning provides the maximum possible storage capacity, but does not increase performance.
What makes a SPAN or BIG different from RAID configurations is the possibility for the selection of drives. While RAID usually requires all drives to be of similar capacity and it is preferred that the same or similar drive models are used for performance reasons, a spanned volume does not have such requirements. The advantage of using this mode is that you can add more drives without having to reformat the system.
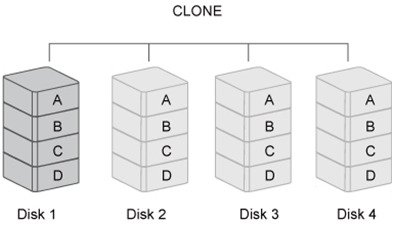
Clone
CLONE consists of at least two drives storing duplicate copies of the same data. In this mode, the data is simultaneously written to two or more disks. Thus, the storage capacity of the disk array is limited to the size of the smallest disk.
RAID Level Comparison
https://www.terra-master.com/global/products.html

#raid#raid1#raid0#raid5#raid6#raid10#raid50#jbod#span#clone#terramaster#raid storage#nas#network storage
3 notes
·
View notes
Text
Verificar el espacio del disco con 10 comandos

Verificar el espacio del disco con 10 comandos, en sistemas linux. Hoy en día, con la popularidad que han adquirido los discos SSD (estado sólido), es importante vigilar el tamaño total de nuestros dispositivos de almacenamiento. Recordemos que los SSD (Solid State Drive) suelen tener mucha menor capacidad. En el artículo de hoy, veremos 10 comandos o métodos con los cuales podrás verificar el espacio total del disco, así como el usado o el libre si aplicas sus opciones. Los 10 comandos propuestos, vienen por defecto en la inmensa mayoría de distribuciones linux, por tanto no tendrás ningún problema. Soy consciente, de que existen otras fórmulas o herramientas GUI para identificar estos datos, pero seamos claros... en el tiempo que tardan en cargar los gráficos de esas aplicaciones, puedes ejecutar 5 veces un comando que te ofrecerá la misma información.

Verificar el espacio del disco
Verificar el espacio del disco con 10 comandos
Algunos de los comandos expuestos, no son muy prácticos. Aun siendo así, es interesante conocer todas las opciones posibles. Todos los ejemplos de este artículo, corresponden a un sistema con dos discos mecánicos de 1Tb montados en raid 1. Comenzamos. Comando df El comando df es uno de los más utilizados para la tarea encomendada, vemos un par de ejemplos. df -Th Vemos algo similar a... # df -Th S.ficheros Tipo Tamaño Usados Disp Uso% Montado en devtmpfs devtmpfs 3,8G 0 3,8G 0% /dev tmpfs tmpfs 3,9G 43M 3,8G 2% /dev/shm tmpfs tmpfs 3,9G 145M 3,7G 4% /run tmpfs tmpfs 3,9G 0 3,9G 0% /sys/fs/cgroup /dev/sda2 ext4 915G 100G 769G 12% / /dev/sda1 ext4 488M 269M 184M 60% /boot /dev/loop0 ext4 1,5G 71M 1,3G 6% /tmp tmpfs tmpfs 780M 0 780M 0% /run/user/0 También podemos imprimir los inodos. df -Thi Salida... # df -Thi S.ficheros Tipo Nodos-i NUsados NLibres NUso% Montado en devtmpfs devtmpfs 972K 386 971K 1% /dev tmpfs tmpfs 974K 27 974K 1% /dev/shm tmpfs tmpfs 974K 574 974K 1% /run tmpfs tmpfs 974K 16 974K 1% /sys/fs/cgroup /dev/sda2 ext4 59M 180K 58M 1% / /dev/sda1 ext4 32K 363 32K 2% /boot /dev/loop0 ext4 94K 2,2K 92K 3% /tmp tmpfs tmpfs 974K 1 974K 1% /run/user/0 Comando fdisk Otra opción muy conocida a la hora de verificar el espacio total del disco, es el comando fdisk. fdisk -l Ejemplo de salida. # fdisk -l Disk /dev/sda: 999.7 GB, 999653638144 bytes, 1952448512 sectors Units = sectors of 1 * 512 = 512 bytes Sector size (logical/physical): 512 bytes / 512 bytes I/O size (minimum/optimal): 512 bytes / 512 bytes Disk label type: dos Identificador del disco: 0x000c615b Disposit. Inicio Comienzo Fin Bloques Id Sistema /dev/sda1 * 2048 1050623 524288 83 Linux /dev/sda2 1050624 1950347263 974648320 83 Linux /dev/sda3 1950347264 1952444415 1048576 82 Linux swap / Solaris Disk /dev/loop0: 1572 MB, 1572864000 bytes, 3072000 sectors Units = sectors of 1 * 512 = 512 bytes Sector size (logical/physical): 512 bytes / 512 bytes I/O size (minimum/optimal): 512 bytes / 512 bytes Si combinas fdisk con otros comandos, puedes especificar exactamente los datos que quieres imprimir. fdisk -l | awk '$1=="Disk" && $2 ~ /^/dev/.*/ {print $2 $3 $4}' Herramienta parted Al igual que fdisk, la herramienta parted también es útil para verificar el espacio del disco. Su información expuesta es clara y compresible. parted -l Imagen de ejemplo.
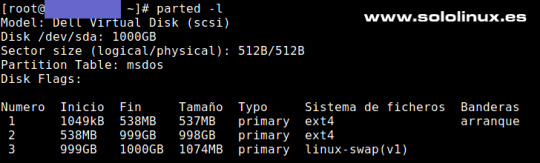
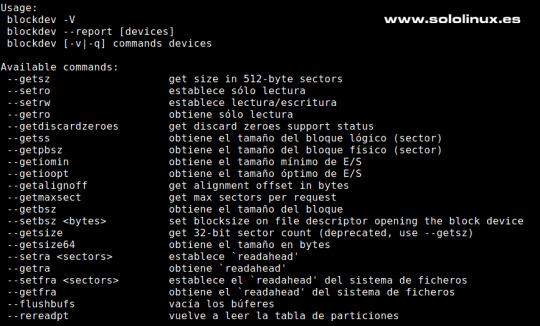
Verificar el espacio del disco con parted Comando lsblk El comando lsblk tiene la capacidad de ofrecernos información, de todos los dispositivos conectados, o de los que hayamos especificado. lsblk Se imprime algo parecido a... # lsblk NAME MAJ:MIN RM SIZE RO TYPE MOUNTPOINT sda 8:0 0 931G 0 disk ├─sda1 8:1 0 512M 0 part /boot ├─sda2 8:2 0 929,5G 0 part / └─sda3 8:3 0 1G 0 part loop0 7:0 0 1,5G 0 loop /var/tmp Comando blockdev Otra interesante y a la vez desconocida opción para verificar el espacio del disco, es el comando blockdev. En un futuro haremos un artículo sobre él. blockdev --report Ejemplo... # blockdev --report RO RA SSZ BSZ StartSec Size Device rw 256 512 4096 0 999653638144 /dev/sda rw 256 512 4096 2048 536870912 /dev/sda1 rw 256 512 4096 1050624 998039879680 /dev/sda2 rw 256 512 4096 1950347264 1073741824 /dev/sda3 rw 256 512 4096 0 1572864000 /dev/loop0 En la siguiente imagen, vemos algunas de las interesantes opciones de este coronado.
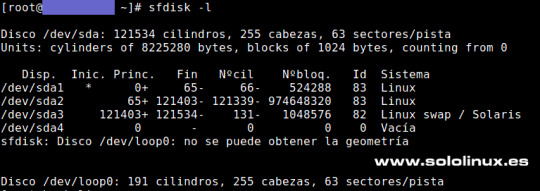
Opciones del comando blockdev Comando lshw Este comando imprime la información de todo el hardware del sistema, sin embargo puedes solicitar que solo imprima la información de los discos. lshw -c disk En nuestro caso se imprime... # lshw -c disk *-disk:0 UNCLAIMED description: ATA Disk product: TOSHIBA MG03ACA1 vendor: Toshiba physical id: 0.0.0 bus info: scsi@0:0.0.0 version: FL1D serial: 93C2K6WCF configuration: ansiversion=5 *-disk:1 description: SCSI Disk product: Virtual Disk vendor: Dell physical id: 1.0.0 bus info: scsi@0:1.0.0 logical name: /dev/sda version: 1028 size: 931GiB (999GB) capacity: 931GiB (999GB) capabilities: 15000rpm partitioned partitioned:dos configuration: ansiversion=6 logicalsectorsize=512 sectorsize=512 signature=000c615b *-disk:2 UNCLAIMED description: ATA Disk product: TOSHIBA MG03ACA1 vendor: Toshiba physical id: 0.1.0 bus info: scsi@0:0.1.0 version: FL1D serial: 93C2K6WEF configuration: ansiversion=5 Verificar el espacio del disco con 10 comandos Comando lsscsi Creado específicamente para los obsoletos discos SCSI, en la actualidad reconoce la mayoría de discos existentes. lsscsi --size Ejemplo... # lsscsi --size disk ATA TOSHIBA MG03ACA1 FL1D - - disk ATA TOSHIBA MG03ACA1 FL1D - - disk Dell Virtual Disk 1028 /dev/sda 999GB Comando sfdisk Como alternativa a fdisk, pero sin ser interactivo, tenemos el comando sfdisk que al igual que todos los descritos anteriormente, también nos ofrece el espacio del disco de forma rápida y sencilla. Mira que fácil. sfdisk -l Imagen de ejemplo.
Verificar el espacio del disco con sfdisk Comando du Quizás el comando du, no sea tan específico para el objetivo principal de este artículo, aun así tiene la capacidad aplicando opciones de ofrecernos valiosa información. # sintaxis du En la tabla vemos las opciones más interesantes, al respecto de lo que hoy tratamos. Revisar los registros Menos ortodoxo que todo lo comentado en este artículo, aunque también válido. Tenemos la posibilidad de listar los registros y buscar en ellos la línea donde se especifica el valor que buscamos (espacio del disco). Nada recomendable, perderás mucho tiempo con estas opciones. Unos ejemplos de uso. journalctl -b dmesg | grep dmesg | grep blocks Canales de Telegram: Canal SoloLinux – Canal SoloWordpress Espero que este artículo te sea de utilidad, puedes ayudarnos a mantener el servidor con una donación (paypal), o también colaborar con el simple gesto de compartir nuestros artículos en tu sitio web, blog, foro o redes sociales. Verificar el espacio del disco con 10 comandos. Chat de SoloLinux en Telegram Read the full article
#10comandos#blockdev#Comandoblockdev#comandodf#comandodu#comandofdisk#comandolsblk#Comandolshw#Comandolsscsi#Comandosfdisk#comandos#discosscsi#discosssd#distribucioneslinux#espaciodeldisco#fdisk#gui#Herramientaparted#parted#raid1#Revisarlosregistros#Solidstatedrive#ssd
0 notes
Photo

TVS-673eのHDD換装
撮った写真をそのまま入れてたら メインのHDD容量が足りなくなってきたので久しぶりの換装。
年末あたりにエラー吐いて交換してたような気がするけど気にしない。

Western Digital HDD 8TB WD Red Plus ‘WD80EFAX-EC
前回換装時に次期換装は10TBか?とか予想してたが、10TBのWDの青って無いのね、8TBから安くても赤しかなかったので懐具合と相談の上、 8TBになってしまった。前回同様外付けから抜くのはガワが増えるだけなので今回は単品で購入。保証も3年あるしね。
で、現状把握。
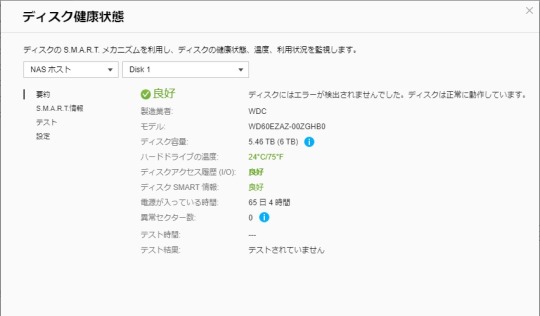
こっちは交換したばかり。65日しか経ってない。

未だエラー吐いてない現役の子。

管理画面から「ディスクを1台ずつ交換する」を選択。

Disk1から交換。

取り外しが可能となり交換できるようになった。ここで古い方か交換すればよかったと後から思い知らされる。

新しいHDDを入れると勝手にリビルド開始。そして待つこと17時間。その途中でDisk2が S.M.A.R.T. でエラーを吐き出す。古い方から取り出せばよかった。
無事同期後、Disk2も換装して待つこと10時間。ようやく再構築完了。

そんでもって容量の拡張に5時間ほど。
前回の容量拡張はそれほどかからなかったのに今回はかなりの時間を要した。
10TBの壁は高かった。
0 notes