#remove background from image using pen tool
Explore tagged Tumblr posts
Visit Tumblr Blog
Explore Tumblr blogs with no restrictions, modern design and the best experience.
Last Seen Tumblr Blogs


Fun Fact
Tumblr Inc. is funded by 13 investors.
Text
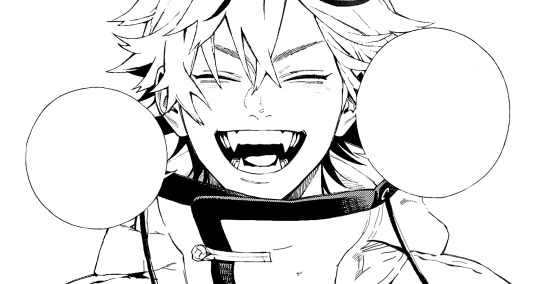
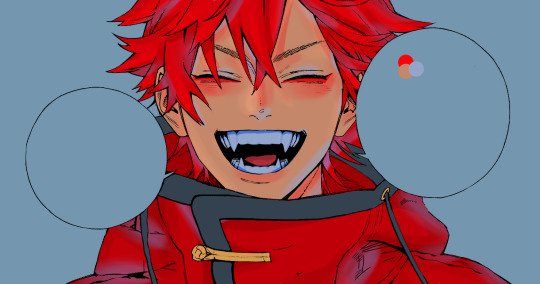
Na'vi Stripes Tutorial!
Tagging @eywaschild891, in case you were still interested in this! (note: this tutorial is about the digital process of adding the stripes, not actually designing the patterns)
I'm using MediBang Paint Pro, but this technique should work in any program that supports layers.

So you've drawn your Na'vi and now you want to add some stripes! First we'll have to start with a base color. Underneath your lineart layer, add two new layers: one as the main base color layer (for coloring hair, eyes, clothes, etc), and on top of that, a separate layer for the skin. Putting the skin on a separate layer is important because that way you'll be able to do the stripes as a clipping mask.
Your layer box should look something like this (you can ignore the gray background and extra folder, they're not important for this tutorial):

Now we can start on the base stripe layer. Create a new layer and set it as a clipping mask on your skin layer. This makes it so that you can't "color outside the lines", so to speak, while drawing the stripes. Then take a hard-edged brush and start drawing the patterns you want. I like to use MediBang's "mapping pen", which has a subtly textured edge, but the regular default Pen tool will work perfectly fine as well.


If you'd like, you can stop here and call this done: solid stripes are perfectly acceptable in a cartoonified stylization. However, if you look closely at Na'vi stripes on canon characters, you'll note that they're not completely solid: they have a subtle fading effect, where they're darker along the edges and a bit lighter in the middle, and in some places they fade out into the body. Sometimes it almost looks watercolor-ish.
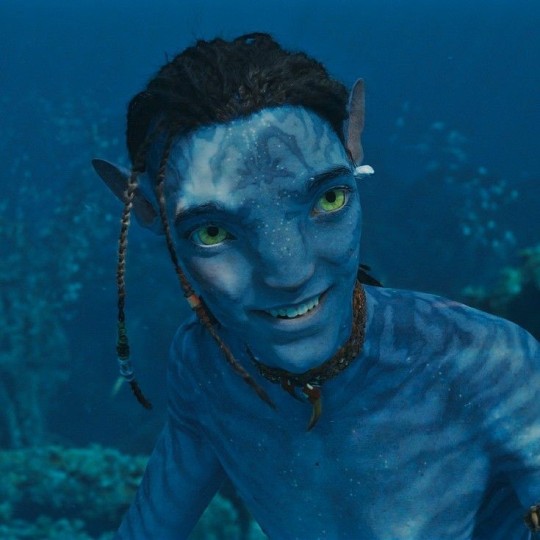
(I'm sure there are better examples out there than these but I'm not up to digging for them rn 😅)
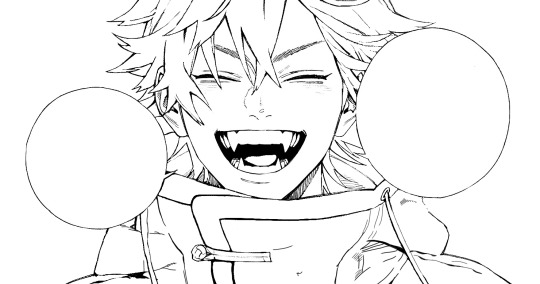
So, let's continue! To fade our stripes, create another clipping mask layer above the main stripe layer. Use a brush with pressure-based opacity such as MediBang's "pencil" to loosely fill the insides of the stripes with the base skin color.


Once you have filled in all the stripes, use the gaussian blur filter to smooth out the fade. The filter doesn't need to be super strong—in fact, if you make it too strong you will loose the detail and the stripes will look solid again. With MediBang's version of the tool, I had it set to 7 (out of a max of 64) for this image, though of course the way it works may be different in other programs; mess around with different settings until you get something you like.
(sadly I do not have a screenshot of the blurred version because apparently the way my cintiq takes screenshots is dumb; it only captured the "gaussian blur" popup window instead of the whole screen. oh well. :P)
Now that we have the fade within the stripes, let's also make them fade into the rest of the body. The areas you'll want to do this with are the torso, inner arms, and inner/back of legs.
Create another clipping mask. Using the same pressure-opacity brush and base skin color as before, loosely block in where you want the stripes to fade into the body.

Once you've finished, gaussian blur the layer just like before. This one can be a little stronger than the inside-stripe one. For this image I had it set to 14.
Sometimes, the areas you block out will overlap with areas that shouldn't be faded—for example, here the fading from the back of the character's thigh is overlapping with her tail. To fix this, just erase it to remove the fade from where it shouldn't be (this is why we do this step on separate layers). Make sure you do this erasing after you've applied the gaussian blur.

Depending on the pose of your character, there may be places where one faded area overlaps with another. For example, in this drawing, the blocking for the arm fading overlaps with the blocking for the torso fading. Here it is with the torso fading turned off so you can see the overlap:

This makes it difficult to do both the arm and the torso on the same layer, because I won't be able to remove where the arm fading overlaps the torso fading without also removing the actual torso fading.
Luckily, there's a simple fix: just do the arm fading on a separate layer. Do this as many times with as many layers as you need to for your particular pose. Sometimes you'll only need one or two, like here; other times you'll need several.
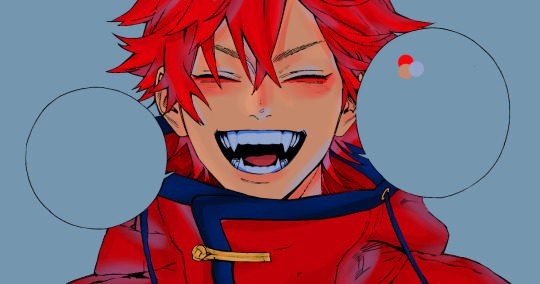
BUT, fading the stripes is the last step! Regardless of how many layers you end up needing, once you're done, you're done! Now you have a Na'vi with nice natural-looking striping 😸

At this point you can go ahead and merge all the clipping masks into the main skin layer and even merge the skin layer with the other-base-colors layer if you're ready!
Hopefully that wasn't too hard to follow; feel free to ask if anything is confusing or unclear. Happy drawing! 😸
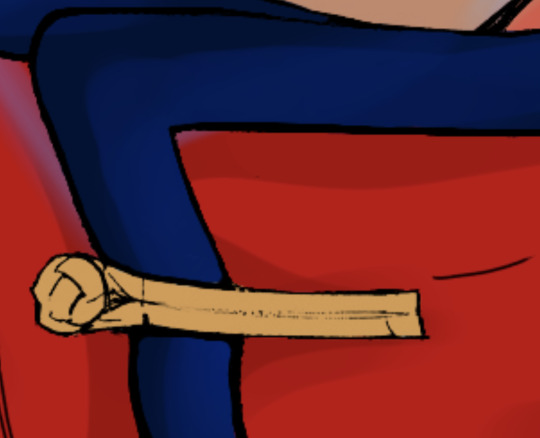
#avatar#avatar 2009#way of water#na'vi#na'vi oc#my art#tutorial#yes i draw every stripe individually yes it takes a long time 😭#anyways...#wanted to make this over the holidays but then i was sick the whole time and not up to it ;w; oh well#i suppose this is also technically a preview for a new ref sheet though 👀#i have made some changes to my sona's design since making her current ref so it was in need of an update#they're not *major* changes or anything; just some minor adjustments to outfits and stripe+sanhì patterns#but enough to want a new ref#so 👀
130 notes
·
View notes
Text
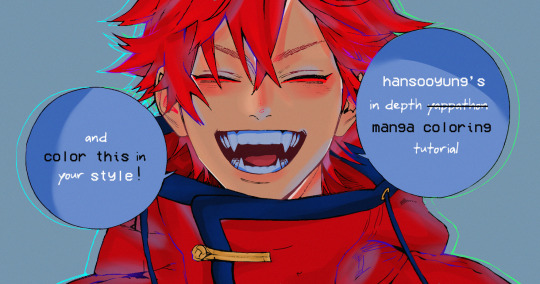
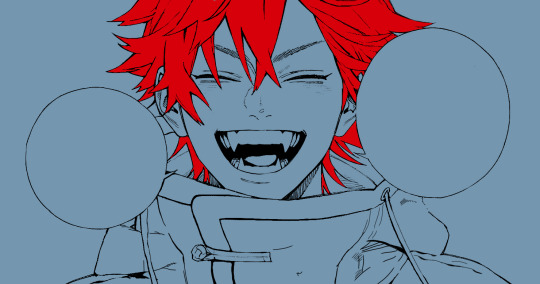
hansooyung's coloring tutorial & ctiys: alma time! 🍒
hello everyone! though i've been meaning to for a while, i've finally gotten around to making my first manga coloring tutorial! i'll be going over cleaning panels and screentones, choosing base colors, and finally shading and lighting.
this will also be a color this in your style challenge, so if you're willing, feel free to post your colored panel and tag me in it!! i'd love to see all the results :)
find details under the cut! 🦋
DISCLAIMERS:
this is just how i personally color! i know for a fact that some of my other friends follow other methods and have such beautiful colorings <33
for colors specifically, i play around a LOT. if you don't like your color scheme for the time being, mess around with it! i don't use psds since i like to mess around by hand with color palettes, but maybe i'll look into it for the future.
i explain a lot just bear with me gang 🙏
TECHNICAL STUFF:
software: ibis paint x (on iphone). i use ibis since it is FREE for all phones and it worked on my chromebook as well.
while this tutorial is made for ibis paint x, everything works on other softwares except the brushes, which i've provided alternatives for below.
brushes: i will be using dip pen (hard) which is automatically included with ibis, and two other brushes i made myself which you can find here and here. for more brushes, @/bkdkdh was incredibly helpful and posted her awesome set here!
for other softwares, you can use similar brushes. dip pen (hard) can just be the default brush, while wet edges is just the default brush on lowered opacity (and more of a rectangle/marker shape?). watercolor pencil is a watercolor brush in the rectangle/marker shape as well. if you can't get the shape, you can always smudge your lines into shape as well, so don't fret too much! a bunch of people only use one brush for coloring everything (which is insane to me, personally, they are so talented!)
fun fact: the first brush listed that i made was originally called "aki tao watercolor smooth" 👍
ok here we go guys!!
STEP ONE: CLEANING THE PANEL
i think of this part as setting up the panel for coloring! usually it's pretty exhausting cuz it's all b&w but it's all worth it i swear. the panel i'll be coloring is this beautiful one of alma from chapter 2:
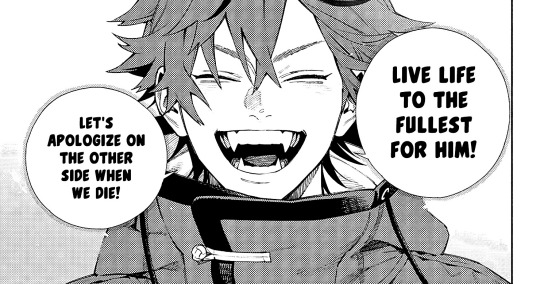
imgur link here (x)
a lot of people redraw their lines to avoid screentones, which is extremely helpful. however, i work on a phone and my fingers are not steady even with the stabilizer turned all the way up T~T. i do it this way, but a different (possibly easier) way may work for you!!!
your first step will be to remove all the white, giving us a transparent background to work with. THIS IS THE NUMBER ONE REASON WHY I USE IBIS PAINT X.
when you upload the image to ibis, a popup comes asking if you would like to "extract line drawing". this creates a lineart of your image. click yes, and your work is like 90% done.
if you're not on ibis, you can redraw your panel, put lineart layer on screen, etc. or you can just extract line drawing from ibis and upload to software of your choice
for those of you not on ibis, i've included the line drawing here (x) if it looks black, don't worry and set your background to white.
omg i was not kidding when i said i explained a lot. ok now onto the three main steps of cleaning the panel:
cleaning background
removing screentones
repainting black lines
for cleaning the background, we're going to clear off all the extraneous stuff. this includes the text in the speech bubble, the gradient screentones behind alma, and the panel line on the left side. just use your eraser tool and go crazy! (i forgot to save the panel at this point of the coloring OTL)
for removing screentones, we're going to remove all those "dots" that mangakas use for shading. these are used to show value for b&w art, but since we're coloring we don't need them—a lot of people have really cool ways of incorporating screentones in their colorings though, and it looks amazing! i used it on nana's hand in my bnha coloring.
remove the screentones from alma's hair and jacket with your eraser tool. this will take time, but it's worth it in the end!
for portions with a bunch of lines, you can create A NEW LAYER and redraw some of the lines. that way, you can erase indiscriminately from the original layer but the lines you drew are still there. again, like i said, my hand is really shaky so i don't do it a lot, but it's extremely helpful for smaller parts where i have control! i used this on alma's jacket, and here's a screenshot of the process:

(i made his jacket purple so i could distinguish between layers easily).
it should look like this when you're done:
for the final step of cleaning, i like to erase all the things colored black (the collar and strings of the jacket, along with the back part of his hair). that way, i can color them in with dark colors and it adds to the whole look of the coloring.
i've circled the parts i'm going to erase below:

and it should look like this when you're done!
ok everyone cheer we're ready to color now!!!!
STEP TWO: BASE COLORS
CROWD CHEERS ok lets go!
this part is the most important to me, because it sets the tone for the whole coloring. i like to use three-four main colors in my colorings, and it's usually background, skintone, hair, and the secret fourth color. the secret fourth color is usually whatever color fits the character's vibe, or if the character's color is the bg, it'll be an accent color.
for example, with my nagi coloring, i used white for the hair, i had my skintone, i had blue as the main coloring vibe (as nagi's color), and black as the accent color.
for alma, i chose his main color to be red! it's the color of his hair and his jacket, so i wanted it to be vibrant and stand out. since blue contrasts red, i went for a greyish-blue shade for the background. (i went for grey rather than solely blue because then it would clash rather than complement).
disclaimer please please please take your device off night mode warm mode f.lux whatever you have. this has screwed me over more times than you may think :(
i like to make my vibrant colors closer to the right end of the color square. for alma's hair, i chose this color:

i dragged it down from the corner a bit but kept the saturation since his hair is kind of dark. we can use vibrant colors to shade it though, so don't worry!
here's his hair and the background together:
now from here, play around with skintones until you find one that matches the hair!
i usually drag around the wheel to the orange-red intersection, and have it on the lighter, more saturated side. here's the color i chose for alma's skintone.
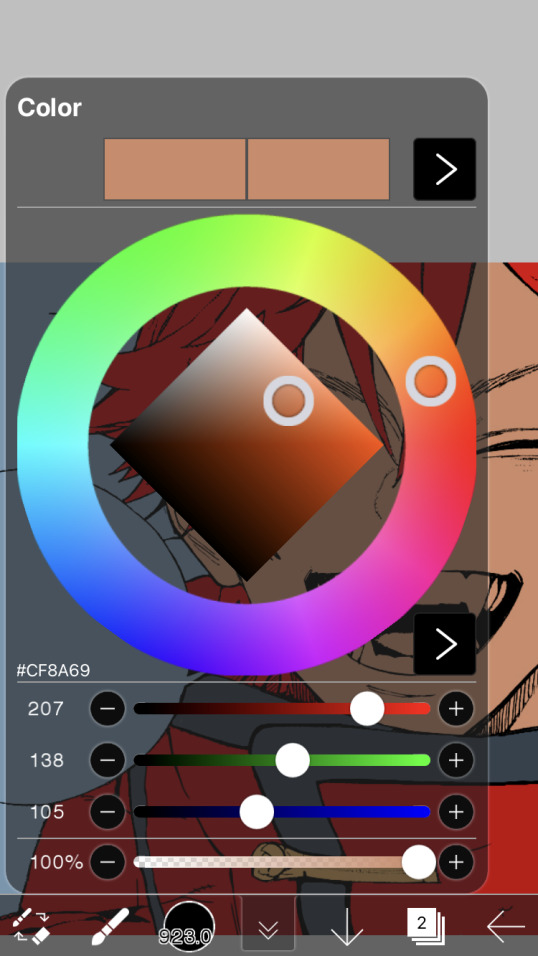
i thought his original skintone looked a bit too orange, so i pulled the saturation back a little bit (moved closer to the left side of the square).
after that, color in his jacket with a bit darker red than hair, choose a gold color for the accents on his jacket, and color in the black parts with a grey-ish color (we will change that later).
here's the base colors!
if it looks a bit bright, don't worry! we can change that with shading. or you might just have to. accept the light.
STEP THREE: SHADING AND LIGHTING
wooo we made it!!!!!!! ok now i lied, we have a bit more of base colors to go. on a layer above the skin, color in your teeth and tongue. for pieces that have a more red feel (like this one), i like to make the teeth and the shading a more vibrant blue color. (for blue pieces, i make it a purple!).
IMPORTANT NOTE: ALL SHADING AND ALL COLORS SHOULD BE DONE ON NEW, CLIPPED LAYER.

i'll then go in and do some light shading with my wet edges brush. i'll use a darker color for hard shadows and then a lighter, more vibrant color to accentuate it.
next up we have blush! a lot of people do this in very different ways but i like to do it directly under the eyes, in a vibrant red shade. make a new layer above the skin and clip it on. color pick alma's hair and drag it to the most saturated shade (red corner). then using the watercolor pencil brush, lower the opacity of the brush and drag a line under the eyes on both sides.
make sure to erase the portion of blush that goes above the eyeline. i also added some lips for alma as you can see, and then added a red line under the eyes! this was back to the regular dip pen (hard) brush on 100% opacity. it may take a few tries to get your blush to the way you want it, so don't worry too much.
now we can start our actual shading!
i break this part up into three steps: skin shading, blue shading, and light shading (highlights?)
for all of them, think about where the light is falling and how it will look on alma.
quick interlude about brushes: i use the watercolor pencil brush for softer, bouncy looks (like blush and noses) and i use the wet edges brush for more hard lines in shading.
again, make a new layer above the skin and clip it on. (i like to have it below the blush, so it doesn't cover it). for skin shading, i take the vibrant red and lower the opacity of the wet edges brush by a significant amount (specifics don't really matter, as long as you're happy with it). i'll trace his neck, from the shadow of his face, shadows of his hair falling on his face, ears, and nose. (for the nose i used the watercolor pencil brush for a softer look).

this is what i have once i'm done!
next we have skin shading part two, where we basically make a new layer on top of our first shading, lower the opacity further, and trace outside whatever we just did to blend it in more.

i used the watercolor pencil brush since it's more softer shading meant for blending! i also added it around the eyebrows for depth.
next up we have our blue shading! this is a technique that i learned from @/bkdkdh's colorings, but adding blue as a shadow really adds to the whole coloring. using the watercolor pencil brush, select a light-ish blue shade (a bit more saturated than background color) and use it to shadow a few more areas than your skin shading. i always make sure to hit the underside of the nose, cuz i think it adds depth!
finally, to wrap up our skin shading we have our lights. i use an orange-ish yellow color, which i set pretty light to not blend into the skin. using the watercolor pencil brush, i'll basically highlight any areas opposite to where the blue was, and highlight different parts. i always highlight one side of the nose as well.
i erased the line around the nose since we now have shading there, and added a darker shade to the teeth since i felt it wasn't shaded enough.
now onto the hair!!! (guys we're almost done bear with me, skin and hair are the two main things and then you can half-ass the clothes)
color pick alma's hair color, then drag the red a bit further down to get a darker yet still saturated color. here's mine:

then, using the wet edges brush, draw lines of shadow wherever clumps of his hair fall or overlap with each other. you can have the opacity set to whatever level you want, i just went with around 90. just try to follow the natural lines and patterns of the original line drawing, and everything should work out fine.

here's how mine looks! then, just like we did for skin shading, place a layer on top and lower the opacity to around 50%. place some more shading to blend it in. you can also shade more parts with this shade for some softer shading. i actually forgot to take a screenshot of this step but you'll see it in the next one!
for our (almost) last part of hair shading, take a layer and place it below both of your shading layers. this is going to be our highlight layer! you can see it below, labeled 49%.

remember how we set alma's hair a bit darker from the corner color? now select that corner color and draw highlights in the center of each hair clump.

lightly visible but it's there!
now here i skipped around a bit bc i was having fun and forgot i was doing a tutorial, but repeat the shading (not highlighting) steps with darker colors for alma's jacket. you should have your base layer, a dark shading, and a softer shading for blending.
we're almost there guys!!!
for the pretty much final step of shading, select a light blue color and do some blue shading with the watercolor pencil brush opposite to wherever your darker shading falls (just like we did on the face). make sure to do it to both your hair and your jacket! here's mine:
now for the black portions, we're going to color the whole thing in a dark blue color. just alpha lock your layer and make a big stroke of dark blue, almost black. for our black shading, we're actually going to go lighter.
select a lighter (but still dark) color and place highlights on the base layer, then take an even more vibrant, lighter blue and place it on the very outside for highlights. a better example of this would be nagi's legs in his blue lock uniform here. then, choose a shade to apply shading to the gold accents on alma's jacket and we're done!
CROWD CHEERS!!!!!
STEP FOUR: FINISHING TOUCHES
we made it guys!!!! for finishing touches, i'll usually do background effects or text or that kind of stuff.
step one is coloring your lines. you can add a new layer and clip it to your lineart, or simply alpha lock your lineart and color directly on top. for hair i like to add vibrant blue/purple lines, along with a few red ones. for skin lines i try to do dark brownish purples, but leaving some black is good too bc it adds flavor!
i colored in the text boxes and added shadows using the wet edge feature, then added some text. for the glitch effect, i duplicated the lineart, dragged the layer below all of my colors (including speech bubbles) and then used the glitch effect with height full from ibis. if you don't have ibis, you can look into features on your software, or you can also just drag your lineart layer a bit to either side and color it in. i also applied just the tiniest bit of noise on top of everything
and there we go!!!!! we made it to the end :)
if you've read all the way til here, thank you so much! if you decide to color this panel of alma (or any other panels!) don't be afraid to post them and tag me for a color this in your style type of thing! (you can also put it in my tracked tag, #user.roy) i'd love to see everyone's works :)
here's the full timelapse: (it stalls for a bit at some times but hey we can't have everything)
#roy colors#tutorials#manga coloring tutorial#useraki#usergojoana#usermica#usernikiforova#tagging some friends <3#alma#gokurakugai
104 notes
·
View notes
Text
how i do my drawing style (obv not every thing is for everyone and this is how i personally do it art are not rules but exploration)
i draw with my palm resting on the tablet, i cant do super precise movements with my hands so i use thick lineart and a bunch of stabilizer for that. if i need long lines i can just lift my hands. i use a 2016 samsung tablet after i switched from the horrible sliperry drawing tablet
currently i use a "pen" brush with opacity AND size jitter so it can sketch and line when i want. ON GREATER BLENDING MODE, this gives a marker sort of look (lines wont overlap)
canvas is 1000x1000 because my tablet is slow and also pixely crunchhhh
my sketches are shapes and dynamics first then anatomy second, in my process i find that treating the sketch as a "newgrounds funky shape artstyle" kind of thing makes things fall in place much smoother too so thats a bonus, and also obv i like it that way lol, its much looser and less stressful, eyeball is my guide. when done my way it looks "imprecise".
I grabbed my shapes/dynamics principles from some of what sinix does and the anatomy/gesture is like 2 bites of knowledge from anatomy guides (the ones who helped me with the style most were the ones who focused in dynamics) furry anatomy was by looking at art and photos, but 80% was just me messing around and finding out
generally i do my sketches in one layer because i softly erase instead of making a new layer (too much work and i cant do really precise strokes) this makes some soft sketchy lines a bit visible, i make a outline if i think the color is drowning the lineart
use curve adjustment to make soft strokes less visible and stronger strokes more visible, i do this because i really like how for me it creates more space for color/shading to fit in
either use 'enclose and fill' tool from krita or just make blocks of color by hands, i make a loot of layers in this process because i like to finetune the colors to my liking and to shade cleanly
currently the way i pick colors isnt too crazy, mostly its based on color theory ideas and my own taste as the judge, if i feel experimental i will try to make some "weird/wrong" color decisions to make it a bit more fun.
as for the color theory what i apply from there is mostly relations with hue saturation and value and my own personal understanding on how they interact together (quick example, for me increasing the saturation of a color "darkens" it a bit)
after this i paint/shade, i try to make it look fun, i use a basic round brush with opacity for more control
after this i make collages backgrounds on my computer WITH ALSO KRITA, my sources of images vary (wikimedia commons, tumblr blogs, pinterest, flickr)
the way i get this specific look is to mess around with some photo manipulation (curves adjustment blending modes), i like krita because it gives you a bajillion filters and blending modes
my favorite ones: "gradient map", "color to alpha (removes background)", "cross channel adjustment" "levels", "hsv adjustment", "curve adjustment" BLENDING MODES: "hard mix (photoshop)", all of modulo blending modes, "overlay", "hard overlay", "lighten", "darken", "dissolve"
mostly what i do on images is bump saturation on hsv adjustment (krita legacy mode on hs vadjustment makes colors a bit more distorted), cut some greens on levels, compress blues and reds, compress saturation, decrease the lightness range and adjust hue a bit if needed, mess with noise and layers. mostly i keep in mind to make the lightness range different from the subject so it doesnt melt together,
if you want more distortion compres with levels and use posterize
glaze on my windows virtual machine (i use linux lol) on high on low quality (this is to protect from theft but also gives a funky filter)
#art process#talking about how i draw#art style#style guide#photo manipulation#krita#art style guide
2 notes
·
View notes
Text
Clipping Path: An Essential Tool for E-Commerce Photo Editing Services
Images play a crucial role in today's digital world, especially in industries such as E-commerce Image Editing Services, advertising, and graphic design. In the world of visual content, the quality and presentation of images can make or break a business's online presence. That's where image editing techniques come into play, and one of the fundamental tools used by proficient content writers and graphic designers is the clipping path.

A clipping path, in simple terms, is a technique used to remove the background of an image or isolate a specific object from its surroundings. It involves creating a vector path around the object's edges using specialized software like Adobe Photoshop. This path then acts as a mask, allowing the designated object to be placed on any background or integrated seamlessly into various designs.
Importance in Image Editing
Clipping path is a crucial aspect of image editing as it provides precision and flexibility in handling images. It enables content writers and designers to manipulate images, remove unwanted elements, and enhance the overall visual appeal, making it an indispensable tool for creating compelling content.
Types of Clipping Paths
Basic Clipping Path
The basic clipping path service is the foundation of all clipping paths. It involves creating a simple outline around an object with straight edges, making it ideal for objects with simple shapes like books, smartphones, or boxes.
Compound Clipping Path
The compound clipping path comes into play when an object has multiple holes or embedded transparency. This type of path requires more intricate techniques to ensure a seamless background removal services, commonly used for jewelry or complex product images.
Complex Clipping Path
The complex clipping path is the most intricate form and is used for objects with intricate shapes or multiple edges. Examples include furry animals, intricate clothing, or detailed machinery.
How Clipping Path Works
Tools and Software
To execute a clipping path, you need software equipped with suitable tools, and Adobe Photoshop stands out as the industry standard. The Pen Tool, in particular, plays a vital role in creating precise paths.
Step-by-Step Process
1. Open the image in Adobe Photoshop.
2. Select the Pen Tool and carefully trace the object's outline.
3. Create a path around the object, ensuring smooth curves and accurate edges.
4. Once the path is complete, apply the clipping path to isolate the object.
Advantages of Clipping Path Services
Photo Retouching
Clipping path services allow for easy photo retouching, enabling writers and designers to enhance the appearance of products or models by removing imperfections.
Background Removal
By removing the background using clipping paths, content writers can place objects on various backgrounds, creating a consistent and visually appealing look.
Creating Unique Image Effects
Clipping path services enable designers to apply various effects and filters to isolated objects, enhancing their visual impact.
Industries Using Clipping Path
Ecommerce Photo Editing Services
E-commerce Photo Editing Services websites heavily rely on clipping path services to present their products with clean and professional images.
Advertising and Marketing
In the advertising and marketing industry, Best Clipping Path Services are employed to create eye-catching visuals for promotional materials.
Graphic Design
Graphic designers use clipping paths to compose stunning layouts and designs, combining different elements seamlessly.
Photography
Photographers utilize clipping path techniques to improve their images and create unique effects during post-processing.
Choosing the Right Clipping Path Service Provider
Experience and Expertise
Look for service providers with a proven track record and expertise in handling various types of clipping paths.
Turnaround Time
Consider the turnaround time offered by the service provider to meet your project deadlines.
Pricing
Compare prices from different providers to find the right balance between quality and affordability.
Customer Reviews
Read customer reviews and testimonials to gauge the service provider's reliability and customer satisfaction.
Tips for DIY Clipping Path
Using Adobe Photoshop
Familiarize yourself with Adobe Photoshop and its Pen Tool to master the art of creating clipping paths.
Pen Tool Mastery
Practice using the Pen Tool to achieve smooth curves and accurate paths.
Refining Edges
Pay attention to refining edges to ensure the isolated object blends naturally with its new background.
Avoiding Common Mistakes in Clipping Path
Rushing the Process
Take your time to create precise paths and ensure high-quality results.
Ignoring Fine Details
Pay attention to small details, as they can make a significant difference in the final output.
Overdoing or Underdoing the Path
Maintain a balance between removing unnecessary elements and preserving essential details.
Future Trends in Clipping Path
AI and Machine Learning in Image Editing
The integration of AI and machine learning algorithms will revolutionize the image editing process, making clipping paths even more efficient and accurate.
Interactive Image Backgrounds
In the future, interactive image backgrounds may become a trend, enabling users to customize the visual environment of products.
Conclusion
Clipping path is an indispensable tool for content writers, designers, and photographers alike. Its ability to isolate objects, remove backgrounds, and create stunning visuals makes it a must-have in the world of image editing. Whether you opt for How to outsource clipping path service or decide to master the technique yourself, the impact of this tool on visual content creation cannot be overstated.
2 notes
·
View notes
Text
Clipping Path Services for Catalogs: A Complete Guide
In the age of visual marketing, catalogs—both print and digital—remain a powerful tool for showcasing products professionally. High-quality images are the heart of an effective catalog, and the key to clean, crisp product visuals lies in one essential photo editing technique: clipping path services.
This complete guide will walk you through everything you need to know about clipping path services for catalogs, including what they are, why they matter, and how to choose the right provider.
What Is a Clipping Path?
A clipping path is a vector path or shape used to cut out a specific object from its background in a photograph. It’s manually drawn—usually using the Pen Tool in Adobe Photoshop—to isolate the subject so it can be placed on a white or transparent background.
In catalog design, clipping paths are essential because they allow designers to standardize all product images for a clean, uniform look across every page.
Why Clipping Path Services Are Crucial for Catalogs1. Professional Appearance
Catalogs represent your brand. Poorly edited images with uneven backgrounds or inconsistent lighting can damage your credibility. A precise clipping path ensures each product is neatly isolated, giving your catalog a professional, polished feel.
2. Visual Consistency
Using clipping paths ensures that every product in your catalog has a consistent background and alignment, maintaining visual harmony across the board—essential for fashion, furniture, jewelry, and electronics catalogs.
3. Flexibility in Design
With clipped images, you can place products on custom backgrounds, adjust shadows, or rearrange items freely. This gives designers more creative control over the layout and theme.
4. Better Printing Results
High-resolution images with clean cutouts print better. You’ll avoid unwanted background artifacts and ensure your printed catalogs look as good as digital ones.
Use Cases by Catalog Type
Catalog TypeWhy Clipping Path Is Needed Fashion/ApparelRemove mannequin or model backgrounds; unify lighting. JewelryIsolate intricate pieces with detailed paths and add natural shadows. ElectronicsFocus on product details with clear, edge-defined cutouts. Home DecorStandardize backgrounds and enhance furniture shape presentation. Food ProductsHighlight textures and colors without distracting backgrounds.
Clipping Path vs. Other Techniques
TechniqueUse CasePrecision Clipping PathHard edges, clear objects, simple to moderately complexVery High Image MaskingHair, fur, transparent or semi-transparent objectsHigh Auto Tools / AIFast, not reliable for catalogs requiring detailLow–Medium
For professional catalogs, manual clipping paths are still the gold standard.
Additional Services to Enhance Catalogs
Drop Shadow/Reflection – Add depth and realism to make products pop.
Color Correction – Ensure consistency across product variations.
Image Retouching – Remove dust, scratches, or imperfections.
Resizing & Cropping – Ensure product images fit catalog layout requirements.
How to Choose the Right Clipping Path Service Provider✔ Quality and Accuracy
Always ask for sample edits. Look for clean, smooth curves—especially around complex shapes.
✔ Scalability
Can the provider handle hundreds or thousands of images within your timeline?
✔ Turnaround Time
For catalog production, delays can cost you. Confirm they meet your deadlines.
✔ Pricing Transparency
Bulk editing should come with discounts. Make sure there are no hidden fees.
✔ Customer Support
A responsive team that offers revisions and quality assurance is essential.
Tips for a Smooth Catalog Workflow
Prepare High-Resolution Images – This improves clipping accuracy.
Group by Category or Product Type – Helps editors apply consistent styles.
Use a Style Guide – Provide editing guidelines (background color, shadow types, margins).
Review in Batches – Avoid surprises by checking early samples.
Automate Delivery – Use file sharing systems like Dropbox, Google Drive, or FTP.
Conclusion
Professional clipping path services are not just about background removal—they’re a cornerstone of catalog production. Whether you’re creating a fashion lookbook, a tech gear guide, or a seasonal print catalog, high-quality image editing ensures your products look their best.
Investing in expert clipping path services saves time, improves quality, and boosts the effectiveness of your marketing materials. Your catalog becomes more than just a product list—it becomes a visual experience that builds trust and drives sales.
0 notes
Text
What Is Ecommerce Photo Editing? [Beginner-Friendly Guide]

A few years back, I helped a friend launch her handmade jewelry store on Shopify. Her pieces were stunning in person—delicate, detailed, and truly one-of-a-kind. But when she uploaded her product photos? Well… let’s just say they didn’t do her work any justice. The lighting was off, the background was distracting, and the colors weren’t true to life.
That’s when I realized just how important E-Commerce Photo Editing really is. It’s not just about making photos “look better”—it’s about making them sell. In the world of online shopping, your product images are your storefront.
So, What Is Ecommerce Photo Editing?
Ecommerce photo editing is the process of enhancing and perfecting product photos so they’re clean, clear, and ready to impress online shoppers.
In short: Ecommerce photo editing makes your product photos look professional, trustworthy, and clickable—driving more sales.
It includes things like:
Removing backgrounds
Adjusting lighting and color
Adding shadows or reflections
Cropping and resizing for platforms like Amazon, Etsy, or Shopify
Retouching details to remove dust, scratches, or wrinkles
Every polished product image you see on Amazon, eBay, or an Instagram shop? Yep—that’s the result of ecommerce photo editing.
Why Ecommerce Photo Editing Matters
Imagine walking into a messy retail store. Shelves are cluttered, lighting is bad, and items are hard to see. Would you stick around?
Probably not.
That’s exactly how unedited photos feel to online shoppers. First impressions matter, and ecommerce editing ensures that your visuals are clean, cohesive, and professional—so customers trust your brand and feel confident buying from you.
Quick Answer: Ecommerce photo editing helps build trust, reduce return rates, and boost conversions.
And if you’re a:
Shopify seller trying to stand out
Fashion brand showcasing textures and color
Etsy creator selling handmade crafts
Real estate pro offering decor or prints
Or a Print-on-Demand brand needing mockups
…then great photos aren’t optional. They’re essential.
How Is Ecommerce Photo Editing Done? [Step-by-Step Breakdown]
You don’t need to be a Photoshop pro to understand the process. Here’s how it typically works:
1. Background Removal
Most platforms like Amazon and eBay require a white or transparent background.
Snippet Tip: Background removal helps products pop and meets marketplace requirements.
This can be done manually with tools like the Pen Tool in Photoshop or using AI-powered background removers. For complex items like hair, jewelry, or fur, a hand-drawn clipping path or image masking gives the best results.
2. Color Correction
Lighting can trick your camera. The goal here is to make your product’s colors match what buyers will get.
Answer: Color correction ensures your product looks natural and true-to-life in every image.
This includes adjusting brightness, contrast, white balance, and vibrance.
3. Retouching & Spot Removal
Dust on a bottle? Wrinkles in a shirt? Smudges on a lens? This is where retouching comes in.
Quick Fix: Retouching removes flaws without changing the real product.
It helps keep things clean, especially for close-up shots or beauty products.
4. Shadow or Reflection Creation
Adding a drop shadow, natural shadow, or mirror reflection makes the product feel grounded—not floating in space.
Pro Tip: A subtle shadow gives dimension and a more realistic look.
This is especially useful for shoes, bags, and home goods.
5. Cropping, Resizing & Optimization
Images are resized to meet specific platform guidelines (Amazon requires 1000x1000 pixels minimum, for example). They’re also compressed for fast loading without losing quality.
Important: Cropping and resizing keep your listing looking professional and platform-ready.
Practical Tips to Get the Perfect Handmade Ecommerce Photo Editing
From years of working with eCommerce brands, here’s what I’ve learned the hard (and helpful) way:
✅ Tip 1: Always Shoot in High Resolution
Editing can’t fix a blurry image. Start with the best quality photo possible—even a smartphone works with good lighting.
Remember: High-res photos = more editing flexibility.
✅ Tip 2: Use Natural Light Whenever Possible
Editing should enhance, not fix poor lighting. Shoot near windows or with soft lights to avoid harsh shadows.
✅ Tip 3: Be Consistent with Angles and Backgrounds
Whether you’re a fashion brand or a tech gadget seller, your images should look uniform.
Why? Consistency builds trust and creates a professional storefront.
✅ Tip 4: Don’t Over-Edit
Too much editing can make products look fake. Avoid ultra-smooth textures or color shifts that mislead buyers.
Pro Tip: The goal is natural and clean—not overly airbrushed.
✅ Tip 5: Outsource When Needed
If you’re swamped or want a professional touch, hire a team that offers handmade ecommerce photo editing, like our pros at DearClippings.com. We specialize in precise, pixel-perfect edits tailored for all types of sellers—from Amazon FBA to boutique Etsy stores.
Short Answer: Handmade editing means real experts ensure every detail is perfect.
Who Needs Ecommerce Photo Editing?
Here’s a quick checklist. If you’re in any of these groups, ecommerce photo editing can be a game-changer:
✅ Amazon, eBay, Etsy, or Shopify seller
✅ Fashion or apparel brand
✅ Home decor or furniture brand
✅ Jewelry or accessories store
✅ Print-on-demand or dropshipping brand
✅ Real estate photographers selling framed prints
✅ Beauty, skincare, or cosmetics business
✅ T-shirt and merchandise designers
Final Thoughts: Your Product Deserves to Shine
I’ve seen firsthand how the right photo edit can turn a scroll-past into a sale. Ecommerce is a crowded space—but your product doesn’t have to blend in.
Investing in professional Ecommerce Photo Editing is like rolling out the red carpet for your customers. And trust me, they notice.
Whether you're just starting out or scaling your store, don't leave your images to chance. Make them clean, clear, and conversion-ready.
Want Expert Help?
We’ve helped thousands of ecommerce brands, influencers, and retailers create stunning product photos with handmade editing—no filters or shortcuts.
👉 Explore our services at DearClippings.com and let's bring your products to life, pixel by pixel.
If you're curious about how we help Shopify sellers or Amazon FBA brands stand out, feel free to reach out. I’d love to hear about your product, your goals—and how we can help make your photos truly shine.
0 notes
Text
From Raw to Remarkable: A Day in Our Editing Workflow

In the fast-paced world of eCommerce, photography isn't just about capturing moments—it's about presenting products with precision, clarity, and style.
At Clipping Way, we turn raw images into market-ready masterpieces that help businesses grow and brands shine.
Our detailed, professional image clipping path service is designed to make your visuals not only stand out—but sell.
Whether you're a photographer, business owner, or Amazon seller, you've probably wondered: How to Resize Image for Amazon?
That’s just one of the many essential edits our expert team handles daily.
Join us behind the scenes for a closer look at how we transform raw files into remarkable, polished results that meet your platform's every requirement.
Step 1: Client Onboarding & Understanding Requirements
Every successful project begins with a clear understanding of the client’s vision. When you reach out to Clipping Way, you’re not treated as just another ticket in the system.
We talk directly with you to learn about your project goals—whether it's background removal, shadow creation, product retouching, or ghost mannequin service.
We offer a Free Trial and an easy Get Quotation process so you can evaluate our quality and price before making a decision. Our pricing is among the lowest in the industry, without compromising quality.
Step 2: Image Sorting & Categorization
Once your images are received, they are reviewed and categorized based on their complexity and required services. For example:
Simple (e.g., a single product on a plain background)
Medium (e.g., multiple objects, some intricate edges)
Complex (e.g., hair masking, jewelry, detailed patterns)
This sorting ensures we assign the right experts to your job and complete it in a timely manner.
Step 3: Precise Clipping Path Creation
Our trained graphic designers use Adobe Photoshop’s Pen Tool to hand-draw accurate clipping paths. We never rely on auto-selection tools, which often miss fine details.
Instead, we ensure clean, professional cutouts with sharp edges—perfect for eCommerce platforms like Amazon, eBay, and Shopify.
Clipping paths are foundational to everything we do—whether we’re removing backgrounds, creating a white backdrop, or preparing files for multi-channel selling.
Step 4: Retouching and Enhancement
After paths are created, our editing team dives into the creative and corrective retouching process.
We remove dust, scratches, wrinkles, and other distractions while maintaining the product’s natural look.
Color corrections are applied as needed to match brand requirements or product authenticity.
We also handle specific tasks such as:
Shadow Creation (natural, drop, or reflection)
Ghost Mannequin Editing
Color Matching and Swapping
Image Resizing for Amazon, Shopify, Etsy, and more
Step 5: Quality Check and Revision
Before delivery, every image undergoes a multi-level quality control process.
Senior editors review the files to ensure paths are tight, edges are smooth, and output matches the original brief. If any tweaks are needed, revisions are done instantly to avoid delays.
At Clipping Way, client satisfaction isn’t optional—it’s guaranteed.
Step 6: Fast, Secure Delivery
We offer multiple delivery formats including PSD, PNG, TIFF, and JPEG. Depending on your preference, we deliver via Google Drive, Dropbox, FTP, or email.
Turnaround times are as fast as 6 hours for urgent orders, thanks to our global team working around the clock.
Why Choose Clipping Way?
Free Trial Available – Test before you trust.
Lowest Price Guaranteed – Starting as low as $0.29 per image.
24/7 Customer Support – We’re here when you need us.
Quick Turnaround – Get images back in 6–24 hours.
100% Manual Editing – No auto-clipping or lazy edits.
We don’t just edit images—we elevate them to professional standards that drive results.

Frequently Asked Questions
1. How long does it take to receive my edited images?
A: We typically deliver within 6 to 24 hours depending on project size and complexity. Rush delivery is available for urgent needs.
2. Is there a limit to the Free Trial offer?
A: You can send up to 2 images for your Free Trial. It’s our way of showing what we can do—no strings attached.
3. Can I request specific file formats for my images?
A: Yes, we deliver in the format of your choice: PNG, PSD, TIFF, or JPEG.
4. What if I'm not satisfied with the editing?
A: We offer free revisions. If you're not satisfied, just let us know—we’ll make it right.
5. Do you provide bulk discounts?
A: Absolutely! We offer special pricing for photographers, studios, and eCommerce businesses that process large volumes regularly.
Conclusion
From the moment we receive your raw images to the final polished output, Clipping Way ensures every pixel is perfect.
Our meticulous editing workflow is built on quality, speed, and affordability—backed by a human touch that machines simply can’t replicate.
So whether you're selling on Amazon, designing a catalog, or showcasing your product online, let us handle the edits while you focus on scaling your business.
0 notes
Text
What is Multiple Clipping Path? A Game-Changer for E-Commerce & Creative Industries

Not too long ago, we found ourselves overwhelmed with editing hundreds of product images for a client’s new seasonal catalog. Each item came in multiple colors, different textures, and unique shadows. Simple background removal wasn’t cutting it anymore. We needed a precise, layer-by-layer approach. That’s when we turned to a multiple clipping path service and it changed everything.
Whether you're selling on Amazon, eBay, Etsy, or Shopify, or running a creative studio, you’ve likely encountered a similar pain point. Let’s talk about what multiple clipping path is, why it matters, and how you can make it work for your business.
What is Multiple Clipping Path?
Multiple clipping path is an advanced version of the standard clipping path technique used in photo editing. Instead of isolating a subject from its background with a single vector path, this method involves creating multiple paths for different parts of an image — think hair, body, shoes, accessories, shadows, and even individual color zones.
Short Answer: Multiple clipping path means creating individual paths for each object or color in an image to allow detailed editing, recoloring, or separation.
This technique is essential when you need to change colors, adjust shadows, or retouch specific parts of an image without affecting others. It's like having a Photoshop Swiss Army knife in your toolkit.
Step-by-Step: How Does Multiple Clipping Path Work?
1. Importing the Image
The process starts with importing your image into Adobe Photoshop. High-resolution images are ideal to capture every detail.
2. Creating Individual Paths
Using the Pen Tool, the editor draws precise paths around different elements — one for the sleeve, one for the collar, one for the buttons, and so on.
Answer-first: The image is broken down into segments using the Pen Tool to allow independent editing of each part.
3. Layer Separation
Each path is assigned to a new layer. This makes it easy to apply effects like color correction or contrast adjustments to specific sections without disturbing the rest.
4. Grouping for Efficiency
Related paths (e.g., all accessories) are grouped to streamline batch editing — perfect for e-commerce product catalogs with hundreds of SKUs.
5. Export in Desired Format
Once editing is done, the final image can be exported in formats like PSD, TIFF, or PNG based on your platform requirements.
Why E-Commerce and Creative Businesses Rely on It
If you're in fashion, real estate, photography, printing, or digital marketing, then you know every pixel counts.
E-Commerce Brands use multiple clipping paths to showcase each variant of a product.
Real Estate Photographers rely on it for color correction and shadow manipulation in interior shots.
Wedding and Event Photographers separate layers to retouch dresses, flowers, and backgrounds independently.
Social Media Influencers need it for cohesive, professional image layouts on Instagram and YouTube thumbnails.
Snippet-ready: Multiple clipping path ensures cleaner edits, accurate recoloring, and faster image turnaround times for professional use.
Expert Tips to Get the Perfect Handmade Multiple Clipping Path
From our experience, quality always beats speed when it comes to clipping paths. Here's what we’ve learned:
1. Insist on Manual Work
Automated tools often leave jagged edges and inconsistent paths. Always choose manual, hand-drawn clipping paths for cleaner results.
2. Provide Clear Instructions
Tell your editing partner exactly what you need — which parts to separate, any color changes, and desired file formats.
3. Zoom In and Review
Request layered files and inspect each path at 200-300% zoom. This helps catch any sloppy outlines or missed areas.
4. Ask for Sample Work First
Before you send a large batch, test the provider with 2-3 sample images.
Expert Tip: Handmade clipping paths are more accurate and flexible, especially when dealing with fine details like hair, fur, or jewelry.
When to Choose These Top Providers: Our Experience
We’ve worked with several clipping path services over the years. Here’s a breakdown of five popular platforms and when to use them:
1. ExpertClipping.com
The go-to for high-volume e-commerce editing. Their turnaround is fast, and the quality is consistent. We’ve used them for fashion catalogs, and they handle color variants and shadows flawlessly.
2. Path Edits
Perfect for advertising agencies and photographers needing more nuanced edits like shadow creation and background enhancement. Great customer service and flexibility.
3. Clipping Path Service
Best for real estate and architecture clients. They specialize in brightness correction, exposure balancing, and edge refinement. Excellent for interior image enhancement.
4. Offshore Clipping
We recommend them for budget-conscious small businesses. Decent quality for the price, especially for simple clipping path jobs and POD (Print on Demand) content.
5. UK Clipping Path
Ideal for European businesses looking for region-based support and GDPR compliance. We’ve had solid experiences using them for beauty and cosmetics brand editing.
Best Practice: Match the provider to your specific needs. High-volume edits? Go with ExpertClipping. Need creative retouching? Try PathEdits.
Final Thoughts: Why Multiple Clipping Path Is No Longer Optional
In today’s visual-first marketing world, image precision drives conversions. Whether you're styling a model shoot, listing real estate, or creating print merch, multiple clipping path services ensure your visuals are clean, color-accurate, and compelling.
Think of it this way: a standard clipping path is like wearing ready-made clothes, but multiple clipping path is bespoke tailoring — designed to fit your exact needs.
Company Information:
Website: https://www.expertclipping.com/
Facebook: https://www.facebook.com/expertclipping
Contact : https://www.expertclipping.com/contact/
Resources: https://www.expertclipping.com/blog/
Youtube: https://www.youtube.com/c/Expertclipping-ec
Twitter: https://twitter.com/expertclipping
Quote: https://www.expertclipping.com/free-quote/
Office Address
UK OFFICE
24 Longbridge Road
Barking Essex IG118tnv
www.expertclipping.co.uk
Phone: 02036093822
24 Longbridge Road
Barking Essex IG118tnv.
E-mail: [email protected]
Phone: +44 02036093822
ITALY OFFICE
168 Belaws, 4th Floor
Via Tolpada 21, 11400
www.expertclipping.com
0 notes
Text
The Significance of Clipping Path solutions in Experienced layouts

Using the digital-1st age, photos are not simply decoration any longer — They are an important booster of engagement, brand name, and sales. it could be an item on an internet retailer or possibly a graphic on the marketing campaign; neat, professional photos make an influence. Amongst the unsung heroes that make this look a probability is the clipping route assistance.
At Attest style, we think that accuracy is toughness. And for track record removal, subject matter separation, or layout flexibility Enhance, clipping paths are an indispensable Resource in almost any designer's package.
what's a Clipping route?
Clipping route can be a freehand vector path that may be utilized to Slash an item off from its history. It can be established utilizing the Pen Tool of Photoshop or similar graphics packages and lets editors to get rid of or Image clipping path substitute drawings with no threatening the integrity of the topic.
as opposed to computerized history elimination computer software, clipping paths are sharp and possess crystal clear edges. This is very important for merchandise images, versions, or any layout product in which good quality and accuracy are necessary.
Why Clipping route solutions are crucial
Let's mention why organizations and creatives use this company And the way it creates genuine worth for visual information.

1. Skilled and constant Visuals
The amateur/Experienced difference ordinarily lies in the details — specifically the perimeters. A badly taken off qualifications can result in jagged traces or artifacts that lessen the quality of your graphics. Clipping path companies produce thoroughly clean, crisp cuts that give just about every picture a shiny and uniform glimpse.
This regularity is key for models. whether or not you’re jogging an internet retail store or creating a printed catalog, aquiring a uniform seem builds trust and strengthens manufacturer identification.
2. E-Commerce Compliance and Conversion
If you present products available on line, your product or service illustrations or photos require to satisfy platform demands and shopper expectations. big platforms like Amazon, Etsy, and eBay often need white or transparent backgrounds. A clipping route enables you to remove or modify backgrounds to meet these requires.
Apart from compliance, much better pictures translate to raised conversion prices. shoppers are probably to acquire items that are well-presented and Plainly seen. A very well-edited item graphic can highlight texture, condition, and colour in a method that builds customer confidence.
3. structure overall flexibility
With Attest structure, our function usually needs pictures that happen to be multi-use in mother nature — starting from Internet sites and brochures to social media marketing advertising. Clipping route providers help us to separate out objects and insert them into new environments in a seamless manner.
possibly if you're generating a banner in overlapping graphics or have to include a picture of a product on a singular background, a clear Lower-out gives whole flexibility In regards to creativeness. You aren't beholden to a single environment or appearance – and will simply assign imagery to dozens of strategies and webpages.
4. Saves Time and assets
guide image editing usually takes quite a long time — particularly if you're working with dozens or many hundreds of images. By acquiring it outsourced to knowledgeable clipping route service, you'll be able to streamline your workflow and give attention to what issues most: approach, creativity, and progress.
rather than throwing away several hours on edge refinement, designers can skip straight into the Resourceful procedure, understanding that they're dealing with significant-excellent belongings.
Who Does Clipping route assistance profit?
Clipping path options are utilised across an array of industries:
E-commerce & Retail: Enabling product or service photographs for on-line shops and marketplaces.
Photographers: Especially style, marriage ceremony, and product or service photography.
Graphic Designers: Minimize-out assets for posters, packaging, digital banners, and so forth.
internet marketing organizations: dependable visuals across many media and platforms.
Publishers & Printers: Print-Prepared property with transparent track record.
whether or not independent enterprise owner or escalating brand, clipping route companies give your photographs the competitive edge they need to outshine.
guide vs. automatic modifying
when AI software program for background removal is recovering, It truly is nevertheless not up to par with guide clipping paths — specially when working with complicated designs like hair, fur, or semi-transparent objects.
Why guide clipping paths?
Smooth, thoroughly clean traces
Edits tailor-made to each photo
No loss of excellent or detail
Improved cure of intricate or blended goods
For the standard-aware models — and to the specialists who need pixel-great photographs — hand modifying is still excellent.
The Bigger Picture
At Attest design and style, clipping route is just a Portion of a basket jam packed with impression modifying and style and design solutions. We embed this assistance within just branding, ad generation, item style and design, and print promoting. introducing processes like impression retouching, coloration correction, and shadow consequences, we generate visuals that don't just look awesome — they get final results.
inside of a time where by your audience scrolls rapidly and types viewpoints even a lot quicker, cleanse and reliable imagery might be the break you may need.
Final Thoughts
Your start line for a strong visual Basis is clear, exceptional images ��� and That is what clipping path solutions offer you. you happen to be developing a model, introducing a product, or launching a marketing campaign — wherever you might be in the method, isolating your topics provides you with flexibility, focus, in addition to a aggressive edge.
#Clipping path service#Clipping path company#Clipping path provider#Professional clipping path#Clipping path Photoshop#Image clipping path#Best clipping path service#Photo clipping path#Clipping path outsource#Cheap clipping path services#Clipping path for eCommerce#clipping path companies#Top clipping path companies
0 notes
Text
eCommerce Image Editing Services: Transform Your Product Photos into Sales Drivers
In today’s competitive digital marketplace, first impressions are everything—especially in eCommerce. High-quality product images have the power to captivate, engage, and convert potential buyers. This is where professional eCommerce image editing services come into play. At SR Clipping, we specialize in transforming ordinary product photos into visually compelling images that boost conversions and enhance your brand’s credibility.
What Are eCommerce Image Editing Services?
eCommerce image editing services refer to a suite of digital photo enhancement processes used to prepare product images for online stores. These services ensure your product photos are polished, professional, and compliant with platform standards such as those from Amazon, eBay, Shopify, Etsy, WooCommerce, and more.
Key components of eCommerce image editing include:
Background removal or replacement
Color correction
Shadow creation and enhancement
Image cropping and resizing
Ghost mannequin effects for apparel
Reflection and glare removal
Noise reduction and sharpening
Batch editing for large catalogs
The goal is simple: make your products look irresistible to your target customers.
Why Are eCommerce Image Editing Services Essential?
1. First Impressions Count
When shopping online, customers cannot touch or try your products. The visual representation becomes their primary guide. Professionally edited images convey trust, quality, and authenticity, helping you stand out from competitors.
2. Boost Conversion Rates
Studies show that high-quality product photos can increase conversion rates by up to 30%. Clean, clear, and consistent images make products more appealing, helping shoppers make faster decisions.
3. Improve SEO Performance
Properly optimized images, including compression, ALT tags, and proper file naming, contribute to better search engine visibility. Google Images is a major traffic source for eCommerce sites.
4. Comply with Marketplace Standards
Most eCommerce platforms (like Amazon or Shopify) have strict photo requirements, including background color, dimensions, and product positioning. Our editing services ensure your listings are compliant and avoid rejection or suspension.
SR Clipping: Your Trusted Partner for eCommerce Image Editing
At SR Clipping, we provide tailored image editing solutions for businesses of all sizes—from small Shopify stores to large online marketplaces. Our experienced editors combine precision and creativity to deliver images that sell.
Our Core Services Include:
1. Background Removal / White Background Editing
The clean, distraction-free white background is an industry standard. We expertly remove cluttered or colored backgrounds and replace them with white or transparent backdrops, per your store's needs.
2. Product Shadow Creation
Adding natural, drop, or reflection shadows gives products a realistic and grounded appearance. It adds depth, highlights the product's shape, and enhances visual appeal.
3. Color Correction & Retouching
Poor lighting or camera settings can make colors appear dull or inaccurate. Our editors balance brightness, contrast, hue, and saturation to ensure your product reflects its true colors.
4. Ghost Mannequin & Apparel Editing
For fashion retailers, ghost mannequin editing is essential to give clothing a 3D, professional look. We remove mannequins while preserving the natural fit and flow of the garment.
5. Clipping Path & Multi-path Editing
We use advanced pen tool techniques to create precise clipping paths around products. This allows for clean background removal and detailed editing for different product parts (e.g., shoes, bags, electronics).
6. Resizing, Cropping & Alignment
Every platform has its own size and format guidelines. We ensure your images are optimized for Amazon, eBay, Etsy, Walmart, WooCommerce, and more.
7. Batch Photo Editing
Handling hundreds or thousands of SKUs? We offer efficient bulk image editing services, saving you time and ensuring consistency across your catalog.
Benefits of Choosing SR Clipping
✅ Expert Team
Our team of graphic designers and photo editors has over 10 years of experience in eCommerce product photography. We understand what sells online—and how to visually represent it.
✅ Fast Turnaround
Speed is essential in online business. We offer 24-hour delivery options and prioritize urgent edits without sacrificing quality.
✅ Affordable Pricing
Whether you're a startup or a large retailer, we offer scalable pricing models to suit your budget—without hidden fees.
✅ 100% Quality Assurance
Before delivery, every image undergoes rigorous quality control. You receive pixel-perfect results ready to upload and convert.
✅ Easy File Upload & Delivery
Our secure file transfer system makes it simple to upload and receive edited images. We support all major file formats (JPG, PNG, PSD, TIFF).
Ideal Industries We Serve
Our eCommerce image editing services cater to a wide range of industries:
Fashion & Apparel
Jewelry & Accessories
Footwear
Home & Furniture
Electronics & Gadgets
Beauty & Skincare Products
Automotive Parts
Food & Beverages
Whether you're selling on Amazon, your own Shopify site, or multiple platforms, we deliver images that resonate with your niche market.
The SR Clipping Process: Simple and Transparent
Here’s how we work with you from start to finish:
Submit Your Request: Upload your images and instructions via our secure portal.
Quotation & Confirmation: We review and provide a cost estimate and turnaround time.
Editing Begins: Our team begins work on your images with attention to detail.
Review & Revisions: You receive the first batch for review. We revise if needed.
Final Delivery: Approved images are delivered in your preferred format and size.
How to Optimize Your eCommerce Images for SEO
Product images aren’t just visual—they also contribute to your on-site and image SEO. Here are some quick tips:
Rename Image Files: Use descriptive keywords (e.g., "blue-leather-handbag.jpg").
Add ALT Text: This helps search engines understand what the image shows and improves accessibility.
Use the Right Dimensions: Resize images to match platform recommendations.
Compress Files: Use tools like TinyPNG or JPEGmini to speed up page load time.
Maintain Consistency: Uniform image styles improve the visual appeal of your store.
If you prefer, SR Clipping can handle the SEO optimization of your product images too.
0 notes
Text
For this advertisement project, I decided to advertise the small indie pop duo The Tulips. I decided to promote this duo because I enjoy their music, and they have an interesting distinct visual. This group uses a vintage style along with pastel colors as their aesthetic. This inspired my palette: pastel pink, sage green, and white. In general, my design is comprised of four main elements: the band, the basket of apples, the text, and the framing elements. The band serves as the focal point, while the arched texts intend to guide the viewer’s perspective. The buttons and the lace are used for decorative framing.
During the process, I used Adobe Illustrator and Photoshop to modify text and add online images into my design. In Photoshop, I removed the background of each image and, if necessary, I would use the magic pen or the lasso pen to remove smaller details. When looking at previous show posters, I noticed they sticker cutouts which emphasized certain elements like the date and venue. This is something I’ve incorporated by creating a white outline on Adobe Illustrator. I then added the original image and expanded the outline, using the direct selection tool. At the center, the two women are holding hands while carrying a basket of apples. This refers to one of their most popular songs, “favorite apple”. In the top and bottom sections of the poster, I put lace and button images from Pinterest for texture and framing. As for the text, I used the Type tool and arched the text. I used the group’s original logo and expanded the lettering. A few difficulties I’ve encountered were exporting an image from one platform to another, rather than creating a linked reference. This would make my image look pixelated and force me to modify it on Photoshop again. Another difficulty was creating the outlines as my sticker cutouts. Not only did I have to expand them to fit the original photos, but I also had to make sure the thickness of the outline was the same for each image. I modified the anchor points to either reduce or increase the thickness. Lastly, I originally wanted the lace to contour all four sides, but it would’ve been a lack of space and balance. In summary, this project aimed to promote an upcoming performance by a musical artist by using design elements such as color, texture, balance, and movement.
0 notes
Text
Master Your Visual Content: Easy Background Removal, Design Tricks, and Photography Tips

In this digital world, creating eye-catching visual content is something all content creators, business owners of small enterprises, and digital artists do. This guide will run you through several ways of removing background images with Photoshop and Illustrator, discuss product photography tips for beginners, brainstorm the best free clipart sites, and share some creative ideas on how to design captivating YouTube thumbnails. We'll also show how PhotoCut, a versatile and user-friendly app, can help you accomplish these tasks quickly and efficiently.
Learn how to easily blur photo parts.
Ways to Remove Background in Photoshop

Photoshop remains one of the most powerful tools for background removal. Here are the most effective methods:
1. Remove Background with the Quick Action Tool
Photoshop now has a one-click option in the "Properties" panel (for images with a layer unlocked). Simply go to Window > Properties and click Remove Background.
2. Use the Select Subject + Mask
Go to Select>Subject to automatically isolate the main subject.
Then click Select and Mask to refine the edges and output the selection to a new layer.
3. Pen Tool for Precise Cuts
This is a manual method:
Use the Pen Tool (P) to create a path around your subject.
Right-click and choose Make Selection>Layer via Cut.
4. Use Channels for Complex Backgrounds
Ideal for hair or transparent objects.
Use the Channels Panel, duplicate the one with the highest contrast, and adjust levels to isolate.
Use Load Selection and mask accordingly.
Ways to Remove Background in Illustrator

Illustrator is ideal for vector-based images. Here’s how to remove backgrounds in Illustrator.
1. Use Image Trace + Expand
Place your image.
Go to Window>Image Trace and choose a preset like "High Fidelity Photo."
Click Expand to convert to vector.
Use the Direct Selection Tool (A) to remove the background paths.
2. Clipping Mask Method
Create a shape that fits around your subject.
Select both the image and the shape.
Right-click>Make Clipping Mask.
3. Opacity Mask for Transparent Backgrounds
This method requires grayscale mask images:
Open the Transparency panel.
Select the image and the mask and apply using "Make Mask."
PhotoCut can be used before importing into Illustrator. Extract the subject using Auto Cut, then import it into Illustrator for vector editing.
Using PhotoCut for Background Removal

For beginners or mobile users, PhotoCut is a great option:
Once you select your picture, tap on the Auto Cut button to remove the subject from the background instantly.
For more precision and clean cut-outs, manually refine the edges with the help of the Magic Brush, for instance, hair or other special details.
Saving in PNG with a transparent background enables you to use it elsewhere or entirely change the background with the help of other in-built templates, be it skies, gradients, or solid colors.
The simple process ultimately makes PhotoCut an effective and robust tool, providing quick background elimination that is good for all social media posts, product shots, or creative edits when on the go.
Add emojis to your photos to make them look aesthetic.
Product Photography Tips for Beginners

Good product photography boosts sales and clicks. Here are some easy tips:
Use Natural Light: A window will help you achieve soft natural lighting. Avoid direct sunlight, which can be harsh and create unflattering shadows.
Use a Plain Background: White or neutral backgrounds keep the focus on the product. PhotoCut can help replace or blur distracting backgrounds.
Use a Tripod or Phone Stand: Stable shots mean professional results. Avoid shaky hands.
Shoot Multiple Angles: Show the front, back, sides, and close-ups.
Edit for Polish: Use PhotoCut to enhance contrast, remove background, or adjust lighting. Add shadows or reflections using built-in tools.
Best Free Clipart Sites

Looking for royalty-free clipart to use in your designs? Here are the top sites:
OpenClipart: A go-to source for 100% public domain clipart. No signup or attribution required, just download and use freely in any project.
Pixabay: Has free vectors, illustrations, and high-res images. It's easy to navigate, so you can find and download what you need fast.
Freepik: Known for its massive selection of free and premium clipart resources. Free assets require attribution, but premium access unlocks even more options without credit.
Vecteezy: Specializes in vector graphics with free and pro versions available. You’ll find professionally designed, editable clipart ideal for commercial or personal use.
SVG Repo: Perfect for web designers and creators looking for clean, scalable icons or illustrations. All resources are in SVG format, ideal for web and app use.
You can easily import clipart from any of these sites into PhotoCut to create custom collages, social media posts, or marketing creatives.
Learn how to blur photo backgrounds on an iPhone.
YouTube Thumbnail Design Ideas

A great YouTube thumbnail can dramatically increase video clicks. Here are creative ideas:
Use Big, Bold Text: Keep your thumbnail text short and impactful. Choose large, bold fonts and use contrasting colors to make it pop, even on small screens.
Add Emojis or Icons: Emojis instantly communicate emotion and context. With PhotoCut’s sticker library, you can easily add expressive elements to make your thumbnail stand out.
Use a Close-Up Face Shot: Faces with strong emotions catch attention fast. Use PhotoCut to cut yourself out and place your image over eye-catching or dramatic backgrounds.
Use a Color Overlay: A subtle color overlay can help unify your thumbnail style. PhotoCut allows you to add transparent color layers to match your channel’s branding.
Include a Preview of the Video’s Best Moment: This gives viewers a taste of what they will see. Choose a moment of action, transformation, or surprise to stir viewer curiosity and entice them to click.
Save time by creating a reusable thumbnail template using PhotoCut. Swap out text and images to keep branding consistent.
Discover the easiest ways to compress image sizes without quality loss.
Conclusion
Editing, product shots, content design, and YouTube visual making must go hand in hand with the right tools. Removal of background images is made easy with PhotoCut, a mobile-friendly application that gives simple background removal, adding of effects, and cleaning of visuals without the hassle of having to learn complicated software. Along with other software like Photoshop or Illustrator and using some top free clipart sites, your path will be endless as far as the creation of wonderful content is concerned.
Need help creating your first thumbnail or removing a background? Open PhotoCut and start exploring—it's that easy!
Learn how to change the image color in Photoshop.
FAQs
Q1. Which Photoshop method is best for removing a background with hair or fur?
Ans. The Select and Mask Workspace (formerly Refine Edge) is the most effective. It allows you to refine the selection, detect edges, and address tricky areas like hair strands.
Q2. Is background removal in Photoshop destructive?
Ans. It can be if you directly erase pixels on the original layer. It's recommended to use layer masks to non-destructively hide the background. This allows you to adjust the mask later if needed.
Q3. Can I directly remove a raster background from an image in Illustrator like in Photoshop?
Ans. Not really in the same way. Illustrator excels with vector graphics. To effectively remove a background from a raster image (like a JPG) in Illustrator, you usually need to trace/vectorize the image first.
Q4. How do I remove a background in Illustrator after vectorizing?
Ans. After vectorizing (using Image Trace), you can:
Ungroup the elements: Ungroup the traced image to separate the subject from the background.
Direct Selection Tool (White Arrow): Use this tool to select and delete the background elements.
Clipping Masks: Create a shape (like a rectangle) to cover the subject, then select both the shape and the vectorized image and create a clipping mask (Object > Clipping Mask > Make). This hides everything outside the shape.
Pathfinder Panel: Use Pathfinder tools (like "Minus Front") to subtract the background shapes from the subject.
Q5. What's the best background for product photography?
Ans. A seamless white or light gray background is generally preferred because it's neutral, doesn't distract from the product, and makes editing easier. You can use a white sweep (a curved background that eliminates the horizon line).
Q6. What kind of lighting should I use for product photography?
Ans. Soft, diffused lighting is key. You can achieve this with:
Natural Light: Diffused natural light from a window is great. Avoid direct sunlight, which can create harsh shadows.
Artificial Light: Softboxes, light umbrellas, or studio strobes can provide controlled and consistent lighting. You need at least two lights: one as your main light and another as a fill.
Q7. Where can I find free clipart for commercial use?
Ans. Always double-check the licensing terms before using any clipart for commercial projects. Here are some options:
Pixabay: An amazing resource for any kind of free images, including clipart, under quite forgiving licensing (so be sure it is almost always free for commercial use, but always verify before you use it).
Unsplash: Primarily a stock photo site, now and then features some clipart.
Pexels: Another excellent source for free stock photos and vector graphics.
Openclipart: A large collection of public domain clipart.
Vecteezy (Free Section): Provides free vector graphics, including icons and illustrations, with attribution required for some licenses.
The Noun Project (Basic Plan): Offers a vast library of icons, but the free plan requires attribution.
Freepik (Free Section): Includes a variety of free vectors, stock photos, and PSD files, usually requiring attribution.
Q8. What should I look for in a clipart license?
Ans. Pay attention to these terms:
Commercial Use: Does the license allow you to use the clipart for commercial purposes (e.g., things like selling products, advertising)?
Attribution: Does the license require crediting the artist or website?
Modification: Are you allowed to alter the clipart (e.g., change colors, size it down/up)?
Redistribution: Are you allowed to redistribute the clipart as a component of your product?
Q9. What are some YouTube thumbnail design ideas?
Ans. Here are some ideas:
Face + Text: A close-up of your face with a clear title.
Product Showcase: Highlight the product or topic of your video.
Before & After: Great for tutorials or transformation videos.
Text overlay: Screenshot gets a moment from the video, which allows instant adding of text.
Collage: Several images merged into a dynamic thumbnail.
Arrows and shapes: Visually guide the viewer to the most important elements.
Emphasis: Bright, bold fonts and colors for keywords only.
Q10. What size should my YouTube thumbnail be?
Ans. It should be 1280 by 720 pixels; the minimum width is 640 pixels. Aspect ratio is 16:9.
0 notes
Text
Furniture Photo Retouching Tips for Stunning Product Images
When it comes to selling furniture online or in catalogs, the quality of your images can make or break a sale. Raw photos—even those taken with a professional camera—often need polishing to truly shine. That’s where furniture photo retouching comes in.
At Zenith Clipping, we’ve helped countless clients turn average furniture photos into clean, eye-catching images that convert. If you want to level up your product photos, here are some of our top furniture photo retouching tips to get professional results every time.

Start with High-Resolution Images Always shoot in high resolution. The more detail you have in the original image, the easier it is to retouch and enhance. This ensures sharp edges, clean textures, and professional results.
🎨 2. Clean the Background Remove clutter, dust, or unwanted shadows from the background. Replace it with a white or solid-colored background if it's for e-commerce, or use natural-looking backdrops for lifestyle shoots.
Pro Tip: Use the Pen Tool or Select Subject + Mask in Photoshop for clean cut-outs.
💡 3. Adjust Lighting and Exposure Furniture photos often suffer from uneven lighting. Use Curves and Levels to balance exposure, and Shadows/Highlights to bring out detail in dark or bright areas.
🪵 4. Enhance Texture and Detail Furniture is all about materials—wood grain, fabric texture, metal finishes. Use High Pass Sharpening and Clarity to make those textures pop, but don’t overdo it.
🎯 5. Fix Perspective and Distortion If the furniture looks slightly skewed or distorted, fix it using Lens Correction or Perspective Warp. Straight lines make furniture look premium and symmetrical.
🧽 6. Remove Imperfections Dust, scratches, or dents should be edited out using the Healing Brush or Clone Stamp Tool. Make sure the surfaces look smooth and flawless without looking fake.
🖼️ 7. Add Realistic Shadows and Reflections A product floating without shadow looks fake. Add natural drop shadows, reflection shadows, or cast shadows to ground the product. It adds realism and depth to your final image.
🖌️ 8. Color Correction and Matching Make sure the wood or fabric color is accurate to the real product. Use Hue/Saturation, Color Balance, or Selective Color to fine-tune shades and maintain brand consistency.
📏 9. Maintain Consistency Across All Photos If you’re editing a batch of furniture images for a catalog or website, make sure they all have the same lighting, background, angles, and shadows for a cohesive look.
🙋♂️ Frequently Asked Questions ❓ What is furniture photo retouching? It’s the process of enhancing and correcting furniture images by removing flaws, adjusting color and lighting, and making them ready for e-commerce, print, or marketing use.
❓ Can I do furniture photo retouching myself? You can, but it takes time, skill, and professional tools like Photoshop. For high-volume or high-quality results, outsourcing to experts like Zenith Clipping is often more efficient.
❓ What formats should I save the final photos in? For web, use optimized JPEG or PNG. For printing or further editing, keep layered PSD or TIFF files. Always export with the correct resolution—300 DPI for print, 72 DPI for web.
🧩 Final Word Furniture photo retouching is more than just polishing an image—it’s about presenting your product in the best possible light. Clean, professional images increase trust and boost sales. At Zenith Clipping, we specialize in delivering high-end furniture photo editing services that highlight the beauty, texture, and form of every piece.
If you want your product photos to stand out, let us do the retouching while you focus on growing your business.
Need perfect furniture photo edits? 👉 Contact Zenith Clipping today for a free trial or quote.
0 notes
Text
How to Make a Clipping Path in Photoshop (Step-by-Step for Beginners)

Not too long ago, I was in the middle of creating a product catalog for an online store I was working with. The images were great, but the backgrounds? Not so much. I needed clean, background-free images to make the products stand out. I asked around, and someone said, “Just create a clipping path in Photoshop.” At the time, I had no idea what that even meant. But once I figured it out, it changed the game.
If you're like I was—searching for how to make a clipping path in Photoshop—this guide is for you.
New to Photoshop? No worries! This easy clipping path tutorial will help you isolate any object like a pro. Great for beginners and creatives! #PhotoshopTutorial #ClippingPath #EditingTips #CreativeDesign #PhotoshopHelp
What is a Clipping Path in Photoshop?
Let’s get straight to the point. A clipping path in Photoshop is a vector path used to cut out an object from its background. It allows you to isolate a subject cleanly, especially useful in product photography and eCommerce.
In short: A clipping path tells Photoshop, “Show only what’s inside this line. Hide the rest.”
Why You Might Need a Clipping Path
Whether you’re a Shopify seller, Amazon retailer, wedding photographer, or social media influencer, clean images matter. A clipping path lets you remove busy or unwanted backgrounds so your product, person, or property pops.
I personally needed it when designing promotional banners for a fashion brand. The raw shots looked dull with the studio background, but once I clipped the subject—bam! It looked like a pro campaign.
How to Make a Clipping Path in Photoshop (Step-by-Step)
Here’s the simple version—because nobody likes confusing tutorials.
Step 1: Open Your Image
Start by launching Photoshop and opening the image you want to edit.
Shortcut: Ctrl + O (Windows) or Cmd + O (Mac).
Step 2: Select the Pen Tool
From the toolbar, choose the Pen Tool (P). This is your main tool for drawing the clipping path.
Note: Make sure the mode is set to Path, not Shape.
Step 3: Zoom In
Zoom in on the object you want to cut out. The more you zoom, the more precise you can be.
Shortcut: Ctrl + + (Zoom in), Ctrl + - (Zoom out)
Step 4: Start Drawing the Path
Click around the object’s edge to create anchor points. If the edge curves, click and drag to create smooth curves.
Tip: Keep the path tight but natural. Don’t overdo it with too many points.
Step 5: Close the Path
Once you’ve gone around the object, close the path by clicking on your starting point.
You’ve just made a basic clipping path in Photoshop!
Step 6: Save the Path
In the Paths panel (Window > Paths), double-click the “Work Path” and save it with a name like "Product Path."
Step 7: Convert to Clipping Path
With the path selected, go to the Paths menu and choose Make Clipping Path.
Done! You can now export the image without the background.
Practical Tips to Get the Perfect Handmade Clipping Path
Over time, I’ve learned a few tricks that make all the difference:
Use a graphic tablet for better hand control, especially on complex shapes like hair or fabric folds.
Adjust anchor points with the Direct Selection Tool (A) if your curves don’t look smooth.
Feather carefully. Don’t feather unless you want soft edges. For product photos, hard edges are cleaner.
Keep it zoomed in. It’s tempting to work zoomed out for speed, but zoomed-in paths are much more accurate.
Quick tip: Always use high-resolution images. The clearer the edge, the better your clipping path will be.
Want crisp, professional-looking images? Learn how to make a clipping path in Photoshop in just a few steps! Perfect for product photos, eCommerce, and creative projects. #ClippingPath #PhotoshopTips #PhotoEditing #ProductPhotography #DesignHack
When to DIY and When to Hire a Clipping Path Service
If you’ve got just a few images, doing it yourself might be worth the effort. But if you’re dealing with bulk product photos or complex edges—like hair, fur, or lace—it’s smarter (and cheaper in the long run) to use a professional service.
Let’s talk about a few top options:
✅ Expert Clipping
Best for: Bulk product images, ecommerce, and professional retouching.
Why I trust them: Fast turnaround, consistent quality, and great for Shopify, Amazon, or Etsy sellers.
Pro tip: Ask for a free trial before committing to bulk orders.
🟡 Expert Graphic International
Best for: Complex photo manipulation and advanced graphic edits.
When to use: If you need more than just clipping—like shadows, reflections, or ghost mannequins.
🔵 FixThePhoto
Best for: Portrait retouching and high-end photo edits.
Great choice for: Wedding and portrait photographers.
🟢 Tech Cloud Ltd
Best for: Real estate, automotive, and large-scale image editing.
Use them if: You’re in real estate or architecture and need tons of image edits with accuracy.
🔴 Photo Editing BD
Best for: Budget-friendly options and simple clipping path services.
Ideal for: Small business owners or Etsy sellers just starting out.
Need help deciding? If you want consistent ecommerce-ready photos fast, I’d personally start with Expert Clipping. I’ve used them for fashion catalogs and bulk Amazon listings—and the results were on point.
Final Thoughts
Learning how to make a clipping path in Photoshop was one of those skills I didn’t know I needed—until I did. Whether you're editing one photo or a hundred, mastering the pen tool gives you total control over your visuals.
But don’t stress if it feels tricky at first. I struggled too. Just keep practicing, zoom in close, and remember—every pro was once a beginner.
If you ever feel stuck, or need to outsource the task for speed and quality, services like Expert Clipping have your back.
Company Information:
Website: https://www.expertclipping.com/
Facebook: https://www.facebook.com/expertclipping
Contact : https://www.expertclipping.com/contact/
Resources: https://www.expertclipping.com/blog/
Youtube: https://www.youtube.com/c/Expertclipping-ec
Twitter: https://twitter.com/expertclipping
Quote: https://www.expertclipping.com/free-quote/
Office Address
UK OFFICE
24 Longbridge Road
Barking Essex IG118tnv
www.expertclipping.co.uk
Phone: 02036093822
24 Longbridge Road
Barking Essex IG118tnv.
E-mail: [email protected]
Phone: +44 02036093822
ITALY OFFICE
168 Belaws, 4th Floor
Via Tolpada 21, 11400
www.expertclipping.com
FAQs About Clipping Path in Photoshop
Q: What’s the difference between clipping path and background removal? A: Clipping path is one method of background removal—specifically using the Pen Tool for sharp, clean cuts.
Q: Can I use the Magic Wand or Quick Selection tool instead? A: You can, but for professional results (like ecommerce or catalogs), a handmade clipping path is more precise.
Q: Is Photoshop the only software to make a clipping path? A: While Photoshop is the industry standard, vector-based tools like Adobe Illustrator can also be used.
Got more questions? Want to share your experience with clipping paths? Drop a comment or reach out—I'd love to hear your story.
0 notes
Text
How to Do Ghost Mannequin Photography Like a Pro

What Is Ghost Mannequin Photography?
Ghost mannequin photography, also called invisible mannequin, is a technique used in product photography. It allows apparel to appear worn without showing a model or mannequin. This clean, floating effect boosts eCommerce sales by giving a polished, professional look.
Why Use the Ghost Mannequin Effect?
This style is ideal for online fashion retailers. It showcases shape, fit, and detail without distractions. It also saves cost compared to hiring models. You get consistent, studio-quality results every time.
What You Need Before You Start
Before shooting, gather your essentials:
A DSLR or mirrorless camera
A sturdy tripod
Studio lights or softboxes
A white or neutral background
A mannequin with removable parts
Editing software like Adobe Photoshop
Preparation sets the tone for professional results. Make sure your clothing is steamed and properly fitted on the mannequin.
Step-by-Step Guide to Creating Ghost Mannequin Photos
1. Set Up the Studio
Use diffused lighting to avoid harsh shadows. Place your camera directly in front of the product. Keep angles straight and consistent for each product.
2. Dress the Mannequin
Ensure the garment fits snugly. Tuck loose areas for a natural appearance. Avoid wrinkles or bunching.
3. Shoot the Main Image
Take a front shot of the product on the mannequin. Keep your focus sharp and aperture narrow to capture full detail.
4. Capture the Inside Label or Back
Remove the mannequin’s neck or back part and shoot the inside collar or back area. This step is crucial to build the final composite.
5. Transfer Images to Editing Software
Load your images into Photoshop or any advanced photo editor. Use high-resolution files to preserve detail during editing.
6. Create the Ghost Effect in Photoshop
youtube
Use the Pen Tool or Select and Mask to cut the product from the background.
Remove the mannequin by carefully selecting its areas and deleting them.
Layer the inside shot beneath the main image.
Align it seamlessly to complete the hollow look.
Zoom in to refine edges. Use layer masks for non-destructive editing. Adjust brightness and contrast to match both images.
7. Retouch and Finalize
Remove any dust or wrinkles. Enhance fabric texture subtly. Make color corrections to reflect the actual product tone.
8. Export Your Image
Save the final image in a web-optimized format like JPEG or PNG. Keep file sizes small for faster loading times without losing quality.
Tips for Perfect Ghost Mannequin Photography
Use a white background for cleaner post-production
Stick to the same lighting setup for consistency
Label your files for easy batch editing
Zoom while editing to catch fine details
Common Mistakes to Avoid
Inconsistent angles or lighting
Poor garment preparation
Rushing through Photoshop edits
Not matching shadows or tones
Take your time to master this. A polished image can significantly impact customer decisions.
Final Thoughts
Ghost mannequin photography isn't just a trend—it's a proven way to elevate your online store. With the right tools and attention to detail, you can create stunning product images that sell. Keep practicing, refining, and experimenting until your results speak for themselves.
Want more guides like this? Don’t forget to bookmark and share!
#GhostMannequin#InvisibleMannequin#DummyRetouching#MannequinRetouching#ProductPhotography#ECommercePhotography#ClothingPhotography#ApparelPhotography#FashionPhotography#GhostMannequinService#InvisibleMannequinService#DummyRetouchingService#MannequinRetouchingService#NeckJoint#NeckJointService#ClothingPhotoEditing#ApparelPhotoEditing#ProductImageEditing#ECommerceImageEditing#Youtube
1 note
·
View note
Text
How to Build a Cohesive Product Grid Using Edited Images

Creating a cohesive product grid is essential for any eCommerce platform aiming to make a memorable first impression.
Whether you're selling on your own site or third-party marketplaces, consistent and professionally edited images help build trust and drive sales.
A clean, uniform product grid doesn't just look good—it communicates professionalism, attention to detail, and brand identity.
eBay Image Size Requirements are just one of the many standards that sellers need to meet to stay competitive and appealing.
At Clipping Way, we specialize in helping businesses create visually harmonious product listings through expertly edited images, ensuring every photo contributes to a polished, professional online storefront.
In this article, we’ll guide you through how to build a cohesive product grid using edited images—an approach that combines technical accuracy with creative strategy.
Why Image Consistency Matters
Imagine browsing a product page where every image is shot from a different angle, under different lighting, or with inconsistent backgrounds.
It feels chaotic, right? Now contrast that with a product grid where every item is aligned, lighting is even, and the background is uniform. The second scenario looks more trustworthy, professional, and easier on the eyes.
A consistent product grid helps:
Improve user experience and navigation
Increase brand trust and recognition
Boost conversion rates
Meet platform standards like Amazon or eBay Image Size Requirements
This is where image clipping path services come into play—removing background distractions, aligning products properly, and resizing according to platform specifications.
Step-by-Step: Building a Cohesive Product Grid
1. Plan Your Product Photography
Start with a blueprint. Decide on angles, lighting setups, and background style. Uniform lighting and camera settings go a long way in reducing the amount of post-production editing required.
2. Use Clipping Path for Background Removal
The clipping path technique is the gold standard for precise object selection and background removal. At Clipping Way, we ensure each product is neatly separated from the background so it can be placed on a white, transparent, or branded background.
3. Standardize Image Sizes and Ratios
Platforms like eBay have specific image size requirements (minimum 500px on the longest side). We help businesses crop and resize images uniformly to meet these standards without losing quality.
4. Align and Center Products
A cohesive grid depends heavily on visual symmetry. That means centering products, making sure they are vertically aligned, and ensuring that the same product types are displayed in the same orientation across the board.
5. Optimize for Load Speed and SEO
Every image is compressed without compromising quality and includes relevant alt tags—improving your website's SEO and user experience.
Why Choose Clipping Way?
100% Manual Clipping Path
Affordable Pricing Without Compromising Quality
Fast Turnaround Time
Free Trial Available
Instant Quote Option
Our experienced graphic designers use Photoshop’s pen tool for the most accurate clipping path, ensuring your product images are polished and professional.
Whether you're an Amazon seller, Shopify merchant, or eBay vendor, we adapt our editing to meet the specific demands of each platform.

Real Business Impact of Edited Product Grids
One of our clients saw a 40% increase in conversion rate within the first month of uploading a newly edited product grid.
Not only did their site appear more trustworthy, but the clean visuals also kept visitors engaged longer, decreasing bounce rates.
Inconsistent, poorly edited images often lead to mistrust or confusion, ultimately affecting sales.
Investing in professional image editing is no longer optional—it's a necessity in today’s competitive market.
FAQ
1. What is a product grid?
A: A product grid is a layout of product images displayed in rows and columns on an eCommerce platform. A cohesive grid uses consistent backgrounds, sizes, and alignments to create a unified visual experience.
2. Why is clipping path important for product grids?
A: Clipping path ensures precise background removal and product isolation, helping to create a consistent look across all product images, which is essential for a clean product grid.
3. What platforms do your edited images support?
A: Our images are optimized for platforms like eBay, Amazon, Shopify, WooCommerce, Etsy, and custom eCommerce websites. We adhere to platform-specific requirements, including eBay Image Size Requirements.
4. Do you offer a free trial?
A: Yes! We provide a Free Trial so you can assess our service quality before committing. This allows you to experience our accuracy, speed, and attention to detail risk-free.
5. How can I get a quotation for my project?
A: Simply visit our website and click on Get Quotation. Provide a few details about your project, and we'll respond quickly with a tailored estimate.
Conclusion
In the visually-driven world of online shopping, building a cohesive product grid using edited images is crucial.
It’s more than just aesthetics—it impacts your branding, customer experience, and ultimately, your bottom line.
With services like manual clipping path, background removal, alignment, and resizing, Clipping Way empowers you to stand out in crowded marketplaces.
Take advantage of our Free Trial and Get Quotation options today to elevate your product listings at a low, competitive price. Let us help you transform scattered product images into a seamless, sales-boosting grid.
0 notes