#restore apple email data
Explore tagged Tumblr posts
Visit Tumblr Blog
Explore Tumblr blogs with no restrictions, modern design and the best experience.
Last Seen Tumblr Blogs


Fun Fact
The Tumblr office adopted Tommy, an 11-year-old Pomeranian.
Text
Buy Apple ID Accounts What Is Apple ID Accounts?Buy Apple ID Accounts. An Apple ID is a user account that allows access to various Apple services and products, such as the App Store, iCloud, iTunes, Apple Music, and more. It serves as a single sign-in across all Apple devices and services. The account is tied to the user’s email address and is used to manage personal information, make purchases, and synchronize data across devices like iPhones, iPads, Macs, and more.Key features of an Apple ID account include:Access to Apple Services: With an Apple ID, users can access Apple services like iCloud for data storage, Apple Music for streaming, iTunes for media purchases, and the App Store for downloading apps.Device Synchronization: Apple ID allows users to sync their settings, photos, contacts, and apps across all their Apple devices using iCloud.Security Features: Apple ID comes with security features like two-factor authentication (2FA) to protect against unauthorized access.Purchase Management: Users can store payment information and make purchases through Apple’s digital stores, including apps, music, movies, and other content.Backup and Recovery: With iCloud, Apple ID provides a way to back up device data and restore it if the device is lost or replaced.Find My iPhone/Mac: This feature helps users locate their devices in case they are lost or stolen by using their Apple ID credentials.Essentially, an Apple ID acts as a digital identity within Apple’s ecosystem, allowing seamless use of Apple’s hardware, software, and services.
24 Hours Reply/Contact Telegram: @smmvirals24 WhatsApp: +6011-63738310 Skype: smmvirals Email: [email protected]
2 notes
·
View notes
Text
What Is Apple ID Accounts?
Buy Apple ID Accounts. An Apple ID is a user account that allows access to various Apple services and products, such as the App Store, iCloud, iTunes, Apple Music, and more. It serves as a single sign-in across all Apple devices and services. The account is tied to the user’s email address and is used to manage personal information, make purchases, and synchronize data across devices like iPhones, iPads, Macs, and more.
Key features of an Apple ID account include:
Access to Apple Services: With an Apple ID, users can access Apple services like iCloud for data storage, Apple Music for streaming, iTunes for media purchases, and the App Store for downloading apps.
Device Synchronization: Apple ID allows users to sync their settings, photos, contacts, and apps across all their Apple devices using iCloud.
Security Features: Apple ID comes with security features like two-factor authentication (2FA) to protect against unauthorized access.
Purchase Management: Users can store payment information and make purchases through Apple’s digital stores, including apps, music, movies, and other content.
Backup and Recovery: With iCloud, Apple ID provides a way to back up device data and restore it if the device is lost or replaced.
Find My iPhone/Mac: This feature helps users locate their devices in case they are lost or stolen by using their Apple ID credentials.
Essentially, an Apple ID acts as a digital identity within Apple’s ecosystem, allowing seamless use of Apple’s hardware, software, and services.
24 Hours Reply/Contact Telegram: @smmvirals24 WhatsApp: +6011-63738310 Skype: smmvirals Email: [email protected]
2 notes
·
View notes
Text
Apple Expert MacBook Battery Replacement

At Apple Expert MacBook Battery Replacement, we do more than just replace batteries we bring your Apple devices back to peak performance! From MacBook battery replacement and screen repair to complex fixes like logic board repair and graphics card repair, our skilled technicians handle it all with precision and care. Lost important files? Our expert team offers comprehensive data recovery services for Mac, Windows, iPhone, iPad, USB drives, and external hard drives, ensuring your valuable data is restored safely.
Facing liquid damage or password issues? We’ve got solutions for that too! Plus, we provide expert iPhone and iPad repairs, including screen and battery replacements. Based in Calgary, we combine fast turnaround with affordable pricing, making us your one-stop shop for all Apple device repairs and data recovery needs. Trust the experts at Apple Expert your device’s new best friend.
Apple Expert
Contact them via email now; Email addresses:
Call :
403-831-3352
403-473-1253
403-413-9000
Or Visit: https://appleexpert.ca/
#Retrieve lost Mac data quickly#Recover Windows files Calgary service#Retrieve deleted Windows data Calgary#Windows system recovery experts Calgary#External drive data recovery Calgary
0 notes
Text
Methods to Recover Deleted Contacts on iPhone
If you've accidentally deleted contacts on your iPhone, don't worry—there are several methods to recover them. While iPhones don't have a traditional "trash" or "recycle bin" for contacts, you can restore deleted contacts through iCloud, email account synchronization, or third-party recovery tools.
1. Restore Contacts via iCloud.com
If your contacts were synced with iCloud, you can restore them from an earlier archive:
Visit iCloud.com and sign in with your Apple ID.
Click on your account name and select Account Settings.
Scroll down to the Advanced section and click Restore Contacts.
Choose an archive date before the contacts were deleted and click Restore.
Note: Restoring contacts will replace the current contacts on all devices synced with iCloud. The current contacts will be archived and can be restored later if needed.
2. Re-enable iCloud Contacts Sync
Sometimes, toggling the iCloud Contacts sync off and on can help recover missing contacts:
Go to Settings > [Your Name] > iCloud.
Toggle Contacts off and choose Keep on My iPhone.
Toggle Contacts back on and select Merge.
This action may restore contacts that were temporarily missing due to sync issues.
3. Restore from iCloud Backup
If you regularly back up your iPhone to iCloud, you can restore contacts by reverting to a previous backup:
Go to Settings > General > Transfer or Reset iPhone > Erase All Content and Settings.
After your iPhone restarts, follow the setup prompts and choose Restore from iCloud Backup.
Select a backup dated before the contacts were deleted.
Caution: This method will replace all current data on your iPhone with the data from the selected backup.
4. Restore from Finder or iTunes Backup
If you have a backup on your computer:
Connect your iPhone to the computer and open Finder (macOS Catalina or later) or iTunes (earlier macOS or Windows).
Select your device and click Restore Backup.
Choose a backup that predates the deletion of contacts and proceed with the restoration.
Note: This process will overwrite current data on your iPhone.
5. Recover Contacts from Email Accounts (e.g., Google, Yahoo)
If your contacts were synced with an email account:
Visit the web interface of your email provider (e.g., Google Contacts).
Check the Trash or Bin folder for deleted contacts.
Select the contacts you wish to restore and choose the Restore option.
Note: Deleted contacts in Google are stored in the Trash for 30 days.
6. Use Third-Party Recovery Tools
If the above methods don't work, consider using third-party software like Disk Drill:
Download and install Disk Drill on your computer.
Connect your iPhone and allow the software to scan for recoverable data.
Preview and recover the deleted contacts.
Note: Recovery success varies, and some tools may require a purchase.
📌 Tips to Prevent Future Contact Loss
Regularly back up your iPhone to iCloud or your computer.
Avoid using third-party cleaner apps that may delete important data.
Ensure contacts are synced with a reliable account (iCloud, Google, etc.).
1 note
·
View note
Text
Popular iPhone Repair in Bangalore at Fixcare
In a world powered by technology, your iPhone is more than just a phone—it's your digital lifeline. From managing work emails to capturing life’s best moments, iPhones are essential to modern life. But what happens when your device gets damaged? You don’t just need a repair—you need a fast, reliable, and expert solution. That’s exactly what Fixcare offers for iPhone repair in Bangalore.
At Fixcare, we bring professional-grade iPhone repair services to your doorstep across Bangalore. Whether it’s a shattered screen, water damage, battery issues, or software glitches, our trained technicians ensure your iPhone is back to peak performance in no time.
Why Fixcare is the Best Choice for iPhone Repair in Bangalore
✅ Trusted Technicians, Apple-Grade Expertise
Fixcare employs only certified and experienced technicians who specialize in Apple devices. With hands-on experience across every iPhone model—from the iPhone 6 to the latest iPhone 15 Pro Max—our team is equipped to solve any issue efficiently and effectively.
✅ Multiple Locations Across Bangalore
No matter where you are in Bangalore—Koramangala, Indiranagar, Whitefield, Electronic City, or Jayanagar—Fixcare’s network of service centers and doorstep repair options make it convenient for you to get your iPhone fixed without delay.
✅ Same-Day iPhone Repairs
We know how important your time is. That’s why Fixcare provides same-day repair services for common problems like screen replacements and battery swaps.
Our iPhone Repair Services in Bangalore
Fixcare offers a wide range of repair services for all iPhone models. Each repair is handled with care using premium-quality spare parts and industry-best practices.
🔧 iPhone Screen Replacement
Cracked or unresponsive screen? Our iPhone screen replacement service in Bangalore restores your device’s original look and functionality. We use high-quality, retina-compatible displays to ensure crystal-clear resolution and touch responsiveness.
🔋 iPhone Battery Replacement
If your battery drains quickly or shuts down unexpectedly, it’s time for a replacement. We offer original-grade battery replacements that bring your iPhone back to full-day usage capability.
🔌 Charging Port Repair
iPhone not charging or connecting to your computer? Our technicians clean, diagnose, and if needed, replace the charging port to ensure reliable performance.
💧 Water Damage Restoration
Accidentally dropped your iPhone in water? Don’t panic! Fixcare provides expert liquid damage repair services that can salvage your device and data.
📷 Camera and Speaker Repairs
If you're facing blurry photos or muffled audio, we repair or replace iPhone cameras, microphones, speakers, and earpieces to restore high-quality media capture and playback.
📱 Face ID, Touch ID & Button Repairs
We also repair broken power buttons, volume buttons, mute switches, and biometric sensors like Face ID and Touch ID for a seamless iPhone experience.
Why Bangalore Chooses Fixcare for iPhone Repairs
🛠️ Free Device Diagnostics
Not sure what’s wrong with your iPhone? Our experts offer free diagnostics before any repair work, so you’re fully informed.
💰 Transparent Pricing
We believe in no hidden charges. All prices are quoted upfront, and we stick to them. You pay only for what you agree to.
🔄 Doorstep Pick-up & Drop Services
Can’t visit our service center? We���ll come to you! Fixcare offers home pick-up and delivery for iPhone repair across Bangalore.
📄 Warranty on Repairs
Most of our iPhone repair services come with a warranty of up to 6 months, ensuring your peace of mind.
Common iPhone Issues We Fix at Fixcare
Problem Service Provided Turnaround Time Cracked Screen Screen Replacement 1–2 hours Battery Draining Fast Battery Replacement 1 hour Not Charging Charging Port Repair 1–2 hours Face ID Not Working Face ID Sensor Repair Same Day Water Damage Internal Cleaning + Logic Board Fix 1–2 days Camera Blur or Focus Issues Camera Module Replacement 2 hours iPhone Not Turning On Diagnosis + Logic Board Repair 1–3 days
iPhone Models We Repair
We support repair services for every iPhone model, including:
iPhone 6 / 6s / 6s Plus
iPhone 7 / 7 Plus
iPhone 8 / 8 Plus
iPhone X / XR / XS / XS Max
iPhone 11 / 11 Pro / 11 Pro Max
iPhone 12 / Mini / Pro / Pro Max
iPhone 13 / Mini / Pro / Pro Max
iPhone 14 / Plus / Pro / Pro Max
iPhone 15 / Plus / Pro / Pro Max
How Our iPhone Repair Process Works
Step 1: Book a Service
Call us or schedule online through our website or WhatsApp support.
Step 2: Get a Free Diagnostic & Quote
We examine your iPhone and provide a transparent, no-obligation quote.
Step 3: Repair & Delivery
Once you approve, our technician begins the repair. Many fixes are completed the same day. You can either collect your device or have it delivered back to you.
Areas in Bangalore We Serve
Fixcare offers iPhone repair in Bangalore across major localities including:
Koramangala
Indiranagar
Jayanagar
Whitefield
Marathahalli
HSR Layout
BTM Layout
Bannerghatta Road
Electronic City
Rajajinagar
Hebbal
Malleshwaram
Arekere
No matter where you are in Bangalore, a Fixcare expert is just a few kilometers away.
Customer Testimonials
“My iPhone 13 screen was completely shattered, and I didn’t want to spend a fortune at the Apple store. Fixcare fixed it the same day and it looks brand new!” — Meghana S., Koramangala
“They repaired my iPhone X battery in less than an hour. Highly recommend Fixcare for anyone looking for quick and affordable iPhone repair in Bangalore.” — Ravi Nair, Indiranagar
“I got a quote from an Apple center that was too high. Fixcare gave me a reasonable price and completed the job professionally with a warranty.” — Shweta M., Whitefield
Tips to Maintain Your iPhone in Top Condition
Avoid Overcharging – Unplug your iPhone once it reaches 100%.
Use Original Chargers – Third-party chargers may damage your battery or logic board.
Keep iOS Updated – Install updates to enhance performance and fix bugs.
Use a Screen Guard & Case – Helps prevent screen and body damage.
Back Up Regularly – Use iCloud or iTunes to avoid data loss.
Conclusion: The Most Trusted iPhone Repair in Bangalore
At Fixcare, we believe you shouldn’t have to choose between speed, quality, and affordability. With professional technicians, genuine spare parts, and an unwavering commitment to customer satisfaction, Fixcare has become the most reliable name for iPhone repair in Bangalore.
Whether it's a quick screen fix, a deep logic board repair, or water damage restoration, we’ve got you covered—fast, affordable, and trustworthy. Don’t wait for minor issues to become major ones. Contact Fixcare today and restore your iPhone to its prime condition.
Frequently Asked Questions (FAQs)
1. How much does iPhone repair in Bangalore cost at Fixcare?
Prices vary by model and issue. Screen replacements start from ₹1,499 and battery replacements from ₹999.
2. Do I need an appointment?
Appointments are recommended but not mandatory. Walk-ins are welcome at our service centers.
3. How long does a typical iPhone screen replacement take?
Most screen replacements are done within 1–2 hours.
4. Do you use original Apple parts?
We use OEM-grade parts that match Apple’s quality standards.
5. What areas in Bangalore do you serve?
We serve all major areas including Koramangala, Indiranagar, Whitefield, Jayanagar, and more.
6. Is there a warranty on the repair?
Yes, we offer up to 6 months warranty on most repairs.
7. Do you offer doorstep service?
Yes, we provide free pickup and delivery for iPhone repairs across Bangalore.
8. Can you recover data from a non-working iPhone?
Yes, we offer data recovery services for damaged or dead iPhones.
0 notes
Text
iPhone Storage Full? Find and Remove Duplicate Videos with These 5 Methods If you're an iPhone user who loves capturing moments through video, you've likely encountered a common problem: duplicate videos taking up valuable storage space. Whether from accidental double recordings, shared media, or backed-up content, these duplicates can quickly consume gigabytes of storage without you realizing it. Finding and removing duplicate videos on your iPhone not only frees up precious storage space but also helps organize your media library for easier access and management. In this comprehensive guide, we'll explore various methods to identify and remove duplicate videos on your iPhone, from using built-in features to third-party applications designed specifically for this purpose. By the end of this article, you'll have all the tools you need to efficiently manage your video collection and reclaim your iPhone storage. Why Duplicate Videos Accumulate on iPhones Before diving into solutions, it's helpful to understand how duplicate videos end up on your device in the first place: Multiple photo backups: When restoring from different backups or syncing across multiple services (iCloud, Google Photos, etc.) Accidental saving: Downloading the same video multiple times from messaging apps or emails Screen recordings: Creating screen recordings of videos you already have saved Photo sharing: Receiving the same video from different people via AirDrop, Messages, or social media Manual copying: Duplicating videos when organizing files Identifying these patterns can help you prevent duplicate accumulation in the future. Method 1: Using the Built-in Photos App Apple's Photos app includes a basic duplicate detection feature introduced in iOS 16 that can help you locate identical videos. Here's how to use it: Finding Duplicates with the Photos App Open the Photos app on your iPhone Go to the Albums tab at the bottom of the screen Scroll down to the Utilities section Look for and tap on the Duplicates album The app will automatically display all duplicate photos and videos found on your device For each set of duplicates, you'll see options to Merge the files, which keeps the highest quality version and deletes the others Note: This feature only identifies exact duplicates with identical file data. Similar videos with slight differences won't be detected. Method 2: Using the Files App to Manually Search For more control over the process, you can manually search through your videos in the Files app: Open the Files app on your iPhone Navigate to On My iPhone or iCloud Drive where your videos are stored Tap the List icon (three lines) in the top-right corner to change the view Tap on the dropdown arrow and select Sort by Size to group larger video files together Manually check files with similar sizes and names that might be duplicates Preview videos by long-pressing on their thumbnails To delete a duplicate, swipe left on the file and tap Delete While this method requires more effort, it gives you greater control over which files to keep or remove. Method 3: Third-Party Duplicate Finder Apps For more powerful duplicate detection capabilities, third-party apps offer advanced features and algorithms. Here are some top options: Gemini Photos Gemini Photos by MacPaw is one of the most popular duplicate finders: Download Gemini Photos from the App Store Launch the app and allow it to scan your media library Tap on the Videos section Navigate to the Similar or Duplicates category Review the suggested duplicates and select those you want to remove Tap Delete to remove the selected videos Gemini Photos uses smart algorithms to detect not only identical duplicates but also similar videos, making it more effective than the built-in Photos app. Photo & Video Duplicate Cleaner Another excellent option with a focus on media files:
Download Photo & Video Duplicate Cleaner from the App Store Open the app and grant necessary permissions Tap Scan Now to begin analyzing your library Select the Videos tab to focus only on video duplicates Review the found duplicates and check those you want to delete Tap Delete Selected to remove them This app offers a simple interface specifically designed for finding duplicate media files. Method 4: Using iCloud and Mac for Larger Libraries If you have a large video collection, using a Mac with your iCloud account can provide more powerful tools: Ensure your iPhone is synced with iCloud Photos On your Mac, open the Photos app Click on Albums in the sidebar Scroll to Utilities and select Duplicates Filter to show only videos by clicking on the dropdown menu and selecting Videos Review and merge duplicates as needed The larger screen and additional processing power of a Mac make handling large video libraries much easier. Method 5: Smart Storage Management Using iPhone Storage Recommendations Your iPhone offers smart recommendations to manage storage: Go to Settings > General > iPhone Storage Wait for the analysis to complete Check the Recommendations section Look for suggestions related to large videos or duplicated content Follow the provided options to optimize storage Using Optimize iPhone Storage Feature Enable the optimize storage feature to automatically manage video storage: Go to Settings > Photos Enable Optimize iPhone Storage This keeps full-resolution videos in iCloud while storing smaller versions on your device Tips to Prevent Duplicate Videos Preventing duplicate videos is easier than removing them later: Use iCloud Photos consistently: Don't switch between multiple backup services Check before downloading: Verify if you already have a video before saving it again Use the "Save Image" option carefully: In messaging apps, check if you already have the video Organize regularly: Set a monthly reminder to clean up your video library Use Albums: Create logical albums to better track your content Security Considerations When Using Third-Party Apps When using third-party duplicate finder apps, keep these security tips in mind: Only download from the App Store: Avoid sideloaded apps for handling your personal media Check privacy policies: Ensure the app doesn't upload your videos to external servers Review permissions: Only grant necessary access to your media library Look for reputable developers: Choose apps from established companies with good reviews Conclusion Finding and removing duplicate videos on your iPhone doesn't have to be a tedious task. From using the built-in Photos app's duplicates feature to leveraging specialized third-party applications, you have multiple options depending on your needs and preferences. Regular maintenance of your video library not only frees up valuable storage space but also makes your video collection more organized and accessible. By implementing the preventive measures discussed, you can minimize duplicate accumulation in the future and keep your iPhone running smoothly. Whether you choose to use Apple's native tools or third-party solutions, taking control of duplicate videos will enhance your iPhone experience and ensure you always have space for capturing new memories without worrying about storage limitations.
0 notes
Text
Is Apple Mail Backed Up with Time Machine?
Apple Mail is a widely used email client among Mac users, providing seamless integration with macOS and iCloud. Given the importance of email communication, ensuring that your Apple Mail data is securely backed up is crucial. One common method Mac users rely on for backups is Time Machine, Apple’s built-in backup solution. But does Time Machine back up Apple Mail? The short answer is yes, but there are nuances and limitations to be aware of.

In this guide, we will explore how Time Machine backs up Apple Mail, how to restore emails from a Time Machine backup, its limitations, and alternative backup solutions.
Understanding Time Machine and Apple Mail Backups
What is Time Machine?
Time Machine is a built-in backup feature in macOS that automatically creates snapshots of your system at regular intervals. It allows users to restore files, applications, and system settings to previous states in case of accidental deletion, corruption, or hardware failure.
Time Machine backs up:
System files and applications
User data (documents, photos, music, and emails)
System settings and preferences
How Time Machine Backs Up Apple Mail
Apple Mail stores emails in a special folder within your user library. When Time Machine performs a backup, it includes this folder, ensuring that your emails, attachments, and email account settings are saved. The primary locations where Apple Mail stores data are:
Mail Data Location: ~/Library/Mail/
Mail Preferences & Account Settings: ~/Library/Containers/com.apple.mail/
Mail Index & Metadata: ~/Library/Application Support/Mail/
Since these directories are included in Time Machine backups, your Apple Mail data is protected and can be restored if needed.
How to Restore Apple Mail Emails Using Time Machine
If you ever lose important emails or need to recover an older version of an email, you can use Time Machine to restore your Apple Mail data. Follow these steps:
Step 1: Open Apple Mail
Ensure that Apple Mail is open before launching Time Machine. This allows Time Machine to directly interact with Mail’s database.
Connect your Time Machine backup drive if it is not already connected.
Step 2: Launch Time Machine
Click on the Time Machine icon in the menu bar (top-right corner) and select Enter Time Machine.
Alternatively, go to System Settings > Time Machine, then click Enter Time Machine.
Step 3: Browse Backup Snapshots
Once inside Time Machine, you’ll see a timeline of backups.
Use the arrows or the timeline on the right to navigate to the date when the missing emails were still present.
The Mail interface will show the backed-up version of your inbox.
Step 4: Restore Emails
Locate the missing email or folder that you want to restore.
Click the Restore button. Time Machine will restore the email(s) to your Mail app.
Once the restoration process is complete, the email should reappear in your inbox.
Step 5: Restart Apple Mail
If the restored emails do not appear immediately, restart Apple Mail or reboot your Mac.
Limitations of Using Time Machine for Apple Mail Backups
Although Time Machine provides a convenient way to back up Apple Mail, there are some drawbacks to consider:
1. No Granular Email Backup
Time Machine does not allow you to selectively back up individual emails. Instead, it backs up the entire Mail database, which means restoring a single lost email may require restoring the entire Mail folder.
2. Backup Frequency Limitations
Time Machine takes hourly snapshots, but if you need a real-time backup of your emails, Time Machine may not be sufficient. If you receive and delete emails frequently, some emails may be lost between backup intervals.
3. Large Backup Size
Since Apple Mail stores all messages, attachments, and metadata within its directory, your Time Machine backup can grow significantly in size over time. This may result in a shorter retention period for backups due to storage constraints.
4. Corruption Risks
If the Mail database becomes corrupted, restoring from a Time Machine backup may also restore the corrupted database, making data recovery difficult. In such cases, a dedicated email backup tool may be more reliable.
5. External Drive Dependency
Time Machine requires an external drive or a network backup location to function. If you do not have a backup drive connected, your Mail data will not be backed up.
Alternative Backup Solutions for Apple Mail
Given the limitations of Time Machine, it is wise to consider additional backup options for your Apple Mail data. Here are some alternative methods:
1. Mail Backup X
Mail Backup X is a dedicated email backup tool that allows Mac users to:
Perform scheduled backups of Apple Mail
Compress and encrypt email archives
Store backups on external drives, cloud storage, or FTP servers
Search and retrieve emails easily
2. iCloud Backup
If you use an iCloud email account, your emails are already stored in Apple’s cloud servers. However, this does not protect locally stored messages or emails from other providers like Gmail or Outlook.
3. Manual Mail Export
You can manually export and save Apple Mail data by:
Opening Apple Mail and selecting the emails or mailbox you want to save.
Clicking File > Export Mailbox.
Choosing a location (external drive, cloud storage, etc.) to save the exported .mbox file.
This method is useful for creating specific backups but lacks automation.
4. Third-Party Cloud Services
Google Drive, Dropbox, and OneDrive offer cloud backup solutions. Some third-party applications can automatically back up email databases to these services.
Best Practices for Apple Mail Backups
To ensure your emails remain secure, follow these best practices:
Use Multiple Backup Methods: Combine Time Machine with another backup tool for redundancy.
Schedule Regular Backups: Ensure that Time Machine is running and backing up your system frequently.
Store Backups in Different Locations: Keep a copy of backups on an external drive and a cloud service.
Verify Backup Integrity: Periodically test your backups by restoring a small batch of emails.
Archive Old Emails: Store older emails separately to reduce the size of your primary backup.
Conclusion
Time Machine is a useful tool for backing up Apple Mail, but it is not a perfect solution. While it captures email data, it lacks fine control over individual email restoration and may not provide real-time protection.
For a more reliable backup strategy, consider combining Time Machine with a dedicated email backup tool like Mail Backup X or manually exporting your emails for additional security. By implementing a robust backup strategy, you can ensure your Apple Mail data remains protected from loss, corruption, or accidental deletion.
0 notes
Text

HT Solution offers expert laptop repair services in Oxford, ensuring your device is restored quickly and efficiently. Our skilled technicians specialize in fixing hardware and software issues, including screen replacement, battery problems, and data recovery. We handle top brands like Dell, HP, Lenovo, and Apple with precision and care. Visit HT Solution for reliable, affordable repairs that bring your laptop back to life. Choose us for quality service in Oxford!
📞 Contact: HT Solution
☎️ Phone: 01865594774
📧 Email:- [email protected]
📍 Address1: 99A St Aldate's, Oxford OX1 1BT, United Kingdom
0 notes
Text
youtube
How to Convert MBOX to EML File Format?
The need to convert MBOX files to EML arises for several reasons, primarily to facilitate accessibility, compatibility, and ease of sharing. MBOX and EML are two distinct file formats used in different email clients. While MBOX files consolidate multiple emails into a single file, EML files store each email as a standalone file, compatible with a broader range of email applications. In this article, we’ll dive into an in-depth, step-by-step guide on converting MBOX to EML to improve email portability and ease of use.
Understanding MBOX and EML File Formats
What is MBOX?
MBOX (Mailbox) is a file format used by various email applications to store messages collectively within a single file. Commonly supported by Mozilla Thunderbird, Apple Mail, Entourage, and others, MBOX is an open-source format that saves all emails in a single text file.
What is EML?
EML (Email Message) is a more versatile format and widely used due to its compatibility across a larger variety of email clients, including Microsoft Outlook, Outlook Express, Windows Live Mail, and others. Each email is saved as a separate file with the .eml extension, preserving metadata such as sender, recipient, subject, and attachments.
Reasons to Convert MBOX to EML
1. Enhanced Compatibility EML files are compatible with multiple platforms, making them accessible across most email clients.
2. Better Organization Each email is saved as an individual file in EML format, making email management more organized.
3. Easier Backup and Restoration With each email stored individually, EML files allow for more streamlined backups and recovery in case of data loss.
4. Improved Portability You can transfer EML files to different devices easily, allowing users to read emails offline.
Methods to Convert MBOX to EML
There are several ways to convert MBOX to EML, including manual techniques and the use of automated tools. Here’s a look at the most effective methods available.
1. Manual Method Using Mozilla Thunderbird
Mozilla Thunderbird, an open-source email client, offers a simple way to convert MBOX files to EML format.
Steps to Convert MBOX to EML in Thunderbird:
Install Thunderbird: If you haven’t already, download and install Mozilla Thunderbird on your device.
Import MBOX File:
Go to Tools > Add-ons > Extensions.
In Top right you can see “ImportExportTools NG” and install it.
After installation, restart Thunderbird.
Use ImportExportTools NG to Import MBOX File:
In Thunderbird, click on Local Folders > Right-click > ImportExportTools NG > Import MBOX file.
Choose your MBOX file to import that file in thunderbird.
Export Emails to EML Format:
After MBOX import, select the emails or folders you want to export.
Right-click on the selected emails and choose ImportExportTools NG > Export all messages in folder > EML format.
Choose a path where you want to save the EML files.
This method is free and effective but may require more effort if you have multiple MBOX files to convert.
2. Using Dedicated MBOX to EML Conversion Software
For large volumes of emails or multiple MBOX files, you use our MBOX to EML converter tools are highly recommended like Webbyacad MBOX converter software.
Advantages of Using Webbyacad MBOX Converter Software:
Batch Conversion: Convert multiple MBOX files to EML in one click.
Retention of Metadata: Keeps email details intact, such as date, sender, recipient, and attachments.
Using Webbyacad MBOX Converter Software:
Download and Install: Download the Webbyacad MBOX Converter Software and install the software on your system.
Add MBOX Files: Select the Add File option to import MBOX files.
Select EML: Choose the EML option from the dropdown as the export format.
Choose Output Location: Specify where the converted EML files should be saved.
Start Conversion: Click Export to initiate the conversion.
Our software also comes with a free trial version, this allows users to test functionality before committing to purchase.
3. Online MBOX to EML Converters
For users who prefer not to install software, several online conversion tools can help convert MBOX to EML. These tools are typically free for small conversions, but they may have file size limits or lack privacy assurances. Always check privacy policies and limitations before uploading sensitive data.
How to Use an Online Converter:
Go to the Website: Visit the chosen online conversion tool’s website.
Upload MBOX File: Select and upload the MBOX file.
Select EML Format: Choose EML as the output format.
Download Converted Files: Once the conversion is complete, download the EML files to your device.
Note: Be cautious while using online converters, especially if the data is sensitive, as these tools may not guarantee data confidentiality.
Best Practices and Tips for Converting MBOX to EML
Backup Original Files: Always keep a backup of the original MBOX file in case any errors occur during conversion.
Use Reliable Software: When using third-party software, opt for reliable and reputable solutions to avoid data corruption or loss.
Check Compatibility: Ensure that your email client is compatible with EML files before converting.
Test on a Small File First: If you have a large volume of emails, start with a small file to test the conversion accuracy and software functionality.
Common Issues and Troubleshooting Tips
1. File Size Limitations: Some converters have file size limitations. Consider breaking down large MBOX files or using premium tools.
2. Loss of Attachments: Some conversion methods may not retain attachments. Ensure the software you choose explicitly supports attachment preservation.
3. Formatting Issues: After conversion, some emails may display formatting inconsistencies. Preview a few EML files in your email client before transferring the entire batch.
By following this comprehensive guide, you can successfully convert your MBOX files to EML and enjoy the enhanced flexibility, compatibility, and organization offered by the EML format. Choose the method that best suits your needs, considering factors like email volume, operating system, and any security concerns.
#mbox#migrate#mboxconverter#mboxtoeml#exportermboxtoeml#importmboxtoeml#transformmboxtoeml#outlook#tools#email migration#export mbox to eml#tranform mbox to eml#mbox to eml#Youtube
0 notes
Text
iPhone Data Recovery: How to Retrieve Lost Data from Your Device

Losing data on your iPhone can be a frustrating experience, whether it’s photos, contacts, messages, or important documents. Accidental deletions, software glitches, or hardware failures can all result in lost data. Fortunately, iPhone data recovery services, such as those provided by Apple Expert, offer a solution to recover your valuable information.
Common Causes of Data Loss
Accidental Deletion: This is perhaps the most common cause of lost data. Users often mistakenly delete files, messages, or photos that they later realize were important.
Software Update Issues: Occasionally, updating to a new iOS version can cause unexpected data loss, particularly if the backup process was incomplete.
Physical Damage: Water damage, drops, and other forms of physical harm can make it difficult to access or recover data.
Forgotten Passcodes: If you're locked out of your device due to a forgotten passcode, regaining access to your data can require specialized recovery tools.
Jailbreaking: While jailbreaking an iPhone offers more customization options, it also opens the door to increased risks of data loss or corruption.
Steps to Take After Data Loss
Stop Using the Device: If you suspect data loss, it’s essential to stop using your iPhone immediately. Continued use may overwrite the deleted data, making it more difficult to recover.
Check Your Backup: Before considering professional recovery services, check whether you have recent backups in iCloud or iTunes. If a backup is available, restoring your iPhone to a previous state may solve the problem.
Seek Professional Help: If backups aren’t available or they don’t contain the lost files, professional iPhone data recovery services can offer advanced tools to retrieve your information.
iPhone Data Recovery Methods
Using iCloud Backup: If your iPhone was backed up to iCloud before the data loss, you might be able to recover your data by restoring from the backup.
Go to Settings > General > Reset > Erase All Content and Settings.
After erasing the content, follow the setup process and choose Restore from iCloud Backup.
Using iTunes Backup: If you have synced your iPhone with iTunes, you can restore your lost data using this method.
Connect your iPhone to your computer and open iTunes.
Select your device and choose Restore Backup.
Select the most recent backup and click Restore.
Third-Party Software: Several third-party applications are available to help recover lost iPhone data without a backup. These tools connect to your device, scan it for recoverable files, and allow you to retrieve what was lost.
Professional Data Recovery Services: If you can’t recover the data yourself or the issue is due to physical damage, professional recovery services like Apple Expert use specialized tools to recover data. Their experts can retrieve data from damaged devices or corrupted files that may be beyond the scope of standard recovery tools.
What Data Can Be Recovered?
Professional iPhone data recovery services can often retrieve a wide variety of lost data, including:
Photos and Videos: Personal memories, family pictures, and recorded videos can all be restored.
Contacts: Lost phone numbers and email addresses can be recovered.
Messages: Whether it's iMessages, SMS, or MMS, your lost conversations may be restored.
Documents: Important work files, PDFs, and other documents stored on your iPhone can be retrieved.
App Data: Information from apps, such as notes, calendars, and browsing history, can also be recovered in some cases.
How Long Does iPhone Data Recovery Take?
The time required for iPhone data recovery depends on the extent of the damage and the amount of data that needs to be recovered. In most cases, professional recovery can take anywhere from a few hours to several days. The complexity of the issue, such as physical damage or encrypted data, can also influence the duration of the recovery process.
Preventing Future Data Loss
To avoid the inconvenience of data loss in the future, consider the following precautions:
Regular Backups: Regularly backing up your iPhone to iCloud or iTunes ensures that even if data loss occurs, you can easily restore your device to a previous state.
Enable iCloud Sync: By enabling iCloud sync for essential apps such as Photos, Contacts, and Notes, your data is constantly updated and saved in the cloud.
Use a Passcode and Face ID: Adding a passcode and enabling Face ID can help secure your phone from unauthorized access.
Avoid Jailbreaking: While it may seem appealing to jailbreak your device, it increases the risk of data corruption and loss.
Why Choose Professional Data Recovery?
Choosing a professional iPhone data recovery service like Apple Expert comes with several advantages:
Expertise: Professional technicians are trained to handle complex data recovery processes and can retrieve data even from physically damaged devices.
Advanced Tools: They use advanced data recovery software and hardware tools that are not available to the general public.
Safe Process: Professionals ensure that your iPhone’s hardware and software are not further damaged during the recovery process.
Losing important data on your iPhone doesn’t have to be a permanent problem. By taking the right steps and seeking professional help, you can recover photos, messages, and other crucial data. Services like Apple Expert offer reliable and secure iPhone data recovery solutions, helping you retrieve your lost files efficiently.
0 notes
Text
Know the details of Thunderbird backup email here
In order to keep one’s data safe and updated it is vital that one carries Thunderbird backup email on a regular basis. The process however can be complicated and even induce data safety concerns. With the availability of several third-party software, people have given over the idea of manual backup and archiving. However, even with the availability of such software, it is important that one checks them for their reliability and compatibility with data. The first thing you can do in that direction is to educate yourself about Thunderbird, check here- https://en.wikipedia.org/wiki/Mozilla_Thunderbird.
Thunderbird email backup service in alignment with your requirements

You can backup mail Thunderbird with Mail Backup X and carry a lot of associated tasks with it at no extra cost. It is priced quite reasonably considering how wide-ranging the facilities it provides are. It is also quite safe for all types of data, is compatible with all sorts of mail file formats to. To ensure that the user feels safe using this Thunderbird email backup tool it has been designed to work in the offline mode.
How to restore Thunderbird mail backup without moving your fingers
One does not have to be adept at the task of Thunderbird email backup in order to carry it regularly. Using this software on a regular basis will provide the desired results. Also important is the capacity of this software to backup and archive data not only from Thunderbird but from Gmail, Hotmail, apple mail, yahoo mail, outlook, and postbox.
Closely associated with the ability of this software to backup and archive data from various sources is the integrated mail viewer. In order to work with data from several sources one would not have to skip continuously from one platform to another, the mail viewer makes sure of that. It works by bringing data from various sources at one place.
Convert mail file formats and use ftp client for additional safety
As this software supports several mail file formats it is also capable of providing the facility of changing mail file formats. It can be used to change the format of the data files to and from .olm, .eml, .pst, .mbox, and .rge.
The ftp client on the other hand makes sure that one can carry backup of data on a regular basis without themselves intervening. The ftp client continuously backs up data and provides the facilities of primary backup and mirror backup as well.
Faster search results and more storage space
With this software you will have the freedom to backup as many files as you want since it meanwhile also saves storage space. It manages to do that by compressing the files methodically.
One does not have to waste time looking for even a bit of data. The ultra-fast data search module can find out any variety of data within nanoseconds.
You can try these features out immediately by purchasing the software. A free demo version of it is also available www.mailbackupx.com/thunderbird-backup-email/.
1 note
·
View note
Text
Apple Expert iPad Repair Calgary’s

At Apple Expert iPad Repair, we go beyond just fixing devices — we restore your digital life. Whether your iPad screen is cracked, your Mac won’t turn on, or you’ve lost valuable data, our certified technicians are here to help.
We specialize in all iPad repairs, including glass screen replacements and battery replacements, along with expert-level Mac services like liquid damage repair, logic board fixes, screen replacements, keyboard replacements, and graphics card repairs.
Need your files back? We offer professional data recovery from Macs, Windows PCs, USBs, external drives, iPhones, and iPads — even if they were accidentally deleted.
Located in Calgary, we’re trusted for speed, reliability, and expert care. Let Apple Expert iPad Repair bring your devices back to life.
Apple Expert
Contact them via email now; Email addresses:
Call :
403-831-3352
403-473-1253
403-413-9000
Or Visit: https://appleexpert.ca/
#MacBook Pro graphics issue repair#GPU repair MacBook Pro Calgary#Mac password removal Calgary service#Remove Mac login password Calgary#Replace dead Mac battery Calgary
0 notes
Text
Restore email mac mails with zero tolerance data integrity
Data integrity is often misjudged when it comes restore mac email. It is about overall accuracy, completeness and consistency of data. So whenever, data transfer takes place, the tool is expected to transfer or convert eh files with completeness and accuracy.
A non-accurate or incomplete transfer of data means the file is unreadable or unrecognizable or broken. In worst cases, the data files transfer or conversion does not take place.
This makes it very crucial to use a highly skilled restore mac email tool for an efficient transfer with zero tolerance data integrity.
We deliver a highly skilled and well-engineered product Mail Backup X. The one of its own kind to restore email mac mails. A tool that maintains hundred percent data integrity and also restore mac email addresses.
The factor is also visible in the applications of the restore mac email app delivering complete data file without any deviation.
Different particulars are transferred while taking backup of emails from Mac. Therefore. We also make sure that mac users undergo the information on Mac OS and Apple mail for a detailed tour on different aspects of them. So, it is advisable to browse the below links on Mac OS and Apple mail for more information.
Maintain data integrity factor in various applications that restore mac emails
It is indicative of the fact that different applications of this restore mac email software preserves data integrity while taking backup of emails from Mac.
The third party mail archive application supports reading and import of common mail archives file formats like .mbox, .rge, .olm, .olk, .pst, .eml, that store mail data by mail clients like Outlook Mac, Outlook Windows, Office 365, Thunderbird, Postbox, Gmail, Yahoo etc.
The inbuilt mail archive application allows you to view important mails from different mail clients. The product allows you to read and import archive files from Mbox viewer, RGE viewer, OLM viewer, OLK viewer, PST viewer, EML viewer without the need to switch between or open mails with different mail clients.
The third application of inbuilt mail migration application is an advanced mail conversion feature to use mail client of your choice on Mac OS. It permits you convert and export mail data to all major mail data file formats like .mbox, .rge, .olm, .pst, .eml.
Test the tool to explore the best way to restore mac email
The best way to explore the data integrity factor is by testing the tool for a realistic experience.
All you need is to download the demo version of the restore mac email tool and on Mac. Use it for 15 days until the validity expires.Switch to the licensed version of the tool, once satisfied.
For complete access of the product, you can click on the licensed version of the tool along with a product key.
For more details on the software, log on to the below website and get all your queries answered in a systematic manner www.mailbackupx.com/restore-mac-email/.
#mac restore tool#mac mail restore#restore mac mailbox#restore mac folder#restore mac data#restore mac files#restore mac email
1 note
·
View note
Text
Best solution to restore Apple email
Don’t look any further for a solution to restore Apple email
Maybe you have never felt the need to restore data. But you keep hearing the experts telling you to archive email data and keep ready for restore if need be. You cannot ignore this advice as it is extremely valid and important. Archiving emails and backing up data regularly is what any wise person will do because we know how data is so prone to damage or hacking or other kind of losses. This is especially true when original messages don’t get stored in device like the case with IMAP based services. You will need to restore Apple email in a case you lose data due to any reason like hardware failure or some other. You will be able to restore only if you have backed it up or archived email folders. Else, you will not be able to do anything. You need a good backup and recovery option for this. Although we will be focusing on a method which covers all IMAP based email services like Gmail, Thunderbird, Yahoo, etc., you can read a little about Apple email to get a fair idea why we must backup emails. Here is the link- https://en.wikipedia.org/wiki/Apple_Mail
Best way to restore Apple email is with a certified software

There are a few methods available to backup as well as restore Apple mails and other on Mac. Yet, you see experts recommending only certified tools. Why is it so? Why don’t they recommend a manual method or maybe restore Apple email app which works online? There must be some factor behind it. While manual methods are never recommended for any similar task which is to be done regularly, they also pose a great challenge to novices. And when we talk of online apps, they are fraught with dangers like data loss, data stealth, corruption, etc. Along with these risks, there is almost zero support available for any doubts or mishaps. This means we shouldn’t be using these apps. We should only use a reliable certified archiving and restoring tool like Mail backup X by InventPure. This is the best one out there for end users.
Now restore Apple email account and other multiple accounts in a short, precise, and easy way
This tool makes it really easy, quick, as well as accurate to backup and restore IMAP emails on Mac. There is something else also which we need to look at. If I am in a need of a software, and I have heard good things about it, even then it would be normal for my mind to have some doubts. All users face these doubts and thus this issue must be settled. This issue is settled by bringing to users a free albeit a limited use demo of this backup tool so that their doubts are settled. They can use most of the important functions that the full restore Apple email tool comes with and once satisfied, they can purchase full version for daily data preservation in the manner they prefer https://www.mailbackupx.com/restore-apple-email/.
1 note
·
View note
Text
Apple Mail backup- A must do task with telling ben
Email data can become a causality of data theft and corruption. Apple email backup is an all-seasons ally to loosen the stranglehold of data loss. Those who delay the inevitable (email backup) find themselves cornered in a spot of bother, as irrecoverable data loss is an open invitation to downtime, which can derail the mightiest of businesses. Moreover, there are many situations which may temporarily cut off access to email data. These events include server crashes due to an unusually heavy network traffic and network issues. Even though such situations don't amount to data loss, they are no less disruptive to the work flow.
How to backup mail on mac – Final solution
So, it's absolutely essential to run full backups from time to time to be able to restore data when outside situations become conducive for data loss. Full backups are not sufficient in themselves because what about those fresh mails, which arrive after we have run a full backup session. These also need to be backed up to ensure complete data recovery in the event of data loss. Here regular incremental backups do the needy and create ideal conditions for complete data recovery. We must also let this fact sink deep that single site backups are not sufficient. Multiple-site backups are in dispensible to engender data redundancy, which lays the very foundation for complete data recovery. Both offline and online storage locations must be utilized to backup Apple mail. Resource efficiency should also be given due consideration by opting in favor of partial backups in situations where full backups will lead to overstuffing of unnecessary mails into a limited storage space.
Perfecting the strategy to backup Apple mail even more
Now that we know that selective backups can do the needy in situations that don't require full backups, let's discuss various backup patterns that can be utilized to strengthen data security. Portable backups are handy in situations when one needs to access email data while on the move. Portable backups onto 'plug and play' media can be carried home to perform professional duties in a comfy atmosphere. Portable backups can be easily shared with interested parties when you are collaborating on some important project. Likewise, mirror backups play an important role by creating multiple backup copies which sustain our ties with email data when some backup copies are rendered inaccessible by device failure or data corruption. Cloud backups do away with the limitations of storage space and cut down the data storage cost by providing a cheap alternative for storing backups. Some degree of data compression will also do a world of good to us.
How to backup Apple mail in a convenience-rich manner?
If you want to experience utmost convenience in Apple email backup then manual methods have to be dropped with immediate effect. Those with a past experience of employing the manual approach will second that these techniques aren't fail proof and leave a lot to be desired by making things complex. Running regular backups with manual methods is infeasible because these techniques are too slow to get things moving in the right direction. The profound data security available from professional tools is also missing when you employee a manual technique. This makes it crystal clear why more and more people are veering towards automatic tools for advanced email management,
How to backup mail on Mac by identifying the best tool?
As we can clearly deduce that professional tools are more appropriate alternatives to backup Apple mail we have our work cut out.How to identify the best tool? It is easier said than done, because you are seeking a lot of qualities in a deserving tool like ease of usage, diversity and fail-proof operation. Evaluating a tool from all angles without using it is almost impossible. This is why you should always look for free demos of professional tools, as experiencing a free trial period is the best way forward to test out the abilities of an Apple mail backup tool. If you are convinced, then do download the free demo of Mail Backup X, a tool that has everything in its arsenal that makes email management an ease-affording and highly satisfying exercise.
Here are some qualities that you will uncover while using the free demo of this exceptional Apple email backup application
Experience technical finesse at its very best for this tool is a true all-rounder that works on both Windows and Mac.
This tool will not disappoint you because it is versatile, platform independent and works with all popular email clients.
This is a tool will limitless potential that has been realized by offering that something extra to users in the form of different backup patterns like full backup, partial backup, mirror backup, incremental backup, etc.
You can create multiple site backups with ease, speed and efficiency that you have never experienced before.
No need to become a beast of burden by using tiresome manual methods because this tool is all set to bring you technological convenience in its full avatar.
Availability of flexible subscription packages at pocket friendly price will offer true satisfaction.
Round the clock user support will be at your back to help your navigate the features of this tool without getting engulfed in doubts.
The steps to carry out various tasks such as email backup, migration and restore are so simple in nature that you will become addicted to the flawless design of this ease-affording tool.
Immediately restore mails from backups and archives to keep downtime at bay.
This is an all-inclusive solution that delivers it all, be it ultra smooth mail migration or speedy email import/export.
Additional benefits like 3x data compression, PDF archiving, PST splitting and a comprehensive mail viewer will bring you boundless joy.
A free demo will set the tone for things to come. Avail it right away and enjoy substantial benefits that will make a positive change to your email management strategy.
Follow the Step by Step Guide to backup Apple Mail in this Video.
youtube
#apple mail#apple mail backup#backup apple mail#apple mailbox backup#apple email backup#apple backup tool#apple mail backup guide#Youtube
0 notes
Text
An easy process on how to backup apple email
I want to share my experience on apple email backup because most of the mac users are used to apple mailbox like me. There are various reason to support it however; my favourite reason is configuration of other mail clients in apple.
If you are wondering that apple mail supports other email services as well then you should definitely click below link for more information.
Many people still wonder on the subject ‘apple email backup and restore’, may be because they are confused on how to do it.
So, I thought to introduce an apple email backup tool to provide a perfect apple email backup solution.
So, just follow the easy steps of this apple email backup software.
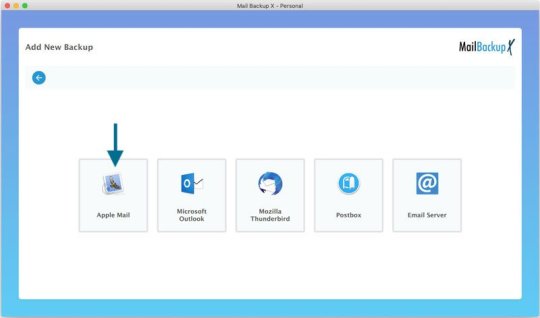
Step 1 Launch the application of Mail Backup X by InventPure, it will display a dashboard on the screen. Select ‘Add new backup’ under Backup Setup for apple mail.
Step 2 After clicking on Add new backup, it will display a list of different IMAP accounts like Office 365, Mozilla Thunderbird, GMAIL, Postbox and so on. Select apple mail from the dialog box.
Step 3 The next step allows the tool to load data from the selected source yahoo mail. The tool will scan through the database and read the email files that are require for archival. It will take few minutesfor the tool to scan the files in your database. In few minutes, you get an actual status of the files and items being scan and procure.
Step 4 The next step is to choose apple email backup folder as the storage and click on done for completion. It allows picking the location where you want to back up the data. You can browse in your folders and choose the right place to store it. You can assign a name to the yahoo backup file to locate it later. You can also choose the option for automatic detection of changes in your database so that they can be sync to the backup. The tool offers this option as an added benefit that can be rarely found in the tool. The tool is loaded with advanced algorithms, which can detect and sync the changes made in the database.
Step 5 The next screen is the Backup confirmation screen which shows the status of the backup that has been completed. It also shows the total number of files that are back up along with a backup log. You can see how many backups being synchronized. This is the final confirmation step that makes yousure that your files have been backed up successfully and with accuracy.
Demo version of the tool eases the selection process

Even if I have produced the steps, it is important to go ahead with the registered version of the tool but not before you test it. It is advised to test the tool with a fifteen days demo version to understand more about the tool and clear your doubts. That is why, I have produced the link of the website below https://www.mailbackupx.com/how-to-backup-apple-mac-mail-mails-on-mac/.
#apple email backup#apple mail#apple mailbox#apple mailbox backup#backup apple mailbox#apple mail tool
0 notes