#restore mac data
Explore tagged Tumblr posts
Visit Tumblr Blog
Explore Tumblr blogs with no restrictions, modern design and the best experience.
Last Seen Tumblr Blogs


Fun Fact
Tumblr has been banned in Indonesia for providing people with access to pornographic content.
Text
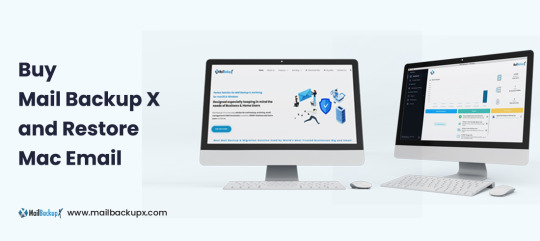
Restore email mac mails with zero tolerance data integrity
Data integrity is often misjudged when it comes restore mac email. It is about overall accuracy, completeness and consistency of data. So whenever, data transfer takes place, the tool is expected to transfer or convert eh files with completeness and accuracy.
A non-accurate or incomplete transfer of data means the file is unreadable or unrecognizable or broken. In worst cases, the data files transfer or conversion does not take place.
This makes it very crucial to use a highly skilled restore mac email tool for an efficient transfer with zero tolerance data integrity.
We deliver a highly skilled and well-engineered product Mail Backup X. The one of its own kind to restore email mac mails. A tool that maintains hundred percent data integrity and also restore mac email addresses.
The factor is also visible in the applications of the restore mac email app delivering complete data file without any deviation.
Different particulars are transferred while taking backup of emails from Mac. Therefore. We also make sure that mac users undergo the information on Mac OS and Apple mail for a detailed tour on different aspects of them. So, it is advisable to browse the below links on Mac OS and Apple mail for more information.
Maintain data integrity factor in various applications that restore mac emails
It is indicative of the fact that different applications of this restore mac email software preserves data integrity while taking backup of emails from Mac.
The third party mail archive application supports reading and import of common mail archives file formats like .mbox, .rge, .olm, .olk, .pst, .eml, that store mail data by mail clients like Outlook Mac, Outlook Windows, Office 365, Thunderbird, Postbox, Gmail, Yahoo etc.
The inbuilt mail archive application allows you to view important mails from different mail clients. The product allows you to read and import archive files from Mbox viewer, RGE viewer, OLM viewer, OLK viewer, PST viewer, EML viewer without the need to switch between or open mails with different mail clients.
The third application of inbuilt mail migration application is an advanced mail conversion feature to use mail client of your choice on Mac OS. It permits you convert and export mail data to all major mail data file formats like .mbox, .rge, .olm, .pst, .eml.
Test the tool to explore the best way to restore mac email
The best way to explore the data integrity factor is by testing the tool for a realistic experience.
All you need is to download the demo version of the restore mac email tool and on Mac. Use it for 15 days until the validity expires.Switch to the licensed version of the tool, once satisfied.
For complete access of the product, you can click on the licensed version of the tool along with a product key.
For more details on the software, log on to the below website and get all your queries answered in a systematic manner www.mailbackupx.com/restore-mac-email/.
#mac restore tool#mac mail restore#restore mac mailbox#restore mac folder#restore mac data#restore mac files#restore mac email
1 note
·
View note
Text

TECHNOLOGY ID PACK
NAMES︰ admin. ajax. alexa. am. atari. audio. auto. bailey. binary. blank. blu. blue. bluesse. browser. browsette. bug. byte. cache. calware. chip. circe. click. clicker. clickie. clicky. cloud. coda. code. codette. codie. cody. computette. crypt. cursor. cy. cyber. cybernet. cybernetica. cyberweb. cypher. cypherre. data. dell. digi. digitalia. digitelle. digitesse. disc. dot. electronica. electronique. emoticon. emoticonnie. fax. file. gig. gizmo. glitch. glitche. glitchesse. glitchette. graphique. hacker. hal. halware. hijack. index. informationne. intelligette. internette. interweb. java. javascript. juno. key. link. linuxe. lotus. lovebytes. mac. mal. malakai. malware. malwaria. memorette. memorie. meta. mic. micah. mickey. morphe. mouse. mousette. myspace. nano. neo. net. netette. nett. netty. paige. pascal. payton. peyton. pixel. programatha. programette. programme. pulse. reboot. rom. router. ruby. sam. sammy. screene. screenette. sean. shock. solitaire. spy. static. stutter. talia. tap. tecca. tech. techette. tessa. tetris. trojan. troubleshoot. ts. user. vir. virus. virusse. volt. vyrus. webbe. wheatley. whirr. widget. will. wirehead. wiresse. zap. zett. zetta. zip.
PRONOUNS︰ ai/ai. alt/alt. anti/antivirus. arc/archive. audio/audio. bat/battery. beep/beep. beep/boop. bit/bit. bit/byte. blue/blue. board/board. bright/bright. brow/browser. browser/browser. brr/brr. bu/bug. bug/bug. buzz/buzz. byt/byte. byte/byte. c/cpu. charge/charger. cir/circuit. cli/click. click/clack. click/click. click/scroll. co/code. code/code. color/color. com/com. com/computer. comp/computer. compute/computer. computer/computer. cor/corrupt. corrupt/corrupt. CPU/CPU. crash/crash. cre/creeper. crtl/crtl. cy/cyber. cyb/cyber. cyber/cyber. da/data. data/data. delete/delete. di/disk. dig/digital. digi/digi. digi/digital. digital/digital. dra/drag. e/exe. electronic/electronic. enter/enter. er/error. err/error. error/error. exe/exe. fi/file. file/file. gi/gif. gli/glitch. glit/glitch. glitch/glitch. graphic/graphic. hac/hacker. hack/hack. hard/hardware. head/phone. hij/hijacker. ho/home. info/info. information/information. int/internet. intelligent/intelligence. intelligent/intelligent. inter/net. internet/internet. it/it. jpg/jpg. key/board. key/cap. key/key. key/keyboard. key/keylogger. lag/lag. lap/laptop. ligh/light. linux/linux. load/load. log/login. main/mainframe. mal/malware. me/media. memory/memorie. mon/monitor. mou/mouse. nano/nano. net/net. net/network. org/org. over/overwrite. page/page. pix/pix. pix/pixel. pixel/pixel. plu/plug. png/png. pop/popup. port/port. pow/power. pro/program. program/program. ram/ram. ran/ransom. reboot/reboot. reload/reload. res/restore. ret/retro. route/router. sca/scan. scr/scroll. scre/screen. scre/screencap. scree/screen. screen/screen. scri/script. script/script. sentient/sentience. shift/shift. site/site. skip/skip. soft/software. spa/spam. space/space. spy/spyware. stop/stop. te/tech. tech/nology. tech/tech. technology/technology. tou/touchpad. txt/txt. typ/type. upload/upload. user/user. vi/viru. vi/virus. vir/virtual. web/page. web/web. whir/whir. wi/wire. win/dow. win/window. wire/wire. wire/wired. zip/zip . ⌨ . ☣ . ⚙ . ⚠ . 🎞 . 🎨 . 🎭 . 🎮 . 🎵 . 👀 . 👁 . 💔 . 💡 . 💢 . 💣 . 💳 . 💵 . 💻 . 💽 . 💾 . 💿 . 📀 . 📱 . 🔇 . 🔈 . 🔉 . 🔊 . 🔋 . 🔌 . 🔎 . 🖥 . 🖱 . 🗡 . 🗯 . 🛠 . 🧿 .
#pupsmail︰id packs#id pack#npt#name suggestions#name ideas#name list#pronoun suggestions#pronoun ideas#pronoun list#neopronouns#nounself#emojiself#techkin#robotkin#internetkin
427 notes
·
View notes
Text
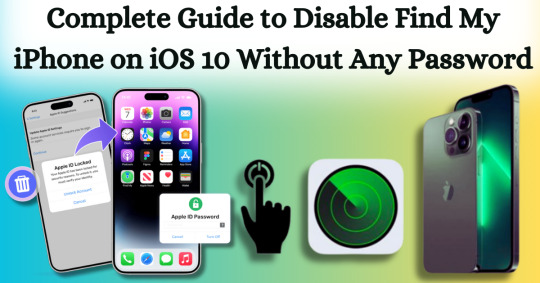
Complete Guide to Disable Find My iPhone on iOS 10 Without Any Password
Disabling Find My iPhone on iOS 10 without any password can often seem like a daunting task, particularly if you’ve forgotten the Apple ID associated with your device. Apple's security measures are designed to protect user data, which can make the process feel intimidating. However, there are legitimate reasons for wanting to turn off this feature, such as when selling or giving away your device or dealing with a locked iPhone that you no longer use. This comprehensive guide aims to equip you with the necessary steps to navigate this challenge smoothly and effectively, focusing specifically on disabling Find My iPhone on iOS 10 without any password.
In this article, we will explore various methods to disable Find My iPhone on iOS 10 without any password required. From utilizing recovery options to employing specialized tools, we will outline the strategies you can employ to regain control over your device. Whether you’re a tech novice or a seasoned user, our step-by-step instructions will help ensure that you can disable this feature safely and effortlessly. By the end of this guide, you will have the confidence and knowledge to manage your iOS device and its security settings with ease, all while successfully disabling Find My iPhone on iOS 10 without any password.
What is Find My iPhone?
Find My iPhone is a robust feature developed by Apple that helps users locate, manage, and secure their Apple devices, including iPhones, iPads, Macs, Apple Watches, and AirPods. It is part of the larger Find My service, which combines location tracking for all Apple devices associated with an Apple ID. Below is a detailed overview of its functionalities, features, and requirements:
Key Features:
Location Tracking: Users can see the current location of their device on a map. If the device is nearby, they can play a sound to help locate it.
Lost Mode: If the device is lost or stolen, users can enable Lost Mode, which locks the device and displays a custom message with a contact number on the screen.
Remote Erase: In case of theft or loss, users can remotely erase all data on the device to protect their personal information.
Find Other Devices: Besides iPhones, Find My can also locate iPads, Macs, Apple Watches, and AirPods.
Activation Lock: When Find My iPhone is enabled, it also activates a security feature that prevents anyone from using the device without the owner’s Apple ID and password, making it harder for thieves to access or sell the device.
Why To Disable Find My iPhone on iOS 10?
Disabling Find My iPhone on iOS 10 can be useful in certain situations where you need to remove the security feature. Below are some common reasons why users might disable it, along with important considerations.
Preparing to Sell or Transfer the Device
If you're planning to sell, gift, or transfer your iPhone to someone else, it's crucial to disable Find My iPhone before doing so. This step is necessary to remove your Apple ID from the device and disable Activation Lock, which ties the iPhone to your Apple ID. Without disabling this feature, the new owner would be unable to access or use the iPhone fully, as they would need your Apple ID credentials to unlock it.
Restoring or Resetting the Device
When you need to perform a full restore or reset on your iPhone, whether for troubleshooting or preparing the device for resale, Find My iPhone must be turned off. iTunes or Finder on a Mac will not allow a full factory reset or software restore if Find My iPhone is enabled because of the Activation Lock feature, which is designed to prevent unauthorized use of the phone.
Without disabling Find My iPhone, any attempt to restore the phone would be halted, requiring you to first enter your Apple ID password to proceed with the process.
Troubleshooting and Repairs
Certain troubleshooting steps and repairs may also require disabling Find My iPhone. For example, if your iPhone encounters a serious issue and you need to restore it via recovery mode, the process won't fully work unless Find My iPhone is disabled first. Additionally, some third-party repair services may require it to be turned off before working on the device to ensure they can perform necessary functions like hardware testing or software restoration.
Reducing Battery Drain
Although less common, some users may disable Find My iPhone to reduce battery drain, particularly if location services are frequently active. Since Find My iPhone relies on tracking the device's location using GPS and other location services, it can cause a minor increase in battery usage. For users who don't find themselves frequently needing the feature, turning it off might help conserve battery power.
Disable Find My iPhone on iOS 10 With Passixer:
Here’s a simple and effective method to disable Find My iPhone on iOS 10 without any password with Passixer, using a trusted iOS unlocking tool like Passixer iPhone Unlocker and a reliable USB cable. This solution is perfect for users looking for a straightforward way to unlock their devices without hassle.
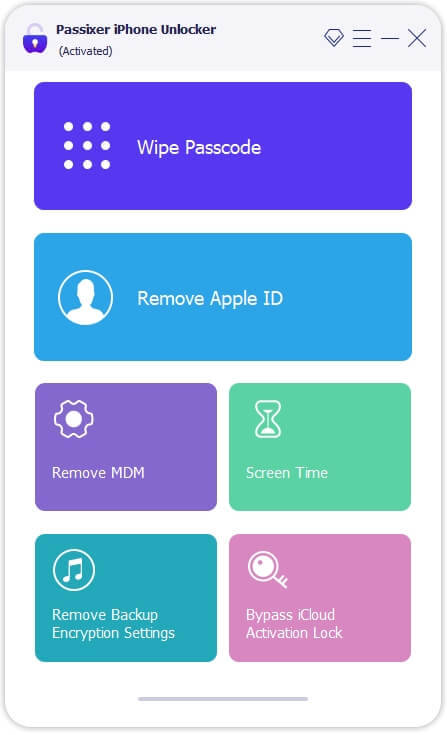
Passixer iPhone Unlocker is an intuitive application designed specifically for iPhone and iPad users who need to bypass security features effortlessly. Whether you’ve forgotten your passcode or need to dissociate an old Apple ID, this powerful software can effectively disable the Find My iPhone feature without the need for the original password. This capability is particularly advantageous for individuals purchasing second-hand devices still linked to a previous owner’s Apple ID.
Key Features
Unlock Any iOS Screen Lock: Easily removes screen locks like 4-digit/6-digit PINs, Face ID, and Touch ID, ensuring you can regain access to your device without complications.
Remove Apple ID Without Password: Unlink an Apple ID without needing the original password, enabling seamless access to all Apple services. This is especially helpful for users with second-hand devices still linked to a previous owner’s Apple ID.
Bypass iCloud Activation Lock: With Passixer, you can bypass the iCloud Activation Lock, simplifying the process of using previously owned devices.
Remove MDM Lock: This software offers two methods to remove Mobile Device Management (MDM) restrictions from devices that belong to companies or educational institutions, without needing passwords or jailbreaking.
Remove Screen Time Passcode: Quickly bypass the Screen Time passcode while ensuring no data is lost, making it ideal for managing family devices.
Remove iTunes Backup Encryption: Access encrypted iTunes backup passwords to retrieve your backup data without risk of information loss.
Device Compatibility: Supports a wide range of devices, including iPhone 4 to iPhone 15, all iPads, and iPod Touch models, and is compatible with iOS 17 and earlier versions.
Cross-Platform Support: Passixer works seamlessly on Windows (11/10/8.1/8/7) and Mac (OS X 10.7 and later, including macOS Big Sur and Monterey).
How To Use:
Step 1: Download and Install Passixer
Head to the official Passixer website to download the program. Complete the installation and launch the software, then select "Remove Apple ID" from the main menu.
Step 2: Connect Your iPhone
Use a USB cable to connect your iPhone (with Find My iPhone enabled) to your PC or Mac. Click "Start" in the software to initiate the unlocking process.
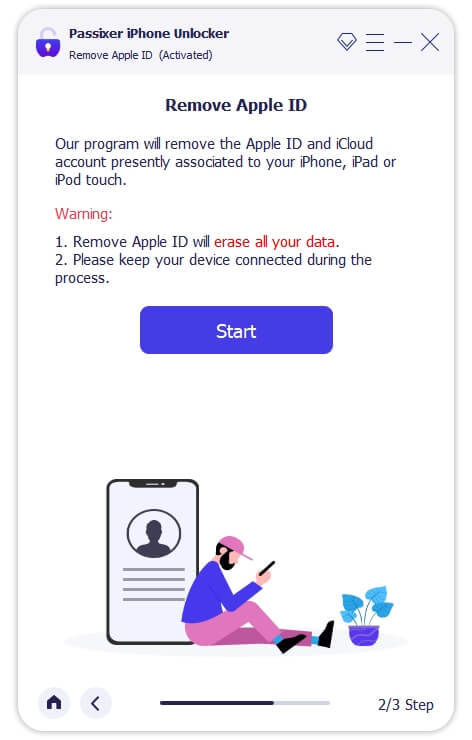
Step 3: Remove Your Apple ID
For iPhones running iOS 11.4 or later, ensure that Two-Factor Authentication is enabled. Verify device information, download the required firmware, and start the Apple ID removal process. This will also automatically deactivate the Find My iPhone feature.
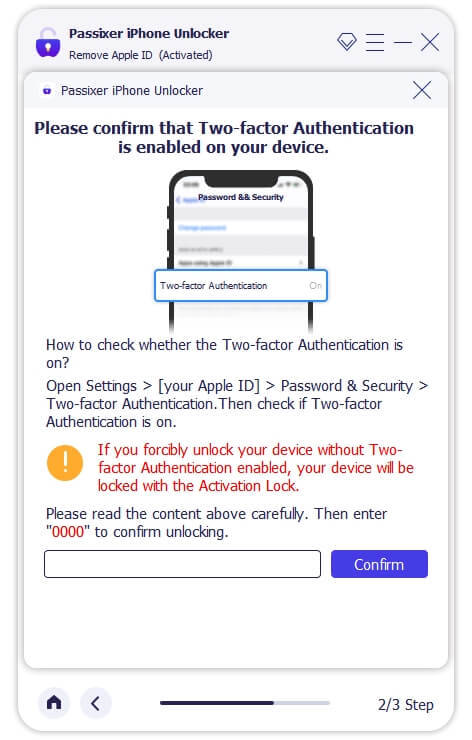
Reset your iPhone settings by opening the Settings app, navigating to General, and selecting Reset > Reset All Settings. Once completed, Passixer will unlink the associated Apple ID.
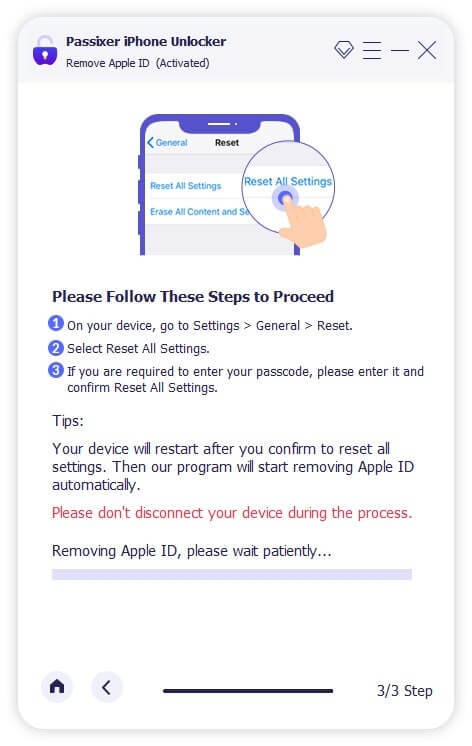
Disabling your Apple ID on an iPhone will also automatically turn off the Find My iPhone feature.
Pros:
No Password Needed: Removes the Apple ID without needing the original password, making it perfect for second-hand devices.
Bypasses Activation Lock: Unlocks iCloud Activation Lock to access devices linked to another user’s Apple ID.
Versatile: Also removes screen locks, bypasses MDM restrictions, and disables Screen Time passcodes without erasing data.
Broad Device Compatibility: Supports a wide range of devices, from iPhone 4 to iPhone 15, as well as iPads and iPod Touch devices.
Cross-Platform Availability: Works on both Windows and Mac.
Cons:
Costs Involved: While some versions offer free trials, full functionality typically requires a paid version.
Pricing Plan:
Enjoy secure and immediate email delivery, along with complimentary customer support. This software is designed specifically for Mac users.
Pricing Options: Select from the following plans: a 1-year license for $39.99, a 1-month license for $29.99, or a one-time lifetime license for $69.99. Each plan allows you to unlock up to 6 iOS devices on a single PC (taxes not included).
Discount Offers: Get up to $20 off on the 1-year and 1-month licenses, with original prices being $59.99 and $39.99, respectively.
Other Ways To Disbale Find My iPhone on iOS 10
Disabling Find My iPhone on iOS 10 without a password can be a complex process due to Apple's robust security measures. However, if you find yourself in a situation where you need to disable this feature, there are several methods you might consider. Below are detailed step-by-step instructions for each method, along with important considerations.
Method 1: Restore via iTunes
Requirements:
A computer with iTunes installed.
A USB cable to connect your iPhone to the computer.
How To Use:
Install iTunes: Make sure you have the latest version of iTunes installed on your computer. You can download it from the Apple website.
Connect Your iPhone: Use a USB cable to connect your iPhone to the computer. Launch iTunes once your device is connected.
Put iPhone into Recovery Mode:
For iPhone 6s and earlier: Press and hold the Home button and the Power button simultaneously until you see the recovery mode screen.
For iPhone 7 and 7 Plus: Press and hold the Volume Down and the Power buttons until you see the recovery mode screen.
For iPhone 8 and later: Quickly press and release the Volume Up button, then the Volume Down button, and finally press and hold the Side button until you see the recovery mode screen.
Restore iPhone: In iTunes, a message will appear indicating that a device in recovery mode has been detected. Choose the option to Restore. This will erase all content and settings from your iPhone, including the Find My iPhone setting.
Set Up iPhone: After the restore is complete, you can set up your iPhone as new or restore from a backup. Note that if Find My iPhone is still activated, it may ask for the Apple ID and password associated with the device.
Method 2: Jailbreak the Device
Warning: Jailbreaking voids your warranty and can expose your device to security risks. Use this method with caution.
Requirements:
A computer with a jailbreaking tool (e.g., Pangu, unc0ver).
How To Use:
Backup Your Data: Before attempting to jailbreak, make sure to back up your data using iTunes or iCloud, as this process may erase your device.
Download Jailbreaking Tool: Download a reputable jailbreaking tool that is compatible with iOS 10.
Connect Your iPhone: Use a USB cable to connect your iPhone to your computer.
Run the Jailbreaking Tool: Launch the jailbreaking software and follow the on-screen instructions to initiate the jailbreak. This usually involves clicking a button to start the process.
Complete the Jailbreak: Once the jailbreak is complete, your device will restart. You may need to install a Cydia app for further customization.
Disable Find My iPhone: After jailbreaking, you can use certain tweaks in Cydia to disable Find My iPhone. Search for relevant tools and follow their instructions.
Method 3: Contact Apple Support
How To Use:
Gather Documentation: Collect any documents that prove your ownership of the device, such as the original receipt or invoice.
Contact Apple Support: Visit the Apple Support website or call their support line. Explain your situation and provide the necessary documentation.
Follow Their Instructions: Apple Support may guide you through the process of disabling Find My iPhone. They may ask for your device's serial number and other identifying information.
Wait for Resolution: Depending on your situation, Apple may take some time to resolve the issue. Follow up as needed.
Conclusion:
In conclusion, disabling Find My iPhone on iOS 10 without a password may seem like a challenging endeavor, but with the right tools and guidance, it can be achieved effectively. Understanding the various legitimate reasons for wanting to disable this feature—such as preparing a device for sale, performing a factory reset, or troubleshooting issues—helps users navigate the process with purpose. By utilizing specialized tools like Passixer or following alternative methods, individuals can confidently regain access to their devices and manage their settings without the burden of forgotten passwords.
Ultimately, the key takeaway from this guide is that while Apple's security measures are designed to protect user data, there are practical solutions available for those in need. Whether you're a tech novice or an experienced user, our comprehensive instructions empower you to tackle this challenge head-on. By following the steps outlined in this guide, you can disable Find My iPhone on iOS 10, ensuring a smooth transition as you either pass on your device or regain control over it. With the right approach and resources, you can successfully navigate the complexities of Apple’s security features and regain full access to your device.
2 notes
·
View notes
Text
Microsoft Outage: CrowdStrike and the 'Blue Screen of Death' Affecting Users Worldwide

photo microsoft
Global Impact
Microsoft Windows users across the globe, including those in India, Australia, Germany, the United States, and the UK, are experiencing a critical issue leading to the infamous 'Blue Screen of Death' (BSOD). This problem causes systems to restart or shut down automatically. Notably, companies like Dell Technologies have attributed this crash to a recent update from CrowdStrike, although Microsoft has yet to confirm this as the root cause of the outage.
Affected Sectors
The outage, which began Thursday evening, primarily impacted Microsoft's Central US region. Essential systems for numerous airlines were crippled, affecting American Airlines, Frontier Airlines, Allegiant, and Sun Country in the US, as well as IndiGo and other airlines in India. Additionally, the disruption extended to banks, supermarkets, media outlets, and other businesses, highlighting the significant reliance on cloud services for critical infrastructure.
CrowdStrike: An Overview
CrowdStrike is a prominent cybersecurity platform that offers security solutions to both users and businesses. It employs a single sensor and a unified threat interface with attack correlation across endpoints, workloads, and identity. One of its key products, Falcon Identity Threat Protection, is designed to prevent identity-driven breaches in real time.
The Issue with CrowdStrike's Update
Reports indicate that a buggy update caused CrowdStrike’s Falcon Sensor to malfunction and conflict with the Windows operating system. This has led to widespread BSOD errors. CrowdStrike has acknowledged the problem, stating, “Our Engineers are actively working to resolve this issue and there is no need to open a support ticket.” The company has promised to update users once the issue is resolved.
Microsoft's Response
Microsoft confirmed that the Azure outage was resolved early Friday. However, this incident serves as a stark reminder of the potential consequences when critical infrastructure heavily relies on cloud services. The outage underscores the need for robust and reliable cybersecurity measures to prevent such widespread disruptions in the future.
Understanding the Blue Screen of Death
The Blue Screen of Death (BSOD) is a critical error screen on Windows operating systems that appears when the system crashes due to a severe issue, preventing it from operating safely. When a BSOD occurs, the computer restarts unexpectedly, often resulting in the loss of unsaved data. The error message typically states, “Your PC ran into a problem and needs to restart. We are just collecting some error info, then we will restart for you.”
This type of error is not exclusive to Windows; similar issues can be seen across Mac and Linux operating systems as well.
While the exact cause of the widespread BSOD errors remains unclear, the incident highlights the interconnectedness and vulnerability of modern digital infrastructure. Both Microsoft and CrowdStrike are working to resolve the issues and restore normalcy to affected users and businesses worldwide.
1 note
·
View note
Text
Without the Bitlocker key, is there a way to restore Windows?

If you have forgotten your bitlocker key, it could be very difficult to do window restoration. Without the bitlocker recovery key, you will not be able to access your files or recover data on your Windows. If you really want to recover your bitlocker, you can use a third-party data recovery tool.
Many companies provide data recovery services like BLR Data Recovery Tool, Recuva, R-Studio, Stellar, EaseUs, etc.
A free trial version of the tools allows users to scan and view all lost and deleted data.
I strongly recommend using the trial version of BLR Data Recovery Tool because it is a powerful and user-friendly software that recovers lost or deleted files from a variety of storage media, including hard disks, SSDs, USB drives, NAS drive, memory cards, Bitlocker, and more. It supports both Windows and Mac operating systems, making it suitable for a wide range of users.
#bitlocker#bitlocker data recovery#bitlocker recovery key#bitlocker data recovery tool#blr data recovery tool#data recovery#data recovery tool#data recovery program#bitlocker data recovery tool free
2 notes
·
View notes
Text
It would be kind of nice to have NixOS or Guix declarations for all these machines but I just can't get into it (yet). I'll try on my mom's macbook once i have a reliable way to recover all her data (she's dead but I'd like to be able to restore how her computer was, in less than an hour).
Had absolutely negative luck with booting macos on a VM so far, let alone transferring data. I do have a Time Machine backup (mostly readable on Linux plus u can boot a Mac from it), and a dd image of the whole drive. It's PROBABLY safe to just wipe the thing and restore it later - but what if it's not? What will I do if I lose all those nasty tradcath propaganda emails and copies of copies of excel sheets?
3 notes
·
View notes
Text
iBypasser Ramdisk Tool V2.7 iCloud Bypass Tool Download
iBypasser Ramdisk Tool V2.7 iCloud Bypass Windows Tool
iBypasser Ramdisk Tool is a powerful application designed to bypass iCloud activation on iOS devices running iOS 11-15 without the need for jailbreaking. It provides various functionalities to disable the passcode, back up files, disable the iCloud account by opening the menu, and retrieve the Apple ID and phone number associated with the device. Additionally, it offers the capability to disable the “Hello” screen using the MEID/GSM signal. Please note that bypassing iCloud activation is not endorsed by Apple and may violate their terms of service.
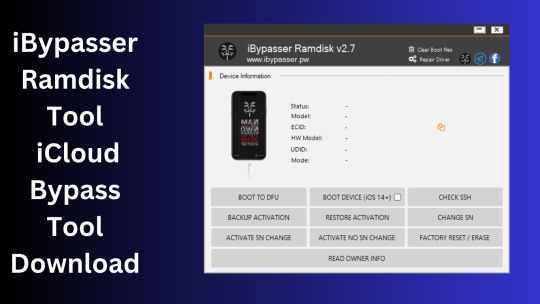
What is iBypasser Ramdisk Tool V2.7?
The iBypasser Ramdisk Tool V2.7 software program was created especially to get around the iCloud activation lock on the iOS device. Customers may use it to give a speedy fix if they find themselves locked out of their devices and unable to access all of the features on their iPhones, iPads, or iPods.
Features iBypasser Ramdisk tool:
Boot Device for iOS 15. x and earlier
Verify SSH
Restore/Backup Activation
Alter SN
Switch on the Hello Device
Go To Owner Info
iOS 15+ (DFU) Data Erasure
Remove Boot File
Changelog!!!
Update: iBypasser Ramdisk AIO v2.0
Resolving boot problems.
DFU Helper was added.
Driver problems were resolved.
Performance augmentation.
How To Use?
You will initially need to register the device’s ECID.
Your MAC notebook should have iBypasser RAMDISK installed. Next, unzip it.
Start your RAMDISK tool after that. then adhere to the directions below.
Enter DFU mode on the iPhone. When you successfully connect your device to DFU mode, the iBypasser RAMDISK Tool will provide you with further alternatives. Activate, Backup Files, Open SSH, Open Proxy, etc.
To open the proxy, type one and press the Enter key. Start SSH by pressing 2; then press 3 to access the backup files.
You may examine the data you successfully backed up on your device in the backup directory.
Second, flash your device with the 3u Tool or iTunes.
Connect your device to DFU mode once you’ve finished flashing it.
Open the proxy after switching the device to DFU mode Type 1. Press 4 again to turn on your gadget.
Readme:
Windows XP, Windows Vista, Windows 7, Windows 8, Windows 8.1, and Windows 10 (32-bit and 64-bit) are all fully compatible with the program.
Create a Backup: If you want to try the tool described above, create a backup of the personal information stored on the Android smartphone or tablet you intend to utilize. Considering that flashing any recovery or firmware has the potential to harm the device.
iBypasser Ramdisk Tool V2.7 iCloud Bypass Tool Download
Click Her
5 notes
·
View notes
Text
Price: [price_with_discount] (as of [price_update_date] - Details) [ad_1] From the manufacturer Performance That Doesn’t Disappoint Big files are no problem—quickly transfer photos, videos, and more with speeds up to 1030MB/s. Good Things Come in Small Packages Compact for easy portability with up to 2TB of storage and an eye-catching minimalist design, the One Touch SSD compliments your laptop—choose from black, white, or blue. Convenient Android Backup Use the included Android backup app to effortlessly transfer photos and videos—freeing up space on your device. Multi-Device Compatibility Quick connections are a snap with both USB-C and USB C-to A for out-of-the-box compatibility with Windows and Mac computers and Android mobile devices. More Features to Love Mylio Create Enjoy a six-month complimentary subscription to Mylio Create—an intuitive and powerful app that helps organize photos into a life calendar and offers easy protection, editing, sharing, and syncing across multiple devices. Automatically back up one computer and one external drive with a 6-month free trial of the Dropbox Backup plan. Keep a copy of your files in the cloud and quickly restore any accidentally deleted data. (Not available in all areas, including China. For new customers and existing Dropbox Basic users only.) Customer Reviews
4.4 out of 5 stars 1,335 4.4 out of 5 stars 426 Max Capacity 2TB 2TB Max Speed 1030 Mb/s 1000Mb/s Shock Resistant Yes Yes Interface USB 3.2 Gen 2 (USB-C), USB 3.0 USB-C, USB 3.0 Works With Windows/ Mac Windows/ Mac Big files? No problem—complete file transfers fast or work directly from the drive with up to 1030MB/s speeds comparable to NVMe Enjoy long-term peace of mind with the included three-year limited warranty and Rescue Data Recovery Services Up to 2TB capacity helps keep all your movies, photos, and more in one place. Plus an eye-catching, travel-sized, and robust design to withstand an active lifestyle—throw into your bag and go Use the included Android backup app to effortlessly transfer photos and videos—freeing up space on your device Actual storage capacity may vary due to differences between decimal and binary calculations. [ad_2]
0 notes
Text
Quick & Professional MacBook Repair in Kundalahalli | Machub
If you’re in Kundalahalli, Bangalore, and your MacBook is giving you trouble, there’s no need to panic. Whether it’s a cracked screen, battery drain, keyboard issues, or a complete system failure, Machub is here to help. As a trusted MacBook service center in Bangalore, we specialize in quick and professional MacBook repair in Kundalahalli, offering Apple-grade support with transparent pricing and warranty-backed service.
This article covers everything you need to know about our repair services—what we offer, how we do it, why we’re different, and why hundreds of Mac users in Kundalahalli trust us with their precious devices.
✅ Why Choose Machub for MacBook Repair in Kundalahalli?
Your MacBook is a premium device, and it deserves premium care. Here’s what makes Machub the most preferred MacBook repair center near Kundalahalli:
Apple-Certified Technicians Our team is trained to handle all MacBook Air and Pro models, including Intel-based and the latest Apple M1, M2, and M3 chip variants.
Quick Turnaround Time We understand your time is valuable. Most repairs are completed within 24 to 48 hours, and we even offer same-day service for select issues.
Genuine Parts with Warranty Every part we replace—screens, batteries, keyboards, SSDs—is sourced from reliable vendors and comes with a minimum 3-month warranty.
Free Pickup and Drop in Kundalahalli Busy schedule? Don’t worry—we offer free doorstep pickup and delivery, making the repair process completely hassle-free.
Transparent Pricing Before we begin any repair, we provide a detailed quote. No surprises, no hidden charges—only honest service.
Data Safety First We follow strict protocols to protect your data during any repair, giving you peace of mind.
📍 Areas We Serve Around Kundalahalli
Machub provides MacBook repair services across Kundalahalli and nearby localities, including:
AECS Layout
Brookefield
Whitefield
Marathahalli
ITPL Road
Kundanahalli Gate
Hoodi
Varthur
Kadugodi
Graphite India
No matter where you are in East Bangalore, expert MacBook help is just a call away.
🔧 Common MacBook Issues We Repair at Machub
We’ve handled just about every MacBook issue you can think of. Here are the most frequent problems our customers in Kundalahalli face:
1. MacBook Screen Replacement
Cracked screen? Vertical lines? No display? We replace damaged MacBook screens with high-quality Retina or LCD displays for all models.
2. MacBook Battery Replacement
Experiencing fast battery drain or a MacBook that doesn’t charge? Our battery replacements are fast, affordable, and come with up to 12 months of warranty.
3. Keyboard & Trackpad Issues
Unresponsive or sticky keys? Faulty trackpad clicks? We repair or replace top cases and input hardware to restore your MacBook’s typing experience.
4. Liquid Damage
Spilled coffee, tea, or water? Don’t switch it on—bring it to us! We clean, dry, and repair internal corrosion and damage efficiently.
5. Logic Board Repair
One of the costliest components, the logic board can sometimes be repaired at a fraction of replacement cost. Our chip-level experts specialize in logic board repairs.
6. Performance Issues
Slow MacBook? Freezing apps? We diagnose software and hardware issues and suggest SSD upgrades, RAM improvements (where possible), or system cleanups.
7. MacBook Won’t Turn On
This could be due to various reasons—from dead batteries to faulty power ICs. We diagnose and fix it within hours.
8. Overheating or Noisy Fan
Your MacBook could be overheating due to dust accumulation or a failing fan. We clean or replace cooling components to restore proper thermal performance.
💻 Supported MacBook Models
We provide support and repairs for:
MacBook Air (2012 to M2 2024)
MacBook Pro (2012 to M3 2024)
MacBook Retina 12” Models
Intel and Apple Silicon (M1, M2, M3) Devices
No matter the model, you’ll receive expert support every time.
🔍 Our Repair Process
Here’s how Machub ensures a smooth, professional, and efficient repair experience:
Free Pickup or Walk-in Book a free pickup online or walk into our service center near Kundalahalli.
Diagnosis & Quote We thoroughly diagnose your MacBook and provide a no-obligation quote.
Repair & Quality Check Once approved, we perform the repair and run multiple post-repair tests.
Delivery & Warranty Your MacBook is delivered back to your home or office in perfect condition.
💼 Business MacBook Repairs in Kundalahalli
Machub also provides corporate repair solutions for startups, coworking spaces, IT companies, and educational institutions in Kundalahalli.
We offer:
Bulk device maintenance
Annual Maintenance Contracts (AMC)
Priority repair handling
On-site diagnosis & health checks
Discounted parts and service packages
🗣️ Customer Testimonials – What Kundalahalli Says About Machub
“I had a MacBook Pro with a broken display and couldn’t find a reliable place nearby. Machub picked it up from Kundalahalli and delivered it back in 2 days. Super professional!” — Anjali P., UI Designer
“Their pricing was transparent, and the battery replacement came with a 12-month warranty. Highly recommend them for MacBook repairs in Bangalore!” — Rohit M., IT Professional
“My MacBook got water damaged during a trip. Machub recovered my data and fixed the logic board without burning a hole in my pocket.” — Sneha R., MBA Student
🌐 How to Book a MacBook Repair in Kundalahalli
📌 Tips to Prevent MacBook Damage
To reduce the chances of future repairs, follow these preventive care tips:
Use a MacBook sleeve or hard case
Avoid overcharging your battery
Keep liquids away from your laptop
Regularly clean vents to prevent overheating
Shut down your MacBook at least once a week
Use original charging accessories only
✅ Why Machub is the Best Choice for MacBook Repair in Kundalahalli
Let’s recap the reasons why Machub is the top-rated MacBook service center near you:
Certified MacBook specialists
Fast and reliable service
Transparent pricing
Free pickup and drop
Genuine parts with warranty
Excellent customer service
1000+ satisfied customers in Bangalore
Whether you're a college student, software engineer, or business owner, Machub ensures your MacBook is in safe hands.
📞 Get Your MacBook Repaired by Experts Today
Your MacBook deserves expert care—and you deserve a repair partner who’s honest, experienced, and efficient. If you’re in Kundalahalli and your MacBook needs help, Machub is just one call away.
Don’t wait for the issue to get worse. Book your service with Machub – Quick & Professional MacBook Repair in Kundalahalli today and enjoy peace of mind with warranty-backed service, doorstep convenience, and expert workmanship.
0 notes
Text

Laptop Speaker Replacement Service Plano iFixDallas Mac and PC Service Data Recovery Service iFixDallas – Laptop Speaker Replacement Service Plano, TX
Experiencing distorted or no sound from your laptop? iFixDallas in Plano offers fast and professional laptop speaker replacement services. Whether your speakers are crackling, low-volume, or completely dead, our certified technicians will fix the issue using quality replacement parts. We service all major brands: Dell, HP, Lenovo, Acer, Asus, Apple MacBooks & more Same-day and walk-in service available Affordable prices with expert repair quality Visit iFixDallas Plano today for reliable laptop audio repair and speaker replacement near you! Laptop Speakers Not Working? We Can Help! At iFixDallas Plano, we specialize in laptop speaker replacement for all brands. Whether it’s low sound, static noise, or no sound at all – we’ll restore your audio fast.
#LaptopSpeakerRepairPlano #iFixDallas #PlanoLaptopRepair #LaptopAudioFixPlano #LaptopSpeakerReplacement
0 notes
Text
Macbook Repair Services in Dubai: Your Trusted Solution for Apple Device Repairs
Comprehensive Macbook Repair Services in Dubai
From cracked screens to battery replacements, Dubai's Apple repair centers cater to all your Macbook needs. Certified technicians use genuine parts to ensure your device operates like new. Macbook Repair Services in Dubai Many repair shops also offer on-site services, allowing you to get your Macbook fixed without the hassle of leaving your home or office.
Specialized iMac Repair Services Dubai
iMacs are a popular choice among professionals for their high performance and sleek design. However, like any electronic device, they can encounter issues such as display problems, hardware failures, or software glitches. iMac Repair Services Dubai specialize in diagnosing and fixing these complex problems efficiently. Whether it's a logic board issue or a screen replacement, expert technicians ensure your iMac is restored to optimal condition.
Macbook Air Screen Replacement
One of the most common issues faced by Macbook Air users is a cracked or malfunctioning screen. A Macbook Air Screen Replacement is a delicate process that requires specialized skills to avoid further damage. Dubai repair centers offer quick and affordable screen replacement services, often providing same-day turnaround. Using high-quality replacement parts, technicians ensure that your Macbook Air's display looks and functions like new, allowing you to resume work or entertainment seamlessly.
Finding "iPhone Repair Near Me" in Dubai
Apart from Mac and iMac repairs, many users also search for iPhone Repair Near Me in Dubai. Whether it's a shattered screen, battery issues, or water damage, local repair shops provide comprehensive iPhone repair services. With numerous certified technicians available, finding a trusted service provider close to your location is simple. Many shops also offer warranty on repairs and use genuine Apple parts to ensure durability and performance.
Why Choose Professional Repair Services?
Opting for professional repair services in Dubai offers several advantages:
Quality Assurance: Certified technicians guarantee genuine parts and expert workmanship.
Time Efficiency: Same-day repairs minimize downtime.
Warranty: Many repair shops offer warranties on their services, providing peace of mind.
Data Safety: Experienced technicians ensure your data remains secure during repairs.
Tips for Maintaining Your Apple Devices
To prolong the lifespan of your Macbook, iMac, or iPhone:
Use protective cases and screen protectors.
Avoid exposure to extreme temperatures.
Regularly update your device software.
Schedule routine maintenance checks with professional repair services.
Conclusion
In Dubai, finding reliable Macbook Repair Services and iMac Repair Services is straightforward with numerous certified providers ready to assist. Whether you need a simple screen replacement or complex hardware repairs, professional technicians deliver quality service to keep your Apple devices in top condition.
0 notes
Text
so. I'm flying out in 6 hours. While trying to update my phone so that the damned American Airlines app worked, my lovely iphone SE decided to death spiral and now needs to be restored. My attempts have not worked. I think I have most of my data backed up on iCloud? but since I still had 2FA on and do not own a Mac I'm gonna have to wait like 20 hours to get access to my iCloud. My old flip phone would not betray me in such a way (it also couldn't connect to the internet though, so. tradeoffs)
on one hand, this is an amazing opportunity for me to visit a place without being glued to my phone. . It'll be like the nineties but with a laptop (still have to finish a data pipeline thing I promised I'd make), and maybe I'll ask people for directions instead of staring at my phone! look up and see the beauty of everything! Bring a classic digital camera for pics if I'm desperate!
on the other hand. my Clipper card was in my Apple wallet. and nowhere else. plus payphones are a dying breed these days, and I'm coming to the unpleasant realization that I do not own enough maps.
I'm not sure if this will be the trip of a lifetime or heck of a tragedy, but it's certain to be one of the two if my next restore attempt fails.
#I really really really hope my phone isn't dead forever.#like I truly hope it isn't#I've had it since 2021#and it's been a bit slow but overall good#and I do not want a new phone ok planned obsolescence can suck it#I don't care if ios whatever can't run I'd just prefer it still work for at least another 3 years.#to reiterate I bet my old flip phone would not do this to me#lowkey considering just popping the sim card in and praying#I bet I wouldn't even have to bring a charger for that one haha#would last the whole week#ugh#if all else fails I guess#os2.txt
1 note
·
View note
Text
QuickBooks Desktop Mac Plus 2024: The Ultimate Guide for Mac Users
Introduction to QuickBooks Desktop Mac Plus 2024
QuickBooks Desktop Mac Plus 2024 is Intuit’s latest accounting solution designed specifically for Mac users. It offers a subscription-based experience that combines the power of QuickBooks Desktop with features tailored for macOS environments. With better performance, enhanced features, and dedicated support, QuickBooks Desktop Mac Plus 2024 is ideal for small businesses and entrepreneurs who prefer working on Apple devices.
Unlike previous one-time-purchase models, QuickBooks Desktop Mac Plus 2024 follows a yearly subscription model. This ensures users get regular updates, security patches, and premium support throughout the subscription period.
For long-time Mac users who felt underserved by earlier QuickBooks versions, this release bridges the gap. It includes modern UI compatibility with the latest macOS versions, ensuring smoother workflows. With data syncing, report customization, and automated backups, QuickBooks Desktop Mac Plus 2024 offers an all-in-one solution for financial management.

Whether you're new to QuickBooks or upgrading from an older version, QuickBooks Desktop Mac Plus 2024 delivers a reliable, Apple-optimized accounting experience. It brings modern tools to small business accounting—right where Mac users need them most.
What's New in QuickBooks Desktop Mac Plus 2024?
QuickBooks Desktop Mac Plus 2024 introduces a suite of new features aimed at streamlining accounting and boosting productivity for Mac-based businesses. This version is more powerful and user-friendly than its predecessors, offering better control over day-to-day finances.
One major enhancement is the updated user interface, fully optimized for macOS Ventura and newer. Mac users will appreciate the improved menu navigation and faster response times. QuickBooks Desktop Mac Plus 2024 also includes better automation for recurring transactions, invoice customization, and bank feeds.
Another key feature is the advanced backup and restore options. With cloud-based backup, users can automatically save files and restore them with ease—providing peace of mind against data loss.
Additionally, QuickBooks Desktop Mac Plus 2024 offers expanded report templates, making financial analysis and tax preparation easier. The software also improves multi-user collaboration, allowing up to three simultaneous users for increased flexibility.
From modernized dashboards to refined security protocols, every enhancement in QuickBooks Desktop Mac Plus 2024 addresses user feedback, making it the most comprehensive version for Mac users yet.
Subscription Model Explained: QuickBooks Desktop Mac Plus 2024
The biggest change in QuickBooks Desktop Mac Plus 2024 is its switch to a subscription-based model. Instead of a one-time purchase, users now pay annually to access the software and its services. This model includes automatic updates, premium support, and essential features to keep the software running smoothly.
Under the subscription plan, QuickBooks Desktop Mac Plus 2024 users benefit from continuous product improvements, including the latest tax updates, feature rollouts, and compatibility patches for new macOS versions.
The subscription also includes data recovery services, automated data backups, and enhanced customer support, offering much more value than the previous one-time-license model.
This change aligns with Intuit’s broader strategy to provide better long-term user experiences. By subscribing to QuickBooks Desktop Mac Plus 2024, businesses ensure they’re always operating with the latest and most secure version of the software.
While some users initially resisted the subscription approach, many now recognize its benefits—particularly the consistent improvements and services that come bundled with it.
Key Features of QuickBooks Desktop Mac Plus 2024
QuickBooks Desktop Mac Plus 2024 delivers an impressive array of features designed to simplify financial tasks and boost productivity for Mac users. Here's a breakdown of what makes this version stand out:
Mac-Native Interface: Fully optimized for macOS, with intuitive navigation and responsive design.
Multi-User Access: Allows up to 3 simultaneous users to manage different aspects of the business in real-time.
Recurring Payments & Reminders: Set up recurring invoices and payment reminders, ensuring timely customer follow-ups.
Custom Reporting Tools: Build tailored reports, track financial trends, and generate P&L statements with ease.
Bank Feeds: Automatically sync transactions from bank accounts, reducing manual data entry.
Cloud Backup: Subscription includes automated cloud backups, reducing risk of data loss.
Enhanced Invoice Customization: Add logos, custom fields, and layouts for professional billing.
These features make QuickBooks Desktop Mac Plus 2024 a robust tool for managing cash flow, invoices, payroll data, and taxes—all from your Mac device.
System Requirements for QuickBooks Desktop Mac Plus 2024
Before installing QuickBooks Desktop Mac Plus 2024, it’s important to ensure your system meets the software’s technical requirements. This guarantees optimal performance and a smooth user experience.
Minimum Requirements:
Operating System: macOS Ventura (13.0) or newer
Processor: Intel Core i5 or Apple M1/M2 chip
Memory: 8GB RAM minimum (16GB recommended for multi-user)
Storage: At least 2.5GB of available disk space
Display: 1280x800 resolution or higher
Internet Connection: Required for product activation, updates, and cloud backup
For best results, using QuickBooks Desktop Mac Plus 2024 on newer MacBooks or iMacs ensures faster load times, quicker data processing, and seamless integration with other Mac apps.
If you run an older version of macOS, upgrading your system is strongly recommended before installing QuickBooks Desktop Mac Plus 2024 to avoid compatibility issues.
How to Upgrade to QuickBooks Desktop Mac Plus 2024
Upgrading to QuickBooks Desktop Mac Plus 2024is a straightforward process, especially for existing users of previous Mac editions. The steps ensure your data is preserved while you take advantage of the latest features and enhancements.
Step-by-Step Upgrade Process:
Backup your data from your current version of QuickBooks Mac.
Uninstall the older version (optional but recommended).
Download or insert the installer for QuickBooks Desktop Mac Plus 2024.
Install and launch the software, then activate it using your Intuit account.
Restore your company file and let QuickBooks update it to the new version.
All prior data, including invoices, customer records, and reports, will remain intact. Once upgraded, you can begin using the new features exclusive to QuickBooks Desktop Mac Plus 2024.
It’s recommended to consult Intuit’s official upgrade guide or contact support if you encounter any issues during the transition.
Pricing and Value: Is QuickBooks Desktop Mac Plus 2024 Worth It?
QuickBooks Desktop Mac Plus 2024 is priced as a yearly subscription, with the base cost starting at around $549.99 per year (subject to change). While this may seem higher than the old one-time purchase price, the added value justifies the investment.
What's Included in the Price:
Annual software updates
Automated backups and recovery
Free customer support
Improved features with each update
Secure cloud integration
For small businesses using Macs, QuickBooks Desktop Mac Plus 2024 offers cost efficiency by bundling accounting tools, tax tracking, and automation into one package.
If you're seeking a Mac-based accounting solution that provides reliability, ease of use, and dedicated support, then QuickBooks Desktop Mac Plus 2024 is well worth the subscription fee.
QuickBooks Desktop Mac Plus 2024 vs QuickBooks Online
Both QuickBooks Desktop Mac Plus 2024 and QuickBooks Online are powerful accounting tools, but they cater to different business needs and preferences.
QuickBooks Desktop Mac Plus 2024:
Ideal for Mac users who prefer desktop applications
Offers better control over file storage and data access
Multi-user access for local networks
One annual payment with updates included
QuickBooks Online:
Cloud-based; accessible from any device with internet
Monthly subscription
More flexible for mobile or remote teams
Easier collaboration with accountants
If you operate mostly from a Mac desktop environment and prioritize performance, QuickBooks Desktop Mac Plus 2024 is the better fit. If cloud accessibility and mobility are top concerns, QuickBooks Online might be more suitable.
Conclusion: Should You Use QuickBooks Desktop Mac Plus 2024?
QuickBooks Desktop Mac Plus 2024 is an excellent choice for Mac-based small businesses seeking a comprehensive, high-performance accounting tool. With its subscription model, improved user interface, cloud backup, and robust accounting features, it provides exceptional value.
If you're a long-time QuickBooks Mac user or considering switching from another platform, this version offers everything you need for financial management in one streamlined package.
Its compatibility with the latest macOS versions, coupled with support and data security, makes QuickBooks Desktop Mac Plus 2024 a worthy investment for serious business owners.
#QuickBooks Desktop Mac Plus 2024#QuickBooks for Mac 2024#QuickBooks Mac subscription#Intuit QuickBooks Mac 2024#QuickBooks Mac accounting software#Mac compatible QuickBooks#QuickBooks Desktop for Mac users#QuickBooks Mac Plus features#Best QuickBooks version for Mac#QuickBooks 2024 for small business Mac
0 notes
Text
Mobile Memory Card Recovery Singapore — Photos, Videos & Files Restored
In an era where smartphones and digital cameras dominate our lives, mobile memory cards have become essential for storing precious memories. However, losing data from these cards — whether it’s photos, videos, or important files — can be frustrating and disheartening. Fortunately, Intelligent Computer Services in Singapore offers specialized mobile memory card recovery solutions to help you retrieve lost data swiftly and efficiently.
The Importance of Mobile Memory Cards
Mobile memory cards are widely used in various devices, including smartphones, tablets, and cameras. They provide a convenient way to expand storage and keep valuable files accessible. Yet, these cards are prone to data loss due to accidental deletions, formatting errors, or physical damage. Understanding the need for data recovery Singapore services is crucial for anyone relying on these devices for daily use.
Comprehensive Data Recovery Services
Intelligent Computer Services provides top-tier data recovery services in Singapore, focusing on restoring lost data from mobile memory cards. Their team of professionals utilizes advanced tools and techniques to recover files, ensuring high success rates. The services include:
Mobile Memory Card Recovery

Hard Drive Failure Data Recovery
While the focus here is on mobile memory cards, it’s worth noting that Intelligent Computer Services also excels in hard drive failure data recovery. If you’re facing issues with your computer’s hard drive, their team can diagnose and recover important files, providing a comprehensive solution for all your data recovery needs.
Data Recovery for Mac Hard Drive
Mac users often encounter unique challenges regarding data recovery. Intelligent Computer Services offers data recovery for Mac hard drives, ensuring that Apple users receive specialized attention and expertise. Their team is well-versed in the intricacies of Mac systems, making them a trusted choice for data recovery.
Why Choose Intelligent Computer Services?
Trusted Experts in Data Recovery
With years of experience in the industry, Intelligent Computer Services has earned a reputation as a reliable provider of data recovery services in Singapore. Their skilled technicians stay updated with the latest recovery methods, ensuring that they can handle even the most challenging data loss situations.
Affordable Data Recovery Singapore
Cost can be a significant barrier when it comes to data recovery. Intelligent Computer Services is committed to providing affordable data recovery in Singapore without sacrificing quality. They believe everyone deserves access to expert recovery solutions, regardless of their financial situation.
Emergency Data Recovery Service
Data loss often happens unexpectedly, creating urgent situations for users. Intelligent Computer Services offers an emergency data recovery service for those who need immediate assistance. Their rapid response team is equipped to handle urgent cases, ensuring that lost data is retrieved as quickly as possible.
Customer-Focused Approach
At the core of Intelligent Computer Services’ business philosophy is a commitment to customer satisfaction. They understand the emotional weight of losing precious memories and important files. Their technicians work closely with clients, providing clear communication and updates throughout the recovery process, ensuring peace of mind.
Conclusion
Losing data from a mobile memory card can be a distressing experience, but with Intelligent Computer Services, help is just around the corner. Specializing in mobile memory card recovery, they offer a comprehensive suite of services tailored to meet the needs of individuals and businesses alike. Whether you require hard drive failure data recovery or data recovery for Mac hard drives, their experienced team is ready to assist. Don’t let data loss define your experience; contact Intelligent Computer Services today and restore your precious memories and important files with ease.
0 notes
Text
How To Unlock iPhone 8/8 Plus via iCloud iCloud is another option that you can explore. In order to use this option though, you need to have had “Find My iPhone” turned on before your iPhone was disabled. Follow these steps On your PC or Mac, go to the iCloud website: icloud.com and sign in with your iCloud ID and password. Choose “Find iPhone” when you log in. Click “All Devices” and choose your locked iPhone 8 or 8 Plus. You will see the option to “Erase iPhone”. Tap on this option and follow the on-screen instructions. Your iPhone will be reset to factory settings remotely. How To Unlock iPhone 8/8 Plus With iTunes iTunes provides a very good option for you to unlock your disabled iPhone. Although, this option may be a bit complicated and slower. Also note that, if it asks for the password during the process, this way is not available for you. Connect your iPhone 8 or 8 Plus to the computer and open iTunes. Click on the device icon to the “Summary”. Here you will see the “Restore iPhone” option, click on it. Click “Restore” and then “Agree”. Your iTunes will erase your data and restore your iPhone to the latest iOS. Ensure you keep your internet stable during the process. Gihosoft Free iPhone Data Recovery is a professional iPhone Data Recovery software to get back all your lost text message, photo, video, call history, note, contact and more from iPhone/iPad/iPod Touch.
0 notes
Text
G Suite Mail Backup Tool

Every business and profession faces risks that can take the menacing form of data loss. This is the reason why we must take effective measures to have the better of these risks. Since digital data is the very life force fueling a business, every effort must be made to repel any chances of data loss. A large chunk of digital data is present in the form of emails and these must be well protected by installing antimalware systems. But this is not enough; we also need data backup and recovery systems to keep data loss at bay. Therefore, we must use professional, third party tools which are way cheaper than expert services and way more convenient than manual methods to backup G suite or any other email service.
G suite backup with a tool that caters simplicity in usage
In order to backup emails with ease we so yearn for, we need a tool that caters user friendly features. It must enable users to personalize an email archiving session. No matter what volume of data is thrown at a tool, it must deliver flawless results. It must issue valid usage license to users and should come decked with an easy plus smooth interface. A tool should not shrink our wallets by overcharging us. If you want to backup G suite email with such a features-packed tool, then you cannot go wrong if you stamp your approval on Mail Backup X.
Mail Backup X- a professional G suite mail backup tool with user friendly features
Mail backup X is a tool that beats the exorbitant professional services in the area of pricing with its highly affordable price tag. This tool also beats the professional services when it comes to the sheer range of features on offer. Easy to use even for beginners, this tool maintains its peak and flawless performance on both Windows and Mac devices. It is compatible with a huge number of email services, which makes it a cost effective solution. Another thing that makes it an even more cost effective choice is this tool's untiring ability to cater the whole range of email management tasks like email migration and restore. You can customize an email backup, restore or achieving session in the light of your unique needs. The level of flexibility on offer from this tool is second to none. You can choose between full and selective backups. PDF archiving feature is also present. Your data is duly encrypted to present no chance to internet threats to meddle in your private affairs. You can also G suite mail contacts backup, which evidences the fact that this tool assures complete data retention. It is updated on a regular basis, which explains the reason why its smooth performance on both Windows and Mac is well sustained.
How to backup G suite email in a manner that affords significant savings in storage space?
To reap significant savings in storage space, you can throw the weight of your trust on this tool that has the unique ability of 3x data compression. The data compression algorithm employed by this tool has been fully tested, so there are no question marks about its safety. Even while using such a high degree of compression, you are assured of complete data retention. Even the folder hierarchy is not messed up during this process. 3x data compression will increase the rate of data transfer thereby leading to faster and effortless results.
G suite email backup that is safe as well
No matter how precarious the outside circumstances are, this tool will keep your data safe by using effective remedies against data theft. Encryption takes the top honors when it comes to completely shutting all doors that may become a source of unauthorized data access. Google approved login ensures that whenever you use this tool to source emails from an email client, the connection is always secure with no scope for unauthorized data access. The users are provided with the option to password protect their files tagged highly confidential. An offline mode of this tool gives vent to all data security concerns populating your mind space. To put it in short, you will not find a more secure tool to backup G suite.
Backup G suite mail folders without pounding your head with complexities
A tool may have the best lineup of features and may be highly secure as well, but its overall utility will diminish considerably if it pounds our head with complexities. Ease in use should be the foremost attribute of a tool, everything else matters thereafter. And this tool gets the balance between simplicity and sophistication absolutely right. No more usage of mind numbing technical terminologies. No more encounters with vague instructions that become a grapevine of confusions. No more getting caught up in an unnecessarily long line up of instructions which lead to brewing of confusions. Use this sophisticated yet straightforward tool to get the intended results in an effortless manner. Short and simple instructions, a user friendly interface, complete absence of heavy technical terminologies and usage of simple language, elevate the level of ease users feel while carrying out myriad email management tasks.
These tools has other ease-affording features as well that simplify email management to a great degree. These features include a smart mail viewer, incremental backups, a smart search module along with a live dashboard.
Backup G suite mail data with a free demo of this tool
There is no better way of discovering the trust-invoking qualities of this tool other than trying out its free demo. This tool has been growing in popularity at an unabated pace because it walks the talks by living up to the expectations of users. Even though everything about this tool is very true and transparent, you can get further insights into its user friendly technology by trying out its free demo. So what are you waiting for? Grab this inopportunity without any second thoughts for this tool is tailor-made to fulfill your diverse needs.
0 notes