#serverless api nextjs
Explore tagged Tumblr posts
Visit Tumblr Blog
Explore Tumblr blogs with no restrictions, modern design and the best experience.
Last Seen Tumblr Blogs


Fun Fact
Tumblr is used by 21% of adults online aged 18-29 years.
Text
Implementation
Culled from our shared Google doc:
Digital platform: “Pinterest for Careers” How will you build your solution? What does it look like?
Landing page Onboarding flow Explore pageCareer Detail pageHow it’s made
Career GeneratorFor Educators (FUTURE)
How does it serve the audience you have selected? How can you begin to iterate on your earlier ideas?
Value Proposition Time & Task The Advocate
What’s our 1 minute elevator pitch for the product?
Wireframes & Prototypes Go to market strategy Problem Statement
How might we centralize resources and real-world advice to help high school students explore and discover career interests?
High school students will benefit from an engaging, centralized resource to discover opportunities with real-world perspectives in order to empower their career decisions.
Final Selection
A web application that aims to be the one-stop resource for all students exploring careers. It is built on the collaboration and input of companies and the online community of working professionals. It will provide written perspectives, engaging social media content, upvoted learning opportunities (books, online courses, etc…), and other features. It is feature-modular, meaning this platform can function with core features and then be extended later with others. It is tuned to help students, but can potentially equip educators with career exploration resources.
Feedback
What is the unique thing that we're offering? Is it the opportunity to step into the job and try it out?
There are many different features to this solution, so what is the one thing that you are known for as people start to expect an experience from this platform?
This is an aggregator and hub solution for information, is that what your audience is looking for/needs? It seems like students are already overwhelmed.
The data points/content we're sharing (that we create rather than partners), how do ensure that it's accurate and fair?
Mock up feedback
What is the relationship that we're communicating with our audience and How is that visualized in the brand assets?
Need a hierarchy of experience, not just graphic content
Prototype Documentation
Now that you have selected your solution; keep sketching and refining your concept. Document your activities in the digital platform.
Web platform (Jamstack)
Curate existing digital content (video format)
Provide curated, vetted, and community-approved career content
Figma mock ups
Drawing information from tik tok, glassdoor, instagram/IGTV, and others
Discuss features of the platform
Mission Statement
Address current problems of existing implementation
Address the importance of career exploration
Call-to-action that leads to Onboarding or Exploration page
An un-intimidating, and welcoming landing page
Instructs you to answer some basic questions about your demographic/intended use for the site
Don’t know what you’re interested in? Click a button to see some options.
Shows different hobbies, interests that users can select.
Already know what youre into? Enter them here.
Instructs you to type in any interests, hobbies, activities... then surfaces traits or characteristics of activity. Traits are clicked on and will lead to keyword results with corresponding career content.
A discovery engine with an engaging explore page
Students can search by keywords or hashtags through a library of content
Each piece of content is tagged (Industry, job, skills, etc.)
The product emphasis is on exploration, while the content emphasis is on real world perspectives
Students can save videos that pique their interest or spark inspiration
Students can refer back to their saved videos and interests on their profile
Incorporate machine learning to make recommendations for more video content
While watching video, students can click on more detailed career pages
Roadmap of career
Salary ranges
Day-to-day tasks
Companies
YouTube channels
Slack communities
Reddit AMA's with students (calendar of upcoming people in the industry)
eLearning opportunities
Books & Articles
Hobbies that would go along well
Starter projects (ex: template Figma files)
Related careers
Internships
Partner with companies to showcase and explain what goes into making one of their products (Nike shoes, IKEA furniture, anything you can think of)
Interactive infographic or web animation of each job role that plays a part in making it a success
You can click on a role and then be redirected to the career detail page
Users can explore careers with minimum effort. Simply click a button to stumble upon a career at random. Uninterested? Click again and generate another.
Allows high school students to explore traditional and non-traditional careers
Connects students with careers and interests through AI & ML
Acts as the definitive career encyclopedia by providing...
Community-vetted resources and information
Real-world perspectives
Indirect access to working professionals and companies
Tools and activities for counselors and teachers to interact and engage with students
Solves a problem that we discovered from the surveys, that current resources/website didn’t provide appealing or interesting career options
Usability testing with real content examples
Get feedback from real users then adjust design decisions
Curated exploration, unheard of or unusual careers, paired with real perspectives (makes us unlike any other career search/discovery resource)
Centralized platform (one-stop shop)
Career Equality - showcase both tradition and non-traditional careers as the professional world evolves
Nurtures discovery and exploration rather than forcing users to choose, or categorizing them into careers.
Methods & Techniques
Design user interface -> Wireframes
User onboarding flow
Explore page experience
User doing deeper research about a career they are interested in
Gather existing content to populate the platform
What are the rules/steps for using videos from tiktok, instagram, youtube, etc.?
How many videos do we need to launch?
Is this a manual process done by the team or can we automate it?
Do we develop criteria for videos making it on the site? If so, how?
Build working prototypes
Find developers to bring it to life
Usability testing
Create different onboarding flows for students and test
We are creating a discovery engine for high school students to explore diverse careers and industries during these formative years. We plan to use primarily short form video content that provides real perspectives, insights, and advice in a snackable and GenZ appropriate format. Our vision for this product is a user-centric digital platform, allowing high school students to consume, save, and share this content.
Explore page example: https://www.figma.com/file/1zHw9I9SIx0jF0TYhnCHKa/Discoverly-Wireframe?node-id=0%3A1
Overall Product:
https://www.figma.com/file/5sZXiojkXw6KDYjU2MG1Hl/Untitled?node-id=165%3A82
Ensure there is sufficient content on the site
Establish KPI’s (key performance indicators)
Launch a beta site (constrain network growth to a single school)
Invite focus groups/influencers to participate; Having influential students on the network quickly will increase the appeal of giraffe, making it a must-goto for students who want to learn about careers (and connect with potential advisors/mentors?)
Once website/systems are functioning as intended, focus on growth - registering as many new users as possible.
Give 10 super users inviting 10 more users (network effect)
Focus on organic, homepage signup over email invite
Once there are x users, kick off monetization efforts with ads, job listings, and freemium subscription models (enhanced communications and search capability?)
Focus on virality
Relentless testing and tweaking of flows --> improving the registration and invitation process
Making career videos public in order to create big traffic and acquisition gains aka indexing career profiles. (e.g. Career profiles showing up in search results will put giraffe in front of more and more people → once people click into the site from search, have them sign up for giraffe before they can view more content?
Launch Influencer program. Select “thought leaders/professionals” to create and share content directly with users, exclusively on giraffe.
MARKET SIZE
The Bureau of Labor Statistics shows that 20-24% of Americans change jobs every year (ADP global research says it's 27%), which means more than 41 million people are searching for jobs and being recruited into jobs every single year (in the US alone).
Because we are a hybrid model, we looked at e-learning as well as the recruting market. The global E-learning Market is expected to reach USD 374.3 Billion by 2026, while Recruiting is a $200 Billion industry.
DISTRIBUTION CHANNELS
giraffe website
Promotional blogs/videos on social media
Blog content with links to the resources
A custom landing page on a paid media campaign
SEO/PPC
KEY PARTNERS
Educational institutions
Corporations
Third-party sellers
Publishers
Digital content producers
VALUE PROPOSITION
Simplifying search process
IMPLEMENTATION
API's
Glassdoor for directory and review of companies
niche.com for college majors
Instagram for career videos
TikTok to integrate how-to job videos
Amazon for book recommendations
TECH STACK
Amazon S3 (file storage)
Google Firebase (database)
Strapi (backend CMS -- this communicates with database and front-end)
NextJS (ReactJS framework)
Netlify (serverless cloud hosting)
TAGLINES
Helping you define success
COMPETITION
https://www.schoolnewsnetwork.org/2020/06/24/virtual-career-exploration-a-hit-with-students/
Virtualjobshadow https://www.virtualjobshadow.com/
Cuecareer (VR) https://www.cuecareer.com/
I Could Be https://www.icouldbe.org/
VR nearpod https://nearpod.com/college-and-career-readiness
WOKEN https://www.iamwoken.com/
MavinGlobal http://www.mavinglobal.com/
Colorado Success https://coloradosucceeds.org/work-based-learning-roadmap/career-awareness/
O*NET https://www.onetonline.org/
0 notes
Text
Building a Blog with Next.js
In this article, we will use Next.js to build a static blog framework with the design and structure inspired by Jekyll. I’ve always been a big fan of how Jekyll makes it easier for beginners to setup a blog and at the same time also provides a great degree of control over every aspect of the blog for the advanced users.
With the introduction of Next.js in recent years, combined with the popularity of React, there is a new avenue to explore for static blogs. Next.js makes it super easy to build static websites based on the file system itself with little to no configuration required.
The directory structure of a typical bare-bones Jekyll blog looks like this:
. ├─── _posts/ ...blog posts in markdown ├─── _layouts/ ...layouts for different pages ├─── _includes/ ...re-usable components ├─── index.md ...homepage └─── config.yml ...blog config
The idea is to design our framework around this directory structure as much as possible so that it becomes easier to migrate a blog from Jekyll by simply reusing the posts and configs defined in the blog.
For those unfamiliar with Jekyll, it is a static site generator that can transform your plain text into static websites and blogs. Refer the quick start guide to get up and running with Jekyll. This article also assumes that you have a basic knowledge of React. If not, React’s getting started page is a good place to start.
Installation
Next.js is powered by React and written in Node.js. So we need to install npm first, before adding next, react and react-dom to the project.
mkdir nextjs-blog && cd $_ npm init -y npm install next react react-dom --save
To run Next.js scripts on the command line, we have to add the next command to the scripts section of our package.json.
"scripts": { "dev": "next" }
We can now run npm run dev on the command line for the first time. Let’s see what happens.
$ npm run dev > [email protected] dev /~user/nextjs-blog > next ready - started server on http://localhost:3000 Error: > Couldn't find a `pages` directory. Please create one under the project root
The compiler is complaining about a missing pages directory in the root of the project. We’ll learn about the concept of pages in the next section.
Concept of pages
Next.js is built around the concept of pages. Each page is a React component that can be of type .js or .jsx which is mapped to a route based on the filename. For example:
File Route ---- ----- /pages/about.js /about /pages/projects/work1.js /projects/work1 /pages/index.js /
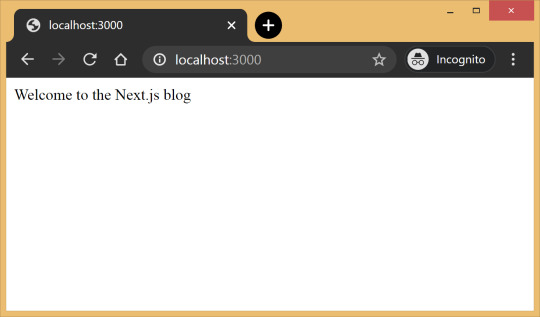
Let’s create the pages directory in the root of the project and populate our first page, index.js, with a basic React component.
// pages/index.js export default function Blog() { return <div>Welcome to the Next.js blog</div> }
Run npm run dev once again to start the server and navigate to http://localhost:3000 in the browser to view your blog for the first time.

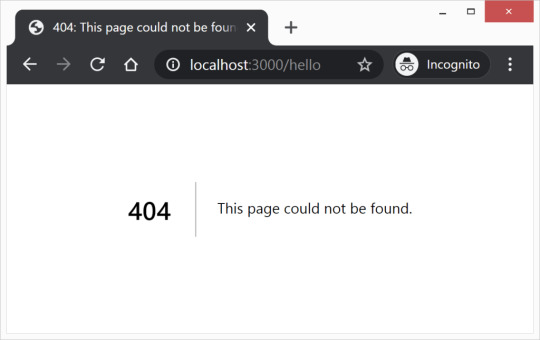
Out of the box, we get:
Hot reloading so we don’t have to refresh the browser for every code change.
Static generation of all pages inside the /pages/** directory.
Static file serving for assets living in the/public/** directory.
404 error page.
Navigate to a random path on localhost to see the 404 page in action. If you need a custom 404 page, the Next.js docs have great information.

Dynamic pages
Pages with static routes are useful to build the homepage, about page, etc. However, to dynamically build all our posts, we will use the dynamic route capability of Next.js. For example:
File Route ---- ----- /pages/posts/[slug].js /posts/1 /posts/abc /posts/hello-world
Any route, like /posts/1, /posts/abc, etc., will be matched by /posts/[slug].js and the slug parameter will be sent as a query parameter to the page. This is especially useful for our blog posts because we don’t want to create one file per post; instead we could dynamically pass the slug to render the corresponding post.
Anatomy of a blog
Now, since we understand the basic building blocks of Next.js, let’s define the anatomy of our blog.
. ├─ api │ └─ index.js # fetch posts, load configs, parse .md files etc ├─ _includes │ ├─ footer.js # footer component │ └─ header.js # header component ├─ _layouts │ ├─ default.js # default layout for static pages like index, about │ └─ post.js # post layout inherts from the default layout ├─ pages │ ├─ index.js # homepage | └─ posts # posts will be available on the route /posts/ | └─ [slug].js # dynamic page to build posts └─ _posts ├─ welcome-to-nextjs.md └─ style-guide-101.md
Blog API
A basic blog framework needs two API functions:
A function to fetch the metadata of all the posts in _posts directory
A function to fetch a single post for a given slug with the complete HTML and metadata
Optionally, we would also like all the site’s configuration defined in config.yml to be available across all the components. So we need a function that will parse the YAML config into a native object.
Since, we would be dealing with a lot of non-JavaScript files, like Markdown (.md), YAML (.yml), etc, we’ll use the raw-loader library to load such files as strings to make it easier to process them.
npm install raw-loader --save-dev
Next we need to tell Next.js to use raw-loader when we import .md and .yml file formats by creating a next.config.js file in the root of the project (more info on that).
module.exports = { target: 'serverless', webpack: function (config) { config.module.rules.push({test: /\.md$/, use: 'raw-loader'}) config.module.rules.push({test: /\.yml$/, use: 'raw-loader'}) return config } }
Next.js 9.4 introduced aliases for relative imports which helps clean up the import statement spaghetti caused by relative paths. To use aliases, create a jsconfig.json file in the project’s root directory specifying the base path and all the module aliases needed for the project.
{ "compilerOptions": { "baseUrl": "./", "paths": { "@includes/*": ["_includes/*"], "@layouts/*": ["_layouts/*"], "@posts/*": ["_posts/*"], "@api": ["api/index"], } } }
For example, this allows us to import our layouts by just using:
import DefaultLayout from '@layouts/default'
Fetch all the posts
This function will read all the Markdown files in the _posts directory, parse the front matter defined at the beginning of the post using gray-matter and return the array of metadata for all the posts.
// api/index.js import matter from 'gray-matter'
export async function getAllPosts() { const context = require.context('../_posts', false, /\.md$/) const posts = [] for(const key of context.keys()){ const post = key.slice(2); const content = await import(`../_posts/${post}`); const meta = matter(content.default) posts.push({ slug: post.replace('.md',''), title: meta.data.title }) } return posts; }
A typical Markdown post looks like this:
--- title: "Welcome to Next.js blog!" --- **Hello world**, this is my first Next.js blog post and it is written in Markdown. I hope you like it!
The section outlined by --- is called the front matter which holds the metadata of the post like, title, permalink, tags, etc. Here’s the output:
[ { slug: 'style-guide-101', title: 'Style Guide 101' }, { slug: 'welcome-to-nextjs', title: 'Welcome to Next.js blog!' } ]
Make sure you install the gray-matter library from npm first using the command npm install gray-matter --save-dev.
Fetch a single post
For a given slug, this function will locate the file in the _posts directory, parse the Markdown with the marked library and return the output HTML with metadata.
// api/index.js import matter from 'gray-matter' import marked from 'marked'
export async function getPostBySlug(slug) { const fileContent = await import(`../_posts/${slug}.md`) const meta = matter(fileContent.default) const content = marked(meta.content) return { title: meta.data.title, content: content } }
Sample output:
{ title: 'Style Guide 101', content: '<p>Incididunt cupidatat eiusmod ...</p>' }
Make sure you install the marked library from npm first using the command npm install marked --save-dev.
Config
In order to re-use the Jekyll config for our Next.js blog, we’ll parse the YAML file using the js-yaml library and export this config so that it can be used across components.
// config.yml title: "Next.js blog" description: "This blog is powered by Next.js"
// api/index.js import yaml from 'js-yaml' export async function getConfig() { const config = await import(`../config.yml`) return yaml.safeLoad(config.default) }
Make sure you install js-yaml from npm first using the command npm install js-yaml --save-dev.
Includes
Our _includes directory contains two basic React components, <Header> and <Footer>, which will be used in the different layout components defined in the _layouts directory.
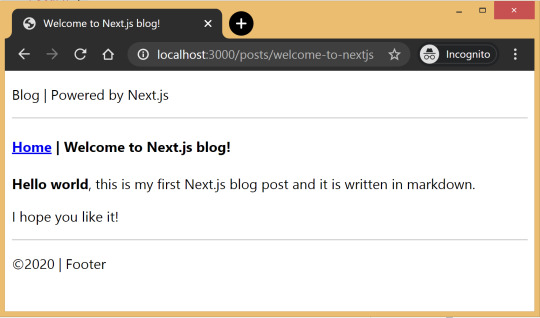
// _includes/header.js export default function Header() { return <header><p>Blog | Powered by Next.js</p></header> }
// _includes/footer.js export default function Footer() { return <footer><p>©2020 | Footer</p></footer> }
Layouts
We have two layout components in the _layouts directory. One is the <DefaultLayout> which is the base layout on top of which every other layout component will be built.
// _layouts/default.js import Head from 'next/head' import Header from '@includes/header' import Footer from '@includes/footer'
export default function DefaultLayout(props) { return ( <main> <Head> <title>{props.title}</title> <meta name='description' content={props.description}/> </Head> <Header/> {props.children} <Footer/> </main> ) }
The second layout is the <PostLayout> component that will override the title defined in the <DefaultLayout> with the post title and render the HTML of the post. It also includes a link back to the homepage.
// _layouts/post.js import DefaultLayout from '@layouts/default' import Head from 'next/head' import Link from 'next/link'
export default function PostLayout(props) { return ( <DefaultLayout> <Head> <title>{props.title}</title> </Head> <article> <h1>{props.title}</h1> <div dangerouslySetInnerHTML=/> <div><Link href='/'><a>Home</a></Link></div> </article> </DefaultLayout> ) }
next/head is a built-in component to append elements to the <head> of the page. next/link is a built-in component that handles client-side transitions between the routes defined in the pages directory.
Homepage
As part of the index page, aka homepage, we will list all the posts inside the _posts directory. The list will contain the post title and the permalink to the individual post page. The index page will use the <DefaultLayout> and we’ll import the config in the homepage to pass the title and description to the layout.
// pages/index.js import DefaultLayout from '@layouts/default' import Link from 'next/link' import { getConfig, getAllPosts } from '@api'
export default function Blog(props) { return ( <DefaultLayout title={props.title} description={props.description}> <p>List of posts:</p> <ul> {props.posts.map(function(post, idx) { return ( <li key={idx}> <Link href={'/posts/'+post.slug}> <a>{post.title}</a> </Link> </li> ) })} </ul> </DefaultLayout> ) }
export async function getStaticProps() { const config = await getConfig() const allPosts = await getAllPosts() return { props: { posts: allPosts, title: config.title, description: config.description } } }
getStaticProps is called at the build time to pre-render pages by passing props to the default component of the page. We use this function to fetch the list of all posts at build time and render the posts archive on the homepage.

Post page
This page will render the title and contents of the post for the slug supplied as part of the context. The post page will use the <PostLayout> component.
// pages/posts/[slug].js import PostLayout from '@layouts/post' import { getPostBySlug, getAllPosts } from "@api"
export default function Post(props) { return <PostLayout title={props.title} content={props.content}/> }
export async function getStaticProps(context) { return { props: await getPostBySlug(context.params.slug) } }
export async function getStaticPaths() { let paths = await getAllPosts() paths = paths.map(post => ({ params: { slug:post.slug } })); return { paths: paths, fallback: false } }
If a page has dynamic routes, Next.js needs to know all the possible paths at build time. getStaticPaths supplies the list of paths that has to be rendered to HTML at build time. The fallback property ensures that if you visit a route that does not exist in the list of paths, it will return a 404 page.

Production ready
Add the following commands for build and start in package.json, under the scripts section and then run npm run build followed by npm run start to build the static blog and start the production server.
// package.json "scripts": { "dev": "next", "build": "next build", "start": "next start" }
The entire source code in this article is available on this GitHub repository. Feel free to clone it locally and play around with it. The repository also includes some basic placeholders to apply CSS to your blog.
Improvements
The blog, although functional, is perhaps too basic for most average cases. It would be nice to extend the framework or submit a patch to include some more features like:
Pagination
Syntax highlighting
Categories and Tags for posts
Styling
Overall, Next.js seems really very promising to build static websites, like a blog. Combined with its ability to export static HTML, we can built a truly standalone app without the need of a server!
The post Building a Blog with Next.js appeared first on CSS-Tricks.
via CSS-Tricks https://ift.tt/38RTO6t
0 notes
Text
Building a Blog with Next.js
In this article, we will use Next.js to build a static blog framework with the design and structure inspired by Jekyll. I’ve always been a big fan of how Jekyll makes it easier for beginners to setup a blog and at the same time also provides a great degree of control over every aspect of the blog for the advanced users.
With the introduction of Next.js in recent years, combined with the popularity of React, there is a new avenue to explore for static blogs. Next.js makes it super easy to build static websites based on the file system itself with little to no configuration required.
The directory structure of a typical bare-bones Jekyll blog looks like this:
. ├─── _posts/ ...blog posts in markdown ├─── _layouts/ ...layouts for different pages ├─── _includes/ ...re-usable components ├─── index.md ...homepage └─── config.yml ...blog config
The idea is to design our framework around this directory structure as much as possible so that it becomes easier to migrate a blog from Jekyll by simply reusing the posts and configs defined in the blog.
For those unfamiliar with Jekyll, it is a static site generator that can transform your plain text into static websites and blogs. Refer the quick start guide to get up and running with Jekyll. This article also assumes that you have a basic knowledge of React. If not, React’s getting started page is a good place to start.
Installation
Next.js is powered by React and written in Node.js. So we need to install npm first, before adding next, react and react-dom to the project.
mkdir nextjs-blog && cd $_ npm init -y npm install next react react-dom --save
To run Next.js scripts on the command line, we have to add the next command to the scripts section of our package.json.
"scripts": { "dev": "next" }
We can now run npm run dev on the command line for the first time. Let’s see what happens.
$ npm run dev > [email protected] dev /~user/nextjs-blog > next ready - started server on http://localhost:3000 Error: > Couldn't find a `pages` directory. Please create one under the project root
The compiler is complaining about a missing pages directory in the root of the project. We’ll learn about the concept of pages in the next section.
Concept of pages
Next.js is built around the concept of pages. Each page is a React component that can be of type .js or .jsx which is mapped to a route based on the filename. For example:
File Route ---- ----- /pages/about.js /about /pages/projects/work1.js /projects/work1 /pages/index.js /
Let’s create the pages directory in the root of the project and populate our first page, index.js, with a basic React component.
// pages/index.js export default function Blog() { return <div>Welcome to the Next.js blog</div> }
Run npm run dev once again to start the server and navigate to http://localhost:3000 in the browser to view your blog for the first time.

Out of the box, we get:
Hot reloading so we don’t have to refresh the browser for every code change.
Static generation of all pages inside the /pages/** directory.
Static file serving for assets living in the/public/** directory.
404 error page.
Navigate to a random path on localhost to see the 404 page in action. If you need a custom 404 page, the Next.js docs have great information.

Dynamic pages
Pages with static routes are useful to build the homepage, about page, etc. However, to dynamically build all our posts, we will use the dynamic route capability of Next.js. For example:
File Route ---- ----- /pages/posts/[slug].js /posts/1 /posts/abc /posts/hello-world
Any route, like /posts/1, /posts/abc, etc., will be matched by /posts/[slug].js and the slug parameter will be sent as a query parameter to the page. This is especially useful for our blog posts because we don’t want to create one file per post; instead we could dynamically pass the slug to render the corresponding post.
Anatomy of a blog
Now, since we understand the basic building blocks of Next.js, let’s define the anatomy of our blog.
. ├─ api │ └─ index.js # fetch posts, load configs, parse .md files etc ├─ _includes │ ├─ footer.js # footer component │ └─ header.js # header component ├─ _layouts │ ├─ default.js # default layout for static pages like index, about │ └─ post.js # post layout inherts from the default layout ├─ pages │ ├─ index.js # homepage | └─ posts # posts will be available on the route /posts/ | └─ [slug].js # dynamic page to build posts └─ _posts ├─ welcome-to-nextjs.md └─ style-guide-101.md
Blog API
A basic blog framework needs two API functions:
A function to fetch the metadata of all the posts in _posts directory
A function to fetch a single post for a given slug with the complete HTML and metadata
Optionally, we would also like all the site’s configuration defined in config.yml to be available across all the components. So we need a function that will parse the YAML config into a native object.
Since, we would be dealing with a lot of non-JavaScript files, like Markdown (.md), YAML (.yml), etc, we’ll use the raw-loader library to load such files as strings to make it easier to process them.
npm install raw-loader --save-dev
Next we need to tell Next.js to use raw-loader when we import .md and .yml file formats by creating a next.config.js file in the root of the project (more info on that).
module.exports = { target: 'serverless', webpack: function (config) { config.module.rules.push({test: /\.md$/, use: 'raw-loader'}) config.module.rules.push({test: /\.yml$/, use: 'raw-loader'}) return config } }
Next.js 9.4 introduced aliases for relative imports which helps clean up the import statement spaghetti caused by relative paths. To use aliases, create a jsconfig.json file in the project’s root directory specifying the base path and all the module aliases needed for the project.
{ "compilerOptions": { "baseUrl": "./", "paths": { "@includes/*": ["_includes/*"], "@layouts/*": ["_layouts/*"], "@posts/*": ["_posts/*"], "@api": ["api/index"], } } }
For example, this allows us to import our layouts by just using:
import DefaultLayout from '@layouts/default'
Fetch all the posts
This function will read all the Markdown files in the _posts directory, parse the front matter defined at the beginning of the post using gray-matter and return the array of metadata for all the posts.
// api/index.js import matter from 'gray-matter'
export async function getAllPosts() { const context = require.context('../_posts', false, /\.md$/) const posts = [] for(const key of context.keys()){ const post = key.slice(2); const content = await import(`../_posts/${post}`); const meta = matter(content.default) posts.push({ slug: post.replace('.md',''), title: meta.data.title }) } return posts; }
A typical Markdown post looks like this:
--- title: "Welcome to Next.js blog!" --- **Hello world**, this is my first Next.js blog post and it is written in Markdown. I hope you like it!
The section outlined by --- is called the front matter which holds the metadata of the post like, title, permalink, tags, etc. Here’s the output:
[ { slug: 'style-guide-101', title: 'Style Guide 101' }, { slug: 'welcome-to-nextjs', title: 'Welcome to Next.js blog!' } ]
Make sure you install the gray-matter library from npm first using the command npm install gray-matter --save-dev.
Fetch a single post
For a given slug, this function will locate the file in the _posts directory, parse the Markdown with the marked library and return the output HTML with metadata.
// api/index.js import matter from 'gray-matter' import marked from 'marked'
export async function getPostBySlug(slug) { const fileContent = await import(`../_posts/${slug}.md`) const meta = matter(fileContent.default) const content = marked(meta.content) return { title: meta.data.title, content: content } }
Sample output:
{ title: 'Style Guide 101', content: '<p>Incididunt cupidatat eiusmod ...</p>' }
Make sure you install the marked library from npm first using the command npm install marked --save-dev.
Config
In order to re-use the Jekyll config for our Next.js blog, we’ll parse the YAML file using the js-yaml library and export this config so that it can be used across components.
// config.yml title: "Next.js blog" description: "This blog is powered by Next.js"
// api/index.js import yaml from 'js-yaml' export async function getConfig() { const config = await import(`../config.yml`) return yaml.safeLoad(config.default) }
Make sure you install js-yaml from npm first using the command npm install js-yaml --save-dev.
Includes
Our _includes directory contains two basic React components, <Header> and <Footer>, which will be used in the different layout components defined in the _layouts directory.
// _includes/header.js export default function Header() { return <header><p>Blog | Powered by Next.js</p></header> }
// _includes/footer.js export default function Footer() { return <footer><p>©2020 | Footer</p></footer> }
Layouts
We have two layout components in the _layouts directory. One is the <DefaultLayout> which is the base layout on top of which every other layout component will be built.
// _layouts/default.js import Head from 'next/head' import Header from '@includes/header' import Footer from '@includes/footer'
export default function DefaultLayout(props) { return ( <main> <Head> <title>{props.title}</title> <meta name='description' content={props.description}/> </Head> <Header/> {props.children} <Footer/> </main> ) }
The second layout is the <PostLayout> component that will override the title defined in the <DefaultLayout> with the post title and render the HTML of the post. It also includes a link back to the homepage.
// _layouts/post.js import DefaultLayout from '@layouts/default' import Head from 'next/head' import Link from 'next/link'
export default function PostLayout(props) { return ( <DefaultLayout> <Head> <title>{props.title}</title> </Head> <article> <h1>{props.title}</h1> <div dangerouslySetInnerHTML=/> <div><Link href='/'><a>Home</a></Link></div> </article> </DefaultLayout> ) }
next/head is a built-in component to append elements to the <head> of the page. next/link is a built-in component that handles client-side transitions between the routes defined in the pages directory.
Homepage
As part of the index page, aka homepage, we will list all the posts inside the _posts directory. The list will contain the post title and the permalink to the individual post page. The index page will use the <DefaultLayout> and we’ll import the config in the homepage to pass the title and description to the layout.
// pages/index.js import DefaultLayout from '@layouts/default' import Link from 'next/link' import { getConfig, getAllPosts } from '@api'
export default function Blog(props) { return ( <DefaultLayout title={props.title} description={props.description}> <p>List of posts:</p> <ul> {props.posts.map(function(post, idx) { return ( <li key={idx}> <Link href={'/posts/'+post.slug}> <a>{post.title}</a> </Link> </li> ) })} </ul> </DefaultLayout> ) }
export async function getStaticProps() { const config = await getConfig() const allPosts = await getAllPosts() return { props: { posts: allPosts, title: config.title, description: config.description } } }
getStaticProps is called at the build time to pre-render pages by passing props to the default component of the page. We use this function to fetch the list of all posts at build time and render the posts archive on the homepage.

Post page
This page will render the title and contents of the post for the slug supplied as part of the context. The post page will use the <PostLayout> component.
// pages/posts/[slug].js import PostLayout from '@layouts/post' import { getPostBySlug, getAllPosts } from "@api"
export default function Post(props) { return <PostLayout title={props.title} content={props.content}/> }
export async function getStaticProps(context) { return { props: await getPostBySlug(context.params.slug) } }
export async function getStaticPaths() { let paths = await getAllPosts() paths = paths.map(post => ({ params: { slug:post.slug } })); return { paths: paths, fallback: false } }
If a page has dynamic routes, Next.js needs to know all the possible paths at build time. getStaticPaths supplies the list of paths that has to be rendered to HTML at build time. The fallback property ensures that if you visit a route that does not exist in the list of paths, it will return a 404 page.
Production ready
Add the following commands for build and start in package.json, under the scripts section and then run npm run build followed by npm run start to build the static blog and start the production server.
// package.json "scripts": { "dev": "next", "build": "next build", "start": "next start" }
The entire source code in this article is available on this GitHub repository. Feel free to clone it locally and play around with it. The repository also includes some basic placeholders to apply CSS to your blog.
Improvements
The blog, although functional, is perhaps too basic for most average cases. It would be nice to extend the framework or submit a patch to include some more features like:
Pagination
Syntax highlighting
Categories and Tags for posts
Styling
Overall, Next.js seems really very promising to build static websites, like a blog. Combined with its ability to export static HTML, we can built a truly standalone app without the need of a server!
The post Building a Blog with Next.js appeared first on CSS-Tricks.
You can support CSS-Tricks by being an MVP Supporter.
Building a Blog with Next.js published first on https://deskbysnafu.tumblr.com/
0 notes
Text
Building a Blog with Next.js
In this article, we will use Next.js to build a static blog framework with the design and structure inspired by Jekyll. I’ve always been a big fan of how Jekyll makes it easier for beginners to setup a blog and at the same time also provides a great degree of control over every aspect of the blog for the advanced users.
With the introduction of Next.js in recent years, combined with the popularity of React, there is a new avenue to explore for static blogs. Next.js makes it super easy to build static websites based on the file system itself with little to no configuration required.
The directory structure of a typical bare-bones Jekyll blog looks like this:
. ├─── _posts/ ...blog posts in markdown ├─── _layouts/ ...layouts for different pages ├─── _includes/ ...re-usable components ├─── index.md ...homepage └─── config.yml ...blog config
The idea is to design our framework around this directory structure as much as possible so that it becomes easier to migrate a blog from Jekyll by simply reusing the posts and configs defined in the blog.
For those unfamiliar with Jekyll, it is a static site generator that can transform your plain text into static websites and blogs. Refer the quick start guide to get up and running with Jekyll. This article also assumes that you have a basic knowledge of React. If not, React’s getting started page is a good place to start.
Installation
Next.js is powered by React and written in Node.js. So we need to install npm first, before adding next, react and react-dom to the project.
mkdir nextjs-blog && cd $_ npm init -y npm install next react react-dom --save
To run Next.js scripts on the command line, we have to add the next command to the scripts section of our package.json.
"scripts": { "dev": "next" }
We can now run npm run dev on the command line for the first time. Let’s see what happens.
$ npm run dev > [email protected] dev /~user/nextjs-blog > next ready - started server on http://localhost:3000 Error: > Couldn't find a `pages` directory. Please create one under the project root
The compiler is complaining about a missing pages directory in the root of the project. We’ll learn about the concept of pages in the next section.
Concept of pages
Next.js is built around the concept of pages. Each page is a React component that can be of type .js or .jsx which is mapped to a route based on the filename. For example:
File Route ---- ----- /pages/about.js /about /pages/projects/work1.js /projects/work1 /pages/index.js /
Let’s create the pages directory in the root of the project and populate our first page, index.js, with a basic React component.
// pages/index.js export default function Blog() { return <div>Welcome to the Next.js blog</div> }
Run npm run dev once again to start the server and navigate to http://localhost:3000 in the browser to view your blog for the first time.
Out of the box, we get:
Hot reloading so we don’t have to refresh the browser for every code change.
Static generation of all pages inside the /pages/** directory.
Static file serving for assets living in the/public/** directory.
404 error page.
Navigate to a random path on localhost to see the 404 page in action. If you need a custom 404 page, the Next.js docs have great information.
Dynamic pages
Pages with static routes are useful to build the homepage, about page, etc. However, to dynamically build all our posts, we will use the dynamic route capability of Next.js. For example:
File Route ---- ----- /pages/posts/[slug].js /posts/1 /posts/abc /posts/hello-world
Any route, like /posts/1, /posts/abc, etc., will be matched by /posts/[slug].js and the slug parameter will be sent as a query parameter to the page. This is especially useful for our blog posts because we don’t want to create one file per post; instead we could dynamically pass the slug to render the corresponding post.
Anatomy of a blog
Now, since we understand the basic building blocks of Next.js, let’s define the anatomy of our blog.
. ├─ api │ └─ index.js # fetch posts, load configs, parse .md files etc ├─ _includes │ ├─ footer.js # footer component │ └─ header.js # header component ├─ _layouts │ ├─ default.js # default layout for static pages like index, about │ └─ post.js # post layout inherts from the default layout ├─ pages │ ├─ index.js # homepage | └─ posts # posts will be available on the route /posts/ | └─ [slug].js # dynamic page to build posts └─ _posts ├─ welcome-to-nextjs.md └─ style-guide-101.md
Blog API
A basic blog framework needs two API functions:
A function to fetch the metadata of all the posts in _posts directory
A function to fetch a single post for a given slug with the complete HTML and metadata
Optionally, we would also like all the site’s configuration defined in config.yml to be available across all the components. So we need a function that will parse the YAML config into a native object.
Since, we would be dealing with a lot of non-JavaScript files, like Markdown (.md), YAML (.yml), etc, we’ll use the raw-loader library to load such files as strings to make it easier to process them.
npm install raw-loader --save-dev
Next we need to tell Next.js to use raw-loader when we import .md and .yml file formats by creating a next.config.js file in the root of the project (more info on that).
module.exports = { target: 'serverless', webpack: function (config) { config.module.rules.push({test: /\.md$/, use: 'raw-loader'}) config.module.rules.push({test: /\.yml$/, use: 'raw-loader'}) return config } }
Next.js 9.4 introduced aliases for relative imports which helps clean up the import statement spaghetti caused by relative paths. To use aliases, create a jsconfig.json file in the project’s root directory specifying the base path and all the module aliases needed for the project.
{ "compilerOptions": { "baseUrl": "./", "paths": { "@includes/*": ["_includes/*"], "@layouts/*": ["_layouts/*"], "@posts/*": ["_posts/*"], "@api": ["api/index"], } } }
For example, this allows us to import our layouts by just using:
import DefaultLayout from '@layouts/default'
Fetch all the posts
This function will read all the Markdown files in the _posts directory, parse the front matter defined at the beginning of the post using gray-matter and return the array of metadata for all the posts.
// api/index.js import matter from 'gray-matter'
export async function getAllPosts() { const context = require.context('../_posts', false, /\.md$/) const posts = [] for(const key of context.keys()){ const post = key.slice(2); const content = await import(`../_posts/${post}`); const meta = matter(content.default) posts.push({ slug: post.replace('.md',''), title: meta.data.title }) } return posts; }
A typical Markdown post looks like this:
--- title: "Welcome to Next.js blog!" --- **Hello world**, this is my first Next.js blog post and it is written in Markdown. I hope you like it!
The section outlined by --- is called the front matter which holds the metadata of the post like, title, permalink, tags, etc. Here’s the output:
[ { slug: 'style-guide-101', title: 'Style Guide 101' }, { slug: 'welcome-to-nextjs', title: 'Welcome to Next.js blog!' } ]
Make sure you install the gray-matter library from npm first using the command npm install gray-matter --save-dev.
Fetch a single post
For a given slug, this function will locate the file in the _posts directory, parse the Markdown with the marked library and return the output HTML with metadata.
// api/index.js import matter from 'gray-matter' import marked from 'marked'
export async function getPostBySlug(slug) { const fileContent = await import(`../_posts/${slug}.md`) const meta = matter(fileContent.default) const content = marked(meta.content) return { title: meta.data.title, content: content } }
Sample output:
{ title: 'Style Guide 101', content: '<p>Incididunt cupidatat eiusmod ...</p>' }
Make sure you install the marked library from npm first using the command npm install marked --save-dev.
Config
In order to re-use the Jekyll config for our Next.js blog, we’ll parse the YAML file using the js-yaml library and export this config so that it can be used across components.
// config.yml title: "Next.js blog" description: "This blog is powered by Next.js"
// api/index.js import yaml from 'js-yaml' export async function getConfig() { const config = await import(`../config.yml`) return yaml.safeLoad(config.default) }
Make sure you install js-yaml from npm first using the command npm install js-yaml --save-dev.
Includes
Our _includes directory contains two basic React components, <Header> and <Footer>, which will be used in the different layout components defined in the _layouts directory.
// _includes/header.js export default function Header() { return <header><p>Blog | Powered by Next.js</p></header> }
// _includes/footer.js export default function Footer() { return <footer><p>©2020 | Footer</p></footer> }
Layouts
We have two layout components in the _layouts directory. One is the <DefaultLayout> which is the base layout on top of which every other layout component will be built.
// _layouts/default.js import Head from 'next/head' import Header from '@includes/header' import Footer from '@includes/footer'
export default function DefaultLayout(props) { return ( <main> <Head> <title>{props.title}</title> <meta name='description' content={props.description}/> </Head> <Header/> {props.children} <Footer/> </main> ) }
The second layout is the <PostLayout> component that will override the title defined in the <DefaultLayout> with the post title and render the HTML of the post. It also includes a link back to the homepage.
// _layouts/post.js import DefaultLayout from '@layouts/default' import Head from 'next/head' import Link from 'next/link'
export default function PostLayout(props) { return ( <DefaultLayout> <Head> <title>{props.title}</title> </Head> <article> <h1>{props.title}</h1> <div dangerouslySetInnerHTML=/> <div><Link href='/'><a>Home</a></Link></div> </article> </DefaultLayout> ) }
next/head is a built-in component to append elements to the <head> of the page. next/link is a built-in component that handles client-side transitions between the routes defined in the pages directory.
Homepage
As part of the index page, aka homepage, we will list all the posts inside the _posts directory. The list will contain the post title and the permalink to the individual post page. The index page will use the <DefaultLayout> and we’ll import the config in the homepage to pass the title and description to the layout.
// pages/index.js import DefaultLayout from '@layouts/default' import Link from 'next/link' import { getConfig, getAllPosts } from '@api'
export default function Blog(props) { return ( <DefaultLayout title={props.title} description={props.description}> <p>List of posts:</p> <ul> {props.posts.map(function(post, idx) { return ( <li key={idx}> <Link href={'/posts/'+post.slug}> <a>{post.title}</a> </Link> </li> ) })} </ul> </DefaultLayout> ) }
export async function getStaticProps() { const config = await getConfig() const allPosts = await getAllPosts() return { props: { posts: allPosts, title: config.title, description: config.description } } }
getStaticProps is called at the build time to pre-render pages by passing props to the default component of the page. We use this function to fetch the list of all posts at build time and render the posts archive on the homepage.

Post page
This page will render the title and contents of the post for the slug supplied as part of the context. The post page will use the <PostLayout> component.
// pages/posts/[slug].js import PostLayout from '@layouts/post' import { getPostBySlug, getAllPosts } from "@api"
export default function Post(props) { return <PostLayout title={props.title} content={props.content}/> }
export async function getStaticProps(context) { return { props: await getPostBySlug(context.params.slug) } }
export async function getStaticPaths() { let paths = await getAllPosts() paths = paths.map(post => ({ params: { slug:post.slug } })); return { paths: paths, fallback: false } }
If a page has dynamic routes, Next.js needs to know all the possible paths at build time. getStaticPaths supplies the list of paths that has to be rendered to HTML at build time. The fallback property ensures that if you visit a route that does not exist in the list of paths, it will return a 404 page.

Production ready
Add the following commands for build and start in package.json, under the scripts section and then run npm run build followed by npm run start to build the static blog and start the production server.
// package.json "scripts": { "dev": "next", "build": "next build", "start": "next start" }
The entire source code in this article is available on this GitHub repository. Feel free to clone it locally and play around with it. The repository also includes some basic placeholders to apply CSS to your blog.
Improvements
The blog, although functional, is perhaps too basic for most average cases. It would be nice to extend the framework or submit a patch to include some more features like:
Pagination
Syntax highlighting
Categories and Tags for posts
Styling
Overall, Next.js seems really very promising to build static websites, like a blog. Combined with its ability to export static HTML, we can built a truly standalone app without the need of a server!
The post Building a Blog with Next.js appeared first on CSS-Tricks.
Building a Blog with Next.js published first on https://deskbysnafu.tumblr.com/
0 notes
Text
Building a Blog with Next.js
In this article, we will use Next.js to build a static blog framework with the design and structure inspired by Jekyll. I’ve always been a big fan of how Jekyll makes it easier for beginners to setup a blog and at the same time also provides a great degree of control over every aspect of the blog for the advanced users.
With the introduction of Next.js in recent years, combined with the popularity of React, there is a new avenue to explore for static blogs. Next.js makes it super easy to build static websites based on the file system itself with little to no configuration required.
The directory structure of a typical bare-bones Jekyll blog looks like this:
. ├─── _posts/ ...blog posts in markdown ├─── _layouts/ ...layouts for different pages ├─── _includes/ ...re-usable components ├─── index.md ...homepage └─── config.yml ...blog config
The idea is to design our framework around this directory structure as much as possible so that it becomes easier to migrate a blog from Jekyll by simply reusing the posts and configs defined in the blog.
For those unfamiliar with Jekyll, it is a static site generator that can transform your plain text into static websites and blogs. Refer the quick start guide to get up and running with Jekyll. This article also assumes that you have a basic knowledge of React. If not, React’s getting started page is a good place to start.
Installation
Next.js is powered by React and written in Node.js. So we need to install npm first, before adding next, react and react-dom to the project.
mkdir nextjs-blog && cd $_ npm init -y npm install next react react-dom --save
To run Next.js scripts on the command line, we have to add the next command to the scripts section of our package.json.
"scripts": { "dev": "next" }
We can now run npm run dev on the command line for the first time. Let’s see what happens.
$ npm run dev > [email protected] dev /~user/nextjs-blog > next ready - started server on http://localhost:3000 Error: > Couldn't find a `pages` directory. Please create one under the project root
The compiler is complaining about a missing pages directory in the root of the project. We’ll learn about the concept of pages in the next section.
Concept of pages
Next.js is built around the concept of pages. Each page is a React component that can be of type .js or .jsx which is mapped to a route based on the filename. For example:
File Route ---- ----- /pages/about.js /about /pages/projects/work1.js /projects/work1 /pages/index.js /
Let’s create the pages directory in the root of the project and populate our first page, index.js, with a basic React component.
// pages/index.js export default function Blog() { return <div>Welcome to the Next.js blog</div> }
Run npm run dev once again to start the server and navigate to http://localhost:3000 in the browser to view your blog for the first time.

Out of the box, we get:
Hot reloading so we don’t have to refresh the browser for every code change.
Static generation of all pages inside the /pages/** directory.
Static file serving for assets living in the/public/** directory.
404 error page.
Navigate to a random path on localhost to see the 404 page in action. If you need a custom 404 page, the Next.js docs have great information.

Dynamic pages
Pages with static routes are useful to build the homepage, about page, etc. However, to dynamically build all our posts, we will use the dynamic route capability of Next.js. For example:
File Route ---- ----- /pages/posts/[slug].js /posts/1 /posts/abc /posts/hello-world
Any route, like /posts/1, /posts/abc, etc., will be matched by /posts/[slug].js and the slug parameter will be sent as a query parameter to the page. This is especially useful for our blog posts because we don’t want to create one file per post; instead we could dynamically pass the slug to render the corresponding post.
Anatomy of a blog
Now, since we understand the basic building blocks of Next.js, let’s define the anatomy of our blog.
. ├─ api │ └─ index.js # fetch posts, load configs, parse .md files etc ├─ _includes │ ├─ footer.js # footer component │ └─ header.js # header component ├─ _layouts │ ├─ default.js # default layout for static pages like index, about │ └─ post.js # post layout inherts from the default layout ├─ pages │ ├─ index.js # homepage | └─ posts # posts will be available on the route /posts/ | └─ [slug].js # dynamic page to build posts └─ _posts ├─ welcome-to-nextjs.md └─ style-guide-101.md
Blog API
A basic blog framework needs two API functions:
A function to fetch the metadata of all the posts in _posts directory
A function to fetch a single post for a given slug with the complete HTML and metadata
Optionally, we would also like all the site’s configuration defined in config.yml to be available across all the components. So we need a function that will parse the YAML config into a native object.
Since, we would be dealing with a lot of non-JavaScript files, like Markdown (.md), YAML (.yml), etc, we’ll use the raw-loader library to load such files as strings to make it easier to process them.
npm install raw-loader --save-dev
Next we need to tell Next.js to use raw-loader when we import .md and .yml file formats by creating a next.config.js file in the root of the project (more info on that).
module.exports = { target: 'serverless', webpack: function (config) { config.module.rules.push({test: /\.md$/, use: 'raw-loader'}) config.module.rules.push({test: /\.yml$/, use: 'raw-loader'}) return config } }
Next.js 9.4 introduced aliases for relative imports which helps clean up the import statement spaghetti caused by relative paths. To use aliases, create a jsconfig.json file in the project’s root directory specifying the base path and all the module aliases needed for the project.
{ "compilerOptions": { "baseUrl": "./", "paths": { "@includes/*": ["_includes/*"], "@layouts/*": ["_layouts/*"], "@posts/*": ["_posts/*"], "@api": ["api/index"], } } }
For example, this allows us to import our layouts by just using:
import DefaultLayout from '@layouts/default'
Fetch all the posts
This function will read all the Markdown files in the _posts directory, parse the front matter defined at the beginning of the post using gray-matter and return the array of metadata for all the posts.
// api/index.js import matter from 'gray-matter'
export async function getAllPosts() { const context = require.context('../_posts', false, /\.md$/) const posts = [] for(const key of context.keys()){ const post = key.slice(2); const content = await import(`../_posts/${post}`); const meta = matter(content.default) posts.push({ slug: post.replace('.md',''), title: meta.data.title }) } return posts; }
A typical Markdown post looks like this:
--- title: "Welcome to Next.js blog!" --- **Hello world**, this is my first Next.js blog post and it is written in Markdown. I hope you like it!
The section outlined by --- is called the front matter which holds the metadata of the post like, title, permalink, tags, etc. Here’s the output:
[ { slug: 'style-guide-101', title: 'Style Guide 101' }, { slug: 'welcome-to-nextjs', title: 'Welcome to Next.js blog!' } ]
Make sure you install the gray-matter library from npm first using the command npm install gray-matter --save-dev.
Fetch a single post
For a given slug, this function will locate the file in the _posts directory, parse the Markdown with the marked library and return the output HTML with metadata.
// api/index.js import matter from 'gray-matter' import marked from 'marked'
export async function getPostBySlug(slug) { const fileContent = await import(`../_posts/${slug}.md`) const meta = matter(fileContent.default) const content = marked(meta.content) return { title: meta.data.title, content: content } }
Sample output:
{ title: 'Style Guide 101', content: '<p>Incididunt cupidatat eiusmod ...</p>' }
Make sure you install the marked library from npm first using the command npm install marked --save-dev.
Config
In order to re-use the Jekyll config for our Next.js blog, we’ll parse the YAML file using the js-yaml library and export this config so that it can be used across components.
// config.yml title: "Next.js blog" description: "This blog is powered by Next.js"
// api/index.js import yaml from 'js-yaml' export async function getConfig() { const config = await import(`../config.yml`) return yaml.safeLoad(config.default) }
Make sure you install js-yaml from npm first using the command npm install js-yaml --save-dev.
Includes
Our _includes directory contains two basic React components, <Header> and <Footer>, which will be used in the different layout components defined in the _layouts directory.
// _includes/header.js export default function Header() { return <header><p>Blog | Powered by Next.js</p></header> }
// _includes/footer.js export default function Footer() { return <footer><p>©2020 | Footer</p></footer> }
Layouts
We have two layout components in the _layouts directory. One is the <DefaultLayout> which is the base layout on top of which every other layout component will be built.
// _layouts/default.js import Head from 'next/head' import Header from '@includes/header' import Footer from '@includes/footer'
export default function DefaultLayout(props) { return ( <main> <Head> <title>{props.title}</title> <meta name='description' content={props.description}/> </Head> <Header/> {props.children} <Footer/> </main> ) }
The second layout is the <PostLayout> component that will override the title defined in the <DefaultLayout> with the post title and render the HTML of the post. It also includes a link back to the homepage.
// _layouts/post.js import DefaultLayout from '@layouts/default' import Head from 'next/head' import Link from 'next/link'
export default function PostLayout(props) { return ( <DefaultLayout> <Head> <title>{props.title}</title> </Head> <article> <h1>{props.title}</h1> <div dangerouslySetInnerHTML=/> <div><Link href='/'><a>Home</a></Link></div> </article> </DefaultLayout> ) }
next/head is a built-in component to append elements to the <head> of the page. next/link is a built-in component that handles client-side transitions between the routes defined in the pages directory.
Homepage
As part of the index page, aka homepage, we will list all the posts inside the _posts directory. The list will contain the post title and the permalink to the individual post page. The index page will use the <DefaultLayout> and we’ll import the config in the homepage to pass the title and description to the layout.
// pages/index.js import DefaultLayout from '@layouts/default' import Link from 'next/link' import { getConfig, getAllPosts } from '@api'
export default function Blog(props) { return ( <DefaultLayout title={props.title} description={props.description}> <p>List of posts:</p> <ul> {props.posts.map(function(post, idx) { return ( <li key={idx}> <Link href={'/posts/'+post.slug}> <a>{post.title}</a> </Link> </li> ) })} </ul> </DefaultLayout> ) }
export async function getStaticProps() { const config = await getConfig() const allPosts = await getAllPosts() return { props: { posts: allPosts, title: config.title, description: config.description } } }
getStaticProps is called at the build time to pre-render pages by passing props to the default component of the page. We use this function to fetch the list of all posts at build time and render the posts archive on the homepage.

Post page
This page will render the title and contents of the post for the slug supplied as part of the context. The post page will use the <PostLayout> component.
// pages/posts/[slug].js import PostLayout from '@layouts/post' import { getPostBySlug, getAllPosts } from "@api"
export default function Post(props) { return <PostLayout title={props.title} content={props.content}/> }
export async function getStaticProps(context) { return { props: await getPostBySlug(context.params.slug) } }
export async function getStaticPaths() { let paths = await getAllPosts() paths = paths.map(post => ({ params: { slug:post.slug } })); return { paths: paths, fallback: false } }
If a page has dynamic routes, Next.js needs to know all the possible paths at build time. getStaticPaths supplies the list of paths that has to be rendered to HTML at build time. The fallback property ensures that if you visit a route that does not exist in the list of paths, it will return a 404 page.

Production ready
Add the following commands for build and start in package.json, under the scripts section and then run npm run build followed by npm run start to build the static blog and start the production server.
// package.json "scripts": { "dev": "next", "build": "next build", "start": "next start" }
The entire source code in this article is available on this GitHub repository. Feel free to clone it locally and play around with it. The repository also includes some basic placeholders to apply CSS to your blog.
Improvements
The blog, although functional, is perhaps too basic for most average cases. It would be nice to extend the framework or submit a patch to include some more features like:
Pagination
Syntax highlighting
Categories and Tags for posts
Styling
Overall, Next.js seems really very promising to build static websites, like a blog. Combined with its ability to export static HTML, we can built a truly standalone app without the need of a server!
The post Building a Blog with Next.js appeared first on CSS-Tricks.
Building a Blog with Next.js published first on https://deskbysnafu.tumblr.com/
0 notes
Text
Build a dynamic JAMstack app with GatsbyJS and FaunaDB
In this article, we explain the difference between single-page apps (SPAs) and static sites, and how we can bring the advantages of both worlds together in a dynamic JAMstack app using GatsbyJS and FaunaDB. We will build an application that pulls in some data from FaunaDB during build time, prerenders the HTML for speedy delivery to the client, and then loads additional data at run time as the user interacts with the page. This combination of technologies gives us the best attributes of statically-generated sites and SPAs.
In short…<deep breath>...auto-scaling distributed websites with low latency, snappy user interfaces, no reloads, and dynamic data for everyone!
Heavy backends, single-page apps, static sites
In the old days, when JavaScript was new, it was mainly only used to provide effects and improved interactions. Some animations here, a drop-down there, and that was it. The grunt work was performed on the backend by Perl, Java, or PHP.
This changed as time went on: client code became heavier, and JavaScript took over more and more of the frontend until we finally shipped mostly empty HTML and rendered the whole UI in the browser, leaving the backend to supply us with JSON data.
This led to a neat separation of concerns and allowed us to build whole applications with JavaScript, called Single Page Applications (SPAs). The most important advantage of SPAs was the absence of reloads. You could click on a link to change what's displayed, without triggering a complete reload of the page. This in itself provided a superior user experience. However, SPAs increased the size of the client code significantly; a client now had to wait for the sum of several latencies:
Serving latency: retrieving the HTML and JavaScript from the server where the JavaScript was bigger than it used to be
Data loading latency: loading additional data requested by the client
Frontend framework rendering latency: once the data is received, a frontend framework like React, Vue, or Angular still has to do a lot of work to construct the final HTML
A royal metaphor

We can analogize the loading a SPA with the building and delivery of a toy castle. The client needs to retrieve the HTML and JavaScript, then retrieve the data, and then still has to assemble the page. The building blocks are delivered, but they still need to be put together after they're delivered.
If only there were a way to build the castle beforehand...
Enter the JAMstack
JAMstack applications consist of JavaScript, APIs and Markup. With today's static site generators like Next.js and GatsbyJS, the JavaScript and Markup parts can be bundled up into a static package and deployed via a Content Delivery Network (CDN) that delivers files to a browser. A CDN geographically distributes the bundles, and other assets, to multiple locations. When a user’s browser fetches the bundle and assets, it can receive them from the closest location on the network, which reduces the serving latency.
Continuing our toy castle analogy, JAMstack apps are different from SPAs in the sense that the page (or castle) is delivered pre-assembled. We have a lower latency since we receive the castle in one piece and no longer have to build it.

Making static JAMstack apps dynamic with hydration
In the JAMstack approach, we start with a dynamic application and prerender static HTML pages to be delivered via a speedy CDN. But what if a fully static site is not sufficient and we need to support some dynamic content as the user interacts with individual components, without reloading the entire page? That's where client-side hydration comes in.
Hydration is the client-side process by which the server-side rendered HTML (DOM) is "watered" by our frontend framework with event handlers and/or dynamic components to make it more interactive. This can be tricky because it depends on reconciling the original DOM with a new virtual DOM (VDOM) that's kept in memory as the user interacts with the page. If the DOM and VDOM trees do not match, bugs can arise that cause elements to be displayed out of order, or necessitate rebuilding the page.
Luckily, libraries like GatsbyJS and NextJS have been designed so as to minimize the possibility of such hydration-related bugs, handling everything for you out-of-the-box with only a few lines of code. The result is a dynamic JAMstack web application that is simultaneously both faster and more dynamic than the equivalent SPA.
One technical detail remains: where will the dynamic data come from?
Distributed frontend-friendly databases!
JAMstack apps typically rely on APIs (ergo the "A" in JAM), but if we need to load any kind of custom data, we need a database. And traditional databases are still a performance bottleneck for globally distributed sites that are otherwise delivered via CDN, because traditional databases are only located in one region. Instead of using a traditional database, we’d like our database to be on a distributed network, just like the CDN, that serves the data from a location as close as possible to wherever our clients are. This type of database is called a distributed database.
In this example, we’ll choose FaunaDB since it is also strongly consistent, which means that our data will be the same wherever my clients access it from and data won’t be lost. Other features that work particularly well with JAMstack applications are that (a) the database is accessed as an API (GraphQL or FQL) and does not require you to open a connection, and (b) the database has a security layer that makes it possible to access both public and private data in a secure way from the frontend. The implications of that are we can keep the low latencies of JAMstack without having to scale a backend, all with zero configuration.
Let's compare the process of loading a hydrated static site with the building of the toy castle. We still have lower latencies thanks to the CDN, but also less data since most the site is statically generated and therefore requires less rendering. Only a small part of the castle (or, the dynamic part of the page) needs to be assembled after it has been delivered:

Example app with GatsbyJS & FaunaDB
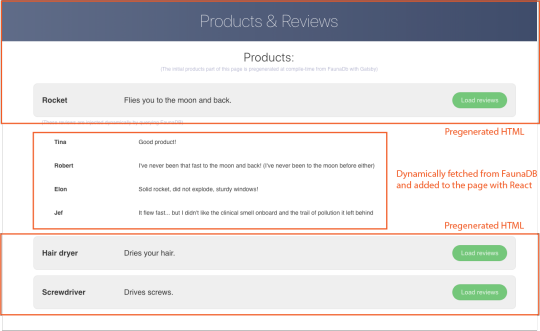
Let’s build an example application that loads data from FaunaDB at build time and renders it to static HTML, then loads additional dynamic data inside the client browser at run time. For this example, we use GatsbyJS, a JAMstack framework based on React that prerenders static HTML. Since we use GatsbyJS, we can code our website completely in React, generate and deliver the static pages, and then load additional data dynamically at run time. We’ll use FaunaDB as our fully managed serverless database solution. We will build an application where we can list products and reviews.
Let’s look at an outline of what we have to do to get our example app up and running and then go through every step in detail.
Set up a new database
Add a GraphQL schema to the database
Seed the database with mock-up data
Create a new GatsbyJS project
Install NPM packages
Create the server key for the database
Update GatsbyJS config files with server key and new read-only key
Load the pre-rendered product data at build time
Load the reviews at run time
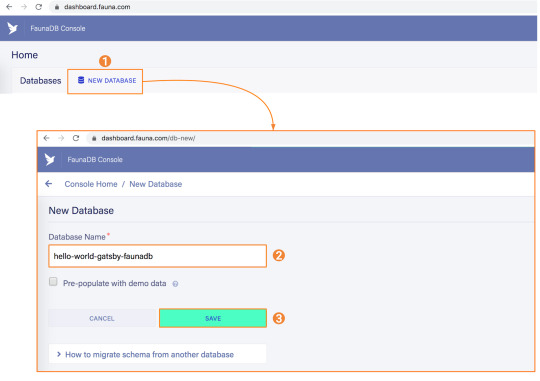
1. Set up a new database
Before you start, create an account on dashboard.fauna.com. Once you have an account, let’s set up a new database. It should hold products and their reviews, so we can load the products at build-time and the reviews in the browser.
2. Add a GraphQL schema to the database
Next, we use the server key to upload a GraphQL schema to our database. For this, we create a new file called schema.gql that has the following content:
type Product { title: String! description: String reviews: [Review] @relation } type Review { username: String! text: String! product: Product! } type Query { allProducts: [Product] }
You can upload your schema.gql file via the FaunaDB Console by clicking "GraphQL" on the left sidebar, and then click the "Import Schema" button.
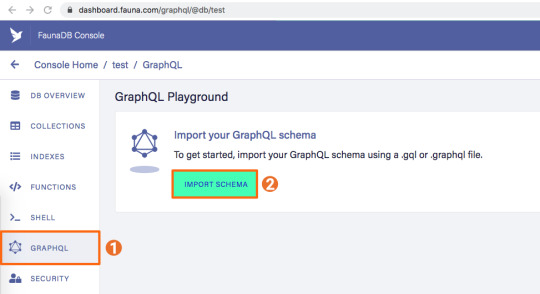
Upon providing FaunaDB with a GraphQL schema, it automatically creates the required collections for the entities in our schema (products and reviews). Besides that, it also creates the indexes that are needed to interact with those collections in a meaningful and efficient manner. You should now be presented with a GraphQL playground where you can test out
3. Seed the database with mock-up data
To seed our database with products and reviews, we can use the Shell at dashboard.fauna.com:
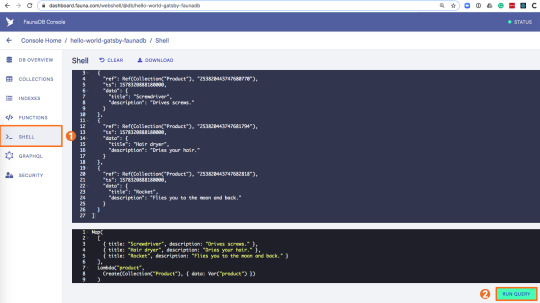
To create some data, we’ll use the Fauna Query Language (FQL), after that we’ll continue with GraphQL to build are example application. Paste the following FQL query into the Shell to create three product documents:
Map( Paginate(Match(Index("allProducts"))), Lambda("ref", Create(Collection("Review"), { data: { username: "Tina", text: "Good product!", product: Var("ref") } })) );
We can then write a query that retrieves the products we just made and creates a review document for every product document:
Map( Paginate(Match(Index("allProducts"))), Lambda("ref", Create(Collection("Review"), { data: { username: "Tina", text: "Good product!", product: Var("ref") } })) );
Both types of documents will be loaded via GraphQL. However, there is a significant difference between products and reviews. The former will not change a lot and is relatively static, while the second is user-driven. GatsbyJS allows us to load data in two ways:
data that is loaded at build time which will be used to generate the static site.
data that is loaded live at request time as a client visits and interacts with your website.
In this example, we chose to let the products be loaded at build time, and the reviews to be loaded on-demand in the browser. Therefore, we get static HTML product pages served by a CDN that the user immediately sees. Then, as our user interacts with the product page, we load the data for the reviews.
4. Create a new GatsbyJS project
The following command creates a GatsbyJS project based on the starter template:
$ npx gatsby-cli new hello-world-gatsby-faunadb $ cd hello-world-gatsby-faunadb
5. Install npm packages
In order to build our new project with Gatsby and Apollo, we need a few additional packages. We can install the packages with the following command:
$ npm i gatsby-source-graphql apollo-boost react-apollo
We will use gatsby-source-graphql as a way to link GraphQL APIs into the build process. Using this library, you can make a GraphQL call from which the results will be automagically provided as the properties for your react component. That way, you can use dynamic data to statically generate your application. The apollo-boost package is an easily configurable GraphQL library that will be used to fetch data on the client. Finally, the link between Apollo and React will be taken care of by the react-apollo library.
6. Create the server key for the database
We will create a Server key which will be used by Gatsby to prerender the page. Remember to copy the secret somewhere since we will use it later on. Protect server keys carefully, they can be used to create, destroy, or manage the database to which they are assigned. To create the key we can go to the fauna dashboard and create the key in the security tab.

7. Update GatsbyJS config files with server and new read-only keys
To add the GraphQL support to our build process, we need to add the following code into our graphql-config.js inside the plugins section where we will insert the FaunaDB server key which we generated a few moments ago.
{ resolve: "gatsby-source-graphql", options: { typeName: "Fauna", fieldName: "fauna", url: "https://graphql.fauna.com/graphql", headers: { Authorization: "Bearer <SERVER KEY>", }, }, }
For the GraphQL access to work in the browser, we have to create a key that only has permissions to read data from the collections. FaunaDB has an extensive security layer in which you can define that. The easiest way is to go to the FaunaDB Console at dashboard.fauna.com and create a new role for your database by clicking "Security" in the left sidebar, then "Manage Roles," then "New Custom Role":

Call the new custom role ‘ClientRead’ and make sure to add all collections and indexes (these are the collections that were created by importing the GraphQL schema). Then, select Read for each for them. Your screen should look like this:
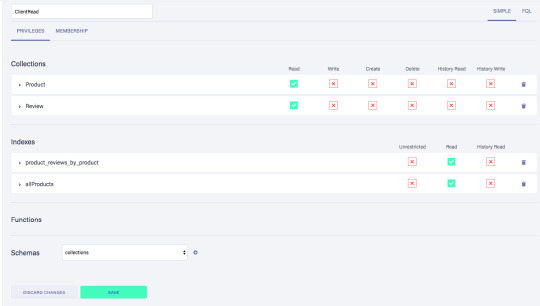
You have probably noticed the Membership tab on this page. Although we are not using it in this tutorial, it is interesting enough to explain it since it's an alternative way to get security tokens. In the Membership tab can specify that entities of a collection (let's say we have a 'Users' collection) in FaunaDb are members of a particular role. That means that if you impersonate one of these entities in that collection, the role privileges apply. You impersonate a database entity (e.g. a User) by associating credentials with the entity and using the Login function, which will return a token. That way you can also implement password-based authentication in FaunaDb. We won't use it in this tutorial, but if that interests you, check the FaunaDB authentication tutorial.
Let’s ignore Membership for now, once you have created the role, we can create a new key with the new role. As before, click "Security", then "New Key," but this time select "ClientRead" from the Role dropdown:
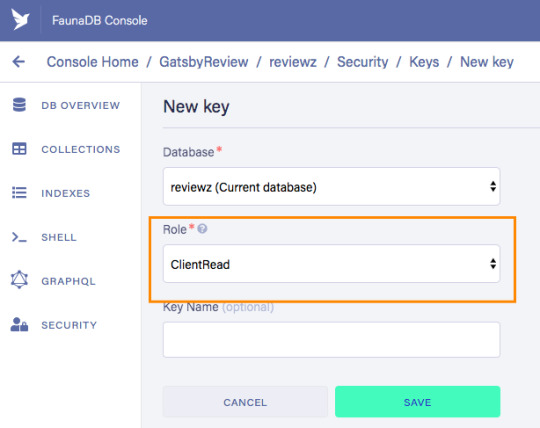
Now, let's insert this read-only key in the gatsby-browser.js configuration file to be able to call the GraphQL API from the browser:
import React from "react" import ApolloClient from "apollo-boost" import { ApolloProvider } from "react-apollo" const client = new ApolloClient({ uri: "https://graphql.fauna.com/graphql", request: operation => { operation.setContext({ headers: { Authorization: "Bearer <CLIENT_KEY>", }, }) }, }) export const wrapRootElement = ({ element }) => ( <ApolloProvider client={client}>{element}</ApolloProvider> )
GatsbyJS will render its Router component as a root element. If we want to use the ApolloClient everywhere in the application on the client, we need to wrap this root element with the ApolloProvider component.
8. Load the pre-rendered product data at build time
Now that everything is set up, we can finally write the actual code to load our data. Let’s start with the products we will load at build time.
For this we need to modify src/pages/index.js file to look like this:
import React from "react" import { graphql } from "gatsby" Import Layout from "../components/Layout" const IndexPage = ({ data }) => ( <Layout> <ul> {data.fauna.allProducts.data.map(product => ( <li>{product.title} - {product.description}</li> ))} </ul> </Layout> ) export const query = graphql` { fauna { allProducts { data { _id title description } } } } ` export default IndexPage
The exported query will automatically get picked up by GatsbyJS and executed before rendering the IndexPage component. The result of that query will be passed as data prop into the IndexPage component.If we now run the develop script, we can see the pre-rendered documents on the development server on http://localhost:8000/.
$ npm run develop
9. Load the reviews at run time
To load the reviews of a product on the client, we have to make some changes to the src/pages/index.js:
import { gql } from "apollo-boost" import { useQuery } from "@apollo/react-hooks" import { graphql } from "gatsby" import React, { useState } from "react" import Layout from "../components/layout" // Query for fetching at build-time export const query = graphql ` { fauna { allProducts { data { _id title description } } } } ` // Query for fetching on the client const GET_REVIEWS = gql ` query GetReviews($productId: ID!) { findProductByID(id: $productId) { reviews { data { _id username text } } } } ` const IndexPage = props => { const [productId, setProductId] = useState(null) const { loading, data } = useQuery(GET_REVIEWS, { variables: { productId }, skip: !productId, }) } export default IndexPage
Let’s go through this step by step.
First, we need to import parts of the apollo-boost and apollo-react packages so we can use the GraphQL client we previously set up in the gatsby-browser.js file.
Then, we need to implement our GET_REVIEWS query. It tries to find a product by its ID and then loads the associated reviews of that product. The query takes one variable, which is the productId.
In the component function, we use two hooks: useState and useQuery
The useState hook keeps track of the productId for which we want to load reviews. If a user clicks a button, the state will be set to the productId corresponding to that button.
The useQuery hook then applies this productId to load reviews for that product from FaunaDB. The skip parameter of the hook prevents the execution of the query when the page is rendered for the first time because productId will be null.
If we now run the development server again and click on the buttons, our application should execute the query with different productIds as expected.
$ npm run develop
Conclusion
A combination of server-side data fetching and client-side hydration make JAMstack applications pretty powerful. These methods enable flexible interaction with our data so we can adhere to different business needs.
It’s usually a good idea to load as much data at build time as possible to improve page performance. But if the data isn’t needed by all clients, or too big to be sent to the client all at once, we can split things up and switch to on-demand loading on the client. This is the case for user-specific data, pagination, or any data that changes rather frequently and might be outdated by the time it reaches the user.
In this article, we implemented an approach that loads part of the data at build time, and then loads the rest of the data in the frontend as the user interacts with the page.
Of course, we have not implemented a login or forms yet to create new reviews. How would we tackle that? That is material for another tutorial where we can use FaunaDB’s attribute-based access control to specify what a client key can read and write from the frontend.
The code of this tutorial can be found in this repo.
The post Build a dynamic JAMstack app with GatsbyJS and FaunaDB appeared first on CSS-Tricks.
via CSS-Tricks https://ift.tt/2RjR7mI
0 notes
Text
Build a dynamic JAMstack app with GatsbyJS and FaunaDB
In this article, we explain the difference between single-page apps (SPAs) and static sites, and how we can bring the advantages of both worlds together in a dynamic JAMstack app using GatsbyJS and FaunaDB. We will build an application that pulls in some data from FaunaDB during build time, prerenders the HTML for speedy delivery to the client, and then loads additional data at run time as the user interacts with the page. This combination of technologies gives us the best attributes of statically-generated sites and SPAs.
In short…<deep breath>...auto-scaling distributed websites with low latency, snappy user interfaces, no reloads, and dynamic data for everyone!
Heavy backends, single-page apps, static sites
In the old days, when JavaScript was new, it was mainly only used to provide effects and improved interactions. Some animations here, a drop-down there, and that was it. The grunt work was performed on the backend by Perl, Java, or PHP.
This changed as time went on: client code became heavier, and JavaScript took over more and more of the frontend until we finally shipped mostly empty HTML and rendered the whole UI in the browser, leaving the backend to supply us with JSON data.
This led to a neat separation of concerns and allowed us to build whole applications with JavaScript, called Single Page Applications (SPAs). The most important advantage of SPAs was the absence of reloads. You could click on a link to change what's displayed, without triggering a complete reload of the page. This in itself provided a superior user experience. However, SPAs increased the size of the client code significantly; a client now had to wait for the sum of several latencies:
Serving latency: retrieving the HTML and JavaScript from the server where the JavaScript was bigger than it used to be
Data loading latency: loading additional data requested by the client
Frontend framework rendering latency: once the data is received, a frontend framework like React, Vue, or Angular still has to do a lot of work to construct the final HTML
A royal metaphor

We can analogize the loading a SPA with the building and delivery of a toy castle. The client needs to retrieve the HTML and JavaScript, then retrieve the data, and then still has to assemble the page. The building blocks are delivered, but they still need to be put together after they're delivered.
If only there were a way to build the castle beforehand...
Enter the JAMstack
JAMstack applications consist of JavaScript, APIs and Markup. With today's static site generators like Next.js and GatsbyJS, the JavaScript and Markup parts can be bundled up into a static package and deployed via a Content Delivery Network (CDN) that delivers files to a browser. A CDN geographically distributes the bundles, and other assets, to multiple locations. When a user’s browser fetches the bundle and assets, it can receive them from the closest location on the network, which reduces the serving latency.
Continuing our toy castle analogy, JAMstack apps are different from SPAs in the sense that the page (or castle) is delivered pre-assembled. We have a lower latency since we receive the castle in one piece and no longer have to build it.
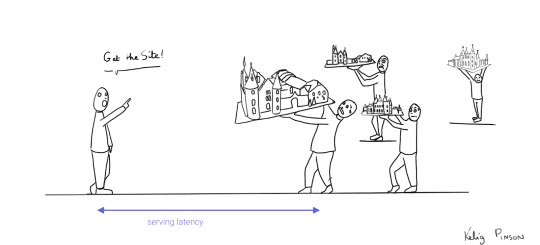
Making static JAMstack apps dynamic with hydration
In the JAMstack approach, we start with a dynamic application and prerender static HTML pages to be delivered via a speedy CDN. But what if a fully static site is not sufficient and we need to support some dynamic content as the user interacts with individual components, without reloading the entire page? That's where client-side hydration comes in.
Hydration is the client-side process by which the server-side rendered HTML (DOM) is "watered" by our frontend framework with event handlers and/or dynamic components to make it more interactive. This can be tricky because it depends on reconciling the original DOM with a new virtual DOM (VDOM) that's kept in memory as the user interacts with the page. If the DOM and VDOM trees do not match, bugs can arise that cause elements to be displayed out of order, or necessitate rebuilding the page.
Luckily, libraries like GatsbyJS and NextJS have been designed so as to minimize the possibility of such hydration-related bugs, handling everything for you out-of-the-box with only a few lines of code. The result is a dynamic JAMstack web application that is simultaneously both faster and more dynamic than the equivalent SPA.
One technical detail remains: where will the dynamic data come from?
Distributed frontend-friendly databases!
JAMstack apps typically rely on APIs (ergo the "A" in JAM), but if we need to load any kind of custom data, we need a database. And traditional databases are still a performance bottleneck for globally distributed sites that are otherwise delivered via CDN, because traditional databases are only located in one region. Instead of using a traditional database, we’d like our database to be on a distributed network, just like the CDN, that serves the data from a location as close as possible to wherever our clients are. This type of database is called a distributed database.
In this example, we’ll choose FaunaDB since it is also strongly consistent, which means that our data will be the same wherever my clients access it from and data won’t be lost. Other features that work particularly well with JAMstack applications are that (a) the database is accessed as an API (GraphQL or FQL) and does not require you to open a connection, and (b) the database has a security layer that makes it possible to access both public and private data in a secure way from the frontend. The implications of that are we can keep the low latencies of JAMstack without having to scale a backend, all with zero configuration.
Let's compare the process of loading a hydrated static site with the building of the toy castle. We still have lower latencies thanks to the CDN, but also less data since most the site is statically generated and therefore requires less rendering. Only a small part of the castle (or, the dynamic part of the page) needs to be assembled after it has been delivered:
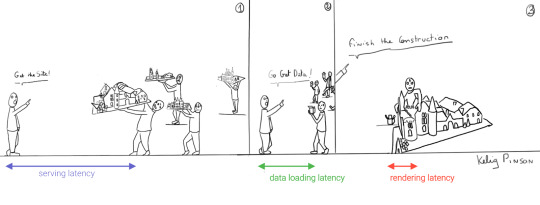
Example app with GatsbyJS & FaunaDB
Let’s build an example application that loads data from FaunaDB at build time and renders it to static HTML, then loads additional dynamic data inside the client browser at run time. For this example, we use GatsbyJS, a JAMstack framework based on React that prerenders static HTML. Since we use GatsbyJS, we can code our website completely in React, generate and deliver the static pages, and then load additional data dynamically at run time. We’ll use FaunaDB as our fully managed serverless database solution. We will build an application where we can list products and reviews.

Let’s look at an outline of what we have to do to get our example app up and running and then go through every step in detail.
Set up a new database
Add a GraphQL schema to the database
Seed the database with mock-up data
Create a new GatsbyJS project
Install NPM packages
Create the server key for the database
Update GatsbyJS config files with server key and new read-only key
Load the pre-rendered product data at build time
Load the reviews at run time
1. Set up a new database
Before you start, create an account on dashboard.fauna.com. Once you have an account, let’s set up a new database. It should hold products and their reviews, so we can load the products at build-time and the reviews in the browser.

2. Add a GraphQL schema to the database
Next, we use the server key to upload a GraphQL schema to our database. For this, we create a new file called schema.gql that has the following content:
type Product { title: String! description: String reviews: [Review] @relation } type Review { username: String! text: String! product: Product! } type Query { allProducts: [Product] }
You can upload your schema.gql file via the FaunaDB Console by clicking "GraphQL" on the left sidebar, and then click the "Import Schema" button.

Upon providing FaunaDB with a GraphQL schema, it automatically creates the required collections for the entities in our schema (products and reviews). Besides that, it also creates the indexes that are needed to interact with those collections in a meaningful and efficient manner. You should now be presented with a GraphQL playground where you can test out
3. Seed the database with mock-up data
To seed our database with products and reviews, we can use the Shell at dashboard.fauna.com:

To create some data, we’ll use the Fauna Query Language (FQL), after that we’ll continue with GraphQL to build are example application. Paste the following FQL query into the Shell to create three product documents:
Map( Paginate(Match(Index("allProducts"))), Lambda("ref", Create(Collection("Review"), { data: { username: "Tina", text: "Good product!", product: Var("ref") } })) );
We can then write a query that retrieves the products we just made and creates a review document for every product document:
Map( Paginate(Match(Index("allProducts"))), Lambda("ref", Create(Collection("Review"), { data: { username: "Tina", text: "Good product!", product: Var("ref") } })) );
Both types of documents will be loaded via GraphQL. However, there is a significant difference between products and reviews. The former will not change a lot and is relatively static, while the second is user-driven. GatsbyJS allows us to load data in two ways:
data that is loaded at build time which will be used to generate the static site.
data that is loaded live at request time as a client visits and interacts with your website.
In this example, we chose to let the products be loaded at build time, and the reviews to be loaded on-demand in the browser. Therefore, we get static HTML product pages served by a CDN that the user immediately sees. Then, as our user interacts with the product page, we load the data for the reviews.
4. Create a new GatsbyJS project
The following command creates a GatsbyJS project based on the starter template:
$ npx gatsby-cli new hello-world-gatsby-faunadb $ cd hello-world-gatsby-faunadb
5. Install npm packages
In order to build our new project with Gatsby and Apollo, we need a few additional packages. We can install the packages with the following command:
$ npm i gatsby-source-graphql apollo-boost react-apollo
We will use gatsby-source-graphql as a way to link GraphQL APIs into the build process. Using this library, you can make a GraphQL call from which the results will be automagically provided as the properties for your react component. That way, you can use dynamic data to statically generate your application. The apollo-boost package is an easily configurable GraphQL library that will be used to fetch data on the client. Finally, the link between Apollo and React will be taken care of by the react-apollo library.
6. Create the server key for the database
We will create a Server key which will be used by Gatsby to prerender the page. Remember to copy the secret somewhere since we will use it later on. Protect server keys carefully, they can be used to create, destroy, or manage the database to which they are assigned. To create the key we can go to the fauna dashboard and create the key in the security tab.

7. Update GatsbyJS config files with server and new read-only keys
To add the GraphQL support to our build process, we need to add the following code into our graphql-config.js inside the plugins section where we will insert the FaunaDB server key which we generated a few moments ago.
{ resolve: "gatsby-source-graphql", options: { typeName: "Fauna", fieldName: "fauna", url: "https://graphql.fauna.com/graphql", headers: { Authorization: "Bearer <SERVER KEY>", }, }, }
For the GraphQL access to work in the browser, we have to create a key that only has permissions to read data from the collections. FaunaDB has an extensive security layer in which you can define that. The easiest way is to go to the FaunaDB Console at dashboard.fauna.com and create a new role for your database by clicking "Security" in the left sidebar, then "Manage Roles," then "New Custom Role":
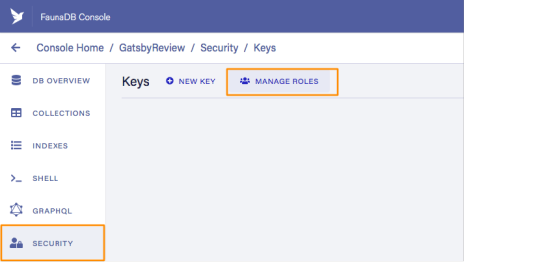
Call the new custom role ‘ClientRead’ and make sure to add all collections and indexes (these are the collections that were created by importing the GraphQL schema). Then, select Read for each for them. Your screen should look like this:

You have probably noticed the Membership tab on this page. Although we are not using it in this tutorial, it is interesting enough to explain it since it's an alternative way to get security tokens. In the Membership tab can specify that entities of a collection (let's say we have a 'Users' collection) in FaunaDb are members of a particular role. That means that if you impersonate one of these entities in that collection, the role privileges apply. You impersonate a database entity (e.g. a User) by associating credentials with the entity and using the Login function, which will return a token. That way you can also implement password-based authentication in FaunaDb. We won't use it in this tutorial, but if that interests you, check the FaunaDB authentication tutorial.
Let’s ignore Membership for now, once you have created the role, we can create a new key with the new role. As before, click "Security", then "New Key," but this time select "ClientRead" from the Role dropdown:

Now, let's insert this read-only key in the gatsby-browser.js configuration file to be able to call the GraphQL API from the browser:
import React from "react" import ApolloClient from "apollo-boost" import { ApolloProvider } from "react-apollo" const client = new ApolloClient({ uri: "https://graphql.fauna.com/graphql", request: operation => { operation.setContext({ headers: { Authorization: "Bearer <CLIENT_KEY>", }, }) }, }) export const wrapRootElement = ({ element }) => ( <ApolloProvider client={client}>{element}</ApolloProvider> )
GatsbyJS will render its Router component as a root element. If we want to use the ApolloClient everywhere in the application on the client, we need to wrap this root element with the ApolloProvider component.
8. Load the pre-rendered product data at build time
Now that everything is set up, we can finally write the actual code to load our data. Let’s start with the products we will load at build time.
For this we need to modify src/pages/index.js file to look like this:
import React from "react" import { graphql } from "gatsby" Import Layout from "../components/Layout" const IndexPage = ({ data }) => ( <Layout> <ul> {data.fauna.allProducts.data.map(product => ( <li>{product.title} - {product.description}</li> ))} </ul> </Layout> ) export const query = graphql` { fauna { allProducts { data { _id title description } } } } ` export default IndexPage
The exported query will automatically get picked up by GatsbyJS and executed before rendering the IndexPage component. The result of that query will be passed as data prop into the IndexPage component.If we now run the develop script, we can see the pre-rendered documents on the development server on http://localhost:8000/.
$ npm run develop
9. Load the reviews at run time
To load the reviews of a product on the client, we have to make some changes to the src/pages/index.js:
import { gql } from "apollo-boost" import { useQuery } from "@apollo/react-hooks" import { graphql } from "gatsby" import React, { useState } from "react" import Layout from "../components/layout" // Query for fetching at build-time export const query = graphql ` { fauna { allProducts { data { _id title description } } } } ` // Query for fetching on the client const GET_REVIEWS = gql ` query GetReviews($productId: ID!) { findProductByID(id: $productId) { reviews { data { _id username text } } } } ` const IndexPage = props => { const [productId, setProductId] = useState(null) const { loading, data } = useQuery(GET_REVIEWS, { variables: { productId }, skip: !productId, }) } export default IndexPage
Let’s go through this step by step.
First, we need to import parts of the apollo-boost and apollo-react packages so we can use the GraphQL client we previously set up in the gatsby-browser.js file.
Then, we need to implement our GET_REVIEWS query. It tries to find a product by its ID and then loads the associated reviews of that product. The query takes one variable, which is the productId.
In the component function, we use two hooks: useState and useQuery
The useState hook keeps track of the productId for which we want to load reviews. If a user clicks a button, the state will be set to the productId corresponding to that button.
The useQuery hook then applies this productId to load reviews for that product from FaunaDB. The skip parameter of the hook prevents the execution of the query when the page is rendered for the first time because productId will be null.
If we now run the development server again and click on the buttons, our application should execute the query with different productIds as expected.
$ npm run develop
Conclusion
A combination of server-side data fetching and client-side hydration make JAMstack applications pretty powerful. These methods enable flexible interaction with our data so we can adhere to different business needs.
It’s usually a good idea to load as much data at build time as possible to improve page performance. But if the data isn’t needed by all clients, or too big to be sent to the client all at once, we can split things up and switch to on-demand loading on the client. This is the case for user-specific data, pagination, or any data that changes rather frequently and might be outdated by the time it reaches the user.
In this article, we implemented an approach that loads part of the data at build time, and then loads the rest of the data in the frontend as the user interacts with the page.
Of course, we have not implemented a login or forms yet to create new reviews. How would we tackle that? That is material for another tutorial where we can use FaunaDB’s attribute-based access control to specify what a client key can read and write from the frontend.
The code of this tutorial can be found in this repo.
The post Build a dynamic JAMstack app with GatsbyJS and FaunaDB appeared first on CSS-Tricks.
Build a dynamic JAMstack app with GatsbyJS and FaunaDB published first on https://deskbysnafu.tumblr.com/
0 notes