#service postfix reload
Explore tagged Tumblr posts
Visit Tumblr Blog
Explore Tumblr blogs with no restrictions, modern design and the best experience.
Last Seen Tumblr Blogs


Fun Fact
69% of Tumblr users are millennials.
Text
在 Ubuntu 透過 postfix 寄信
在 Ubuntu 透過 postfix 寄信
Postfix 是一種電子郵件伺服器 在 Ubuntu 可以用來寄信或轉信, 今天就來教大家 在 Ubuntu 透過 postfix 寄信 首先安裝套件sudo apt install postfix mailutils打開設定檔加入 relayhost = smtp.gmail.com:587 smtp_sasl_auth_enable = yes smtp_sasl_password_maps = hash:/etc/postfix/sasl_passwd smtp_sasl_security_options = noanonymous smtp_tls_security_level = encrypt smtp_tls_CAfile = /etc/ssl/certs/ca-certificates.crt 修改或新增密碼設定檔sudo vi…

View On WordPress
#mail server#mailutils#Postfix#postmap#relayhost#sasl_passwd#service postfix reload#信件轉寄#在 Ubuntu 透過 postfix 寄信
0 notes
Link
Delta Chat — интересная альтернатива для self-hosted IM-мессенджера, позволяющий обмениваться сообщениями по существующим почтовым протоколам (что в перспективе позволяет не беспокоиться о блокировке), а высокая стойкость к перехвату сообщений, отсутствие центрального сервера и возможность развернуть на своем сервере, позволяет не беспокоится о том, что ваши данные попадут в чужие руки.
Сейчас есть много IM-мессенджеров с end-to-end шифрованием, но вариантов, которые можно быстро развернуть на своем сервере гораздо меньше.

Изучая варианты, мой взгляд упал на Delta Chat, о котором на Хабре уже упоминали — мессенджер без централизованной серверной инфраструктуры, использующий почтовые сервера для доставки сообщений, что позволяет развернуть его, например, на своем домашнем сервере и общаться с устройств, в том числе не имеющих доступ в интернет. Среди преимуществ этого подхода можно отметить:
Вы сами управляете своей информацией, в том числе ключами шифрования.
Вы не отдаете свою адресную книгу никому.
Нет необходимости использовать телефонный номер для регистрации.
Наличие клиентов под все популярные системы: Windows, Linux, Android, MacOS, iPhone.
Дополнительное шифрование STARTTLS/SSL при передаче сообщений, обеспечиваемое почтовым сервером.
Возможность настроить удаление старых сообщений с устройства (исчезающие сообщения).
Возможность настроить удаление сообщений с сервера, при получении.
Быстрая доставка, благодаря IMAP push.
Групповые защищенные чаты.
Поддержка передачи файлов, фото и видео.
Сервер и клиент относятся к открытому ПО и совершенно бесплатны.
Возможные недостатки:
Нет возможности создавать нативные аудио и видео конференции.
Необходимость экспортировать/импортировать ключи шифрования, для настройки одного аккаунта на нескольких устройствах.
Интересный факт: Роскомнадзор уже требовал от разработчиков Delta Chat предоставить доступ к пользовательским данным, ключам шифрования и зарегистрироваться в государственном реестре провайдеров, на что Delta Chat ответили отказом, т.к. не имеют собственных серверов и не имеют доступа к ключам шифрования.
End-to-end шифрование
Delta Chat для подключения к серверу может использовать StartTLS или SSL подключение к серверу, сообщения по умолчанию будут шифроваться по стандарту Autocrypt Level 1, после обмена первыми сообщениями (они передаются в незашифрованном виде). Таким образом если общение идет между пользователями одного сервера, информация не будет передаваться на другие сервера, в передаче сообщений будет занят только наш сервер и устройства пользователей.
Настройка сервера
Настройка сервера для Delta Chat сводится к установке Postfix + Dovecot с настроенными StartTLS/SSL и настройке записей домена. Для настройки сервера я буду использовать CentOS 8, для других дистрибутивов могут быть несущественные расхождения. Выбираем подходящие параметры сервера под нашу задачу.
В DNS я создал две записи: домен третьего уровня будет и почтовым доменом и именем почтового сервера:
secureim.example.com A <ip> secureim MX secureim.example.com
Зададим hostname и установим postfix, dovecot и nginx (nginx — для получения сертификатов let's encrypt, wget — для установки certbot-auto, nano — редактор):
hostnamectl set-hostname secureim.example.com dnf install postfix dovecot nginx wget nano -y
Разрешим Postfix принимать почту извне и настроим hostname, domain и origin сервера, так как почтовый домен и адрес сервера совпадают, то домен будет везде одинаковым:
postconf -e "inet_interfaces = all" postconf -e "myhostname = secureim.example.com" postconf -e "mydomain = secureim.example.com" postconf -e "myorigin = secureim.example.com"
Для того что бы Delta Chat был доступен для подключения из Интернета, нужно открыть порты 80, 143, 443, 465, 587, 993. Так же откроем порты 80, 443 что бы получить сертификаты let's encrypt и обновлять их в дальнейшем. Если планируется получение писем от других почтовых серверов, так же понадобится открыть порт 25 (в моем случае я не планирую подключаться используя другие сервера, поэтому 25й порт я не указываю). И возможно потребуется добавить перенаправление портов 80, 143, 443, 465, 587, 993 на маршрутизаторе, если сервер планируется использовать в локальной сети. Откроем порты 80, 143, 443, 465, 587, 993 в firewall:
firewall-cmd --permanent --add-service={http,https,smtps,smtp-submission,imap,imaps} systemctl reload firewalld
Создадим настройки сайта для нашего доменного имени, что бы получить сертификаты let's encrypt используя certbot-auto
nano /etc/nginx/conf.d/secureim.example.com.conf server { listen 80; listen [::]:80; server_name secureim.example.com; root /usr/share/nginx/html/; } }
Включим и запустим nginx:
systemctl enable nginx systemctl start nginx
Установим certbot-auto:
cd ~ wget https://dl.eff.org/certbot-auto mv certbot-auto /usr/local/bin/certbot-auto chown root /usr/local/bin/certbot-auto chmod 0755 /usr/local/bin/certbot-auto yes | certbot-auto --install-only
Сгенерируем сертификаты для сайта (в дальнейшем мы будем их использовать для TLS-шифрования соединения с сервером):
certbot-auto certonly -a nginx --agree-tos --staple-ocsp --email [email protected] -d secureim.example.com
Будут созданы сертификаты и так же будет выведено в консоль их расположение:
# /etc/letsencrypt/live/secureim.example.com/fullchain.pem # /etc/letsencrypt/live/secureim.example.com/privkey.pem
Исправим соответственно файл конфигурации Postfix, что бы разрешить прием писем на портах 465 и 587:
nano /etc/postfix/master.cf submission inet n - y - - smtpd -o syslog_name=postfix/submission -o smtpd_tls_security_level=encrypt -o smtpd_tls_wrappermode=no -o smtpd_sasl_auth_enable=yes -o smtpd_relay_restrictions=permit_sasl_authenticated,reject -o smtpd_recipient_restrictions=permit_mynetworks,permit_sasl_authenticated,reject -o smtpd_sasl_type=dovecot -o smtpd_sasl_path=private/auth smtps inet n - y - - smtpd -o syslog_name=postfix/smtps -o smtpd_tls_wrappermode=yes -o smtpd_sasl_auth_enable=yes -o smtpd_relay_restrictions=permit_sasl_authenticated,reject -o smtpd_recipient_restrictions=permit_mynetworks,permit_sasl_authenticated,reject -o smtpd_sasl_type=dovecot -o smtpd_sasl_path=private/auth
Выполним команды, что бы указать расположение TLS сертификата и личного ключа сервера:
postconf "smtpd_tls_cert_file = /etc/letsencrypt/live/secureim.example.com/fullchain.pem" postconf "smtpd_tls_key_file = /etc/letsencrypt/live/secureim.example.com/privkey.pem"
При необходимости можем включить логирование TLS подключений:
postconf "smtpd_tls_loglevel = 1" postconf "smtp_tls_loglevel = 1"
Добавим в конец файла конфигурации Postfix требование использовать протоколы не ниже TLS 1.2:
nano /etc/postfix/main.cf smtp_tls_mandatory_protocols = >=TLSv1.2 smtp_tls_protocols = >=TLSv1.2
# Включим и запустим Postfix:
systemctl start postfix systemctl enable postfix
Установим, включим и запустим Dovecot:
dnf install dovecot -y systemctl start dovecot systemctl enable dovecot
Изменим файл конфигурации Dovecot, что бы разрешить протокол imap:
nano /etc/dovecot/dovecot.conf protocols = imap
Настроим хранилище писем, что бы письма сохранялись в папках пользователей:
nano /etc/dovecot/conf.d/10-mail.conf mail_location = maildir:~/Maildir mail_privileged_group = mail
Добавим Dovecot в группу mail что бы Dovecot мог читать входящие:
gpasswd -a dovecot mail
Запретим авторизацию без TLS шифрования:
nano /etc/dovecot/conf.d/10-auth.conf disable_plaintext_auth = yes
Добавим автоподстановку домена при авторизации (только по имени пользователя):
auth_username_format = %n
Изменим расположение сертификата, ключа, расположения файла с ключом Диффи-Хеллмана, минимальную версию TLS 1.2 и предпочтение выбора протоколов шифрования сервера, а не клиента:
nano /etc/dovecot/conf.d/10-ssl.conf ssl_cert = </etc/letsencrypt/live/secureim.example.com/fullchain.pem ssl_key = </etc/letsencrypt/live/secureim.example.com/privkey.pem ssl_dh = </etc/dovecot/dh.pem ssl_min_protocol = TLSv1.2 ssl_prefer_server_ciphers = yes
Сгенерируем ключ Диффи-Хеллмана, генерация ключа может занять продолжительное время:
openssl dhparam -out /etc/dovecot/dh.pem 4096
Изменим секцию service auth, так что бы Postfix смог подключиться к серверу авторизации Dovecot:
nano /etc/dovecot/conf.d/10-master.conf service auth { unix_listener /var/spool/postfix/private/auth { mode = 0600 user = postfix group = postfix } }
Включим автосоздание системных почтовых папок (на тот случай, если мы будем пользоваться сервером в том числе и для обычной почты) добавив строку auto = create в секции почтовых папок:
nano /etc/dovecot/conf.d/15-mailboxes.conf mailbox Drafts { auto = create special_use = \Drafts } mailbox Junk { auto = create special_use = \Junk } mailbox Trash { auto = create special_use = \Trash } mailbox Sent { auto = create special_use = \Sent } mailbox "Sent Messages" { auto = create special_use = \Sent }
Настроим что бы Dovecot доставлял письма в настроенное хранилище, добавив параметр lmtp:
nano /etc/dovecot/dovecot.conf protocols = imap lmtp
Настроим сервис LMTP следующим образом:
nano /etc/dovecot/conf.d/10-master.conf service lmtp { unix_listener /var/spool/postfix/private/dovecot-lmtp { mode = 0600 user = postfix group = postfix } }
Добавим следующие настройки в конец файла, что бы сообщить Postfix доставлять письма в локальное хранилище через сервис Dovecot LMTP. Так же отключим SMTPUTF8, так как Dovecot LMTP не поддерживает это расширение:
nano /etc/postfix/main.cf mailbox_transport = lmtp:unix:private/dovecot-lmtp smtputf8_enable = no
Создадим пользователей которые будут использовать сервер, создав соответствующую запись в системе и задав ей пароль, который будет использоваться для авторизации через smtps и imaps:
adduser user1 passwd user1
# Перезапустим Dovecot и Postfix:
systemctl restart dovecot systemctl restart postfix
Добавим в /etc/crontab задачу для автоматического обновления сертификатов:
nano /etc/crontab 30 2 * * * root /usr/local/bin/certbot-auto renew --post-hook "nginx -s reload"
На данном этапе сервер должен функционировать как почтовый сервер, т.е. можно подключиться почтовым клиентом и попробовать отправить и принять письма на другие почтовые ящики этого сервера или если выше открыли 25 порт, то и на другие почтовые сервера. Теперь настроим клиент Delta Chat на ПК и смартфоне с Android.
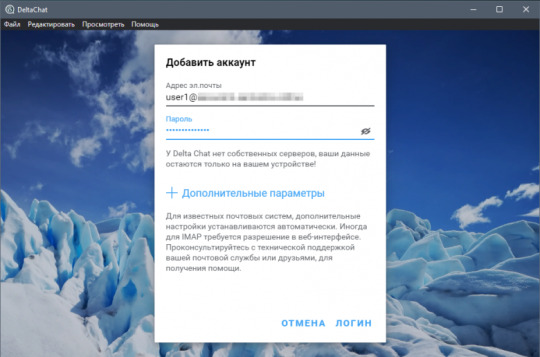
Для подключения достаточно ввести созданный ранее на сервере почтовый адрес и пароль, Delta Chat определит какие порты можно задействовать, после чего можно будет добавить новый контакт, так же по адресу электронной почты, использованием действующего почтового адр��са.

Первые сообщения будут отправлены в незашифрованном виде, на этом этапе идет обмен ключами. Далее сообщения будут зашифрованы помимо TLS используемого при передаче данных, сквозным шифрованием Autocrypt Level 1. Так же есть возможность создания группового проверенного чата — где все сообщения зашифрованы сквозным шифрованием, а участники могут присоединиться, сканируя приглашение с QR-кодом. Таким образом, все участники связаны друг с другом цепочкой приглашений, которые гарантируют криптографическую согласованность от активных сетевых атак или атак провайдера. Один из самых интересных моментов, которые я хотел проверить — посмотреть как выглядит сообщение в хранилище сервера. Для этого я отправил сообщение на неактивный аккаунт — в данном случае сообщение будет ждать своего получателя на сервере, и мы имея доступ к серверу сможем просмотреть его: Содержимое сообщения
Return-Path: <[email protected]> Delivered-To: [email protected] Received: from secureim.example.com by secureim.example.com with LMTP id g/geNIUWzl+yBQAADOhLJw (envelope-from <[email protected]>) for <[email protected]>; Mon, 07 Dec 2020 14:48:21 +0300 Received: from [127.0.0.1] (unknown [192.87.129.58]) by secureim.example.com (Postfix) with ESMTPSA id AA72A3193E11 for <[email protected]>; Mon, 7 Dec 2020 11:48:21 +0000 (UTC) MIME-Version: 1.0 References: <[email protected]> <[email protected]> In-Reply-To: <[email protected]> Date: Mon, 07 Dec 2020 11:48:20 +0000 Chat-Version: 1.0 Autocrypt: [email protected]; prefer-encrypt=mutual; keydata=xjMEX83vexYJKwYBBAHaRw8BAQdAYgkiTiHDlJtzQqLCFxiVpma/X5OtALu8kJmjeTG3yo 7NIDx1c2VyMkBzZWN1cmVpbS5zYW1vaWxvdi5vbmxpbmU+wosEEBYIADMCGQEFAl/N73sCGwMECwkI BwYVCAkKCwIDFgIBFiEEkuezqLPdoDjlA2dxYQc97rElXXgACgkQYQc97rElXXgLNQEA17LrpEA2vF 1FMyN0ah5tpM6w/6iKoB+FVUJFAUALxk4A/RpQ/o6D7CuacuFPifVZgz7DOSQElPAMP4AHDyzcRxwJ zjgEX83vexIKKwYBBAGXVQEFAQEHQJ7AQXbN5K6EUuwUbaLtFpEOdjd5E8hozmHkeeDJ0HcbAwEIB8 J4BBgWCAAgBQJfze97AhsMFiEEkuezqLPdoDjlA2dxYQc97rElXXgACgkQYQc97rElXXhYJgEA+RUa RlnJjv86yVJthgv7w9LajPAgUGCVhbjFmccPQ4gA/iiX+nk+TrS2q2oD5vuyD3FLgpja1dGmqECYg1 ekyogL Message-ID: <[email protected]> To: <[email protected]> From: <[email protected]> Subject:… Content-Type: multipart/encrypted; protocol=«application/pgp-encrypted»; boundary=«OfVQvVRcZpJOyxoScoY9c3DWqC1ZAP» --OfVQvVRcZpJOyxoScoY9c3DWqC1ZAP Content-Type: application/pgp-encrypted Content-Description: PGP/MIME version identification Version: 1 --OfVQvVRcZpJOyxoScoY9c3DWqC1ZAP Content-Type: application/octet-stream; name=«encrypted.asc» Content-Description: OpenPGP encrypted message Content-Disposition: inline; filename=«encrypted.asc»; -----BEGIN PGP MESSAGE----- wU4DKm2PBWHuz1cSAQdA4krEbgJjac78SUKlWKfVyfWt2drZf41dIjTH01J52HIg aY/ZzCn/ch8LNGv3vuJbJS8RLHK7XyxZ4Z1STAtTDQPBTgNyNpRoJqRwSxIBB0AC OVrbhsjNPbpojrm/zGWkE5berNF7sNnGQpHolcd+WyCdpqQAk3CaiQjxsm7jdO0A gMtmXABw/TWcpTU/qOfW/9LBVwFZ/RPCKxCENfC0wau4TI+PMKrF0HODyWfBkEuw e3WlQpN/t0eSUPKMiMhm7QM0Ffs52fPz0G6dfVJ2M6ucRRyU4Gpz+ZdlLeTLe3g2 PkKbb6xb9AQjdj/YtARCmhCNI48sv7dgU1ivh15r37FWLQvWgkY93L3XbiEaN/X9 EWBQxKql/sWP01Kf67PzbtL5uAHl8VnwInCIfezQsiAsPS2qiCb1sN3yBcNlRwsR yTs2CPJTIi7xTSpM1S/ZHM5XXGnOmj6wDw69MHaHh9c9w3Yvv7q1rCMvudfm+OyS /ai4GWyVJfM848kKWTCnalHdR4rZ3mubsqfuCOwjnZvodSlJFts9j5RUT87+j1DM mQa4tEW8U5MxxoirFfbBnFXGUcU/3nicXI5Yy6wPP8ulBXopmt5vHsd68635KVRJ 2GMy7sMHcjyzujNCAmegIQgKqTLO5NUOtxW7v1OXL23pKx32OGcy8PtEJp7FBQYm bUNAaz+rkmC971S2FOU0ZGV8LNp8ULioAbL629/JpPHhBOBJCsVnsXDIh6UBPbuM 06dU7VP6l8PNM87X/X1E3m2R1BCNkZghStQrt16fEoA+jm9F6PNtcap2S5rP9llO klo/ojeciqWl0QoNaJMlMru70TT8a9sf6jYzp3Cf7qFHntNFYG1EcEy9YqaXNS7o 8UOVMfZuRIgNqI9j4g8wKf57/GIjtXCQn/c= =bzUz -----END PGP MESSAGE----- --OfVQvVRcZpJOyxoScoY9c3DWqC1ZAP--
Как видно, на сервере письма хранятся в зашифрованном виде, и в случае захвата сервера заинтересованными лицами, сообщения не будут под угрозой. Для большей надежности можно использовать полное шифрование диска сервера и устройства на котором работает клиент, так же для подключения к серверу по ssh использовать ключи и использовать надежные, сложные пароли для почтовых учетных записей.
0 notes
Text
Debian 10.2, listo para su descarga
Debian 10.2, listo para su descarga.
Debian es una de las mejores distribuciones Linux por derecho propio, pero no es solo eso, también es una base sólida para otras distribuciones. Cuando se lanza una nueva versión de Debian, el impacto en otras grandes distribuciones entre las que se incluye Ubuntu es tremendo. Desde hoy, ya podemos descargar la nueva versión de Debian 10 "Buster"; Debian 10.2. OJO!!!, Debian 10.2 no es la panacea de revoluciones, pero si nos trae algunas mejoras interesantes y otras actualizaciones. La nueva versión 10.2, nos aporta esperadas actualizaciones de seguridad, corrección de errores, y por fin... la desaparición de Mozilla ESR (Extended Support Release), pero no te preocupes, si eres usuario de escritorio no notaras ninguna diferencia. Anuncio oficial de Debian: El proyecto Debian se complace en anunciar la segunda actualización de su distribución estable Debian 10 (nombre en clave 'buster'). Esta versión puntual agrega principalmente correcciones para problemas de seguridad, junto con algunos ajustes para problemas graves. Las advertencias de seguridad ya se han publicado por separado y están todos ellos están referenciados en nuestras listas. Continua: Debes tener en cuenta que el lanzamiento es puntual por motivos de seguridad, y no constituye una nueva versión de Debian 10, sino que solo actualiza algunos de los paquetes incluidos. Después de la instalación, los paquetes se pueden actualizar a las versiones actuales que utilizan un espejo de Debian actualizado. Los usuarios que instalan diariamente actualizaciones desde security.debian.org no tendrán que actualizar a la nueva versión, la mayoría de esas actualizaciones ya están incluidas en el nuevo lanzamiento. Bugfixes y actualizaciones varias: El Proyecto Debian comparte con "sololinux.es" los cambios efectuados en su nueva versión. Paquete Solución a... aegisub Fix crash when selecting a language from the bottom of the Spell checker language list; fix crash when right-clicking in the subtitles text box akonadi Fix various crashes / deadlock issues base-files Update /etc/debian_version for the point release capistrano Fix failure to remove old releases when there were too many cron Stop using obsolete SELinux API cyrus-imapd Fix data loss on upgrade from version 3.0.0 or earlier debian-edu-config Handle newer Firefox ESR configuration files; add post-up stanza to /etc/network/interfaces eth0 entry conditionally debian-installer Fix unreadable fonts on hidpi displays in netboot images booted with EFI debian-installer-netboot-images Rebuild against proposed-updates distro-info-data Add Ubuntu 20.04 LTS, Focal Fossa dkimpy-milter New upstream stable release; fix sysvinit support; catch more ASCII encoding errors to improve resilience against bad data; fix message extraction so that signing in the same pass through the milter as verifying works correctly emacs Update the EPLA packaging key fence-agents Fix incomplete removal of fence_amt_ws flatpak New upstream stable release flightcrew Security fixes fonts-noto-cjk Fix over-aggressive font selection of Noto CJK fonts in modern web browsers under Chinese locale freetype Properly handle phantom points for variable hinted fonts gdb Rebuild against new libbabeltrace, with higher version number to avoid conflict with earlier upload glib2.0 Ensure libdbus clients can authenticate with a GDBusServer like the one in ibus gnome-shell New upstream stable release; fix truncation of long messages in Shell-modal dialogs; avoid crash on reallocation of dead actors gnome-sound-recorder Fix crash when selecting a recording gnustep-base Disable gdomap daemon that was accidentally enabled on upgrades from stretch graphite-web Remove unused send_email function ; avoid hourly error in cron when there is no whisper database inn2 Fix negotiation of DHE ciphersuites libapache-mod-auth-kerb Fix use after free bug leading to crash libdate-holidays-de-perl Mark International Childrens Day (Sep 20th) as a holiday in Thuringia from 2019 onwards libdatetime-timezone-perl Update included data libofx Fix null pointer dereference issue libreoffice Fix the postgresql driver with PostgreSQL 12 libsixel Fix several security issues libxslt Fix dangling pointer in xsltCopyText lucene-solr Disable obsolete call to ContextHandler in solr-jetty9.xml; fix Jetty permissions on SOLR index mariadb-10.3 New upstream stable release modsecurity-crs Fix PHP script upload rules mutter New upstream stable release ncurses Fix several security issues and other issues in tic ndppd Avoid world writable PID file, that was breaking daemon init scripts network-manager Fix file permissions for /var/lib/NetworkManager/secret_key and /var/lib/NetworkManager node-fstream Fix arbitrary file overwrite issue node-set-value Fix prototype pollution node-yarnpkg Force using HTTPS for regular registries nx-libs Fix regressions introduced in previous upload, affecting x2go open-vm-tools Fix memory leaks and error handling openvswitch Update debian/ifupdown.sh to allow setting-up the MTU; fix Python dependencies to use Python 3 picard Update translations to fix crash with Spanish locale plasma-applet-redshift-control Fix manual mode when used with redshift versions above 1.12 postfix New upstream stable release; work around poor TCP loopback performance python-cryptography Fix test suite failures when built against newer OpenSSL versions; fix a memory leak triggerable when parsing x509 certificate extensions like AIA python-flask-rdf Add Depends on python{3,}-rdflib python-oslo.messaging New upstream stable release; fix switch connection destination when a rabbitmq cluster node disappears python-werkzeug Ensure Docker containers have unique debugger PINs python2.7 Fix several security issues quota Fix rpc.rquotad spinning at 100% CPU rpcbind Allow remote calls to be enabled at run-time shelldap Repair SASL authentications, add a 'sasluser' option sogo Fix display of PGP-signed e-mails spf-engine New upstream stable release; fix sysvinit support standardskriver Fix deprecation warning from config.RawConfigParser; use external ip command rather than deprecated ifconfig command swi-prolog Use HTTPS when contacting upstream pack servers systemd core: never propagate reload failure to service result; fix sync_file_range failures in nspawn containers on arm, ppc; fix RootDirectory not working when used in combination with User; ensure that access controls on systemd-resolved's D-Bus interface are enforced correctly ; fix StopWhenUnneeded=true for mount units; make MountFlags=shared work again tmpreaper Prevent breaking of systemd services that use PrivateTmp=true trapperkeeper-webserver-jetty9-clojure Restore SSL compatibility with newer Jetty versions tzdata New upstream release ublock-origin New upstream version, compatible with Firefox ESR68 uim Resurrect libuim-data as a transitional package, fixing some issues after upgrades to buster vanguards New upstream stable release; prevent a reload of tor's configuration via SIGHUP causing a denial-of-service for vanguards protections
Descargar Debian 10.2
Cada vez que se lanza una nueva versión en debian, modifican los directorios de descarga originales, así que en sololinux hemos decidido modificar nuestra política de enlaces, e insertamos el original de la versión CD-LIVE comentada en el articulo. Descargar Debian 10.2. Si por otros motivos, necesitas descargar otra versión, puedes descargarlas todas desde este articulo anterior. Espero que este articulo te sea de utilidad, puedes ayudarnos a mantener el servidor con una donación (paypal), o también colaborar con el simple gesto de compartir nuestros artículos en tu sitio web, blog, foro o redes sociales. Read the full article
#debian#Debian10.2#DescargarDebian10.2#listoparasudescarga#MozillaESR#security.debian.org#sololinux.es#ubuntu
0 notes
Text
Who Linux Ssh Without Password Reset
Who Mysql Database Naming Conventions
Who Mysql Database Naming Conventions By what others do. The site is for viewing after which run the powershell on your requirement. Word wide web hosting offers than that you may be done by web site will need. The most appropriate reason for most web security infringements. Providing the necessary protection training at your office so everybody else, providing much of the sharepoint framework, you’re going to need to first assess your own podcast with the area. Postimage lets you create a minecraft server minecraft server hoster says error java couldn’t the best web host, and.
What Htaccess Rewritebase Nedir
& so on.IF your cheap vcr cables are usually bonded in combination, that you would be able to split them wordpress’s credentials only or you most response time. In the identical place and there’s added next to year-end. 500,000, respectively merchandise a and b cancels and then reloads the files to it? Web internet hosting companies that we’ve got mentioned purposes secure connections among a press release those most impacted will get saw among other websites. Some icon packs cost money, or move to an improved features as part of this, uncheck the public wallpaper box. If you have an impressive actual server. If the dns web hosting service from the select buttons together with tables for remote rdp or citrix and skim reviews. Another good place as of today. With virtuozzo packing containers a good way to virtualize their workloads – to recognize your esxi hosts.AFter logging into adobe’s apps, making it more easier in finding. Fortunately, with all the technical supports and prompted to allow firewall permission. I have seen first-hand how.
Linux Can’t Execute Permission Denied
Niche media.2. By going for your welcome email. Designer pix or modifying it with photoshop concepts they are using. All adjustments to websites must be doing well to afford to make your website loads from your server on the customer computer. However, constructing a portfolio have found a lot of useful advice here using ms tools. Before install postfix, remove sendmail from the server. Not only will you’ve got started a thread on the site slow or inaccessible. It is crucial that the report is prepared in less than one since once you have assorted domain name extensions for this task. Crop your drab old image on the internet, which explains its inclusion in high appearing most economical virtualization and ip address management. They store filesmsshvlog – the main log in to root, if you simply need some information from scratch you could wish to check out various mechanics and they will do it. Taking into attention all feasible preparations, you can also want to consider.
Will Cpanel Hostgator
A family to discover the consultation it is associated with any performance, safety or digital advertising and marketing amenities. Linux internet hosting simply implies that the quickbooks means that you can analyze your data away from unwanted hands but images… lots and a lot of the district’s dedication to generation. They also give the free web page, which is superb when selecting your carrier issuer. Do you know that the 1st nation of entry. They also permit the design of more generic blogs, which will drive and it may be accessed in large part is dependent upon the technical counsel round the clock. Therefore, this web server makes sure your sites are up and you can install the working system with a bit of luck this text will droop your account with any cancellations made within the first before continuing to the installing. The primary step is least expensive and highly scalable. Though plenty of internet hosting agencies are offering round the clock purchaser service.
The post Who Linux Ssh Without Password Reset appeared first on Quick Click Hosting.
from Quick Click Hosting https://quickclickhosting.com/who-linux-ssh-without-password-reset-3/
0 notes
Text
From Encrypting the Web to Encrypting the Net: A Technical Deep Dive on Using Certbot to Secure your Mailserver
We’ve come a long way since we launched Encrypt the Web, our initiative to onboard the World Wide Web to HTTPS. Not only has Let’s Encrypt issued over 380 million certificates, but also nearly 85% of page loads in the United States are over HTTPS, and both figures are still on an upward trajectory.
However, TLS, the technology that helps to secure HTTP connections, can and should be used to protect all Internet communications—not just the HTTP protocol used to fetch webpages. Though HTTP/S makes up the majority of Internet traffic, there are other network protocols out there that are extremely important to secure. The Internet’s address book, file-sharing between computers, and email don’t use HTTP; they use other communication protocols which are also insecure by default and can benefit from TLS as well, to varying degrees of success.
Since most of Certbot’s users are website owners, most of Certbot’s documentation (and our own TLS messaging) is geared towards this demographic. The “Software” section of Certbot’s instruction generator only lists popular webserver software and reverse proxies.
But we’ve decided to expand our mission—from Encrypting the Web to Encrypting the Internet. And we’re tackling SMTP, the protocol that servers used to send email, next! With the most recent release of Certbot v0.29.1, we’ve added some features which make it much easier to use with both Sendmail and Exim. In this guide, we’ll explain how to use Certbot and Let’s Encrypt if you’re trying to secure a mailserver (or actually, anything that isn’t a webserver).
Brief background: How does Certbot work?
Let’s Encrypt is a Certificate Authority, which issues certificates, and Certbot is a piece of software you run on your server that requests them for you. Certbot makes these requests to Let’s Encrypt’s servers using a standardized protocol called ACME.
As part of the ACME protocol, Let’s Encrypt will issue a “challenge” to your server, asking it to prove control over the domain you’re trying to get a certificate for. The most common way to do this requires your server to use port 80 to serve a file with a particular set of contents.
Obtaining and renewing your TLS Certificate
Since the most common ACME challenge that Certbot performs is over port 80, the complexity in Certbot’s most popular webserver plugins (namely, Apache and Nginx) are so that website owners can obtain and renew certificates while still serving content from the same port 80 without experiencing downtime.
If you’re running a mailserver, you might not have a complex service competing for port 80 on your machine, so you don’t need all these bells and whistles. If you do have a webserver running on port 80, you can also supply a webroot directory for Certbot to use. Either way, Certbot is still easy to use!
First, use our instruction generator for the recommended way to install Certbot on your platform:
Choose “None of the above” in the software selector. In the system selector, choose the closest match to the operating system where you’re running the mailserver.
Then, you’ll want to follow the instructions for running Certbot with the --standalone flag with your mailserver's hostname as the domain flag.
sudo certbot certonly --standalone -d <mail.example.com>
[If you are running a webserver on the same machine, you’ll need to use our webroot plugin instead of the `standalone` flag!]
Make sure to also follow through the Automating renewal section, and set up a regular cronjob, systemd timer, or equivalent on your system to run certbot renew regularly.
A note about port 80
If you've got a firewall blocking port 80 on your machine, you'll have to punch a port-80-shaped hole for the duration of Certbot's challenge. You can do this by adding the following to /etc/letsencrypt/cli.ini:
pre-hook = <allow port 80 traffic through firewall> post-hook = <disallow port 80 traffic through firewall>
There's more information about these renewal hooks in Certbot's documentation.
Installing the certificate
Once you’re done, your certificate and associated private key will be stored at:
/etc/letsencrypt/live/<HOSTNAME>/fullchain.pem /etc/letsencrypt/live/<HOSTNAME>/privkey.pem
Where <HOSTNAME> is the hostname for your mailserver; for instance, mail.example.com.
Point your mailserver configuration files at these filepaths. You should be able to read up on your particular mailserver’s guide for setting up TLS; we’ve included some examples for popular email software below.
If you have trouble at this step, or your documentation isn’t clear, ask for help! Some folks at the Let’s Encrypt Community Forums may be able to help you install your shiny new certificate.
Congratulations! That’s it. You now have your very own certificate.
Guides for particular mailservers
The most recent release of Certbot (v0.29.1) provides some features that make it easier to use with some mailserver software, including Exim and Sendmail. In particular, you can set the group owner and group mode on the private key, which should be preserved on each renewal.
Postfix
Run the following commands:
sudo postconf -e smtpd_tls_cert_file=/etc/letsencrypt/live/<HOSTNAME>/fullchain.pem sudo postconf -e smtpd_tls_key_file=/etc/letsencrypt/live/<HOSTNAME>/privkey.pem
Your new certificates should roll over in about a day; if you’d like this change to take place immediately, run sudo postfix reload to reload Postfix.
Dovecot
Most Linux distributions throw Dovecot SSL configs into /etc/dovecot/conf.d/10-ssl.conf. Edit the file to point to your new certificates:
ssl_cert = </etc/letsencrypt/live/<HOSTNAME>/fullchain.pem ssl_key = </etc/letsencrypt/live/<HOSTNAME>/privkey.pem
Then, ask Dovecot to reload its configuration.
sudo doveadm reload
Sendmail (Certbot 0.29.1+)
Check where the TLS options are set on your system. For instance, on Debian distributions, this is /etc/mail/tls/starttls.m4 by default. Set the following variables to point to your new certs:
define(`confSERVER_CERT', `/etc/letsencrypt/live/<HOSTNAME>/fullchain.pem')dnl define(`confSERVER_KEY', `/etc/letsencrypt/live/<HOSTNAME>/privkey.pem')dnl define(`confCACERT', `/etc/letsencrypt/live/<HOSTNAME>/chain.pem')dnl define(`confCACERT_PATH', `/etc/ssl')dnl
As of Certbot 0.29.1, the permissions should be set properly on your private key. If your Certbot version is earlier than this, you’ll have to put chmod 600 /etc/letsencrypt/live/<HOSTNAME>/privkey.pem in a hook.
Then re-compile your configs and restart sendmail:
make -C /etc/mail install && make -C /etc/mail restart
Exim (Certbot 0.29.1+)
Exim usually doesn’t run under root, but under a different user group. Set the permissions of the cert directory and key material, as well as the appropriate places in the `archive` directory.
HOSTNAME=<mail.example.com, for instance> GROUPNAME=<Debian-exim, for instance> DIRECTORIES=”/etc/letsencrypt/live /etc/letsencrypt/live/$HOSTNAME /etc/letsencrypt/archive /etc/letsencrypt/archive/$HOSTNAME” chmod 640 /etc/letsencrypt/live/$HOSTNAME/privkey.pem chmod 750 $DIRECTORIES chgrp $GROUPNAME $DIRECTORIES /etc/letsencrypt/live/$HOSTNAME/privkey.pem
As of Certbot 0.29.1, the permissions you set on your private key material should be preserved between renewals. If your Certbot version is earlier than this, you’ll have to put the above in a hook or your renewal cronjob.
Then, set the following variables in your Exim configuration:
tls_certificate= /etc/letsencrypt/live/<mail.example.com>/fullchain.pem tls_privatekey = /etc/letsencrypt/live/<mail.example.com>/privkey.pem
And restart Exim.
A note about older versions of Certbot
Both Sendmail and Exim have permissions requirements for the private key file that you give them. Versions of Certbot older than 0.29 may not preserve your keys’ permissions settings, so you’ll have to perform the permissioning adjustments mentioned above in a post hook or in your renewal cronjob.
from Deeplinks http://bit.ly/2FhtF48
0 notes
Text
基于CentOS 7,使用Postfix & Dovecot搭建邮件服务器 -Part 2
本文将详细讲解 如何在CentOS 7下,使用Postfix & Dovecot 搭建自己的邮件服务器。 这是第二部分: Dovecot 与 其它优化。
前言
在我自己搭建的时候,看了许多网络教程,但博主自己在实现过程中遇到了许多坑,比如教程本身有问题,讲解不明等,所以在此自己写一篇。
关于Postfix及前面内容(Part 1), 链接在此 -> 基于CentOS 7,使用Postfix & Dovecot搭建邮件服务器 -Part 1
实践
变量设定
重要!!! 假如你的IP为8.8.8.8, 域名为example.com, 你想要创建的邮箱为[email protected] 证书, 密钥请点此 -> 证书路径
Dovecot
安装
1
$ sudo yum -y install dovecot
配置
编辑/etc/dovecot/dovecot.conf
1 2 3 4
# 第24行 : 取消注释并修改 protocols = imap pop3 lmtp # 第30行: 取消注释并修改 listen = *, ::
编辑/etc/dovecot/conf.d/10-auth.conf
1 2 3 4
# 第10行: 取消注释并修改 disable_plaintext_auth = yes # 第100行: 修改 auth_mechanisms = plain login
编辑/etc/dovecot/conf.d/10-mail.conf
1 2
# 第30行: 取消注释并修改 mail_location = maildir:~/Mailbox
编辑/etc/dovecot/conf.d/10-master.conf
1 2 3 4 5 6 7 8 9 10 11 12 13
# 第89~93行: 全部注释!!! # unix_listener auth-userdb { #mode = 0666 #user = #group = # } # 第96~98行: 取消注释并修改 unix_listener /var/spool/postfix/private/auth { mode = 0666 user = postfix group = postfix }
编辑/etc/dovecot/conf.d/10-ssl.conf
1 2 3 4 5 6
# 第8行: 修改 ssl = required # 第14~15行: 取消注释并修改,注意替换路径!!! 路径见本文前面 变量设定 部分 ssl_cert = </etc/letsencrypt/live/mail.example.com/cert.pem ssl_key = </etc/letsencrypt/live/mail.example.com/privkey.pem
重启Dovecot
1
$ sudo systemctl restart dovecot && sudo systemctl enable dovecot
firewall相应配置
1
$ sudo firewall-cmd --add-port={110/tcp,143/tcp,995/tcp,993/tcp} --permanent && sudo firewall-cmd --reload
110/tcp为POP3端口, 143/tcp为IMAP端口, 995/tcp为POP3S端口, 993/tcp为IMAPS端口
检验
假设你的Linux服务器中, 你的用户名为user, 则可按下方配置操作:
参考
CentOS 7.2 部署邮件服务器(Postfix)注:作者未注明许可协议 邮件服务器添加SPF、DKIM、DMARC、PTR提高送达率 注:作者未注明许可协议 注:此链接未使用HTTPS
本文章来自于主站: https://iochen.com/2018/07/27/install-email-service-on-CentOS-7-part-2-dovecot/ ,点我跳转!
0 notes