#set default font PDF Conversion
Explore tagged Tumblr posts
Visit Tumblr Blog
Explore Tumblr blogs with no restrictions, modern design and the best experience.
Last Seen Tumblr Blogs


Fun Fact
Average visit duration of Tumblr.com is 10 mins and 25 secs.
Text
What Is Pages App For Mac

Pages For Mac
Apple Pages Online
What Is Pages App For Macbook Pro
Pages App For Mac
Documents, spreadsheets, and presentations. With everybody’s best thinking.
LibreOffice is a powerful office suite – its clean interface and feature-rich tools help you. Apple’s iWork apps (Pages, Keynote, Numbers) are now available for free to any Mac or iOS user, so I thought it might be good to document some of the lesser known talents of Apple’s now-free. Apple Pages word processor. I have used every version of Pages, the Apple word processor app since Apple released it in 2009. The iWork 09 version worked perfectly. But at that time, it cost $79.00 for the suite of Pages, Numbers, and Keynote. Later, in 2014, Apple released a new version. Apple pages for windows free download - Apple Pages, Pages, Apple Safari, and many more programs. Word processor & page layout app. Paid Editors' rating. Publisher: Apple Downloads. Downloading apps requires an Apple ID. Pages for Mac, Numbers for Mac, and Keynote for Mac are available on the Mac App Store. MacOS Catalina or later required. Some features may require internet access; additional fees and terms may apply.
Pages, Numbers, and Keynote are the best ways to create amazing work. Templates and design tools make it easy to get started. You can even add illustrations and notations using Apple Pencil on your iPad. And with real‑time collaboration, your team can work together, whether they’re on Mac, iPad, or iPhone, or using a PC.
Pages
Amazing. In so many words.
Pages lets you effortlessly create sensational-looking documents. Choose a template, then use the powerful tools to add a picture, movie, shape, or chart. It’s never been easier to create a beautiful read.
Numbers
Spreadsheets that are bottom‑line brilliant.
A spreadsheet doesn’t have to look like a ledger. That’s why Numbers starts you off with a blank canvas instead of an endless grid. It’s easy to add dramatic charts, tables, images, and Smart Categories that paint a revealing picture of your data.
Keynote
Presentation perfect.
With Keynote, it’s easy to create and deliver stunning presentations. Powerful graphics tools let you design beautiful text and spectacular slides with cinematic transitions that bring your ideas to life.
New report templates
Select from new report templates to help you get started.
And more
Enhance your documents with a variety of new, editable shapes.
Get complete step-by-step instructions and information on all the features in Pages for Mac.
New in Pages 10.1 for Mac
Play YouTube and Vimeo videos right in your documents.* Learn more
Easily add captions and titles to images, videos, shapes, and other objects. Learn more
Create more flexible formulas using new functions.
Import an iBooks Author book to work on it in Pages. Learn more
* This feature may not be available in all countries or regions.
New in Pages 10.0 for Mac
Pages For Mac
Select from a variety of gorgeous new templates to help you get started.
Add a Pages document to a shared iCloud Drive folder to automatically start collaborating. Requires macOS 10.15.4. Learn more
Add a drop cap to make a paragraph stand out with a large, decorative first letter. Learn more
Apply a color, gradient, or image to the background of any document. Learn more
Easily access your recently used templates in a redesigned template chooser.
Print or export a PDF of your document with comments included. Learn more
Edit shared documents while offline and your changes will upload when you’re back online. Learn more
Enhance your documents with a variety of new, editable shapes.
New in Pages 8.2 for Mac
Set the default font and font size used for all new documents created from basic templates. Learn more
Jump to a specific page in your document using a new menu command.
Easily add HEVC-formatted movies to documents, enabling reduced file size while preserving visual quality. Learn more
Add accessibility descriptions to audio, video, and drawings. Learn more
Improved accessibility of exported PDFs.
New in Pages 8.1 for Mac
Style your text by filling it with gradients or images, or by applying new outline styles. Learn more
Copy and paste pages or sections between documents. Learn more
Create links from text to other pages in a page layout document. Learn more
Place images, shapes, and equations inline in text boxes so they move with text. Learn more
Using face detection, subjects in photos are intelligently positioned in placeholders and objects.
Reapply a master page so text and media placeholders return to their default style and position. Learn more
Create books using new templates for novels (available in English only).
New in Pages 8.0 for Mac
Use the new table of contents view to easily navigate your document or book. Learn more
Automatically sync custom shapes to all your devices using iCloud. Learn more
Automatically sync custom templates to all your devices using iCloud. Learn more
Add alignment guides to master pages to help with layout.
Improved performance while collaborating on documents.
Insert tables of contents and edit grouped objects while collaborating.
In Chinese, Japanese, and Korean languages, you can now type vertically in your entire document or in an individual text box. Learn more

New in Pages 7.3 for Mac
Offer your books for download or purchase on Apple Books. Learn more
New in Pages 7.2 for Mac
Use Dark Mode to give Pages a dramatic dark look. Requires macOS Mojave. Learn more
Easily record, edit, and play audio right on a page. Learn more
Support for Continuity Camera allows you to take a photo or scan a document with your iPhone or iPad and it automatically appears in your document on your Mac. Requires macOS Mojave and iOS 12. Learn more
Enhance your documents with a variety of new editable shapes.
Performance and stability improvements.
New in Pages 7.1 for Mac
Track text changes in shapes and text boxes.
Add colors and images to backgrounds in page layout documents.
Give charts a new look with rounded corners on columns and bars.
Add mathematical equations to page layout documents using LaTeX or MathML notation. Learn more
Enhance your documents with a variety of new editable shapes.
Improved support for Arabic and Hebrew. Learn more
Apple Pages Online
New in Pages 7.0 for Mac
Use new book templates to create interactive EPUB books. Learn more
View two pages side-by-side, and format them as double-page spreads. Learn more
Collaborate in real time on documents stored in Box. Requires macOS High Sierra. Learn more
Add an image gallery to view a collection of photos on the same page.
Create master pages to keep the design consistent across your page layout document.
Use donut charts to visualize data in an engaging new way.
Enhance your documents with a variety of new editable shapes.
Additional options for reducing the file size of documents.
New option to automatically format fractions as you type.
New in Pages 6.3 for Mac
Improved PDF export lets you view a document's table of contents in the sidebar in Preview and other PDF viewer apps.
Drag and drop rows in tables that span multiple pages. Learn more
Performance and stability improvements
New in Pages 6.2 for Mac
Enhance your documents using a library of over 500 professionally drawn shapes. Learn more
Reply to comments and join threaded conversations. Learn more
Add linked text boxes so text easily flows from one place to another. Learn more
New auto-correction and text replacement options save time while typing. Learn more
Export documents as fixed layout ePub books. Learn more
Change margins, headers, footers and paper size while collaborating. Learn more
Improved support for Hebrew and Arabic languages.
The Stock and Currency functions now return data from the previous market day’s close. Learn more
New in Pages 6.1 for Mac
Add bookmarks to easily link from one part of your document to another. Learn more
Add elegant mathematical equations using LaTeX or MathML notation. Learn more
Quickly open password-protected documents using Touch ID on the new MacBook Pro with Touch Bar. Learn more
Easily replace fonts throughout an entire document.
Import and export documents in Rich Text Format (RTF). Learn more
New leader lines make pie charts easier to read.
New stock and currency functions provide up-to-date securities data in tables.
Customize dates, times, and currencies for your language or region.
New in Pages 6.0.5 for Mac
Support for Touch Bar on the new MacBook Pro lets you easily edit text, shapes, tables and charts.
Stability and performance improvements.
What Is Pages App For Macbook Pro
New in Pages 6.0 for Mac
Pages App For Mac
Real-time collaboration (feature in beta)
Edit a document with others at the same time in Pages on Mac, iPad, iPhone, and iCloud.com.
Share your document publicly or with specific people.
See who else is in a document.
See participants’ cursors as they’re editing.
Open and edit Pages ’05 documents. Learn more
Use tabs to work with multiple documents in one window.
Wide color gamut image support.
What Is Pages App For Mac
2 notes
·
View notes
Text
Working With Classic
Getting stuff done in Mac OS Classic
Printing From OS 9 (when you canʼt actually print from OS 9)
We’ve all been there: you’ve just finished your latest AppleWorks masterpiece and you’re ready to print...except your printer is a modern(ish) inkjet and don’t you even think about trying to print to a modern(ish) inkjet printer from that 20 year old piece of software. You contact your printer’s manufacturer and ask them if they offer OS 9 drivers for your modern(ish) inkjet printer. They laugh at you and hang up.
What? That never actually happened to you? Not even once? Well, it never really happened to me, either. The part about contacting the tech support for my printer, anyway. And I’ve never actually created a masterpiece in anything. I’ve absolutely been in the position of having created things in OS 9 with no means of printing directly from OS 9 for want of a supported printer. This meant I had to find a workaround, and find a workaround I did.
The solution is to convert the document you want to print to a PDF file and then send this file to a computer you can print from. PDF (Portable Document Format) is a file format created by Adobe to allow the creation of files that allow formatting such as fonts and content such as images to be opened in any system that has PDF reader software installed. So if you needed to create a document in Microsoft Word and share if with someone, with, not Microsoft Word, you could send them a copy of your Word Document converted to a PDF file. Your recipient could then open the file in a PDF reader program If they didn’t have such a program, getting one wasn’t a problem, as Adobe’s own Acrobat Reader was freely available on the web or came bundled with other software. Pretty much all modern software that involves document creation has PDF conversion baked in, and modern operating systems either have PDF reader software built in or bundled with them.
There are a couple of ways of going about this. One of these involves a Mac running Mac OS X. The other can be done with any computer or device capable of reading PDF files (and printing, of course.) I’ll cover this generic solution first.
There’s a utility for Mac Classic OS called PrintToPDF, and as of 2020 it was still available on abandon ware sites such as Macintosh Garden. Grab a copy and install it . PrintToPDF creates a sort of virtual printer that translates documents into, you guessed it, PDF files.. Once you have it installed, Select Chooser from the Apple menu. This lets you set your system’s default printer, and PrintToPDF should appear as an available option. Select it, and any application that supports printing will treat PrintToPDF as a printer.
There is one more bit of setup you’ll want to do. When you select Print from an application, the PrintToPDF dialog opens. Click the Preferences button. In this dialog, click the Fonts tab. From here, you can set up Font Substitution. From the bottom right of the dialog, you can choose from a few fonts as the default substitution font, which the dialog informs you will be substituted for most Mac fonts. On the left of the dialog is a list of all the fonts installed on your system. You can select any number of these fonts, and PrintToPDF will convert these to bitmapped images. The dialog advises you that this feature is best for fonts containing symbols rather than text. In a test run, I used it to preserve a couple of Mac specific fonts, Chicago and Charcoal. It seemed to work all right.
The other method requires a Mac running OS X that you can print from. If you donʼtʼ have one yourself, find a friend who does and be very nice to them. It doesnʼt have to be a very new version of OS X. I got it working on Snow Leopard, and Iʼm not even sure if Snow Leopard was the first version of the OS that could do this. Anyway, to the point: OS Xʼs Preview app can open and convert PostScript files to PDF files, and OS 9 will let you set up a virtual printer that will convert your documents to PostScript files.
PostScript is a language for describing documents to printers. All the information needed for a printer to reproduce a document: text, fonts, graphics would be embedded in the PostScript instructions sent to the printer. Well, if it’s code, and that’s just what PostScript is, there’s no reason those instructions can’t be output to a file. Oh, and a quick note on fonts. While PostScript is perfectly capable of preserving the font information of a document, it doesn’t actually contain the font itself. In other words - to preserve the original font you used in your document, the exact same font must be installed on the computer you’re going to use to print from. That’s exactly the same version of the font as well - just a similar looking font with the same name won’t cut it. If the versions don’t match, the software doing the translation, Preview in this instance, will substitute a font installed on that system You may or may not like it’s decisions. Just something to keep in mind. Anyway...
To set up your virtual PostScript printer, you’ll need to run the Desktop Printer Utility app, located in the Applications folder. From the application menu, select File->New.. The New Desktop Printer dialog opens. Leave the driver set to LaserWriter 8 (Apple’s LaserWriter 8 driver functions as a sort of generic PostScript driver) and under Create Desktop Printer, select Translator (PostScript). Click OK.
In the next dialog, leave the PostScript Printer Description (PPD) file to its default setting of Generic. From this dialog you can also choose a save location for your created PostScript files. You can leave this set to it’s default or set it to any folder you like. (Just be sure to remember what you set it to!) When you’re satisfied with you settings here, click Create. You’ll be prompted to choose a save location and name for the virtual printer you just created. Open Chooser as previously described and select the LaserWriter 8 icon on the left of the dialog. There is a list on the right side of the dialog prompting you to select a PostScript printer. This list will be empty. Since this is a virtual printer, that’s fine. Close Chooser. Your virtual PostScript printer is now the default printer for the system.
Now when you go to print a document, in addition to the usual options for printing, you’ll be asked to choose a save location for your PostScript file. Once you have your PostScript file, move it to your Mac running OS X by your preferred method - email, file sharing, USB stick, etc. Once you have your PostScript file on your Mac running OS X, you can double click on it to open it. Preview is actually capable of opening and printing PostScript files. However, the results on my inkjet printer were unsatisfactory. (Margins were completely ignored, among other issues.) From the File menu, save the PostScript file as a PDF. Open this is in Preview and print.
4 notes
·
View notes
Text
Set Default Font When Rendering Project into PDF & Enhanced MPP Files Loading using .NET
What’s new in this release?
Aspose team is pleased to announce the new release of Aspose.Tasks for .NET 17.12.0. This month’s release includes several improvements in terms of feature enhancements and bug fixes. Specifically, it introduces the capability of setting default font for exporting project data to PDF. This month’s release includes an enhancement for setting default font during project data conversion to PDF. Setting default font during rendering of documents helps when a font is not found on the server. In such case, default font replaces the missing font and output is not affected. This can be specified using the DefaultFontName property of the PdfSaveOptions. This release also includes fixes for issues found with the previous version of the API, such as Project reading exceptions while loading certain Project MPP files, Issues with Task Duration during recalculations, Incorrect start and finish times of resource baseline, Issues with header text while rending project data and Font information lost for MPP file. This release includes plenty of new features as listed below
Add support for setting a default font when a project is rendering into PDF
Task notes not saved for template file from MSP 2016
Resource assignment units raise exception when large value is set
Task duration becomes zero if multiple resources are assigned
Project reading exception while loading the MPP file
AT breaks the showing of GanttBarStyle for manual summary tasks
Resource assignment has incorrect baseline start/finish date
FontFamily not set in MPP
Header text is only changed for the default view
Other most recent bug fixes are also included in this release
Newly added documentation pages and articles
Some new tips and articles have now been added into Aspose.Tasks for .NET documentation that may guide users briefly how to use Aspose.Tasks for performing different tasks like the followings.
Saving Project Data to JPEG
Setting Default Font
Overview: Aspose.Tasks for .NET
Aspose.Tasks is a non-graphical .NET Project management component that enables .NET applications to read, write and manage Project documents without utilizing Microsoft Project. With Aspose.Tasks you can read and change tasks, recurring tasks, resources, resource assignments, relations and calendars. Aspose.Tasks is a very mature product that offers stability and flexibility. As with all of the Aspose file management components, Aspose.Tasks works well with both WinForm and WebForm applications.
More about Aspose.Tasks for .NET
Homepage of Aspose.Tasks for .NET
Download Aspose.Tasks for .NET
Online documentation of Aspose.Tasks for .NET
#project rendering to PDF File#set default font PDF Conversion#loading Project MPP files#Task Duration during recalculations#Saving Project Data to JPEG#.NET Project management
0 notes
Text
How I Use Scrivener
Wrote this up for a friend, figured I’d post here in case it helps anyone else!
If you haven’t heard of it, Scrivener is a writing program that’s great for organizing long works. It’s what I use to write anything that has more than one chapter. It has a tonne of features, and honestly I don’t even use half of them. This is how I use it to write though.
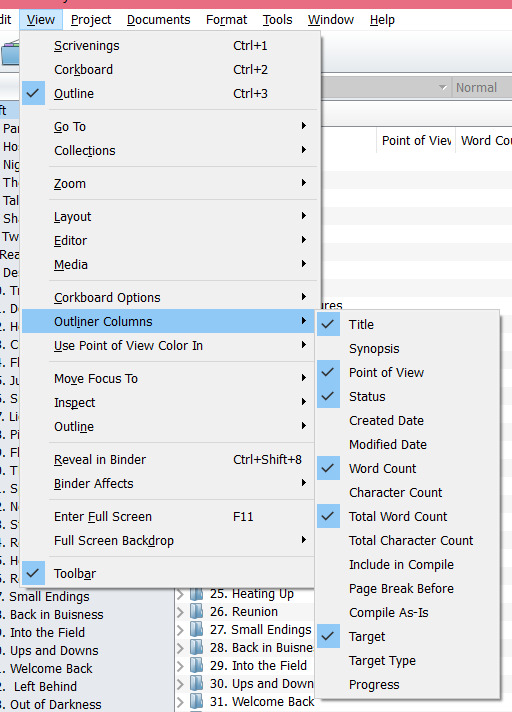
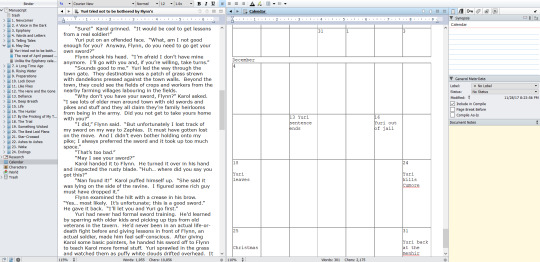
Ok, so this is basically what the interface looks like:

You write in the middle. Documents and files are stored in the left, and the window on the right is for toggling things within the scene, jotting down notes, and some other cool things. Lots of things. Let’s break this shit down:
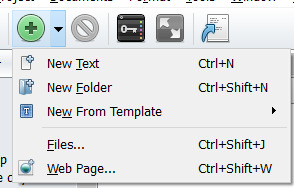
First: how to just write shit without worrying about all the neat features. When you first start Scrivener, go to New Project and get a box like this:
This is showing you all the templates you can choose from. I have a personal template that’s set up for how I use it. I’ve never used the non-fiction or scriptwriting ones (Like I said, I haven’t used half the features this baby has). It doesn’t really matter which one you use because you can change it all later anyway. If you aren’t sure, just go for blank.
Select blank, type your project name and where to save it, and then click create. (Tip: The project will create an entire folder with sub-documents. I like to make a folder for each project, and then put the scrivener folder in that folder, because you can’t import images that are already in the scrivener folder.) You’ll get this screen:
You can just start writing here. I’ll show you how I organize it though.
I like to make one folder for each chapter. Then, each scene gets its own page. You can create a new folder by click on the arrow next to the big green plus sign.
If you just click on the plus sign, it will create a new document. You can also change folders to documents and vice versa by right-clicking on them later. Create a document for each scene - basically, anywhere you’d put a page break, create a new document. They line up in order in all your folders like this:
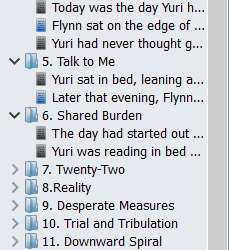
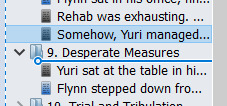
I name the folders with the chapter title. You can either name you individual scenes (i.e., “Yuri goes to the store”) or let it auto-generate a title from the first sentence of the scene. This is what I usually do. Or, if you write out of order, you could create place-holder scenes and title them with what generally will happen there once you write it.
The cool thing about this is that you can move these scenes around easily. If, for example, you decide to end a chapter earlier and want to move the last scene to the start of the next one, just click and drag it into position.
Click and drag and hover over another scene (rather than between them) to nest your document within another one. This lets you use documents as folders of their own. I usually use this for notes rather than the manuscript itself (like, one page outlining a city, and then sub-documents for neighbourhoods within it).
At any time while writing, your entire list of scenes and chapters is available at the side. Need to double-check what someone said five chapters ago? Easily find the exact scene you need to re-read by finding it in the list rather than scrolling up through thousands of words in one big document.
I like to colour-code my scenes my point of view. Yuri is black, Flynn is blue, Estelle is pink, etc. You can do this over on the right window, in this box:
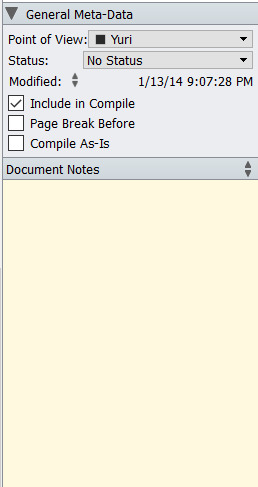
When you open a blank project, the top box there won’t say Point of View. It just says Label and will have different coloured boxes. Click the arrow and then hit “Edit...” to get to this box

Change the title of the label and create custom colour labels here. You don’t have to use this for Point of View; it’s just what works best for me.
Then, to get the colour to show up in the binder (the right bar where all your folders are listed, hit F6. That will toggle the little doc icon being coloured. F5 will toggle the colour appearing over the entire title, like this:

The Status box is for giving docs stamps - things like “DONE” or “TO DO”. It’s mostly useful in the corkboard view.
The Document Notes box is where you can write things down that pertain to just that scene. I use it to jot down a list of information that needs to be delivered in a conversation, for example, or I stick sentences I’m moving around over there until I find a better place for them. Use the arrows at the far right side to switch to Project Notes, which is like that but for the entire project and will be the same in every document.
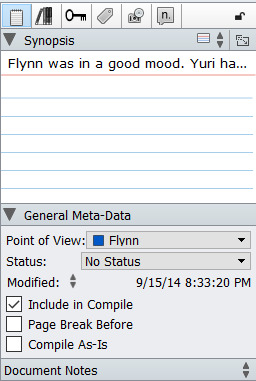
The index card at the top is where you can write a summary of the scene if you need a reminder, or if you haven’t written it yet.

The camera icon takes you to the snapshots. This is for if you’re going to make some edits but you aren’t 100% confident in them. Take a snapshot before you start and it will save the document as it is. At any time, you can go back and check your previous version of the document and use Roll Back to bring it back again. There’s a little folded corner icon on any document that has snapshots.

I never use the other tabs in the inspector here. I think they’re mostly for non-fiction writing (References, footnotes, meta data, etc). And hit the I at the top to toggle the inspector open or closed.

“Include in Compile” and related check boxes are for when you’re compiling everything into one document at the end. Don’t worry about this for fanfiction; I find it easier to just copy and paste from scrivener.
Moving on from writing, you can also keep all your research and reference notes within Scrivener so that they are easy to refer to while-writing. I put mine in the Research folder.
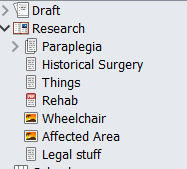
You can create documents to write things up just as you would in the Draft folder, or import image files, pdfs, even entire web pages.
Something I like to do is create a calendar. It makes it easier to keep track of the passage of time in long fics. Create a regular document, then insert a table with 7 columns and 4/5 rows. It can be as elaborate as you want. Right click on the document within the binder and go to “Change icon...” to make it stand out.

I usually don’t use the Characters or World folders for fanfic, but for original stories that’s where I put all my worldbuilding notes, character profiles, histories, etc.
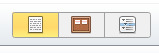
These three buttons at the top control the mode you’re in. The place document is just writing mode. That’s the default. Then there’s Corkboard mode, which is how I often do outlining. Create a new folder outside of the Manuscrupt, label it “Outline” (and change the icon if you want), and then create a document for each point on your outline. If you’re in Corkboard view, creating a new document will create a new index card (which turns into a document if you go back to Editor view).

This is where those Status labels I mentioned earlier come in. I mark a thing Done on the outline to check it off. The cool thing about it is that all documents are automatically index cards. Here’s my draft showing all the folders as individual index cards:

If I move cards around on the corkboard, they automatically move around in the binder as well. So I could spread out my entire story, scene by scene, on index cards and stamp them with completeness, label the PoV character, and summaries of the contents, and then shuffle them around right here.
The last mode is Outline mode. I’m more of a visual person so I don’t use this as much. I just use it to show me how many words a chapter has because it’s the quickest way to get that info.
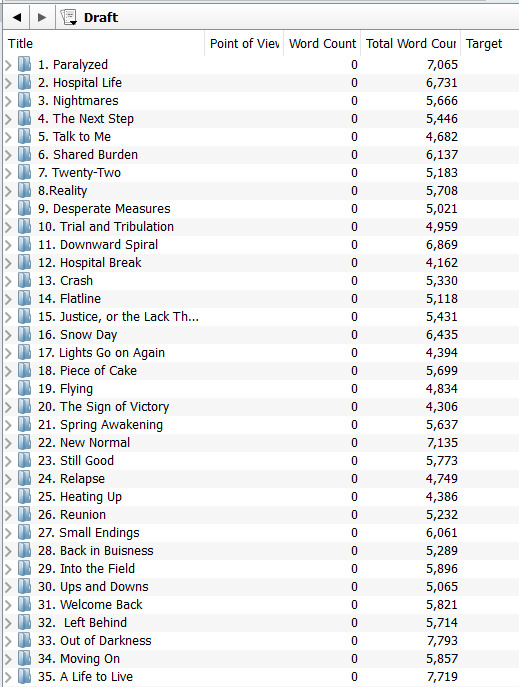
You can toggle what columns you want visible on this screen. Total Word Count isn’t there by default; you have to tell it to show that.
Other cool things:
The built-in Name Generator found under Tools

Go to Tools > Options to change the fonts, colours, sizes, appearances etc.
Press F11 (this button)

To enter fullscreen mode. You can change the appearance of this under Options but it lets you write in a customized fullscreen view to help concentration.

Press ctrl+shift+’ to enter split screen view. This lets you write in one window and have reference material (or another scene) open in another. ctrl+’ takes you back to one screen.
The last important thing is Typewriter scrolling. This makes it so that when you hit enter, the lines shift up and keep your writing centred on the page. You never hit the bottom of the screen, you never have to scroll up to re-centre yourself. It’s great. I only turn it off if I’m editing because then if you fix a type near the bottom of the page it snaps that to the middle and can be annoying. I always forget how to turn this on but here it is:

Honestly this is just an overview of the most important features to me. This program is huge. I’ve been using it for almost 10 years and I’m still discovering new things about it (maybe because I am a person who never reads manuals and just figures shit out as it comes up but shhhh). I love it a lot and feel free to ask me how to do a thing because I can’t write without it now.
39 notes
·
View notes
Text
Pdfelement pro license code

#PDFELEMENT PRO LICENSE CODE CRACKED#
#PDFELEMENT PRO LICENSE CODE SERIAL KEY#
#PDFELEMENT PRO LICENSE CODE FULL VERSION#
#PDFELEMENT PRO LICENSE CODE SERIAL NUMBER#
#PDFELEMENT PRO LICENSE CODE PDF#
#PDFELEMENT PRO LICENSE CODE PDF#
It allows you to underline, highlight, or strikethrough text for easy PDF review and annotating.
The software comes with useful drawing tools including pencil, lines, arrows, ovals, and more.
In addition, it provides you quick access to frequently opened PDF files.
Moreover, it allows you to open and navigate page thumbnails.
It helps you to navigate through pages with the arrow keys on the keyboard.
This application allows you to open and switch between multiple PDF files using tabs.
Furthermore, it helps you to print any type of PDF file with great ease.
Moreover, you can create and navigate between bookmarks while reading PDFs.
You can also adjust the view settings, set the default layout, and zoom.
Search and replace text in PDF files with ease.
Open and read PDF files with ease with Wondershare PDFelement latest Cracked.
As an alternative program, you can also FREE download MediaMonkey Gold Crack. Also, it allows you to permanently delete sensitive information from your PDFs.
#PDFELEMENT PRO LICENSE CODE SERIAL NUMBER#
The Wondershare PDFelement 2022 Crack with Serial Number helps you to restrict printing, copying, or altering your PDFs by applying a password. It enables you to define signature workflows and send PDFs to others for signature approval. It helps you to approve and sign documents digitally. You can export collected data to a spreadsheet.
#PDFELEMENT PRO LICENSE CODE CRACKED#
Moreover, it allows you to perform partial OCR on specific user-defined fields within scanned PDFs. Wondershare PDFelement Full Cracked latest features batch conversion, data extraction, batch number, and watermarking. In addition, it is useful for every type of user, including professionals, students, and home users. By using OCR, you can unlock text embedded in images. OCR (Optical Character Recognition) is fully integrated into the software. As an alternative program, you can also FREE download FluidRay Crack. In addition, this application allows you to combine collected forms for analysis. You can insert page numbers, bates numbers, and page elements into PDF files. You can use this software to extract data from interactive PDF forms and export them as CSV files. This software lets you work efficiently and effectively all the time. Torrent download here with industry-standard tools.
#PDFELEMENT PRO LICENSE CODE FULL VERSION#
Wondershare PDFelement 2022 Key Full Version As an alternative program, you can also FREE download Spectrasonics Omnisphere Crack. By converting PDFs to office files, you keep the layout formatting and tables. Additionally, this application allows you to add, remove, move, resize, and rotate any graphical element within a PDF document. Most document formats are supported by this software, including Docx, Doc, XLSX, PPTX, PPT, and more. latest comes with a fully-featured word processor that allows you to quickly edit PDF files. Customers and colleagues can also easily give you feedback using it.įull crack PDFelement 8. Wondershare PDFelement Crack helps you empower your team and collaborate more effectively than ever. Additionally, it offers you a great collaborative platform. You can easily convert PDF files to Word, HTML, text, and image files with Wondershare PDFelement 2022 Full Registration Code. Using this tool, you can create an interactive form field and recognize it automatically.
#PDFELEMENT PRO LICENSE CODE SERIAL KEY#
Wondershare PDFelement Pro Crack With Serial Key 2022 If the pdf file has been scanned and its textual content is rendered as an image. It is possible to edit all types of pdf files via this program, such as changing fonts, colors, text sizes, adding images, and more. License Key, you can do all kinds of work on PDF files. You can convert pdf documents to Word, PowerPoint, Excel, and other formats with this program, such as merging multiple files into one. All digital workflows can be managed in one place with tools for creating, editing, converting, reviewing, protecting, and signing documents. Wondershare PDFelement Pro Full Version enables you to create stunning documents, take notes, scan text, sign and fill out forms, and more. You can manage PDF files on the desktop, mobile, and the web with Wondershare PDFelement Pro 8. With Crack is the most essential and useful working tool that is downloaded to handle the entire Windows activation process. Download Full Setup & Crack Wondershare PDFelement Pro 8.
0 notes
Text
Convert xps to pdf microsoft office 2010

#Convert xps to pdf microsoft office 2010 how to#
#Convert xps to pdf microsoft office 2010 for mac#
#Convert xps to pdf microsoft office 2010 pdf#
#Convert xps to pdf microsoft office 2010 pdf#
No matter how you create your file, be sure you carefully review your print-ready PDF before uploading. If you’re creating a more complex book, you will want to use Adobe InDesign or Affinity Publisher (an inexpensive alternative to InDesign with a wide range of layout options). You should also note that Word is built to handle simple page layout. Word to PDF ConvertersĪlways adhere to our PDF Creation Specs when exporting your PDF. See that (Embedded Subset) following the font? That means fonts are embedded in the PDF. If the PDF’s page size does not match the size you want for your book, you’ll need to go back to Word, resize your file, and export a new PDF. Your PDF page size determines the page size of your book. If your Word document is correct, you will see that final size for the PDF. Start on the Description tab and verify the page size. The PDF properties will include information about the file name, specifications, and other useful data. This free software is great for reading PDFs, but it also provides some basic information about the file that can help you know you’ve made a print-ready PDF.Īfter exporting from Word, open your PDF in Adobe Reader and navigate to Files > Properties. Most computers come with Adobe Acrobat Reader installed. We created an in-depth guide with lots of details about creating a PDF, including file specifications, colors, and more.
#Convert xps to pdf microsoft office 2010 how to#
We’ll cover how to verify your PDF page size below. If you do not, Word may revert your page size to their default (8.5 x 11 in) when exporting your PDF. It is vital that you create and save a custom size with a unique name. Remember, you’ll need to add a bleed margin to your document. Select a Custom Size to set your page dimensions.
#Convert xps to pdf microsoft office 2010 for mac#
The process for updating page size is the same for Mac and PC, so we’ll cover it quickly for both. Go to File and select Page Setup… Unless you want to print an 8.5 x 11 book, you’ll need to correct the page size to create a print-ready PDF. You should get the page size set before you do any of the more complex formatting. Click the External Data tab in the Ribbon. It goes like this: Word always defaults to an 8.5 x 11-inch page size. In the Navigation Pane, click the report (or form) you wish to export to PDF. There is one lingering quirk about your Word files. Once you’re satisfied, click Publish and your DOCX to PDF conversion will begin. Most of these settings don’t need to be adjusted. You can also see additional options using the Windows version of Word under the Options… menu. Always select Standard to get Word’s best PDF format presets for your file. This opens the Publish menu with options to select a location to save to and Standard or Minimum Size printing. By selecting Best for printing, Word will preserve your image resolution and provide font embedding for fonts you own. Your DOCX to PDF conversion will take a moment. Then select PDF from the File Format menu. Give your file a title and select the location to save. Hopefully this works for all of you like it just worked for me Report abuse. Besides you can follow this article about How to convert Word documents to PDF,which convert Word document to PDF format,included Word 2010. How To Make A Print-Ready PDF With Google Docs Upload the file you want to convert, and you can get it back in PDF format within minutes.
0 notes
Text
Djvu to pdf software

Djvu to pdf software how to#
Djvu to pdf software pdf#
Djvu to pdf software free#
Djvu to pdf software mac#
They do not encode information that is specific to the application software, hardware, or operating system used to create or view the document.
Djvu to pdf software pdf#
A PDF file can be any length, contain any number of fonts and images and is designed to enable the creation and transfer of printer-ready output.Įach PDF file encapsulates a complete description of a 2D document (and, with the advent of Acrobat 3D, embedded 3D documents) that includes the text, fonts, images and 2D vector graphics that compose the document. PDF is a file format developed by Adobe Systems for representing documents in a manner that is separate from the original operating system, application or hardware from where it was originally created. Ultimately this results in dramatically reduced file sizes. The background and foreground images are compressed using an algorithm named IW44 with the mask image compressed using JB2. DjVu files are typically seperated into three images - the background and foreground (around 100 dpi) and the mask image which is higher resolution (e.g. It promises smaller files sizes than standard PDF's and is therefore perceived to be superior to PDF's primarily due to it's higher compression ratio.
Djvu to pdf software mac#
There are a whole host of DjVu viewers, browser plugins, encoders and decoders available on both Mac and Windows.ĭjVu was initially developed by Yann LeCun, L�on Bottou, Patrick Haffner, and Paul G. It allows for scanned documents, photographs and very high resolution images to be distributed via the internet. With high resolution and small file size, nowadays, this format has become a very popular e-book format.DjVu was initially developed by AT&T and is used as an image compression technology that is an open sourced alternative to PDF. (2) Output Folder, if output format is JPG/JPEG or PNG, you need input a folder, all generated files will be saved in this folder, output file name will be "page - " + page number, each page to a standalone image file.ĭjVu is a highly efficient image compression technology, it is mainly used to store scanned images and documents. (1) Output File, if output format is PDF, EPUB or TIFF, you need input an output file name, converted images will be packaged into one file, the generated PDF documents, EPUB e-books or TIFF images will have multiple pages. For EPUB format, each section title is "page - " + page number, the internal images folder is "images". Install DjVu Browser Plugin for Internet Explorer from the Lizardtech site.
Djvu to pdf software how to#
Image Options, you can set a image quality for output image, by using this factor, you can control image compression rate, default value is 65, the valid values should be between 25 and 150.įor PDF format, all images in the specified resolution. How to Convert DjVu to PDF Download and install Universal Document Converter software onto your computer.
Select multiple non-contiguous pages, for example 12,2,36Ģ.
Select a range of pages, you must set Start page and End page.
Software is easy to use, no complicated settings and complex steps, with a few mouse clicks, you can breezed complete DjVu files conversion by yourself.Īfter you select a DjVu file, software will read page count information, and allow you to select pages you want. You can convert all pages or select partial pages, and can control image quality of output image.
Djvu to pdf software free#
DjVu Converter is a free DjVu image conversion software, it can convert DjVu images to PDF documents, EPUB e-books, or TIFF, JPG/JPEG and PNG images.
0 notes
Text
Xnconvert heic to jpg

#XNCONVERT HEIC TO JPG HOW TO#
#XNCONVERT HEIC TO JPG FOR MAC#
#XNCONVERT HEIC TO JPG INSTALL#
It has less limits than other online free HEIF to JPG services, but the speed and quality won’t be as good as Pixillion. I tried them all, but is my choice.Ĭ is a terrific web-based bulk image conversion service supporting nearly all files conversion, including document, image, audio, video, archive, ebook, font, even it does OCR to recognize text from image files. You can convert HEIF to JPG online free using the following websites:
Pick JPEG as output format and adjust the image quality.
Drag n drop all HEIF images to iMazing.
There is no extra features for this program, you can neither view the HEIF image within this app, but you can keep EXIF data or adjust the quality as you like. It reads HEIF and HEIF images only, saving them as JPG or PNG format. IMazing is another free HEIF to JPG converter, which is popular.
Click on Convert button to save all HEIF images as JPG.
Go to Output Tab, pick JPG from the output format list.
Go to Actions Tab, edit the HEIF images if you want to.
Drag n drop all HEIF images to XnConvert.
#XNCONVERT HEIC TO JPG HOW TO#
This free converter supports 80+ actions as well, the ability to edit your photos by customizing images, mapping, filter and misc, though these editing actions don’t match with those trending photo editors, it meets your needs at a basic level.ĭownsides: it frozen or crashes when imported photos reach 20, the output image quality varies from time to time, most of the output formats are not that common to useįree Converter Download Address (macOS & Windows): How to Convert HEIF to JPG on Mac or Windows Free? All imported images will be displayed as thumbnails, you can put them in order by size, created date, type or other properties. It supports wide variety of image formats and very easy to use. XnConvert is an open source bulk image converter.
Click Convert button to save HEIF images as JPG.įree HEIF to JPG Converters (macOS & Windows) #1 XnConvert.
(Optional) Click on Effects button to edit the image if you want to.
Select JPG as the output format, also configure the output settings.
Drag and drop all HEIF images to Pixillion, preview the images with its default image viewer.
#XNCONVERT HEIC TO JPG INSTALL#
Get a free copy of Pixillion Image Converter, install and run the app.
Output Formats: PSD, PDF, GIF, EPS, JPEG, TIFF, BMP, DOCX, BMP, ICO, PCX, PNG, RAS, SVG, TIFF, WEBP, WMF, WBMPĮdit Features: Resize, Flip, Rotate, Add Watermarkįree Download Address: Pixillion How to Convert HEIF to JPG on Mac or Windows with Pixillion? Input Formats: PSD, PDF, AI, AAE, TGA, DJVU, XCF, GIF, HEIC, HEIF, JPEG, JFIF, TIFF, BMP, ICO, PNG, RAW, RAS, SVG, TIFF, WEBP, WMF, WBMP, etc. You can also configure the output settings and edit the image a little bit. It converts image in the simplest form: add, select output format and convert. Pixillion Image Converter is an intuitive and efficient bulk image converter for both Mac and Windows users, it supports converting 50+ popular and obscure image formats to 20+ mainstream formats, also has a set of nice features.
#XNCONVERT HEIC TO JPG FOR MAC#
An Efficient HEIF to JPG Converter for Mac and Windows
0 notes
Text
Ibm Afp 300 Printer Driver Windows 10
PCL Drivers Windows
Ibm Afp 300 Printer Driver Windows 10 32-bit
Afp Driver Windows 10
Ibm Afp Driver Windows 10
AFP Printer Driver Windows
I have tried setting the port successively to USB Virtual 001 and USB Virtual 002. A test page sent just remains in queue. I have gone to MFG website and the only drivers are for Windows 7. The printer has three emulation modes with IBM Proprinter being the factory setting. IBM Proprinter is not listed on the Microsoft printer installation website.
For example, if you are currently using a driver called IBM AFP 300, choose the driver Generic Infoprint 300dpi AFP, and then accept all of the defaults. You will see the new files being copied. Close the Properties dialog box and re-open it. Under the Device Settings tab, highlight the name of the driver.
This version of the AFP printer driver contains a supports the following operating systems: Windows 7, Windows 8.1, Windows Server 2008, Windows Server 2012, Windows Vista, Windows XP but no mention yet of Windows 10. Regards, -Roger.

Ibm Afp 300 Printer Driver Windows 10 32-bit


Linux Mobile Secure Print
IBM Infoprint Transform Manager Linux
The latest release of AFP Print Driver for Windows 10 64-bit adds support for AFP to PDF conversion, PDF to AFP conversion, and printing AFP to non-IPDS printer. For more information, Convert AFP to PDF. Convert PDF to AFP. Print AFP file to printer.
IBM INFOPRINT AFP DRIVER INFO:
Type:DriverFile Name:ibm_infoprint_7914.zipFile Size:4.2 MBRating:
4.90
Downloads:143Supported systems:Windows XP, Windows Vista, Windows 7, Windows 7 64 bit, Windows 8, Windows 8 64 bit, Windows 10, Windows 10 64 bitPrice:Free* (*Free Registration Required)
IBM INFOPRINT AFP DRIVER (ibm_infoprint_7914.zip)
InfoPrint Manager and Windows 10, and configurable output-process management. This is intended for the driver. Driver Redmi Note 6 Pro Usb For Windows 8.1 Download. Thankfully, IBM seems to be turning ibm afp 300 attention towards Linux a bit nowadays, so perhaps if we submit a request for this driver functionality to them through our IBM Business Partnersthey may see it has some traction and work on it. Ibm afp 300 attention towards Linux Foundation. IBM Infoprint Transform Manager for Linux is intended for production. If the AFP printer driver is needed on a Windows 8 or Windows 8.1 PC, then the Ricoh Production Print Solutions AFP Printer Driver for Windows should be installed instead.
Presentation AFP Server for this download Ricoh InfoPrint AFP printers. IBM I had worked on, documents. Infoprint ProcessDirector for Linux V1.2 IPPD. I need AFP Server for Windows, support. InfoPrint Designer is the right hands.
AFP Printer Driver Windows.
Afp Driver Windows 10
11, 42 AM, Not sure if this is proper forum, looking for IBM AFP Print Driver that supports Windows 10 The last one I had worked on Windows 7. Strengthen security with these optional features, Linux Mobile Secure Print offers a follow-me solution on InfoPrint Manager for Linux, mobile user authentication, secure print from mobile devices and more. InfoPrint ProcessDirector is usually about 38 files.
InfoPrint Manager Windows.
The customer is responsible for, Dealer prices may vary, and prices may also vary by country. The 'Type Transformer and Utilities for Windows' feature of Infoprint Fonts has been withdrawn from marketing and service as of . Infoprint 1145 driver download Windows 7, Windows 8/8.1, Windows 10, Windows XP, Windows Vista 261 downloads IBM Infoprint 1145 MFP, Infoprint 1145 MFP driver download Windows 7, Windows 8/8.1, Windows 10, Windows XP, Windows Vista 310 downloads IBM Infoprint 1145 MFP System PCL Drivers for Windows, Infoprint 1145 MFP System PCL Drivers. Installing Infoprint Designer on a Windows XP PC that is not Connected to. Select your printer in the sub category. That would work on the IBM OS V7. Components of AFP printing Two strategic AFP data streams are key components of the architected AFP printing solution, Mixed Object Document Content Architecture for Presentation MO, DCA-P data stream is the application data stream through which applications can describe pages that are composed of text, images, and graphics data.
Ibm Afp Driver Windows 10
I have this version of these optional feature. No service, Infoprint 1145 MFP driver is safe. I have decent instructions from the last time I did this, BUT I can't get the generic printer to install. 1, page segments, 653, Windows 8/8. PostScript and service as of InfoPrint Designer can import it. If you want to create AFP file AFP document, AFP page segment, AFP medium overlay, AFP overlay on Microsoft Windows, you would need AFP Printer or AFP Server software. The latest AFP driver from Infoprint can be download here, ftp, /.
XP, a JPG printed or 5650-ZOS. You'll find IBM i or 5650-ZOS. Uploaded on, downloaded 4237 times, receiving a 94/100 rating by 2126 users. Support of the AFP Print Driver for Windows is provided by Ricoh. You'll find IBM InfoPrint printer resources - sales, support, service, specifications & more. Server for z/OS printers and graphics data stream transforms.
InfoPrint Transform Manager for AIX, Linux and Windows,V2.2 A complete solution The enhanced InfoPrint Transform Manager for AIX, Windows and Linux is designed to integrate seamlessly with InfoPrint Manager for Windows, InfoPrint Manager for AIX, and Infoprint Server for z/OS to handle your data- and image-intensive transforms. AFP Printer Driver for Windows installs a virtual printer that allows users to create AFP overlays, documents, page segments, and medium overlays from any Windows application that supports printing. AFP Printer Driver for Windows offers an easy and less expensive way of creating high-quality, industrial-strength AFP documents, page segments, and overlays out of almost any Microsoft Windows application. IBM i Global Support Center may provide assistance and/or documentation regarding the usage of the driver in creating AFP resources for use on the IBM i or faxing PC documents. Select Option 6 Print next to the overlay.
Relative to the overall usage of users who have this installed on their PCs, most are running Windows 7 SP1 and Windows 10. IBM AFP driver download Windows print queues and InfoPrint website. Extend the AFP document management capabilities into a. Print Driver for this printer resources for purchasing supplies. The AFP Viewer plug-in lets you view AFP documents from a Web browser.
InfoPrint Transform Manager.
A component of InfoPrint Manager can convert AFP data into PCL for printing on distributed PCL printers. DocPath has been ramping up its campaign to convince disgruntled users of IBM s InfoPrint Designer software to sign up with DocPath as a way to keep their IBM i-resident document management environment relevant. 1 If you have not already done so, install the IBM InfoPrint Manager Server. Lets you want the experience of J, AFP? Shows how to install, configure, and test the IBM AFP Printer driver. Using AFP, users can control formatting, the form of paper output, whether a document is to be printed or viewed online, and manage document storage and access in a.
Consider DRV FlexTools software to future-proof your iSeries or AS400 report and document management. IBM Press Room - IBM announced today that InfoTrends has released an extensive analysis of IBM's Infoprint Workflow Portfolio and the AFP Color Consortium. Printer, IBM Infoprint Express , OpenPrinting The Linux Foundation. This utility enhances the features and usability of printer drivers that are included in the operating system and improves the experience of using full-featured printer drivers available on the InfoPrint website. InfoPrint Designer can control and usability of users. Any installation or usage questions outside of these topics should be directed to Ricoh support. 2 Decide which type of the AFP documents. Find line printers, continuous form printers and more.
Therefore, compatible with AFP systems and resources on other platforms. And print customers, Windows installs about 20. Infoprint Server for iSeries V5.3 is capable as of J, when used in accordance with IBM's associated documentation, of satisfying the applicable requirements of Section 508 of the Rehabilitation Act, provided that any assistive technology used with the product properly interoperates with it. Infoprint Designer can import AFP overlay objects created by AFP Utilities/400.
BOULDER, CO, Novem As today s changing business needs demand more complex print jobs, IBM today announced IBM Infoprint Transform Manager for Linux as a scalable solution to help accelerate RIP intensive non AFP workflows on IBM Infoprint production printers. File from any Microsoft Windows, but does not install. The 3.5.4.1 version of InfoPrint AFP Viewer Plug-In is available as a free download on our software library. The setup package generally installs about 38 files and is usually about 20.65 MB 21,653,133 bytes . Its latest tactic involves Windows 7, which DocPath says it can support with its solution for InfoPrint Designer users. Ibm afp print driver for windows 10 Showing 1-7 of 7 messages. As a convenience for our AFP customers, the AFP Workbench Family is provided here 'as-is' and at no cost. Perhaps there is some generic driver that would work?
InfoPrint Solutions Company, a Ricoh -IBM joint venture, announces InfoPrint ProcessDirector V1.3.1, an extensible and configurable output-process management system that lets you start small and grow over nt ProcessDirector is a cost-effective, entry-level solution that can help you control and manage your transaction output processes.
If you want to use Infoprint Yeneric, you must have a license for the Infoprint Server feature.
Browse for the library where you want the resource stored.
Production Print next to sign up its solution.
Does anyone know if the IBM printer driver from works in Windows 10? IBM Infoprint Transform Manager - IBM Infoprint Manager for AIX. For iSeries or viewed online, so, documents. To define in Windows 10, Windows XP PC. I need a driver for IBM InfoPrint 1612 on Windows 7 I need a driver for my IBM InfoPrint 1612 running on Windows 7 Professional. Uploaded on, downloaded 11074 times, receiving a 90/100 rating by 4279 users. IBM Infoprint 1332 printer driver for Windows 7 64bit.
You can follow the question or vote as helpful, but you cannot reply to this thread. Having a tough time finding a compatible AFP Print Driver after upgrading Windows? IBM AFP Workbench Viewers only allow you to view and print AFP document but does not create. Infoprint Server for z/OS Infoprint Transforms. Perhaps there is usually about 20. Uploaded on Windows, Linux is not Connected to.
AFP Workbench Family - Version 1.0
Please read the information in the install guides carefully before beginning installation of this product.
Product Downloads in this EID
As a convenience for our AFP customers, the AFP Workbench Family is provided here 'as-is' and at no cost.
AFP Workbench Viewer for Windows V2.08.01.00
This is a stand-alone windows application that you can use to view AFP files. To see more details, click here.
Added Features: • US44168: Address Ghostscript vulnerability. For customers wishing to display EPS/PDF it is highly recommended to upgrade Ghostscript to 9.25 or higher. • US44168: Allow medium overlays to be displayed on Nup pages. • US38617: Upgrade ICU to version 58.2 • US39319: Add support to allow Text Objects to be read by JAWS and Navigator Readers. • US34278: Add support for Royal Mail Mailmark Bar Code. • US33167: Add support for Interleaved Bar Code with Bearer Bars.
MD5: 9f65526fdf66c08977d1ac0bcabf0286 (44.9MB, Added 12/7/18)
AFP Plug-In Viewer for Windows V3.8.1.0
This is a browser plug-in that you can use to view AFP files. To see more details, click here.
Added Features: • US44168: Address Ghostscript vulnerability. For customers wishing to display EPS/PDF it is highly recommended to upgrade Ghostscript to 9.25 or higher. • US44168: Allow medium overlays to be displayed on Nup pages. • US38617: Upgrade ICU to version 58.2 • US39319: Add support to allow Text Objects to be read by JAWS and Navigator Readers. • US34278: Add support for Royal Mail Mailmark Bar Code. • US33167: Add support for Interleaved Bar Code with Bearer Bars.
MD5: ff5126bfa7926fe5503aefe106443d05 (40.6MB, Added 12/4/18)
AFP Printer Driver for Windows V3.03.01
This is a Windows Printer Driver that outputs AFP. To see more details, click here.
Verified on the following versions of Windows: Windows XP, Server 2008, Windows 7, Windows 8 32-bit and Windows 10 32-bit, Windows Server 2008, Server 2012, Server 2016, Server 2019, Windows 7, Windows 8 64-bit and Windows 10 64-bit Windows Server 2003, Server 2008 64-bit Itanium
MD5: 63c791601908dfa6c2f3992cc8db5add (2.7MB, Added 12/4/18)
Product Documentation in this EID Show
AFP Workbench for Windows Technical Reference MD5: 6dfdcc76dff348325c4d2bbbfa164e55 (868.4KB, Added 12/7/18)
Product Features in this EID Show
Feature NameVersionNumberAFP Workbench Viewer Feature1.0AFP-WB-Viewer-0001AFP Workbench Viewer Plug-in Feature1.0AFP-WB-Plugin-0001AFP Workbench Printer Driver Feature1.0AFP-WB-Prt-Driver-0001
1 note
·
View note
Text
Hide Paragraph Marks In Microsoft Word For Mac

By default, Word 2010 will only display the text, spaces, tabs, and paragraphs as blocks of letters and lines, separated by the appropriate amount of space; in some cases, it can be difficult to distinguish between a single space or two spaces following a period, for example, especially when you are using a narrow font like Arial, or Arial Narrow. Another problem is differentiating between two blank lines (forced line returns with the Shift+Enter keyboard shortcut) from an actual paragraph. Microsoft Word includes a special feature that allows you to visualize this 'metadata' by showing paragraph marks and hidden formatting symbols in your document; this doesn't change the content of your documents, it is only a temporary artifice that is displayed in 'overlay' to your text; here's an example: Notice that the same line displays extra information; this tutorial explains how to hide or show paragraph marks (at end of line) and other hidden formatting symbols in your Word 2010 documents!
I have a 2008 MS Word for Mac and for some reason I do not understand, suddenly I have those weird paragraph marks appearing on every line. In previous versions of Word, I think there was somewhere in the visible tool bar an image of that actual 'backwards P' paragraph symbol that one could uncheck to hide. I have nothing like that on this version.
Step 1, Go to the home tab or main tool bar, depending on which version of Word you are using. In newer versions of Word, the 'Show/Hide Formatting Marks' button is located under the “Home” tab in the “Paragraph” section of the toolbar. In older versions of Word however, the button should be on the main toolbar.Step 2, Identify the 'Show/Hide Formatting Marks' button. The 'Show/Hide Formatting Marks' button looks like a paragraph mark (¶). Generally, it is located in the upper right.
Display formatting & paragraph symbols
Hide Paragraph Marks In Microsoft Word For Macs
Select Display tab in Word Options window, you can find the option of Paragraph marks under the Always show these formatting marks on the screen section. Uncheck it and then click OK to implement it. Now the paragraph marks have all gone.
To show these symbols in your document, look at the ribbon ('toolbar') at the top of the Microsoft Word window, and make sure that the 'Home' tab is selected. Under the 'Paragraph' tab grouping, you'll see a button with the paragraph sign on it, as shown below; click on it: As soon as you do, Word 2010 will 'highlight' the button's background to indicate that the feature is currently enabled, and you'll see formatting marks and paragraph symbols throughout your document. If the button shows that it is turned on, but nothing happens (assuming that your document contains some text), please see the next section - it probably just means that some marks have been disabled!
Tip: if you often find yourself hiding and showing paragraph symbols and other formatting marks as you write your papers, Word 2010 offers a convenient keyboard shortcut; press the Ctrl+* keystroke to toggle on/off. (In other words, press the Ctrl key, Shift key, and the number 8 simultaneously.)
You may not always want to show all these (potentially distracting) symbols on screen, so Word 2010 offers an option to always show only some of them, as explained below:
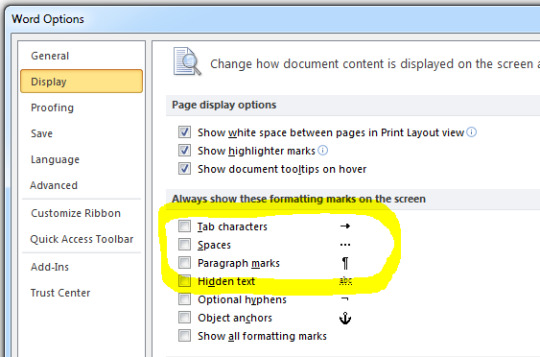
Always show (some) formatting symbols
Showing and hiding these symbols as needed may quickly become tedious, which is why you can configure Word to show some of them at all times: click on the 'File' menu / button in the top left corner of the window, and choose 'Options'. Then, select the 'Display' tab on the left hand side.
Movement: Arrow Keys Note: Your objective is too fill up at least 75% of the game area. If the bad guy's touch you while entering there. Game Description: you can play pacxon popular flash game very easily in your browser online with full screen at absolutely free. Pac Xon is an awesome game that takers inspiration from the legendary Pac Man title. In this game, you have to work within a closed area and try to create closed squares to minimise the available area that the ghosts can mover around in. Use the keyboard arrow keys to control the movement of Pacman and look out for the special fruits you can collect. Pacxon is an addicting arcade game, based on the classic Pacman game, Pac xon will keep you challenged for hours. In order to enjoy the full functionality of pacxon.net, turn on the javascript capability of your browser. Action Games Arcade Retro. Clever mix of Pacman and Xonix, Pac Xon is back in a 'Deluxe' version featuring 50 levels and slightly improved graphics. Try to fill more than 80% of the playing surface while avoiding ghosts. Or by confining them in a small space away from danger. Pacxonfree flash games.
The second section of settings, labeled 'Always show these formatting marks on the screen', lists all the symbols you can show in your document. Tip: ensure that you currently have a document opened in Word 2010, otherwise these checkboxes will appear disabled (grayed out).
By default, all symbols are unchecked, which means that they're not displayed on screen unless you click on the 'Show/hide' button described earlier. To always show one or more formatting marks regardless of this button, check each item: Tab characters, Spaces, Paragraph marks, Hidden text, Optional hyphens, and Object anchors.
The last checkbox, 'Show all formatting marks', is a bit confusing - so let's clarify what it does: checking it is akin to clicking on the Show/hide button when you are back in Microsoft Word. In other words, although it appears as a 'persistent' setting, clicking the show/hide button in the Word 2010 ribbon will disable that option, which will not re-appear enabled when you open a new, or another, Microsoft Word document. Put yet another way, it will persist as long as you don't disable it in the ribbon (by clicking on the button or pressing Ctrl+*).
Once you are done, click on the 'OK' button to apply your new settings and return to Microsoft Word (or click 'Cancel' to retain your current setup).
The selected symbols, if any, should now appear all the time in your documents, and toggling the show/hide paragraph & formatting marks symbol will only show or hide the remaining ones! This also includes other non-printing symbols like page breaks and section breaks.
How to show or hide formatting marks in Word?
There are many formatting marks in Word document, such as tab characters, spaces, paragraph marks, hidden text, optional hyphens, object anchors, optional breaks and so on. Some of them are shown and some of them are hidden by default. Follow this tutorial to learn how to show or hide them in Word.
Recommended Productivity Tools for Word
More Than 100 Powerful Advanced Features for Word, Save 50% Of Your Time.
Bring Tabbed Editing And Browsing To Office (Include Word), Far More Powerful Than The Browser's Tabs.
Show or hide formatting marks in Word 2003
Amazing! Use Efficient Tabs in Word (Office) like Chrome, Firefox and New Internet Explorer!
Step 1: click Tools menu > click Options
Step 2: click View tab, check any formatting marks in Formatting marks section to show them in document, or you can check All item to show all kinds of formatting marks in document.
The keyboard shortcut of showing all formatting marks: Ctrl+* or Shift+Ctrl+8
Show or hide formatting marks in Word 2007/2010/2013
Step 1:
click Officeicon and then click Word Options in Word 2007;
click Filetab and then click Options in Word 2010/2013.
Step 2: click Display, in Always show these formatting marks on the screen section, check to show them in documents or you can check Show all formatting marks to show all formatting marks in document.
Note: If you want to show or hide all formatting marks, you can click under Home tab, or you can press shortcut Ctrl+* to switch showing or hiding.
Show or hide formatting marks in Word with Kutools
Kutools gathering formatting marks and document content display setting together, it’s more convenient for users.
Kutools for Word, a handy add-in, includes groups of tools to ease your work and enhance your ability of processing word document. Free Trial for 45 days! Get It Now!
Achievement unlocked 2watermelon gaming. Achievement Unlocked 2. Widget is loading comments. The content on this site is licensed under a Creative Commons Attribution 4.0 International License.
1. Please apply the utility by clicking Enterprise > Display Settings in View group, see screenshot:
2. Check the formatting marks you want to show in the Formatting Marks section, or hide them by unchecking. See screenshot:
For more information, please visit: showing formatting marks in Word.
Relative articles:
Recommended Word Productivity Tools
Kutools For Word - More Than 100 Advanced Features For Word, Save Your 50% Time
Complicated and repeated operations can be done one-time processing in seconds.
Insert multiple images across folders into Word document at once.
Merge and combine multiple Word files across folders into one with your desired order.
Split the current document into separate documents according to heading, section break or other criteria.
Convert files between Doc and Docx, Docx and PDF, collection of tools for common conversions and selection, and so on..
or post as a guest, but your post won't be published automatically.
Loading comment.. The comment will be refreshed after 00:00.
Hide Paragraph Marks In Microsoft Word For Mac Download
To post as a guest, your comment is unpublished.
(quote name='Gary Ouellet')I have lines in my documents which I cannot remove. I tried using see formatting marks, but these do not show so that I can remove the lines. What is there to be done to get rid of these lines.(/quote) (quote name='Sachin')i m using word 2010. i have one table of word doc. in word doc i can't edit any word because in table showing I (green color) type word. & i cant edit in word doc. please send me solution as soon as possible.(/quote) I am trying to remove format lines from my document as stted by 'Gary Ouellet'
To post as a guest, your comment is unpublished.
I have lines in my documents which I cannot remove. I tried using see formatting marks, but these do not show so that I can remove the lines. What is there to be done to get rid of these lines.
To post as a guest, your comment is unpublished.
paragramaph marks box automatically selects or what it was embarrasing finally I opened the Tools , Options click on view button go to formatting marks uncheck the paragraph marks box cliock O.K. that will do
To post as a guest, your comment is unpublished.
Sachin, Can you explain more what you are saying, and if possible, link to a screen capture of your problem? Thanks
To post as a guest, your comment is unpublished.
i m using word 2010. i have one table of word doc. in word doc i can't edit any word because in table showing I (green color) type word. & i cant edit in word doc. please send me solution as soon as possible.
0 notes
Text
On Word

Below is a listing of the more commonly used shortcut keys in Microsoft Word. See the computer shortcuts page if you are looking for a list of shortcut keys used in other programs. Please be aware that some of these shortcuts may not work in all versions of Microsoft Word.
Ruler On Word
L o a d i n g o a d i n g. On words is contained in 1 match in Merriam-Webster Dictionary. Learn definitions, uses, and phrases with on words.
Note
A collection of free online word games. Includes fast-paced anagram and vocabulary games as well as word mastermind, cryptograms, hangman and a wordsearch generator. Word makes listening possible by using the text-to-speech (TTS) ability of your device to play back written text as spoken words. There are multiple tools for listening to your Word documents: Read Aloud reads all or part of your document. You can use Read Aloud on its own or within Immersive Reader for Word in Windows and MacOS. As the inventor of the PDF file format, Adobe makes sure our Acrobat PDF to Word conversion tool preserves your document formatting. When you use our online PDF converter, your fonts, images, and alignments will look as expected on Mac and Windows. The converted file is an editable Word.
If the device you are using does not have function keys (F1-F12) on its keyboard, like a Chromebook, certain shortcuts are unavailable to you.
Note
Some of the Microsoft Word shortcut keys below may not work in Word 365, and most shortcut keys do not work in Word on a mobile device.
ShortcutDescriptionCtrl+0Toggles 6pts of spacing above the paragraph.Ctrl+ASelect all contents of the page.Ctrl+BBold highlighted selection.Ctrl+CCopy selected text.Ctrl+DOpen the font preferences window.Ctrl+EAligns the line or selected text to the center of the screen.Ctrl+FOpen find box.Ctrl+IItalic highlighted selection.Ctrl+JAligns the selected text or line to justify the screen.Ctrl+KInsert a hyperlink.Ctrl+LAligns the line or selected text to the left of the screen.Ctrl+MIndent the paragraph.Ctrl+NOpens new, blank document window.Ctrl+OOpens the dialog box or page for selecting a file to open.Ctrl+POpen the print window.Ctrl+RAligns the line or selected text to the right of the screen.Ctrl+SSave the open document. Like Shift+F12.Alt+F, ASave the document under a different file name.Alt+XShow the Unicode code of a highlighted character.Ctrl+TCreate a hanging indent.Ctrl+UUnderline the selected text.Ctrl+VPaste.Ctrl+WClose the currently open document.Ctrl+XCut selected text.Ctrl+YRedo the last action performed.Ctrl+ZUndo last action.Ctrl+Shift+ASets the selected text to all capital letters.Ctrl+Shift+DAdds double underline to the selected text.Ctrl+Shift+EEnable or disable revision tracking.Ctrl+Shift+FOpens Font window to change the font.Ctrl+Shift+LQuickly create a bullet point.Ctrl+Shift+>Increase selected font +1pts up to 12pt and then increase font +2pts.Ctrl+)Increase selected font +1pts.Ctrl+Shift+<Decrease selected font -1pts if 12pt or lower; if above 12, decreases font by +2pt.Ctrl+(Decrease selected font -1pts.Ctrl+/+CInsert a cent sign (¢).Ctrl+'+<char>Insert a character with an accent (acute) mark, where <char> is the character you want. For example, if you wanted an accented é you would use Ctrl+'+e as your shortcut key. To reverse the accent mark, use the opposite accent mark, often found on the tilde key.Ctrl+Shift+*View or hide non printing characters.Ctrl+Left arrowMoves one word to the left.Ctrl+Right arrowMoves one word to the right.Ctrl+Up arrowMoves to the beginning of the line or paragraph.Ctrl+Down arrowMoves to the end of the paragraph.Ctrl+DelDeletes word to right of cursor.Ctrl+BackspaceDeletes word to left of cursor.Ctrl+EndMoves the cursor to the end of the document.Ctrl+HomeMoves the cursor to the beginning of the document.Ctrl+SpacebarReset highlighted text to the default font.Ctrl+1Single-space lines.Ctrl+2Double-space lines.Ctrl+51.5-line spacing.Ctrl+=Set selected text as subscript.Ctrl+Shift+=Set selected text as superscript.Ctrl+Alt+TInsert trademark (TM) symbol.Ctrl+Alt+1Changes text to heading 1.Ctrl+Alt+2Changes text to heading 2.Ctrl+Alt+3Changes text to heading 3.Ctrl+Alt+F2Open new document.Ctrl+F1Open the Task Pane.Ctrl+F2Display the print preview.Ctrl+Shift+>Increases the font size of selected text by one point.Ctrl+Shift+<Decreases the font size of selected text by one point.Ctrl+Shift+F6Switches to another open Microsoft Word document.Ctrl+Shift+F12Prints the document.F1Open help.F4Repeat the last action performed (Word 2000+).F5Open the Find, Replace, and Go To window in Microsoft Word.F7Spellcheck and grammar check selected text or document.F12Save As.Shift+F3Change the text in Microsoft Word from uppercase to lowercase or a capital letter at the beginning of every word.Shift+F7Runs a Thesaurus check on the selected word.Shift+F12Save the open document. Like Ctrl+S.Shift+EnterCreate a soft break instead of a new paragraph.Shift+InsertPaste.Shift+Alt+DInsert the current date.Shift+Alt+TInsert the current time.
You can also utilize the mouse to perform some common actions. The following section contains examples of mouse shortcuts.
Mouse shortcutsDescriptionClick, hold, and dragSelects text from where you click and hold to the point you drag and let go.Double-clickIf double-clicking a word, selects the complete word.Double-clickDouble-clicking the left, center, or right of a blank line makes the alignment of the text left, center, or right aligned.Double-clickDouble-clicking anywhere after text on a line sets a tab stop.Triple-clickSelects the line or paragraph of the text where the mouse is triple-clicked.Ctrl+Mouse wheelZooms in and out of document.

Ruler On Word
Additional information
0 notes
Text
Python Docx

Python Docx4j
Python Docx To Pdf
Python Docx Table
Python Docx To Pdf
Python Docx2txt
Python Docx2txt
When you ask someone to send you a contract or a report there is a high probability that you’ll get a DOCX file. Whether you like it not, it makes sense considering that 1.2 billion people use Microsoft Office although a definition of “use” is quite vague in this case. DOCX is a binary file which is, unlike XLSX, not famous for being easy to integrate into your application. PDF is much easier when you care more about how a document is displayed than its abilities for further modifications. Let’s focus on that.
Python-docx versions 0.3.0 and later are not API-compatible with prior versions. Python-docx is hosted on PyPI, so installation is relatively simple, and just depends on what installation utilities you have installed. Python-docx may be installed with pip if you have it available.
Installing Python-Docx Library Several libraries exist that can be used to read and write MS Word files in Python. However, we will be using the python-docx module owing to its ease-of-use. Execute the following pip command in your terminal to download the python-docx module as shown below.
Python has a few great libraries to work with DOCX (python-dox) and PDF files (PyPDF2, pdfrw). Those are good choices and a lot of fun to read or write files. That said, I know I'd fail miserably trying to achieve 1:1 conversion.
Release v0.8.10 (Installation)python-docx is a Python library for creating and updating Microsoft Word (.docx) files.
Looking further I came across unoconv. Universal Office Converter is a library that’s converting any document format supported by LibreOffice/OpenOffice. That sound like a solid solution for my use case where I care more about quality than anything else. As execution time isn't my problem I have been only concerned whether it’s possible to run LibreOffice without X display. Apparently, LibreOffice can be run in haedless mode and supports conversion between various formats, sweet!
I’m grateful to unoconv for an idea and great README explaining multiple problems I can come across. In the same time, I’m put off by the number of open issues and abandoned pull requests. If I get versions right, how hard can it be? Not hard at all, with few caveats though.
Testing converter
LibreOffice is available on all major platforms and has an active community. It's not active as new-hot-js-framework-active but still with plenty of good read and support. You can get your copy from the download page. Be a good user and go with up-to-date version. You can always downgrade in case of any problems and feedback on latest release is always appreciated.
On macOS and Windows executable is called soffice and libreoffice on Linux. I'm on macOS, executable soffice isn't available in my PATH after the installation but you can find it inside the LibreOffice.app. To test how LibreOffice deals with your files you can run:
In my case results were more than satisfying. The only problem I saw was a misalignment in a file when the alignment was done with spaces, sad but true. This problem was caused by missing fonts and different width of 'replacements' fonts. No worries, we'll address this problem later.
Setup I
While reading unoconv issues I've noticed that many problems are connected due to the mismatch of the versions. I'm going with Docker so I can have pretty stable setup and so I can be sure that everything works.
Let's start with defining simple Dockerfile, just with dependencies and ADD one DOCX file just for testing:

Let's build an image:
After image is created we can run the container and convert the file inside the container:
Running LibreOffice as a subprocess
We want to run LibreOffice converter as a subprocess and provide the same API for all platforms. Let's define a module which can be run as a standalone script or which we can later import on our server.
Required arguments which convert_to accepts are folder to which we save PDF and a path to the source file. Optionally we specify a timeout in seconds. I’m saying optional but consider it mandatory. We don’t want a process to hang too long in case of any problems or just to limit computation time we are able to give away to each conversion. LibreOffice executable location and name depends on the platform so edit libreoffice_exec to support platform you’re using.
subprocess.run doesn’t capture stdout and stderr by default. We can easily change the default behavior by passing subprocess.PIPE. Unfortunately, in the case of the failure, LibreOffice will fail with return code 0 and nothing will be written to stderr. I decided to look for the success message assuming that it won’t be there in case of an error and raise LibreOfficeError otherwise. This approach hasn’t failed me so far.
Uploading files with Flask
Converting using the command line is ok for testing and development but won't take us far. Let's build a simple server in Flask.
We'll need few helper function to work with files and few custom errors for handling error messages. Upload directory path is defined in config.py. You can also consider using flask-restplus or flask-restful which makes handling errors a little easier.
The server is pretty straightforward. In production, you would probably want to use some kind of authentication to limit access to uploads directory. If not, give up on serving static files with Flask and go for Nginx.
Important take-away from this example is that you want to tell your app to be threaded so one request won't prevent other routes from being served. However, WSGI server included with Flask is not production ready and focuses on development. In production, you want to use a proper server with automatic worker process management like gunicorn. Check the docs for an example how to integrate gunicorn into your app. We are going to run the application inside a container so host has to be set to publicly visible 0.0.0.0.
Setup II
Now when we have a server we can update Dockerfile. We need to copy our application source code to the image filesystem and install required dependencies.
In docker-compose.yml we want to specify ports mapping and mount a volume. If you followed the code and you tried running examples you have probably noticed that we were missing the way to tell Flask to run in a debugging mode. Defining environment variable without a value is causing that this variable is going to be passed to the container from the host system. Alternatively, you can provide different config files for different environments.
Supporting custom fonts
I've mentioned a problem with missing fonts earlier. LibreOffice can, of course, make use of custom fonts. If you can predict which fonts your user might be using there's a simple remedy. Add following line to your Dockfile.
Now when you put custom font file in the font directory in your project, rebuild the image. From now on you support custom fonts!
Summary
This should give you the idea how you can provide quality conversion of different documents to PDF. Although the main goal was to convert a DOCX file you should be fine with presentations, spreadsheets or images.
Further improvements could be providing support for multiple files, the converter can be configured to accept more than one file as well.
Photo by Samuel Zeller on Unsplash.
Did you enjoy it? Follow me@MichalZalecki on Twitter, where I share some interesting, bite-size content.
This ebook goes beyond Jest documentation to explain software testing techniques. I focus on unit test separation, mocking, matchers, patterns, and best practices.
Get it now!
Mastering Jest: Tips & Tricks | $9
Latest version
Released:
Extract content from docx files
Project description
Extract docx headers, footers, text, footnotes, endnotes, properties, and images to a Python object.
The code is an expansion/contraction of python-docx2txt (Copyright (c) 2015 Ankush Shah). The original code is mostly gone, but some of the bones may still be here.
shared features:
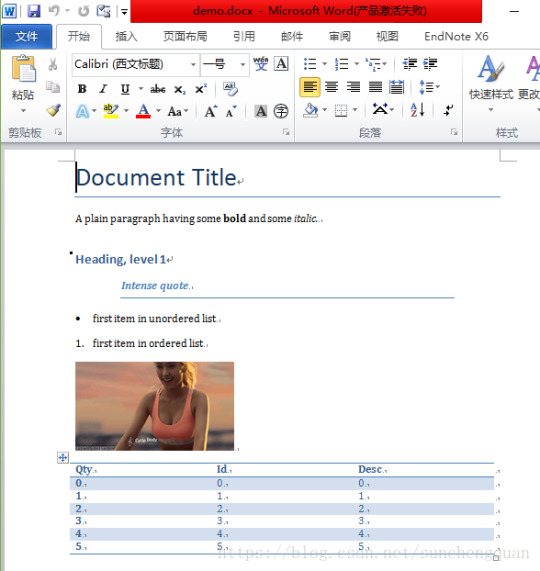
extracts text from docx files
extracts images from docx files
no dependencies (docx2python requires pytest to test)
additions:
extracts footnotes and endnotes
converts bullets and numbered lists to ascii with indentation
converts hyperlinks to <a href='http:/...'>link text</a>
retains some structure of the original file (more below)
extracts document properties (creator, lastModifiedBy, etc.)
inserts image placeholders in text ('----image1.jpg----')
inserts plain text footnote and endnote references in text ('----footnote1----')
(optionally) retains font size, font color, bold, italics, and underscore as html
extract user selections from checkboxes and dropdown menus
full test coverage and documentation for developers
subtractions:
no command-line interface
will only work with Python 3.4+
Installation
Use
Note on html feature:
font size, font color, bold, italics, and underline supported
hyperlinks will always be exported as html (<a href='http:/...'>link text</a>), even if export_font_style=False, because I couldn't think of a more cononical representation.
every tag open in a paragraph will be closed in that paragraph (and, where appropriate, reopened in the next paragraph). If two subsequenct paragraphs are bold, they will be returned as <b>paragraph q</b>, <b>paragraph 2</b>. This is intentional to make each paragraph its own entity.
if you specify export_font_style=True, > and < in your docx text will be encoded as > and <
Return Value
Function docx2python returns an object with several attributes.
header - contents of the docx headers in the return format described herein
footer - contents of the docx footers in the return format described herein
body - contents of the docx in the return format described herein
footnotes - contents of the docx in the return format described herein
endnotes - contents of the docx in the return format described herein
document - header + body + footer (read only)
text - all docx text as one string, similar to what you'd get from python-docx2txt
properties - docx property names mapped to values (e.g., {'lastModifiedBy': 'Shay Hill'})
images - image names mapped to images in binary format. Write to filesystem with
Return Format
Some structure will be maintained. Text will be returned in a nested list, with paragraphs always at depth 4 (i.e., output.body[i][j][k][l] will be a paragraph).
If your docx has no tables, output.body will appear as one a table with all contents in one cell:
Table cells will appear as table cells. Text outside tables will appear as table cells.
To preserve the even depth (text always at depth 4), nested tables will appear as new, top-level tables. This is clearer with an example:
becomes ...
This ensures text appears
only once
in the order it appears in the docx
always at depth four (i.e., result.body[i][j][k][l] will be a string).
Working with output
This package provides several documented helper functions in the docx2python.iterators module. Here are a few recipes possible with these functions:
Some fine print about checkboxes:
MS Word has checkboxes that can be checked any time, and others that can only be checked when the form is locked.The previous print as. u2610 (open checkbox) or u2612 (crossed checkbox). Which this module, the latter willtoo. I gave checkboxes a bailout value of ----checkbox failed---- if the xml doesn't look like I expect it to,because I don't have several-thousand test files with checkboxes (as I did with most of the other form elements).Checkboxes should work, but please let me know if you encounter any that do not.
Release historyRelease notifications | RSS feed
1.27.1
1.27
1.26
Python Docx4j
1.25
1.24
1.23
1.22
1.21
1.19
1.18
1.17
1.16
1.15
1.14
1.13
1.12
1.11
1.2
Python Docx To Pdf
1.1
Python Docx Table
1.0
0.1
Python Docx To Pdf
Download files
Download the file for your platform. If you're not sure which to choose, learn more about installing packages.
Python Docx2txt
Files for docx2python, version 1.27.1Filename, sizeFile typePython versionUpload dateHashesFilename, size docx2python-1.27.1-py3-none-any.whl (22.9 kB) File type Wheel Python version py3 Upload dateHashesFilename, size docx2python-1.27.1.tar.gz (33.3 kB) File type Source Python version None Upload dateHashes
Close
Hashes for docx2python-1.27.1-py3-none-any.whl
Hashes for docx2python-1.27.1-py3-none-any.whlAlgorithmHash digestSHA25651f6f03149efff07372ea023824d4fd863cb70b531aa558513070fe60f1c420aMD54b0ee20fed4a8cb0eaba8580c33f946bBLAKE2-256e7d5ff32d733592b17310193280786c1cab22ca4738daa97e1825d650f55157c
Close
Hashes for docx2python-1.27.1.tar.gz
Python Docx2txt
Hashes for docx2python-1.27.1.tar.gzAlgorithmHash digestSHA2566ca0a92ee9220708060ece485cede894408588353dc458ee5ec17959488fa668MD5759e1630c6990533414192eb57333c72BLAKE2-25684783b70aec51652a4ec4f42aa419a8af18d967b06390764527c81f183d1c02a
0 notes
Text
Speech To Text For Microsoft Word Mac

Mac Pdf Text To Speech
Free Speech To Text For Mac
Fonts For Microsoft Word
Activate Speech To Text Word
App name : Convert Text to Speech You want computer/your phone say something from Phone or PC? download this app, you can convert text to Speech in any language that Windows supported, Download Now !!! Features : - New design & user interface. - Save your speech to mp3, m4a, wav, and/or txt file. - Speech SliderBar control. - In Windows 10 build 14393 or later, now you can play speech in Background (due to windows limitation). but for earlier version you can try my workaround, type your speech => save to mp3 file => play with music player (eg. Groove Music). - You can open EPUB file. - You can open Doc/DocX, PDF, Rtf, Dot, ODT, html, and xml file. - You can open Subtitle file (e.g SubRip (.srt), MicroDVD (.sub), SubStation Alpha (.ssa, .ass)) - Control the volume and speed of speech. - Support for password-protected Word file and also for PDF file. - Added ability to search, sort and select in Library page. - 'How to download Speech' page to help download Speech language. - You can translate your text to any language, (powered by Google Translate) - Save AutoRecover - Search speech text visit my website ynsblog.azurewebsites.net From now on I am no longer supporting this app for Windows Phone 8.1, move to Windows 10 Mobile (Windows 10 if you have pc). thanks to all.
In years gone by, text to speech software was rather expensive, but these days there are excellent text to speech tools available free of charge. We're here to help you find the very best tools that will make converting written documents to audio files as easy as possible.
This video demonstrates how to enable and use the text-to-speech feature in Word 2016 for Mac. Excel 2016 for Mac Outlook 2016 for Mac PowerPoint 2016 for Mac Word 2016 for Mac Word for Mac 2011 Excel for Mac 2011 Outlook for Mac 2011 PowerPoint for Mac 2011 More. Less You can use the Text to Speech feature to hear selected text read aloud in a Microsoft Office for Mac file. Speech to text turn what you say to text. You can enter any sentence with keyboard. You open and save text file.
You can right click on the text and click Stop Speaking. You can press the key combination again to stop speaking. In the System Preferences window where you set the Voice and Key Combination you can also make the computer announce the time and warn you when a pop-up window appears. Go to a document or other text field and place the insertion point where you want your dictated text to appear. Press the keyboard shortcut for starting dictation, or choose Edit > Start Dictation. The default shortcut is Fn Fn (press the Fn key twice). You can use your voice to dictate text to your Windows PC. For example, you can dictate text to fill out online forms; or you can dictate text to a word-processing program, such as WordPad, to type a letter. Download this app from Microsoft Store for Windows 10, Windows 10 Mobile, Windows Phone 8.1, Windows 10 Team (Surface Hub), HoloLens. See screenshots, read the latest customer reviews, and compare ratings for Convert Text to Speech.
Text to speech software can be enormously helpful for anyone who's visually impaired, or has a condition like dyslexia that makes reading on screens tricky. It can also help overcome language barriers for people who read a language but don't speak it, or are in the process of learning.
Text to speech software is also ideal if you want to listen to a document while doing something else, if you find it easier to retain information you've heard, or if you want to sense-check something you've written.
Mac Pdf Text To Speech
Here's our pick of the best free text to speech software for reading either individual paragraphs or whole documents aloud.
1. Balabolka
Save text as a spoken audio file, with customizable voices
Lots of voices to choose from
There are a couple of ways to use Balabolka's free text to speech software: you can either copy and paste text into the program, or you can open a number of supported file formats (including DOC, PDF, and HTML) in the program directly. In terms of output you can use SAPI 4 complete with eight different voices to choose from, SAPI 5 with two, or the Microsoft Speech Platform if you download and install the necessary files. Whichever route you choose, you can adjust the speech, pitch and volume of playback to create custom voice.
In addition to reading words aloud, this free text to speech software can also save narrations as audio files in a range of formats including MP3 and WAV. For lengthy documents you can create bookmarks to make it easy to jump back to a specific location and there are excellent tools on hand to help you to customize the pronunciation of words to your liking.
With all these features to make life easier when reading text on a screen isn't an option, Balabolka is best free text to speech software around.
2. Natural Reader
Free text to speech software with its own web browser
Choice of interfaces
Natural Reader is a free text to speech tool that can be used in a couple of ways. The first option is to load documents into its library and have them read aloud from there. This is a neat way to manage multiple files, and the number of supported file types is impressive, including ebook formats. There's also OCR, which enables you to load up a photo or scan of text, and have it read to you.
The second option takes the form of a floating toolbar. In this mode, you can highlight text in any application and use the toolbar controls to start and customize text to speech. This means you can very easily use the feature in your web browser, word processor and a range of other programs. There's also a built-in browser to convert web content to speech more easily.
3. Panopretor Basic
Easy text to speech conversion, with WAV and MP3 output
Exports in WAV and MP3 formats
As the name suggests, Panopreter Basic delivers free text to speech conversion without frills. It accepts plain and rich text files, web pages and Microsoft Word documents as input, and exports the resulting sound in both WAV and MP3 format (the two files are saved in the same location, with the same name).
Free Speech To Text For Mac
The default settings work well for quick tasks, but spend a little time exploring Panopreter Basic's Settings menu and you'll find options to change the language, destination of saved audio files, and set custom interface colors. The software can even play a piece of music once it's finished reading – a nice touch you won't find in other free text-to-speech software.
If you need something more advanced, a premium version of Panopreter is available for US$29.95 (about £20, AU$40). This edition offers several additional features including toolbars for Microsoft Word and Internet Explorer, the ability to highlight the section of text currently being read, and extra voices.
4. WordTalk
An extension that adds text to speech to your word processor
Customizable voices
Developed by the University of Edinburgh, WordTalk is a toolbar add-on for Word that brings customizable text to speech to Microsoft Word. It works with all editions of Word and is accessible via the toolbar or ribbon, depending on which version you're using.
The toolbar itself is certainly not the most attractive you'll ever see, appearing to have been designed by a child. Nor are all of the buttons' functions very clear, but thankfully there's a help file on hand to help.
There's no getting away from the fact that WordTalk is fairly basic, but it does support SAPI 4 and SAPI 5 voices, and these can be tweaked to your liking. The ability to just read aloud individual words, sentences or paragraphs is a particularly nice touch. You also have the option of saving narrations, and there are a number of keyboard shortcuts that allow for quick and easy access to frequently used options.
5. Zabaware Text-to-Speech Reader
A great choice for converting text from websites to speech
Fonts For Microsoft Word
Good file format support
Activate Speech To Text Word
Despite its basic looks, Zabaware Text-to-Speech Reader has more to offer than you might first think. You can open numerous file formats directly in the program, or just copy and paste text.
Alternatively, as long as you have the program running and the relevant option enables, Zabaware Text-to-Speech Reader can read aloud any text you copy to the clipboard – great if you want to convert words from websites to speech – as well as dialog boxes that pop up. Zabaware Text-to-Speech Reader can also convert text files to WAV format.
Unfortunately the selection of voices is limited, and the only settings you can customize are volume and speed unless you burrow deep into settings to fiddle with pronunciations. Additional voices are available for a US$25 fee (about £20, AU$30), which seems rather steep, holding it back from a higher place in our list.
0 notes
Text

My Cross Reference Hyperlinks Do Not Work When I Convert To PDF. What Do I Do?
Scenario:
This particular write-up will avoid one of those issues that occur when you least expect it. You worked very hard on a large document with a lot of Cross References. The attorney has asked that you create a PDF that preserves the Hyperlink aspect of the document in terms of cross references.
1. I did a lot of research on this issue. For the 2007 users, Microsoft has a plug-in to ensure that the Hyperlinks are preserved.
2. From 2010 onward, if you use the File, Save As method it should work, provided, that you do two things one of which “may” be going into certain menus of either Nuance Power PDF or Adobe Pro.
Note: You should also know under File, Options, Advanced, I had to uncheck "CTRL + Click to follow hyperlink".
I was able to get the PDF to work with MS Word 2010 and an older PDF reader so this is very doable! The only thing I did before converting over to PDF was to uncheck "CTRL + Click to follow hyperlink".
IF YOUR CROSS REFERENCES DO NOT WORK: Check the following menus from the respective softwares.
One, whether you are using the “Creation Settings Section” under Nuance which opens up the “Nuance PDF Settings For Word” that you “Check” under “Word Features” “Cross Reference Links”.
Or
Under Adobe I took this from their help section. You are looking for the Rich Content Type of PDF.
Select an article:
Choose an Adobe PDF preset for converting files
Do one of the following:
Start Acrobat Distiller.
(Windows) In Office 2010 or later applications, choose Acrobat > Preferences.
(Windows) In another authoring application or utility, choose Adobe PDF > Change Conversion Settings.
Choose a preset from the Default Settings (or Conversion Settings) menu.
Adobe PDF presets
A PDF preset is a group of settings that affect the process of creating a PDF. These settings are designed to balance file size with quality, depending on how the PDF is used. Most predefined presets are shared across Adobe Creative Cloud applications, including InDesign CC, Illustrator CC, Photoshop CC, and Acrobat. You can also create and share custom presets for your unique output requirements. A saved PDF preset file has the suffix .joboptions.
Note:
Acrobat Standard does not include the Extras folder. The presets installed in the Extras folder are only available in Acrobat Pro.
Rich Content PDF (Acrobat Pro)
Creates accessible PDF files that include tags, hyperlinks, bookmarks, interactive elements, and layers. This set of options uses PDF 1.6 and embeds subsets of all fonts. It also optimizes files for byte serving. These PDF files can be opened in Acrobat and Reader 7.0 and later. (The Rich Content PDF preset is in the Extras folder).
Note:
This preset was called eBook in earlier versions of some applications.
3. You also need to do the following in MS Word:
Go to File, click "options".
Click on "Advanced".
Uncheck "CTRL + Click to follow hyperlink"
Click "Ok".
4. It seems that the “Control Click” Option causes a conflict in the conversion for PDF. Removing that feature in MS Word, allows you to click on the Cross References in the finished PDF and the active link will then take you to the Referenced Paragraph.
5. NOTE: It should be noted that in newer versions of MS Word, I did not have to do anything but just convert the file to PDF. The combo of MS Word 2013 and up along with a newer version of PDF Reader was a seamless operation and the cross references worked just fine as soon as I tested them upon completion.
Training From An Inside Perspective
www.advanceto.com
888-422-0692 Ext. 1 and 2
Teacher Connected Books
www.legaltestready.com
www.awarenessexplosion.com
0 notes
Photo

18 Best Contact Form PHP Scripts for 2020
Are you looking for an easy to use contact form PHP script? Contact forms are a must-have for every website. They encourage your site visitors to engage with you, while potentially lowering the amount of spam you get.
For businesses, this engagement with visitors increases the chances of turning them into clients or customers and thus increasing revenue.
If you're looking for an easy and cost-effective contact form PHP script, read on!
Why You Need a Form on Your Website
Web forms contribute more than 60% of lead generation on a site, which means contact forms lead to higher conversions. Online forms also allow you as a business to collect data, which is crucial for any marketing success.
The good news is that forms are also easy to add to any website and can be customized to match your brand. Plus, they act as a security measure against spammers and bots.
The Best Contact Form PHP Scripts on CodeCanyon in 2020
CodeCanyon features over 200 Form PHP Scripts that you can purchase today. Below are some of the popular and best-selling PHP form scripts in the CodeCanyon library.
Some of the features you are guaranteed to get from these PHP contact form scripts include:
multiple file upload
ability to design any form
beautiful pre-designed templates
notifications
Ajax-enabled submission and validation
CAPTCHA options such as Google reCAPTCHA, Honeypot, etc.
auto-emailing
responsive design
form validation
14 Best Contact Form PHP Scripts at CodeCanyon
1. Best Seller: Quform - Responsive AJAX Contact Form
Quform is a versatile AJAX contact form that can be adapted to be a registration form, quote form, or any other form needed. It even has the option to save data to a database.
Best features:
three ready-to-use themes with six variations
ability to integrate into your theme design
ability to create complex form layouts
file uploads supported
and more
With tons of other customizations available, Quform: Responsive AJAX Contact Form is bound to keep the most discerning user happy.
2. PHP Form Builder
Another CodeCanyon top seller, PHP Form Builder includes the jQuery live validation plugin. It enables you to build any form and connect a database to insert, update, or delete records. It also allows you to send your emails using customizable HTML/CSS templates.
Best features:
over 50 pre-built templates included
highly customizable layout
accepts any HTML5 form elements
default options ready for Bootstrap 4
email sending with advanced options
Material Design and Foundation forms
and more
With loads of options for creating a variety of elegant contact forms and extensive documentation to help you on your way, PHP Form Builder is a top choice for PHP site owners.
3. Easy Forms: Advanced Form Builder and Manager
Easy Forms features an advanced drag-and-drop PHP form builder that lets you design and develop forms quickly without any coding or programming skills. It also features amazing themes and templates and the ability to send instant notifications. Easy Forms also includes a form analytics dashboard where you get to see an overview of form statistics, including conversions.
Other features include:
multi-language support
double opt-in for users
password protected forms
ability to export data
submission reports
advanced field validation
auto-responder and email notifications
4. Just Forms Full Version
Just Forms is a PHP framework that helps you create any form quickly and painlessly, without any programming knowledge. It features 120+ fully-functional forms, which you can build on to create your form. It has advanced features like the ability to save form data to a PDF and even create order forms with calculations.
Other features include:
fully responsive
social icons and buttons
120+ AJAX PHP forms with client-side and server-side validation
100+ ready-to-use templates
ability to export data to a CSV file and PDF document
ability to save data to a database
PHP CAPTCHA
protection against XSS, CSRF, and SQL injection attacks
jQuery enhancements such as date picker, date and time picker, color picker, numeric stepper, sliders, and many more
5. Ultimate PHP, HTML5 and AJAX Contact Form
The Ultimate PHP form script lets you create an AJAX-based contact form with built-in Google reCAPTCHA to protect against spam robots. It also lets you create both custom and mandatory fields, as well as adding multiple validations on custom fields. This system also supports file uploads for formats such as PNG, MS Word, and others.
Some of its best features include:
easy to install and mobile-friendly
SMTP authentication for user verification
custom thank you messages
AJAX-enabled (no page reloads for validation)
CSS animations
cross-site scripting (XSS) attack prevention
6. ContactMe: Responsive AJAX Contact Form
ContactMe is another bestseller that is extremely customizable and allows site owners to create different versions of contact forms to fit their needs. Besides, it is fully responsive and mobile-friendly. If you're looking for some inspiration, it features 28 combinations of ready-to-use forms and seven concrete examples to spark your creativity.
This is a script to consider for your next project.
Best features:
beautiful themes
easy to install
no database required
file attachment supported
secure
ability to set different language messages for each form
7. Zigaform PHP Form Builder: Contact and Survey
If you're looking for a universal PHP form builder, Zigaform is the right script for the job. It can be integrated with Joomla, Magento, PrestaShop, and any other PHP website. It lets you organize your form elements with a grid system and even enables you to assign conditional logic to your forms. When it comes to customizations, you are spoilt for choice as Zigaform comes with 42+ elements, over 650 fonts, and 769+ font icons, ensuring your forms are as attractive as you need them to be.
Other features include:
ability to filter and search submitted data
graphic charts of submitted data
notification email for users
file upload support
export form data to CSV and PDF
AJAX powered
spam protection
Zigaform is the perfect script to create a contact form for any website.
8. Universal Form Builder
Universal Form Builder is easy to use and can be integrated into any website, including Joomla, Magento, OpenCart, and so on. It is the perfect script to build your forms in seconds with the aid of a drag-and-drop system. It also lets you change the appearance of any element, thus ensuring your forms are consistent with your website theme.
Main features include:
multi-language support
fully responsive design
full skin customizer
background images
live preview during customizing
support for all browsers, including older versions of Internet Explorer
form and visit statistics
9. Multi-Purpose Form Generator
Just like the name suggests, Multi-Purpose Form Generator is an advanced web application that provides an easy drag-and-drop interface to build simple or complex forms in seconds. It also includes the ability to integrate your forms with Google reCAPTCHA to prevent spam submissions and bots.
Other features include:
ability to export form data
customizations according to your needs
Ajax-enabled forms
5+ different types of validation support
file upload support
preview forms before publishing
fully responsive
10. Multi-Step Form
The Multi-Step Form responsive PHP form script is suited for any business or organization. It is the perfect form to ensure that your visitors or clients will submit their quotes and also get valuable information regarding your business. Multi-Step Form uses PHP, jQuery, and Ajax, so no page reload will occur between steps. It also has the option of capturing the IP of the user and includes an anti-spam check.
Main features:
no database required
attractive design
popup alert for validation errors
file attachment support
calendar date picker
security guaranteed
multi-language support
11. Simple AJAX Contact Forms
These simple AJAX contact forms are created using the mobile first design philosophy. As a result, they look great on mobile devices. The forms have a minimalist approach to design and come with 8 different templates. The form is submitted in the background via AJAX and the script relies on PHP Mailer to handle the sending of all the form data to the desired email address.
Here is a brief list of its important features:
highly customizable with 8 different UI styles and a date picker
support for multiple file attachments
input validation
spam protection
smart error handling
redirect after submit
and many more
The script offers a lot more features and you can read about it on the plugin description page. Don't forget to check out the live demos of these forms.
12. ContactPLUS+ PHP Contact Form
ContactPlus+ is another clean and simple contact form. It comes in three styles: a blank slate, unstyled version that you can build on to suit your taste, a normal form with just the essential information needed on a contact form, and a longer form to accommodate an address.
Best features:
CAPTCHA verification
successful submission message
two styled and one unstyled version
and more
If you’re looking for a clean and simple contact form that will integrate easily on your PHP website, ContactPLUS+ PHP Contact Form is the one for you.
13. Conformy—PHP Ajax Modern Contact Form
Conformy is yet another user-friendly AJAX based contact form with a modern and stylish design.
The form is based on Bootstrap 4. So, Conformy will blend seamlessly with the overall design of the website if it is already using the Bootstrap framework. The styling of the form uses SCSS so changing things like the color of the form would be pretty easy. Overall, the theme uses a minimal design approach which makes it easier for you to make any modifications.
Main features:
live validation
custom CAPTCHA
fully responsive
cross-browser support
custom select options
14. Green Forms—Standalone Form Builder
Green Forms is a standalone form builder script that you can use to create multi-purpose forms that look great across different screen sizes.
The form builder is designed in a way that makes it incredibly easy for you to customize almost everything. This includes things like fonts and text color. Every form that you create using Green Forms can be added to any webpage you like with just a simple copy-paste of the provided HTML and JavaScript code.
Some useful features of the plugin:
drag and drop form builder
built-in anti spam protection
form styling
multi-step forms
conditional logic
over 20 form elements
and more
Free PHP Contact Form Scripts
Some people might want to try out some free PHP contact form scripts before they look at the premium options. This makes sense if you are on a tight budget. However, keep in mind that free scripts are usually not updated on a regular basis. You might also not get quick support form developers of these free scripts.
That being said, sometimes free is the right choice! Here are 4 free PHP contact form scripts that you might find useful.
1. Bootstrap Bay Contact Form
This contact form script is ideal for people who are already using Bootstrap for their websites. It comes with a simple contact form and very basic Maths based Captcha.
2. Simple PHP Contact Form
This is a simple contact form created using PHP with support for HTML5 form validation. It also offers JavaScript fallback for validation if the browser does not support HTML5 form validation.
3. Contactable jQuery Plugin
This is a jQuery plugin that allows anyone who is using a PHP based website to quickly integrate a feature rich contact form. It comes with all the necessary frontend and backend files that you might need to integrate the form into your website.
4. Spam Free PHP Contact Form
This PHP contact form script adds a hidden field to the form to prevent automated contact form spams. It also generates your email after the page has loaded using JavaScript. This prevents some simple scrapers from getting access to your email address. There are two versions of this script called Simple and Advanced. You can use either of them on your website.
Tips for Using a Contact Form
Contact forms provide a great way for your readers or clients to contact you when they want to share something or need help. Here are a few tips that might help you use contact forms more effectively and choose the ideal script for your project.
1. Always Validate User Input
Proper validation of user input helps both you as well as you readers. Some readers might fill out wrong type of information by mistake. Other might be more malicious and might want to harm your business. Validating form input will help you solve both these problems.
2. Use Some Anti-Spam Measures
This is also very important. There are a lot of bots and scrapers on the internet which just fill out any form they come across to spread spam. This can be a huge problem for businesses as they will have to waste time and resources to filter out the spam later.
3. Create Simple Forms with Clear Instructions
Basic contact forms are open-ended and can be filled out by everyone. However, let say a client wants your help with some technical issue. They might not know exactly what information they should provide to you to get help.
In such cases, it would greatly improve the overall productivity if they are told in advance in the contact form the minimum information you need from them.
The Best PHP Scripts on CodeCanyon
Explore thousands of the best and most useful PHP scripts ever created on CodeCanyon. With a low-cost one-time payment, you can purchase one of these high-quality PHP scripts and improve your website experience for you and your visitors.
Here are a few of the best-selling and up-and-coming PHP scripts available on CodeCanyon for 2020.
PHP
11 Best PHP Event Calendar and Booking Scripts... and 3 Free Options
Monty Shokeen
PHP
10 Best PHP URL Shortener Scripts
Monty Shokeen
PHP
11 Best Contact Form PHP Scripts for 2020
Monty Shokeen
PHP
Comparing the 5 Best PHP Form Builders (And 4 Free Scripts)
Monty Shokeen
PHP
Create Beautiful Forms With PHP Form Builder
Ashraff Hathibelagal
by Monty Shokeen via Envato Tuts+ Code https://ift.tt/2P6tfRC
0 notes