#signature pad js example
Explore tagged Tumblr posts
Visit Tumblr Blog
Explore Tumblr blogs with no restrictions, modern design and the best experience.
Last Seen Tumblr Blogs


Fun Fact
When “GIF” was named word of the year in 2012, Oxford Dictionaries U.S.A. credited Tumblr for pushing the word.
Text
7 Best iOS Emulators For PC (Windows And Mac) To Run iOS Apps
Employing a Android or i-OS emulator to conduct amobile program in your own desktop computer system has quite a few benefits, such as replicating the cell apparatus's behaviour without the extra hardware price. By way of instance, you may conduct games such as PUBG and Pokemon Proceed in your own pc using an emulator. Additionally, it helps program developers find abrupt behaviour throughout the screening period of their programs.
When there really are lots of deserving Android emulators out-there, this sort of answers for conducting i-OS programs on Windows and Mac are not ordinary. That will aid you, I have curated alist of this finest i-OS emulators for both PC and Mac. The majority of the listings within this short article are all liberated, yet many others allow you to make the most of the emulator app for some trial time interval. Thus, let us begin:
Notice: The i-OS emulation applications said from the record have been largely geared at program developers who would like to check their programs before forcing it into ultimate launch. Some programs may be described as considered a little specialized to prepare, and also routine users ready to make work with of an easy i-OS program in their own computer may not discover them even very beneficial. As previously mentioned, there is a genuine deficiency of easy-to-use i-OS simulation program.
Leading Rated I-OS Emulators for PC and Mac | 20-19 Edition
Appetize.io
Ripple
I-OS Simulator at Xcode
TestFlight
Electric Cellular Studio
Distant I-OS Simulator for Windows
iPadian
1. Appetize.io
I have comprised Appetize.io and recorded it at the very first place as a result of simplicity of use provided via this freemium services. Considering that the shortage of i-OS emulators for both personal computer and Mac at the very first location, it really is amazing to chance upon a method that requests one to add your own program on its site, and also you're all set.
The programmers may utilize Appetize.ion for streaming i-OS simulators from the internet web browser with the goal of embedding programs in testing, websites, along with alternative stages of evolution. Speaking concerning the prices, the completely absolutely totally free trial phase with this i-phone simulator provides you one hundred moments of flowing period to get programs. It's possible for you to track your utilization in the dash and also install alarms whenever you accomplish your limitation.
System: World Wide Net (browser-based)
Prices programs: No Cost of Charge, Top Quality
2. Ripple

Even though Appetize.io can be really actually just a browser-based i-phone emulator for PCs, Ripple does its occupation at the kind of the Chrome extension. It truly is very famous for analyzing crossplatform portable and html 5 software without moving right through an intricate installation procedure.
Targeted Toward programs such as PhoneGap and WebWorks, Ripple Intends to Assist programmers by providing attributes such as HTML DOM Inspection, Automatic Screening, JS Debugging, and much more. In realtime, an individual will conduct the programs on various monitor resolutions and apparatus. This i-OS emulator to the own computer will not have to get re started in the event that you select a fresh apparatus, making the knowledge pretty practical.
System: World Wide Net expansion (browser-based)
Prices programs: Totally Absolutely Free
3. I-OS Simulator at Xcode
Apple's home-grown Xcode program development environment for Mac has its app simulator for i-OS, tvOS, watchOS, along with iMessage. Therefore, if a person really is utilizing Xcode whilst the most important program development package, afterward it truly is adequate to categorize various kinds of interactions such as faucets, apparatus spinning, scrolling, and also other activities completed from the consumer.
Mac consumers may certainly kick off their programs from your Xcode job. What offers Safari a border around other complimentary i-phone emulators may be your skill to try web programs by obtaining Safari inside of Xcode.
System: Mac
Prices programs: Totally Absolutely Free
4. TestFlight
TestFlight, that is currently possessed by Apple, is frequently utilised by programmers to test their own i-OS programs coded with Xamarin. You may even think of it since Apple's formally advocated system for analyzing those programs.
TestFlight's intensive documentation can be an advantage tip with this particular i-OS emulator for computer system. This completely absolutely totally free program supports programs such as i-OS, watchOS, tvOS, along with iMessage. Additionally, it has an alternative for outside beta screening of all those programs previous to the last inspection. The drawback with the emulation assistance is an relatively technical installation, and also you additionally must produce a App Store source account.
System: Mac
Prices programs: Totally Absolutely Free
5. Electric Mobile Studio

Electric Cellular Studio Electric cellular Studio can be still a paid solution to make sure execute i-OS programs on Windows computer systems, however, it also provides the complete product identification for a week, helping to make it a qualified option with this particular specific list. Its emphasize features incorporate full size emulation of both I phones, I-pads, and reactive programs, and also the power to make utilize of exactly precisely the exact identical merchandise or service on just two computers to get shared job installations at your office along with dwelling.
Programmers additionally desire this i-phone emulator for Windows-10 due into this incorporated WebKit along with Chrome shredding software which produce their tasks simpler. An individual may add hot key navigation keys for mapping their favourite short cuts. Windows users may even readily incorporate the particular application to get i-OS program with Visual Studio.
System: Windows
Prices programs: Demo, Compensated out
6. Remoted iOS Simulator for Windows

Remoted I-OS Simulator for Windows Still another favorite choice to try i-OS software for your own Windows personal computer will be Remoted i-OS Simulator for Windows. This is really a developer-focused instrument which arrives pre-loaded like an integral part of Xamarin from Visual Studio. Microsoft has step by step documentation which can be found on its internet site that end consumers may trace along with examine their own programs together using the i-OS simulator.
The program's window indicates a pretty helpful tool bar on very best that's of use options such as House, Settings, Lock, and screen-shot. From Preferences, you also can empower contact ID-like performance, mimic moving and static requirements and shake gestures, spinning, etc.. The application also delivers iPhone-like signature gestures along with stylus inputsignal.
System: Windows
Prices programs: No Cost, Compensated out
7. iPadian

You can find lots of applications such as iPadian which can be pretty famous for supplying an I pad or even i-phone for example adventure on computer and Mac. But, these remedies do not allow you to upload your own app/code and examine drive that insteadthey do the job as a customized made coating towards the peak of one's OS, also something could put in particular iOS-like programs out of their program shop. In the event you only want touse an i-OS simulator which reproduces the appearance and design of i-OS hardware, then you also could really go for iPadian.
System: Windows, Mac
Replies programs: Compensated out
I expect that only enjoy our listing of Android emulators for PCs, you will likewise locate this iOS-focused record very valuable. In addition, we wish to make a new listing of retro match emulators so-on like RetroArch and PCSX2 also, so keep tuned in. Read Fossbytes!
0 notes
Text
Introduction to Rich web based Applications
Rich internet applications - A rich Internet application (RIA) is a Web application designed to deliver the same features and functions normally associated with desktop applications. RIAs generally split the processing across the Internet/network divide by locating the user interface and related activity and capability on the client side, and the data manipulation and operation on the application server side. Rich web-based application - A rich web application (originally called a Rich Internet Application RIA or Install able Internet Application) is a Web application that has many of the characteristics of desktop application software, typically delivered by way of a site-specific browser, a browser plug-in, an independent sandbox, extensive use of JavaScript, or a virtual machine. The concept is closely related to a single-page application, and may allow the user interactive features such as drag and drop, background menu, WYSIWYG editing, etc. Key features of RiWAs
Built with powerful development tools,
RIAs can run faster and be more engaging
can offer users a better visual experience and more interactivity than traditional browser applications that use only HTML and HTTP.
The benefits and advantages of the Rich Client are: ... Full interactive experience – Unlike Web applications that provide page-by-page interaction and feedback, the Rich Client provides a full interactive end-user experience. Minimal Total Cost of Ownership.

Rich GUIs in RiWAs use Delta-Communication to communicate with the server components. 1. DC happens behind the GUI - Eliminates page refreshed 2. DC can process asynchronously - Eliminates page freezing 3. DC works faster - Eliminates the work-wait pattern
What is Delta Communication?? Delta Communications, LLC, doing business as Clearwave Communications, provides local, long distance, data, and Internet telecommunications services to residences and businesses in Southern Illinois. It offers service plans, which include mobile, dial up and high speed Internet, and telephone systems
Advantages:
Delta modulation provides the benefit of lower bandwidth consumption because data transmitted as only one bit per sample.
Lower bandwidth makes the process of data communication more cost effective.
Context of Delta Communication
Simple-Pull-Delta-Communication (SPDC) - can be seen as the simplest form of DC
Used in AJAX
single XHR request to the server
client-side:Native JS support
Server-side:special technology is not needed
Pollingis used to simulate data-push
send XHR requests periodically to the server
client-side:Native JS support
Server-side : special technology is not needed
can increase network traffic(less scalable)
Blank responses can waste resources
Cometis used to simulate data-push
Long-lived XHR requests
Client-side: Native JS support
Server-side : Need a streaming server.special technology is not needed,can be implemented with standard web technologies.
Server-Sent-Events (SSE)is used (only) for true data-push
Similar to coment, but no client requests
client-side: HTML5 provides native JS support
server-side:need a streaming server,special technology is not needed , can be implemented with standard web technologies.
reduce network traffic than polling/comet(more scalable)
blank responses and requests are totally eliminated.
WebSocket(WS)is bi-directional
Supports both data-pull and true data-push
client-side : HTML5 provides native JS support
server-side : Need a WS server.complex
Reduce network traffic than polling/comet/SSE/(highly scalable, 10CK is addressed)
history and the evolution of the XHR and AJAX XHR - The concept behind the XMLHttpRequest object was originally created by the developers of Outlook Web Access (by Microsoft) for Microsoft Exchange Server 2000. ... Mozilla created a wrapper to use this interface through a JavaScript object which they called XMLHttpRequest An Ajax ("Asynchronous Javascript and XML") request is sometimes called an XHR request ("XmlHttpRequest"), which is the name most browsers give the object used to send an Ajax request, because at least initially Ajax calls involved the sending and receiving of XML but now it's just as common to send/receive JSON, plain
role of the DC-engine in RiWAs. internal and external corporate communications and marketing functions including advertising, corporate brand management and community engagement. Client-side controller and model reduce the roundtrips to the server.Improve the performance and increase the scalability.Delta-communication further improves the performance, increases the scalability, and as a result provides higher user experience. role of the DC-Bus The term web service is either:
(generic) a service offered by an electronic device to another electronic device, communicating with each other via the World Wide Web, or
(specific) a web service implemented in the particular technology or brand, e.g W3C Web Services.
In a web service, the Web technology such as HTTP—originally designed for human-to-machine communication—is utilized for machine-to-machine communication, more specifically for transferring machine-readable file formats such as XML and JSON. In practice, a web service commonly provides an object-oriented web-based interface to a database server, utilized for example by another web server, or by a mobile app, that provides a user interface to the end user. Many organizations that provide data in formatted HTML pages will also provide that data on their server as XML or JSON, often through a web service to allow syndication, for example Wikipedia's Export. Another application offered to the end user may be a mashup, where a web server consumes several web services at different machines, and compiles the content into one user interface.
Ajax Traditionally webpages required reloading to update their content. For web-based email this meant that users had to manually reload their inbox to check and see if they had new mail. This had huge drawbacks: it was slow and it required user input. When the user reloaded their inbox, the server had to reconstruct the entire web page and resend all of the HTML, CSS, JavaScript, as well as the user's email. This was hugely inefficient. Ideally, the server should only have to send the user's new messages, not the entire page. By 2003, all the major browsers solved this issue by adopting the XMLHttpRequest (XHR) object, allowing browsers to communicate with the server without requiring a page reload. The XMLHttpRequest object is part of a technology called Ajax (Asynchronous JavaScript and XML). Using Ajax, data could then be passed between the browser and the server, using the XMLHttpRequest API, without having to reload the web page. With the widespread adoption of the XMLHttpRequest object it quickly became possible to build web applications like Google Maps, and Gmail that used XMLHttpRequest to get new map tiles, or new email without having to reload the entire page. Ajax requests are triggered by JavaScript code; your code sends a request to a URL, and when it receives a response, a callback function can be triggered to handle the response. Because the request is asynchronous, the rest of your code continues to execute while the request is being processed, so it's imperative that a callback be used to handle the response. Unfortunately, different browsers implement the Ajax API differently. Typically this meant that developers would have to account for all the different browsers to ensure that Ajax would work universally. Fortunately, jQuery provides Ajax support that abstracts away painful browser differences. It offers both a full-featured $.ajax() method, and simple convenience methods such as $.get(), $.getScript(), $.getJSON(), $.post(), and $().load(). Most jQuery applications don't in fact use XML, despite the name "Ajax"; instead, they transport data as plain HTML or JSON (JavaScript Object Notation). In general, Ajax does not work across domains. For instance, a webpage loaded from example1.com is unable to make an Ajax request to example2.com as it would violate the same origin policy. As a work around, JSONP (JSON with Padding) uses <script> tags to load files containing arbitrary JavaScript content and JSON, from another domain. More recently browsers have implemented a technology called Cross-Origin Resource Sharing (CORS), that allows Ajax requests to different domains.
The $.ajax() Function The jQuery $.ajax() function is used to perform an asynchronous HTTP request. It was added to the library a long time ago, existing since version 1.0. The $.ajax() function is what every function discussed in the previously mentioned article calls behind the scene using a preset configuration. The signatures of this function are shown below:

The url parameter is a string containing the URL you want to reach with the Ajax call, while options is an object literal containing the configuration for the Ajax request. In its first form, this function performs an Ajax request using the url parameter and the options specified in options. In the second form, the URL is specified in the options parameter, or can be omitted in which case the request is made to the current page. The list of the options accepted by this function, described in the next section, is very long. So, I’ll keep their description short. In case you want to study in-depth their meaning, you can refer to the official documentation of $.ajax(). The option Parameter There are a lot of different options you can specify to bend $.ajax() to your need. In the list below you can find their names and their description sorted in alphabetic order:
accepts: The content type sent in the request header that tells the server what kind of response it will accept in return
async: Set this options to false to perform a synchronous request
beforeSend: A pre-request callback function that can be used to modify the jqXHR object before it is sent
cache: Set this options to false to force requested pages not to be cached by the browser
complete: A function to be called when the request finishes (after success and error callbacks are executed)
contents: An object that determines how the library will parse the response
contentType: The content type of the data sent to the server
context: An object to use as the context (this) of all Ajax-related callbacks
converters: An object containing dataType-to-dataType converters
crossDomain: Set this property to true to force a cross-domain request (such as JSONP) on the same domain
data: The data to send to the server when performing the Ajax request
dataFilter: A function to be used to handle the raw response data of XMLHttpRequest
dataType: The type of data expected back from the server
error: A function to be called if the request fails
global: Whether to trigger global Ajax event handlers for this request
headers: An object of additional headers to send to the server
ifModified: Set this option to true if you want to force the request to be successful only if the response has changed since the last request
isLocal: Set this option to true if you want to force jQuery to recognize the current environment as “local”
jsonp: A string to override the callback function name in a JSONP request
jsonpCallback: Specifies the callback function name for a JSONP request
mimeType: A string that specifies the mime type to override the XHR mime type
password: A password to be used with XMLHttpRequest in response to an HTTP access authentication request
processData : Set this option to false if you don’t want that the data passed in to the data option (if not a string already) will be processed and transformed into a query string
scriptCharset: Sets the charset attribute on the script tag used in the request but only applies when the “script” transport is used
statusCode: An object of numeric HTTP codes and functions to be called when the response has the corresponding code
success: A function to be called if the request succeeds
timeout: A number that specifies a timeout (in milliseconds) for the request
traditional: Set this to true if you wish to use the traditional style of param serialization
type: The type of request to make, which can be either “POST” or “GET”
url: A string containing the URL to which the request is sent
username: A username to be used with XMLHttpRequest in response to an HTTP access authentication request
xhr: A callback for creating the XMLHttpRequest object
xhrFields: An object to set on the native XHR object
That was pretty long, isn’t it? Well, as developers you probably have stopped reading this list at the fifth or sixth element I guess, but that’s fine. The next section will be more exciting because we’ll put the $.ajax() function and some of these options into action.
Putting It All Together In this section we’ll see this function and some of its options in action. Example of $.ajax()
We’ll start with a simple demo that reproduces the same code we developed in the previous article, but this time we’ll adopt $.ajax(). The code I’m talking about is shown below for your commodity:
Updating this snippet to employ the $.ajax() function, we obtain the code shown below:
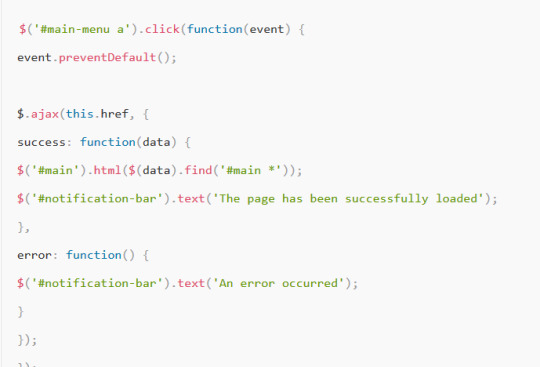
Here can see that I used the first form of the function. I’ve specified the URL to send the request to as the first parameter and then an object of options as the second parameter. The latter takes advantage of just two of the several properties discussed in the previous section: success and error to specify what to do in case of success or failure of the request respectively.
0 notes
Text
Intro to MDX in Gatsby
Most of you have probably used Markdown files in your Gatsby.js sites, and you already know it’s an amazing way to write content. But plain Markdown is geared towards text-based content, and it can be limiting when you want to step outside of that use case. That all changes with MDX, a superset of Markdown that allows us to embed JSX directly into Markdown files. Sounds awesome, doesn’t it? In this article we’ll explore the basics of MDX with Gatsby, including some introductory techniques to help you start using it right away.
Before we dive in, you will need to have a Gatsby project that is set up and ready to edit. If you need help getting to that point, please follow the steps in Your First Steps with Gatsby v2 and then return here afterwards.
🐊 Alligator.io recommends �
️⚛️ React for Beginners by Wes Bos
ⓘ About this affiliate link
Installation
Thanks to Gatsby’s incredible plugins library, the installation process is easy! Using MDX with Gatsby only requires a single plugin, gatsby-plugin-mdx, along with the MDX peer dependencies.
Let’s install those now, like this:
$ yarn add gatsby-plugin-mdx @mdx-js/mdx @mdx-js/react
Let’s also install gatsby-source-filesystem so that we can make use of frontmatter, generate Gatsby nodes from local files, and use import/export functionality in our MDX files:
$ yarn add gatsby-source-filesystem
While not technically required, this step is highly recommended — as it really opens the full potential of MDX content with Gatsby!
Configuration
Like with all Gatsby plugins, we need to add configuration details to the plugins section of gatsby-config.js.
Let’s configure both gatsby-plugin-mdx and gatsby-source-filesystem like this:
gatsby-config.js
module.exports = { //...siteMetadata, etc plugins: [ { resolve: `gatsby-source-filesystem`, options: { name: `pages`, path: `${__dirname}/src/pages/`, }, }, { resolve: `gatsby-plugin-mdx`, defaultLayouts: { default: require.resolve(`./src/components/layout.js`), }, }, // ... other plugins ], }
Notice that we are setting a default key in the defaultLayouts option. This will automatically wrap all MDX files with our site’s default layout.js component.
The gatsby-config.js file has been edited, so don't forget to restart the development environment before proceeding!
Configuration options
There are several configuration options available for gatsby-plugin-mdx:
extensions: (Array of strings) Sets file extensions that will be processed as MDX. I typically set this to ['.mdx', '.md'] to also process normal Markdown files as MDX.
defaultLayouts: (Object) This is frequently used when you have multiple types of generated content, such as blog posts and product reviews. (And as seen above, you can also set a default key to auto-wrap all MDX files.)
gatsbyRemarkPlugins: (Array of plugin objects) This allows us to use various Gatsby-specific remark plugins along with the MDX processing. The gatsby-remark-images plugin is often used here.
remarkPlugins: (Array of plugin objects) Similar to the above option, but for non-Gatsby dependent remark plugins.
rehypePlugins: (Array of plugin objects) Similar to above, but for rehype plugins.
mediaTypes: (Array of strings) Sets which media types are processed. (You probably won’t need to use this very often.)
Full details on the usage of these options can be found in the plugin’s documentation. These docs are excellent, and I highly recommend going over them after reading this article! 🔍
Basic Usage
The configuration we have so far can already process all .mdx files in our site. And thanks to Gatsby’s built-in behavior, if we add them to the src/pages/ directory they will also become pages automatically!
Let’s do that now by creating a simple MDX file at src/pages/mdx-intro/index.mdx. We’ll start off with some frontmatter and basic Markdown text, like a typical Markdown blog page would have:
/src/pages/mdx-intro/index.mdx
--- title: MDX is Magical! path: /mdx-intro date: 2019-08-25 --- # Hooray For MDX! This will be like turbo-charged Markdown!
You can view this new page by visiting http://localhost:8000/mdx-intro in your browser.
You’ll probably recognize this page creation pattern if you went through the Your First Steps with Gatsby v2 article, the only difference being this is an MDX file instead of Markdown. This is nothing special or new so far. Let’s change that!
Using Components in MDX
One of the primary features of MDX is that we can import and use JSX components right inside of Markdown content.
To demonstrate this, let’s create a simple component at /src/components/TitleBar.js that will let us display a customized title bar.
/src/components/TitleBar.js
import React from 'react'; const TitleBar = ({ text, size, bkgdColor }) => ( <div style={{ margin: '2rem 0', padding: '2rem', backgroundColor: bkgdColor || '#fff', }} > <h2 style={{ fontSize: size || '18px', margin: 0, }} > {text} </h2> </div> ); export default TitleBar;
Next, let’s update our MDX file to look like this:
/src/pages/mdx-intro/index.mdx
--- title: MDX is Magical! path: /mdx-intro date: 2019-08-25 --- import TitleBar from "../../components/TitleBar.js"; <TitleBar size={"32px"} bkgdColor={"#4aae9b"} text={props.pageContext.frontmatter.title} /> This will be like turbo-charged Markdown!
There are two things to note here:
First, we just imported and used a React component directly inside Markdown! Let that sink in for a moment, because this is an incredibly powerful concept. (Imagine blog posts with animated charts and/or dynamically loaded data, complex interactivity, and more.)
Second, you may have noticed that we are able to access the frontmatter values from props.pageContext.frontmatter. This can be quite useful, too!
Important: If your MDX files contain frontmatter, always place any import statements after the frontmatter block!
Go ahead and view the updated page in your browser, and try editing the size and bkgdColor props to watch it update. It’s a really simple example, but again: we are using a React component inside Markdown! Pretty sweet, right?!
Assigning Layouts
As mentioned in the configuration section, MDX provides us with an easy way to set up custom layouts. These layouts are convenient for wrapping additional styling and/or content around our MDX files.
Configuring default layouts
We can set up default layouts for our MDX files in gatsby-config.js, even for specific locations. Take a look at this example:
gatsby-config.js
module.exports = { plugins: [ { resolve: `gatsby-source-filesystem`, options: { name: `pages`, path: `${__dirname}/src/pages/`, }, }, { resolve: `gatsby-source-filesystem`, options: { name: `posts`, path: `${__dirname}/src/blog/`, }, }, { resolve: `gatsby-plugin-mdx`, options: { defaultLayouts: { posts: require.resolve("./src/components/blog-layout.js"), default: require.resolve("./src/components/layout.js"), }, }, }, ], }
In this example, we have configured our site so that all MDX files sourced from the /src/blog directory would use blog-layout.js as a layout/wrapper. We also set up a default config here, too.
Note: This behavior doesn't currently seem to work as expected with MDX files sourced from the pages directory. (But you can still wrap them with a default layout setting, like we have currently done.)
Manually assigning or removing layouts
Sometimes you will need to wrap a specific MDX file with a unique layout, or with no layout at all. This can be easily done by using JavaScript’s export default syntax inside our MDX files, which overrides any defaultLayout settings. We’ll cover that in the next section!
Importing Other MDX Files
In addition to importing/using JSX components, we can also import and use other MDX files as if they were components. (Hint: they actually are!)
Let’s create a new MDX file in our components directory, at /src/components/postSignature.mdx. We will use this at the bottom of our MDX page as an author’s signature.
/src/components/postSignature.mdx
##### Thanks for Reading! *🐊 Al E. Gator | www.alligator.io | [email protected]* export default ({ children }) => ( <> {children} </> )
Notice the export default statement at the bottom of the file. As mentioned in the previous section, this is how we can override our defaultLayout configuration settings. In this case, we’re exporting an empty <> wrapper around our signature instead.
Moving along, let’s import this MDX signature into our main MDX file, over at /src/pages/mdx-intro/index.mdx:
/src/pages/mdx-intro/index.mdx
--- title: MDX is Magical! path: /mdx-intro date: 2019-08-25 --- import TitleBar from "../../components/TitleBar.js"; import PostSignature from "../../components/postSignature.mdx"; <TitleBar size={"32px"} bkgdColor={"#4aae9b"} text={props.pageContext.frontmatter.title} /> This is like turbo-charged Markdown! <PostSignature />
You should now see this signature at the bottom of the mdx-intro page. Awesome!! 😎
GraphQL Queries
Thanks to the plugin combo of gatsby-plugin-mdx and gatsby-source-filesystem, our MDX pages are also readily available to us via GraphQL queries.
We won’t spend much time on this, as this functionality is nearly identical to querying plain Markdown files in the same manner. (The only difference is that the MDX nodes are in allMdx and mdx instead of allMarkdownRemark and markdownRemark.)
Here’s an example query that would fetch the frontmatter of all available MDX files:
query { allMdx { edges { node { frontmatter { title path date(formatString: "MMMM DD, YYYY") } } } } }
Providing Other Data
We can also provide additional data through our MDX files by using JavaScript’s export syntax, (not to be confused with export default as used above!) Any exported variables are added to the GraphQL schema automatically, so that we can use it when needed in GraphQL queries and/or during rendering.
Here’s some example “Food Truck Review” data that we could add to our MDX page:
export const myReviews = [ { name: "Tim's Tacos", overall: 9, variety: 7, price: 8, taste: 9 }, { name: "Noodleville", overall: 7, variety: 5, price: 6, taste: 8 }, { name: "Waffle Shack", overall: 6, variety: 5, price: 4, taste: 6 }, ];
After adding that anywhere in the file, we could query the data in GraphQL by accessing allMdx.nodes.exports, like this:
query MdxExports { allMdx { nodes { exports { myReviews { name overall variety price taste } } } } }
This is just a really basic demo, but this functionality can be used in incredibly creative and dynamic ways.
A Practical Example
Let’s finish up by adding a fun & practical example to our page. We’re going to use the myReviews data that we set up above to display an animated bar chart!
First, let’s add the Recharts library to our site. This is a powerful but lightweight charting library that I use frequently in my client projects.
$ yarn add recharts
Next, we will use Recharts to create a reusable bar chart component. Since this isn’t an article about Recharts, just go ahead and create a new file at /src/components/BarChart.js and paste in the following code:
/src/components/BarChart.js
import React, { PureComponent } from 'react'; import { BarChart, Bar, XAxis, YAxis, CartesianGrid, Tooltip, Legend, ResponsiveContainer, } from 'recharts'; const colorsList = ['#008f68', '#6db65b', '#4aae9b', '#dfa612']; class ExampleChart extends PureComponent { render() { return ( <div style={{ width: '100%', height: 350 }}> <ResponsiveContainer> <BarChart data={this.props.data}> <CartesianGrid strokeDasharray="2 2" /> <XAxis dataKey="name" /> <YAxis type="number" domain={[0, 10]} /> <Tooltip /> <Legend /> {this.props.bars.map((bar, i) => ( <Bar dataKey={bar} fill={colorsList[i]} key={`bar_${i}`} /> ))} </BarChart> </ResponsiveContainer> </div> ); } } export default ExampleChart;
Now we have a nice bar chart component set up, so we just need to import and use it in the MDX page. Here’s our final version:
/src/pages/mdx-intro/index.mdx
--- title: MDX is Magical! path: /mdx-intro date: 2019-08-25 --- import TitleBar from '../../components/TitleBar'; import PostSignature from '../../components/postSignature.mdx'; import BarChart from "../../components/BarChart"; export const myReviews = [ { name: "Tim's Tacos", overall: 9, variety: 7, price: 8, taste: 9 }, { name: "Noodleville", overall: 7, variety: 5, price: 6, taste: 8 }, { name: "Waffle Shack", overall: 6, variety: 5, price: 4, taste: 6 }, ]; <TitleBar text={props.pageContext.frontmatter.title} size={'32px'} bkgdColor={'#4aae9b'} /> This page is built with turbo-charged Markdown! #### My Food Reviews: <BarChart data={myReviews} bars={["overall", "variety", "price", "taste"]} /> <PostSignature />
You should now see a sweet-looking multi-colored bar chart that animates into view, and even has animated tooltips on rollover. 📊👈
And I’ll say it again:This is all inside a Markdown (MDX) page! Just think of all the interesting blog posts and pages you can create in no time flat…
Conclusion
We have really covered a lot in this intro to MDX with Gatsby! Hopefully it wasn’t too overwhelming, and you can see that this combo is a total game-changer for rapid website development.
However, we only scratched the surface of what is possible. From here, I recommend digging into the Gatsby docs section on MDX. It’s a rabbit-hole worth venturing down, I promise! 🕳🐇
via Alligator.io https://ift.tt/2Z6FtMW
0 notes
Photo

New Post has been published on https://cryptomoonity.com/hero-node-project-progress-report%ef%bc%8810-8-10-19%ef%bc%89/
Hero Node Project Progress Report(10.8–10.19)
Hero Node Project Progress Report(10.8–10.19)
Hero Node Project Progress Report(10.8–10.19)
Development
Contract Development
– Complete DTrade Phase II contract development, including main functions such as pending orders and transactions.
– Complete the main interface test for the DTrade contract.
Hero-store Development
– Decentralized shopping mall contract development.
– Increase merchant and seller operations, and provide sellers with the ability to add, delete, change, and check.
Front-end development
– Complete DTrade corresponding front page, including order list and order interface.
– Complete optimization of some Hero components and performance adaptation across platforms.
– Fix the Hero-table-cell component in Hero-js.
– Basically complete the creation of the Hero-store mall, add, delete sellers, set, modify, delete the page of the ad rights list.
– Debug the external custom element components of the Hero-js framework.
– Fix Hero-js nav navigation bar adaptation problem, add left and right click buttons.
Hero Mobile Optimization
– Hero Mobile works with js-side test development.
– Add a usage example of Hero Mobile sample project.
– Test the fingerprint signature and fingerprint function and modify related bugs.
Marketing
1. On October 15th, members of the Hero Node operations team participated in the IFPI Tenth Financial Technology Decision-Makers Conference hosted by the Financial Research Institute and the Policymakers Group. The conference focused on “Dialogue on the Future of Financial Technology”, from regulatory policy and regulation. Technology, the Belt and Road, financial technology strategic cooperation, future banking, auto finance, insurance technology, consumer finance, supply chain finance, blockchain, big data, cloud computing, artificial intelligence, payment innovation, investment and financing, etc.
2. On October 16th, members of the Hero Node operations team participated in the 1118th Golden Reward International Creative Festival. Golden Rewards is the world’s first commercial and creative award. Currently, there are more than 20 countries and regions in more than 20 countries and regions. Nearly 500 first-line companies submit thousands of excellent commercial creative works to compete. The annual Golden Reward International Creative Festival attracts people from The active participation of creative people all over the world has become one of the largest creative festivals in Asia.
3. On October 18th, members of the Hero Node operations team participated in the QCon Global Software Development Conference, a comprehensive technology event hosted by InfoQ China. The conference is mainly for technical team leaders, architects, engineering directors and developers who have more than 5 years of work experience. They invited domestic and foreign technical experts as guest speakers to share technical innovations and practices based on hot topics.
4. On October 19th, members of the Hero Node operation team participated in the 2018 (2nd) Future Banking and Financial Technology Innovation Summit. The summit set up keynote speeches, roundtable discussions, tea breaks and other links for decision-making groups in the banking and financial industry chain. Experts from all walks of life provide an optimal platform for knowledge exchange, experience sharing, thinking collisions, point of view, and business opportunity discovery.
5. On October 20th, members of the Hero Node operation team participated in the SAIC 2018 Shanghai Artificial Intelligence Conference hosted by Donghua University. The conference focused on the development of artificial intelligence and technological evolution and artificial intelligence with the theme of “AI empowerment and wisdom for the future”. The new model of interaction with the industry and the core link of artificial intelligence invites city leaders, expert academicians, business leaders, and industry users to discuss new challenges that collide with artificial intelligence and industrial interaction.
END
In an open world, Hero Node welcomes any and all feedback. Especially helpful feedback will be rewarded!
Talk to us:
Email: [email protected]
Twitter: https://twitter.com/hero_node
Medium: https://medium.com/@hero_node
Reddit: https://www.reddit.com/r/HeroNodeOfficial/
Source
Related
What is Blockchain Title: What is Blockchain Video duration: 8:53 Views: 2 Likes: 0 Dislikes: 0 Publication date: 2018-09-03 04:02:20 https://www.youtube.com/watch?...
Nucleus Vision’s recently announced protocol to po... Nucleus Vision’s recently announced protocol to power Govt of Assam Blockchain applications Nucleus Vision’s recently announced protocol to power...
How to Identify Top Performing Cryptocurrencies to... Title: How to Identify Top Performing Cryptocurrencies to Add to Your Portfolio Video duration: 3:28 Views: 145 Likes: 11 Dislikes: 0 Publication ...
Top 5 Industries Already Being Disrupted by Crypto... Title: Top 5 Industries Already Being Disrupted by Cryptocurrency! Video duration: 7:48 Views: 1869 Likes: 126 Dislikes: 6 Publication date: 2018-...
.yuzo_related_post .relatedthumb background: !important; -webkit-transition: background 0.2s linear; -moz-transition: background 0.2s linear; -o-transition: background 0.2s linear; transition: background 0.2s linear;;color:!important; .yuzo_related_post .relatedthumb:hoverbackground:#fcfcf4 !important;color:!important; .yuzo_related_post .yuzo_text color:!important; .yuzo_related_post .relatedthumb:hover .yuzo_text color:!important; .yuzo_related_post .relatedthumb acolor:!important; .yuzo_related_post .relatedthumb a:hovercolor:!important; .yuzo_related_post .relatedthumb:hover a color:!important; .yuzo_related_post .relatedthumb margin: 0px 0px 0px 0px; padding: 5px 5px 5px 5px;
0 notes