#sigquit
Explore tagged Tumblr posts
Visit Tumblr Blog
Explore Tumblr blogs with no restrictions, modern design and the best experience.
Last Seen Tumblr Blogs


Fun Fact
12.7% of mobile users access Tumblr.
Text
Apple - Prevent "<application> quit unexpectedly" message on sigquit

0 notes
Text
[Media] Sudo-Stealer
Sudo-Stealer Sudo-Stealer is an *nix program for stealing sudo passwords by disguising as the original sudo software. Its capabilities are almost similar to that of the original sudo program as such as displaying the same input messages, error messages like incorrect attempts and also handling of some system signals such as SIGQUIT, SIGINT & SIGTSTP. It verify the password, stores it in json support as well as username, the command that was executed and the execution time in a file for later usage. Features: ▫️ Maximum of 3 wrong password attempts ▫️ Timeouts the superuser session's after 15 minutes ▫️ Stores correct passwords with their respective commands and the time it was executed https://github.com/Genaro-Chris/Sudo-Stealer

0 notes
Text
Linuxのプロセス強制終了について
実行コマンドについて
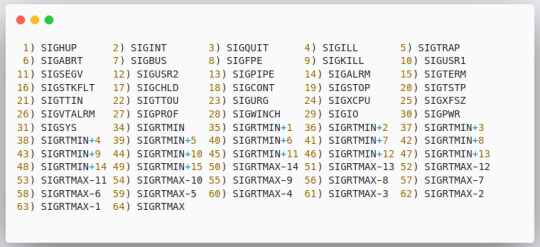
// 強制終了(シグナルID 9)を指定する $ kill -9 $PID // シグナルIDの一覧 $ kill -l 1) SIGHUP 2) SIGINT 3) SIGQUIT 4) SIGILL 5) SIGTRAP 6) SIGABRT 7) SIGBUS 8) SIGFPE 9) SIGKILL 10) SIGUSR1 11) SIGSEGV 12) SIGUSR2 13) SIGPIPE 14) SIGALRM 15) SIGTERM 16) SIGSTKFLT 17) SIGCHLD 18) SIGCONT 19) SIGSTOP 20) SIGTSTP 21) SIGTTIN 22) SIGTTOU 23) SIGURG 24) SIGXCPU 25) SIGXFSZ 26) SIGVTALRM 27) SIGPROF 28) SIGWINCH 29) SIGIO 30) SIGPWR 31) SIGSYS 34) SIGRTMIN 35) SIGRTMIN+1 36) SIGRTMIN+2 37) SIGRTMIN+3 38) SIGRTMIN+4 39) SIGRTMIN+5 40) SIGRTMIN+6 41) SIGRTMIN+7 42) SIGRTMIN+8 43) SIGRTMIN+9 44) SIGRTMIN+10 45) SIGRTMIN+11 46) SIGRTMIN+12 47) SIGRTMIN+13 48) SIGRTMIN+14 49) SIGRTMIN+15 50) SIGRTMAX-14 51) SIGRTMAX-13 52) SIGRTMAX-12 53) SIGRTMAX-11 54) SIGRTMAX-10 55) SIGRTMAX-9 56) SIGRTMAX-8 57) SIGRTMAX-7 58) SIGRTMAX-6 59) SIGRTMAX-5 60) SIGRTMAX-4 61) SIGRTMAX-3 62) SIGRTMAX-2 63) SIGRTMAX-1 64) SIGRTMAX
ref
linux killできないプロセスを強制終了する
0 notes
Text
Lab 8: Signals Solution
Lab 8: Signals Solution
You are given a basic signal handling program. Extend it to: * Reset the counter to 0 every 15 seconds using SIGALRM. Make sure this works every 15 seconds, not just once. * Add 5 to the counter when the user presses Ctrl+\ (SIGQUIT) * Add 10 to the counter when SIGUSR1 is received * Exit gracefully (print the final count and “Goodbye!”) when SIGINT is received (already provided) Sending…

View On WordPress
0 notes
Text
Comando kill no Linux (envia sinais) [Guia Básico]

O Comando kill no Linux envia sinais para os processos. Ele é usado geralmente para terminar a execução de processos identificados pelo seu PID. Se nenhum sinal específico for passado como parâmetro, o kill irá enviar o sinal SIGTERM (15) para terminar o processo de forma elegante. Neste exemplo o kill Força o servidor de web identificado pelo PID 1953 a ler novamente o seu arquivo de configuração: $ ps aux | grep httpdwwwrun 1952 0.0 1.7 93232 2248 ? S 16:15 0:00 /usr/sbin/httpd -f /etc/httpd/httpd.confwwwrun 1953 0.0 1.7 93232 2248 ? S 16:15 0:00 /usr/sbin/httpd -f /etc/httpd/httpd.confwwwrun 1954 0.0 1.7 93232 2248 ? S 16:15 0:00 /usr/sbin/httpd -f /etc/httpd/httpd.conf # kill –HUP 1953 Termina abruptamente os processos de serviço de web com os PIDs 1953 e 1954: # kill –9 1953 1954 A opção -l do kill oferece uma lista de sinais e seus respectivos códigos: $ kill -l 1) SIGHUP 2) SIGINT 3) SIGQUIT 4) SIGILL 5) SIGTRAP 6) SIGABRT 7) SIGBUS 8) SIGFPE 9) SIGKILL 10) SIGUSR1 11) SIGSEGV 12) SIGUSR2 13) SIGPIPE 14) SIGALRM 15) SIGTERM ( ... ) Um comando que facilita enviar sinais para processos que tem vários processos filhos é o killall. https://youtu.be/xwcD5xrR5nE Aprenda muito mais sobre Linux em nosso curso online. Você pode efetuar a matrícula aqui. Se você já tem uma conta, ou quer criar uma, basta entrar ou criar seu usuário aqui. Gostou? Compartilhe Read the full article
0 notes
Link
In this post, we will explore how can we control processes?
Foreground Processes The foreground processes are those which can be seen on UI and require some sort of user input. For example, a text editor.
Background Processes The background processes are those which do not require any form of input from the user and run automatically in the background.
Let's take an example, that we want to run a Spring Boot Gradle application using the command gradle bootrun.

Now the process has started but we cannot access the terminal.
What if we want to move the process in the background?
To move the process in the background all we have to do is press Ctrl + Z

In the above example, we can see that the process is now moved to the background and it returns the process id (PID) along with status of suspended.
But what is the meaning of suspended here?
The suspend state specifies that our process is not terminated but is present in a suspended state.
Okay, so when we use the Ctrl + Z the process is temporarily stopped.
What if we wanted to bring the process to the foreground again?
To bring the process to foreground we use the command fg

In the above example, we moved our process to the foreground again using the command fg and it returned us the status continued with PID.
Now, what if we want to terminate the process?
To terminate a process we press Ctrl + C
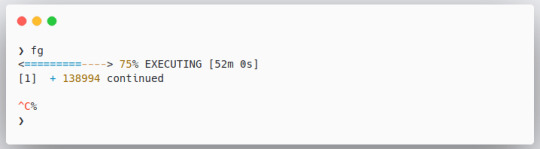
In the above example, we pressed Ctrl + C to terminate the running process.
Till now we have seen how to run a process in the foreground, move the process to background, and bring the process to the foreground again.
What if we wanted to start the process in the background?
To run a process in the background all we need to do is write & at the end of our command
Let's take an example that we want to run gedit in the background
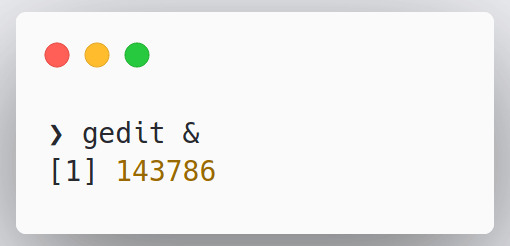
In the above example, we used the command gedit & and ran the process in the background and we got a process id(PID) in return.
So the process is running in the background but how can we confirm it?
To check all the processes in our current terminal we use the command jobs.
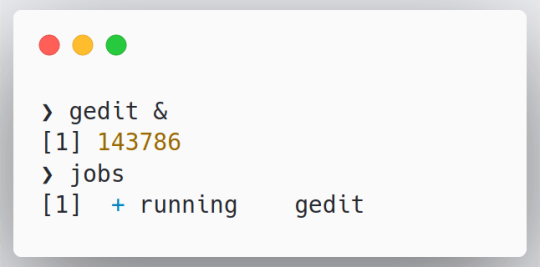
In the above example, we can see that a job is running in the background named gedit.
Now, we have already seen how to bring a process to the foreground but what if there are multiple processes?
To bring a specific process to the foreground we use the following syntax
fg #{process_number}
Let's take an example and bring our gedit job to the foreground
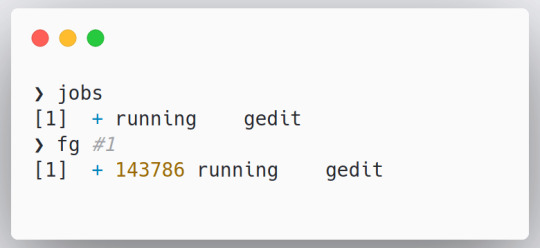
In the above example, we used the command fg #1 and brought the gedit process to the foreground again.
Now, let's have a look at how to control processes using signals
We use the kill command to send signals to programs.
There are many different signals we can send using the kill command and we can list these signals using the command kill -l.
Let us explore a few of the most used signals
Signal Value Description SIGHUP 1 Hangup detected on controlling terminal or death of controlling the process SIGINT 2 Interrupt from keyboard It is the action performed when we press Ctrl + C SIGQUIT 3 Quit from keyboard SIGKILL 9 Immidiately kill the process without any time for cleanup SIGTERM 15 It is used to Terminate a process. It is the default action with KILL command SIGCONT 19,18,25 Used to Continue the process if stopped SIGSTOP 17,19,23 Used to Stop a process
The signals SIGKILL and SIGSTOP cannot be caught, blocked, or ignored.
To kill any process using kill command we need the PID of the respective process. We can either use the name of the signal or the value of a signal along with PID to kill any process.
Let's take an example, that we want to kill the screenshot application
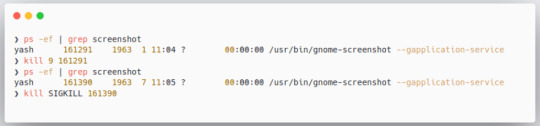
In the above example, we first searched for the PID using the command we learned in the last post ps -ef | grep screenshot.
We used the kill command along with signal value as well as with signal name to kill the screenshot application.
What if we wanted to kill the process with name and not PID?
To kill a process with a name we use the pkill {regular_expression}
Let's take an example, we used the command pkill fire. This command, when executed will kill every process starting with fire.
What if we want to kill all the instances of a running application? Is there any way we can do it in 1 go?
We can kill multiple instances of an application using the killall command.
The main difference between killall command and pkill command is that we need to provide exact value to killall command.

In the above example, we used the commands pkill and killall to kill gedit. While executing we observed that when we give killall command an incomplete name the killall was unable to find the processes.
This was all about how we can control the processes.
0 notes
Text
Hướng dẫn kill process trên Linux
Thỉnh thoảng bạn sẽ gặp phải một số vấn đề với ứng dụng khi mà những process này không có phản hồi. Đôi khi ��óng ứng dụng hay thậm chí là khởi động lại ứng dụng đó cũng không có tác dụng gì cả. Trong những trường hợp như vậy, sự lựa chọn đầu tiên chúng ta thường nghĩ đến ở đây là restart lại hệ thống – có thể dẫn đến việc tốn thời gian để xử lý, và trong một số trường hợp, việc làm này là không thể chấp nhận được bởi hệ thống đang chạy những dịch vụ quan trọng. Có một số cách khá hữu ích khác được sử dụng để chấm dứt vấn đề này – chính là terminate process mà không cần phải restart lại hệ thống. Trong bài viết này, mình sẽ giải thích cách để kill process trong hệ thống Linux với GUI và command line.
Lưu ý: trong bài viết này mình sẽ giải thích và thực hiện các câu lệnh chạy trên hệ điều hành Ubuntu 20.04 LTS.
Sử dụng System Monitor
Gnome System Monitor là tiện ích GUI được tích hợp sẵn trên hệ điều hành Ubuntu có thể được sử dụng để kill process trên hệ điều hành Linux. Nó cho phép chúng ta dừng một process và tiếp tục chạy process đó với tùy chọn Continue. Tùy chọn End cho phép chấm dứt một process một cách an toàn trong khi đó tùy chọn Kill sẽ ép process đó phải chết bất chấp.
Nếu System Monitor không được cài đặt trên hệ thống của bạn, bạn có thể cài đặt nó bằng lệnh sau đây:
$ sudo apt-get install gnome-system-monitor
Để khởi động System Monitor, tìm kiếm nó trong phần search bar. Sau đó kết quả sẽ được hiển thị như sau, lúc này bạn chỉ cần nhấn vào icon để mở nó lên thôi.

Trong cửa sổ System Monitor, bạn sẽ thấy một danh sách các process đang chạy trên hệ thống. Để kill một process, click chuột phải vào nó, và sau đó chọn Kill. Nó sẽ kill những process được lựa chọn ngay lập tức.

Kill process bằng phím tắt trên terminal
Command line trên linux có một số phím tắt khá hữu ích. Trong đó, có một số phím tắt có thể được sử dụng để kill một process đang chạy.
Ctrl+C: nó sẽ gửi SIGINT để chấm dứt process đang chạy.
Ctrl+Z: nó sẽ gửi SIGSTP để tạm dừng một ứng dụng và chạy nó ở chế độ background. Tuy nhiên, nó không chấm dứt process. Để xem các process bị dừng, bạn có thể sử dụng lệnh jobs. Sử dụng lệnh fg để đưa process trở thành foreground.
Ctrl+\: nó gửi SIGQUIT để chấm dứt process. Nó cũng tạo ra một core dump file – được sử dụng để debug process.
Kill process sử dụng lệnh kill
Có một số dòng lệnh khá hữu ích được sử dụng để kill process trên hệ thống Linux như là kill, pkill và killall.
Để tìm những process nào hiện đang chạy trên hệ thống, bạn có thể sử dụng lệnh ps với cờ -A để xem.
$ ps –A
Nó sẽ liệt kê tất cả các process đang chạy trên hệ thống của bạn.
Kill
Lệnh kill có thể được dùng dđể kill process đang chạy trên hệ thống Linux. Được sử dụng đi kèm với PID – là id của process sẽ bị kill.
Để tìm ID của process đang chạy, bạn có thể dùng lệnh ps -A và truyền vào pipe vào lệnh grep để tìm chính xác process ID của một process cụ thể.
$ ps –A | grep <processname>
Ví dụ: Để tìm process ID của chương trình FireFox đang chạy, bạn có thể sử dụng lệnh sau:
$ ps –A | grep firefox
Một khi bạn đã thấy PID của process cụ thể nào đó, bạn có thể kill nó như sau:
$ kill PID
Lệnh kill sẽ gửi tín hiệu SIGTERM tới PID cụ thể được yêu cầu chấm dứt sau khi thực hiện các hoạt động dọn dẹp cần thiết.
Trong một số trường hợp, chạy lệnh kill có thể sẽ không thể chấm dứt một process được. Trong trường hợp này, bạn cần phải sử dụng thêm tùy chọn “-9” nữa thì mới kill triệt để được process.
$ kill -9 PID
Sử dụng tùy chọn -9 với lệnh kill sẽ gửi tín hiệu SIGKILL được yêu cầu xử lý chấm dứt process ngay lập tức mà không có bất kỳ hoạt động dọn dẹp nào được diễn ra.
Pkill
Tương tự như lệnh kill, pkill cũng gửi tín hiệu SIGTERM cho phép chấm dứt một process nào đó không có phản hồi. Tuy nhiên, có một số lợi ích của pkill so với lệnh kill – chính là bạn sẽ không cần phải cung cấp PID của một process nữa. Thay vì vậy, bạn chỉ cần cung cấp từ khóa khớp với lại process cần kill.
$ pkill <keyword>
Ví dụ, để kill chương trình FireFox, bạn chỉ cần gõ lệnh như sau là cũng kill được process rồi.
$ pkill firef
Ở lệnh trên, nó sẽ kill hết tất cả các process có tên khớp với từ khóa như đã đề cập bên trên.
Với pkill, bạn cũng có một số tùy chọn để kill các process đang chạy bởi một người dùng cụ thể.
$ pkill –u <username> < keyword>
Hãy cẩn thận khi sử dụng tùy chọn này, bởi nếu bạn không chỉ định từ khóa của process, tất cả các process với username được chỉ định sẽ bị kill hết.
Killall
Lệnh killall cũng tương tự như pkill ngoại trừ việc nó cần tên process đầy đủ chính xác luôn thay vì là khớp từ khóa.
Để sử dụng lệnh killall để chấm dứt tất cả process và các process con của chúng với một cái tên process cụ thể, sử dụng cú pháp như sau:
$ killall <prcoessname>
Ví dụ:
$ killall firefox
Kết luận
Trong bài viết này, bạn đã biết được nhiều cách để kill process trong Linux rồi đấy. Nên nhớ, sử dụng những lệnh này cẩn thận vì khi kill process sẽ dẫn đến việc mất mát dữ liệu. Ngoài ra, kill process sai cách có thể gây ảnh hưởng đến những yếu tố khác trên hệ thống nữa đấy.
The post Hướng dẫn kill process trên Linux appeared first on Quang Vũ Blog.
source https://blog.vu-review.com/kill-process.html
0 notes
Text
Linux process communication - Signals
Para conseguir ler e entender esse post, é necessário que vc saiba o mínimo de Linux e da linguagem de programação C.
Primeiramente, o que é signals? signals(em português, sinais) é o método de comunicação entre processos Linux. Ou seja, através desses signals, eles podem pedir, ou avisar, algo para outros processos em execução.
Um bom exemplo para entender signals, é o comando kill, quando executamos o comando kill para um determinado processo, estamos enviando um sinal chamado SIGTERM para a ele. Esse sinal é um PEDIDO de finalização ao processo, isso quer dizer que, se você enviar esse signal para o processo do Chrome, por exemplo, ele estará pedindo ao chrome para que ele finalize a sua execução, esse pedido pode, ou não, ser ignorado. Agora, caso você utilize o argumento "-9" no comando kill, você estará enviando um signal chamado SIGKILL para o processo. Diferente do SIGTERM, o SIGKILL não pode ser ignorado, não importa o que o processo esteja fazendo, se ele receber esse sinal, ele imediatamente é finalizado.
Existem diversos outro signals no Linux, não irei explicar todos, então deixarei uma tabela aqui em baixo de alguns desses signals.
A = abort T = terminate I = ignore S = stop
Signal
Default Action
Description
SIGABRT
A
Process abort signal.
SIGALRM
T
Alarm clock.
SIGBUS
A
Access to an undefined portion of a memory object.
SIGCHLD
I
Child process terminated, stopped,
[XSI]

or continued.

SIGCONT
C
Continue executing, if stopped.
SIGFPE
A
Erroneous arithmetic operation.
SIGHUP
T
Hangup.
SIGILL
A
Illegal instruction.
SIGINT
T
Terminal interrupt signal.
SIGKILL
T
Kill (cannot be caught or ignored).
SIGPIPE
T
Write on a pipe with no one to read it.
SIGQUIT
A
Terminal quit signal.
SIGSEGV
A
Invalid memory reference.
SIGSTOP
S
Stop executing (cannot be caught or ignored).
SIGTERM
T
Termination signal.
SIGTSTP
S
Terminal stop signal.
SIGTTIN
S
Background process attempting read.
SIGTTOU
S
Background process attempting write.
SIGUSR1
T
User-defined signal 1.
SIGUSR2
T
User-defined signal 2.
[XSI]
SIGPOLL
T
Pollable event.
SIGPROF
T
Profiling timer expired.
SIGSYS
A
Bad system call.
SIGTRAP
A
Trace/breakpoint trap.
SIGURG
I
High bandwidth data is available at a socket.
SIGVTALRM
T
Virtual timer expired.
SIGXCPU
A
CPU time limit exceeded.
SIGXFSZ
A
File size limit exceeded.
Tirando o SIGKILL e o SIGSTOP, todos os outros processos podem ser ignorados, ou interpretado de outras formas. Olhando na tabela, você verá um sinal chamado SIGUSR1, sua ação padrão é finalizar um processo, porém, programas podem interpretar esse sinal do modo que bem quiser. Podemos usar como exemplo, o comando dd, que serve para copiar arquivos, geralmente usado para gravar arquivos do tipo ISO em pendrives. Se vc enviar o sinal SIGUSR1 ao dd, enquanto ele estiver em execução, ele irá receber o sinal e retornar informações sobre o progresso atual. Exemplo abaixo.

Ou seja, ao invés de finalizar o processo, como ele faz por padrão, ele interpreta o sinal SIGUSR1 como um pedido de informações sobre o progresso.
AGORA, PROGRAMANDO...
Se você quiser entender melhor, siga-me, vamos voar como cavalinhos com asas no mundo das condicionais binárias. Traduzindo, bora lá codar em C.
Para tratar sinais em C, precisamos incluir a biblioteca signal.h e a biblioteca de syscall, a unistd.h.
Primeiramente, vamos começar com um programa bem simples, ele vai ignorar quando o usuário tentar parar o script com ctrl+c. Para isso, é importante saber que, quando vc lança essa combinação de teclas, vc está enviando um signal SIGINT ao processo. Vamos usar uma função bem chamada sigignore.
#include <stdio.h> #include <unistd.h> #include <signal.h> #include <stdlib.h> int sigignore(int sig); int main () { sigignore(SIGINT); for(int x=0; x<5; x++){ sleep(1); printf("olan"); fflush(stdout); } printf("finalizein"); return 0; }
Agora, todas as tentativas de finalizar o processo com ctrl+c irão ser falhas.

Ai neste gif que passei meia hora pra fazer, vimos o ctrl+c não fez efeito nenhum, ele continuou executando até finalizar o processo. OK, isso ficou um pouco sem graça, vamos fazer algo mais legal. Vamos fazer que, quando a usuário mande SIGINT, o programa execute uma função e imprima ou faça algo. Para isso, vamos usar a função signal(), passando o sinal que queremos tratar e a o ponteiro para a função que será acionada. signal(SIG, &FUNC). A função deve ter o parametro para a entrada do signal.
#include <stdio.h> #include <unistd.h> #include <signal.h> #include <stdlib.h> void exitsafe(int signal); FILE *fd; int main(void) { signal(SIGINT, &exitsafe); int cnt = 0; fd = fopen("output.txt", "w"); while(1) { cnt += 1; fprintf(fd, "%s%dn", "Ola", cnt); puts("Data Writed"); sleep(2); } } void exitsafe(int signal) { puts("nSIGINT DETECETADO: Fechando arquivo com segurança"); fclose(fd); exit(0); }
Ok, agora vamos ver como ficou. (lembrando que ^c significa ctrl+c)
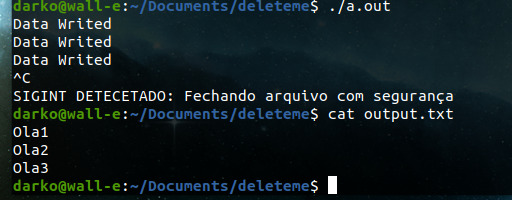
O código apenas abre um arquivo e começa escrever nele em um looping fechado com um delay de 2 segundos para não flodar. Em um caso sem a nossa função de exitsafe, o programa iria apenas parar sem fechar o arquivo aberto, porém, com a nossa função quando ele recebe o sinal para parar ele aciona a função exitsafe() para finalizar o programa corretamente.
Neste caso parece ser algo besta e simples, mas softwares mais complexos se parado instântaneamente pode ocorrer de lixos no sistema ou algum problema mais sério.
Por hoje é isso, essa foi apenas uma preview sobre as funções do signals no sistema linux, creio que valha a pena dá uma estudada mais profundamente neste assunto futuramente.
0 notes
Photo

Nginxとphp-fpmを用いてLaravalを表示する https://ift.tt/2ZiNpeO
どうも、若松です。
前回はLaravelをDockerで起動し、イメージを軽量化するところまで行いました。 https://cloudpack.media/48190
今回は、php artisanでのサーバ起動ではなく、Nginx+php-fpmでLaravelを表示するところまでを行います。
設定
ディレクトリ構造
docker/ ├─ docker-compose.yml ├─ nginx/ | ├─ Dockerfile | └─ default.conf └─ laravel/ └─ Dockerfile
docker-compose.yml
version: '2' services: nginx: image: nginx ports: - "80:80" laravel: image: laravel
Dockerfile(nginx)
FROM nginx:1.17-alpine # ローカルから設定ファイルをコピー COPY default.conf /etc/nginx/conf.d/default.conf
default.conf(nginx)
server { listen 80; server_name localhost; location / { # ドキュメントルート設定 root /var/www/laravel/public; fastcgi_split_path_info ^(.+\.(?:php|phar))(/.*)$; fastcgi_intercept_errors on; fastcgi_index index.php; include fastcgi_params; # FastCGIの向き先をLaravelコンテナに設定 fastcgi_pass laravel:9000; fastcgi_param SCRIPT_FILENAME $document_root$fastcgi_script_name; fastcgi_param PATH_INFO $fastcgi_path_info; fastcgi_param PATH_TRANSLATED $document_root$fastcgi_path_info; } error_page 500 502 503 504 /50x.html; location = /50x.html { root /usr/share/nginx/html; } }
Dockerfile(laravel)
FROM amazonlinux:2 as vender # PHPインストール RUN amazon-linux-extras install -y php7.3 RUN yum install -y php-pecl-zip php-mbstring php-dom # Composerインストール RUN php -r "copy('https://getcomposer.org/installer', 'composer-setup.php');" RUN php -r "if (hash_file('sha384', 'composer-setup.php') === '48e3236262b34d30969dca3c37281b3b4bbe3221bda826ac6a9a62d6444cdb0dcd0615698a5cbe587c3f0fe57a54d8f5') { echo 'Installer verified'; } else { echo 'Installer corrupt'; unlink('composer-setup.php'); } echo PHP_EOL;" RUN php composer-setup.php RUN php -r "unlink('composer-setup.php');" RUN mv composer.phar /usr/local/bin/composer # 環境変数設定 ENV COMPOSER_ALLOW_SUPERUSER 1 ENV COMPOSER_HOME "/opt/composer" ENV PATH "$PATH:/opt/composer/vendor/bin" # Laravelインストール RUN composer global require "laravel/installer" # Laravelプロジェクト作成 WORKDIR /var/www RUN composer create-project laravel/laravel laravel FROM php:7.3-fpm-alpine # ビルド用コンテナから必要なコンテンツをコピー COPY --from=vender --chown=www-data:www-data /var/www/ /var/www/
操作
コマンドは全て最上位ディレクトリの dockerから行う想定です。
Nginxコンテナビルド
docker build nginx/. -t nginx --squash
Laravelコンテナビルド
docker build laravel/. -t laravel --squash
docker-composeで起動
docker-compose up
ブラウザで表示を確認
http://localhost:8000 にアクセスすることで以下のサンプルを表示します。

解説
Nginxコンテナ
ベースイメージ
FROM nginx:1.17-alpine
ベースイメージにはNginx公式リポジトリにあるnginx:1.17-alpineを使用しました。 2019/7/14現在のNginxの最新が1.17であり、軽量化を目的にAlpineLinux版を使いたかったためです。 80番ポートの開放やNginxの起動についてはベースイメージ内で既に設定されているため、今回のDokcerfileには記述していません。
default.conf
COPY default.conf /etc/nginx/conf.d/default.conf
設定はローカルに用意したdefault.confをイメージにコピーして配置します。 FastCGI設定のほとんどは一般的な設定のため、特徴的なものだけ解説します。
root
root /var/www/laravel/public;
ドキュメントルートはLaravelコンテナのアプリケーションが配置されているディレクトリを指定します。
fastcgi_pass
fastcgi_pass laravel:9000;
UnixソケットかTCPを指定できますが、Unixソケットではコンテナを越えられないため、TCPで設定します。 アドレスの指定にはDockerのNamespaceを利用します。
Laravelコンテナ
前回のDockerfileからの差異のみ解説します。
ベースイメージ
FROM php:7.3-fpm-alpine
実行用イメージのベースを php:7.3-alpineからphp:7.3-fpm-alpineに変更しました。 これによってデフォルトでphp-fpmがインストールされた状態から設定を行えばよくなります。 9000番ポートの開放やphp-fpmの起動についてはベースイメージ内で既に設定されているため、今回のDokcerfileには記述していません。
Laravelコンテンツのオーナー変更
COPY --from=vender --chown=www-data:www-data /var/www/ /var/www/
php:7.3-fpm-alpineのphp-fpm初期設定では、php-fpmのワーカ起動ユーザはwww-dataになっています。 COPYコマンドで配置したLaravelコンテンツはrootがオーナーになってしまうため、そのままだと権限エラーとなります。 そこで、--chownオプションを使用し、オーナーをwww-dataへ変更しています。 --chownオプションはBashでいうところのchown -Rとなるため、ディレクトリがあっても再帰的に処理してくれます。
docker-compose
今回からコンテナが2つになったため、操作簡略のためにdocker-composeを導入しました。 docker-composeには起動時のオプション設定や、複数コンテナのビルド、依存関係制御など様々な機能がありますが、ここではコンテナ起動/停止とポートオプションのみ使用しています。
複数コンテナのビルドを使用しない理由
本当であれば使用したかったのが本音です。 しかしながら2019/7/14現在、BuildKitやsquashオプションに対応していないため、あえてdockerコマンドでビルドを行っています。
Tips
コンテナイメージ内にあるファイルをローカルにコピーする
設定ファイルを作成する際に、デフォルトの設定をローカルにコピーし、それを改変して作成していくことはよくあると思います。 コンテナではSCPが使えないため、代わりにdocker cpコマンドを使用します。 今回のdefault.confの場合は、以下のようにしてコピーしました。
docker run -d --name nginx nginx:1.17-alpine docker cp $(docker ps --filter name=nginx -aq):/etc/nginx/conf.d/default.conf .
コンテナイメージの履歴を確認する
FROMで使用するベースイメージには予めポートの開放やデーモンの起動が設定されている場合があります。 今回でいうところのNginxやphp-fpmですね。 それを確認するにはdocker historyコマンドを使用します。 例としてphp-fpmのhistoryを確認してみます。
docker history --format php:7.3-fpm-alpine /bin/sh -c #(nop) CMD ["php-fpm"] /bin/sh -c #(nop) EXPOSE 9000 /bin/sh -c #(nop) STOPSIGNAL SIGQUIT /bin/sh -c set -eux; cd /usr/local/etc; if… /bin/sh -c #(nop) WORKDIR /var/www/html /bin/sh -c #(nop) ENTRYPOINT ["docker-php-e… /bin/sh -c docker-php-ext-enable sodium ...
このようにズラズラとコマンドが表示されるかと思います。 これは実行日次のtimestampが新しい順で上から並んでいます。 これを見るとベースイメージの最後に、9000番ポートの開放とphp-fpmの実行が行われているため、今回のDockerfileではポートの開放とデーモンの起動が不要なことがわかります。
まとめ
Nginx+php-fpmに加えて、docker-composeも導入してみました。 そんなに特殊な設定を行ったわけではありませんが、Dockerfileの書き方やコンテナ特有の設定等はお伝えできたかと思います。
元記事はこちら
「Nginxとphp-fpmを用いてLaravalを表示する」
July 29, 2019 at 04:00PM
0 notes
Text
iulia care ne iubeste
USO- Cheatsheet
1.Procese
Cum sa afisezi doar anumiti parametri la procese
ps -eo pid,tid,class,rtprio,ni,pri,psr,pcpu,pmem,stat,wchan:14,comm //exemple de chestii de afisat
ps -eo *ce vrei sa afisezi*
Cum afisezi tot la procese
ps aux
Cum sa afisezi procesele unui anumit utilizator
ps -U root -u root
Cum sa bagi un proces in bg
1. Il pornesti si apesi ctrl-z si dai comanda bg
2. Il pornest cu & dupa ( sleep 100 &)
Cum sa vezi procesele din background
Cu fg sau cu jobs
Cum sa bagi un proces in foreground
Cu fg
Cum sa ucizi un proces si ce fac si alte chestii importante din kill
kill -9 *pid*
pkill *numele procesului*
1 - SIGHUP - ?, controlling terminal closed,
2 - SIGINT - interupt process stream, ctrl-C
3 - SIGQUIT - like ctrl-C but with a core dump, interuption by error in code, ctl-/
9 - SIGKILL - terminate immediately/hard kill, use when 15 doesn't work or when something disasterous might happen if process is allowed to cont., kill -9
15 - SIGTERM - terminate whenever/soft kill, typically sends SIGHUP as well?
18 - SIGCONT - Resume process, ctrl-Z (2nd)
19 - SIGSTOP - Pause the process / free command line, ctrl-Z (1st)
30 - SIGPWR - shutdown, typically from unusual hardware failure
2.Utilizatori
Cum sa creezi un utilizator
Cu interfata care cere parola: adduser ana
Fara interfata: useradd ana
Parola se schimba cu passwd ana
Cum stergi un utilizator
deluser ana
Cum sa creezi un grup
addgroup/groupadd *numele grupului*
Cum sa adaugi un utilizator intr-un grup
usermod -a -G examplegroup exampleusername
Cum sa modifici grupul primar al unui utilizator
usermod -g groupname username
Cum sa stergi un grup
delgroup *numele*
Cum sa vezi lista utilizatorilor sau a grupurilor
cat /etc/passwd / getent passwd
cat /etc/group getent group
Cum sa schimbi homeul utilizatorului
usermod -d /newhome/username username //doar muta
usermod -d -m /newhome/username username //muta si continutul homeului
Cum sa modifici ownershipul unui fisier
1. Si pt user si pt grup
chown user:grup file.txt
2. Pt user
chown user file.txt
3.Pt grup
chgrp grup file.txt
Cum sa modifici permisiunile unui fisier
chmod ugo+rwx filename
chmod 777 filename
Cum sa aflii detalii despre username
finger, id
3.Chestii de text
Cum sa sortezi un fisier bazat pe o anumita coloana
1. Sortam un fisier bazat doar pe a 3a coloana
sort -k 3,3 myFile
-k specifica de la a cata coloana sa se faca sortarea, 3,3 specifica ca incepand si terminand cu coloana a 3a,
-u specifica sa pastreze numai liniile unicat
-t c sa specifici dleimitatorul
awk '{print $1,$4}' employee.txt
4.Chestii de scripturi
shebang:#!/bin/bash
http://tldp.org/HOWTO/Bash-Prog-Intro-HOWTO-4.html#ss4.2
for:
for i in {1..5}
do
echo "Welcome $i times"
done
if:
if [ $1 -gt 100 ]
then
echo Hey that\'s a large number.
if (( $1 % 2 == 0 ))
then
echo And is also an even number.
fi
fi
while:
while [ condition ]
do
command1
command2
command3
done
Chestii de stiut $#,$@
5.Chestii de criptare
ordinea corecta a pornirii sistemului, primul sector al unui hard disk
Cum sa encodezi/decodezi ceva baza 64
encodezi:openssl base64 -in <infile> -out <outfile>
decodezi:echo QWxhZGRpbjpvcGVuIHNlc2FtZQ== | base64 --decode
Cum sa encodezi/ decodezi un fisier/arhiva openssl
encodare:openssl aes-256-cbc -a -salt -in secrets.txt -out secrets.txt.enc
decodare:openssl aes-256-cbc -d -a -in secrets.txt.enc -out secrets.txt.new
Cum sa hashuiesti ceva md5
md5sum <<<"my string"
Cum sa fac o arhiva ZIP si cum sa o scoti
zip squash.zip file1 file2 file3
unzip squash.zip
6.Chestii de montare
Fisier care sa contina numai octeti de 0
dd if=/dev/zero of=upload_test bs=100M count=1
dd if=/dev/zero of=**fisierul in care se pun** bs=100M count=1
Cum sa formatezi o partite noua de tip ext 3
mkfs.ext3 ./upload_test
Cum sa o montezi
mount upload_test directory
mount *fisier ext* *director*
Cum sa montezi read-only
mount -o ro upload_test directory
Cum verifici ca e montata
df -H
7.Chestii de retele
Pt a seta adresa, netmaskul, gw etc fisierul /etc/network/interfaces
configurare dns /etc/resolv.conf
Pt a trimite un anumit numar de pachete la un interval
ping -i interval -c numar adresa
0 notes
Text
Comando kill no Linux (envia sinais) [Guia Básico]

O Comando kill no Linux envia sinais para os processos. Ele é usado geralmente para terminar a execução de processos identificados pelo seu PID. Se nenhum sinal específico for passado como parâmetro, o kill irá enviar o sinal SIGTERM (15) para terminar o processo de forma elegante. Neste exemplo o kill Força o servidor de web identificado pelo PID 1953 a ler novamente o seu arquivo de configuração: $ ps aux | grep httpdwwwrun 1952 0.0 1.7 93232 2248 ? S 16:15 0:00 /usr/sbin/httpd -f /etc/httpd/httpd.confwwwrun 1953 0.0 1.7 93232 2248 ? S 16:15 0:00 /usr/sbin/httpd -f /etc/httpd/httpd.confwwwrun 1954 0.0 1.7 93232 2248 ? S 16:15 0:00 /usr/sbin/httpd -f /etc/httpd/httpd.conf # kill –HUP 1953 Termina abruptamente os processos de serviço de web com os PIDs 1953 e 1954: # kill –9 1953 1954 A opção -l do kill oferece uma lista de sinais e seus respectivos códigos: $ kill -l 1) SIGHUP 2) SIGINT 3) SIGQUIT 4) SIGILL 5) SIGTRAP 6) SIGABRT 7) SIGBUS 8) SIGFPE 9) SIGKILL 10) SIGUSR1 11) SIGSEGV 12) SIGUSR2 13) SIGPIPE 14) SIGALRM 15) SIGTERM ( ... ) Um comando que facilita enviar sinais para processos que tem vários processos filhos é o killall. https://youtu.be/xwcD5xrR5nE Você que é profissional de TI, de suporte ou desenvolvedor, já pensou em aprender Linux de verdade? E ainda de quebra tirar uma certificação LPI Linux Essentials de quebra? E melhor ainda, com o melhor curso Online para Linux? Faça como essas pessoas e crie sua conta agora. Aqui você tem tudo para você ter sucesso nas provas de LPI e CompTIA - Aulas Práticas no Shell - Flashcards para memorização - Jogos de Palavras cruzadas - 06 servidores virtuais na Amazon só pra você - Mapas Mentais - Vídeo Glossário - Simulado preparatório para as provas - Agenda de aula personalizada - Exercícios guiados – Laboratórios reais - Recursos de Aula (anotações e outros) Quer saber se uma certificação vale a pena ? Saiba porque os salários são bons, e porque as empresas estão procurandoprofissionais de Linux. Você vai ententer que os benefícios superam de longe o sacrifício. E se você já se decidiu, veja nosso Guia de Certificação. E se quer saber onde fazer as provas, consulte a lista de cidade. Se quiser saber o idioma das provas, veja esse post. Aprenda muito mais sobre Linux em nosso curso online. Você pode fazer a matrícula aqui. Se você já tem uma conta, pode acessar aqui. Gostou? Compartilhe Read the full article
0 notes
Text
Comando kill no Linux (envia sinais) [Guia Básico]

O Comando kill no Linux envia sinais para os processos. Ele é usado geralmente para terminar a execução de processos identificados pelo seu PID. Se nenhum sinal específico for passado como parâmetro, o kill irá enviar o sinal SIGTERM (15) para terminar o processo de forma elegante. Neste exemplo o kill Força o servidor de web identificado pelo PID 1953 a ler novamente o seu arquivo de configuração: $ ps aux | grep httpdwwwrun 1952 0.0 1.7 93232 2248 ? S 16:15 0:00 /usr/sbin/httpd -f /etc/httpd/httpd.confwwwrun 1953 0.0 1.7 93232 2248 ? S 16:15 0:00 /usr/sbin/httpd -f /etc/httpd/httpd.confwwwrun 1954 0.0 1.7 93232 2248 ? S 16:15 0:00 /usr/sbin/httpd -f /etc/httpd/httpd.conf # kill –HUP 1953 Termina abruptamente os processos de serviço de web com os PIDs 1953 e 1954: # kill –9 1953 1954 A opção -l do kill oferece uma lista de sinais e seus respectivos códigos: $ kill -l 1) SIGHUP 2) SIGINT 3) SIGQUIT 4) SIGILL 5) SIGTRAP 6) SIGABRT 7) SIGBUS 8) SIGFPE 9) SIGKILL 10) SIGUSR1 11) SIGSEGV 12) SIGUSR2 13) SIGPIPE 14) SIGALRM 15) SIGTERM ( ... ) Um comando que facilita enviar sinais para processos que tem vários processos filhos é o killall. https://youtu.be/xwcD5xrR5nE Aprenda muito mais sobre Linux em nosso curso online. Você pode efetuar a matrícula aqui. Se você já tem uma conta, ou quer criar uma, basta entrar ou criar seu usuário aqui. Gostou? Compartilhe Read the full article
0 notes