#sims2 accessory box
Explore tagged Tumblr posts
Visit Tumblr Blog
Explore Tumblr blogs with no restrictions, modern design and the best experience.
Last Seen Tumblr Blogs


Fun Fact
China blocked Tumblr because of pornography and censorship problems in 2013.
Text
TS2: Accessory Box for Giu's Bloody Posebox by Julie J


Much easier to have the accessories for poseboxes in an accessory box so they're not clogging up the accessories bin.
Great for storytellers
Posebox is included - You can get it from Giu's which is available via wayback machine here with pictures of the poses.
If you have the original accessories and want to use the box, please delete the originals and use the files with Julie J in the filename.
Accessory Box can be found in Misc/Misc
DOWNLOAD
#juliej#s2cc#ts2cc#julie j#julietoon-ts2#giu pose box#juliej-accessory box#juliej-accbox#sims2 accessory box#ts2 accessory box
51 notes
·
View notes
Note
Hey Ilenia! I'm wondering if it's possible to make an accessory box type of mod. Basically a skin care deco item using the LC_GlowyDewsSkincare and the LC_SetItandForgetIt items from this set converted by LC (https://modthesims. info/d/673623/4t2-bathroom-clutter-kit-conversion-updated-26-01-2023.html) that we can click on to apply facemasks on our sims? These masks specifically (thesimsresource. com/downloads/details/category/sims2-sets-makeup/title/purifying-face-mask-set/id/470590/) and these eye masks (tumblr. com/jsasimmer/736349330844352512/needa-rest-with-eye-masks-on-sunday)
If the masks could boost comfort and hygiene whilst on that would be cool, but I don't know if thats possible so no pressure for that. Thank you if it's possible or not! :)
As far as I know, face masks are make up not accessories so it's not possible to make an accessory box with them...
7 notes
·
View notes
Text
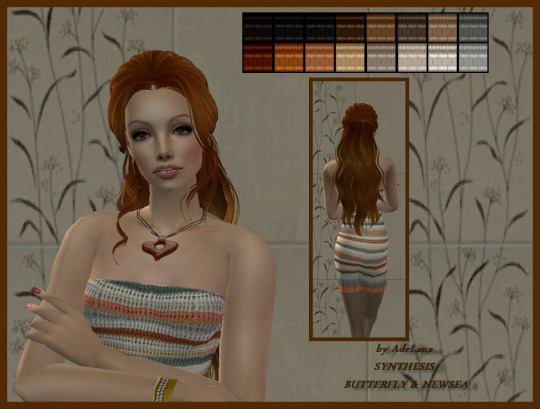
Cabelos Femininos Para The Sims 2 - (Parte 84)
1# [AdeLana]_NS&BFsynthesis
My Sims city block: Синтез двух причёсок от NewSea и B-fly (adelana-sims.blogspot.com)
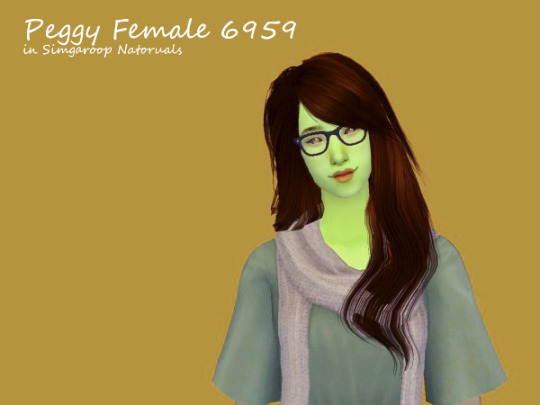
2# [adelinesims2] - Peggy Female 6959 Simgarooped
Adeline's Little Simblr, Peggy Female 6959 hair in Simgaroop’s textures and... (tumblr.com)
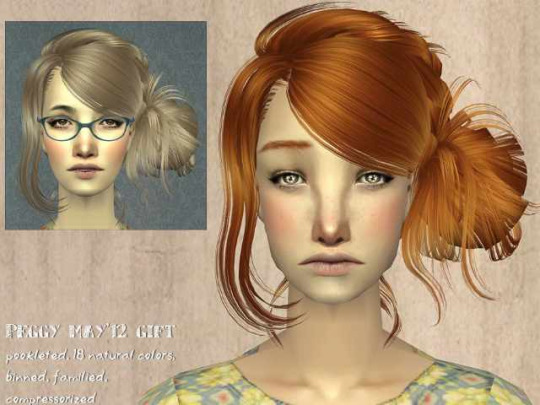
3# [snapun]-Peggy-May12gift-pookleted
[snapun]-Peggy-May12gift-pookleted.rar | Fornecido pelo Box
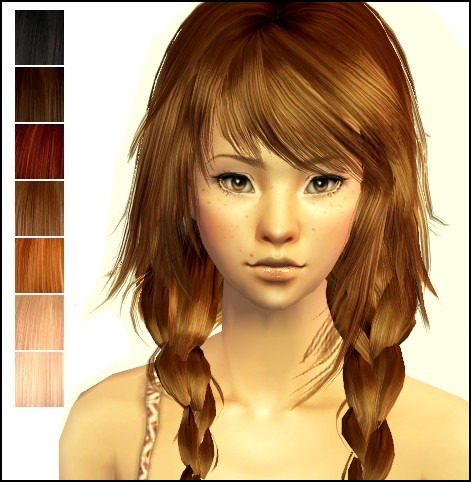
4# Peggy Hair Project Part #03 *binned*
Mod The Sims - Peggy Hair Project Part #03 *binned*
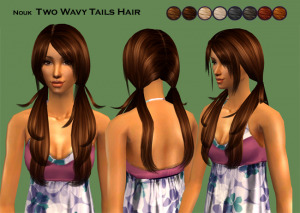
5# Two Wavy Tails - All Ages
Two Wavy Tails - All Ages (wickednoukfamily.com)
6# [TXPS]B-flysims2-femalehair-049
TxPrincessShan Sims: I've Been Bad, but I'm so Good to You.
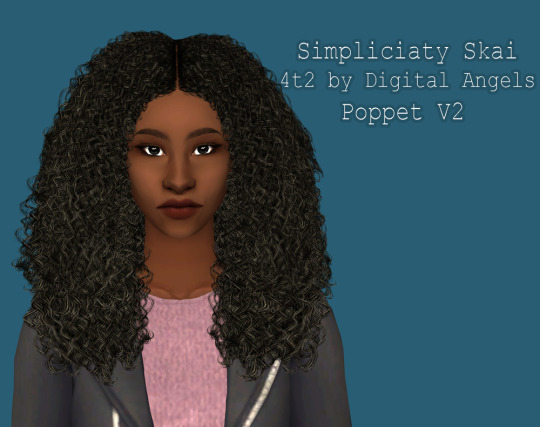
7# Suratan-zir_Simpliciaty_Skai_4t2
As soon as I saw this gorgeous hair conversion I... : (tumblr.com)
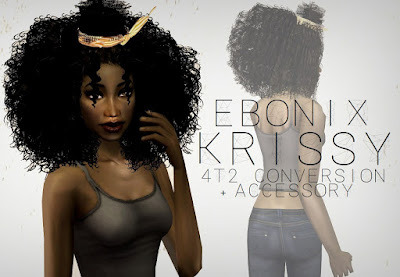
8# EBONIX KRISSY FOR SIMS2 (PLUS HAIR ACCESSORY)
Ebonix Krissy for sims2 (plus hair accessory) - Grecadea sims
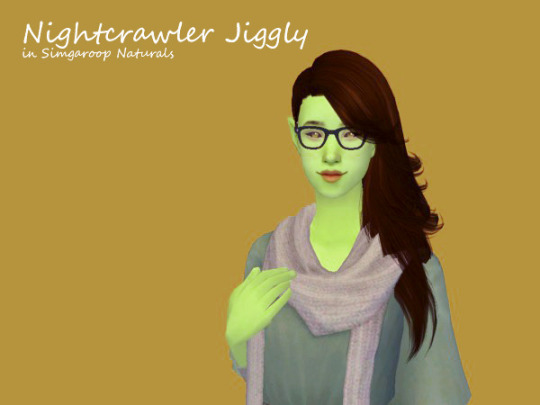
9# [adelinesims2] - Nightcrawler Jiggly Simgarooped
Adeline's Little Simblr, Nightcrawler Jiggly hair in Simgaroop’s textures... (tumblr.com)
10# [AdeLana]_PeggyMODIFIED
My Sims city block: Модификацию причёски от Пегги (adelana-sims.blogspot.com)

3 notes
·
View notes
Text
Tutorial: How to default the penguin
@grilledcheese-aspiration asked me if I had any step-by-step tutorial on how I defaulted the penguin, but I had none, so I made one! :-D (beware of long post and many pictures beneath the cut)

Before we begin, this is a tutorial on how to default the penguin and add new meshes to it, not just a simple texture replacement. If you’re wondering why I’m making a tutorial on this it’s because the penguin has too many morphs and can’t be exported out of Milkshape, but I found a way around that :-)
With that out of the way, you have to have SimPE with NVIDIA DDS, Milkshape with the plugins and the seasons expansionpack of ts2 installed. It might be possible to do this with blender or any other meshing program, but I will only be showing how I did it with Milkshape.
If you know how to extract files etc (the basic stuff), you might want to start at Part 2: Adding new meshes, 4. I would say this tutorial is fairly beginner-friendly, since I did my best to show every single step.
Part 1: Extracting neccessary files
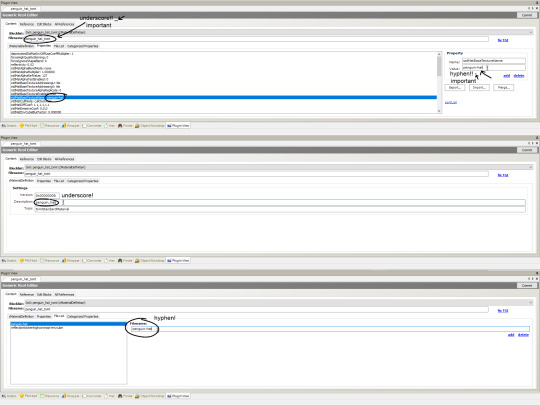
1. Open up SimPE, search for “penguin” in finder and click on start:

(bigger image)
2. Scroll down a bit until you find the files we need: penguin_surface_txmt*, penguin_tslocator_gmdc, penguin_untagged0_shpe and penguin-surface_txtr. Double click on them one at a time to open them, then right click - extract and save them somewhere (you might want to name them txmt, gmdc, shpe and txtr so it’s easier knowing what’s what).
*I use Nopke’s penguin fix so if you do as well and don’t want your added mesh(es) to the penguin to be covered in snow, extract the txmt from his fix instead of EA’s original.
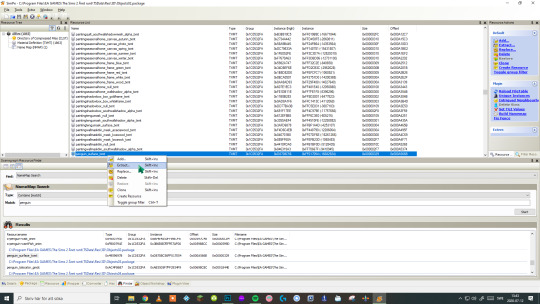
(bigger image)
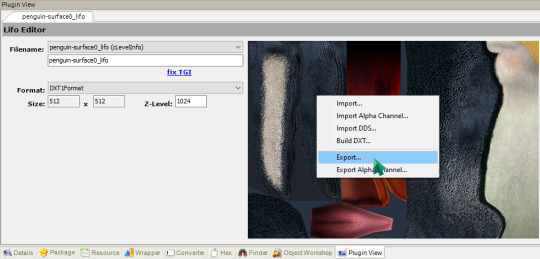
3. You’ll want to double click on the penguin-surface0_lifo file if you’re planning on editing the texture as well to get the highest resolution of the texture. You're not supposed to extract it though, just right click on the image and choose export and save it somewhere.
4. Make a new package in SimPE: File - New or CTRL + N if you use any of Chris Hatch’s updated versions of SimPE.

5. Right click somewhere in the middle of SimPE and choose “Add”:
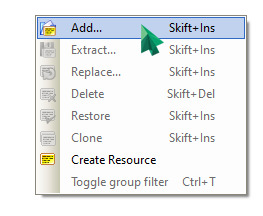
6. A window will pop up. Locate your extracted files (txmt, gmdc, shpe, txtr) and import them all, then save your file and give it a name.
Part 2: Adding new meshes
1. In my case, I’m going to show how I added the hat, but it should be fairly the same for whatever you want to add to the penguin, the only difference will be the joint assignment later.
2. Open your accessory/whatever’s mesh (in my case, the hat) in SimPE and export the gmdc by right clicking on it and choosing “extract”, then save it somewhere. You have to extract one texture as well. Open up a recolor, right click on the image and choose “export” (like you did with the penguin lifo file).

(bigger image)
3. Open up Milkshape and choose File - Import - Sims2 UniMesh Import V4.09A, then a window will pop up.

(bigger image)
4. Now, if your mesh you’re planning to add to the penguin is too big/small, you’ll want to import that mesh first and use Tools - Scale All... (it’s the third option from the bottom) and play around with it a bit until you get it the right size. I usually do it like this:
import mesh, scale and then import the penguin mesh to see if it’s the size I want. If not, I undo the import (CTRL + Z or Edit - Undo) and then undo once again to get the mesh back to original size. Then I do “scale all” again and repeat the process until I’m happy with the size.
Why you have to do it this way is bc if you have both the hat (in my case) and the penguin mesh in Milkshape when you use “scale all”, everything will scale, including the penguin mesh.
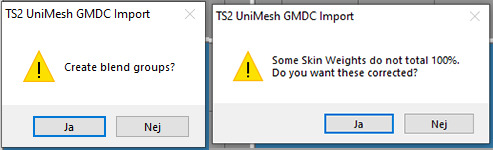
When you import the penguin’s mesh it will ask you if you want to “Create Blend Groups?” and then it will ask you “Some Skin Weights do not total 100%. Do you want these corrected?”. It doesn’t actually matter if you choose yes or no, since we will not be exporting the penguin mesh anyway so you can choose no but I clicked yes on both options bc you never know.
5. To move your mesh around in Milkshape, go to the “group” tab and double click on your mesh group to select it (it should turn red) and then go back to the “model” tab and click on “move”, then use any of the three grey windows to move your selected mesh around.
When you're happy with the size and have put the new mesh where you want it to be on the penguin, click on your mesh group in the group tab and rename it if you want. I named my hat group like this: (click on rename after you’ve edited the name, otherwise it won’t save your new name)

6. Then click on comment. A window like this will pop up:
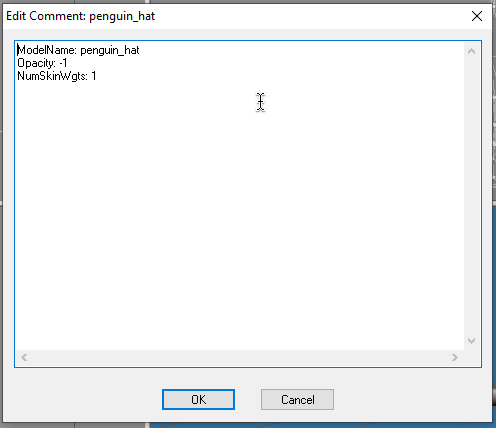
7. If you renamed the group, you have to write your new name at the top after “ModelName:” like seen in the image above. After ModelName: [insert your group name here] you should have something like: Opacity: -1 and NumSkinWgts: [a number between 1-3] like also seen in the image above. Click on OK to apply the changes. By now you’ll want to save the file as a .ms3d just in case something goes wrong. It’s always nice with a backup. You can save it by going to File - Save As... (or CTRL + SHIFT + S).
8. Now that you’re done with the mesh and has saved it as a .ms3d file, delete the two penguin_surface mesh groups and all their morphs if you clicked yes to the “Create blend groups?” (in other words: everything but your added mesh group). After that you’ll want to export it by going to File - Export. Export it as Milkshape 3D ASCII and save it somewhere.
(bigger image)
Part 3: Bone assignment
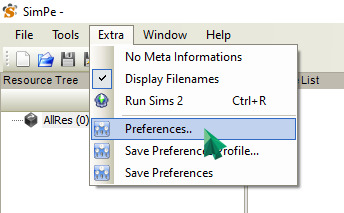
1. Before you can import the new mesh, you have to go to Extra - Preferences and check the "Advanced Mode" box then restart SimPE.

(bigger image)
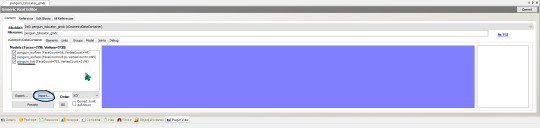
2. After restarting SimPE, open up your .package file with all of the penguin extracted resources in SimPE and click on the penguin_tslocator_gmdc. Click on “import” and choose your exported Milkshape 3D ASCII mesh. It should then be added to the gmdc like this:
(bigger image)
3. Click on the groups tab, then select your newly imported mesh group. Now, you want to click on the bar under “Joints:”

(bigger image)
4. Then this list will pop up:
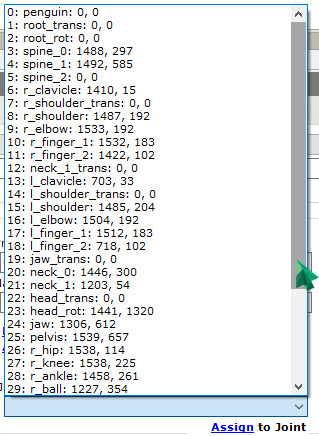
5. Now all you have to do is find the correct joint to assign your newly imported mesh to. It can be tricky to find the right joint, or perhaps it’s just me not being comfortable with joints yet haha :p I’m thinking the joints with “0, 0″ may be empty joints, in other words: the penguin doesn’t have/use them, but I’m not sure (but it makes sense, doesn’t it?). Anyway, when you’ve assigned it to what you think is the correct joint, click on “assign” and then click on commit to apply the changes.
Part 4: Creating necessary resources
1. Now that you’ve successfully added the mesh to the penguin, we need to create a txmt, add a txtr file and edit the shpe. We’ll start with the txtr.
If you want to edit the penguin’s texture, right click on “penguin-surface_txtr” and choose “Clone” so you get two of them. Open up your photo editor of choice, import the penguin-surface0_lifo_512x512.png and edit it (if you want to that is). When you’re done, save it as a .png, click on one of the two “penguin-surface_txtr”, right click the image, choose “Build DXT” and import your edited texture. Commit the changes. (These steps are shown down below if you don’t know how to import it.)
2. Click on “penguin-surface_txtr” and rename it to whatever your new mesh name is. In my case, it’s “penguin-hat_txtr”. After you’ve renamed it, click on “Fix TGI” (this is important since it gives your edited resource a new instance number so it won’t overwrite the original resource you extracted (or cloned it from). Right click on the image and choose “Build DXT”.

(bigger image)
3. Choose DXT3 or DXT5 (I never use DXT1, it completely destroys the quality. DXT3 is the one I use 99% of the time) click on “open” and find your mesh’s texture and choose it. Click on “Build” an then commit to save the changes.

4. Now it’s time for the txmt. Click on “penguin_surface_txmt” (remember you have to extract the txmt from Nopke’s fix if you don’t want your added mesh to be covered in snow during winter) and change the name to your new added mesh’s name. For me, this is “penguin_hat”. You’ll need to edit it in 4 places. After editing, click on “Fix TGI” and then on “commit” to save the changes.
(bigger image)
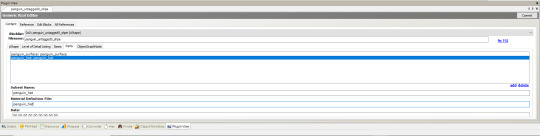
5. Now for the shpe. Click on "penguin_untagged0_shpe” and click on “add”:

(bigger image)
6. “Subset Name” is your mesh group name (the mesh group name in the gmdc) and “Material Definition File” is the txmt. For me it’s “penguin_hat” in both. Click on commit after editing to save the changes.
(bigger image)
7. And you’re done! Save the file, drop it in your downloads folder and see if everything’s working. If you use “boolprop testingcheatsenabled true” you can shift + click on the mailbox and under “Make NPC ...” you can choose “penguin” to force one to visit your lot. Simslice also has a penguin summoner here (<- booty link) it’s the “penguin_summoner.rar”. This is much faster than waiting for the penguin to randomly come by.
Help etc.
I think I’ve explained every step correctly, but it’s very possible that I’ve forgot something or made a mistake somewhere. Let me know if you find any! Also, if you can’t understand something, let me know and I’ll try to explain it again.
And ofc, if you need any help, feel free to comment, send an ask or message me :-)

13 notes
·
View notes
Photo


PART 2 - Sims4 - Sims2 Moschino
11.PedestalTable = 1 pedestal end table+8 recolors
12.PhotoAccessoryShelf = 1 shelf with accessories+4 recolors, 1 shelf (no accessories)+4 recolors (*NOTE: the picture for the accessory shelf is in Part 1 photos)
13.Rack_Clothing-Deco = hanging clothing only...for the deco closet+7 recolors
14.Rack_Clothing-Dresser = hanging clothing on bar (this one works as a dresser)+6 recolors of the clothing.
15.Rack_Functional = whole designer rack from sims4 (this one works as a closet)+2 recolors (only the rack, shoes purse and boxes are recolorable...the clothes are not!) I will add another 4 colors for the closet later because I got frustrated trying to make the clothing recolorable too and didn't get to the other rack colors!!
16.RackDeco_Misc = this is the deco purse, shoes and boxes separated from the original closet. The are in the right height position to go in the deco rack useing moveon cheat. + 7 recolors
Also, I want my sim fashion photographer to have access to a variety of clothing without having to buy them (Designer Samples) so I recolored MaryLou-Numenor Shop at Home Clothes rack invisible and stuck it in a corner by the Designer Rack! I included those files too (ML-NMN-HackedCoatRack+Invisi)
17.RackDeco_RackONLY = this is just the rack from the original+5 recolors *my solution for not being able to recolor the original clothing! Now you can make your own Designer Rack using deco clothing (#13) and the deco shoes, boxes, and purse (#16)
18.Sofa-Chair = chair+11 recolors and sofa+11 recolors
19.TrunkCoffeeTable = trunk coffee table+6 recolors
DOWNLOAD - Sims File Share
219 notes
·
View notes
Video
youtube
“FOR YOU TOO” ANIMATION BOX SIMS 2
It’s crazy how many accessories I use for this box. I mean they all were meant for separate boxes.
DOWNLOAD: https://simfil.es/1122629/
SWORD ACC: http://blueheavensims.blogspot.com/2016/07/the-armory-nixnivis-tsm-longswords.html GUN ACC: https://www.tapatalk.com/groups/lost_utopia/magnum-gun-t221.html#new BOW ACC: http://blueheavensims.blogspot.com/2016/10/the-armory-tourney-poses-and-extras.html GIANT FAN: http://web.archive.org/web/20090522165149fw_/http://www.rosesims2.net/sims2/magic/sims2magic_3.htm PHONE: http://alwayssims2.tumblr.com/post/132504473303/thanks-again-guys-you-are-the-best-we-love-you KNIFE: https://www.simfileshare.net/download/637720/
Song: Melanie Martinez - Piggyback TUMBLR: https://kvngedits.tumblr.com/ WATTPAD: https://www.wattpad.com/user/kvngedits
32 notes
·
View notes
Text
Acessórios Femininos Para The Sims 2 (Parte 27)
1# [Star Sims] Necklaces With Pixel Heart
Star Sims ★: Gift 8 (starsimsdownloads.blogspot.com)

2# VeilBride_AAS
[Sims 2] Accessories | Page 11 | Diễn đàn Game VN

3# Grrl Geek - OFB Goggles in 5 Colors
Mod The Sims - Grrl Geek - OFB Goggles in 5 Colors

4# BlooMsToeNails_byPupke
*8 recolours of BlooM's Toe Nail Accessory* (insimenator.org)

5# DreamCatch by EB
[Sims 2] Accessories | Page 11 | Diễn đàn Game VN

6# Carton bag
4t2 carton box - Grecadea sims

7# Chain Reaction
The Sims Resource - Chain Reaction

8# Die Sonne by Ersel for Sims 2
ERSCH Sims ♥ SecondLife — Die Sonne Accessory by Ersel my 2000 followers... (tumblr.com)

9# Dangling Shinies - 28 Necklaces for All Ages by 2FW
(Hot Topic Project #4) Dangling Shinies - 28 Necklaces for All Ages - Two Fingers Whiskey — LiveJournal

10# Ersel-AmneziaCrown
ERSCH Sims ♥ SecondLife — Amnezia Crown of Roses by Ersel (FOR Sims2) For... (tumblr.com)

4 notes
·
View notes