#sims3tutorial
Explore tagged Tumblr posts
Visit Tumblr Blog
Explore Tumblr blogs with no restrictions, modern design and the best experience.
Last Seen Tumblr Blogs


Fun Fact
The “We are the 99%” Tumblr blog became the slogan for the Occupy Wall Street movement.
Text
I just shared a guide to optimizing worlds and lots in The Sims 3! This guide addresses some of the community's most under-reported issues related to object limits and lot sizes for optimization and performance improvements in open worlds in The Sims 3. I hope you enjoy it, find it useful, and would be incredibly interesting to open a dialogue from this thread so that together, as a community, we can build a guide with best practices for developing optimized worlds for The Sims 3.
Also, if you try any of the ideas offered and are interested in providing feedback, any information is welcome and will contribute to the material we just wrote.
It has a summary for lazy people, so if you don't want to read everything, just read the summary xD
READ HERE
159 notes
·
View notes
Text
Custom Sclub Lashes Slider Compatible
Hi!
This is a simple tutorial of how to make custom eyelashes!
Here are the files:
https://simfileshare.net/download/3453755/
Open the EyelashAFBase.package in TSRW
Change the age if you want.
Export the texture and make your new texture fit! Make sure you also edit the alpha channel to fit yours and keep it white on the RGB layer
Import your textures into the TSRW file
When you are done, export from TSRW as SIMS3PACK
Open the SIMS3PACK in TSRW then export as package, or use a converted to convert to package, doing it this was renumbers the IDs
Open the file in s3pe and right click the GEOM files, select replace, and pick the GEOM from the files above that fits the age group you are doing!
Test it works in game!
21 notes
·
View notes
Text
Separate Accidental Regroup in Milkshape
Hi everyone, I'm not sure who all uses Milkshape but I do when I make my Sims 3 CC. I recently had to look up/read different tutorials on how to fix an issue when you merged two groups together, and actually need them separated.
Firstly, double click the Group you need to fix.
Go to edit > duplicate selection or use CTRL D hotkey.
Click on the duplicated group, and rename it otherwise if you adjust either one it'll mimic the original you duplicated from.
Hide all groups you're not adjusting.
Go to the Model tab and press Select, then Face.
Select the parts you don't need and go to edit > delete selection then vice versa on the duplicated group
WALLA! You have now separated the "accidental" regrouped meshes.
#tutorial#milkshape#milkshapetutorial#s3tutorial#sims3#sims3tutorial#s3milkshapetut#tut#s3tut#sims3tut
5 notes
·
View notes
Note
Hey Frankie. I hope this question doesn't frustrate you because I was searching sims3tutorial for polycount and I know there's a lot on there to help me with this. I was originally trying to follow mspoodle1's tutorial on how to check polycounts of objects. I tried to download the wrappers for S3PE even with 7zip but to no avail:( I was wondering, when you go to milkshape and click direct X tools, are the figures from that the polycount? (づ ̄ ³ ̄)づ
Hey ho!
Yup, thats the polycount but in Milkshape you don’t need to go on DirectX, just press Tools > Show Model statistics. And in blender top right it says triangle count, thats also the polycount :D
1 note
·
View note
Note
Hi. How do you mesh your pants?
Hey so I don’t mesh clothing, I only convert. You can try sims3tutorial hub for help and tutorials.
0 notes
Photo

Tutorial time! Ts4 to ts3: accessories
Hello there beautiful people! I made this tutorial for the lovely anon who requested this tutorial *cough* @33321a *cough*
Since it’s a pretty long tutorial (100 steps), I decided to put it under a read more. Also! There’s a little surprise at the bottom of this tutorial, more like a treat for converting something awesome! :D
NOTE: This is an accessory tutorial, So we need a mesh in our case. Earrings, Necklaces, Bracelets and Glasses. I would not recommend using a hat though, but for the more advanced CC creators, It’s right at the bottom of this tutorial!
What do I need?
Greeners will list them for you riiight here:
Le Milkshape 3D: CLICK ME FOR FREE MILKSHAKES *liesss*
TSRW 1.72 or older: CLICK MEE~
Blender: CLICK n’ BLEND
Sims4Studio: TOUCH THE PLUMBOB or CLICKS ME
Photoshop or Gimp: CLICK THE P or CLICK THE FOX
MeshToolKit: CLICK HERE FOR THE BONErS
TS3 body templates: CLICK MAH
Plugins you maybe-maybe-not-wanna use. You wanna use these for sure
Align normals - Milkshape CLICK ME I’M NORMAL
DDS plugin - Photoshop: CLICK ME!
Now that you survived my ultimate boring greeners’ and taking ages of installing everything *here have a cookie* ‘Get ya stuff here’ part, let’s move on to the exciting part, the part you came for (ゝ∀・)
Da Sims 4 Studio part
No! Don’t run away pls TS4 hater \(°o°;)! I know it says ‘Sims 4′ but it also says ‘Studio!’ But we will soon cleanse your soul with TS3 stuff, so stay strong my friend!
Boost up your s4studio

(Sorry for the fraps number thingy at the side of the screen!)
2. Go to the CAS tab and tick ‘Create 3D mesh’
3. Click the big CAS button

Now you want to choose a accesories type. Feel free to use the filters!
4. Click a thumbnail. I would recommend going for a gray-ish color
5. Click on ‘next’

6. Now you’ll see a 3D version of the earrings and a ts4 sim. Click Diffuse
7. Click export

8. Name it ‘Diffuse’ or Multiplier. This will be our grayscaled texture later on.
9. Click save’
MAKE SURE YOU DID THIS BEFORE YOU PROCEED

Go to ‘Settings’ in top of the window thingy and make it find Blender 2.70′s EXE file (Blender.exe). If it’s giving you any other error, please message me!

10. Go to the mesh tab
11. Make sure the Level of Detail is LOD0, if there is no LOD0, choose LOD1
12. Click on ‘Export mesh.’

13. Now you wanna save it and call it whatever you wanna call it! ^-^
14. Double click on the Blender file we just exported and it should boost up Blender automatically
Blend ‘n shake
CAMERA INSTRUCTIONS:
I’d suggest copy pasting this list on a text editor so you don’t forget about them.
Holding the scroll thingy: Will rotate the view
Scrolling the scroll thingy: Will zoom in and out
Shift+Holding scroll thingy: Change view position
CTRL+Holding scroll thingy: Move your mouse and see what it does!
If you have this lil thingy:

Here are some awesome view switchers:
1: Will swith the view to the Front view
CTRL+1: Will switch the view to the back view
3: Will switch the view to the left view:
CTRL+3: Will switch the view to the right view
7: top view
9: Bottom view
5: Change perspective. Great when you’re meshing furniture or creating poses!

15. All we have to do is go to File>export>Waterfront (OBJ)

16. 1. stands for ‘give it a name.
16. 2. Stands for ‘Tick the following boxes:
Apply modifier
Include edges
Write normals
Objects as OBJ groups
(All the other ones should be left unticked!)

17. Go to File>New

18. To delete the cube, You either use the Delete button on your keyboard or X on your keyboard and press enter

19. File > Import > Waterfront (Obj.)

20. Choose the OBJ file we just exported, our earrings.

21. Now you want to select all the meshes EXCEPT for the EARRINGS
But greenie how do I use this Blender, what is a blender, HALP!
The super duper interesting Blender shortcut instruction list!
Note: All these shortcuts will work in the UV map layout we’ll encounter later on.
A: Will select everything Object mode (The view we’re in right now) And will select all the dots (vertices) In edit mode. We’ll discuss the edit mode later on.
B: Will let you select whatever you want with just dragging the mouse
C: Hey we made the alphabeth here Is basically this brush selecting tool. Works great in Edit mode, but I rarely use it in object mode.
CTRL+Rightclick: (Does not work with the UV map layout Will let you create this circle to select stuff!
TAB: Will let you switch back to edit mode or object mode!
L: (Will only work with Blender 2.70 or later) Stands for Linked. Will let you select parts of the mesh that are, well linked in a way. Works great with meshes with hard edges or hair meshes!
Shift+Right click: Is selecting one object (In object mode. In edit mode, you’ll be able to select one vertex at a time).
Woot! You just learned about 65% of Blender and 80% of the basics! :D Yes I’m, duolingo


So to get back to step 21...
21/22. Select the Head, scalp, body and the teeth mesh. Then, delete it (X or Delete on keyboard)

Yay! Earrings! :D let’s create a ts3-compatible UV MAP now
Puzzles and headaches=UVMapping

23. 1 (the corner thingy with the edges, 3 stripes right in the corner) Is something we can create a second window with. So let’s do that! Drag it to your left.
23. 2. The image icon is the one you wanna choose. So switch from the cube kind of icon to the image! :)

24. Now we want to resize our UV map! Just for a quick refresher, here you go with some additional instructions:
- Experience blender users: Just basically fill the UV map like I showed in the image! ^- ~
The super duper interesting Blender shortcut instruction list!
Note: All these shortcuts will work in the UV map layout we’ll encounter later on. I’d also suggest copy pasting this list on a text editor so you don’t forget about them.
A: Will select everything Object mode (The view we’re in right now) And will select all the dots (vertices) In edit mode. We’ll discuss the edit mode later on.
B: Will let you select whatever you want with just dragging the mouse
C: Hey we made the alphabeth here Is basically this brush selecting tool. Works great in Edit mode, but I rarely use it in object mode.
CTRL+Rightclick: (Does not work with the UV map layout Will let you create this circle to select stuff!
TAB: Will let you switch back to edit mode or object mode!
L: (Will only work with Blender 2.70 or later) Stands for Linked. Will let you select parts of the mesh that are, well linked in a way. Works great with meshes with hard edges or hair meshes!
Shift+Right click: Is selecting one object (In object mode. In edit mode, you’ll be able to select one vertex at a time).
Aaand a few new ones!
S: Stands for scaling.
S+X: Stands for scaling horizontally
S+Y: Stands for scaling vertically
R: Stands for rotating
G: Stands for grab n move!
G+Y: Stands for grab and moving it up and down
G+X: Stands for grabbing and moving it left and right
Now we’ve covered that, let’s do one thing before we get to the excited part

25. Go to UV> Export uv Layout. This will be our reference for later on.

26. Save it and name it something like ‘UV.png’
Use the Phrase! I mean Face!

(Make sure you downloaded Nysha’s TS3 body references
27. File>Import>waterfront (obj) and go to the ts3 tempate folder we jsut downloaded. Now import the ‘afscalp.obj’ and the afface.obj’.
!!DO NOT import any morphs files like ‘afFATface.obj’!!

A FACE! HELLO STRANGER! I know it looks pretty dead inside, doesn’t it?... wait where are they eyes?
28. Now let’s switch to ‘edit mode’ by expanding the thingy I marked. Or just go with using tab. As long as your mesh is showing any dots, you’ll be fine and did’t screw up
28. B So now you see this lil’ button over there right? (square with 4 dots icon) He’ll be your best bud. Don’t give him a soda or a beer, it hates that and will destroy your computer and take over the world.
This lil’ bud will make sure that you won’t just select the front part of the mesh but also the back! :D Go try it out!
29. Now we want to move it closer to the ear to obey gravity. Go wild with the shortcuts I shared with you, here are a few new ones to add to the list:
Red arrow: Pull at it and your mesh will move to the left or to the right!
Blue arrow: Pull t it and your mesh will go up and down!
Green arrow: Pull at it and your mesh will go back and forth!
Note: If you’re doing bracelets or necklaces, you might need to adjust the mesh a bit. This will mean it’s meshing time! I’d recommend selecting a bit of the mesh with C or B and move it around with either the shortcuts I told you about or the arrows I just showed. It’s a bit like creating poses but with a mesh ^- ~
Experienced Blender users: Using the mirror modifier in this case is fine too!

30. After you’re done, we’ll be deleting the scalp and face. Select both meshes EXCEPT FOR THE EARRINGS and delete it (X or Delete on keyboard)

31. Now we’re going to export it. File>Export>Waterfront (obj)

32. I usually replace it with the file we exported before, but it’s totally fine to create a new Obj file. Do call it ‘Mesh.obj’ though or something so you know which file you’re importing later on. Now let’s click the ‘export OBJ’ button.
You can close Blender if you like! Or keep it open till you’ve tested it in-game :) Or save the file as a blend!
The wonderful world of TSRW!

33. Open TSRW, Click on ‘Create new project’ and then Accessories>Next

34. Expand Human>Adult (or Young adult)>Female. And then choose a mesh that looks just like the ts4 mesh we’re converting! In this case, the earrings pedant I highlighted.

35. In title, name it something unique. If you don’t another CASPART will override yours, since we all know that one lazy creator who keeps calling their CC ‘Accessory’ or something simple.
A good way to make it unique is calling it something like: TS4 convertion earrings - YOUR NAME:
In my case that would be: TS4 to TS3 earrings teardrops - Greenplumbboblover. DO NOT SURE THIS ONE PLS

36. A face! :D Less dead-looking too XD Anyway, this is the first thing you’ll see. I usually change the categories at this point. which you’ll have to expand.
If you’re planning on doing this, ONLY tick the categories you’d wear earrings. So don’t tick them all pls. Don’t be that creator. So I’d go for Everyday, formal, outerwear. Untick the other categories.

37. Let’s move on to the Mesh tab. This is a mesh map. Look, a box with a red arrow? What will it do? What shall we do with it? Well, first make sure you’re on the ‘HIgh level of details’
38. Click on the box with the red arrow.

39. Now call it something like ‘Reference’ or ‘This is a Reference’ so you know this is a reference mesh. And make sure you’re exporting it as a WSO and NOT as a obj!
Keep TSRW running on the background since we’ll get back to it in a bit! now and boost up your MILKSHAPE 3D
Let’s create milkshapes together !

40. Boost up your Milkshape and go to File>Import>TSRW Object. MAKE SURE YOU INSTALLED THE TSRW PLUGIN LIKE DESCRIBED HERE: CLICK ME!

41. Import the EA reference mesh we exported made.

42. Tada! Earrings! :D

43. Now import our mesh. File> Import>Waterfront OBJ

44. Click that stranger over there! Or well, our mesh ^- ~

45. Two?! Oh no! But wait! First we gotta rename OUR earrings as ‘group_0′. write in the text bad (next to the rename button) group_0. Then click the rename button.

46. Now let’s delete the reference mesh by highlighting EA’s group. (This one might be called group_0 as well) and use the ‘delete’ button right above the ‘rename’ button.

47. Select the entire mesh/highlight the mesh red by clicking on group_0 and use the ‘select’ button, the one right above the delete button.
48. Go to Tools>Model cleaner

49. Click ‘NO’ on this one. And OK on the other one.

50. Make sure you installed align normals just like you installed the TSRW plugin.
Go to vertex>Align normals. Make sure your mesh is highlighted in red here as well!

51. Let’s export our file! File>export>TSRW Object
Let’s create LODS! - Why are LODS important?
There are 3 Lods, sometimes 4 (usually on hair meshes):
Very high level of details (VHLOD/HHLOD)
High level of details (HLOD)
Medium level of details (MLOD)
Low level of details. (LLOD)
(Some people call the LLODs, etc. So added those here as well!)
If you have a HQ mod, you might recognize these guys:

Yep those are LLOD sims! Them, looking this way is important (When you zoom out of course :P)
But why are they so important Greenie? Get to the point!
I know that some CC creators might go all ‘Omg Lods? Pffft I’ll just add my HLOD/HHLOD in ALL the LODS!’ - Don’t be this creator. Please. I know that some of you might be offended by what I just said, but it is YOUR responsibility to keep the game RUNNING and being less laggy or Crashy.
(Also don’t start the ‘My computer is powerful enough to run 105775738953 polycounts and lods!’ drama, because really, we all know that this game can only handle like 2GB of memory because EA’s memory limit, and besides, most people don’t even have a gaming computer or a powerful computer. Even though it’s 2017).
Yes, the game can Crash or lag if you DO include your HLOD in all the lods. Why? You might wonder, well, because whenever you zoom out, the game has to render more objects. The more shapes the mesh has, the more the game has to render and calculate!
Of course, this isn’t the main case. Polycounts are something that are causing this problem as well. But since we are converting EA meshes, I wouldn’t be bothered by the polycounts yet.
If you are interested in polycounts, please take a look at @simlicious awesome Polycount explanation: CLICK ME!
Let’s do the LODS! :D
Sorry for scaring you if you did! I didn’t mean to >.<

(I switched off the Wireframe overlay there, sorry! But you shoould be able to see whether you selected your mesh with the group>select option in the 2D windows ^-^ )
52. Go to Tools>DirectX Mesh Tools...

53. Move the arrow thingy to the middle of the entire bar.
54. Then, click the save button thingy with the red line.

55. Oh no it’s all black! That’s never a good sign! Lettt’s align normal it! :D Vertex>Align Normals

56. Done! Look at our gorgeous MLOD! :D
57. Export it like File>Export>TSRW Object. and call it MLOD.
Repeat step 52 till 57. This time with our MLOD mesh, to make the LLOD mesh.
Let’s give it some BoneRs !

58. Open your Meshtoolkit and go to ‘Auto Tools for WSO’ (See blue highligted pic)

59. Make sure you’re in the ‘Auto assign bones’ tab.

60. The WSO mesh to modify should be OUR mesh. The reference mesh tab, EA’s MESH.
61. Click ‘Do assignments and Save’ and replace Our mesh’s WSO file to save it ^-^
Repeat 58 till 61 for your MLOD and LLOD
Back to TSRW wonderland! ₍₍ ◝(・ω・)◟ ⁾⁾

62. Click the box with the green arrow to import our mesh.


63. Click your mesh and ALWAYS click YES on every pop up.
Greenieee it’s giving me errors halp! ヽ(゚Д゚)ノ
You miiight have forgotten to apply model cleaner and align normals ^- ~ Go my child! Go apply thy align normals and model cleaner!

64. Ohh earrings! :D Awesome! You just successfully imported your first mesh!
Click on the ‘High level of details’ bar and switch to ‘Medium level of details’ and repeat step 62. to 64 and import the MLOD file you made.
Do the same thing with your LLOD.
Texturing!

65. Open Photoshop and drag your UV.png and THEN your diffuse.png file into Photoshop.

66. Right click on the diffuse file and click ‘Rasterize Layer’

67. Resize your diffuse texture so it fits the UV map. IF you don’t do this, your texture will look UGLY.

68. OPTIONAL BUT RECOMMENDED: So or original texture is quite blurry right? Feel free to repaint it! :D Which I did here.

69. Let’s include a black background for it, just for the sake of preventing big unnecessary files. If your texture has transparent bits or if your accessories are gloves, DO NOT include a black background.

70. NOw delete the UV map texture and go to Image>Adjustments>Desaturate to make it grayish.

MAKE SURE, that they’re both equally gray. As in, one part should not be nearly black since that won’t work well when IN-CAS CASTing our accessory.

71. Make sure you have installed the NVidea DDS plugin for photoshop for this. Go to File> Save As

72. Let’s save it as a DDS and call it Diffuse or multiplier!

73. Since we don’t have a transparent background (Or/and a Alpha channel) We want to export it as a DXT1 RGB 4 bpp | No alpha. I’ll reffer to DXT1 by the way.
Specular map time!
Specular maps are actually the textures to tell the game ‘hey, let’s add some shine over here! :D’

74. Make sure you haven’t merged the black background with the diffuse layer. Go to image>adjustments>levels. (Or brightness/contrast, or curves, whatever you feel like using)

But greenie, what’s too much and what not?
Take a look at greenie’s super duper-ish specular guide! :D
No or barely shine: Usually means that the CASpart won’t be shiny.
WARNING: Do no use a solid black texture as specular map, your mesh will appear really shiny beacuse the game’s confused!
Somewhat shine: Will cause a little bit of shine, but not too much.
Lots of shine: Works great with highlights! :D And I’d recommend using it just for highlights, like when you’re creating gem-like earrings or maybe metal-ish
Although this is just a pattern, this is one of the cool things you can do with specular maps! (also by simlicious) CLICK ME!

75. File>Save as> save as DDS and name s Specular map.

76. CASPart specular maps should ALWAYS be exported as a DXT1!!
Let’s make it recolorable! :D
Masks are basically ‘color targets’ for the channels to know ‘OH hey! I need to make this part black or give it a pattern!’

77. I usually make a new layer by clicking on the paper icon on the right side of the layer panel. (if you’re lost, here’s an alternative: Layer>New>new layer, OR ctrl+shift+n)

78. I want the sphere-shaped part, the tear drop shaped part and the goldish part to have a channel. So I need 3 channels.
With the rectangle tool, you’ll be able to select the first par of the texture that should be the first texture. Make sure the red is 255 and G and B 0

79. For the second channel, we want to drag G/Green to 255 to create yellow!

80. Select both the red and yellow channel, right click and select ‘Select inverse’.

81. Now webucket fill that area! :D And make sure the R=255 and the B=255. Set the G to 0.
If anyone’s curious, the reason why we’re filling the entire mask is due to the game also recognising white and black colors and will get confused. At least, it has happened to me that the mask would turn part-overlay and part mask.

82. Delete all the other layers except for the mask one.

83. Go to File> Save as, name it Mask and save it as a DXT1.
Back to TSRW wonderland

84. To import our Multiplier, click on Multiplier>Edit
NOTE: if your cloned caspart has a overlay that you don’t want or need, click on the overlay (like showed with the multiplier)> Edit, in window that just popped up> Make Empty
!!PLEASE SAVE YOUR TSRW PROJECT FREQUENTLY!!

85. Click on the box with the green arrow (import)) And import the ‘Multiplier.dds that we just exported from Photoshop.
86. Click ‘Done’

Repeat step 84 to 86 for the mask and specular map!
DO NOT edit any other map/texture!
Enabling Channels

In the texture tab, you want to scroll all the way down to the ‘patterns tab.’
87. To enable/disable channels go to Channel B, enabled>switch false to true.
Do the same with Pattern C if needed.

BUT GREENIE I NEED COLORS! I SAY COLORS!!
88. Go try clicking on a pattern and use the edit button.

89. A SCREEN! :D WITH COLORS :DD Double click on the number part of the list or the arrow thingy and go get your colors!
BUT GREENIE-
HUSH MY CHILD! PATTERNS COMING RIGHT YOUR WAY:

90. Presets! Let’s switch to a different preset for this. So go to the second one.
Greenie, da fuq are presets?

Now that we covered that. Let’s move on...

91. OH NO Our textures disappeared! WHAT DO WE DO NOW?! ヽ(`Д´)ノ (д´ノ) ヽ( )ノ (ヽ´△) ヽ(´△`)ノ Weell let’s click on the mask file> EDIT> Browse (Next to the box with the red box/export).

92. Let’s click OUR mask from the list!
*warning: So as we all know TSRW HATES textures and will throw ‘no memory’ messages Which is utter bullshit Thanks for the memory leak!
So please! Save your file after every action!
Repeat step 91 and 92

93. Move to the Pattern panel and edit a channel.
94. Click on the folder icon (Blue highlighted).

95. Select whatever category you’re looking for.
96. Of course you can edit the colors the same way like solid-colors

97. LET’S NUKE ONE FOR FUN, so go to the last preset.

98. Now click on the page thingy and delete this one. If you need more presets, use ‘duplicate’ instead :D
EXPORTING! Go see the world my child!

I usually double check stuff at this point, including the LODS and category.
99. Go to edit>Projects

100: Export> To .package

And now name it something special so people will be able to, if something’s wrong with your download, to find you back by looking up the ‘name’ of your blog. Please don’t go with a name you like, like ‘buttfart’ even though in reality your name is ‘flowersandninjas5ever’

Look! :D EARRINGS! Okay one thing though, if the mesh appears to be incredibly shiny (like here) in-CAS it’s because the UV map is overlapping another one. It will look fine in-game though! ^- ~

If something’s still not working, or not clear, or whatever, feel free to message me! Or Ask me and I will adjust the tutorial, though I think it’s pretty straightforward ^- ~
Now get yourself a treat! :D Download the earrings right here:
DOWNLOAD ME
343 notes
·
View notes
Text
How to Roleplay a Functional Wedding party: Masterlist
Mods you’ll need (mostly optional):
Limbo
Relax to sit
Wedding Inactives
Nondefault cakes
Transmogrifier
Buyable Bunch of gifts
Gift Giving Overhaul
Arsil Cooler
Set Table mod
Slow Dance mod
Pose Player addon mod
CC Suggestions:
Deco Priest - There are a few formal dressed sims in here you can use in front of the wedding arch
Wedding cakes
Party Set up
Plan Party in any lot in your world.
Set up chairs in front of where the wedding service will mainly happen.
Have all invited guests “relax” using the sit mod script interaction. They will do this for two hours without getting up. Note: They will have the throw rice interaction once they get up so be prepared for that. I don’t consider it a bug as I think they should all be seated for the actual wedding interaction.
Have your sims do the service, and you can further have them kiss, makeout, do more romantic interactions with everyone watching. The most important part is being able to kiss further during the service.
Using poseplayer add on, all you have to do is click on the sims you want to pose for your screenshots. I personally only install pose list compatible poses, I have several standing and sitting story telling poses that will last me my entire playthroughs. This part is up to you, but I wanted to include it as an easier way to create memories.
Showtime Camera: If you have 3+ sims in your household and two of them are getting married, have the other sim record the exchanging of rings to keep as a memory and watch throughout the sims life and future generations. You can also do this for NPC weddings and give it as a gift after the wedding.
The limbo mod is a scripted object that I’ve only ever used for weddings and children’s parties. They don’t serve much use to me during adult parties where everyone is drinking booze and going crazy. So this is just a fun interaction you can have your wedding guests line up and do with the bride and groom.
The slow dance mod is autonomous but also you can set your sims to dance to to classical musical in a more romantic and Waltz-esque style. I change to classical so the interaction will pop up, then quickly change the music to custom or something else more modern and fitting to the theme of the wedding.
The nondefault cakes has the slice cake interaction. You can transmogrify custom wedding cakes from one of those cakes.
The Cooler mod is if you would like to serve your own meals at the wedding. I make a 3 course meal, enough for all the guests, and enough tables and chairs. Using the set the table mod, I set all the tables and chairs with the first part of the meal. Then the second. The third course is the cake as the desert, so I add the cake to a very pretty decorated table somewhere in the front or center of the eating area. The sims will gather around and wait to grab their cake slices. This serves as a secondary part of the wedding party. AKA another activity altogether that can be done.
Note: You can also use the take out mod to order fancy meals and keep them in your fridge before the party, I normally get the food 2 days in advance.
Using the buyable bunch of gifts mod I call the sims getting married in the household to open the presents. The gift giving overhaul fixes the gift giving system so that your adult sims will receive more appropriate gifts for their age group and from all EP’s except ITF. Protip: I also use this for house warming parties and birthdays <3.
You can do most of these things for NPC weddings. They will cut the cake themselves.
So you’ll have the wedding vows section, the eating section, the dancing section, and the fun section. Using EA features you can hire a pianist and a bartender for your lot.
Putting this altogether and making sure everyone is having a good time within the time restraints of party setup (calling the services, seating everyone, making the 3 course meal) can be roleplayed as a mini game for wedding planner sims. You can use the browse social media interactions, and take pictures for your blog to increase performance with the Event planner custom career. Just make sure you have linked this career to the EA business career using Sonyaju’s UC at city hall. And with NPC wedding mod available you can now actually be a more active wedding planner professionally.
Alternatively, using NRAAS traveler mod, you can do a destination wedding. I recommend smaller vacation worlds. Suva Diva Resort comes to mind, and Nilxis’ vacation world packs. EA’s France and Monte Vista. I have a greek themed world. You can do a winter indoor wedding, etc. Just invite all the people you want to attend the wedding to your household. Then use the travel services mod and invite them all with you(City hall > Nraas > Traveler > Allowable > Friends must be actually friends or they won’t show up as options). I’ve playtested this as they were all in my household at the wedding destination world, I would simply create a realistic resort like hotel with several rooms for all my guests. You can use MC to make them unplayable, they will be in your household you just can’t click on them or make them do things, they will have fun and go to lots autonomously on their own. You can invite them out for bachelor parties, beach parties, go for a drink, etc. Note: They may still be in your household when you return home so just move them back out into their designated households, you can use money cheats to readjust your household funds.
And I almost always send my newly weds to a new world for honeymoon vacations. I spend a lot of time building up my small vacation worlds so I try to get as much functionality as I can out of them. I usually send them right after the wedding. If it was a destination wedding, I don’t because that kind of was their honeymoon, so I’ll pause the vacation and stay there a bit longer just so the newly wed couple can enjoy their time together before having to return back to work.
Note: You can transmogrify the wedding arch to a rug or floor object if you don’t like the arches, even custom ones, or cannot find an arch decent enough for your specific build
Happy Simming!
22 notes
·
View notes
Text
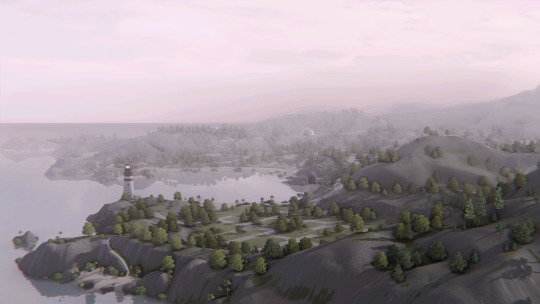
Tutorial de ajuste para Neblina no The Sims 3
Everything you need to know to correctly configure fog in The Sims 3 and not have any more bugs related to it in your game! This tutorial will make the maps look stunning! Share to reach as many people as possible.
Hoje você vai aprender como ajustar a neblina corretamente pra obter visuais deslumbrantes e mais realistas no The Sims 3. Infelizmente por mais de 10 anos tivemos diversos problemas relacionados à neblina, alguns deles: Montanhas cortadas quando a câmera estava muito afastada Neblina desaparecendo abruptamente quando dávamos zoom-out Densidade de neblina estranha causando um visual não…

View On WordPress
14 notes
·
View notes
Text
Please Join In!
Hey Guys,
As much as we wish we could do all the tutorials you guys request, we sadly don’t have all the knowledge/skills. So we would really love it if some of the amazing creators out there would help us out with some of these tutorials!
So if you know how to do one of the below tutorials, it would be awesome if you could :D
This is the list of all the tutorials people have requested to make:
How to create contacts
How to create eyebrows
How to make a wraparound neck tattoo
How to convert clothing to different ages
How to convert TS4 makeup to TS3
How to mesh shoes
Convert TS4 roof colors to TS3
We really appreciate any help! Even reblogging/sharing helps :)
-Your tutorial hub team
39 notes
·
View notes
Text
Resolution Upscale: Performance
A neat trick with resolution scaling I learned on Skyrim. As discussed before on my blog if you play at lower resolutions you get smoother playback. It’s less pixels your computer has to render which means more stability in overall gameplay. The downside to that is quality, specifically pixel quality.

This is the lowered resolution I selected, remember to do this in fullscreen mode instead of windowed. Windowed mode is best to play at your screen’s resolution (for most of you that will be 1080 x 1920) while fullscreen mode is better suited to render better picture quality at lower resolutions.

Using the power of Reshade we are going to adjust the sharpness to upscale the resolution “back up” to 1080 x 1920. The AMD sharpness is especially helpful here. In the end you should get something that looks like this

Beautiful! Now you get the smoothness, performance, hyper fast pixel rendering with none of the quality loss.
Happy simming!
13 notes
·
View notes
Text
Sims 3 Custom music fix
Some simmers figured out the bug with custom music not playing here
" The Sims 3They must be all . mp3 files with a bit rate no larger than 320kbit/s. “
The game isn’t formatted for anything higher which is why the music will stop mid way or not even play altogether,
when simmers tested this they got to play over 200+ songs in their folder.
Get Audacity for free and use this method to format all music you download to 320kbit/s.
“ Just select the file type you want from the "Format" menu and select "Options" to change the bit rate. Preset bit rate mode provides four bit rates that are selected for you. Choose a low bit rate to lower the bit rate of the audio. “
This should completely fix all custom music issues. I’ve tested this with mp3 files over an hour long and so forth. Sometimes I make my own playlists because I like to have my own music playing in certain area’s of the game. Like 5 star restaurants get romantic jazz music, indie music for hangout places certain bars, jersey club twerk music etc. All I have to do us change the “song” until I find the right playlist for that lot.
6 notes
·
View notes