#single source of truth redux
Explore tagged Tumblr posts
Visit Tumblr Blog
Explore Tumblr blogs with no restrictions, modern design and the best experience.
Last Seen Tumblr Blogs


Fun Fact
Tumblr is used by 21% of adults online aged 18-29 years.
Text
Context API vs. Redux: Which One Should You Choose?

State management is one of the most critical aspects of React development. As an application grows, handling state efficiently becomes a challenge. Two popular solutions, Context API and Redux, offer different ways to manage and share state across components. While both are widely used, understanding their differences will help you choose the right tool for your project.
Understanding Context API
The Context API is a built-in feature in React that enables components to share state without prop drilling. Instead of manually passing props through every level of the component tree, it allows a Provider component to wrap around sections of an application, making state available to any child component that needs it.
Why Developers Love Context API
One of the biggest advantages of Context API is that it eliminates prop drilling, making it easier to pass data across deeply nested components. This is particularly useful in scenarios where multiple components need access to the same data, such as theme settings or user authentication status.
Moreover, Context API is lightweight and does not require additional libraries. This makes it an excellent choice for small to medium-sized applications that don’t require extensive state management.
However, Context API has limitations when dealing with frequent state updates. Every time the context value changes, all components consuming that context re-render, which can lead to performance issues if not managed properly.
Diving Into Redux

Redux, on the other hand, is an independent state management library that follows a predictable unidirectional data flow. It introduces a single source of truth, meaning that all state is stored in a central location and can only be modified through actions and reducers.
Why Redux is Preferred for Large Applications
Redux shines in large-scale applications where managing global state efficiently is crucial. It provides strict state management, which ensures that data updates occur in a controlled and predictable manner.
One of its key strengths is middleware support. Libraries like Redux Thunk and Redux Saga allow developers to handle asynchronous operations, such as API calls, in an organized manner. This is particularly useful in applications that require complex side effects or rely heavily on asynchronous data fetching.
Additionally, Redux comes with powerful debugging tools like Redux DevTools, which enable developers to track every state change, rewind actions, and inspect state mutations in real time.
However, Redux does require more boilerplate code compared to Context API. Setting up actions, reducers, and stores adds complexity, which can be overwhelming for beginners or for projects where state management is relatively simple.
Comparing Context API and Redux
When deciding between Context API and Redux, it's important to consider key factors such as setup complexity, performance, scalability, and debugging support.
Setup Complexity – Context API is straightforward to implement since it is built into React. Redux, on the other hand, requires setting up a store, actions, and reducers, making it more complex to integrate.
Performance – While Context API reduces prop drilling, it can cause unnecessary re-renders when state updates frequently. Redux is optimized for performance since state updates happen in a structured way using reducers and selectors.
Scalability – Context API works well for small to medium-sized applications but may struggle as state management becomes more intricate. Redux is designed for large applications where maintaining a global state efficiently is essential.
Debugging – Redux provides advanced debugging tools that allow developers to inspect and track state changes. Context API, in contrast, relies on React DevTools, which offers limited debugging capabilities compared to Redux DevTools.
Middleware Support – Redux supports middleware solutions that help manage asynchronous operations, such as API requests or side effects. Context API does not have built-in middleware support, making Redux a better choice for handling complex asynchronous tasks.
When Should You Use Context API?
Context API is a great choice if:
Your application has a simple or moderate state management requirement.
You want to avoid prop drilling without adding external dependencies.
Your project does not require middleware for handling asynchronous actions.
You are working on a small app and need a lightweight state-sharing solution.
When Should You Use Redux?
Redux is the better choice when:
Your application involves complex state management with multiple components depending on shared state.
You need to handle asynchronous operations like fetching data from APIs.
You want structured state updates and debugging tools to track changes efficiently.
Your project is large and requires a scalable state management solution with middleware support.
Final Thoughts: Which One is Right for You?
Both Context API and Redux are powerful tools for state management, but the choice depends on your project’s needs. If you’re building a small to medium-sized application and need a quick, lightweight solution, Context API is the way to go. However, if your project requires scalability, middleware, and advanced debugging tools, Redux will be the better option.
State management is a key factor in React applications, and choosing the right tool will ensure better maintainability and performance in the long run. Want to explore more? Check out the in-depth guide on Context API vs. Redux for a deeper comparison!
0 notes
Text
Build Scalable E-Commerce Apps with React Native & Redux
1. Introduction React Native is a powerful framework for building cross-platform mobile applications using JavaScript and React. Redux, on the other hand, is a state management library that helps you manage global state by providing a single source of truth for your application’s data. Together, these technologies can be used to build scalable and maintainable e-commerce applications. In this…
0 notes
Text
Looking to level up your React applications? Discover how Redux can supercharge your state management and improve your app's performance. From simplifying complex state logic to enabling predictable behavior across components, Redux offers powerful solutions for React developers. Dive into the latest blog post to learn about its key functions, advantages, and why it's an essential tool for building scalable applications. 🚀📊
#ReactJS#Redux#WebDevelopment#JavaScript#StateManagement#FrontendDevelopment#CodingTips#TechBlog#ReactDevelopment#WebApp#DevCommunity#SoftwareEngineering
1 note
·
View note
Text
Advanced Techniques for State Management in React: Redux vs. Context API

Introduction State management is a crucial aspect of building robust and scalable React applications. Two popular approaches for managing state in React are Redux and the Context API. In this article, we will delve into advanced techniques for state management using Redux and the Context API, comparing their strengths, weaknesses, and best use cases to help you make informed decisions when choosing the right approach for your project.
Redux: A Predictable State Container Redux is a powerful state management library that provides a predictable and centralized way to manage the state of your application. Key features of Redux include:
Single Source of Truth: Redux stores the entire state of your application in a single immutable object, making it easier to manage and debug. Unidirectional Data Flow: Actions are dispatched to update the state, following a strict unidirectional data flow pattern. Middleware Support: Redux allows you to apply middleware for handling asynchronous actions, logging, and more. DevTools: Redux DevTools provide powerful debugging capabilities, allowing you to inspect and time-travel through your application’s state changes.
Context API: Built-in State Management in React The Context API is a feature introduced in React that allows you to pass data through the component tree without having to pass props down manually at every level. Key aspects of the Context API include:
Provider-Consumer Pattern: The Context API uses a provider-consumer pattern to share data across components without prop drilling. Simpler Setup: Compared to Redux, the Context API requires less boilerplate code and setup, making it easier to implement for smaller applications. Lightweight: For simpler state management needs or when Redux might be overkill, the Context API provides a lightweight alternative.
Choosing the Right Approach When deciding between Redux and the Context API for state management in your React application, consider the following factors:
Complexity: Redux is well-suited for complex applications with a large state that requires predictable updates. The Context API is more suitable for simpler state management needs. Scalability: Redux’s centralized store and strict data flow make it easier to scale and maintain larger applications. The Context API may lead to performance issues with deeply nested components. Developer Experience: Redux’s debugging tools and middleware support provide a robust developer experience. The Context API offers a simpler setup but may lack advanced debugging capabilities.
Conclusion Both Redux and the Context API offer powerful solutions for state management in React, each with its own strengths and use cases. By understanding the advanced techniques and considerations for using Redux and the Context API, you can make informed decisions when architecting your React applications. Whether you choose the predictability of Redux or the simplicity of the Context API, mastering state management is essential for building efficient and maintainable React applications. For businesses looking to optimize the navigation and user experience of their React applications, partnering with a reputable React.js development company can be a strategic investment. from these companies you can hire experienced React.js developers who specialize in leveraging tools like React Router to build efficient and user-friendly web applications.
0 notes
Text
Exploring the Top 5 Libraries for React Native Development

In the ever-evolving world of mobile app development, React Native stands out as a powerful framework that allows developers to build cross-platform applications with ease. To further amplify your React Native development journey, we've curated a list of the top five libraries that can supercharge your projects.
React Navigation: Smooth navigation is the backbone of any mobile app, and React Navigation is the go-to library for achieving just that in your React Native projects. With a declarative API, it provides an intuitive way to manage navigation in your app, supporting various navigation patterns like stack, tab, and drawer navigation. React Navigation makes it seamless to create dynamic and interactive user experiences, ensuring your users navigate through your app effortlessly.
Redux: State management is a critical aspect of building robust applications, and Redux has been a staple in the React Native ecosystem for managing state in a predictable manner. With a single source of truth, Redux makes it easier to debug and test your application, especially as it scales. Integrating Redux into your React Native project ensures a scalable architecture and efficient state management, making it a must-have library for complex applications.
React Native Elements When it comes to building visually appealing and consistent UIs, React Native Elements is a game-changer. This library provides a set of customizable and ready-to-use UI components that follow the principles of Material Design. From buttons and cards to sliders and icons, React Native Elements simplifies UI development, enabling you to create stunning interfaces without compromising on functionality.
AsyncStorage: Storing and retrieving data locally is a common requirement in mobile applications. AsyncStorage comes to the rescue by providing a simple, asynchronous key-value storage system for React Native. Whether you need to cache user preferences, store authentication tokens, or save app settings, AsyncStorage ensures a hassle-free way to persist data locally on your users' devices.
React Native Firebase: Firebase has long been a go-to solution for backend services, and the React Native Firebase library seamlessly integrates Firebase with your React Native application. Whether you need authentication, real-time database capabilities, or cloud functions, React Native Firebase provides a set of well-documented and easy-to-use APIs, simplifying the process of adding robust backend functionality to your mobile app.
Conclusion: These top five React Native libraries—React Navigation, Redux, React Native Elements, AsyncStorage, and React Native Firebase—can significantly enhance your development workflow and help you create high-quality, feature-rich mobile applications. Panoramic Infotech excels in React Native Development, offering cutting-edge solutions that seamlessly bridge the gap between web and mobile applications.
#react native app development company usa#top react native development company usa#react native development company usa#react native app development services usa#react native developer company usa
0 notes
Text
Mastering Ionic Mobile App Development: A Step-by-Step Guide
Understanding the Power of Ionic app development

In the rapidly evolving landscape of mobile app development, Ionic has emerged as a powerful framework for building cross-platform applications that are both visually appealing and highly functional. Whether you're an aspiring developer or a representative of an Ionic mobile app development company, this step-by-step guide will take you through the journey of mastering Ionic mobile app development.
Ionic is a popular open-source framework that combines HTML, CSS, and JavaScript to build high-quality mobile applications that work seamlessly across different platforms like iOS, Android, and the web. The key advantage of Ionic lies in its ability to use a single codebase to create native-like experiences, saving both time and resources for developers.
Setting the Foundation
Before diving into the world of Ionic app development, ensure you have a strong foundation in web technologies like HTML, CSS, and JavaScript. Ionic leverages these technologies, so a solid understanding will make your learning journey smoother.
Familiarizing with Ionic Components
Ionic offers a plethora of pre-designed UI components that aid in crafting visually appealing interfaces. Mastering Ionic components is crucial for creating intuitive user experiences. Start by exploring Ionic’s documentation and experimenting with different components to understand their usage.
Installation and Setup
To get your hands dirty with Ionic, you need to set up your development environment. Install Node.js, Ionic CLI, and Cordova to begin creating and testing your apps. These tools are the building blocks of your Ionic app development journey.
Creating Your First Ionic App
Nothing beats the thrill of creating your first Ionic app. Use the Ionic CLI to generate a new project, select a starter template, and build a basic app structure. Run your app on different platforms using commands provided by Ionic.
Navigating Through Navigation
Navigation is a critical aspect of mobile app design. Ionic’s navigation system allows you to create complex navigation flows with ease. Learn to set up navigation using the ion-router component and understand concepts like navigation stacks and route parameters.
Styling for Aesthetics
Ionic provides a set of default themes, but you can customize your app’s look and feel to align with your brand identity. Grasp the fundamentals of Ionic’s theming system and utilize CSS variables to achieve a personalized design.
Integrating Native Device Features
Ionic wouldn't be a top choice for app development without its ability to access native device features. Learn to integrate device capabilities like camera, geolocation, and sensors using Cordova plugins and Ionic Native wrappers.
Handling Data Effectively
Most apps require interaction with APIs and databases. Master the art of making HTTP requests using Angular's HttpClient module and learn about state management using tools like Redux or RxJS to ensure smooth data handling.
Testing and Debugging
Bugs are inevitable, but the key is to identify and fix them efficiently. Explore tools like Chrome DevTools and Ionic DevApp for testing and debugging your app. Conduct thorough testing on real devices and emulators to ensure compatibility.
Deployment
The moment of truth arrives when you're ready to share your masterpiece with the world. Deploying an Ionic app involves configuring platforms, optimizing performance, and publishing to app stores. Follow platform-specific guidelines for a seamless deployment experience.
Continuous Learning
The tech landscape is ever-evolving, and Ionic is no exception. Stay updated with the latest Ionic releases, enhancements, and best practices. Engage with the Ionic community through forums, blogs, and social media to keep refining your skills.
Partnering with Ionic App Development Services
For businesses seeking to harness the potential of Ionic apps, partnering with a specialized Ionic Mobile App Development Company is a strategic move. These companies offer Ionic App Development Services tailored to your unique needs, ensuring high-quality and feature-rich applications that captivate your audience.
Performance Optimization
In the world of mobile app development, performance is paramount. Ionic provides tools and techniques to ensure your app runs smoothly and efficiently. Learn about lazy loading, which loads only the required components when needed, and optimize your app's images, animations, and data fetching to provide a snappy user experience.
Enhancing User Experience
User experience (UX) can make or break an app's success. Delve into advanced Ionic features like gestures and animations to create fluid and intuitive interactions. Implement responsive designs that adapt to various screen sizes, orientations, and devices.
Security Measures
As an Ionic developer, it's essential to prioritize app security. Explore authentication and authorization mechanisms to safeguard user data. Implement secure communication protocols and stay updated on the latest security vulnerabilities and best practices.
Scaling Up with Ionic
As your skills grow, so can the complexity of the apps you build. Master the techniques of modularization and code organization to manage larger codebases effectively. Learn about performance profiling tools to identify bottlenecks and optimize code for scalability.
Exploring Ionic Capacitor
While Cordova is a popular choice for integrating native features, Ionic Capacitor offers a modern alternative. Explore this native runtime for building web apps that run natively on iOS, Android, and the web. Compare the benefits and drawbacks of Capacitor against Cordova to make informed decisions.
Incorporating PWA Elements
Progressive Web Apps (PWAs) blend the best of web and mobile app experiences. Ionic allows you to create PWAs alongside native apps. Learn how to leverage Service Workers and manifest files to transform your Ionic app into a PWA, enhancing its reach and performance.
A/B Testing and Analytics
To create successful apps, you need to understand how users interact with them. Implement A/B testing to compare different app variations and determine which performs better. Integrate analytics tools to gather insights into user behavior, enabling data-driven improvements.
Contributing to the Ionic Community
Becoming a master goes beyond personal development. Engage with the Ionic community by contributing to open-source projects, participating in forums, and sharing your knowledge through blog posts and tutorials. Collaboration and knowledge sharing enrich both your skills and the Ionic ecosystem.
Ionic Apps Development Company
If you're a part of an Ionic Apps Development Company, your journey doesn't stop at mastering the framework. Building a reputable company involves understanding client needs, project management, and effective communication. Offer tailored solutions, stay updated with market trends, and showcase your expertise through a portfolio of successful Ionic projects.
Embracing the Future of Mobile Development
The journey of mastering Ionic mobile app development is one of continuous learning, experimentation, and innovation. As you progress through these steps, remember that each app you create contributes to your growth as a developer or as an Ionic Apps Development Company. The versatility, cross-platform compatibility, and rich features offered by Ionic make it a compelling choice for modern app development.
In Conclusion
Mastering Ionic mobile app development is a fulfilling journey that combines creativity, technical prowess, and a commitment to providing top-notch user experiences. By following this step-by-step guide, you're equipped with the knowledge to craft remarkable cross-platform applications. Remember, the road to mastery is ongoing, and each app you build will refine your skills further. So, embrace the process, innovate, and create with Ionic!
0 notes
Text
Exploring Redux and Redux Toolkit in AchieversIT React.js Training

State management is a crucial aspect of React.js applications, especially as they grow in complexity. Redux is a popular state management library that helps developers manage the state of large-scale applications efficiently. In AchieversIT React.js training, developers not only learn the basics of Redux but also explore Redux Toolkit, a powerful and opinionated toolset that simplifies Redux setup and usage. In this article, we will delve into the world of Redux and Redux Toolkit as covered in AchieversIT React.js training and understand how they streamline state management in React.js applications.
Understanding Redux Redux is a predictable state container for JavaScript applications, and it is often used with React.js to manage the application state in a centralized and predictable manner. Redux follows a unidirectional data flow, making it easier to track changes and maintain a clear understanding of how data changes over time.
The three core principles of Redux are:
Single Source of Truth: The entire application state is stored in a single JavaScript object called the "store." This provides a centralized location for all the state data, making it easier to manage and access the data.
State is Read-Only: The state in Redux is immutable, meaning it cannot be directly modified. To update the state, developers dispatch "actions" to describe the changes they want to make. These actions are then processed by "reducers."
Changes are Made with Pure Functions: Reducers are pure functions that take the current state and an action as input and return a new state. They don't modify the original state but create a new state based on the action.
Advantages of Redux Redux offers several advantages that make it a popular choice for state management in React.js applications:
Predictable State Changes: Since state changes are managed through actions and reducers, developers can easily trace and understand how the state changes over time, leading to more predictable behavior.
Easier Debugging: Redux's immutability and predictable state changes make it easier to debug applications, as developers can precisely identify the point at which the state changes and trace any issues.
Centralized State Management: With Redux, all the application state is stored in a single store, making it easier to manage and access data from any component in the application.
Time Travel Debugging: Redux allows developers to record and replay user actions, enabling powerful time travel debugging, which helps in reproducing and fixing bugs.
Introducing Redux Toolkit Redux Toolkit is a set of utilities and best practices designed to simplify Redux development. It provides a more intuitive and efficient way to work with Redux, reducing the boilerplate code and setup required for traditional Redux configurations.
Redux Toolkit includes the following key features:
createSlice: It simplifies the process of creating Redux "slices," which define parts of the state and the actions that can update that state. createSlice reduces the need for writing separate action creators and action types.
configureStore: It automatically sets up the Redux store with sensible defaults, including middleware setup, such as Redux Thunk for handling asynchronous actions.
createAsyncThunk: It simplifies the process of creating asynchronous actions by generating async action creators that automatically dispatch pending, fulfilled, and rejected actions.
createEntityAdapter: It simplifies working with normalized data and entity collections in the Redux store, making it easier to handle data that is stored as entities.
immer Integration: Redux Toolkit uses Immer under the hood, allowing developers to write reducer logic with mutable code while still maintaining immutability.
AchieversIT React.js Training and Redux Toolkit In AchieversIT React.js training, developers gain hands-on experience with Redux and are introduced to Redux Toolkit as the preferred approach for state management in React.js applications. The training covers the following aspects:
Understanding Redux Fundamentals: Developers learn the core principles of Redux, including actions, reducers, and the Redux store. They gain a clear understanding of how Redux fits into the React.js application architecture.
Redux Toolkit Setup: AchieversIT React.js training simplifies the setup process by demonstrating how to configure the Redux store using Redux Toolkit's configureStore function. This includes integrating necessary middleware for handling asynchronous actions.
Using createSlice: Developers learn to define Redux slices using the createSlice function, which reduces the boilerplate code typically associated with creating action creators and action types.
Handling Asynchronous Actions: AchieversIT React.js training introduces developers to createAsyncThunk, enabling them to handle asynchronous actions more efficiently and with a clearer syntax.
Working with Entity Collections: Developers explore createEntityAdapter and learn how to manage normalized data in the Redux store using entities, making data handling more efficient and scalable.
Conclusion Redux and Redux Toolkit are powerful tools for state management in React.js applications. AchieversIT React.js training equips developers with the knowledge and skills to use Redux effectively, including advanced techniques such as Redux Toolkit. By mastering Redux and Redux Toolkit, developers can build scalable and maintainable React.js applications with a clear and predictable data flow. The centralized state management provided by Redux simplifies debugging and ensures consistency throughout the application.
0 notes
Text
10 Must-Know Tools for Every React JS Developer
React JS developer, having the right set of tools can significantly enhance your productivity and help you build amazing web applications. We will explore ten must-know tools that every React JS developer should be familiar with. From code editors and debugging tools to state management libraries and UI component frameworks, we've got you covered with all the essentials.

1. Visual Studio Code (VS Code)
As a leading code editor, Visual Studio Code is a favorite among developers worldwide. Its lightweight, extensible, and powerful features make it an excellent choice for react js developer. With VS Code's extensive library of extensions, you can customize your environment and enhance your coding experience.
2. React Developer Tools
React Developer Tools is a browser extension that allows you to inspect and debug React component hierarchies. It provides valuable insights into your application's component structure, props, state, and performance. This tool is indispensable for identifying and resolving React-related issues efficiently.
3. Redux
Redux is a popular state management library for React applications. It helps you manage the state of your application in a predictable and organized manner. Redux is known for its single source of truth principle, making it easier to debug and maintain large-scale React projects.
4. Axios
Axios is a promise-based HTTP client that simplifies making AJAX requests in React applications. With its straightforward syntax and support for interceptors and transformations, Axios streamlines data fetching and handling in your projects.
5. React Router
When it comes to building dynamic and single-page applications with React, React Router is a must-have tool. It enables you to handle navigation and routing efficiently, making your application more interactive and user-friendly.
6. Storybook
Storybook is a fantastic tool for developing and testing UI components in isolation. It allows you to build, document, and visualize React components in different states, ensuring that your UI elements are robust and visually appealing.
7. ESLint
Maintaining code quality and consistency is crucial in any software development project. ESLint is a widely used tool for linting JavaScript code, providing real-time feedback and identifying potential errors and code style violations in your React projects.
8. Prettier
Prettier is an opinionated code formatter that helps you maintain a consistent code style across your React application. By automatically formatting your code, Prettier saves you time and reduces the chances of introducing syntax errors.
9. Jest
Jest is a powerful testing framework that simplifies writing unit and integration tests for your React components. With its built-in support for snapshot testing and parallel test execution, Jest boosts the reliability and performance of your test suites.
10. Material-UI
Material-UI is a widely used UI component library for React that follows Google's Material Design guidelines. It offers a wide range of customizable and aesthetically pleasing components, enabling you to create stunning and responsive user interfaces effortlessly.
Conclusion
Hire reactjs developer, having the right set of tools can make a significant difference in your development workflow. From code editors and debugging tools to state management libraries and UI component frameworks, each tool plays a crucial role in building exceptional React applications.
0 notes
Text
Commissions Redux

Hi Folks!
This has been copied from my main blog and cleaned up a bit, since I’m trying to separate the fan stuff from the main to keep something like a semblance of an order. Commissions are therefore moved from Mana-chan’s Corner to here. They are still open and perfectly free, just read the rules, please. In case you wish to support me, you can do either of these things:
» Leave a Tip
» Buy Me a Coffee
As I am currently jobless (thank you Corona) every bit is appreciated.
» Full Update
For a long time I didn’t take any commissions because the fandoms and pairings I have inspiration for is a limited fraction of my active fandoms (i.e. the fandoms I engage with via reading fic, commenting, enjoying content, reblogging, etc.) and I didn’t want to disappoint.
Recently, in an unexpected strike of utter genius (which only took me like... 5 years to work out), I had the epiphany to compile a list of fandoms+pairings I’d be more than happy to write as you desire.
» Commission Rules/FAQ. Please read before commissioning.
» For full list of available fandoms/genres click below.
» Fandoms
» The Untamed | Mo Dao Zu Shi
The most recent fandom, also the one that currently dominates my mind.
Including: CQL, Novel, Movies. I haven’t read a lot of the source material, but I’m intending to and I already did some research. For now I think I prefer a mix of canons.
» Pairings
» Lan Wangji/Wei Wuxian
» Jiang Cheng & Wei Wuxian (mostly gen, but I believe I could do something sexual/romantic as well, but please ask first if you have any specific ideas)
» Jiang Cheng/Wen Qing (please read the rules)
» Jiang Cheng/Wen Ning (tentative)
» Nie Mingjue/Wei Wuxian
» Nie Mingjue/Lan Xichen (tentative, though I mostly see myself as writing them on the side)
» Any version of the 3zun (same as above)
» Lan Xichen/Wei Wuxian
» Jin Zixuan/Wei Wuxian
» Specific Canons / Prompts
The Untamed basically exploded over my head and didn’t leave me alone. In the past few months a few plotbunnies developed which I’d all love to write at one point. You can chose to prompt me either of these or pick any general prompt, or anything you’d like to read, as long as it aligns with what I can write.
» The First Witness
Genre: Case Fic, Modern AU, Canon retell, Drama, Tragedy, Romance, M/M
Pairings: WWX/LWJ
Includes: Forensic Medical Examiner Wei Wuxian, Inspector Lan Wangji, Single Dad Wei Wuxian, Wei Sizhui / Wen Yuan, the dead ones are dead, Badass Grandmother Baoshan Sanren, Yunmeng Bros Reconciliation, Businessman Jiang Cheng, Murder Mystery, Pining, Getting Together, HIV positive character, past off-screen rape (mentioned only). It’s basically what it says, a canon retell wrapped in a modern day case fic. It was the first thing that I had inspiration for.
» Nurse Wei Wuxian slice of life Modern AU
Genre: Modern AU, slice of life, recovery, drama, tragedy, adoption, M/M, hurt & comfort, getting together, romance, fluff
Pairings: WWX/LWJ
Includes: pediatric nurse Wei Wuxian, pediatric nurse MianMian, elementary school teacher Lan Wangji, pediatrician Lan Xichen, intense care nurse Jiang Yanli, intense care doctor Wen Qing, teacher’s aide Wen Ning, Yunmeng reconciliation, only some are dead, Wen family+WWX living together.
Premise: Former convict Wei Wuxian, fresh out of nursing school, applies for a job at Dr. Lan Xichen’s pediatric practice. Lan Xichen (who sometimes takes pro bono foster children abuse cases) isn’t quite sold on the idea of a former felon turned nurse attending to already traumatized children, but upon interview decides to give WWX a chance. Not only does he never regret it, it turns out it’s to be the best decision he’s ever made, not only in regards to his practice. Meddling ensues, love blossoms, truths are revealed, happy end. Probably the fluffiest story on the list.
» ABO Yunmeng Shuanjie Fake Marriage AU
Not what you think. Does not involve pseudo-incest (at least not for a long time, haven’t decided on the end results yet). First ABO I’ve ever considered writing, but all the more exciting, since I know now what I want of it.
Pairing: WWX/LWJ (temporal, non-endgame - so far, platonic), WWX & JC (gen, ruling partners)
Includes: fake marriage, extra marital affair, male pregnancy, abo (mostly non-traditional, I think?), not actual pseudo incest, adoption, canon divergence, not everybody dies, Wen Chao being a monster, sexual assault (interrupted), golden core loss, NO golden core transfer, misunderstandings, complicated political situations, the Wens are saved and live in Lotus Pier, a-Yuan is still adopted, “sometimes love is not enough”
Premise: shortly after concluding the studies at Cloud Recesses LWJ starts courting WWX. Engagement is discussed between the two clans, but the Wen indoctrination and the burning of the Cloud Recesses gets in between. When LWJ refuses to lie in order to save WWX from Wen Chao’s assault, JC steps in and pretends to be the one engaged to WWX to save his brother from a forced bond. To prevent this from being debunked and to ensure a future marriage (which will now be more challenging to achieve, given the state of Cloud Recesses), LWJ and WWX mate and bond in the Xuanwu cave. Then Lotus Pier is sacked, JC loses his golden core, the Jiangs are dead and the Yunmeng siblings flee for their lives, find refuge in Yiling, etc. Plays out as in canon except they find out WWX is pregnant and transferring the golden core would cause an abortion. WWX still says do it, but changes his mind in the last minute, leading to JC finding out about his plan upon waking up and remaining coreless. They flee to Meishan and marry to protect WWX’s reputation (since a marriage would now be impossible for a long time on both sides - Gusu and Yunmeng, AND JC needs WWX more than ever and WWX is not abandoning his little brother) Sunshot happens, WWX invents the control tower & still saves the Sunshot campaign. The sixteen years that follow are utter chaos.
» Nie Mingjue/Wei Wuxian arranged marriage AU
You know what this is inspired by.
Pairing: Nie Mingjue/Wei Wuxian, Lan Wangji/Wei Wuxian (unfullfilled, for a long time)
Includes: arranged marriage, some characters die, Nie Mingjue dies but later, revenge, wwx adopts a-yuan, canon divergence, slow burn, learning to love, the Wens live, political intrigues, wwx and nhs teaming up against jgy
Premise: To save the Wens and himself from qi deviation Wei Wuxian marries Nie Mingjue (in spite of being in love with LWJ). Slowly some truths are revealed and feelings blossom but some tragedies cannot be prevented. NMJ realizes the feelings that are between WWX and LWJ, but they both marry regardless. Later WWX realizes that NMJ is similarly in love with Lan Xichen. With time they learn to love and respect each other, NMJ learns about what WWX did for JC, WWX learns clarity to play for NMJ when JGY nearly succeeds killing him (WWX suspects but he has no proof). NMJ still dies (disappears) and widower WWX spends the next decade or so seeking revenge and searching for his husband’s body so that he can rest in peace. It’s all very bittersweet, but there’s a happy ending.
» Hakuouki + Extended Universe
The longest active and steadiest fandom. I know exactly what I’ll write and what not.
Including characters from: Urakata, Toki no Kizuna, the most recent overhauls (Kyoto Winds, Edo Blossoms). I’ve seen all three anime seasons, played a few routes of Kyoto Winds and read some walkthroughs. I’m not completely done with all of them, but I’ll take the time to research if the commission demands it.
» Pairings
» Harada Sanosuke/Nagakura Shinpachi (I lovingly refer to them as my naval battle cruiser)
» Harada Sanosuke/Shiranui Kyou
» Shiranui Kyou/Takasugi Shinsaku
» Kondou Isami/Hijikata Toushizou (tentative)
» Hijikata Toushizou/Saitou Hajime (tentative)
» Nagakura Shinpachi/Saitou Hajime
» Saitou Hajime/Toudou Heisuke
» Yukimura Chizuru/Sen-hime
» Ibuki Ryuunosuke/Kosuzu (please read the rules)
» Specific Canons / Prompts:
I’ve had a number of inspirations for this, which I’ve never written, but would love to delve into. You can chose to prompt me either of these or, of course, pick a general prompt.
» Fabulous Family Series
The one in progress, you can check it out on AO3. You can prompt me in this, if there’s something you’d like to read.
Pairings (current and planned): Harada/Nagakura, Kondou/Hijikata, Okita/Chizuru (casual), Heisuke/Saitou, Takasugi/Shiranui, Chizuru/Sen-chan, Ibuki/Kosuzu, Ibuki->Saitou (one-sided crush), Saitou/Chizuru (temporal)
Tags: adoption, modern AU, lgbtq+ issues, M/M, genderfluid character, disabled character (future), teenage pregnancy (future), slice of life, sexual assault (future), child abuse (future reveal), romance, ace/aro character, casual sex, underage sex,
» Gender Swap AU
Main Ship: Harada/Nagakura
Side Ship: Ibuki/Kosuzu
Summary: Sannan secretly tests a version of his experimental Ochimizu on a few of the captains. The result is that the new day dawns with some drastic changes to their bodies that have nothing to do with white hair, glowing eyes or bloodthirst, but with a whole other set of complications.
Premise: Original story was supposed to be about Shinpachi developing and unexpected attraction to Sano, them “experimenting” together and Sano falling pregnant. While the others manage to turn back to their original bodies, Sano doesn’t and it is all very complicated. Eventually he does (after giving birth), but instead of it being a good thing it just makes things more complicated. In the end, he choses to live in a female body instead of death and marries Shinpachi. Would include trans issues, gender dysphoria, friendship vs. love, the nature of attraction, respect, feminism and female issues. I wanted to write it as a multi-chapter, but never got around to it. But I’d love to put it out there in any form I can.
» Prince of Tennis
Tentatively putting this down as one of my oldest fandoms. I never wrote for it as cosistently as with other fandoms, but a few years back I rp-ed it for quite a while and could probably still write for it, if the pairing’s right.
Including: ShinTeniPuri characters up to Pirates and Black Holes (I haven’t read much further, but I’ll probably catch up at one point? I always do.)
» Pairings / Characters (mostly Shitenhouji and Higa centric)
» Oshitari Kenya/Shiraishi Kuranosuke
» Oshitari Kenya/Chitose Senri
» Oshitari Kenya & Oshitari Yuushi (gen, ask me about cest)
» Shishido Ryou/Oishi Shuuichirou
» Oshitari Yuushi/Kikumaru Eiji
» Oshitari Yuushi/Hirakoba Rin (this relates to that rp)
» Kai Yuujirou & Hirakoba Rin (both gen and slash)
» Kite Eishirou/Hirakoba Rin
» Watanabe Osamu/Sakaki Tarou
» Higa gen
» Shitenhouji gen and casual relationships (ask me about specific ones)
» Hara Tetsuya/Taira Yoshiyuki
» Mori Juuzaburou & Hara Tetsuya (mostly gen, but I probs could do casual slash as well)
» Ochi Tsukimitsu/Mori Juuzaburou
» Marui Bunta/Hara Tetsuya (you will never get this, but it derives from that rp I did and would still def write it if people are interested)
» Tango Pair (Sanada Genichirou/Atobe Keigo)
» Specific Canons / Prompts
Most of what I had in my head has faded but a few things remained. Of course you can also come with your own prompt at me.
» College AU, future fic
Premise: Everyone has grown up and moved on. The Oshitari cousins are now rooming together, both studying medicine at Tokyo University. They’re upper neighbors with Shishido Ryou (paedagogy) and Oishi Shuuichirou (medicine), who both miss their doubles partners, but have seemingly moved on from their middle school days and broken hearts. No such thing can be said about Kenya, who can’t get over his break up with Shiraishi following their graduation, or Yuushi, who seems to hold secrets of his own.
I haven’t developed much for this, most of it are scattered ideas, but I’d love to explore it. I’ve thought of some pairings for it, but none of them final. It would also leave a lot of room for casual stuff or one-night stands. It’s actually an ideal prompt premise, from that standpoint.
Pairings (at start, no necessarily final): Oshitari Kenya/Shiraishi Kuranosuke (past), Oishi Shuuichirou/Shishido Ryou (current), Oishi Shuuichirou/Kikumaru Eiji (past), Shishido Ryou/Ootori Choutarou (past), Oshitari Yuushi/Kikumaru Eiji (current, secret),
» It takes two to Tango / Tango towards Destruction
An old fic that was supposed to be a series which I never finished, but could pick it up and remaster it. It’d be a nostalgia project.
Pairing: Tango Pair
Premise: Atobe’s father finds out about him and Sanada dating and threatens to disown him if they don’t break up. In the original Atobe runs away, but I’m thinking now he simply might not take it seriously enough and then it would escalate. He ends up moving in with the Sanada family. Your typical rich boy loses everything and struggles through poverty, finding meaning, building a life for himself, coming off age.
» One Piece
A fandom older than even TeniPuri it’s been with me the longest. Unfortunately it doesn’t inspire me anymore the way it used to, but I’d still be able to write some things for it, if the right muse struck me. I kinda want to. Nostalgia, you know.
» Pairings
» Zoro/Sanji
» Ace/Zoro
» Ace/Sanji
» Luffy/Law (tentative, like, I ship them hard but I don’t know if I’d be able to write something for them? Oh but I’d like to try)
» Mihawk/Shanks
» Mihawk & Zoro & Perona family dynamics
» Zeff & Sanji adopted family dynamics
» Usopp & Yasopp gen
» Izo? I’d like to try an Izo.
» Canons
» Canonverse
Set in the original canon of the fandom.
Including (not limited to): backstory - past canon, present canon, future fic (please specify), canon divergence
» Modern AU
Including (not limited to): no powers, modern with magic (potential, please ask), slice of life, mystery, case fic, ‘job AU’ (coffee shop, doctors, idols, etc., please specify/ask)
» Sci-fi AU
Including: original sci-fi canon, Star Trek, Star Wars, Firefly, Cowboy Bebop, Dune (tentative), Hyperion (tentative), for everything else ask. I know a lot of sci-fi, but not enough lore for each of them to set a story in. I might be interested but it'd necessitate research.
» High Fantasy AU
Including (not limited to): original fantasy canon, Lord of the Rings, Harry Potter, Witcher, but overall I’d prefer if you ask about this. I haven’t read/seen a lot of the most recent and popular franchises (mostly because I’m writing my own high fantasy and don’t want it to be too influenced by other things, and someone already told me it sounds like Game of Thrones, so that one’s a big no. Sorry...)
» No Powers, other than modern AU
Including (not limited to): everything that doesn’t fall under the modern AU list, but has no powers in it, i.e. historical AU (specify time & culture), future AU (near & far), cyberpunk dystopia (possibly), post-apocalyptic (possibly). I don’t write zombies.
» Superpowers / Hero AU
Including (not limited to): X-Men, Avengers, Wildstorm Universe, original superhero canon
» Genres
I do mostly serious stuff, like drama, tragedy, intrigues, arranged marriage, tragic backstory, etc. I like to put my characters through a lot of suffering. I always joke that it’s very easy to spot my favorite character by the amount of torture I put them through. I feel that it makes the happy ending weigh even more. Sometimes I even prefer a bad ending, if it gives the story more meaning (I mean, imagine LotR trilogy have a happy ending. It would totally take away all the development and the lessons the characters went through.) I wish I could write light stuff but so far I have not succeeded. I use a lot of sarcasm and irony though?
My shorter fics tend to be fluffy and sweet rather than funny, if full of playful banter and teasing. Relationships are usually depicted in a naturalistic rather than romantic way (I’m ace/aro myself, and I have lots of opinions about the nature of love and attraction, and how a functioning relationship ideally looks like and it tends to seep into my writing). Instead of traditional romance I like to write a non-traditional one. Slow burn, instead of love on first sight. Learning to love instead of falling hard. But it also depends on the pairing. I can write most things if I put my mind to it, so don’t hesitate to prompt me and I’ll let you know whether it works for me or not.
I’m not shy of dealing with child abuse, assault, suicidal ideation, trauma, disability and other difficult topics in my writing, so if you wanna request any of these or something similar I’m a-okay with it, as long as you discuss it with me. I’m not knowledgeable in everything so it’s likely I’ll need to do research, but I’m more than alright with it. Honestly, it’s very probable that I’d love to try.
» Kinks
I’m okay with most stuff. Where I draw the line is the really hardcore stuff like scat and kinks involving feces, some forms of humiliation, zoophilia, necrophilia, mutilation, stuff like that.
I’m alright with both dub-con & non-con (although I refuse to depict is as normalized, or glorified), bondage, s&m, dom/sub, light bdsm (ask me about the harder stuff. I’m not against it, I’m just not always in the mood or right mindset for writing it), omorashi (tentative, ask me), daddy kink, breath play, age play, spanking, verbal humiliation, dirty talk, edging, come eating, orgasm denial,... all the good stuff.
5 notes
·
View notes
Text
North & South Series Review
By ChrisB

“Look back. Look back at me.”
Although I would be hard pressed to pick one BBC period romantic drama that is my favorite, North & South is in the top three. It contains the single most romantic moment ever filmed in period costume and, after all, isn’t the romance why those of us who love these things keep coming back for more?
Shockingly, I had never heard of this novel, or Elizabeth Gaskell for that matter, until I watched this miniseries on the BBC. I recorded it because, well, the BBC always does period drama well and I decided that it couldn’t be all that bad. All that bad? I fell in love with it from the first. It sat on my DVR until I could buy the DVDs; I estimate I have watched it more than a dozen times.
Admittedly, Mrs. Gaskell owes a great deal to our beloved Miss Austen. The plot is Pride and Prejudice redux, but so are so many others. It is a wonderful story, told and shot beautifully with two actors that have just the right amount of chemistry. This review will assume that you have know the series and, therefore, will contain spoilers. As I said, however, it is a plot you have most likely come across before.
I have been wanting to post this review for the longest time, but have been procrastinating because I wanted to read the novel that was the source material. It is very nearly unreadable. I finally gave up and skimmed it for the good parts, but even they were few and far between. All hail, once again, Sandy Welch. I have said before how brilliantly she is able to adapt for television. This show may very well be her crowning achievement.
The first hour is spent introducing us to the characters with whom we will spend the next four hours and kicking off the drama. Played by Daniela Deby-Ashe, Margaret Hale is a woman of her time, yet also incredibly modern. Right from the start, we get a sense of the kind of young woman Margaret Hale is. She is confident, strong, reliable, and able to face life’s challenges head on. In the first ten minutes, we see her turn down a marriage proposal from a man she doesn’t love.
Forced to leave the only home she has ever known, Margaret moves to Milton, a large manufacturing city in the north. As she is looking for a house, she meets Thornton, played to perfection by Richard Armitage. The first time she, and we, see Thornton, he is towering above the mill he runs looking impressive and, yes, incredibly handsome. Our first impression, however, is soon tempered by the fact that he is brutal towards one of his employees, beating the man in front of Margaret.
This is the first of many instances in the first hour in which the differences between the genteel south and the working north are highlighted. The people from Milton whom we meet, Nicholas Higgins, his daughter Bessie, and Mrs. Thornton in particular, are all proud and hard-working. They value their individualism and they abhor charity. Margaret, desperately lonely and looking for a friend, keeps inadvertently offending those she meets.
She invites herself to the Higgins’ home offering to bring a basket. Both Nicholas and Bessie laugh at her, spurning what Margaret sees as a gesture of good will. Not one to be easily thwarted, Margaret does go to visit and she and Bessie take the first steps towards friendship. The woman who would more obviously be her friend, Thornton’s sister Fanny, is silly and vain. Margaret realizes that she has more in common with the working class than the middle class.
Margaret and Thornton spar continually. Unlike the others of his class whom we see, Thornton wants more out of life than just being a mill worker. He hires Mr. Hale to teach him classics and he is intrigued by Margaret and her views. She, however, is unable to move past her first sight of him and is barely civil to him.
Everything begins to change in the second hour. The mill workers all strike and, as a result the workers are starving and the mill owners are becoming desperate for a way to send everyone back to work. Margaret refuses to allow the workers’ pride dissuade her, but she has learned about northern pride. She quietly leaves food and money.
Her charity gets her into trouble with the mill owners. At a dinner party, the other guests all round on her when it is discovered what she has been doing. Ever fearless, Margaret stands her ground, insisting that there is no just cause in the world for a child to starve. As Thornton watches her stand up to the room, we can almost watch him fall in love with her.
Her fearlessness, however, leads her into great danger and trouble. As the desperate mill workers attack the Thornton mill, she runs down and tries to mollify the mob. This scene shows us that there is still a large gap between Margaret and Thornton. She is trying to placate; he is sternly holding his ground. The mob goes after them, injuring Margaret. The end result is that the workers are shamed enough to go back to work. Ironically, Margaret’s intervention works.
Thornton is so overwhelmed by what she has done that he decides to propose to her. The proposal scene at the end of the second hour rivals the first proposal in Pride and Prejudice. Margaret is shocked and not remotely interested in this man she still sees as rough and in trade, and exactly as Elizabeth does, she accuses Thornton of not being a gentleman.
Thornton reacts by shouting at Margaret. He tries to assure her that he loves her, that he is not proposing simply because of what happened at the mill. They argue fiercely and, although Margaret refuses to even consider his offer, she is not unmoved. There is a great deal of passion in their conversation, on both sides.
The third hour opens with a heartbroken Thornton and a distressed Margaret. Thornton turns to his mother for comfort. Mrs. Thornton is a fascinating woman. She knows herself and her children well and is able to see all three of them for who and what they really are. She does tend to think a bit too highly of her son, and her reluctance for him to marry is a touch creepy, but it is easy to understand what Thornton sees in Margaret. He already loves an incredibly strong woman who is unafraid to speak her mind.
It is during the third hour that we see just how strong Margaret is and we watch this young woman fall in love with a man who is now out of reach. The third hour is filled with death and with partings. During each, Margaret is the one who is strong, who comforts those around her even while she grieves herself.
When Bessie dies, Margaret comforts Nicholas. When her mother dies, Margaret comforts Frederick and her father. When Boucher dies, it is Margaret who goes to tell his wife when both Nicholas and her father refuse to do so. It is also Margaret who goes to the station to see Frederick off to London. Once again, she is saying goodbye to someone she loves, probably for the last time.
Thornton sees her at the station and assumes that Margaret does not love him because she is in love with someone else. The irony is, of course, that Margaret is falling in love with him. Throughout the course of this hour, we see her defend Thornton to Henry and she even tells Frederick that “he is a gentleman.”
When Thornton defends Margaret and backs up her lie, even though he doesn’t understand the truth, the transition is complete and Margaret looks at him with longing. But, as she tries to break through to him and thank him, he tells her in no uncertain terms that he did what he did for her father and that he no longer loves her. The stricken look on Margaret’s face is all we need to see to understand how deep her feelings now run.
For a love story, Margaret and Thornton spend very little time together in the fourth hour. Instead, each faces life’s slings and arrows and each ends up being able to see the world from the other’s perspective.
Thornton hires Higgins and quickly sees what Margaret saw in him. The two learn to respect each other a great deal and even begin to like each other at the end. I love the scene where Nicholas plays Cupid, telling Thornton how wrong he’s been about Margaret without ever telling him. The look on Nicholas’s face as the penny drops is absolutely priceless.
Margaret, meanwhile, loses her father and gains a fortune. She returns to Helstone to learn what we all must in our twenties -- the wonderful places we remember from our childhood are not necessarily so wonderful when seen through the prism of adulthood and life experiences. Instead, she finds herself drawn back to the north and back to the man she loves. What I love about the fact that Margaret will fund the return of the mill is that she and Thornton will come together as equals.
But first, we must have the denouement and the way these two come together is simply wonderful. There was an awful lot of griping on the internet when this series came out about the fact that Thornton is not wearing a tie and that a couple of that class would never have behaved that way in public.
To which I say, who the hell cares? I choose to believe that both are so swept up in the fact that they are finally with the other that they forget where they are. Plus, what a delicious irony that they should behave in exactly the way that both Thornton and his mother falsely condemn Margaret for through most of the third hour.
As wonderful as that scene is, it is not my favorite. For me, the best moment not only of this drama but of any BBC miniseries ever, is when Margaret leaves Milton in the snow. Thornton watches her go and pleads for her to turn around. Of course she doesn’t. The camera stays on Thornton for an eternity and we watch as his heart breaks. I’m not sure what it is about this scene, but it gets me ever single time and I always will Margaret to turn around. She never does.
There are many aspects to this series that I have chosen not to write about as this post is long enough as it stands. The music is a treat; the other characters are interesting; I love the way Margaret wears her hair; I could go on and on. Just trust me -- this is one of the great ones.
ChrisB is a freelance writer who spends more time than she ought in front of a television screen or with a book in her hand.
#North and South#Elizabeth Gaskell#Margaret Hale#John Thornton#Daniela Denby-Ashe#Richard Armitage#BBC#Doux Reviews#TV Reviews#something from the archive
129 notes
·
View notes
Text
Significant React Native Developer Tools to consider for Mobile App Development

React Native is one of the most loved and popular frameworks for mobile app development. The reasons are manifold! To begin with, React Native enables cross-platform app development; the code is highly reusable across the Android & iOS platforms. Moreover, React Native projects are cost-efficient and the end products can be deployed much faster as compared to most other options. Also, the learning curve is lower than in other frameworks. Speed, budget-friendliness, and ease of development – What more can app creators ask for? To add to these goodies, the React Native ecosystem also offers loads of handy tools and IDEs that make app development a breeze. This post explores the offerings of the major React Native developer tools that play a vital role in saving the time and effort of development teams.
Top React Native Developer Tools
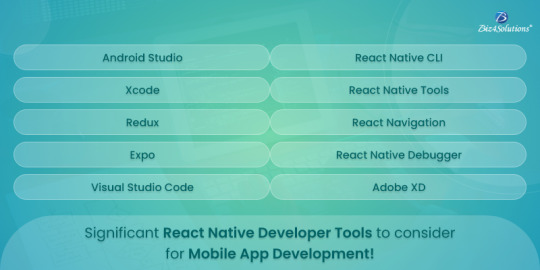
Redux
Redux is a free-source JavaScript-based tool used for UI creation and state management in React Native and React applications. It also helps developers with the functions of live code editing, time-traveling debugging, and app testing.
Redux is a small-sized utility containing dependencies and is easy to test. Since its file size is just 2KB, this tool functions well with view libraries including React. Redux can be operated across various development settings like front-end, back-end, native platforms, etc.
Redux proves handy in managing data in large-scale and complex React Native applications. React apps store information within the local State and transfer this information from parent components to the child components using props (properties). In larger apps, this architecture becomes difficult to handle. Here, Redux comes into the picture.
Check out the data flow mechanism in Redux.

State: The application’s “State” is an object tree within one single store. The “State” is the single source of truth that drives the app and describes the app’s condition at any given point in time. But the “State” is read-only and the only way to modify it is through “Actions”.
Actions: “Actions” refer to the events that take place within an app as a result of user input. The “Actions” send payload information from the app to the store. “Actions” are the single source of information that reaches the store. So, if the state needs any modifications, they will be executed through “Actions.”
Reducers: “Reducers” are pure functions that carry out changes to the “State.” Whenever an action gets triggered for state change, “Reducers” make the necessary modifications to the previous “State” and return the new “State” with the updated value.
Store: The “Store” holds all states together in an app. Remember to use only one “Store” for the entire app if you’re using Redux as the practice of multiple stores doesn’t work here.
Components: Here lies the User Interface of the app. A declarative description of the user interface based on the app’s present “State” is called a “View”. The app renders the UI as per the “State.” So, the UI gets re-rendered whenever there a new “State” forms.
Android Studio
Android Studio is an IDE (Integrated Development Environment) based on Java & Intellij IDEA. It provides React Native developer tools for the Android OS along with code editing utilities.
Android Studio’s key offerings include an advanced database inspector, visual layout editor, smart code editor, a flexible build system, APK analyzer, real-time profilers, etc. It also supports Kotlin DSL in the Android Gradle plugin and enables an Android emulator to run inside the Android Studio.
This tool is very useful for code editing and helps React Native developers in code creation, analysis and refraction. Here, it uses its feature of “instant Push” for pushing the code and making the necessary modifications while the app is running.
React Native app development projects using Android Studio has one or more modalities along with the source code and resource files. The modalities offer several modules including Library modules, Android app modules, & Google App Engine modules.
Xcode
Xcode is an Apple-created IDE & code editor designed to help with the development of iOS mobile apps, desktop applications for macOS, etc. This tool comprises a complete development environment and offers a set of integrated tools. These integrated tools help in carrying out various tasks including development, testing, debugging, app compilation, and deployment. Xcode is a good pick for iOS app development in React Native and also for installing and debugging the iOS package.
Using Xcode, developers can view more real-time information about the Build process and can create custom Build configurations. For instance, Xcode allows you to pick your preferred simulator device, customized Build scheme, etc. The React Native CLI runs certain functionalities of Xcode with the help of the scripting code under the hood. With the CLI, one can effortlessly run and build the code using just a single command line. However, if you use only the CLI, unexpected Build-related issues are likely to crop up. Here comes the role of Xcode. It allows you to directly get clear visibility of the issue and identify its root cause.
Expo
Expo is one of the most effective React Native Developer tools. It proves immensely beneficial and facilitates faster deployment for projects involving cross-platform apps in React Native. This open-source tool provides the Expo SDK library, a wide range of React Native components, and native APIs that support Android & iOS platforms. Expo is well documented and boasts of a Slack community and other community forums.
Expo offers a wide range of native APIs for Android and iOS app development. Some of the native abilities offered by the Expo bundle are camera, location, file system, social authentication, push notifications, etc. This way, developers enjoy direct API access and can easily add native features to the software.
In cross-platform app development, 95% of the code can be reused across the Android and iOS platforms. Yet some native coding is needed; the amount of native coding required depends on your use case. Here, Expo simplifies native coding by managing the entire code behind the scenes without the need for developers to be familiar with native mobile code. Besides, there’s a utility called Expo Snacks. It enables React Native developers to create the code directly into the browser and preview it as well.
Using Expo, one can directly preview the code by just scanning a QR code. This proves helpful during conducting app demos for customers; you can simply use a QR code instead of employing APKs or TestFlight builds.
The Expo container app allows developers to directly conduct the testing on the device. With Expo, there isn’t any need to publish all updates to the app store as there is no native code involved. As such, you can quickly publish updates to an app.
Visual Studio Code
Visual Studio Code is one of the most robust React Native Developer tools as it blends the simplicity of a source code editor with robust developer tools like IntelliSense code completion & debugging. This is a free and open-source code editor developed by Microsoft and has been written in JavaScript, TypeScript & Cascading Style Sheets. This powerful tool caters to an environment of extensions. It supports technologies like TypeScript, JavaScript, Java, & Node.js.; programming languages like Python, C #, PHP, C++, Go, etc.; and runtimes such as Unity & .NET. Visual Studio Code is compatible with all major platforms including Windows, Mac, and Linux.
It offers a plethora of built-in features like Debugging Codes, Smart Coding with IntelliSense, Built-in Git Command, code refactoring, understanding of rich semantic code, Customizable themes, and many more. With Visual Studio Code, you can reap the benefits of a frictionless edit-build-debug cycle. It integrates with the build as well as the scripting tools to speed up the workflow of regular tasks. This saves you the time and effort wasted in fiddling with your development environment and you can focus on innovation. Its support for Git allows developers to work with source control without having to leave the editor.
Visual Studio Code helps development teams to productively execute tasks like auto-indentation, syntax highlighting, box selection, bracket-matching, snippets, etc. Moreover, the tool offers functionalities like an intuitive keyboard shortcut and enables easy customization and keyboard shortcut mapping; so that developers can effortlessly navigate their code. Furthermore, Visual Studio Code provides an interactive debugger that assists you in stepping through the source code, inspecting the variables, viewing call stacks, and executing console-related commands.
React Native CLI
React Native CLI is an MIT-licensed utility offered by the React Native framework itself. It is used for bootstrapping a React Native application from the command line using an innovative approach. React Native CLI helps developers to interact with the native layer of the application. This utility is used for debugging functions and automating processes such as running the packager, creating apps, connecting apps, etc. React Native CLI enables customizations as well. For instance, you can install an RN project using this tool even if the project has been set up using packages like TypeScript or boilerplates.
React Native Tools
This Microsoft-created free tool is an extension of Visual Studio Code and assists development teams with React Native app development as well as debugging. It is considered to be one of the best options for debugging among React Native Developer tools. With React Native Tools, you can debug React components and React Native styles. Developers can take a back seat during the code debugging process as their job is done by the commands generated by this tool. These commands help in running the react-native command; a ‘command palette’ is used for this purpose.
React Navigation
React Navigation helps in executing & navigating the ‘navigation’ function in an RN application. It is coded using JavaScript & is easy to use. This tool contains a chain of navigators that are used to define the screen flow of an app. Navigators such as Tab, Stack, Drawers, etc. help developers to create navigation routes in native applications.
Using this tool, you don’t need to employ native navigation APIs directly on iOS & Android apps. This is because React Navigation reconstructs certain subsections of these APIs. As such, the process of debugging becomes simpler and you can customize it as per your need. Also, developers can integrate third-party JavaScript plugins without having to be well-versed in various programming languages like Java, Kotlin, Objective-C, Swift, etc.
React Native Navigation is a substitute for React Navigation designed to cater to cross-platform app development with React Native. This tool employs native navigation APIs directly on iOS and Android imparting a natural look and feel to the app. This tool manages presentations and the transitions taking place between screens. React Native Navigation provides multiple customization options and extensible platforms. Developers knowing how to write apps in JavaScript can customize any portion of the tool as per the requirement. Also, developers can create their own navigators and replace the user-facing API.
React Native Debugger
React Native Debugger is one of the most effective debugging tools for React Native development, especially when developers are already using Redux. It is a stand-alone desktop app that is compatible with Windows, Linux, Mac OS X, etc. Its USP is that it can be combined with Redux tools as well. This tool assists with UI designing and provides clear visibility of the visual elements on the screen. This way, you can thoroughly examine the visual elements present on the screen and make the necessary modifications without much ado. With React Native Debugger, the processes of app development & debugging become speedier and all the more productive.
Adobe XD
Adobe XD offers several UI/UX designing tools including prototype designing, real-time code editing, etc. This tool proves handy in creating the UI/UX of mobile and web applications.
Adobe XD comes with features like flexible artboards, Repeat Grid, etc. that reduce designers’ time and efforts considerably. It is capable of handling complicated design systems & symbol libraries. Adobe XD provides intuitive tools that help you to easily connect screens. You can also employ low-fidelity wireframes to create interactive prototypes. These capabilities can be leveraged to carry out user testing without the need for any coding.
With Adobe XD, the task of switching from static layouts to dynamic prototypes can be carried out with just a single click. Therefore, one can easily modify designs as required. Using the “auto-animate” feature, it becomes easier to prototype rich interactions as it automatically animates micro-interactions present across the Adobe XD artboards.
Some other Notable React Native Developer Tools
Ignite
Ignite is a free and open-source React/React Native toolchain that consists of sections of codes, plugins, and boilerplates. With Ignite, developers can access multiple boilerplates; they enjoy the flexibility to select the boilerplate from various supporting plugins. The boilerplates support cross-platform development across the iOS and Android platforms.
The other offerings of Ignite include customizable themes, components, etc. and API testing services, and so on. The latest offering is Ignite Bowser which employs MobX-State-Tree for the tasks of state management, React Navigation, etc. It provides generators for models, components, etc.
Nuclide
Nuclide is a customized IDE that facilitates code improvements. This free & open-source React Native developer tool offers functionalities like Hack development, Remote development, JavaScript development, mercurial support, in-built debugging, context view, task runner, debugger, working sets, and many more. Developers can benefit from the feature of “Code diagnostics” for developing JavaScript and generating the details of errors or issues whenever the code fails. Using Nuclide, you can make the app powerful and scalable.
Vasern
Vasern is an open-source & lightweight data storage utility that improves the storage capacity in React Native iOS applications. This tool comes with a native engine to facilitate native performance. It can create a local database in just five minutes. However, Vasern is still in its formative stages, although its Alpha version is working quite effectively.
Flow
Flow is one of those few React Native developer tools that offer programming advantages and static typing. This tool is open-source and free. Flow’s offerings include real-time feedback, ease of integration, type inference services, customizable JavaScript, etc. With Flow, developers can be assured of an easy-going, reliable, and fast coding process. This tool also monitors the errors within the code by using static typing annotations.
Flipper
Flipper is an excellent React Native tool for debugging Android and iOS apps. This dynamic debugging tool works wonders to enhance your coding productivity. This tool allows you to visualize, examine as well as control your React Native mobile applications from a plain desktop interface. Flipper can be used as it is or can be extended with the help of the plugin API. This tool extends its support to most operating systems including Windows, Linux, and Mac. Flippers offerings are Network Logging, console logs, Hermes Debugger, Layout Inspecting for UI creation assistance, etc. With Flipper, you can build your own customized plugins as per the project requirements.
Bottomline:
These tools and IDEs are valuable resources for React Native app development teams as they simplify tasks and save development time. These amazing tools lead to the creation of robust and performant applications. Most importantly, the correct usage of these tools guarantees faster time-to-market. However, to leverage the full potential of these React Native Developer tools, one must know when to use them and how to employ them. So, if you are a novice in this arena, it is advisable to seek technical assistance from professional React Native app development services to execute your project.
0 notes
Text
React and Redux: A Step-by-Step Guide to State Management and Action Creators
Introduction Brief Explanation React and Redux: A Step-by-Step Guide to State Management and Action Creators is a comprehensive tutorial that will teach you how to manage state in a React application using Redux. Redux is a state management library that helps you manage global state by providing a single source of truth for your application’s state. This tutorial will cover the core concepts of…
0 notes
Text
MIDWIFE SHINES AND SMOLDERS ON “CHRISTINA’S WORLD”
The song appears on her new album Luminol, out on July 16. // Watch a music video for the lead single now.

"the type of warm, melancholic drone you want to pull up to your chin like a weighted blanket" - Pitchfork
Midwife is the moniker of multi-instrumentalist Madeline Johnston; she lives and works in San Miguel, New Mexico by way of Denver, Colorado, where she spent the better half of the past decade developing her experimental pop project.
When 2020 began, Johnston had several national and international tours planned (including a highly anticipated set at the year’s Roadburn Festival) to promote her album released just prior, the critically-acclaimed Forever. Unfortunately, the pandemic rescheduled everything and Madeline shifted her focus back to recording and back to her internal landscape. Luminol was written and produced during this time, and the album features 6 new songs which explore dark subject matter in her trademark dark yet crystalline manner.
Serendipitously, almost exactly one year to the date of Midwife’s ultimately postponed performance at Roadburn, Luminol’s first single “Christina’s World” premiered over the weekend as part of Roadburn Redux programming. Today, we’ve unveiled the Alana Wool-directed video for all to see.
Watch (+ share) Midwife’s music video for “Christina’s World.”
Luminol is a chemical used by forensic investigators to reveal trace amounts of blood left at a crime scene. When it reacts with blood, luminol emits a chemiluminescent blue glow that can be seen in a darkened room. In the same way this chemical reveals evidence at a scene, Midwife is interested in profound truth— turning trial and tribulation into sources of light. Luminol navigates themes of incarceration, locus of control, clarity, self harm, confinement, agency, and truth-seeking, all erupting in a bioluminescent Rothko color-field of blue.
The Luminol album cover shows a dark figure standing at the edge of a body of water. It symbolizes the way humanity had been on a precipice throughout 2020, to later find out they had been there all along. Being one of Midwife’s most personal records, Luminol's cover artwork is a picture of Madeline Johnston's mother taken in the 1980’s, when she was the same age as Madeline at the time of the album's recording. By redacting the figure, Johnston hopes that anyone could see themselves there, by the water, as a form leftover when all the elements of their lives are stripped away and what is left is a host.
Luminol features collaborations from various artists and on "Christina's World," Midwife is joined by Flenser label mate Dan Barrett (Have A Nice Life) for additional vocals and keyboards, and additional guitars by Tucker Theorore. Luminol also features contributions from Angel Diaz (Vyva Melinkolya), Zachary Cole Smith, Ben Newman, and Colin Caulfield (DIIV).
Luminol will be released on July 16th via The Flenser and is available for pre-order now. Keep up with Midwife on Facebook and follow The Flenser for more details regarding Luminol.
Luminol, track listing:
1. God Is A Cop
2. Enemy
3. 2020
4. Colorado
5. Promise Ring
6. Christina’s World
1 note
·
View note
Photo

Credit:• @theindiandev What you know about Redux ? Comment 🔥 Redux is the most loved library to keep a single source of truth in terms of maintaining application's state, It's always a good idea to use library like redux, Let's know about it with this post. Redux is a Predictable State Container for JS Apps. Follow @theindiandev for more such posts 😎 . . I have a series of React JS projects on Youtube as project based learning is a must have thing for a developer. Please subscribe me at YouTube (Link in Bio)😁 #webdevelopers #frontend #angular #coding #programming #reactjs #html #fullstack #softwaredeveloper #nodejs #webdev #java #100daysofcode #html5 #websites #redux #vue #softwaredevelopment #framework #javascriptdeveloper #vuejs #frontenddeveloper #html #css #webdevelopment #websitedesign #javascript #fullstackdeveloper #react #reactnative (at London, United Kingdom) https://www.instagram.com/p/CL2G6V5AAir/?igshid=1ak4rn840iwy4
#webdevelopers#frontend#angular#coding#programming#reactjs#html#fullstack#softwaredeveloper#nodejs#webdev#java#100daysofcode#html5#websites#redux#vue#softwaredevelopment#framework#javascriptdeveloper#vuejs#frontenddeveloper#css#webdevelopment#websitedesign#javascript#fullstackdeveloper#react#reactnative
0 notes
Text
New Xbox One Games for June 2 to 5

New Xbox One Games for June 2 to 5.
Strawberry Vinegar – June 3
Sakuraba Rie, aged nine, is a cynical and grumpy girl who cares little for her fellow classmates, and does not have a single friend. That is, until a self-proclaimed demon from the deepest, darkest pits of Hell suddenly appears in Rie's kitchen and steals a tray of cookies. What will happen between these two young girls? Will friendship blossom between them, or perhaps something more? Features: Succulent, mouth-watering art of food80,000 words long with 6 different endingsA unique tale of friendship between a young girl and a demonUpdated blinking sprites and UI
Depth of Extinction – June 3
In a flooded future world, killer machines are plotting mankind's demise. As the sole defender of humanity's last government, only you can create the ultimate squad and save humanity in this turn based, tactical RPG with roguelike elements. Features: Explore a sunken world and build your own storyFamiliar tactical options with a few new twists including action refunds, stealth positioning and ambushesCreate the ultimate squad from 10 different character classesOutfit your team with 115 different weapons, armor, and itemsFight 30+ unique enemies from 5 factionsPosition your team and then get the kill with stealthControl the leader and the other characters will follow (and pick up loot) using an advanced AI
Awesome Pea 2 – June 3
Awesome Pea 2 - next chapter of classic platformer game. Greedy Pea is back in the game! Now with even more dark dungeons, deadly traps and gold! What you will definitely find in this game (again): Pixel gameboy-style graphics (when everything is green)25 different levelsRetro soundtrack (sounds like your old computer)Lots of shiny coins
Tour de France 2020 – June 4
Experience the intensity of the Tour de France! Compete against the peloton in all 21 official stages of the Tour de France 2020. To wear the yellow jersey on the Champs-Elysées, you will need to take risks, attack, sprint and perfect your race tactics. New features: • All 21 official stages of the Tour de France 2020 • The classic Liège-Bastogne-Liège race for the first time in Tour de France • Redesigned, more realistic time-trials. You must manage your stamina and riding position to improve your aerodynamics and achieve the best time • New first-person camera for greater immersion • More attacking and opportunistic peloton • Improved race interface with more details about your surroundings (competitors, route, descents, etc.) • Online mode: redesigned matchmaking system
Tcheco in the Castle of Lucio – June 5
Tcheco in the Castle of Lucio is an 8-bit, 2D platformer. It’s a challenging, non stop action experience that incentivizes quick thinking, platforming precision and memorization. Like older 8-bit games, it’s a game that’s meant to be replayed over and over again until mastered. Quick reactions and timing are necessary for success in the game. Levels – which are in the form of rooms – are short and require you to quickly scan to find a way to get to the next room, which is either a doorway that requires a key found within that room or a black hole Visually and from an auditory standpoint, everything about the game is designed to look and feel like an old school 8-bit game. Features: 2D platform game, perfect for classic Famicom/NES game fans!Graphics and sounds inspired by 8-bit aesthetics.2 game modes, "Classic" and the brand new "Try harder".65 rooms of progressive difficulty.Easy to learn, simple gameplay.
Outbuddies DX – June 5
Experience real non-linear Metroidvania gameplay and uncover five distinct areas, all with remarkable puzzles, environmental hazards, epic boss encounters and captured Wozan to uncage. Your Buddy unit will procedurally map the area and function as a handy quality of life tool that can be controlled at will to manipulate your surroundings using various abilities like hacking, scanning, and telekinesis. Enter Bahlam, a sunken city of the Old Gods, located deep in the South Atlantic Ocean. Following a shipwreck, adventurer and maritime archaeologist Nikolay Bernstein regains consciousness 36.000 feet under the sea. He's severely wounded and unwillingly connected to a supernatural Buddy-unit. Searching for answers about his displacement our main protagonist digs deep into the lost undercity, gradually realizing an ominous presence hollowing in its shadowed caverns. On your journey home you will share your fate with a friendly tribe of mining creatures, the Wozan, who fear the Old Gods and strive to get back to the surface since their ancestors had been enslaved 5000 years ago. Some of them were able to flee and founded secret colonies deep inside the sunken ruins, others are still exploited by the hostile creatures that have overtaken the city since the Old Gods suddenly disappeared. Explore Bahlam with high freedom of movement like climbing, crawling and diving right from the start. As you progress your set of options will expand by discovering ancient weapon systems, suit upgrades and hacking protocols for your droid. All gear will be carefully balanced in terms of combat abilities and has to be used selectively to overcome specific hazards and puzzles. The local Co-Op option invites a second player to explore and experience this adventure together by taking control over the invincible Buddy unit. Support each other on your journey home, solve puzzles and overcome Bahlam's hostile maze. This will also provide an opportunity for team-speedrunning as a very unique take on the scene. Features: Explore an open vibrant fantasy worldReal Metroidvania gameplay with lots of gear, puzzles and Easter eggsUnique dual-hero scheme with local Co-Op supportEpic boss battles & believable enemy AIsIntriguing narrative and memorable charactersHigh freedom of movement @ 60 FPSHandcrafted pixel artOriginal soundtrack by OGRE music
The Sims 4: Eco Lifestyle – June 5
Play to change and make a difference in The Sims 4 Eco Lifestyle expansion pack! Move into a community of fellow collaborative makers to help your new neighbors decide on a Community Space Project, reduce your eco footprint, and watch your neighborhood transform. Ready for your Sims to impact their world? Requires The Sims 4 base game to play.
We Were Here Together – June 5
Embark on a puzzle solving adventure in which you and a partner must prove you can communicate and work together to escape the haunted Castle Rock. It all begins with an emergency flare lighting up the sky and a distress call waking you from uneasy dreams. Your fellow Antarctic explorers are in trouble, and the two of you left at base camp must work together to launch a rescue mission. If only you knew what you were getting into… From the research base camp you’ll need to figure out a way to get to the source of the distress flare. Once you’re through the frozen Antarctic wastes, you'll find yourselves separated inside a medieval castle, facing puzzles, secrets, and dangers! You and your partner start out with nothing but your wits and a walkie-talkie each. Observation, smart communication and teamwork will be the only way to escape from the sinister Castle Rock. Your voice will have to lead the way. You and your expedition partner must traverse the Antarctic wasteland and infiltrate a sinister medieval castle. All you start with is a pair of walkie-talkies – will you be able to work together on the same wavelength? Two minds will have to think alike. Immerse yourself in an intriguing cooperative experience as you and your partner puzzle your way through a series of thrilling situations. Discover brand new environments and mysteries, together. We were not alone… Darkness has engulfed the once magnificent Castle Rock and its surroundings. Can you discover the truth behind the grim fate of the fallen citadel and make it out alive… or will the original inhabitants catch you on your way out? PLAY MORE WE WERE HERE GAMES! If you enjoy We Were Here Together, don’t forget to check out the earlier entries: We Were Here and We Were Here Too. Features: Spine-tingling story: uncover a dark history, and become closer acquainted with the malevolent being known only as ‘the Jester’. Who, or what, is he?Walkie-talkie: you must communicate to progress – find out just how good you are at describing and explaining thingsPuzzle packed: work together to solve this captivating digital escape roomMysterious locales: explore the expedition base camp, frozen Antarctic valleys, and the sinister Castle Rock itself https://youtu.be/XhE5mPCHdY4
Rigid Force Redux – June 5
CLASSIC SHOOT’EM UP ACTION IS BACK! Rigid Force Redux breathes new life into the classic side-scrolling shooter genre with its lovingly hand-crafted 3D models, stunning environments, detailed effects and an electrifying Synthwave soundtrack. DEVASTATING FIREPOWER! Arm your fighter with numerous upgradeable weapon systems and supplemental Force Shards! Collect Energy Orbs to fill up your energy supply and eventually unleash an extremely powerful blast against your foes! CONFRONT AN OVERPOWERING ARMADA! Battle it out against huge swarms of enemies, heavy gunships, laser wielding mechs and giant alien creatures. Every enemy has its own unique and challenging strategy, from the tiniest creature up to the largest boss. LOTS OF EXTRAS! Just in case the extensive, action-packed Main Mission is not enough for you, try the challenging Arcade and Boss Rush Modes, defend your ranking in the global leaderboards and grab all 40 achievements. Everything is prepared for countless hours of shooting fun! Features: Classic side-scrolling shoot’em up action with modern 3D graphicsUnique weapon and power-up systemsLots of different enemies, challenging mid-bosses and huge end bossesExciting story mode with animated cutscenes and full voice-oversAdditional Arcade and Boss Rush game modesSix different action-packed stagesChallenging but fair gameplayAdjustable difficulty level - for beginners to experienced playersOnline LeaderboardsOriginal synthwave soundtrack by Dreamtime featuring Michael Chait https://youtu.be/QazNCNWV04Q
Cyber Protocol – June 5
All of the android G0X6’s life processes were shut down. The only way to bring him back is to hack his security system and manually start the recovery protocol. But it’s one hitch… So far, even the largest corporations haven’t accomplished this challenge. Can you save your friend and prove you’re the best hacker in this lawless city? Cyber Protocol is an arcade puzzle game set in a Cyberpunk scenario with a strong and dynamic gameplay. If you want to test your logical skills and reflex, you love the retro style and good energetic music, just grab a gamepad. What can you expect? ABSORBING GAMEPLAY Fast-paced, difficult and fun. You will need to plan carefully but also often think on your feet. VARIOUS CHALLENGES Each of 100 levels brings a new, original challenge. You will face new setups, obstacles and traps with different mechanics, so don’t feel too confident. DIFFICULT: OVER 9000 Still looking for more adrenaline? Try hacking the system in the arcade mode at an increased pace and with limited lives. You can get your place in the top 20 global ranking of cyber hackers, if you good enough. Wish you survive! COMPETITION If playing with deadly AI is not enough, you always can invite your family and friends. Cyber Protocol supports local challenges for even 4 players, but remember—the title of the best hacker can reach only one. RETRO VIBE Miss retro games style? Don’t worry—we got you covered! Travel back in time to the 80’s by changing Cyber Protocol themes and sounds. BEST 8BITS Just sit, relax and listen to the Cyber Protocol’s Syntwave and 8bit soundtracks. You will deserve it. You will need it. Are you ready for the challenge? Read the full article
0 notes
Link
There is no doubt that web forms play an integral role in our web site or applications. By default, they provide a useful set of elements and features — from legends and fieldsets to native validation and states — but they only get us so far when we start to consider the peculiarities of using them. For example, how can we manipulate the state of a form? How about different forms of validation? Even hooking a form up to post submissions is a daunting effort at times. Component-driven front-end libraries, like React, can ease the task of wiring web forms but can also get verbose and redundant. That’s why I want to introduce you to Formik, a small library that solves the three most annoying parts of writing forms in React:
State manipulation
Form validation (and error messages)
Form submission
We’re going to build a form together in this post. We’ll start with a React component then integrate Formik while demonstrating the way it handles state, validation, and submissions.
Creating a form as a React component
Components live and breathe through their state and prop. What HTML form elements have in common with React components is that they naturally keep some internal state. Their values are also automatically stored in their value attribute. Allowing form elements to manage their own state in React makes them uncontrolled components. That’s just a fancy way of saying the DOM handles the state instead of React. And while that works, it is often easier to use controlled components, where React handles the state and serves as the single source of truth rather than the DOM. The markup for a straightforward HTML form might look something like this:
<form> <div className="formRow"> <label htmlFor="email">Email address</label> <input type="email" name="email" className="email" /> </div> <div className="formRow"> <label htmlFor="password">Password</label> <input type="password" name="password" className="password" /> </div> <button type="submit">Submit</button> </form>
We can convert that into a controlled React component like so:
function HTMLForm() { const [email, setEmail] = React.useState(""); const [password, setPassword] = React.useState("");
return ( <form> <div className="formRow"> <label htmlFor="email">Email address</label> <input type="email" name="email" className="email" value={email} onChange={e => setEmail(e.target.value)} /> </div> <div className="formRow"> <label htmlFor="password">Password</label> <input type="password" name="password" className="password" value={password} onChange={e => setPassword(e.target.value)} /> </div> <button type="submit">Submit</button> </form> ); }
This is a bit verbose but it comes with some benefits:
We get a single source of truth for form values in the state.
We can validate the form when and how we want.
We get performance perks by loading what we need and when we need it.
OK, so why Formik again?
As it is with anything JavaScript, there’s already a bevy of form management libraries out there, like React Hook Form and Redux Form, that we can use. But there are several things that make Formik stand out from the pack:
It’s declarative: Formik eliminates redundancy through abstraction and taking responsibility for state, validation and submissions.
It offers an Escape Hatch: Abstraction is good, but forms are peculiar to certain patterns. Formik abstracts for you but also let’s you control it should you need to.
It co-locates form states: Formik keeps everything that has to do with your form within your form components.
It’s adaptable: Formik doesn’t enforce any rules on you. You can use as less or as much Formik as you need.
Easy to use: Formik just works.
Sound good? Let’s implement Formik into our form component.
Going Formik
We will be building a basic login form to get our beaks wet with the fundamentals. We’ll be touching on three different ways to work with Formik:
Using the useFormik hook
Using Formik with React context
Using withFormik as a higher-order component
I’ve created a demo with the packages we need, Formik and Yup.
Method 1: Using the useFormik hook
As it is right now, our form does nothing tangible. To start using Formik, we need to import the useFormik hook. When we use the hook, it returns all of the Formik functions and variables that help us manage the form. If we were to log the returned values to the console, we get this:
We’ll call useFormik and pass it initialValues to start. Then, an onSubmit handler fires when a form submission happens. Here’s how that looks:
// This is a React component function BaseFormik() { const formik = useFormik({ initialValues: { email: "", password: "" }, onSubmit(values) { // This will run when the form is submitted } }); // If you're curious, you can run this Effect // useEffect(() => { // console.log({formik}); // }, [])
return ( // Your actual form ) }
Then we’ll bind Formik to our form elements:
// This is a React component function BaseFormik() { const formik = useFormik({ initialValues: { email: "", password: "" }, onSubmit(values) { // This will run when the form is submitted } }); // If you're curious, you can run this Effect // useEffect(() => { // console.log({formik}); // }, [])
return ( // We bind "onSubmit" to "formik.handleSubmit" <form className="baseForm" onSubmit={formik.handleSubmit} noValidate> <input type="email" name="email" id="email" className="email formField" value={formik.values.email} // We also bind our email value onChange={formik.handleChange} // And, we bind our "onChange" event. /> </form> ) }
This is how the binding works:
It handles form submission with onSubmit={formik.handleSubmit}.
It handles the state of inputs with value={formik.values.email} and onChange={formik.handleChange}.
If you take a closer look, we didn’t have to set up our state, nor handle the onChange or onSubmit events as we’d typically do with React. However as you might have noticed, our form contains some redundancy. We had to drill down formik and manually bind the form input’s value and onChange event. That means we should de-structure the returned value and immediately bind the necessary props to a dependent field, like this:
// This is a React component function BaseFormik() { const {getFieldProps, handleSubmit} = useFormik({ initialValues: { email: "", password: "" }, onSubmit(values) { // This will run when the form is submitted } }); // If you're curious, you can run this Effect // useEffect(() => { // console.log({formik}); // }, [])
return ( <form className="baseForm" onSubmit={handleSubmit} noValidate> <input type="email" id="email" className="email formField" {...getFieldProps("email")} // We pass the name of the dependent field /> </form> ) }
Let’s take things even further with the included <Formik/> component.
Method 2: Using Formik with React context
The <Formik/> component exposes various other components that adds more abstraction and sensible defaults. For example, components like <Form/>, <Field/>, and <ErrorMessage/> are ready to go right out of the box. Keep in mind, you don’t have to use these components when working with <Formik/> but they do require <Formik/> (or withFormik) when using them. Using <Formik/> requires an overhaul because it uses the render props pattern as opposed to hooks with useFormik. The render props pattern isn’t something new in React. It is a pattern that enables code re-usability between components — something hooks solve better. Nevertheless, <Formik/> has a bagful of custom components that make working with forms much easier.
import { Formik } from "formik";
function FormikRenderProps() { const initialValues = { email: "", password: "" }; function onSubmit(values) { // Do stuff here... alert(JSON.stringify(values, null, 2)); } return ( <Formik {...{ initialValues, onSubmit }}> {({ getFieldProps, handleSubmit }) => ( <form className="baseForm" onSubmit={handleSubmit} noValidate> <input type="email" id="email" className="email formField" {...getFieldProps("email")} /> </form> )} </Formik> ); }
Notice that initialValues and onSubmit have been completely detached from useFormik. This means we are able to pass the props that <Formik/> needs, specifically initialValues and useFormik. <Formik/> returns a value that’s been de-structured into getFieldProps and handleSubmit. Everything else basically remains the same as the first method using useFormik. Here’s a refresher on React render props if you’re feeling a little rusty. We haven’t actually put any <Formik/> components to use just yet. I’ve done this intentionally to demonstrate Formik’s adaptability. We certainly do want to use those components for our form fields, so let’s rewrite the component so it uses the <Form/> component.
import { Formik, Field, Form } from "formik";
function FormikRenderProps() { const initialValues = { email: "", password: "" }; function onSubmit(values) { // Do stuff here... alert(JSON.stringify(values, null, 2)); } return ( <Formik {...{ initialValues, onSubmit }}> {() => ( <Form className="baseForm" noValidate> <Field type="email" id="email" className="email formField" name="email" /> </Form> )} </Formik> ); }
We replaced <form/> with <Form/> and removed the onSubmit handler since Formik handles that for us. Remember, it takes on all the responsibilities for handling forms. We also replaced <input/> with <Field/> and removed the bindings. Again, Formik handles that. There’s also no need to bother with the returned value from <Formik/> anymore. You guessed it, Formik handles that as well. Formik handles everything for us. We can now focus more on the business logic of our forms rather than things that can essentially be abstracted. We’re pretty much set to go and guess what? We’ve haven’t been concerned with state managements or form submissions! “What about validation?” you may ask. We haven’t touched on that because it’s a whole new level on its own. Let’s touch on that before jumping to the last method.
Form validation with Formik
If you’ve ever worked with forms (and I bet you have), then you’re aware that validation isn’t something to neglect. We want to take control of when and how to validate so new opportunities open up to create better user experiences. Gmail, for example, will not let you input a password unless the email address input is validated and authenticated. We could also do something where we validate on the spot and display messaging without additional interactions or page refreshes. Here are three ways that Formik is able to handle validation:
At the form level
At the field level
With manual triggers
Validation at the form level means validating the form as a whole. Since we have immediate access to form values, we can validate the entire form at once by either:
using validate, or
using a third-party library with validationSchema.
Both validate and validationSchema are functions that return an errors object with key/value pairings that those of initialValues. We can pass those to useFormik, <Formik/> or withFormik. While validate is used for custom validations, validationSchema is used with a third-party library like Yup. Here’s an example using validate:
// Pass the `onSubmit` function that gets called when the form is submitted. const formik = useFormik({ initialValues: { email: "", password: "" }, // We've added a validate function validate() { const errors = {}; // Add the touched to avoid the validator validating all fields at once if (formik.touched.email && !formik.values.email) { errors.email = "Required"; } else if ( !/^[A-Z0-9._%+-]+@[A-Z0-9.-]+\.[A-Z]{2,4}$/i.test(formik.values.email) ) { errors.email = "Invalid email address"; } if (formik.touched.password && !formik.values.password) { errors.password = "Required"; } else if (formik.values.password.length <= 8) { errors.password = "Must be more than 8 characters"; } return errors; }, onSubmit(values) { // Do stuff here... } }); // ...
And here we go with an example using validationSchema instead:
const formik = useFormik({ initialValues: { email: "", password: "" }, // We used Yup here. validationSchema: Yup.object().shape({ email: Yup.string() .email("Invalid email address") .required("Required"), password: Yup.string() .min(8, "Must be more than 8 characters") .required("Required") }), onSubmit(values) { // Do stuff here... } });

Validating at the field level or using manual triggers are fairly simple to understand. Albeit, you’ll likely use form level validation most of the time. It’s also worth checking out the docs to see other use cases.
Method 3: Using withFormik as a higher-order component
withFormik is a higher-order component and be used that way if that’s your thing. Write the form, then expose it through Formik.
A couple of practical examples
So far, we’ve become acquainted with Formik, covered the benefits of using it for creating forms in React, and covered a few methods to implement it as a React component while demonstrating various ways we can use it for validation. What we haven’t done is looked at examples of those key concepts. So, let’s look at a couple of practical applications: displaying error messages and generating a username based on what’s entered in the email input.
Displaying error messages
We’ve built our form and validated it. And we’ve caught some errors that can be found in our errors object. But it’s no use if we aren’t actually displaying those errors. Formik makes this a pretty trivial task. All we need to do is check the errors object returned by any of the methods we’ve looked at — <Formik/>, useFormik or withFormik — and display them:
<label className="formFieldLabel" htmlFor="email"> Email address <span className="errorMessage"> {touched["email"] && errors["email"]} </span> </label> <div className="formFieldWrapInner"> <input type="email" id="email" className="email formField" {...getFieldProps("email")} /> </div>
If there’s an error during validation, {touched["email"] && errors["email"]} will display it to the user. We could do the same with <ErrorMessage/>. With this, we only need to tell it the name of the dependent field to watch:
<ErrorMessage name="email"> {errMsg => <span className="errorMessage">{errMsg}</span>} </ErrorMessage>
Generating a username from an email address
Imagine a form that automatically generates a username for your users based on their email address. In other words, whatever the user types into the email input gets pulled out, stripped of @ and everything after it, and leaves us with a username with what’s left. For example: [email protected] produces @jane. Formik exposes helpers that can “intercept” its functionality and lets us perform some effects.In the case of auto-generating a username, one way will be through Formik’s setValues:
onSubmit(values) { // We added a `username` value for the user which is everything before @ in their email address. setValues({ ...values, username: `@${values.email.split("@")[0]}` }); }
Type in an email address and password, then submit the form to see your new username!
Wrapping up
Wow, we covered a lot of ground in a short amount of space. While this is merely the tip of the iceberg as far as covering all the needs of a form and what Formik is capable of doing, I hope this gives you a new tool to reach for the next time you find yourself tackling forms in a React application. If you’re ready to take Formik to the next level, I’d suggest looking through their resources as a starting point. There are so many goodies in there and it’s a good archive of what Formik can do as well as more tutorials that get into deeper use cases. Good luck with your forms!
0 notes