#so I went ahead and kept their color schemes consistent
Photo
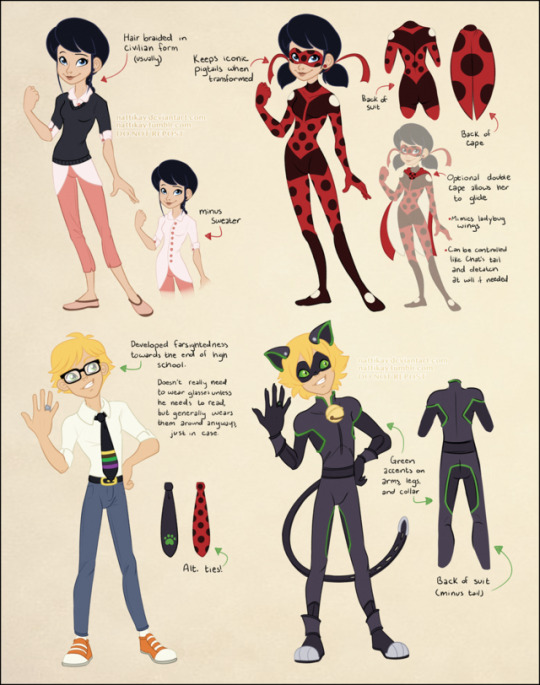


Official designs for adult!Love Square (which I guess is no longer a square since they know each other’s identities at this point ;) ) from my Future AU!
[edit] tumblr is sometimes dumb about image resolution so if you need to you can go here to see the top image in full view and read the text better
#miraculous#adrien agreste#marinette dupain-cheng#ladybug#chat noir#adrienette#ladynoir#future au#my art#I didn't wanna make toooo many changes from their teen designs because they're just so goooood#like there's just so many subtle details to the designs in relation to each other that are just 👌#(for adrienette I mean)#so I went ahead and kept their color schemes consistent#just a few style changes to show that no they have not been wearing the exact same clothes for over a decade haha#also I've done a ladybug revamp before as some of you may remember#but I wound up being pretty unsatisfied with it--just didn't flow well enough#and after that I was just really inconsistent with it for a while#so now I finally sat down and made a new one with simpler shapes in relation to the flow of her body#I like it better#chat's is pretty much the same as his old one because again I just love his original somuch I don't feel much need to change it#but I did give him some extra color variation#like darker fabric on the arms belt and boots#and of course the green accents#I used to put the green on pretty much all of his seams but it looked too messy#so I reduced it to just the collar arms and legs#soooo yeah here's the designs I use/will use in my future au enjoy
890 notes
·
View notes
Text
Sugar with a Side of Coffee Ch. 10- Trivia Night
Chapter 10: Trivia Night
Series Masterlist
The team could deduce that Spencer and Cate had made up; he began to show up with his hot coffee and a fresh baked good in the morning again. JJ tried to talk with him about his and Cate’s relationship, but he insisted they were just friends. Emily suggested having another night out, but Spencer wasn’t keen on that idea.
Especially after seeing how easily someone could get to her through him, like the photographs made clear, he wanted to keep her at an arm’s distance. He would rather have her safe than to be the reason she got hurt.
Derek and Penelope had grown impatient waiting for Spencer to introduce them to her officially. Sure, Derek had met her briefly at the bar, but the team as a whole wanted to get to know her, maybe give their stamp of approval. They all knew how much Spencer deserved a ray of sunshine in his life. They also wanted to see what had Spencer so captivated by her.
Luckily, they had schemed up a little plan to not force, but encourage an introduction. Penelope had seen a flyer on her way into work about a Trivia Night being held at the bar on 18th that they frequented. The team as a whole was due for a night out anyhow, so they could play it off as a coincidence. Derek was one step ahead of Penelope, he had stopped into The Empty Mug to talk to Marta about their plan. He had assumed that since Cate typically worked the cart, that Marta would be inside the shop. And like the profiler he was, he was right.
Marta recognized him right away. She quickly got through the line to take care of his order.
“To what do I owe this pleasure?” Marta smirked at him. Derek laughed her off.
“I have a plan to get our Pretty Boy and your friend together.”
It took little convincing to get Marta on board of he and Penelope’s plan. Even Marta was tired of the pining and wanted to help them finally get together. Spencer and Cate were painfully obvious to anyone else about their feelings, but to each other, they kept them hidden.
Marta could see how Cate’s spirits were lifted when she came in from a shift after seeing Spencer. And on the nights when he walked her home, Marta could see Cate’s face light up. Marta was also a witness to the mutual blushing between them. She could see the stolen glances and the way the two teetered on the edge of friends or more.
When Cate came in after her shift on the cart, she was smiling and had a bit of a bounce to her step. Marta could only assume she and Spencer had seen each other this morning. As soon as Cate reappeared from the back, Marta was hot on her trail.
“So,” Marta started, already putting on her begging face. “I was thinking that it’s been a while since we last went to the bar on 18th and we both could use a night out! I’ll even drive!” Marta had her hands placed on Cate’s shoulders, slightly shaking her as she pleaded.
“Uh, yeah I don’t have any plans, I just have to run home and feed Shrimp and I’ll meet you back here?” Cate had told Spencer she was free tonight when she saw him this morning, but she’d have to update him later. Marta was doing a small celebratory series of jumps. Just as soon as she had ran up to Cate, she was shooing her out the door to move her along to go get ready.
“Perfect, I’ll expect you back here by five thirty, I want to be there by six.” Marta watched as Cate walked to her apartment, the two of them laughing to themselves.
Cate’s apartment felt different since the leak. She no longer kept her books out on shelves or anywhere they could be damaged. She traded them out for little figurines and pictures in frames. It made Cate’s place feel less like her, but she never wanted to risk her books until she found a more reliable place.
Shrimp batted a little golden pom pom with wings around Cate’s living room floor. She was busy in her room, pulling clothes out for a cute outfit. Her bedroom door was open, allowing for Shrimp to walk in and jump on her bed to watch what she was doing. She turned when she heard his bell and held up a hanger with an olive green shirt on it.
“Which do you prefer?” Cate asked the orange cat as she swapped between the green shirt and a mustard yellow one. Shrimp just closed his eyes and curled up to sleep. “Thanks for the help.” Cate smiled and decided on the yellow shirt. She paired it with dark blue jeans and some tan heels.
After putting the other clothes back where they belonged and taking a quick shower and changing, Cate walked to her kitchen, enjoying the sound of her heels clicking on the floor. She filled Shrimp’s bowl and gave him fresh water. Taking her phone out of her back pocket, she lifted it to her mouth to record a voice message for Spencer.
“Hey Spence, I know I said I was free tonight, but Marta wanted to go out, so I can’t hangout- if that’s what you wanted to do!” She had rushed the last part, mentally scolding herself for making assumptions.
Spencer would be lying if he said he wasn’t a little disappointed that Cate had managed to come up with plans that didn’t involve him. As he sat at his desk, He was tempted to ask where she was going, but he didn’t want to pry. As he set his phone down, Penelope approached his desk. She wore her smile as well as she sported her colorful clothing and accessories.
“Good evening, Boy Wonder! I come bearing some fun times. Tonight, we- as in Morgan, Prentiss, JJ and I are going to a trivia night! Would you like to come?” Penelope held a pink papered flyer in her hand.
“Wouldn’t it be cheating considering my eidetic memory?” Spencer furrowed his brows at her.
“Well, yes we would have an advantage, but it will be fun winning and we can celebrate with drinks or something. Consider it team bonding time!” Spencer wondered how much bonding the team could really have. Since he and Cate were not going to see each other, he might as well fill his night with fun with his team.
He didn’t bother going home after work, he rode with Emily, and JJ to the bar on 18th. They parked around back, Derek and Penelope pulling in front of them. The air was cooling down as they exited their cars. Derek finished up a quick phone call as they were parking. The group made their way to the entrance, walking to the right side of the trivia section, picking a table that would fit their team of five.
Cate had made it back to The Empty Mug shortly before Marta had wanted her to arrive. Of course, Marta was running a little late, and hadn’t even gotten dressed yet. Cate went up the stairs and greeted Marta’s parents having dinner. Marta was in her room, still in a towel as she dried her curly hair.
By the time they got to the bar on 18th, it was a little after six. Marta and Cate took a tall table on the left side of the trivia table. On the table there was a menu of appetizers that were half price for the duration of the trivia night and a list of rules for trivia night.
“Wow that looks fun, should we try our hand at a giftcard for this place?” Marta referred to the grand prize: a thirty dollar gift card to the bar. Cate scoffed.
“You know we might as well. It beats paying full price for some food.” Cate glanced over the menu, deciding what sort of greasy food would hit the spot.
The host for trivia spoke into the mic, checking it to see if it was on. They welcomed everybody and went over the rules for the game. Some general rules: teams must consist of 2-6 players. One player must present their answer to the host per team. The game will consist of ten questions. If needed, a tie breaker will be introduced to the game at the end of the night.
“Alright, everyone, I am going to spin the wheel to decide our first category and question.” The host announced. They gave a large wheel with different colored pie slices and pictures representing categories a spin. “Our first category is Math, get your pencils ready.”
What is the top number of a fraction called?
Marta flew out of her seat and made a run for the host’s table. One the way, she saw that Derek had beat her to the table. She groaned, dramatically throwing her head back.
“Nice to see you, too.” Derek sauntered over to Marta after giving his team’s answer to the host. “Cate is with you?” Marta nodded and confirmed their table’s whereabouts. “Perfect. We can’t see you from our table. We’ll send Reid to the host for the tenth question.” After keeping it short and brief, Derek walked back to their table. Marta walked back to her and Cate’s table. Marta had to tell Cate that she wasn’t fast enough.
The host called everyone’s attention to confirm the correct answer was given. They spun the wheel again, the next category was Music.
How many black keys on a piano?
“Out of 88 keys on a piano, 52 are white and 36 are black.” Spencer recited from memory. Penelope scribbled the number down and made a break for the host. She spotted a brunette low ponytail with her back to her. Penelope recognized Cate. Penelope turned on her heel, and walked back to the table of agents.
It would seem that Cate and Marta held their own against other teams who consisted of more than two people, especially the team of agents across the section. They had been neck and neck for first place. Right now, the agents were in the lead.
The trivia host spun the wheel to decide the category. The wheel seemed to spin forever as it slowed. Finally landing on Science, the host plucked an index card that held the question and answer from a rotating filing system for index cards.
Which scientist is credited for the modern study of genetics?
Cate launched from her seat. Her and Marta were one point from tying with the team in first place. Cate had gotten quite invested in this silly game of trivia. Her competitive side was coming out, and her need for the win was strong. As she was reaching the host’s table she caught sight of a familiar face. She shook her head to keep focused, and gave the host her slip with the answer. Instead of walking back towards her table, she continued to the right of the host, towards Spencer.
“What are you doing here?” Cate stopped in front of him. Spencer held his team’s slip in his long fingers, folding it over nervously.
“Some of my team from the BAU wanted some ‘team bonding’” Spencer told her. It was clicking in his head; Garcia’s persistence, Cate’s last minute change of plans, Derek’s phone call. They had been set up. Cate nodded at him.
“Sounds fun! I’ll catch you later then.” She turned to go back to her table. The host called that there were only two questions left. Cate’s answer was announced as correct, putting her team and Spencer’s team in a tie. The next two points were taken by other teams, but Spencer and Cate’s teams were tied for first. It was the final, tie breaking question for the two teams in first. The wheel spun and landed on pop culture.
Give the five digit code used to access the Ministry of Magic from the red phone booth in Harry Potter.
Cate was ecstatic that her extensive knowledge of the Wizarding World was coming in handy. Marta shoved her in excitement and Cate bounded through tables to get to the host’s booth. Spencer had taken longer than he liked to rifle through his first readthrough of the series. He was glad his long legs allowed him to take long strides. He looked for Cate in the aisle in front of the host’s table. She was on the floor, gripping her ankle. Because there were no other teams to worry about, he moved to go see if she was alright.
Her hair was in her face, and he couldn’t see her face well enough to read her expression. He hadn’t noticed the heels she was wearing. He hadn’t known her to wear heels in all the times they’d hung out. He bent down, putting a hand on her shoulder.
“Are you okay?” He asked.
“Yeah, I think I mis-stepped and rolled my ankle on something.” Cate looked around the floor around her, for what she could’ve stepped on. Spencer held a hand out, ready to help her up. Cate had other plans, though and pulled herself up, pushing him behind her to throw her paper at the host, who was shaking his head laughing.
“That’s cheating!” Spencer looked at her, mouth agape.
“And having a certifiable genius on your team isn’t?” Cate smiled back. With the announcement of Cate and Marta’s win, both teams walked to their partners.
“Well played, Cate.” Derek said as he approached. JJ and Emily introduced themselves to the girls. Cate looked to Penelope. With a smile she extended her hand.
“Nice glasses.” Penelope was wearing the red frames again, Cate remembered Penelope from the coffee cart. Her first taste of the coffee order of Spencer Reid.
“Spencer has definitely met his match with you.” Emily spoke to Cate, the two glancing at Spencer after she said it. A blush was creeping up the back of his neck.
“He definitely didn’t mention how pretty you are!” JJ said. Spencer’s blush made its way to his ears. “No wonder he stops for coffee every morning.” Everyone turned to Marta. “And the coffee is amazing, thank your parents for delivering to the Bureau.” The whole team was loving the change in coffee. It was a definite upgrade from the cheap stuff they used to buy. The team and Marta and Cate pulled chairs over at the agents’ table to converse a little while longer without being in the way of any servers.
Spencer and Cate walked together out the door of the bar, his team had not to subtly been shooting him looks of approval. If Cate had said anything to prove she was remotely compatible with Spencer, they would look at him- wide eyed and raised brows. Spencer had tried not to make eye contact with any other agent at the table.
“6-2-4-4-2.” Spencer spoke first. Cate smiled. “I did know the answer, for the record.”
“Magic.” she replied. “You never cease to amaze me, Spence.” Cate looked up at him, smiling. He just shoved his hands into his cardigan.
Spencer walked her to Marta’s car, Marta already inside waiting for her. He opened the door for her to get in. She smiled a thanks at him. If she smiled like that again at him, Spencer swore he might combust.
In Emily’s car, JJ and Emily were waiting for Spencer to come back. As soon as he shut the door, they were squealing with excitement. The entire ride back to the bureau, they spoke highly of Cate, and pinpointed exactly what qualities they thought balanced Spencer out and how she was his perfect match. Spencer didn’t deny any of their words; he just smiled and thought about Cate. He wasn’t so sure he could keep up being just friends anymore.
#spencer reid#spencer reid x oc#spencer reid fanfiction#spencer reid fluff#criminal minds#criminal minds fanfiction#derek morgan#aaron hotchner#emily prentiss#penelope garcia#sugar with a side of coffee fanfic
21 notes
·
View notes
Text
How Not to Get Penalized by the Penguin 4.0 Real-Time Algorithm Filter
The long and also creepy silence that awaited the air since Penguin's last upgrade has actually lastly been broken. On 23rd September, Google dropped the bombshell as well as introduced that Penguin is now part of Google's core online search engine ranking algorithm.
And it has actually been well worth the 715-day delay! Both biggest changes in just how the filter (or ranking signal, relying on how you look at it) now functions are:
Penguin 4 is actual time. As soon as you eliminate your poor links and disavow those you can not, there's a little bit extra you can do compared to stick around and hope to the other G (god).
Penguin 4 is granular. Your entire website will not be struck out of the park even if a message on sooperarticles.com web links to your out-of-stock item.
A week after the statement, the court is still out on whether Penguin 4.0 has actually fully rolled out. And offered the sheer number of signals, filters as well as data rejuvenates that overlap, it is extremely hard to determine the impacts of Penguin (or any type of other algo variable, for that issue) on a particular LINK or SERP with absolute certainty.
Dr. Pete Meyers of Moz tweeted something extremely substantial:
" My intestine feeling is that we're not going to see a large Penguin 4.0 spike."
That has actually held good for a week until now. A poll on Search Engine Optimization Round Table backs it up:
It appears the first 3 models have succeeded in frightening the spammers away, as well as Search engine optimizations and web designers across the globe have actually transformed a brand-new leaf. Or, it may be that Google has just incorporated the code into the algorithm yet, and with a few tweaks, the effect may be more visible as Penguin strikes every one of Google's data centers as well as turn out over a prolonged amount of time, as when gazillions of URLs are re-crawled.
Eric Enge of Stone Holy place Consulting confirmed this:
So if you, like us, remain in the 72% that typically aren't seeing any kind of fireworks, read on to find out exactly how you can remain risk-free and also far from the warzone.
Don't expect to be warned
As with Panda, there won't be any kind of official word from Google on future updates. The apparent means to recognize if your site had been struck by a mathematical fine was to inspect if you had a website traffic drop on the date of the announcement.
Not happening anymore.
And no usage thronging those online forums or troubling @rustybrick for the newest news. You alone are accountable for your sites, SEO-related activities, ups, downs, and also recovery.
Build great links
“Create great content!”
You listen to that all over. It's exactly what Google has actually always informed us. It's exactly what the physician claimed when my child was born.
Okay, I exaggerate. But not a great deal. While a lot of us are active developing wonderful material these days, we have the tendency to give just a wee bit much less relevance to that old workhorse - PageRank. As well as the road to high PageRank is paved with authority web links. Google gently reminded us of that elephant in the space:
The assimilation of Penguin right into the core algorithm does not make link structure outdated. As a matter of fact, it is a lot more critical compared to ever. Web link building techniques and approaches that are viable or really work have continued to be practically the exact same in the previous half-decade or two. Going onward, the real-time and granular qualities of Penguin 4.0 will certainly make sure that link building also adheres to suit.
How so?
First, let's consider the "real-time" nature of Penguin. Search engine optimizations all over are delighted that their healing efforts (disavowing or removing low top quality web links) will certainly yield prompt outcomes. Nevertheless, the opposite is also true. One indiscreet project, a couple of gaudy sources, or an ill-considered eruption in web link velocity can cause your rankings to plummet at the wrong time and cost you a great deal of money.
That said, it will be much simpler to identify just what triggered the fall, and if you act swiftly, you'll be back in the video game within no time. SEO experts, consisting of (I would love to assume) us, have actually always kept that a "fine healing" doesn't mean you obtain your rankings back, it just suggests there's no spam holding you down any longer. To really restore your visibility and also perception quantity, you have to continually build authority links on the topic (as well as to the page) in question.
In the past, that used to be even more of a spray and hope technique - you proceeded developing brand-new, reliable links, but continued to be in a state of extensive suspense up until the following data refresh taken place. Our clients and site proprietors as a whole took these suggestions (which cost loan, initiative and also time to execute) with a pinch of salt and also a hardly discernible roll of eyes. We currently stand absolved: compared to the old days, Penguin 4 guarantees a basically instantaneous recovery (when Google recrawls as well as reindexes your web pages) - surges in website traffic can be clearly attached to positive initiatives, if any.
Now allowed's take a better take a look at the "granularity" element. As Google said in their announcement (and Gary Illyes later cleared up), Penguin will no much longer randomly demote rankings of entire sites in search engine result. Rather, Google will currently look at "spam signals" and devalue the real incoming links based upon the crappiness of private web pages or domains that are linking out to your site.
I believe this is an indicator that Google is reasonably positive they have actually achieved two points:
They have actually built a detailed working database of spammy domains with the assistance of all the disavow files submitted so far.
They are now able to use something like Moz's Spam Rating on a per-URL basis.
Taken along with the real-time part, this means you could prepare for not only the amount however additionally the top quality of the web links you develop. If you're a gadget seller, for instance, by all indicates up your link building stake with reviews, comparisons as well as whatnot (from anywhere you could obtain them) in the added to Cyber Monday. However get web links with more how-to and benefit-focused web content (on customer technology sites such as Engadget or Wired) the remainder of the year round.
Got my point?
Mind your keywords
One mistake even skilled Search engine optimizations as well as link builders make is to relate Penguin with negative links. Penguin fights much even more compared to spammy links. In its original blog post declaring the arrival of Penguin, Google specifically discussed (and also offered an example of) keyword stuffing ahead of link schemes. They went on to say:
What are these quality standards? Here you go:
So, no matter of whether the web content you produce gets on your website or the one from which you're building a link, ensure it's distinct, valuable, high quality and also provides a good customer experience. It's the same for your tags, markup and meta content. We do remember to produce material for humans now, yet frequently neglect to create titles, summaries and anchor text for them. Explore your abundant fragments, over-optimizing your landing pages, getting innovative with your affiliate programs, or enabling your target market to go crazy on your website, might all cause unplanned consequences.
I'm privy to first-hand empirical (yet not irrefutable) evidence that an URL could be hit by Penguin for certain search terms however not others, so I suggest you go as wide as feasible with your keyword targeting and material optimization.
Don't try to outwit Google
As Google continuouslies delegate progressively bigger pieces of its valued formula to equipment discovering, it faces a predicament that has been burglarizing programmers of their sleep for years: new code inevitably damages the one that presently functions. With AI, this trouble is compounded since, as numerous Googlers have actually admitted, even those who developed and established these formulas in activity don't completely recognize just how they function at the moment.
Gary revealed that numerous Google patents aren't being placed to great use as they weren't yet possible or compatible with existing systems.
We've seen exact match domain name names and specific match support message regularly cycle through now-it-works, now-it-doesn' t phases.
In the past, there have been reports of Google algorithm updates such as Pigeon being rolled back. Penguin 3 demotions will be gotten rid of in order to enable Penguin 4 to function its magic.
Bearing the above in mind, if you are advanced link builder that does not mind attempting out hats of varying color, the genuine time and granular residential properties of Penguin 4 might tempt you to try out stuff along the following lines:
Remember when you put those "borderline" domain names (that you just weren't fairly sure were injuring you) in your disavow file "simply to be safe?" Now is the moment to eliminate them and discover out. While Gary Illyes and also John Mueller both tweeted that Google's disavow referrals haven't changed, Gary later admitted "for Penguin particularly there's much less requirement" for a disavow documents (screenshot below).
Simultaneously shedding the candle at the other end, you can likewise attempt structure links that aren't exactly natural or editorial however you think "wouldn't do any harm." Certainly I don't indicate high rate visitor blogging, rerouted domains or repurposed microsites, ecommerce website cloning, or vibrant PBNs making use of big scale masking incorporated with mass-produced, fresh content.
Build connect to specific web pages or campaign-specific sections on your site. Integrate this with an inner connecting method that involves connecting to these assigned Links from the homepage or various other important web pages as well as tweaking the meta robots nofollow tag to regulate the circulation of web link juice (hello PageRank/anchor message sculpting) to them.
If any one of these methods obtain you in trouble with Penguin, you might swiftly stop as well as transform back.
But ... do not attempt these at home. The threat is absolutely ineffective. If you could consider it, Google has already thought about it. Someone has currently done it and the machines are already dealing with it.
Manual activities seem to have declined externally, but they're significantly alive and kicking, Google sent out 4,300,000 notices of hands-on activities to web designers in 2015. And they schedule an especially horrible revenge for methodical spammers:
You're much better off following their guidelines word for word, also if that white hat does not obtain you that evasive front row seat.
Coda
While Gary is positive that several webmasters will certainly enjoy as soon as Penguin 4 completes its turn out, Dr. Pete's prophecy makes more feeling to me:
" If you didn't see a Penguin recovery, I doubt you'll see it in the following couple of days."
Karma is a bitch but she does not bite everybody. Google continuouslies shuffle and also fuddle its SERPs in order to make "optimization" incredibly challenging, abstruse as well as unpredictable.
The just thing worth optimizing in the future is just what individuals take into the search box - aim to build a brand name and influence the discussion around it to such a degree that Google is entrusted to no choice but to go after it.
If you have any kind of inquiries about Google charges, or require any kind of aid recuperating from guidebook or mathematical activities, don't hesitate to obtain in contact. We have a group of SEO pros that comprehend the principles of Google's search formula, and also have the experience as well as tools needed to keep your traffic and exposure climbing.
#digital marketing#marketing#marketing strategy#media marketing#seo#social media#social media management#social media marketing strategy
1 note
·
View note
Text
[FN] A Gauligy | Part 2 (10,000-word mark)
If you have not read the last part, I recommend doing that first because this is a direct continuance.
Enjoy!
________________________________________________________________________________________________________________________________
The drinks remained untouched, but the boys figured they would have more opportunities to try the concoction. After a couple of minutes of just sitting there, the boys decided to try and look around and scope out the area. Many of the other eaters had already left, and the boys followed after the group that was departing now, which the boys didn’t recognize. The group seemed to be trying to find the courtyard that the boys had seen earlier that morning, but all the doors were locked. This continued on for some time, but each and every door was either barred shut on the other side or was locked. Eventually, they all gave up and just began to head back to their rooms. The boys both looked at each other and shrugged and were turning to follow the group when the sounds of a muffled conversation reached their ears. As I previously stated, Coal and Ande both had very strong curiosities. So strong, that once something even remotely mysterious reaches their minds, they must find out more. And so, they did.
Chapter 7: Without even a word, the boys both knew what was on the other’s mind. Slowly turning back towards the direction that the voices were coming from, they tiptoed as fast as they dared across the hard, wooden floor. The voices seemed to be coming from a door that was a little more bedazzled than the rest. It had gold linings to go along with the color scheme, and instead of the usual blunt knob in front of the doors, it had a golden handle that shined very brightly in the well-lit hallway. Upon reaching the door, the boys lost all sense of carefulness in replace of raging curiosity, and they rushed to get their ears close to the door to hear what was being said inside. Here is what they heard. “… wouldn’t you say so?” The speaker had a higher voice but was definitely male. “I would have to agree with you. This has been the most eventful journey thus far.” The boys instantly recognized this voice. It belonged to the sentry guard for the Sick Wagon. “But what could be the purpose? We have done nothing against them since… well, you know.” Asked the other man cryptically. And just then, a very informative back and forth began between the two men. “I have no idea. It could be any number of reasons, but there must be a reasonable one. Why waste important time and even lives on a wagon full of people that are sick with Traitor’s disease.” Ande and Coal looked at each other, puzzled. We’ll discuss this later, Ande mouthed, as the conversation resumed. He didn’t want to miss a sentence. “… I don’t think he knows what he’s doing. His dad must not have passed on his secrets. Random terrorist attacks never lead to good outcomes. It gets you nothing and fills your adversary with rage.” Stated the other man. “I agree, Orp. So, when did the regent say we were supposed to head out? They’re starting to get nosy.” “Tomorrow morning, first thing. No breakfast. We want them back down to where they started when they got here. Too much nutrition could ruin the sickness.” Replied Orp. “And now, I think it’s time we put this conversation on hold. For now, at least. We wouldn’t want any unsuspecting traitors stumbling in here!” Orp let out a chuckle at his own joke, and the sentry let out a good-natured grunt of a laugh. Then there were steps towards the door, and the boys had to dive away before they were discovered. Luckily for them, the hallway took a sharp left turn directly after Orp’s office, so they just had to duck into the safety of a sharp bend and hope that the sentry’s path was going back towards the dining room. The boys’ luck hadn’t run out quite yet, and they could hear him klunking down the hallway in the opposite direction of their little hiding spot. Once they heard his boots fade far enough away, the boys jogged back towards the relative safety of their room. About twenty minutes later they reached it and plopped onto their respective beds. All this new information was startling, but Coal knew exactly where to start. “We’d better save some dinner for tomorrow morning since we won’t be served breakfast.”
Chapter 8: The afternoon rolled on. The boys discussed what they had heard for a while but eventually left their room once again in search of something more entertaining to do. Back in the great hall, Coal noticed an extra hallway on the opposite side of the one they had previously gone down. The hallway was right next to the stairs, so it was hidden when scaling them. This was the only hallway they had yet to explore, so they sauntered over to it. The hallway was quite short, but it had a branch going to the left, sharp enough so that they could not see what was on the other side of the bend. Who knew waited on the other side? So far, they had already discovered so much, and they were eager to find out more about this mysterious haven for the people sick with Brushworm’s disease. The hallway was nothing fascinating by itself, they quickly discovered. The walls had the same color scheme as any of the other hallways that they had explored, and all shared the same theme of having a mix of paintings of people, buildings and natural scenes. These were all beautiful, but not what the boys wanted to see at that moment. This style rambled on through the hallway, but after the first couple of feet, the boys stop paying attention, for at the end of the hall there was grass. Now, obviously it was not inside the castle, no, the castle was too well kept for that to happen. The grass was on the outside of the castle, through a set of massive double doors, which happened to be wide open, letting in a cool breeze. The boys slowly walked towards the door, oblivious of their surroundings. Could this really be true? That easy to get out? It can’t be. They didn’t dare to make a sound, so the trip took several minutes of tiptoeing once they got over their initial shock. After all, what if this was an accident and the open doors where their only chance of the way out? They wouldn’t want to alert anyone, especially that sentry who was clearly not as nice as they previously imagined. Once to the door, the breeze overwhelming their noses, they glanced at each other, glanced quickly backward to check the hall, and then took a step out onto the turf. And then another one, and another, until they were at the top of the small mound which had filled the doorway when they had first seen it open. The mound was raised up high enough for them to see the massive scene unfolding before them. “So, this would explain where everyone went…” Ande muttered. I’ll start by describing the first thing that the boys saw. It was, after all, directly in front of them. A massive, bulky figure clad in chainmail and iron. It was holding a double-edged sword, and it seemed to know how to use it, as it was quickly dispatching guard after guard in front of it. The boys quickly realized that it was the creature that had snapped the table they had been eating at and broken the pretty skylights. And this time, it someone appeared twice as ferocious as it had then. Speckles of blood were all over his armor and sword, but they were clearly old. The creature appeared to be doing his best to not permanently harm any over the soldiers. When one would come into to attack it, the creature would either kick or punch the soldier, effectively taking him out of the fight and possibly giving him a splitting headache, but everyone who has had a headache knows that death is far more painful than death. In the background, soldiers were eyeing the creature warily, and any that were not doing that were in another conflict even further out in the field. This conflict seemed to be against a creature that was also humanoid in shape but had no similarities to men other than that. The creature seemed to consist of stone and other kinds of rocks, which strangely did not crunch against each other when it moved. This creature stood several feet taller than the other one, standing at a good twelve feet tall, at least. To make things easier, we’ll name this creature Rocky, and the other armored creature we’ll call Blue. Blue was also quickly dispatching the soldiers who were attacking him, making use of his massive, bulky arms to knock the guards sky-high. One of the guards almost landed on top of Coal, narrowly missing him and rolling down the slope the boys had just finished climbing. The boys stood there, mesmerized by the spectacle of the battle. But they quickly snapped out of it when Blue turned and saw them. He was off in an instant, closing in on Coal. If you have read before, you may know of authors saying everything moved like it was in slow motion. This was not the case in this situation. Blue was on top of Coal before Ande even had a chance to yell, and Blue was already down the slope and to the door by the time Ande had finished saying, “Watch out!” Ande recovered quickly and ran down after the creature, snatching a crossbow from the guard who had been knocked over only moments before. Ande didn’t necessarily know how to use it, but he knew that they could do damage, and there seemed to be a bolt already ready to be fired, tensed against the string. The creature had run through the door into the hallway that the boys had just come from, in the process smashing his head against the top of the door and almost collapsing the whole thing. Luckily for Ande, the door didn’t just look nice, it was also very sturdy, and so he passed through it and followed the sounds of destruction coming from up ahead. Rather than taking a right and running back through the way the boys had come through, the creature took a sharp left, smashing through the wall quite easily and emerging into another hallway. Coal just closed his eyes and hoped that he would end up alive, but evidently the creature wanted him alive, as it could have easily crushed him earlier and let his body on the ground. This thought almost scared Coal more than dying did. Who knew what the creature wanted with him? Ande reached the end of the first hallway and gazed through the hole in the wall for a split-second before charging through it. A glimpse of the creature passing around another bend could be seen up ahead, and so Ande started running again, down yet another hallway. He knew in the back of his mind that he stood no chance at catching this creature, but he couldn’t let it just take his brother away from that easily. And so, he kept running, reaching the crossway and spinning to follow the creature’s lead without a moment of hesitation this time. A wide-open hole stood before him, on the other side he could see that same field he and Coal had first walked into, but instead of seeing the battle directly forward, he saw it to his far left, sprawled out before him. This part of the field was raised up, so he had a bird’s eye view. The rock creature had left, and he could just see the smaller creature who had been in the distance running towards the woods which bordered the four castles before it slipped into the tree line. Ande continued to glance around, trying to find where the creature had gone with his brother, when an armored hand grabbed onto his mouth, effectively keeping him from yelling in alarm.
Chapter 9: Ande still let out a muffled cry, then accidentally pulled the trigger on the crossbow, firing the quarrel into the ground where it lodged itself. Ande spun around, and almost yelled again, but the hand followed him and kept him from uttering a sound. In front of him stood the creature, and next to him Coal, who appeared to be calm. “It’s ok, Ande. He’s a friend.” Coal said. “A… friend?” Ande looks suspiciously at the armor-clad giant. “Surprisingly, yes. He knows what’s going on around here.” Coal responded. The suit of armor took it’s hand off of Ande’s mouth and flicked it’s visor open. Staring down at Ande were two mismatched eyes, one of the green and one of them brown. They were serious but not unkind, years of military precision and discipline behind them. They didn’t focus on him for long, instead choosing to glance around behind Ande, never staying in one place for long. Ande found it a bit dizzying, so he looked back down at Coal, who appeared tiny next to the giant. The giant reached out his hand and Ande hesitated and then shook it. Thankfully, the giant’s grip did not crush Ande’s hand as he had worried it would. “So, what’s going on with this place?” Ande inquired. And then the giant spoke for the first time. “We’ve got a lot to talk about.” The giant’s voice sounded like what Ande had imagined it would. It was gruff, deep, but, like his eyes, it was not unkind. It had an edge of sadness, but only a hint of it. His voice had the same wear on it that his armor did, one that was aware of all the evils in the world and had experienced many of them. “We need to be on our way. The guards will be here any moment now.” The giant scooped up Coal, and then reached out to Ande, offering a lift. “I think I’ll walk alongside you if it’s all the same.” Ande shot back. He didn’t believe that he fully trusted the giant yet. “Do you have a name?” Ande asked, changing the subject. “I have a name no human could pronounce. Call me what you wish.” And with that, the giant was off, his visor flipping down with the tilt of his head. Ande ran after him. “What… about…” Ande was trying to keep up and think of a good name, but he was cut short when he heard shouting and the noises of boots running behind them. He decided to save his breath for running, and sped up, pulling up closer to the giant. The soldiers continued to yell, and Ande could hear the tell-tale sound of the metal boots spreading out. “They’re going to… cut us off.” Ande warned, panting. The group was now running down a pathway that was leading back towards the main road that the sick wagon had come from. More boots could be heard up ahead, and the giant turned his head down to protect Coal, while simultaneously creating a battering ram that no sane person would want to stand in front of. Ande shifted a little to his right, getting completely behind the giant. Up ahead there was a bottleneck between the side of the castle that the group had been running next to and the wall which was direct to their left. The soldiers appeared stepped in front of what spelled freedom for the boys, and they quickly shut a metal gate in front of the path. The giant did not slow, however. “Get on… we’re going to jump it.” He said, reaching out his hand to Ande without slowing his pace. I guess I have no choice unless I want to be left behind. And so Ande climbed on and was quickly hoisted onto the giant’s back, where he was plopped down next to Coal, who had been lifted a moment ago. “Hold on tight!” The giant roared. The boys now both had a nice view of the soldiers and the sturdy-looking iron gate which was ahead of them. They also had a good view of the archers which had their bows drawn, ready to fire at a moment’s notice. The gate was only ten feet away now, and yet the giant did not slow. It was five feet away, and the giant did not slow. And then they were in the air, jumping over the gate, clearing it by a good foot. The giant came down on those soldiers with the ferocity of a lion, drawing his sword mid-flight and whacking the nearest soldier who dared to defy him with the blunt edge of the sword. The archers fired a volley, and the giant stopped for a second to kneel and shield the boys from the arrows, which bounced off his bulky armor and fell to the ground. Then they were up again, and the giant was charging past the archers, making a break for the road. He quickly moved the boys to his chest while he ran, getting them out of the arrows’ paths. Another volley could be heard clacking off the giant’s back, but the boys paid no attention. Freedom was right in front of them, right across the road. The giant bounded onto the road, and with one last glance at the soldiers, the giant leaped through the air into the tree line. The boys were both more than ready to get off of the giant as they were getting quite nauseous, but rather than a gentle landing, the giant landed with a thud and rolled down the slope which had been covered by the trees. The boys found themselves tumbling for the second time in as many days, rolling and rolling until they finally slowed to a halt. This time around they were slightly less dazed then they had been before, thanks to the giant receiving the brunt of the fall. But the boys were less focused on themselves once they had gotten back up. The giant was still on the ground, moaning in pain. A massive steel arrow protruded from his back, where it had found a chink in his armor mid-flight and had inserted itself into his shoulder. Soldiers could be heard running across the road several hundred feet up the hill they had just fallen down. Suddenly, things didn’t look so bright. “Come… here…” The giant managed to moan, beckoning with his hand gently. The boys walked over and crouched down next to him. “You’re going to be ok.” Coal said, worry infecting his face. “No, I won’t… but you will… Help is on the way,” The giant groaned out. “But that’s not important… right now… this whole facility is designed… to relax you. Don’t… give in.” The soldiers were getting very close now, and the boys realized that they needed to leave now if they wanted a chance at escaping. “Go… if you get captured, remember this…” The soldiers busted through the trees, instantly crowding the small clearing that the boys had tumbled into. “Don’t drink… the Scarlet Wine.” The giant whispered out, and then he let out a sharp sigh, and he stopped breathing. The soldiers didn’t risk anything, quickly inserting their blades into chinks in the giant’s armor, making sure that he was dead. The boys tried to run, but soldiers quickly surrounded them and bound their wrists and legs. The boys could only watch as the soldiers continued to stab the giant. “Cowards! He’s dead and you’re still afraid of him.” Coal yelled, but his eyes were growing misty with the realization that this giant had risked his life to save them, and he had lost it. “Creatures like this tend to find ways to live, even after they’re presumed dead.” This was the voice of one of the soldiers who had an array of medals pinned to his chest plate, identifying him as some kind of leader. His voice was high and nasally, and he was a little shorter than the rest of the soldiers. Both of the boys instantly disliked him, but he seemed not to care, ignoring their molten glares. “Right, back to the castle. You two are to carry these children,” He said, pointing at two of the guards which were a little bulkier than the rest. “And you two, stay here and dispose of the body.” This command was directed at two more soldiers which had crossbows instead of swords. The boys were scooped up and the troop, minus the two chosen bowman, started up the hill back towards the castle. The two bowmen began to pile sticks and brush on top of the giant’s body, and it quickly became evident what they planned to do. “You can’t do that! He did nothing wrong!” Coal cried, his eyes were now both veritable waterfalls. “Aiding in the escape of two enemies of the king is a punishable offense by the Vernille grand law.” The leader shot back, and with that, the conversation seemed to be at an end. The guards, after collecting a respectable mound of kindling, tossed a torch onto the pile and stepped back to watch as the giant’s body was slowly consumed by the flame. The boys watched for a moment, but then Ande decided it was better if they didn’t. “Look away, Coal.” He said, and Coal obeyed. However, Coal continued to cry softly the entire way back to the castle, and Ande wanted to join him, but he knew that he had to keep a strong countenance, for Coal’s sake. Crying wasn’t going to get anywhere, but determination could. The boys now knew that they must leave this castle, whatever they had to do. These people were not their friends. They were once again outcasts.
Chapter 10: It did not take long until the boys found themselves once again inside their room, but this time the door was locked behind them. It was now the dying moments of the afternoon when dinner is best served, and the boys’ stomachs were beginning to remind them that the past day had had a wonderful meal at around this time, and they would appreciate it if the boys would FEED THEM. The boys did their best to ignore the hunger pains and hoped that dinner would be served soon. They were just beginning to wonder whether they were going to be starved when the door was flung open and a guard beckoned for them to follow him. They both looked at each other and then Ande led the way to the guard. The door was shut behind them, and they were quickly marched down the stairs and to the dining hall, where everyone else seemed to be acting normally, completely oblivious to the escape attempt that had happened earlier that afternoon. They were completely oblivious to the fallen hero which had risked his life for two of their fellow Sick Ones. The boys were marched over to two untaken chairs and were sat down, and then the guards stepped away, but Ande noticed that he stayed in the area to make sure that the boys didn’t try to escape. The boys didn’t eat much. How could they? They both felt sick to their stomachs but tried to eat just in case this was their last meal for a couple of days. After less than half an hour, they both decided that they couldn’t eat anything more and began to consider possible things to do. “We could try and book it back out the way we went before.” Coal said, but that idea was quickly ruled out. “They definitely would’ve closed that off by now.” Ande reminded him. And so, the boys continued to brainstorm, careful not to talk too loudly in case they were overheard. But their talks didn’t last long, for once the guards had noticed that the boys were finished with their food, they quickly escorted the two back up the stairs and to their room. No one at the table seemed to notice, they all were enjoying themselves too much. The boys were quickly shoved into their room, falling to the ground. The door made a clicking sound behind them, the tell-tale noise of the lock being engaged. “Well, that’s settled.” Coal said, and both the boys got up off the floor and walked over to their beds. It was still light out, and neither of the boys felt very tired. Soon Ande was at the window, fiddling with the bars which kept them from escaping. They were rock solid, the metal having been molded right into the wall. Coal was messing with the door handle, but there was not even a keyhole on the boys’ side of the door, and the door was obviously too strong to break through with anything short of a battering ram and several strong men. The boys both knew that they really had no chance to escape out of this room, but it seemed to help by at least trying. After a while, both boys sat back down and discussed everything that happened to them in the last couple of days. “Good thing we didn’t get a chance to drink the Scarlet Wine.” Commented Coal, yawning. The boys had quickly figured out that he meant the red liquid that had always been put in front of them at each meal. “It was definitely very lucky. I wonder what’s so bad about it? There must be some kind of side-effect.” Ande added, yawning as well. “And now you’ve got me yawning!” He said, smiling. “Sorry, I can’t help it. It’s been a long day,” Coal said, grinning. “I wonder if the Wine somehow relaxes you? None of the other people at the table even noticed a bunch of guards escorting us away.” “That’s probably the best theory we’ve had yet. It would be perfect too, no one would be-.” Ande was suddenly interrupted by someone or something banging on their door. The boys both looked at each other. “Who could that be? They obviously don’t have a key.” Coal whispered. Ande shrugged and walked over to the door. “Who are you?” He bluntly asked. No answer came, but the knob began to turn, and Ande jumped away from the door. The door was pushed open, and in the doorway, where the boys were expecting to see a guard or some kind of monster, but instead, the doorway contained someone who looked about Coal’s age. “I’m Brew, and I’m letting you out of this room on one condition: that you follow me.” It was a girl, so at least the boys didn’t have to worry about being murdered. But this girl definitely had some things up here sleeves, and she looked very unpredictable. The boys looked at each other, shrugged, and then got off their beds and walked over to the door.
Chapter 11: The girl was already out of the door by the time the boys stood up, so they both rushed over to the door and glanced down the hallway. She stood to the boys’ right, on the opposite side of the hall that the stairs were on. “Hurry up!” She whisper-shouted, and the boys obeyed, carefully closed the door behind them and then jogged over to her. They were both very grateful for the thick carpet on the floor, because anyone who has ever done any sort of sneaking knows that carpet is much quieter than wood or stone. They reached her quickly and she knocked on one of the doors, performing a pattern quickly. The door opened and she stepped inside, then turned and motioned for the boys to follow her inside. “Maybe we’ll just stay out here?” Coal suggested, but he knew it was pointless. The second a guard stepped into that hallway, they would see and recognize the boys, and the girl, Brew, said as much. “How do we know this isn’t some kind of trap?” Ande inquired, but he knew the answer to that question as well. “In case you didn’t realize, you already are in one. What’s the difference if you get trapped in one more?” The girl was right. So, the boys sighed and stepped inside, and almost immediately the door was shut behind them. They stood there without saying anything for at least ten seconds, and considering nothing terrible happened, they assumed that coming into this room had been a good idea. They glanced around and quickly noticed the other occupants of the room. There was an older man by the door who was probably the one who shut it, and then there was a younger girl and her mother, and a pair of twin boys who looked to be a couple of years older than Ande. “Welcome to the Council of the Enlightened Sick Ones.” Brew said, somehow managing to have a straight face. The boys, however, did not seem to realize that she was serious, and both burst out laughing. In fact, they laughed so hard that they couldn’t see the offended look in the rag-tag group’s eyes, which didn’t exactly earn the boys any extra trust to start out. But after a minute or two of merriment, Ande noticed the group’s expressions and bumped Coal with his elbow. “What? Oh…” The boys stared around at the group with sheepish expressions on their faces. “Sorry…” The awkwardness in the air was almost tangible, but thankfully Brew broke the silence. “Well, whether you think so or not, this is an important matter, and important matters generally should have important-sounding names.” Her words stung, but both boys knew that they had earned them. “Let me introduce you to the Council.” With this, she took time and gestured to each of the group. “Here’s Wheaton,” she pointed at the older man holding the door. He had blue eyes, and wore a black cap, which was probably there to conceal the fact that he was almost completely bald. “Then there’s Cotton and her daughter Molly.” She pointed to the woman who was sitting in the corner with her daughter on her lap. The little girl and her mother both shared black hair and hazel colored eyes, but the little girl had a stronger jaw than her mother, and they both had a complexion darker than Coal’s. “And last but not least, there’s Dior and Gran.” She gestured to the twins. They both nodded at the boys. They shared the same blue eyes and brown hair, the only difference being that Dior had a small scar on his forehead, which was partly concealed by his air. “Everybody, this is Coal and Ande.” The boys both looked at her with looks of bewilderment. “How do you know our names?” Ande asked, getting it out right before Coal managed to. “Oh, just some simple eavesdropping. It was quite easy to hear the guards talking about two boys who almost escaped on the back of a giant.” Brew said this plainly as if it were a common fact. “So, someone else had actually paid attention to what’s going on around here.” Ande muttered. “It’s really not too hard to see once you open your eyes.” Brew shot back. Now that they had a moment to think, they could really take in this passionate girl in. Passionate may not be the first word that would come to mind when the boys thought of Brew, but it’s quite a bit kinder. Brew had the average skinny build that most of the slaves in the Vernille Empire had, but rather than looking beaten down like a lot of them, she had a fiery determination in her light green eyes. She had about the same skin color as Ande, but it was hard to tell because she was bundled up and the only skin showing was on her face. The boys took this in quickly, and they had to, for she was already beginning to speak again. “So, now that we’re all introduced, let’s talk about why you were invited here,” Brew started. “This room contains every last person who hasn’t already been relaxed by the wine,” Here Coal interrupted her, “It’s called the Scarlet Wine.” He said. Brew gave him a look of irritation and then continued, “Call it what you want, but it’s affecting people’s judgment. No one cares what happens to them anymore. Luckily for each of us, by luck or on purpose, we haven’t had a drop to drink. I think that we can all safely assume that these people aren’t here to help us enjoy the rest of our lives,” “You got that right…” Ande said under his breath. “Please stop interrupting me. Now, normally this wouldn’t matter because we’re going to die anyway, but consider this: What do they have to gain? We could simply say that they didn’t want anyone escaping and spreading the disease, but this is very elaborate for that.” Here she coughed, cleared her throat, and then continued, “There’s something going on. So, we have before us two choices. We can either try and escape, maybe live a couple of days, a week or two if we’re lucky, OR, we can figure out what’s going on. I’ve heard that there is someone who knows where an antidote could be located. He lives in the Quarantined City. He’s much too old to have retrieved it himself, but the knowledge of it was passed down to him from someone else. He may not have long to live. He’s already only a month away from his, eh… expiration date.” These last details were not even heard by the rest of the Council of Enlightened Sick Ones, because a glimmer of hope had penetrated each of them. “A cure, you say?” Asked Ande, his eyes wide and his hands shaking ever-so-slightly. “Count us in.”
Chapter 12: The group had brainstormed for a couple more minutes, and when the boys had mentioned that they had overheard the two officers talking about leaving the next day, hope began to permeate the air even more. The Quarantined City was where the journey that the Sick Wagons took ended, and with a little luck, they could be there in time to get the location of the cure before the older man passed on.
---------------------------------------------------------------------------------------------------------------------------------------------------------------------------------
All feedback is appreciated! :)
Sorry that it's a little crammed together, if you want the MS Word file which has all the editing, just ask.
submitted by /u/TG_III
[link] [comments]
via Blogger https://ift.tt/2qN051B
0 notes
Text
Making A Concrete Coffee Table Top
Hey, good news! I finally have a place to put my feet up in the beach house living room. Or, as Sherry would state this good news: we finally have a coffee table!
light fixture / ceiling medallion / similar rug / similar sofa / similar curtains / curtain rods
And it was a DIY that was SO MUCH CHEAPER than the high end alternative, so three cheers for that. Oh and people who follow our InstaStories know we’ve switched out the rug in here for this rug since taking these pics, so there will be a post all about that (and the other dining room tweak we’ve made) coming up in a week or two. But back to the coffee table.
We’ve actually had the table base for a while, but it’s been completely topless for months. We scored this wooden octagonal table base from a neighbor who had planned on adding a top to it at some point, but after months of doing nothing with it she put it on our neighborhood buy/sell board for a whopping $7. After paying 700 pretty pennies for it, it remained topless in our garage for several months before moving to the beach house last fall (see below)… where it remained – still topless – until last month.
Our grand scheme was to get a stone top custom cut for it. Marble would look great, but we also considered more durable options like quartz. But quotes from two different stone yards – even for remnant pieces – came back between $700 – $900. I KNOW. They were MUCH higher than we expected, partially because of the size (it’s 38″ at its widest, which makes it deeper than a standard countertop by a fair amount) and the octagonal shape.
So we quickly shifted from “buying a stone top for it” to “DIYing a stone-like top for it” – and after weighing all sorts of solutions (faux stone laminate, a wood top we painted white or even tried to “marble”, etc) we landed a white concrete top that would give us a nice chunky stone look, but at a much cheaper cost. Unfortunately, the project kept getting nudged behind bigger tasks like installing the kitchen and building bunk beds. Hence why I was forced to uncomfortably prop my feet up on this edge of this puppy each time we visited. Feel bad for me, please.
We feared that a solid poured concrete slab would (a) be very heavy and (2) be very prone to cracking or breaking – especially without adding lots of extra support under the table top. Plus little kid heads + a solid hunk of concrete sounded worrisome. So instead we decided to create a wood top and then cover the wood with Ardex Feather Finish, which is a thin concrete material that we used years ago to give our laminate kitchen counters the appearance of solid concrete.
Making The Wood Coffee Table Top
We picked up a 4 x 4′ sheet of 3/4″ plywood because we wanted something sturdy enough to span the tabletop without sagging. To mark my cuts, I simply flipped the table over on top of the plywood and traced the edges with a pen. Don’t worry, I’ll show you how I made it overhang the table’s edge in a moment.
Using my circular saw outside, I trimmed off the edges to get an octagon that perfectly fit the top of our table base. No overhang. Yet.
Next I cut 8 pieces of 1 x 2″ whitewood to create a border around my cut plywood. After summoning some of my 8th-grade geometry, I determined that I needed to cut each one at a 22.5-degree angle to fit them around the octagon. But surprise-surprise, my miter saw was one step ahead of me and already had that as a preset angle.
Then, with the plywood laid on top of the base with the edges flush, I started nailing each of my 1 x 2″ pieces around the edges (into the plywood, not the table base). I put wood glue on it before I nailed, which help things hold for the long haul. Adding this border did a few helpful things:
It made the wood top slightly larger than the base, giving it a nice overhang
It made the wood top look twice as thick as it really is, without adding much more weight to it
It helped keep the top in place by making it almost like a snug shoebox top. I still screwed it to the base from underneath just to be safe.
Once it was all nailed in, I used wood putty to fill in all of my gaps and nail holes. This probably wasn’t a super critical step (I was going to coat this with a skim coat of concrete, after all) but I discovered the table isn’t a perfect octagon, so some of my corners weren’t as tight as I’d hoped. This shot is from before I sanded the excess wood filler off:
Applying The Concrete Finish
We haven’t used Ardex Feather Finish since our first project with it: our old kitchen’s laminate counters (here’s the tutorial for applying it and then sealing them to be food safe). While we decided the application was awesome for a quick makeover, they did get a little oil-stained around the stove since we used food-safe sealer as opposed to some of the more heavier duty sealers. No worries, we just added a cutting board to cover the small splatters – and we loved the imperfections and movement that was created in the application process. Definitely a whole lot better than the old plastic-y counters the house came with. Overall: we’d definitely recommend this method for a kitchen counter update – especially if you use a stronger sealer.
For the coffee table we decided to use the white Ardex instead of the standard gray color, so we tracked down a 10 pound bag online for $40. The dry Ardex mix just combines with water, so to apply it all you really need are some mixing/measuring buckets and various sized trowels to apply and smooth it. Oh, and sandpaper and a power sander (this is the one we have).
The bag suggested a 2 to 1 mix of Ardex powder to water, but I read our old post and reminded myself that I had liked a bit more water than that – it helped keep the mix looser and easier to spread. So I started by measuring one small batch at a time (I think I needed about twice this much to complete one coat).
I mixed them together using a small trowel, making sure to getting any remaining powder mixed in. I aimed for a thick pancake batter consistency – like it would sorta hold to my trowel for a moment before dripping off on its own.
Then I just scooped everything onto my table and started spreading it smooth, using larger trowels on the top and smaller ones on the edges. Note: whatever surface you’re doing this on should be sanded enough to be rough. Our plywood was already slightly textured, so I could skip this step, but if you’re doing it on the top of a piece of furniture, be sure to take a pass with low-grit sandpaper first (like 60-80 grit).
Ardex takes more than one coat (we did two this time) so my first pass was really about coverage, not smoothness. I was worried about sanding too much off during the next step, especially on the edges and corners, so I threw caution to the wind and really laid it on thick around the edge.
I gave it several hours to dry and then came back to start smoothing. The first thing I did (and my favorite part) was to use a putty knife to scrape all of the stalactites that dripped down the bottom edge. It was so satisfying and it gave us a really clean edge on the bottom.
Then I took some low-grit sandpaper (80) and went to town on the rest of the top with my palm sander. Since I knew another coat was coming after this one, I wasn’t concerned about getting it flawlessly smooth. I mostly wanted to eliminate any hard ridges that would catch clumps of Ardex during my next application.
This is what the top looked like after I sanded the first coat. Obviously, you can see lots of my trowel marks as well as little pockets where the Ardex didn’t spread completely smoothly. It’s a bit rougher than we wanted for the final product, but it was fine for a first coat.
The second coat went on in pretty much the exact same method – except I did mix the Ardex a bit thinner and I took a bit more care getting a smoother application since this would be the top one that’s seen by everyone. Plus, when I sanded it, I moved from my initial low-grit (80) sandpaper down to 120 then 220, so that the finished table was super smooth. I didn’t remember to snap any photos of the coffee table after we sanded the second coat, but took lots of them once it was sealed and finished, so if we skip ahead for a second, here’s the finished result:
Sealing The Concrete
There are lots of products out there for sealing concrete. As I mentioned, we used food safe eco-sealer on our kitchen counters, which we think might be the reason tiny little grease spatters sunk in next to the stove – but since we’re not planning to prepare food on this table, we went with something heavier duty for a nice super-durable finish this time. Our final choice? This “Wet-Look” Sealer by Behr. Sherry suggested something high-gloss, which would really mimic that glossy stone look, and we were both really happy with how it turned out. Almost a mirror-like shine – which you can sort of see in the photo above.
I just used a small foam roller to apply a thin coat along the top and all of the sides. Once it had dried for a few hours, we did a second coat (and later a third coat, just to be safe). I barely made a dent in the 1 gallon container (it was the smallest one they sold) but at least I have some on hand to do a touch-up sealing coat every year or two, just to be safe.
Once it was all fully dry, we brought it in and let it cure for a week before putting any objects on it (not that it needs that long – we just weren’t at the beach house for a week). And BOY DOES IT FEEL GOOD TO HAVE A COFFEE TABLE!
light / ceiling medallion / similar rug / similar curtains / curtain rods / TV stand / similar chair
The white top breaks up the darker rug and couch nicely, and also helps tie together some of the other bright white accents like the bookshelf and the curtains.
It’s hard to tell from these photos, but although the concrete is super glossy and chunky, it still has imperfections, which is definitely part of the charm. Instead of looking like a big block of shiny plastic, it gives off that raw concrete vibe – even in the glossy white color. This next picture probably best shows a few light trowel marks. It all feels smooth to the touch, but when you look closely they’re definitely there. Again, this is some of the “interest” that we expected from the Ardex process (or at least my version of it – ha!) and for us it takes the place of the movement we would’ve gotten from a stone like marble.
Sherry and I have also discussed everything from staining the wood base a little bit darker (especially to disguise the light edges) to painting the while base a glossy white to emphasize the interesting shape of the legs. But for now I’ve argued that we should just kick up our feet and enjoy having a place to actually kick up our feet. IS THAT TOO MUCH TO ASK?
bookcase / similar pink pillow / similar blue pillow / white faux wood window blinds
And don’t even get me started on the other furniture adjustments we’re thinking about in this room. Actually since we took these photos we’ve painted and recovered two armchairs for that wall on the right, so there’s a lot more comfy seating in here now (although we’re thinking about a few other adjustments before calling it done). But that’s a topic for another day!
Also! If you have any where-did-you-get-that questions about the beach house (or paint color questions, which we also get a lot) this page has all the answers for you.
P.S. Do you get our free weekly emails? We love sending bonus details, design tips, random style thoughts, and other house-related stuff. Click here to get them delivered right to your inbox. And thanks to everyone who is on the list already – Sherry loves putting them together for you each week.
*This post contains affiliate links*
The post Making A Concrete Coffee Table Top appeared first on Young House Love.
Making A Concrete Coffee Table Top published first on https://aireloomreview.tumblr.com/
0 notes
Text
Making A Concrete Coffee Table Top
Hey, good news! I finally have a place to put my feet up in the beach house living room. Or, as Sherry would state this good news: we finally have a coffee table!
light fixture / ceiling medallion / similar rug / similar sofa / similar curtains / curtain rods
And it was a DIY that was SO MUCH CHEAPER than the high end alternative, so three cheers for that. Oh and people who follow our InstaStories know we’ve switched out the rug in here for this rug since taking these pics, so there will be a post all about that (and the other dining room tweak we’ve made) coming up in a week or two. But back to the coffee table.
We’ve actually had the table base for a while, but it’s been completely topless for months. We scored this wooden octagonal table base from a neighbor who had planned on adding a top to it at some point, but after months of doing nothing with it she put it on our neighborhood buy/sell board for a whopping $7. After paying 700 pretty pennies for it, it remained topless in our garage for several months before moving to the beach house last fall (see below)… where it remained – still topless – until last month.
Our grand scheme was to get a stone top custom cut for it. Marble would look great, but we also considered more durable options like quartz. But quotes from two different stone yards – even for remnant pieces – came back between $700 – $900. I KNOW. They were MUCH higher than we expected, partially because of the size (it’s 38″ at its widest, which makes it deeper than a standard countertop by a fair amount) and the octagonal shape.
So we quickly shifted from “buying a stone top for it” to “DIYing a stone-like top for it” – and after weighing all sorts of solutions (faux stone laminate, a wood top we painted white or even tried to “marble”, etc) we landed a white concrete top that would give us a nice chunky stone look, but at a much cheaper cost. Unfortunately, the project kept getting nudged behind bigger tasks like installing the kitchen and building bunk beds. Hence why I was forced to uncomfortably prop my feet up on this edge of this puppy each time we visited. Feel bad for me, please.
We feared that a solid poured concrete slab would (a) be very heavy and (2) be very prone to cracking or breaking – especially without adding lots of extra support under the table top. Plus little kid heads + a solid hunk of concrete sounded worrisome. So instead we decided to create a wood top and then cover the wood with Ardex Feather Finish, which is a thin concrete material that we used years ago to give our laminate kitchen counters the appearance of solid concrete.
Making The Wood Coffee Table Top
We picked up a 4 x 4′ sheet of 3/4″ plywood because we wanted something sturdy enough to span the tabletop without sagging. To mark my cuts, I simply flipped the table over on top of the plywood and traced the edges with a pen. Don’t worry, I’ll show you how I made it overhang the table’s edge in a moment.
Using my circular saw outside, I trimmed off the edges to get an octagon that perfectly fit the top of our table base. No overhang. Yet.
Next I cut 8 pieces of 1 x 2″ whitewood to create a border around my cut plywood. After summoning some of my 8th-grade geometry, I determined that I needed to cut each one at a 22.5-degree angle to fit them around the octagon. But surprise-surprise, my miter saw was one step ahead of me and already had that as a preset angle.
Then, with the plywood laid on top of the base with the edges flush, I started nailing each of my 1 x 2″ pieces around the edges (into the plywood, not the table base). I put wood glue on it before I nailed, which help things hold for the long haul. Adding this border did a few helpful things:
It made the wood top slightly larger than the base, giving it a nice overhang
It made the wood top look twice as thick as it really is, without adding much more weight to it
It helped keep the top in place by making it almost like a snug shoebox top. I still screwed it to the base from underneath just to be safe.
Once it was all nailed in, I used wood putty to fill in all of my gaps and nail holes. This probably wasn’t a super critical step (I was going to coat this with a skim coat of concrete, after all) but I discovered the table isn’t a perfect octagon, so some of my corners weren’t as tight as I’d hoped. This shot is from before I sanded the excess wood filler off:
Applying The Concrete Finish
We haven’t used Ardex Feather Finish since our first project with it: our old kitchen’s laminate counters (here’s the tutorial for applying it and then sealing them to be food safe). While we decided the application was awesome for a quick makeover, they did get a little oil-stained around the stove since we used food-safe sealer as opposed to some of the more heavier duty sealers. No worries, we just added a cutting board to cover the small splatters – and we loved the imperfections and movement that was created in the application process. Definitely a whole lot better than the old plastic-y counters the house came with. Overall: we’d definitely recommend this method for a kitchen counter update – especially if you use a stronger sealer.
For the coffee table we decided to use the white Ardex instead of the standard gray color, so we tracked down a 10 pound bag online for $40. The dry Ardex mix just combines with water, so to apply it all you really need are some mixing/measuring buckets and various sized trowels to apply and smooth it. Oh, and sandpaper and a power sander (this is the one we have).
The bag suggested a 2 to 1 mix of Ardex powder to water, but I read our old post and reminded myself that I had liked a bit more water than that – it helped keep the mix looser and easier to spread. So I started by measuring one small batch at a time (I think I needed about twice this much to complete one coat).
I mixed them together using a small trowel, making sure to getting any remaining powder mixed in. I aimed for a thick pancake batter consistency – like it would sorta hold to my trowel for a moment before dripping off on its own.
Then I just scooped everything onto my table and started spreading it smooth, using larger trowels on the top and smaller ones on the edges. Note: whatever surface you’re doing this on should be sanded enough to be rough. Our plywood was already slightly textured, so I could skip this step, but if you’re doing it on the top of a piece of furniture, be sure to take a pass with low-grit sandpaper first (like 60-80 grit).
Ardex takes more than one coat (we did two this time) so my first pass was really about coverage, not smoothness. I was worried about sanding too much off during the next step, especially on the edges and corners, so I threw caution to the wind and really laid it on thick around the edge.
I gave it several hours to dry and then came back to start smoothing. The first thing I did (and my favorite part) was to use a putty knife to scrape all of the stalactites that dripped down the bottom edge. It was so satisfying and it gave us a really clean edge on the bottom.
Then I took some low-grit sandpaper (80) and went to town on the rest of the top with my palm sander. Since I knew another coat was coming after this one, I wasn’t concerned about getting it flawlessly smooth. I mostly wanted to eliminate any hard ridges that would catch clumps of Ardex during my next application.
This is what the top looked like after I sanded the first coat. Obviously, you can see lots of my trowel marks as well as little pockets where the Ardex didn’t spread completely smoothly. It’s a bit rougher than we wanted for the final product, but it was fine for a first coat.
The second coat went on in pretty much the exact same method – except I did mix the Ardex a bit thinner and I took a bit more care getting a smoother application since this would be the top one that’s seen by everyone. Plus, when I sanded it, I moved from my initial low-grit (80) sandpaper down to 120 then 220, so that the finished table was super smooth. I didn’t remember to snap any photos of the coffee table after we sanded the second coat, but took lots of them once it was sealed and finished, so if we skip ahead for a second, here’s the finished result:
Sealing The Concrete
There are lots of products out there for sealing concrete. As I mentioned, we used food safe eco-sealer on our kitchen counters, which we think might be the reason tiny little grease spatters sunk in next to the stove – but since we’re not planning to prepare food on this table, we went with something heavier duty for a nice super-durable finish this time. Our final choice? This “Wet-Look” Sealer by Behr. Sherry suggested something high-gloss, which would really mimic that glossy stone look, and we were both really happy with how it turned out. Almost a mirror-like shine – which you can sort of see in the photo above.
I just used a small foam roller to apply a thin coat along the top and all of the sides. Once it had dried for a few hours, we did a second coat (and later a third coat, just to be safe). I barely made a dent in the 1 gallon container (it was the smallest one they sold) but at least I have some on hand to do a touch-up sealing coat every year or two, just to be safe.
Once it was all fully dry, we brought it in and let it cure for a week before putting any objects on it (not that it needs that long – we just weren’t at the beach house for a week). And BOY DOES IT FEEL GOOD TO HAVE A COFFEE TABLE!
light / ceiling medallion / similar rug / similar curtains / curtain rods / TV stand / similar chair
The white top breaks up the darker rug and couch nicely, and also helps tie together some of the other bright white accents like the bookshelf and the curtains.
It’s hard to tell from these photos, but although the concrete is super glossy and chunky, it still has imperfections, which is definitely part of the charm. Instead of looking like a big block of shiny plastic, it gives off that raw concrete vibe – even in the glossy white color. This next picture probably best shows a few light trowel marks. It all feels smooth to the touch, but when you look closely they’re definitely there. Again, this is some of the “interest” that we expected from the Ardex process (or at least my version of it – ha!) and for us it takes the place of the movement we would’ve gotten from a stone like marble.
Sherry and I have also discussed everything from staining the wood base a little bit darker (especially to disguise the light edges) to painting the while base a glossy white to emphasize the interesting shape of the legs. But for now I’ve argued that we should just kick up our feet and enjoy having a place to actually kick up our feet. IS THAT TOO MUCH TO ASK?
bookcase / similar pink pillow / similar blue pillow / white faux wood window blinds
And don’t even get me started on the other furniture adjustments we’re thinking about in this room. Actually since we took these photos we’ve painted and recovered two armchairs for that wall on the right, so there’s a lot more comfy seating in here now (although we’re thinking about a few other adjustments before calling it done). But that’s a topic for another day!
Also! If you have any where-did-you-get-that questions about the beach house (or paint color questions, which we also get a lot) this page has all the answers for you.
P.S. Do you get our free weekly emails? We love sending bonus details, design tips, random style thoughts, and other house-related stuff. Click here to get them delivered right to your inbox. And thanks to everyone who is on the list already – Sherry loves putting them together for you each week.
*This post contains affiliate links*
The post Making A Concrete Coffee Table Top appeared first on Young House Love.
Making A Concrete Coffee Table Top published first on https://ssmattress.tumblr.com/
0 notes
Text
Making A Concrete Coffee Table Top
Hey, good news! I finally have a place to put my feet up in the beach house living room. Or, as Sherry would state this good news: we finally have a coffee table!
light fixture / ceiling medallion / similar rug / similar sofa / similar curtains / curtain rods
And it was a DIY that was SO MUCH CHEAPER than the high end alternative, so three cheers for that. Oh and people who follow our InstaStories know we’ve switched out the rug in here for this rug since taking these pics, so there will be a post all about that (and the other dining room tweak we’ve made) coming up in a week or two. But back to the coffee table.
We’ve actually had the table base for a while, but it’s been completely topless for months. We scored this wooden octagonal table base from a neighbor who had planned on adding a top to it at some point, but after months of doing nothing with it she put it on our neighborhood buy/sell board for a whopping $7. After paying 700 pretty pennies for it, it remained topless in our garage for several months before moving to the beach house last fall (see below)… where it remained – still topless – until last month.
Our grand scheme was to get a stone top custom cut for it. Marble would look great, but we also considered more durable options like quartz. But quotes from two different stone yards – even for remnant pieces – came back between $700 – $900. I KNOW. They were MUCH higher than we expected, partially because of the size (it’s 38″ at its widest, which makes it deeper than a standard countertop by a fair amount) and the octagonal shape.
So we quickly shifted from “buying a stone top for it” to “DIYing a stone-like top for it” – and after weighing all sorts of solutions (faux stone laminate, a wood top we painted white or even tried to “marble”, etc) we landed a white concrete top that would give us a nice chunky stone look, but at a much cheaper cost. Unfortunately, the project kept getting nudged behind bigger tasks like installing the kitchen and building bunk beds. Hence why I was forced to uncomfortably prop my feet up on this edge of this puppy each time we visited. Feel bad for me, please.
We feared that a solid poured concrete slab would (a) be very heavy and (2) be very prone to cracking or breaking – especially without adding lots of extra support under the table top. Plus little kid heads + a solid hunk of concrete sounded worrisome. So instead we decided to create a wood top and then cover the wood with Ardex Feather Finish, which is a thin concrete material that we used years ago to give our laminate kitchen counters the appearance of solid concrete.
Making The Wood Coffee Table Top
We picked up a 4 x 4′ sheet of 3/4″ plywood because we wanted something sturdy enough to span the tabletop without sagging. To mark my cuts, I simply flipped the table over on top of the plywood and traced the edges with a pen. Don’t worry, I’ll show you how I made it overhang the table’s edge in a moment.
Using my circular saw outside, I trimmed off the edges to get an octagon that perfectly fit the top of our table base. No overhang. Yet.
Next I cut 8 pieces of 1 x 2″ whitewood to create a border around my cut plywood. After summoning some of my 8th-grade geometry, I determined that I needed to cut each one at a 22.5-degree angle to fit them around the octagon. But surprise-surprise, my miter saw was one step ahead of me and already had that as a preset angle.
Then, with the plywood laid on top of the base with the edges flush, I started nailing each of my 1 x 2″ pieces around the edges (into the plywood, not the table base). I put wood glue on it before I nailed, which help things hold for the long haul. Adding this border did a few helpful things:
It made the wood top slightly larger than the base, giving it a nice overhang
It made the wood top look twice as thick as it really is, without adding much more weight to it
It helped keep the top in place by making it almost like a snug shoebox top. I still screwed it to the base from underneath just to be safe.
Once it was all nailed in, I used wood putty to fill in all of my gaps and nail holes. This probably wasn’t a super critical step (I was going to coat this with a skim coat of concrete, after all) but I discovered the table isn’t a perfect octagon, so some of my corners weren’t as tight as I’d hoped. This shot is from before I sanded the excess wood filler off:
Applying The Concrete Finish
We haven’t used Ardex Feather Finish since our first project with it: our old kitchen’s laminate counters (here’s the tutorial for applying it and then sealing them to be food safe). While we decided the application was awesome for a quick makeover, they did get a little oil-stained around the stove since we used food-safe sealer as opposed to some of the more heavier duty sealers. No worries, we just added a cutting board to cover the small splatters – and we loved the imperfections and movement that was created in the application process. Definitely a whole lot better than the old plastic-y counters the house came with. Overall: we’d definitely recommend this method for a kitchen counter update – especially if you use a stronger sealer.
For the coffee table we decided to use the white Ardex instead of the standard gray color, so we tracked down a 10 pound bag online for $40. The dry Ardex mix just combines with water, so to apply it all you really need are some mixing/measuring buckets and various sized trowels to apply and smooth it. Oh, and sandpaper and a power sander (this is the one we have).
The bag suggested a 2 to 1 mix of Ardex powder to water, but I read our old post and reminded myself that I had liked a bit more water than that – it helped keep the mix looser and easier to spread. So I started by measuring one small batch at a time (I think I needed about twice this much to complete one coat).
I mixed them together using a small trowel, making sure to getting any remaining powder mixed in. I aimed for a thick pancake batter consistency – like it would sorta hold to my trowel for a moment before dripping off on its own.
Then I just scooped everything onto my table and started spreading it smooth, using larger trowels on the top and smaller ones on the edges. Note: whatever surface you’re doing this on should be sanded enough to be rough. Our plywood was already slightly textured, so I could skip this step, but if you’re doing it on the top of a piece of furniture, be sure to take a pass with low-grit sandpaper first (like 60-80 grit).
Ardex takes more than one coat (we did two this time) so my first pass was really about coverage, not smoothness. I was worried about sanding too much off during the next step, especially on the edges and corners, so I threw caution to the wind and really laid it on thick around the edge.
I gave it several hours to dry and then came back to start smoothing. The first thing I did (and my favorite part) was to use a putty knife to scrape all of the stalactites that dripped down the bottom edge. It was so satisfying and it gave us a really clean edge on the bottom.
Then I took some low-grit sandpaper (80) and went to town on the rest of the top with my palm sander. Since I knew another coat was coming after this one, I wasn’t concerned about getting it flawlessly smooth. I mostly wanted to eliminate any hard ridges that would catch clumps of Ardex during my next application.
This is what the top looked like after I sanded the first coat. Obviously, you can see lots of my trowel marks as well as little pockets where the Ardex didn’t spread completely smoothly. It’s a bit rougher than we wanted for the final product, but it was fine for a first coat.
The second coat went on in pretty much the exact same method – except I did mix the Ardex a bit thinner and I took a bit more care getting a smoother application since this would be the top one that’s seen by everyone. Plus, when I sanded it, I moved from my initial low-grit (80) sandpaper down to 120 then 220, so that the finished table was super smooth. I didn’t remember to snap any photos of the coffee table after we sanded the second coat, but took lots of them once it was sealed and finished, so if we skip ahead for a second, here’s the finished result:
Sealing The Concrete
There are lots of products out there for sealing concrete. As I mentioned, we used food safe eco-sealer on our kitchen counters, which we think might be the reason tiny little grease spatters sunk in next to the stove – but since we’re not planning to prepare food on this table, we went with something heavier duty for a nice super-durable finish this time. Our final choice? This “Wet-Look” Sealer by Behr. Sherry suggested something high-gloss, which would really mimic that glossy stone look, and we were both really happy with how it turned out. Almost a mirror-like shine – which you can sort of see in the photo above.
I just used a small foam roller to apply a thin coat along the top and all of the sides. Once it had dried for a few hours, we did a second coat (and later a third coat, just to be safe). I barely made a dent in the 1 gallon container (it was the smallest one they sold) but at least I have some on hand to do a touch-up sealing coat every year or two, just to be safe.
Once it was all fully dry, we brought it in and let it cure for a week before putting any objects on it (not that it needs that long – we just weren’t at the beach house for a week). And BOY DOES IT FEEL GOOD TO HAVE A COFFEE TABLE!
light / ceiling medallion / similar rug / similar curtains / curtain rods / TV stand / similar chair
The white top breaks up the darker rug and couch nicely, and also helps tie together some of the other bright white accents like the bookshelf and the curtains.
It’s hard to tell from these photos, but although the concrete is super glossy and chunky, it still has imperfections, which is definitely part of the charm. Instead of looking like a big block of shiny plastic, it gives off that raw concrete vibe – even in the glossy white color. This next picture probably best shows a few light trowel marks. It all feels smooth to the touch, but when you look closely they’re definitely there. Again, this is some of the “interest” that we expected from the Ardex process (or at least my version of it – ha!) and for us it takes the place of the movement we would’ve gotten from a stone like marble.
Sherry and I have also discussed everything from staining the wood base a little bit darker (especially to disguise the light edges) to painting the while base a glossy white to emphasize the interesting shape of the legs. But for now I’ve argued that we should just kick up our feet and enjoy having a place to actually kick up our feet. IS THAT TOO MUCH TO ASK?
bookcase / similar pink pillow / similar blue pillow / white faux wood window blinds
And don’t even get me started on the other furniture adjustments we’re thinking about in this room. Actually since we took these photos we’ve painted and recovered two armchairs for that wall on the right, so there’s a lot more comfy seating in here now (although we’re thinking about a few other adjustments before calling it done). But that’s a topic for another day!
Also! If you have any where-did-you-get-that questions about the beach house (or paint color questions, which we also get a lot) this page has all the answers for you.
P.S. Do you get our free weekly emails? We love sending bonus details, design tips, random style thoughts, and other house-related stuff. Click here to get them delivered right to your inbox. And thanks to everyone who is on the list already – Sherry loves putting them together for you each week.
*This post contains affiliate links*
The post Making A Concrete Coffee Table Top appeared first on Young House Love.
Making A Concrete Coffee Table Top published first on https://bakerskitchenslimited.tumblr.com/
0 notes
Photo

Making A Concrete Coffee Table Top https://ift.tt/2IzVEdg
Hey, good news! I finally have a place to put my feet up in the beach house living room. Or, as Sherry would state this good news: we finally have a coffee table!
And it was a DIY that was SO MUCH CHEAPER than the high end alternative, so three cheers for that. Oh and people who follow our InstaStories know we’ve switched out the rug in here for this rug since taking these pics, so there will be a post all about that (and the other dining room tweak we’ve made) coming up in a week or two. But back to the coffee table.
We’ve actually had the table base for a while, but it’s been completely topless for months. We scored this wooden octagonal table base from a neighbor who had planned on adding a top to it at some point, but after months of doing nothing with it she put it on our neighborhood buy/sell board for a whopping $7. After paying 700 pretty pennies for it, it remained topless in our garage for several months before moving to the beach house last fall (see below)… where it remained – still topless – until last month.
Our grand scheme was to get a stone top custom cut for it. Marble would look great, but we also considered more durable options like quartz. But quotes from two different stone yards – even for remnant pieces – came back between $700 – $900. I KNOW. They were MUCH higher than we expected, partially because of the size (it’s 38″ at its widest, which makes it deeper than a standard countertop by a fair amount) and the octagonal shape.
So we quickly shifted from “buying a stone top for it” to “DIYing a stone-like top for it” – and after weighing all sorts of solutions (faux stone laminate, a wood top we painted white or even tried to “marble”, etc) we landed a white concrete top that would give us a nice chunky stone look, but at a much cheaper cost. Unfortunately, the project kept getting nudged behind bigger tasks like installing the kitchen and building bunk beds. Hence why I was forced to uncomfortably prop my feet up on this edge of this puppy each time we visited. Feel bad for me, please.
We feared that a solid poured concrete slab would (a) be very heavy and (2) be very prone to cracking or breaking – especially without adding lots of extra support under the table top. Plus little kid heads + a solid hunk of concrete sounded worrisome. So instead we decided to create a wood top and then cover the wood with Ardex Feather Finish, which is a thin concrete material that we used years ago to give our laminate kitchen counters the appearance of solid concrete.
Making The Wood Coffee Table Top
We picked up a 4 x 4′ sheet of 3/4″ plywood because we wanted something sturdy enough to span the tabletop without sagging. To mark my cuts, I simply flipped the table over on top of the plywood and traced the edges with a pen. Don’t worry, I’ll show you how I made it overhang the table’s edge in a moment.
Using my circular saw outside, I trimmed off the edges to get an octagon that perfectly fit the top of our table base. No overhang. Yet.
Next I cut 8 pieces of 1 x 2″ whitewood to create a border around my cut plywood. After summoning some of my 8th-grade geometry, I determined that I needed to cut each one at a 22.5-degree angle to fit them around the octagon. But surprise-surprise, my miter saw was one step ahead of me and already had that as a preset angle.
Then, with the plywood laid on top of the base with the edges flush, I started nailing each of my 1 x 2″ pieces around the edges (into the plywood, not the table base). I put wood glue on it before I nailed, which help things hold for the long haul. Adding this border did a few helpful things:
It made the wood top slightly larger than the base, giving it a nice overhang
It made the wood top look twice as thick as it really is, without adding much more weight to it
It helped keep the top in place by making it almost like a snug shoebox top. I still screwed it to the base from underneath just to be safe.
Once it was all nailed in, I used wood putty to fill in all of my gaps and nail holes. This probably wasn’t a super critical step (I was going to coat this with a skim coat of concrete, after all) but I discovered the table isn’t a perfect octagon, so some of my corners weren’t as tight as I’d hoped. This shot is from before I sanded the excess wood filler off:
Applying The Concrete Finish
We haven’t used Ardex Feather Finish since our first project with it: our old kitchen’s laminate counters (here’s the tutorial for applying it and then sealing them to be food safe). While we decided the application was awesome for a quick makeover, they did get a little oil-stained around the stove since we used food-safe sealer as opposed to some of the more heavier duty sealers. No worries, we just added a cutting board to cover the small splatters – and we loved the imperfections and movement that was created in the application process. Definitely a whole lot better than the old plastic-y counters the house came with. Overall: we’d definitely recommend this method for a kitchen counter update – especially if you use a stronger sealer.
For the coffee table we decided to use the white Ardex instead of the standard gray color, so we tracked down a 10 pound bag online for $40. The dry Ardex mix just combines with water, so to apply it all you really need are some mixing/measuring buckets and various sized trowels to apply and smooth it. Oh, and sandpaper and a power sander (this is the one we have).
The bag suggested a 2 to 1 mix of Ardex powder to water, but I read our old post and reminded myself that I had liked a bit more water than that – it helped keep the mix looser and easier to spread. So I started by measuring one small batch at a time (I think I needed about twice this much to complete one coat).
I mixed them together using a small trowel, making sure to getting any remaining powder mixed in. I aimed for a thick pancake batter consistency – like it would sorta hold to my trowel for a moment before dripping off on its own.
Then I just scooped everything onto my table and started spreading it smooth, using larger trowels on the top and smaller ones on the edges. Note: whatever surface you’re doing this on should be sanded enough to be rough. Our plywood was already slightly textured, so I could skip this step, but if you’re doing it on the top of a piece of furniture, be sure to take a pass with low-grit sandpaper first (like 60-80 grit).
Ardex takes more than one coat (we did two this time) so my first pass was really about coverage, not smoothness. I was worried about sanding too much off during the next step, especially on the edges and corners, so I threw caution to the wind and really laid it on thick around the edge.
I gave it several hours to dry and then came back to start smoothing. The first thing I did (and my favorite part) was to use a putty knife to scrape all of the stalactites that dripped down the bottom edge. It was so satisfying and it gave us a really clean edge on the bottom.
Then I took some low-grit sandpaper (80) and went to town on the rest of the top with my palm sander. Since I knew another coat was coming after this one, I wasn’t concerned about getting it flawlessly smooth. I mostly wanted to eliminate any hard ridges that would catch clumps of Ardex during my next application.
This is what the top looked like after I sanded the first coat. Obviously, you can see lots of my trowel marks as well as little pockets where the Ardex didn’t spread completely smoothly. It’s a bit rougher than we wanted for the final product, but it was fine for a first coat.
The second coat went on in pretty much the exact same method – except I did mix the Ardex a bit thinner and I took a bit more care getting a smoother application since this would be the top one that’s seen by everyone. Plus, when I sanded it, I moved from my initial low-grit (80) sandpaper down to 120 then 220, so that the finished table was super smooth. I didn’t remember to snap any photos of the coffee table after we sanded the second coat, but took lots of them once it was sealed and finished, so if we skip ahead for a second, here’s the finished result:
Sealing The Concrete
There are lots of products out there for sealing concrete. As I mentioned, we used food safe eco-sealer on our kitchen counters, which we think might be the reason tiny little grease spatters sunk in next to the stove – but since we’re not planning to prepare food on this table, we went with something heavier duty for a nice super-durable finish this time. Our final choice? This “Wet-Look” Sealer by Behr. Sherry suggested something high-gloss, which would really mimic that glossy stone look, and we were both really happy with how it turned out. Almost a mirror-like shine – which you can sort of see in the photo above.
I just used a small foam roller to apply a thin coat along the top and all of the sides. Once it had dried for a few hours, we did a second coat (and later a third coat, just to be safe). I barely made a dent in the 1 gallon container (it was the smallest one they sold) but at least I have some on hand to do a touch-up sealing coat every year or two, just to be safe.
Once it was all fully dry, we brought it in and let it cure for a week before putting any objects on it (not that it needs that long – we just weren’t at the beach house for a week). And BOY DOES IT FEEL GOOD TO HAVE A COFFEE TABLE!
The white top breaks up the darker rug and couch nicely, and also helps tie together some of the other bright white accents like the bookshelf and the curtains.
It’s hard to tell from these photos, but although the concrete is super glossy and chunky, it still has imperfections, which is definitely part of the charm. Instead of looking like a big block of shiny plastic, it gives off that raw concrete vibe – even in the glossy white color. This next picture probably best shows a few light trowel marks. It all feels smooth to the touch, but when you look closely they’re definitely there. Again, this is some of the “interest” that we expected from the Ardex process (or at least my version of it – ha!) and for us it takes the place of the movement we would’ve gotten from a stone like marble.
Sherry and I have also discussed everything from staining the wood base a little bit darker (especially to disguise the light edges) to painting the while base a glossy white to emphasize the interesting shape of the legs. But for now I’ve argued that we should just kick up our feet and enjoy having a place to actually kick up our feet. IS THAT TOO MUCH TO ASK?
And don’t even get me started on the other furniture adjustments we’re thinking about in this room. Actually since we took these photos we’ve painted and recovered two armchairs for that wall on the right, so there’s a lot more comfy seating in here now (although we’re thinking about a few other adjustments before calling it done). But that’s a topic for another day!
P.S. Do you get our free weekly emails? We love sending bonus details, design tips, random style thoughts, and other house-related stuff. Click here to get them delivered right to your inbox. And thanks to everyone who is on the list already – Sherry loves putting them together for you each week.
*This post contains affiliate links*
The post Making A Concrete Coffee Table Top appeared first on Young House Love.
0 notes
Text
Making A Concrete Coffee Table Top
Hey, good news! I finally have a place to put my feet up in the beach house living room. Or, as Sherry would state this good news: we finally have a coffee table!
And it was a DIY that was SO MUCH CHEAPER than the high end alternative, so three cheers for that. Oh and people who follow our InstaStories know we’ve switched out this rug since taking these pics, so there will be a post all about that (and the other dining room tweak we’ve made) coming up in a week or two. But back to the coffee table.
We’ve actually had the table base for a while, but it’s been completely topless for months. We scored this wooden octagonal table base from a neighbor who had planned on adding a top to it at some point, but after months of doing nothing with it she put it on our neighborhood buy/sell board for a whopping $7. After paying 700 pretty pennies for it, it remained topless in our garage for several months before moving to the beach house last fall (see below)… where it remained – still topless – until last month.
Our grand scheme was to get a stone top custom cut for it. Marble would look great, but we also considered more durable options like quartz. But quotes from two different stone yards – even for remnant pieces – came back between $700 – $900. I KNOW. They were MUCH higher than we expected, partially because of the size (it’s 38″ at its widest, which makes it deeper than a standard countertop by a fair amount) and the octagonal shape.
So we quickly shifted from “buying a stone top for it” to “DIYing a stone-like top for it” – and after weighing all sorts of solutions (faux stone laminate, a wood top we painted white or even tried to “marble”, etc) we landed a white concrete top that would give us a nice chunky stone look, but at a much cheaper cost. Unfortunately, the project kept getting nudged behind bigger tasks like installing the kitchen and building bunk beds. Hence why I was forced to uncomfortably prop my feet up on this edge of this puppy each time we visited. Feel bad for me, please.
We feared that a solid poured concrete slab would (a) be very heavy and (2) be very prone to cracking or breaking – especially without adding lots of extra support under the table top. Plus little kid heads + a solid hunk of concrete sounded worrisome. So instead we decided to create a wood top and then cover the wood with Ardex Feather Finish, which is a thin concrete material that we used years ago to give our laminate kitchen counters the appearance of solid concrete.
Making The Wood Coffee Table Top
We picked up a 4 x 4′ sheet of 3/4″ plywood because we wanted something sturdy enough to span the tabletop without sagging. To mark my cuts, I simply flipped the table over on top of the plywood and traced the edges with a pen. Don’t worry, I’ll show you how I made it overhang the table’s edge in a moment.
Using my circular saw outside, I trimmed off the edges to get an octagon that perfectly fit the top of our table base. No overhang. Yet.
Next I cut 8 pieces of 1 x 2″ whitewood to create a border around my cut plywood. After summoning some of my 8th-grade geometry, I determined that I needed to cut each one at a 22.5-degree angle to fit them around the octagon. But surprise-surprise, my miter saw was one step ahead of me and already had that as a preset angle.
Then, with the plywood laid on top of the base with the edges flush, I started nailing each of my 1 x 2″ pieces around the edges (into the plywood, not the table base). I put wood glue on it before I nailed, which help things hold for the long haul. Adding this border did a few helpful things:
It made the wood top slightly larger than the base, giving it a nice overhang
It made the wood top look twice as thick as it really is, without adding much more weight to it
It helped keep the top in place by making it almost like a snug shoebox top. I still screwed it to the base from underneath just to be safe.
Once it was all nailed in, I used wood putty to fill in all of my gaps and nail holes. This probably wasn’t a super critical step (I was going to coat this with a skim coat of concrete, after all) but I discovered the table isn’t a perfect octagon, so some of my corners weren’t as tight as I’d hoped. This shot is from before I sanded the excess wood filler off:
Applying The Concrete Finish
We haven’t used Ardex Feather Finish since our first project with it: our old kitchen’s laminate counters (here’s the tutorial for applying it and then sealing them to be food safe). While we decided the application was awesome for a quick makeover, they did get a little oil-stained around the stove since we used food-safe sealer as opposed to some of the more heavier duty sealers. No worries, we just added a cutting board to cover the small splatters – and we loved the imperfections and movement that was created in the application process. Definitely a whole lot better than the old plastic-y counters the house came with. Overall: we’d definitely recommend this method for a kitchen counter update – especially if you use a stronger sealer.
For the coffee table we decided to use the white Ardex instead of the standard gray color, so we tracked down a 10 pound bag online for $40. The dry Ardex mix just combines with water, so to apply it all you really need are some mixing/measuring buckets and various sized trowels to apply and smooth it. Oh, and sandpaper and a power sander.
The bag suggested a 2 to 1 mix of Ardex powder to water, but I read our old post and reminded myself that I had liked a bit more water than that – it helped keep the mix looser and easier to spread. So I started by measuring one small batch at a time (I think I needed about twice this much to complete one coat).
I mixed them together using a small trowel, making sure to getting any remaining powder mixed in. I aimed for a thick pancake batter consistency – like it would sorta hold to my trowel for a moment before dripping off on its own.
Then I just scooped everything onto my table and started spreading it smooth, using larger trowels on the top and smaller ones on the edges. Note: whatever surface you’re doing this on should be sanded enough to be rough. Our plywood was already slightly textured, so I could skip this step, but if you’re doing it on the top of a piece of furniture, be sure to take a pass with low-grit sandpaper first (like 60-80 grit).
Ardex takes more than one coat (we did two this time) so my first pass was really about coverage, not smoothness. I was worried about sanding too much off during the next step, especially on the edges and corners, so I threw caution to the wind and really laid it on thick around the edge.
I gave it several hours to dry and then came back to start smoothing. The first thing I did (and my favorite part) was to use a putty knife to scrape all of the stalactites that dripped down the bottom edge. It was so satisfying and it gave us a really clean edge on the bottom.
Then I took some low-grit sandpaper (80) and went to town on the rest of the top with my palm sander. Since I knew another coat was coming after this one, I wasn’t concerned about getting it flawlessly smooth. I mostly wanted to eliminate any hard ridges that would catch clumps of Ardex during my next application.
This is what the top looked like after I sanded the first coat. Obviously, you can see lots of my trowel marks as well as little pockets where the Ardex didn’t spread completely smoothly. It’s a bit rougher than we wanted for the final product, but it was fine for a first coat.
The second coat went on in pretty much the exact same method – except I did mix the Ardex a bit thinner and I took a bit more care getting a smoother application since this would be the top one that’s seen by everyone. Plus, when I sanded it, I moved from my initial low-grit (80) sandpaper down to 120 then 220, so that the finished table was super smooth. I didn’t remember to snap any photos of the coffee table after we sanded the second coat, but took lots of them once it was sealed and finished, so if we skip ahead for a second, here’s the finished result:
Sealing The Concrete
There are lots of products out there for sealing concrete. As I mentioned, we used food safe eco-sealer on our kitchen counters, which we think might be the reason tiny little grease spatters sunk in next to the stove – but since we’re not planning to prepare food on this table, we went with something heavier duty for a nice super-durable finish this time. Our final choice? This “Wet-Look” Sealer by Behr. Sherry suggested something high-gloss, which would really mimic that glossy stone look, and we were both really happy with how it turned out. Almost a mirror-like shine – which you can sort of see in the photo above.
I just used a small foam roller to apply a thin coat along the top and all of the sides. Once it had dried for a few hours, we did a second coat (and later a third coat, just to be safe). I barely made a dent in the 1 gallon container (it was the smallest one they sold) but at least I have some on hand to do a touch-up sealing coat every year or two, just to be safe.
Once it was all fully dry, we brought it in and let it cure for a week before putting any objects on it (not that it needs that long – we just weren’t at the beach house for a week). And BOY DOES IT FEEL GOOD TO HAVE A COFFEE TABLE!
The white top breaks up the darker rug and couch nicely, and also helps tie together some of the other bright white accents like the bookshelf and the curtains.
It’s hard to tell from these photos, but although the concrete is super glossy and chunky, it still has imperfections, which is definitely part of the charm. Instead of looking like a big block of shiny plastic, it gives off that raw concrete vibe – even in the glossy white color. This next picture probably best shows a few light trowel marks. It all feels smooth to the touch, but when you look closely they’re definitely there. Again, this is some of the “interest” that we expected from the Ardex process (or at least my version of it – ha!) and for us it takes the place of the movement we would’ve gotten from a stone like marble.
Sherry and I have also discussed everything from staining the wood base a little bit darker (especially to disguise the light edges) to painting the while base a glossy white to emphasize the interesting shape of the legs. But for now I’ve argued that we should just kick up our feet and enjoy having a place to actually kick up our feet. IS THAT TOO MUCH TO ASK?
And don’t even get me started on the other furniture adjustments we’re thinking about in this room. Actually since we took these photos we’ve painted and recovered two armchairs for that wall on the right, so there’s a lot more comfy seating in here now (although we’re thinking about a few other adjustments before calling it done). But that’s a topic for another day!
P.S. Do you get our free weekly emails? We love sending bonus details, design tips, random style thoughts, and other house-related stuff. Click here to get them delivered right to your inbox. And thanks to everyone who is on the list already – Sherry loves putting them together for you each week.
The post Making A Concrete Coffee Table Top appeared first on Young House Love.
Making A Concrete Coffee Table Top published first on https://carpetgurus.tumblr.com/
0 notes
Text
Making A Concrete Coffee Table Top
Hey, good news! I finally have a place to put my feet up in the beach house living room. Or, as Sherry would state this good news: we finally have a coffee table!
And it was a DIY that was SO MUCH CHEAPER than the high end alternative, so three cheers for that. Oh and people who follow our InstaStories know we’ve switched out this rug since taking these pics, so there will be a post all about that (and the other dining room tweak we’ve made) coming up in a week or two. But back to the coffee table.
We’ve actually had the table base for a while, but it’s been completely topless for months. We scored this wooden octagonal table base from a neighbor who had planned on adding a top to it at some point, but after months of doing nothing with it she put it on our neighborhood buy/sell board for a whopping $7. After paying 700 pretty pennies for it, it remained topless in our garage for several months before moving to the beach house last fall (see below)… where it remained – still topless – until last month.
Our grand scheme was to get a stone top custom cut for it. Marble would look great, but we also considered more durable options like quartz. But quotes from two different stone yards – even for remnant pieces – came back between $700 – $900. I KNOW. They were MUCH higher than we expected, partially because of the size (it’s 38″ at its widest, which makes it deeper than a standard countertop by a fair amount) and the octagonal shape.
So we quickly shifted from “buying a stone top for it” to “DIYing a stone-like top for it” – and after weighing all sorts of solutions (faux stone laminate, a wood top we painted white or even tried to “marble”, etc) we landed a white concrete top that would give us a nice chunky stone look, but at a much cheaper cost. Unfortunately, the project kept getting nudged behind bigger tasks like installing the kitchen and building bunk beds. Hence why I was forced to uncomfortably prop my feet up on this edge of this puppy each time we visited. Feel bad for me, please.
We feared that a solid poured concrete slab would (a) be very heavy and (2) be very prone to cracking or breaking – especially without adding lots of extra support under the table top. Plus little kid heads + a solid hunk of concrete sounded worrisome. So instead we decided to create a wood top and then cover the wood with Ardex Feather Finish, which is a thin concrete material that we used years ago to give our laminate kitchen counters the appearance of solid concrete.
Making The Wood Coffee Table Top
We picked up a 4 x 4′ sheet of 3/4″ plywood because we wanted something sturdy enough to span the tabletop without sagging. To mark my cuts, I simply flipped the table over on top of the plywood and traced the edges with a pen. Don’t worry, I’ll show you how I made it overhang the table’s edge in a moment.
Using my circular saw outside, I trimmed off the edges to get an octagon that perfectly fit the top of our table base. No overhang. Yet.
Next I cut 8 pieces of 1 x 2″ whitewood to create a border around my cut plywood. After summoning some of my 8th-grade geometry, I determined that I needed to cut each one at a 22.5-degree angle to fit them around the octagon. But surprise-surprise, my miter saw was one step ahead of me and already had that as a preset angle.
Then, with the plywood laid on top of the base with the edges flush, I started nailing each of my 1 x 2″ pieces around the edges (into the plywood, not the table base). I put wood glue on it before I nailed, which help things hold for the long haul. Adding this border did a few helpful things:
It made the wood top slightly larger than the base, giving it a nice overhang
It made the wood top look twice as thick as it really is, without adding much more weight to it
It helped keep the top in place by making it almost like a snug shoebox top. I still screwed it to the base from underneath just to be safe.
Once it was all nailed in, I used wood putty to fill in all of my gaps and nail holes. This probably wasn’t a super critical step (I was going to coat this with a skim coat of concrete, after all) but I discovered the table isn’t a perfect octagon, so some of my corners weren’t as tight as I’d hoped. This shot is from before I sanded the excess wood filler off:
Applying The Concrete Finish
We haven’t used Ardex Feather Finish since our first project with it: our old kitchen’s laminate counters (here’s the tutorial for applying it and then sealing them to be food safe). While we decided the application was awesome for a quick makeover, they did get a little oil-stained around the stove since we used food-safe sealer as opposed to some of the more heavier duty sealers. No worries, we just added a cutting board to cover the small splatters – and we loved the imperfections and movement that was created in the application process. Definitely a whole lot better than the old plastic-y counters the house came with. Overall: we’d definitely recommend this method for a kitchen counter update – especially if you use a stronger sealer.
For the coffee table we decided to use the white Ardex instead of the standard gray color, so we tracked down a 10 pound bag online for $40. The dry Ardex mix just combines with water, so to apply it all you really need are some mixing/measuring buckets and various sized trowels to apply and smooth it. Oh, and sandpaper and a power sander.
The bag suggested a 2 to 1 mix of Ardex powder to water, but I read our old post and reminded myself that I had liked a bit more water than that – it helped keep the mix looser and easier to spread. So I started by measuring one small batch at a time (I think I needed about twice this much to complete one coat).
I mixed them together using a small trowel, making sure to getting any remaining powder mixed in. I aimed for a thick pancake batter consistency – like it would sorta hold to my trowel for a moment before dripping off on its own.
Then I just scooped everything onto my table and started spreading it smooth, using larger trowels on the top and smaller ones on the edges. Note: whatever surface you’re doing this on should be sanded enough to be rough. Our plywood was already slightly textured, so I could skip this step, but if you’re doing it on the top of a piece of furniture, be sure to take a pass with low-grit sandpaper first (like 60-80 grit).
Ardex takes more than one coat (we did two this time) so my first pass was really about coverage, not smoothness. I was worried about sanding too much off during the next step, especially on the edges and corners, so I threw caution to the wind and really laid it on thick around the edge.
I gave it several hours to dry and then came back to start smoothing. The first thing I did (and my favorite part) was to use a putty knife to scrape all of the stalactites that dripped down the bottom edge. It was so satisfying and it gave us a really clean edge on the bottom.
Then I took some low-grit sandpaper (80) and went to town on the rest of the top with my palm sander. Since I knew another coat was coming after this one, I wasn’t concerned about getting it flawlessly smooth. I mostly wanted to eliminate any hard ridges that would catch clumps of Ardex during my next application.
This is what the top looked like after I sanded the first coat. Obviously, you can see lots of my trowel marks as well as little pockets where the Ardex didn’t spread completely smoothly. It’s a bit rougher than we wanted for the final product, but it was fine for a first coat.
The second coat went on in pretty much the exact same method – except I did mix the Ardex a bit thinner and I took a bit more care getting a smoother application since this would be the top one that’s seen by everyone. Plus, when I sanded it, I moved from my initial low-grit (80) sandpaper down to 120 then 220, so that the finished table was super smooth. I didn’t remember to snap any photos of the coffee table after we sanded the second coat, but took lots of them once it was sealed and finished, so if we skip ahead for a second, here’s the finished result:
Sealing The Concrete
There are lots of products out there for sealing concrete. As I mentioned, we used food safe eco-sealer on our kitchen counters, which we think might be the reason tiny little grease spatters sunk in next to the stove – but since we’re not planning to prepare food on this table, we went with something heavier duty for a nice super-durable finish this time. Our final choice? This “Wet-Look” Sealer by Behr. Sherry suggested something high-gloss, which would really mimic that glossy stone look, and we were both really happy with how it turned out. Almost a mirror-like shine – which you can sort of see in the photo above.
I just used a small foam roller to apply a thin coat along the top and all of the sides. Once it had dried for a few hours, we did a second coat (and later a third coat, just to be safe). I barely made a dent in the 1 gallon container (it was the smallest one they sold) but at least I have some on hand to do a touch-up sealing coat every year or two, just to be safe.
Once it was all fully dry, we brought it in and let it cure for a week before putting any objects on it (not that it needs that long – we just weren’t at the beach house for a week). And BOY DOES IT FEEL GOOD TO HAVE A COFFEE TABLE!
The white top breaks up the darker rug and couch nicely, and also helps tie together some of the other bright white accents like the bookshelf and the curtains.
It’s hard to tell from these photos, but although the concrete is super glossy and chunky, it still has imperfections, which is definitely part of the charm. Instead of looking like a big block of shiny plastic, it gives off that raw concrete vibe – even in the glossy white color. This next picture probably best shows a few light trowel marks. It all feels smooth to the touch, but when you look closely they’re definitely there. Again, this is some of the “interest” that we expected from the Ardex process (or at least my version of it – ha!) and for us it takes the place of the movement we would’ve gotten from a stone like marble.
Sherry and I have also discussed everything from staining the wood base a little bit darker (especially to disguise the light edges) to painting the while base a glossy white to emphasize the interesting shape of the legs. But for now I’ve argued that we should just kick up our feet and enjoy having a place to actually kick up our feet. IS THAT TOO MUCH TO ASK?
And don’t even get me started on the other furniture adjustments we’re thinking about in this room. Actually since we took these photos we’ve painted and recovered two armchairs for that wall on the right, so there’s a lot more comfy seating in here now (although we’re thinking about a few other adjustments before calling it done). But that’s a topic for another day!
P.S. Do you get our free weekly emails? We love sending bonus details, design tips, random style thoughts, and other house-related stuff. Click here to get them delivered right to your inbox. And thanks to everyone who is on the list already – Sherry loves putting them together for you each week.
The post Making A Concrete Coffee Table Top appeared first on Young House Love.
Making A Concrete Coffee Table Top published first on https://novaformmattressreview.tumblr.com/
0 notes
Text
Making A Concrete Coffee Table Top
Hey, good news! I finally have a place to put my feet up in the beach house living room. Or, as Sherry would state this good news: we finally have a coffee table!
And it was a DIY that was SO MUCH CHEAPER than the high end alternative, so three cheers for that. Oh and people who follow our InstaStories know we’ve switched out the rug in here for this rug since taking these pics, so there will be a post all about that (and the other dining room tweak we’ve made) coming up in a week or two. But back to the coffee table.
We’ve actually had the table base for a while, but it’s been completely topless for months. We scored this wooden octagonal table base from a neighbor who had planned on adding a top to it at some point, but after months of doing nothing with it she put it on our neighborhood buy/sell board for a whopping $7. After paying 700 pretty pennies for it, it remained topless in our garage for several months before moving to the beach house last fall (see below)… where it remained – still topless – until last month.
Our grand scheme was to get a stone top custom cut for it. Marble would look great, but we also considered more durable options like quartz. But quotes from two different stone yards – even for remnant pieces – came back between $700 – $900. I KNOW. They were MUCH higher than we expected, partially because of the size (it’s 38″ at its widest, which makes it deeper than a standard countertop by a fair amount) and the octagonal shape.
So we quickly shifted from “buying a stone top for it” to “DIYing a stone-like top for it” – and after weighing all sorts of solutions (faux stone laminate, a wood top we painted white or even tried to “marble”, etc) we landed a white concrete top that would give us a nice chunky stone look, but at a much cheaper cost. Unfortunately, the project kept getting nudged behind bigger tasks like installing the kitchen and building bunk beds. Hence why I was forced to uncomfortably prop my feet up on this edge of this puppy each time we visited. Feel bad for me, please.
We feared that a solid poured concrete slab would (a) be very heavy and (2) be very prone to cracking or breaking – especially without adding lots of extra support under the table top. Plus little kid heads + a solid hunk of concrete sounded worrisome. So instead we decided to create a wood top and then cover the wood with Ardex Feather Finish, which is a thin concrete material that we used years ago to give our laminate kitchen counters the appearance of solid concrete.
Making The Wood Coffee Table Top
We picked up a 4 x 4′ sheet of 3/4″ plywood because we wanted something sturdy enough to span the tabletop without sagging. To mark my cuts, I simply flipped the table over on top of the plywood and traced the edges with a pen. Don’t worry, I’ll show you how I made it overhang the table’s edge in a moment.
Using my circular saw outside, I trimmed off the edges to get an octagon that perfectly fit the top of our table base. No overhang. Yet.
Next I cut 8 pieces of 1 x 2″ whitewood to create a border around my cut plywood. After summoning some of my 8th-grade geometry, I determined that I needed to cut each one at a 22.5-degree angle to fit them around the octagon. But surprise-surprise, my miter saw was one step ahead of me and already had that as a preset angle.
Then, with the plywood laid on top of the base with the edges flush, I started nailing each of my 1 x 2″ pieces around the edges (into the plywood, not the table base). I put wood glue on it before I nailed, which help things hold for the long haul. Adding this border did a few helpful things:
It made the wood top slightly larger than the base, giving it a nice overhang
It made the wood top look twice as thick as it really is, without adding much more weight to it
It helped keep the top in place by making it almost like a snug shoebox top. I still screwed it to the base from underneath just to be safe.
Once it was all nailed in, I used wood putty to fill in all of my gaps and nail holes. This probably wasn’t a super critical step (I was going to coat this with a skim coat of concrete, after all) but I discovered the table isn’t a perfect octagon, so some of my corners weren’t as tight as I’d hoped. This shot is from before I sanded the excess wood filler off:
Applying The Concrete Finish
We haven’t used Ardex Feather Finish since our first project with it: our old kitchen’s laminate counters (here’s the tutorial for applying it and then sealing them to be food safe). While we decided the application was awesome for a quick makeover, they did get a little oil-stained around the stove since we used food-safe sealer as opposed to some of the more heavier duty sealers. No worries, we just added a cutting board to cover the small splatters – and we loved the imperfections and movement that was created in the application process. Definitely a whole lot better than the old plastic-y counters the house came with. Overall: we’d definitely recommend this method for a kitchen counter update – especially if you use a stronger sealer.
For the coffee table we decided to use the white Ardex instead of the standard gray color, so we tracked down a 10 pound bag online for $40. The dry Ardex mix just combines with water, so to apply it all you really need are some mixing/measuring buckets and various sized trowels to apply and smooth it. Oh, and sandpaper and a power sander (this is the one we have).
The bag suggested a 2 to 1 mix of Ardex powder to water, but I read our old post and reminded myself that I had liked a bit more water than that – it helped keep the mix looser and easier to spread. So I started by measuring one small batch at a time (I think I needed about twice this much to complete one coat).
I mixed them together using a small trowel, making sure to getting any remaining powder mixed in. I aimed for a thick pancake batter consistency – like it would sorta hold to my trowel for a moment before dripping off on its own.
Then I just scooped everything onto my table and started spreading it smooth, using larger trowels on the top and smaller ones on the edges. Note: whatever surface you’re doing this on should be sanded enough to be rough. Our plywood was already slightly textured, so I could skip this step, but if you’re doing it on the top of a piece of furniture, be sure to take a pass with low-grit sandpaper first (like 60-80 grit).
Ardex takes more than one coat (we did two this time) so my first pass was really about coverage, not smoothness. I was worried about sanding too much off during the next step, especially on the edges and corners, so I threw caution to the wind and really laid it on thick around the edge.
I gave it several hours to dry and then came back to start smoothing. The first thing I did (and my favorite part) was to use a putty knife to scrape all of the stalactites that dripped down the bottom edge. It was so satisfying and it gave us a really clean edge on the bottom.
Then I took some low-grit sandpaper (80) and went to town on the rest of the top with my palm sander. Since I knew another coat was coming after this one, I wasn’t concerned about getting it flawlessly smooth. I mostly wanted to eliminate any hard ridges that would catch clumps of Ardex during my next application.
This is what the top looked like after I sanded the first coat. Obviously, you can see lots of my trowel marks as well as little pockets where the Ardex didn’t spread completely smoothly. It’s a bit rougher than we wanted for the final product, but it was fine for a first coat.
The second coat went on in pretty much the exact same method – except I did mix the Ardex a bit thinner and I took a bit more care getting a smoother application since this would be the top one that’s seen by everyone. Plus, when I sanded it, I moved from my initial low-grit (80) sandpaper down to 120 then 220, so that the finished table was super smooth. I didn’t remember to snap any photos of the coffee table after we sanded the second coat, but took lots of them once it was sealed and finished, so if we skip ahead for a second, here’s the finished result:
Sealing The Concrete
There are lots of products out there for sealing concrete. As I mentioned, we used food safe eco-sealer on our kitchen counters, which we think might be the reason tiny little grease spatters sunk in next to the stove – but since we’re not planning to prepare food on this table, we went with something heavier duty for a nice super-durable finish this time. Our final choice? This “Wet-Look” Sealer by Behr. Sherry suggested something high-gloss, which would really mimic that glossy stone look, and we were both really happy with how it turned out. Almost a mirror-like shine – which you can sort of see in the photo above.
I just used a small foam roller to apply a thin coat along the top and all of the sides. Once it had dried for a few hours, we did a second coat (and later a third coat, just to be safe). I barely made a dent in the 1 gallon container (it was the smallest one they sold) but at least I have some on hand to do a touch-up sealing coat every year or two, just to be safe.
Once it was all fully dry, we brought it in and let it cure for a week before putting any objects on it (not that it needs that long – we just weren’t at the beach house for a week). And BOY DOES IT FEEL GOOD TO HAVE A COFFEE TABLE!
The white top breaks up the darker rug and couch nicely, and also helps tie together some of the other bright white accents like the bookshelf and the curtains.
It’s hard to tell from these photos, but although the concrete is super glossy and chunky, it still has imperfections, which is definitely part of the charm. Instead of looking like a big block of shiny plastic, it gives off that raw concrete vibe – even in the glossy white color. This next picture probably best shows a few light trowel marks. It all feels smooth to the touch, but when you look closely they’re definitely there. Again, this is some of the “interest” that we expected from the Ardex process (or at least my version of it – ha!) and for us it takes the place of the movement we would’ve gotten from a stone like marble.
Sherry and I have also discussed everything from staining the wood base a little bit darker (especially to disguise the light edges) to painting the while base a glossy white to emphasize the interesting shape of the legs. But for now I’ve argued that we should just kick up our feet and enjoy having a place to actually kick up our feet. IS THAT TOO MUCH TO ASK?
And don’t even get me started on the other furniture adjustments we’re thinking about in this room. Actually since we took these photos we’ve painted and recovered two armchairs for that wall on the right, so there’s a lot more comfy seating in here now (although we’re thinking about a few other adjustments before calling it done). But that’s a topic for another day!
P.S. Do you get our free weekly emails? We love sending bonus details, design tips, random style thoughts, and other house-related stuff. Click here to get them delivered right to your inbox. And thanks to everyone who is on the list already – Sherry loves putting them together for you each week.
*This post contains affiliate links*
The post Making A Concrete Coffee Table Top appeared first on Young House Love.
Making A Concrete Coffee Table Top published first on https://landscapingmates.blogspot.com
0 notes
Text
This Post Was A Long Time Coming
I can’t handle eating disorders. They’re the worst. I hate them I hate them I hate them, and FRANKLY I don’t see how I can exercise ever and be recovered. What does recovery look like? Well, I think it looks like me not thinking about eating disorders.
Eating eating eating. How can I “eat healthy” and not have an eating disorder? I don’t know.
Last last night was crazy.
Clementine and I went downtown, had sushi. My mum said I didn’t have enough to eat. I ordered more than my quinoa cone and soup, a salmon roll and some of Julia’s “hideous” cream cheese roll.
Then we went down the street, in the cold, to a strip club. I said I was going to eat more, I didn’t.
It was “ladies night” and the club was on the second floor of a building. Right underneath a “Polish Rub” massage parlor. I was expecting some stingy, scary, place. So, much to my relief when I got there there was a cluster of late 20-40 year old women. All laughing joyously as wine had already coursed through their system. A couple gay men as well. We waited in a clean and bright lobby in front of an elevator. In preparation they had sent the ladies back down.
Eventually we all decided to “storm the upstairs” and so up we went. We paid, they scanned our ID’s and we found seats. The chairs were set up around a large stage in a circular fashion. Soon, a socitally-pretty blonde girl in a strap-y white flowing dress came and offered us drinks. Julia ordered a gin and tonic. I wasn’t sure what to get at first (I was thinking calories). A eastern european woman and her husband sat beside julia. “Suckkksss for youuuuu” I said smiling as the man sat next to her. “Margooo” She said in a pleading voice. The woman received a what looked like a margarita that was green, and sparking. When I asked what it was she said that she had asked for “Something sweet.”. She asked I could try if I liked, I declined. Her husband had ordered some non-alcoholic beverage as well.
Eventually, I followed Julia’s lead. The Society Approved Pretty Girl (SAPG) waitress kind of approached me and said “One bill? Or two?” Okay. So if Clementine and I are in some lesbian relationship, or I’m trying in vain to woo her by taking her to a male strip show, I’m the butch. Or, I exude the dominant personality vibe. Was what I gained from that interaction. Once the SAPG asked if this was our first time (and we told her it was) she took a liking to us. She gave us the tip that if we went and purchased a bunch of one dollar bills, and folded them over the barrier between the table and the stage, the strippers would come and pay extra close attention to us.
Later, when our water split on our ones’. She came and mopped up. “I’m not done” said she. She returned with a pile of napkins and one by one placed the bills in between the sheets, pressed them, then pulled them out for us to continue sticking into stripper’s butt cracks and the like.
I saw a guy walk around with a tacky white shirt and glasses. I thought he was a dancer. Clementine corrected me. “Nah. I think he’s like their announcer or pimp.” She’s surprisingly intuitive sometimes.
Eventually the men came out, one by one and began to perform for us.
The first guy was a cop. He came out with a big bag of props and began to dance around circle stage. The lovely middle aged people from the lobby were seated from 1-4 o’clock (If clementine and I were somewhere around 5) Past the drink couple was a group of women including this one who interested me. She did this thing where she placed her chin on her hands and would just watch the dancer like her stare alone could seduce them. She bit her lip turn her gaze upwards and give money. Like she was in control or something. I don’t know. I kept string back at her, judging her silently. Cop guy was pretty cool. He was the best dancer skill wise. He had fire, and impressive pole acrobatics. This could be to make up for the fact that his penis was small.
(That’s right, they go full nudity.)
I was really getting into it, or trying to at least, so I took the pretty server’s advice and folded bills over the ledge. The guy came around and took his towel and put it around my head and waggled his penis around. Wow.
At the end when I threw him an extra dolla’ bill he kissed my hand and said: “I hope it was as good for you as it was for me.”
Then a cowboy, who didn't have many moves but a very big penis.
Then some inconspicuous SWAT team guy with the color scheme of an edgy lifeguard. Black and red. This guy’s name was Casanova. He was the “hottest” according to the pretty server who told us told us this ahead of time upon Clementine’s inquiry.
During the whole night the flamboyant MC was announcing between performances “If any of you would like a private dance from any of these fine gentlemen, you can do so for only twenty five dollars!” I was thinking about it the entire time. Clementine and I joked about it, she even pondered if we could get one together and by the end I was so... revved up, it was clear I was the most into the idea, so I told clementine: “Wait here.” and I went and withdrew $25 from the ATM with the ludicrous withdrawal charge of $5.
Then, began to make my way across the short room, past scantly dressed ladies and female strippers who were beginning to make their presence known for the start of their show. The first one was dressed like a bride, I believe. I tapped the MC, the sunglassed man, the flamboyant fella’, on the shoulder of his white T-shirt.“Hi... Um, I’d like to have a private dance.”I held out my meager offering of dollar bills.“Sure darling, who with?”“Um... Casanova. Please.”“Alright.” He touched me on the back and sat me down in a booth. “Wait here. I’ll go tell him.”So I sat on the booth until MC mcDazzle returned.“Casanova is coming soon. He just has a lot of lotion on him right now and is trying to wash it off. Wait here.”
“Oh okay.”
Watching the current female stripper who was in the middle of lighting a heart she drew on the stage with alcohol on fire, and Clementine observe her nonchalantly made me wonder if I had made a mistake, If I should stay and watch this snazzy show, but I didn't have much time to think it over though, because soon came someone to tell me I couldn’t sit at the private booth unless I’d paid for it, and then not long after that came Casanova.“Are you Margo?” He said, touching me gently.I smiled. “Yes.” He smiled “Follow me.”
He then lead me back past the dressing rooms to a lounge lit with neon lights and consisted of several nooks. Each with a couch and a curtain, which was rung like a shower curtain protecting it. Carmelo sat me down and I looked to the left, where I just saw into another nook. Two girls were being entertained by one dancer. “Shoot.” I thought. “I could’ve brought Clementine.” The dancer was the first one, the policeman now dressed down, who looked over to Casanova and said something which imbued me with the impression that the girls were the least of their concerns, and they (the policeman dancer in particular) were more concerned with money and physical sensation than anything else.The retired police man said something like: “So, do I just go out there and like... ask them? I've had like three girls already!!!” Something like that?Then my personal S.W.A.T man, who imbued with me the sense that he was macho, experienced, and didn't give a darn care about what the other dancer said or did.Then, my dear Casanova closed the curtain and focused on me.
“Is this your first time?” My genie from a passion bottle inquired
“Yes...” I responded.
Casanova smiled knowingly.
“Are you nervous?”
I wasn't nervous, but to play his game of misogyny and predictability for some reason I can’t fathom I smiled as sweetly as I could and said “Yes.”
“Why are you nervous?” A smile crept on Casanova’s lips. “I’m getting naked for you.” I smiled in return. My willingness to buy into his preplanned Q and A had worked. I had pleased my fairy god stripper. He began to get naked. He swayed his hips and gently pushed my shoulders into the seat. “Just relax.” He told me.
And with articles of clothing falling on the floor like snowflakes, or male ejaculation choose your own adventure, my dear sweet titillating Casanova began to dance.
Now you have to understand, here he is, dancing for a skinny girl, suffering from anorexia who has a muted sense of humor but no hormones. For him, I imagine it was like throwing hay at a dead hamster. Unenjoyable and lifeless as that metaphor. The stripper equivalent of putting paper into a jammed scanner. Limp and lifeless as his penis.
He was good humored though, as I began my Q an A
“So.” I asked. “Do you like your job?”
“If I didn’t like it then I wouldn’t be doing it...” he purred.
“Where did you learn to dance?”
“I don’t know.... when I was a kid on the street I would dance. I just learned.”
He leaned over me. Swung his penis around. I was entranced by his abdominal muscles.
“Can I touch?”
“Sure.”
So I awkwardly ran my hands along his saucy obliques.
The *ttch tch tch* was playing in the background. The purple and blues of the mood lit room created an intriguing ambiance, and I was entertained to say the least by my macho man candy for hire.
Soon though, he pulled me up gently by the hand and said “Thank you.”
With that, I stumbled back out to the club and sat down on my stool just in time to catch the stipper with black hair and a tight body slide slip out of a kiddie pool and slide across the the soaped stage flat belly first.
“How was it?” asked Clementine.
“It was good.” I told her.
We watched the ladies for a bit and mused at how much more talented they were than the men, and how much more fun they were to watch.
Near the end of our stay, Cassanova came by our table and made small talk with Clementine. I could tell by the way he looked at her, and the amount of eye contact he made with my friend that he favored her.
He passed her his phone. “Here. Put in your number.” Clementine did so,
then he passed it to me and requested I do the same.
Now why, I gave into the whims of this man, I don’t even know. I was being seduced. But I gave in.
Have you read the book “The Game”? Highly recommend. It’s about that shit. manipulation and the rest.
Then he leaned over to Clementine and I and said “Give me a kiss.”
Clementine kissed him on his cheek. Lo and behold, so did I.
I can’t believe I give into this shit!
He did give us the name of a good club though, I believe it was called the “Temple”
Anywhoo, we walked down the streets afterwards and was looking for the club. There was people trying to sell us bracelets, getting us in for cheaper into other clubs that looked all rainbow in their spelling, which was kind of confusing because why would they be selling it to us for cheaper if they couldn't make a profit.
Interesting fact, it seemed to me that the clubs were very divided by race. Like, skin tone. The first club we passed by was the white young people club. Then the club with people selling wrist bands outside was definitely lots of Asian people.
Anyways, eventually we got to the Temple. What a place. It was definitely the black people club.
I was struck my the hired dancers dancing against the walls. It was cool to see them, how they made eye contact with each other to take breaks.
I asked for something to drink at the bar, something “sweet”
The guy just looked at me. “We don’t really do that here.” He said.
He attempted to make something sweetish, and charged me 11 dollars for it. I barley even touched it. Alcohol has calories...
We danced. Clementine kept asking me if I was okay, like if I was on drugs or something. I was just spacing out and taking it all in. What did it mean? It felt like entire world was in this club! But it wasn't. Not even a fragment of the city was here. The rest were at home, working, with families, sleeping, relaxing. What was everyone running from?
We grinded with some guys. I saw a tall, guy with freckles across the dance floor, my kind of catch, but I grimaced as I saw he was towing a cute girl by the hand.
It didn't take long for clementine to lock eyes with some guy and get swept away. Grind fest.
Eventually we broke away and I worked up the courage to ask these guys to play pool.
More hired ladies came through the dance floor with champagne bottles in holders that looked like jet planes.
Clementine came to me and said the guy wanted to take her somewhere.
“Maybe not.” I suggested.
She went anyways.
I figured I was a bad friend for letting her go or something. But I almost didn't care, I was disassociating all over the place. It was so loud..
I played more pool, then went back on the dance floor and looked at this one twitchy guy who was making eye contact with me on the regular. So, I made eye contact with him eventually and got to moving in. “Do you want to dance?” He asked. “Sure.” I responded.
His dancing was just as twitchy as his eye contact. He wasn't even grinding to the music. Eventually I just turned around and said “Thank You.”
Clementine found me, thank god. the guy still in tow and who did we happen to run into but the tall attractive guy with freckles. But it wasn't any guy. It was Damien. Damien Stork from High School. This guy I had this massive crush on and wore lose shirts around but he was kind of an asshole and couldn't accept when he had been tagged and disobeyed his parents. But boy was he smat.
I asked him, trying to look as attractive as possible next to his perfect attractive friends “What are you doing now?” “Stocks” “Of course you are.”
Of course Damien Stork is doing freakin’ stocks. What else would be be doing?
“How is that?”
“It’s crazy,” said Damien, his eyes alight. “You’ll make 300,000 one day and loose 200,000 the next.”
He is highly ADHD. I remember my parents telling me this, I also know they refused to medicate him. So there. Though... I think he asked for it... begged for it?
Anyways, eventually his beautiful girl friend dragged him away and we went back to dancing.
Somewhere in there a stout asian man grabbed Clementine and talked to her. She later told me he was asking her questions like “Can I ask you a few questions” and “What is your favorite color” ect. He wanted her to come to a ranch in the country??? Sugar baby? Soon we left.
We went to the bathroom and Clementine asked if I wanted to go... I kind of wanted to stay till closing. To see what it was like, but we determined it wasn't until a few hours at least. 4am? So we left. While getting our jackets Clementine embraced with her man for a long kiss. He wanted to take her home, then we went home.
We saw Damien and his girl outside.
The taxi driver... I felt like he ripped us off somehow. Something to do with him turning off the money counter display... but I can’t remember why?
I collapsed, but felt oddly rested the next day.
In the morning I felt violated, the strip club part especially, but it’s okay now. Now it just feels like a story.
0 notes
Text
Making A Concrete Coffee Table Top
Hey, good news! I finally have a place to put my feet up in the beach house living room. Or, as Sherry would state this good news: we finally have a coffee table!
And it was a DIY that was SO MUCH CHEAPER than the high end alternative, so three cheers for that. Oh and people who follow our InstaStories know we’ve switched out this rug since taking these pics, so there will be a post all about that (and the other dining room tweak we’ve made) coming up in a week or two. But back to the coffee table.
We’ve actually had the table base for a while, but it’s been completely topless for months. We scored this wooden octagonal table base from a neighbor who had planned on adding a top to it at some point, but after months of doing nothing with it she put it on our neighborhood buy/sell board for a whopping $7. After paying 700 pretty pennies for it, it remained topless in our garage for several months before moving to the beach house last fall (see below)… where it remained – still topless – until last month.
Our grand scheme was to get a stone top custom cut for it. Marble would look great, but we also considered more durable options like quartz. But quotes from two different stone yards – even for remnant pieces – came back between $700 – $900. I KNOW. They were MUCH higher than we expected, partially because of the size (it’s 38″ at its widest, which makes it deeper than a standard countertop by a fair amount) and the octagonal shape.
So we quickly shifted from “buying a stone top for it” to “DIYing a stone-like top for it” – and after weighing all sorts of solutions (faux stone laminate, a wood top we painted white or even tried to “marble”, etc) we landed a white concrete top that would give us a nice chunky stone look, but at a much cheaper cost. Unfortunately, the project kept getting nudged behind bigger tasks like installing the kitchen and building bunk beds. Hence why I was forced to uncomfortably prop my feet up on this edge of this puppy each time we visited. Feel bad for me, please.
We feared that a solid poured concrete slab would (a) be very heavy and (2) be very prone to cracking or breaking – especially without adding lots of extra support under the table top. Plus little kid heads + a solid hunk of concrete sounded worrisome. So instead we decided to create a wood top and then cover the wood with Ardex Feather Finish, which is a thin concrete material that we used years ago to give our laminate kitchen counters the appearance of solid concrete.
Making The Wood Coffee Table Top
We picked up a 4 x 4′ sheet of 3/4″ plywood because we wanted something sturdy enough to span the tabletop without sagging. To mark my cuts, I simply flipped the table over on top of the plywood and traced the edges with a pen. Don’t worry, I’ll show you how I made it overhang the table’s edge in a moment.
Using my circular saw outside, I trimmed off the edges to get an octagon that perfectly fit the top of our table base. No overhang. Yet.
Next I cut 8 pieces of 1 x 2″ whitewood to create a border around my cut plywood. After summoning some of my 8th-grade geometry, I determined that I needed to cut each one at a 22.5-degree angle to fit them around the octagon. But surprise-surprise, my miter saw was one step ahead of me and already had that as a preset angle.
Then, with the plywood laid on top of the base with the edges flush, I started nailing each of my 1 x 2″ pieces around the edges (into the plywood, not the table base). I put wood glue on it before I nailed, which help things hold for the long haul. Adding this border did a few helpful things:
It made the wood top slightly larger than the base, giving it a nice overhang
It made the wood top look twice as thick as it really is, without adding much more weight to it
It helped keep the top in place by making it almost like a snug shoebox top. I still screwed it to the base from underneath just to be safe.
Once it was all nailed in, I used wood putty to fill in all of my gaps and nail holes. This probably wasn’t a super critical step (I was going to coat this with a skim coat of concrete, after all) but I discovered the table isn’t a perfect octagon, so some of my corners weren’t as tight as I’d hoped. This shot is from before I sanded the excess wood filler off:
Applying The Concrete Finish
We haven’t used Ardex Feather Finish since our first project with it: our old kitchen’s laminate counters (here’s the tutorial for applying it and then sealing them to be food safe). While we decided the application was awesome for a quick makeover, they did get a little oil-stained around the stove since we used food-safe sealer as opposed to some of the more heavier duty sealers. No worries, we just added a cutting board to cover the small splatters – and we loved the imperfections and movement that was created in the application process. Definitely a whole lot better than the old plastic-y counters the house came with. Overall: we’d definitely recommend this method for a kitchen counter update – especially if you use a stronger sealer.
For the coffee table we decided to use the white Ardex instead of the standard gray color, so we tracked down a 10 pound bag online for $40. The dry Ardex mix just combines with water, so to apply it all you really need are some mixing/measuring buckets and various sized trowels to apply and smooth it. Oh, and sandpaper and a power sander.
The bag suggested a 2 to 1 mix of Ardex powder to water, but I read our old post and reminded myself that I had liked a bit more water than that – it helped keep the mix looser and easier to spread. So I started by measuring one small batch at a time (I think I needed about twice this much to complete one coat).
I mixed them together using a small trowel, making sure to getting any remaining powder mixed in. I aimed for a thick pancake batter consistency – like it would sorta hold to my trowel for a moment before dripping off on its own.
Then I just scooped everything onto my table and started spreading it smooth, using larger trowels on the top and smaller ones on the edges. Note: whatever surface you’re doing this on should be sanded enough to be rough. Our plywood was already slightly textured, so I could skip this step, but if you’re doing it on the top of a piece of furniture, be sure to take a pass with low-grit sandpaper first (like 60-80 grit).
Ardex takes more than one coat (we did two this time) so my first pass was really about coverage, not smoothness. I was worried about sanding too much off during the next step, especially on the edges and corners, so I threw caution to the wind and really laid it on thick around the edge.
I gave it several hours to dry and then came back to start smoothing. The first thing I did (and my favorite part) was to use a putty knife to scrape all of the stalactites that dripped down the bottom edge. It was so satisfying and it gave us a really clean edge on the bottom.
Then I took some low-grit sandpaper (80) and went to town on the rest of the top with my palm sander. Since I knew another coat was coming after this one, I wasn’t concerned about getting it flawlessly smooth. I mostly wanted to eliminate any hard ridges that would catch clumps of Ardex during my next application.
This is what the top looked like after I sanded the first coat. Obviously, you can see lots of my trowel marks as well as little pockets where the Ardex didn’t spread completely smoothly. It’s a bit rougher than we wanted for the final product, but it was fine for a first coat.
The second coat went on in pretty much the exact same method – except I did mix the Ardex a bit thinner and I took a bit more care getting a smoother application since this would be the top one that’s seen by everyone. Plus, when I sanded it, I moved from my initial low-grit (80) sandpaper down to 120 then 220, so that the finished table was super smooth. I didn’t remember to snap any photos of the coffee table after we sanded the second coat, but took lots of them once it was sealed and finished, so if we skip ahead for a second, here’s the finished result:
Sealing The Concrete
There are lots of products out there for sealing concrete. As I mentioned, we used food safe eco-sealer on our kitchen counters, which we think might be the reason tiny little grease spatters sunk in next to the stove – but since we’re not planning to prepare food on this table, we went with something heavier duty for a nice super-durable finish this time. Our final choice? This “Wet-Look” Sealer by Behr. Sherry suggested something high-gloss, which would really mimic that glossy stone look, and we were both really happy with how it turned out. Almost a mirror-like shine – which you can sort of see in the photo above.
I just used a small foam roller to apply a thin coat along the top and all of the sides. Once it had dried for a few hours, we did a second coat (and later a third coat, just to be safe). I barely made a dent in the 1 gallon container (it was the smallest one they sold) but at least I have some on hand to do a touch-up sealing coat every year or two, just to be safe.
Once it was all fully dry, we brought it in and let it cure for a week before putting any objects on it (not that it needs that long – we just weren’t at the beach house for a week). And BOY DOES IT FEEL GOOD TO HAVE A COFFEE TABLE!
The white top breaks up the darker rug and couch nicely, and also helps tie together some of the other bright white accents like the bookshelf and the curtains.
It’s hard to tell from these photos, but although the concrete is super glossy and chunky, it still has imperfections, which is definitely part of the charm. Instead of looking like a big block of shiny plastic, it gives off that raw concrete vibe – even in the glossy white color. This next picture probably best shows a few light trowel marks. It all feels smooth to the touch, but when you look closely they’re definitely there. Again, this is some of the “interest” that we expected from the Ardex process (or at least my version of it – ha!) and for us it takes the place of the movement we would’ve gotten from a stone like marble.
Sherry and I have also discussed everything from staining the wood base a little bit darker (especially to disguise the light edges) to painting the while base a glossy white to emphasize the interesting shape of the legs. But for now I’ve argued that we should just kick up our feet and enjoy having a place to actually kick up our feet. IS THAT TOO MUCH TO ASK?
And don’t even get me started on the other furniture adjustments we’re thinking about in this room. Actually since we took these photos we’ve painted and recovered two armchairs for that wall on the right, so there’s a lot more comfy seating in here now (although we’re thinking about a few other adjustments before calling it done). But that’s a topic for another day!
P.S. Do you get our free weekly emails? We love sending bonus details, design tips, random style thoughts, and other house-related stuff. Click here to get them delivered right to your inbox. And thanks to everyone who is on the list already – Sherry loves putting them together for you each week.
The post Making A Concrete Coffee Table Top appeared first on Young House Love.
Making A Concrete Coffee Table Top published first on https://aireloomreview.tumblr.com/
0 notes
Text
Making A Concrete Coffee Table Top
Hey, good news! I finally have a place to put my feet up in the beach house living room. Or, as Sherry would state this good news: we finally have a coffee table!
light fixture / ceiling medallion / similar rug / similar sofa / similar curtains / curtain rods
And it was a DIY that was SO MUCH CHEAPER than the high end alternative, so three cheers for that. Oh and people who follow our InstaStories know we’ve switched out the rug in here for this rug since taking these pics, so there will be a post all about that (and the other dining room tweak we’ve made) coming up in a week or two. But back to the coffee table.
We’ve actually had the table base for a while, but it’s been completely topless for months. We scored this wooden octagonal table base from a neighbor who had planned on adding a top to it at some point, but after months of doing nothing with it she put it on our neighborhood buy/sell board for a whopping $7. After paying 700 pretty pennies for it, it remained topless in our garage for several months before moving to the beach house last fall (see below)… where it remained – still topless – until last month.
Our grand scheme was to get a stone top custom cut for it. Marble would look great, but we also considered more durable options like quartz. But quotes from two different stone yards – even for remnant pieces – came back between $700 – $900. I KNOW. They were MUCH higher than we expected, partially because of the size (it’s 38″ at its widest, which makes it deeper than a standard countertop by a fair amount) and the octagonal shape.
So we quickly shifted from “buying a stone top for it” to “DIYing a stone-like top for it” – and after weighing all sorts of solutions (faux stone laminate, a wood top we painted white or even tried to “marble”, etc) we landed a white concrete top that would give us a nice chunky stone look, but at a much cheaper cost. Unfortunately, the project kept getting nudged behind bigger tasks like installing the kitchen and building bunk beds. Hence why I was forced to uncomfortably prop my feet up on this edge of this puppy each time we visited. Feel bad for me, please.
We feared that a solid poured concrete slab would (a) be very heavy and (2) be very prone to cracking or breaking – especially without adding lots of extra support under the table top. Plus little kid heads + a solid hunk of concrete sounded worrisome. So instead we decided to create a wood top and then cover the wood with Ardex Feather Finish, which is a thin concrete material that we used years ago to give our laminate kitchen counters the appearance of solid concrete.
Making The Wood Coffee Table Top
We picked up a 4 x 4′ sheet of 3/4″ plywood because we wanted something sturdy enough to span the tabletop without sagging. To mark my cuts, I simply flipped the table over on top of the plywood and traced the edges with a pen. Don’t worry, I’ll show you how I made it overhang the table’s edge in a moment.
Using my circular saw outside, I trimmed off the edges to get an octagon that perfectly fit the top of our table base. No overhang. Yet.
Next I cut 8 pieces of 1 x 2″ whitewood to create a border around my cut plywood. After summoning some of my 8th-grade geometry, I determined that I needed to cut each one at a 22.5-degree angle to fit them around the octagon. But surprise-surprise, my miter saw was one step ahead of me and already had that as a preset angle.
Then, with the plywood laid on top of the base with the edges flush, I started nailing each of my 1 x 2″ pieces around the edges (into the plywood, not the table base). I put wood glue on it before I nailed, which help things hold for the long haul. Adding this border did a few helpful things:
It made the wood top slightly larger than the base, giving it a nice overhang
It made the wood top look twice as thick as it really is, without adding much more weight to it
It helped keep the top in place by making it almost like a snug shoebox top. I still screwed it to the base from underneath just to be safe.
Once it was all nailed in, I used wood putty to fill in all of my gaps and nail holes. This probably wasn’t a super critical step (I was going to coat this with a skim coat of concrete, after all) but I discovered the table isn’t a perfect octagon, so some of my corners weren’t as tight as I’d hoped. This shot is from before I sanded the excess wood filler off:
Applying The Concrete Finish
We haven’t used Ardex Feather Finish since our first project with it: our old kitchen’s laminate counters (here’s the tutorial for applying it and then sealing them to be food safe). While we decided the application was awesome for a quick makeover, they did get a little oil-stained around the stove since we used food-safe sealer as opposed to some of the more heavier duty sealers. No worries, we just added a cutting board to cover the small splatters – and we loved the imperfections and movement that was created in the application process. Definitely a whole lot better than the old plastic-y counters the house came with. Overall: we’d definitely recommend this method for a kitchen counter update – especially if you use a stronger sealer.
For the coffee table we decided to use the white Ardex instead of the standard gray color, so we tracked down a 10 pound bag online for $40. The dry Ardex mix just combines with water, so to apply it all you really need are some mixing/measuring buckets and various sized trowels to apply and smooth it. Oh, and sandpaper and a power sander (this is the one we have).
The bag suggested a 2 to 1 mix of Ardex powder to water, but I read our old post and reminded myself that I had liked a bit more water than that – it helped keep the mix looser and easier to spread. So I started by measuring one small batch at a time (I think I needed about twice this much to complete one coat).
I mixed them together using a small trowel, making sure to getting any remaining powder mixed in. I aimed for a thick pancake batter consistency – like it would sorta hold to my trowel for a moment before dripping off on its own.
Then I just scooped everything onto my table and started spreading it smooth, using larger trowels on the top and smaller ones on the edges. Note: whatever surface you’re doing this on should be sanded enough to be rough. Our plywood was already slightly textured, so I could skip this step, but if you’re doing it on the top of a piece of furniture, be sure to take a pass with low-grit sandpaper first (like 60-80 grit).
Ardex takes more than one coat (we did two this time) so my first pass was really about coverage, not smoothness. I was worried about sanding too much off during the next step, especially on the edges and corners, so I threw caution to the wind and really laid it on thick around the edge.
I gave it several hours to dry and then came back to start smoothing. The first thing I did (and my favorite part) was to use a putty knife to scrape all of the stalactites that dripped down the bottom edge. It was so satisfying and it gave us a really clean edge on the bottom.
Then I took some low-grit sandpaper (80) and went to town on the rest of the top with my palm sander. Since I knew another coat was coming after this one, I wasn’t concerned about getting it flawlessly smooth. I mostly wanted to eliminate any hard ridges that would catch clumps of Ardex during my next application.
This is what the top looked like after I sanded the first coat. Obviously, you can see lots of my trowel marks as well as little pockets where the Ardex didn’t spread completely smoothly. It’s a bit rougher than we wanted for the final product, but it was fine for a first coat.
The second coat went on in pretty much the exact same method – except I did mix the Ardex a bit thinner and I took a bit more care getting a smoother application since this would be the top one that’s seen by everyone. Plus, when I sanded it, I moved from my initial low-grit (80) sandpaper down to 120 then 220, so that the finished table was super smooth. I didn’t remember to snap any photos of the coffee table after we sanded the second coat, but took lots of them once it was sealed and finished, so if we skip ahead for a second, here’s the finished result:
Sealing The Concrete
There are lots of products out there for sealing concrete. As I mentioned, we used food safe eco-sealer on our kitchen counters, which we think might be the reason tiny little grease spatters sunk in next to the stove – but since we’re not planning to prepare food on this table, we went with something heavier duty for a nice super-durable finish this time. Our final choice? This “Wet-Look” Sealer by Behr. Sherry suggested something high-gloss, which would really mimic that glossy stone look, and we were both really happy with how it turned out. Almost a mirror-like shine – which you can sort of see in the photo above.
I just used a small foam roller to apply a thin coat along the top and all of the sides. Once it had dried for a few hours, we did a second coat (and later a third coat, just to be safe). I barely made a dent in the 1 gallon container (it was the smallest one they sold) but at least I have some on hand to do a touch-up sealing coat every year or two, just to be safe.
Once it was all fully dry, we brought it in and let it cure for a week before putting any objects on it (not that it needs that long – we just weren’t at the beach house for a week). And BOY DOES IT FEEL GOOD TO HAVE A COFFEE TABLE!
light / ceiling medallion / similar rug / similar curtains / curtain rods / TV stand / similar chair
The white top breaks up the darker rug and couch nicely, and also helps tie together some of the other bright white accents like the bookshelf and the curtains.
It’s hard to tell from these photos, but although the concrete is super glossy and chunky, it still has imperfections, which is definitely part of the charm. Instead of looking like a big block of shiny plastic, it gives off that raw concrete vibe – even in the glossy white color. This next picture probably best shows a few light trowel marks. It all feels smooth to the touch, but when you look closely they’re definitely there. Again, this is some of the “interest” that we expected from the Ardex process (or at least my version of it – ha!) and for us it takes the place of the movement we would’ve gotten from a stone like marble.
Sherry and I have also discussed everything from staining the wood base a little bit darker (especially to disguise the light edges) to painting the while base a glossy white to emphasize the interesting shape of the legs. But for now I’ve argued that we should just kick up our feet and enjoy having a place to actually kick up our feet. IS THAT TOO MUCH TO ASK?
bookcase / similar pink pillow / similar blue pillow / white faux wood window blinds
And don’t even get me started on the other furniture adjustments we’re thinking about in this room. Actually since we took these photos we’ve painted and recovered two armchairs for that wall on the right, so there’s a lot more comfy seating in here now (although we’re thinking about a few other adjustments before calling it done). But that’s a topic for another day!
Also! If you have any where-did-you-get-that questions about the beach house (or paint color questions, which we also get a lot) this page has all the answers for you.
P.S. Do you get our free weekly emails? We love sending bonus details, design tips, random style thoughts, and other house-related stuff. Click here to get them delivered right to your inbox. And thanks to everyone who is on the list already – Sherry loves putting them together for you each week.
*This post contains affiliate links*
The post Making A Concrete Coffee Table Top appeared first on Young House Love.
Making A Concrete Coffee Table Top published first on https://ssmattress.tumblr.com/
0 notes
Last Seen Blogs

omadketokitchen
OMADKeto.Kitchen


fear-of-oliveoil
Active on August 2023

shroudedrancher
I'm Not o-fucking-kay

resumeprimecom
Resume Prime