#so i copied my save over to a folder on my desktop and started reinstalling it on steam cuz my friend has it on family share
Text
was 5 seconds away from losing my 95 hour dark souls 3 save. i might have just killed myself in front of all of you
#Im reinstalling ds3 on steam cuz i was trying to download a mod and it bricked my shit#so i copied my save over to a folder on my desktop and started reinstalling it on steam cuz my friend has it on family share#and i looked back in my saves location and it was just. gone. the last remaining trace was in my clipboard#didnt even delete it or anything had no idea what happened
10 notes
·
View notes
Text
Download Mac Os Mountain Lion Dmg Free

Click on the button given below to download Mac OS X Lion 10.7.5 DMG free. It is a complete offline setup of Mac OS X Lion 10.7.5 with the direct download link. You can also download Mac OS X Mountain Lion 10.8.5 For Latest Premium Android APK Visit www.allapkworld.com.
Mac Os Mavericks
Mac Os Mountain Lion Download
quoz.netlify.com › ▄ ▄ ▄ Download Mac Os Lion Dmg ▄ ▄ ▄
May 30, 2020 Mac OS X Lion is a seventh powerful and major release of Mac OS X. It is a standalone Bootable DVD DMG Image installer of Lion OS X. Mac Os X Mountain Lion 10.8.4 Dmg Free Mac OSX Lion Overview. Apple has introduced many operating systems, Mac OS X is one of the powerful and stable releases from Apple.
Sep 18, 2017 Download Mac OS X Mountain Lion 10.8.3 DMG free standalone complete image for 32-bit and 64-bit. Mac OS X Mountain Lion V10.8.3 is a very powerful and reliable Macintosh Operating System for all the users. Sep 07, 2018 Coincidentally, the Mac OS X Mountain Lion download was the last paid upgrade to an OS X release.
Mac OS X Mountain Lion Free Download. Get the latest 10.8.5 OS X Mountain Lion the newest version of the world’s most advanced desktop operating system. It has over 200 new features that update the Mac and make it the best computer there is. Download Mac OS X Mountain Lion DMG File Installer for version 10.8. Free download and experience Apple's OS X 9th edition with brand new features.
You don't need to download Lion from the App Store because you can do a clean install starting from Recovery HD, holding Command and R keys while your Mac is starting > http://support.apple.com/kb/HT4718 After starting in Recovery, erase Macintosh HD in Disk Utility, close Disk Utility and reinstall OS X.
Oct 19, 2016 Mac OS X Lion Free Download. October 19, 2016 March 8, 2017 Muhammad. Mac OS X Lion is a seventh powerful and major release of Mac OS X. It is a standalone Bootable DVD DMG Image installer of Lion OS X. Mac OSX Lion Overview. Apple has introduced many operating systems, Mac OS X is one of the powerful and stable releases from Apple. Mar 25, 2019 Niresh Mac OSX Mountain Lion 10.8.5 ISO Category(Operating System)Niresh Mac OSX Mountain Lion 10.8.5 ISO Free Download Latest for Windows. It is full Bootable ISO Image of Niresh Mac OSX Mountain Lion for AMD & Intel. I bougth a Lion copy about a year ago. Now I want to do a clean install on my Mac so I've to download the dmg of Lion from App store. Anyway from App Store I can't no more find my Lion purchased copy.
However, it's better to make a bootable copy of your Lion installer onto a DVD or USB drive so you won't have to redownload Lion every time you want to reinstall it.
If you don't see Lion listed in purchases, check if it's hidden, and if so, unhide it > http://support.apple.com/kb/ht4928Do this before reinstalling OS X Lion from Recovery. After unhiding, go to Purchases and you will be able to download Lion. Then, use Lion Diskmaker to create a bootable DVD or USB drive with Lion > http://liondiskmaker.com
The DMG image format is by far the most popular file container format used to distribute software on Mac OS X. Here’s how to convert a DMG file into an ISO file that can be mounted on a Windows PC. Dmg file is the disc image file which is widely used by Mac systems. Most of Mac operating systems and applications are distributed in dmg files. On Windows PC, it is very convenient to manipulate dmg files with PowerISO. You can open dmg file, convert it to iso file, or burn it to a CD / DVD disc. Programs used to perform the conversion from exe file to dmg format. It looks like that the exe to dmg conversion is often sought by users that want to convert a Windows installer (usually.exe) to a Mac installer (often saved as.dmg or.app), so they can install Windows app on Mac. This is not possible. Jan 22, 2017 Well I Think I Know How To But I Need to Convert ALL The Files To A Disk Image (.dmg) And Then Package It Into A.app (Mac OS X Executable) Folder But How Would I convert Certain Files Like.bsa To A Disk Image. Aug 17, 2018 Programs used to perform the conversion from dmg file to exe format. A dmg to exe conversion is often searched by users that would like to convert an installer for macOS / OS X app (often saved as.dmg or.app) to installer usable on Windows (.exe,.msi etc.). This is not possible via some conversion utility and it is unlikely that some dmg to exe converter exists. How to convert dmg to exe.

Jul 18, 2013 5:58 AM
Download Mac Os X 10.7 Lion Installer
If you looking on the internet a Mac OS X Snow Leopard DMG File So, you come to the right place now a day shares with you a Snow Leopard DMG free download without app store direct link. Mac OS X 10.6.8 Snow Leopard is an upgrade version to the previous version of OS X Leopard. Mac OS launch many more cool features in this Snow Leopard to improve the work and enjoy Full Mac OS experience and also fixed all previous version Bugs and multimedia specially Improve to play and also recorded and as well audio and many official features listed below.
Users can use the built-in or external camera to create professional images, use backdrop effects and adjust focus, white balance and visibility. iChat comes with screen sharing and the media experience is enhanced with DVD player. This release contains many other applications to meet the day-to-day needs of users. The main thing about the operating system is that it is suitable for all the old and newest devices. In short, it’s a stable release for MAC OS X with a variety of powerful features.
Mac OS X Snow Leopard OverView:
It has come to light that an upgrade to the Mac Os X Snow Leopard would be a wise choice if your Mac is performing slowly and requires boosting, as this OS is meant to provide increased efficiency and automated drivers to the hardware you want to connect. The Mac OS X Lion system was experimented with, so this update has been eagerly awaited and OS enthusiasts are impressed to see the number of improvements they have ever wanted to see over the years. What I really like is the sophisticated user interface and the control of stacks.
Snow Leopard is one of the leading Mac systems that support all new devices and fixes. A slicker user interface that allows users to enjoy the features easily and cleanly. This multilingual operating system includes many powerful tools such as Photo Booth, Screen Sharing, Boot Camp, DVD Player, iChat, QuickTime and much more. The design of this operating system specifically pays attention to security. There are also several improvements and fixes to make this OS better than the previous versions.
Snow Leopard is one of Mac’s leading operating systems that support and fixes all latest devices. A sleeker user interfaces with a clean environment for users to enjoy the functionality without problems. This multi-lingual operating system offers several powerful instruments such as a photo booth, screen sharing, boot camp, DVD player, iChat and QuickTime. The design of this operating system is specifically based on safety. There are also several improvements and corrections to make this OS better than the previous versions. you can also check out the MacOS High Sierra DMG.
Features Of Mac Os X Snow Leopard
A vast array of improvements and technological advancements.
Equipped with hardware acceleration support.
New theme wallpapers are included.
A smoother way to control stacks.
Preview for applications and programs.
Functional enhancements are the major purpose for the release.
Documents stacking is pretty much improved.
No cap on upgrading from Mac the predecessor release.
The original finder is with much-improved functionality.
More stable and less frequent browsing system.
QuickTime X features a simplified GUI with a greater focus on codec support.
Finder has a new Cocoa Desktop Window and Contextual Menu.
Apple included a beta version of Safari 4 with Snow Leopard.
Mac users can now connect to Microsoft Exchange 2007 servers via Mail, Address Book, and iCal.
Installing Snow Leopard on multiple machines takes approx 15 minutes in comparison to around an hour for Leopard.
Much More………………/
Mac OS X Snow Leopard DMG Technical Setup Details
Software Full Name: Mac OS X Snow Leopard
Setup File Name: Mac_OS_X_Snow_Leopard_10_6_8_Official.iso
Full Setup Size: 5.07 GB
Setup Type: Offline Installer / Full Standalone Setup
Compatibility Architecture: 32 Bit (x86) / 64 Bit (x64)
Latest Version Release Added On: 14th Mar 2019
Download Mac Os X Lion Dmg
System Requirements For Mac OS X Snow Leopard v10.6
Download Mac Os Mountain Lion Dmg Free
8 GB free HDD
2GB RAM
Core 2 Duo Intel Processor
Download Free Mac OS X Snow Leopard V10.6.8 DMG
mno-ngm.netlify.com › Mac Os X Mountain Lion Installation Files Dmg Download █ █
Mac Os X Mountain Lion Installation Files Dmg Download
Download Mac OS X Mountain Lion DMG File Installer for version 10.8. Free download and experience Apple's OS X 9th edition with brand new features. Dec 18, 2019 Mac OS X Lion 10.7 ISO and DMG Files Free Download. Even though you’ve waited enough here, we know that wasn’t your genuine intent. Well, don’t worry (saying for the third time, as we mean it). On this web page you will find the Mac OS X Lion ISO files. And the best thing?
Mac Os X Mountain Lion Dmg File Download
Apple have always been impressing the crowd with their software and hardware enhancements over the year. To add a feather to that cap, Apple has redefined the operating system experience with the Mac OS X Mountain Lion 10.8.
Overview
The Mac OS X Mountain Lion released after being in the Beta version run for a very long time. The Mac OS X Mountain Lion is much more efficient and technologically sound enough to secure your data much stronger than the previous Mac OS Versions, claims Apple. The user interface is said to be improved and much sleeker in the aesthetic appeal.
License
Official Installer
File Size
4.43GB
Language
English
Developer
Apple Inc.
Apple has made sure to take in the views and considerations of the Beta version users and the tweaks made through this update are a strong testimony to it. The environment is fabricated with a much easier user experience to tackle all the problems efficiently and smoothly. The Wi-fi performance is also tweaked up to give you seamless connectivity and improved upload and download speeds.
The Mac OS X Mountain Lion 10.8 also houses a better and stable operating system with its release so to give the user the hassle-free experience. There has been a lot of speculations that a huge amount of data can be sent over the internet before the release. Apple made that true with the release of the Mac OS X Mountain Lion 10.8.
Some of the very much looked up to feature in the Mac OS X Mountain Lion 10.8 is
1. Stable Operating System
The stability in the Operating system is a much looked upon the issue in the software framework of Apple. With tons of reviews and inputs from the user, Apple has finally cracked the code and has increased the stability of the operating system with the release of the Mac OS X Mountain Lion 10.8. The framework has been worked upon and the tiny attention to details has been given to enable the smoothest user experience for Apple.
2. Security Enhancements
There are also improved security enhancements with this update. Apple has been a company that always believes in keeping the security details and the privacy of its customers and has maintained the same till date. The more improved security enhancements in the Mac OS X Mountain Lion 10.8 update have been top-notch with more security beefed up for browsing, uploading data and as well as downloading data from the internet. The safety protocol involved with apple mail has also greatly improved.
3. Increased Performance of MacBook
Well the Mac OS X Mountain Lion 10.8 is the dawn update for MacBook users especially. Apple focused on decoding and solving the bugs that erupted among the various MacBook users with the Beta version release of the Mac OS X Mountain lion. The Mountain Lion OS also improved the user interface of the MacBook interface.
4. Sending Huge data over the internet
The Mac OS X Mountain Lion 10.8 had many expectations before its release out of which sending huge data over the internet was speculated. It was initially considered as a fan-made rumor but Apple made it a reality with the release of the Mac OS X Mountain Lion. Now wit the release of the Mac OS X Mountain lion, you can send huge amounts of data over the internet which was previously not allowed by the Apple Mac Servers as the Software couldn’t support such a feature with its previous OS versions.
5. Fixes for Screen Saver Issues and Smart Card
The issues that popped up with the previous Mac OS versions speculated a lot of commotion among the Apple users such that apple made it a top priority to make sure that they solved the issue with the next update. The screen saver framework was improved along with the issues that popped up with the Smart card as well. The improvements in these aspects made the Mac OS X Mountain Lion top of the game and well appreciated and welcomed by the users.
There are also many more features to add up to the mentioned features, the other upgrades are minute details and those improvements haven’t created a bigger impact on the user experience.
System Requirements of the Mac OS X Mountain Lion
Minimum RAM requirement of 2GB.
Free Hard Disk Drive of 8GB.
Intel Multi-Core processor.
Download Mac OS X Mountain Lion 10.8 ISO and DMG Image
The Mac OS X Mountain DMG file can be downloaded from the below link. The Mac OS X Mountain Lion is considered to be a very stable operating system and won’t be much of a trouble to the users. Make sure that the minimum system requirements are met. The File size is around 4.2 GB. You can also download the DMG file of various other operating systems from the ISO River website.
So, you’ve decided to download an older version of Mac OS X. There are many reasons that could point you to this radical decision. To begin with, some of your apps may not be working properly (or simply crash) on newer operating systems. Also, you may have noticed your Mac’s performance went down right after the last update. Finally, if you want to run a parallel copy of Mac OS X on a virtual machine, you too will need a working installation file of an older Mac OS X. Further down we’ll explain where to get one and what problems you may face down the road.
A list of all Mac OS X versions
We’ll be repeatedly referring to these Apple OS versions below, so it’s good to know the basic macOS timeline.
Cheetah 10.0Puma 10.1Jaguar 10.2Panther 10.3Tiger 10.4Leopard 10.5Snow Leopard 10.6Lion 10.7Mountain Lion 10.8Mavericks 10.9Yosemite 10.10El Capitan 10.11Sierra 10.12High Sierra 10.13Mojave 10.14Catalina 10.15
STEP 1. Prepare your Mac for installation
Given your Mac isn’t new and is filled with data, you will probably need enough free space on your Mac. This includes not just space for the OS itself but also space for other applications and your user data. One more argument is that the free space on your disk translates into virtual memory so your apps have “fuel” to operate on. The chart below tells you how much free space is needed.
Note, that it is recommended that you install OS on a clean drive. Next, you will need enough disk space available, for example, to create Recovery Partition. Here are some ideas to free up space on your drive:
Mac Os X Mountain Lion Installation Files Dmg Download Mac
Uninstall large unused apps
Empty Trash Bin and Downloads
Locate the biggest files on your computer:
Go to Finder > All My Files > Arrange by size
Then you can move your space hoggers onto an external drive or a cloud storage.
If you aren’t comfortable with cleaning the Mac manually, there are some nice automatic “room cleaners”. Our favorite is CleanMyMac as it’s most simple to use of all. It deletes system junk, old broken apps, and the rest of hidden junk on your drive.
Download CleanMyMac for OS 10.4 - 10.8 (free version)
Download CleanMyMac for OS 10.9 (free version)
Download CleanMyMac for OS 10.10 - 10.14 (free version)
STEP 2. Get a copy of Mac OS X download
Normally, it is assumed that updating OS is a one-way road. That’s why going back to a past Apple OS version is problematic. The main challenge is to download the OS installation file itself, because your Mac may already be running a newer version. If you succeed in downloading the OS installation, your next step is to create a bootable USB or DVD and then reinstall the OS on your computer.
How to download older Mac OS X versions via the App Store
If you once had purchased an old version of Mac OS X from the App Store, open it and go to the Purchased tab. There you’ll find all the installers you can download. However, it doesn’t always work that way. The purchased section lists only those operating systems that you had downloaded in the past. But here is the path to check it:
Mac Os Mavericks
Click the App Store icon.
Click Purchases in the top menu.
Scroll down to find the preferred OS X version.
Click Download.
This method allows you to download Mavericks and Yosemite by logging with your Apple ID — only if you previously downloaded them from the Mac App Store.
Without App Store: Download Mac OS version as Apple Developer
If you are signed with an Apple Developer account, you can get access to products that are no longer listed on the App Store. If you desperately need a lower OS X version build, consider creating a new Developer account among other options. The membership cost is $99/year and provides a bunch of perks unavailable to ordinary users.
Nevertheless, keep in mind that if you visit developer.apple.com/downloads, you can only find 10.3-10.6 OS X operating systems there. Newer versions are not available because starting Mac OS X Snow Leopard 10.7, the App Store has become the only source of updating Apple OS versions.
Purchase an older version of Mac operating system
Os X Snow Leopard
You can purchase a boxed or email version of past Mac OS X directly from Apple. Both will cost you around $20. For the reason of being rather antiquated, Snow Leopard and earlier Apple versions can only be installed from DVD.
Buy a boxed edition of Snow Leopard 10.6
Get an email copy of Lion 10.7
Get an email copy of Mountain Lion 10.8
Os X Lion
The email edition comes with a special download code you can use for the Mac App Store. Note, that to install the Lion or Mountain Lion, your Mac needs to be running Snow Leopard so you can install the newer OS on top of it.
How to get macOS El Capitan download
If you are wondering if you can run El Capitan on an older Mac, rejoice as it’s possible too. But before your Mac can run El Capitan it has to be updated to OS X 10.6.8. So, here are main steps you should take:
1. Install Snow Leopard from install DVD.
2. Update to 10.6.8 using Software Update.
3. Download El Capitan here.
“I can’t download an old version of Mac OS X”
If you have a newer Mac, there is no physical option to install Mac OS versions older than your current Mac model. For instance, if your MacBook was released in 2014, don’t expect it to run any OS released prior of that time, because older Apple OS versions simply do not include hardware drivers for your Mac.
But as it often happens, workarounds are possible. There is still a chance to download the installation file if you have an access to a Mac (or virtual machine) running that operating system. For example, to get an installer for Lion, you may ask a friend who has Lion-operated Mac or, once again, set up a virtual machine running Lion. Then you will need to prepare an external drive to download the installation file using OS X Utilities.
Burning yosemite dmg in el capitan. Apr 21, 2016 How do I burn a Disk Image in Mac OS X El Capitan? If you noticed recently, Mac OS X El Capitan has removed a lot of handy features from the Disk Utility program–one of them being the ability to burn disk images (DMG or IMG).
After you’ve completed the download, the installer should launch automatically, but you can click Cancel and copy the file you need. Below is the detailed instruction how to do it.
STEP 3. Install older OS X onto an external drive
The following method allows you to download Mac OS X Lion, Mountain Lion, and Mavericks.

Start your Mac holding down Command + R.
Prepare a clean external drive (at least 10 GB of storage).
Within OS X Utilities, choose Reinstall OS X.
Select external drive as a source.
Enter your Apple ID.
Now the OS should start downloading automatically onto the external drive. After the download is complete, your Mac will prompt you to do a restart, but at this point, you should completely shut it down. Now that the installation file is “captured” onto your external drive, you can reinstall the OS, this time running the file on your Mac.
Boot your Mac from your standard drive.
Connect the external drive.
Go to external drive > OS X Install Data.
Locate InstallESD.dmg disk image file — this is the file you need to reinstall Lion OS X. The same steps are valid for Mountain Lion and Mavericks.
How to downgrade a Mac running later macOS versions
If your Mac runs macOS Sierra 10.12 or macOS High Sierra 10.13, it is possible to revert it to the previous system if you are not satisfied with the experience. You can do it either with Time Machine or by creating a bootable USB or external drive.
Instruction to downgrade from macOS Sierra
Instruction to downgrade from macOS High Sierra
A lot of efforts has been made on order to get it done. The approach towards public needs has also been the best when it comes to Apple, a good product becomes the best irrespective of the cost that some people criticize. Now go to the boot menu and install the Mac OS X TIGER ISO on your PC.There are demo videos available if any further assistance is required. Final Words.The Mac OS X TIGER is the best OS ever created by Apple as the company has admitted itself. Mac os x tiger install dvd free download windows 7.
Mac Os Mountain Lion Download
Instruction to downgrade from macOS Mojave
Instruction to downgrade from macOS Catalina
Before you do it, the best advice is to back your Mac up so your most important files stay intact. In addition to that, it makes sense to clean up your Mac from old system junk files and application leftovers. The easiest way to do it is to run CleanMyMac X on your machine (download it for free here).
Visit your local Apple Store to download older OS X version
If none of the options to get older OS X worked, pay a visit to nearest local Apple Store. They should have image installations going back to OS Leopard and earlier. You can also ask their assistance to create a bootable USB drive with the installation file. So here you are. We hope this article has helped you to download an old version of Mac OS X. Below are a few more links you may find interesting.
These might also interest you:
0 notes
Photo
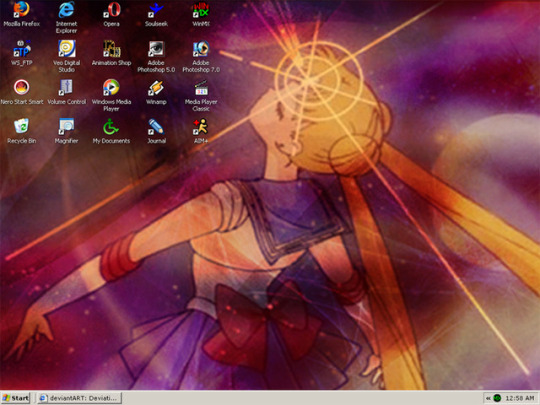
Inspired by @dialup2002 to post some more old stuff. :) This is a desktop screenshot I posted on my DevART account January 2005. Kicking it with Windows XP, but I loved/preferred the classic style that I was accustom to (95-98-ME). I made the wallpaper used, but I’m having trouble finding a copy of it. I’ll prob try to remake it in non-1024x768 resolution lmao. Not sure if this is from 2005. It might have been from 2004, but I hadn’t posted it yet. I did that a lot.
Some fun notes about some of the software icons pictured (lots of info):
Firefox - THE FIRST BROWSER TO DO TABS OMG. I was a huge advocate for Firefox, especially in its initial releases. They were doing things on the internet nobody had really seen up to that point, and made it popular! Since I had so many issues (as most people do) with Internet Explorer, I was shopping around for a new browser at the time of this shot. Google Chrome didn’t exist yet. (Can you imagine??)
IE - As stated above, I disliked IE. It was kept for various reasons, however. Such as testing website layouts, since the mass-majority of people used it and things looked different in browsers when you were coding.
Opera - While giving Firefox a try, I also managed to snag a very, very early copy of Opera. I’ve always been the type of person that loved to try out new stuff as early as possible, and this was a very special piece of software that I wanted to give a go. The reason that it was special? You had to send away for a CD for it. That’s right, kids. They snail-mail’ed me a CD because it was considered “commercial software.” I paid to get that browser lmfao. I was super super hyped later in 2005, because it became “freeware” and I was able to more-easily push my friends to try it out. The devs were (and still are) seriously awesome. This is why I still use Opera as my main browser today! Ya’ll should try it if you aren’t already! You can even use your most-beloved Chrome extensions on it. :)
Soulseek & WinMX - Holy crap, you guys! lmao Is anyone here old enough to remember these programs?? XD This was basically where most people went after Napster bit the dust. This was when we were all scrambling, trying to find a new P2P sharing program. This was right in-between the eMule/Donkey phase and before the Limewire/KaZaA fiascos where people’s computers were being overloaded with viruses from companies trying to stop pirating. Ahh, the wild, wild west... Days were so exciting when you spent hours downloading something that could potentially ruin your computer lmao
WS_FTP - Still one of my favorite FTP programs for Windows! Works like a charm! These days I use Transmit 5 for Mac, but this was my first program ever for file transfer protocol. It’s basically a tool for uploading files to my website’s server, because back when I first registered it, there was no web uploader for that kinda stuff. Now I stick with that because it’s easier and I’m used to it lol
Veo Digital Studio - Used to use this for my webcam back before webcams were built into laptops, and before they were common enough to have amazing freeware available for them. (Also this is hilarious.) The quality was horrible, but I was hella excited to take pictures and share them with friends and on my blog at the time. From what I remember, there was something I used after this that was some type of South Korean selca software. Haduri? Something like that. It was really cute and even let you do little animations. :)
Animation Shop - Okay. So... from what I remember, this might have been owned by the people that made Paint Shop Pro? I think it was Corel. I honestly don’t remember where I got this from, but this is what I used to use to make animated gifs (because Photoshop just....didn’t for some reason? I had to use PSP at some point, I remember that. I just don’t remember why lmao. It might have been my copy didn’t allow it, or my computer was just too shit to run it good enough, or just stopped working because....Windows).
Adobe Photoshop 5.0 - I originally got this rip from a friend of mine, whose dad got a CD from his company that he worked at. It was an official/real license, which was really awesome! I think this was the first version of Photoshop I ever owned (!!), which is pretty amazing to think about about! I had that CD copy for a few years. I initially was gifted a copy of the CD around 2001-2002 or so. I know for a fact I had newer versions (7.0 was legend before CS suite came around), so I’m not sure why I was using this one at this point lmao. My guess is, like mentioned above, something happened with my computer and I didn’t want to format it and reinstall everything lol or because it was the fastest version I had installed to boot up and do a quick photo edit.
Adobe Photoshop 7.0 - I do remember this took a long time to start up. I can only imagine this was like a bad pirated copy or something, or was so bloated with new stuff in it, and that’s why I kept 5.0 for a quick boot. I know I used this majority of the time, though. Most of my backups for brushes and fonts are from backups that include 7.0 as a zip. ¯\_(ツ)_/¯ My computer wasn’t the most powerful at the time, despite what I pushed it to do, so this is prob why. But hell yeah! Photoshop represent! lol I still use it today, and its still one of the first things I install on a fresh OS install. Enjoying CC 2017 these days.
Nero Start Smart - I was so excited to make mix CDs and share them! Back in the day before you had stuff like playlists that were sharable on YouTube/Spotify, etc, you had this to share music. Or play in your car. Or CD walkman. Nero was a software you could burn your CD-Rs and make your own laser-etched album art! I begged for years to get a CD burner lmao. Back when casette tapes were still around enough that my parents were like “but why???” lmao. They were not common back in the day like they became over time, just, like, included on your computer. Back then you had to buy one and install it into your computer tower yourself! I got mine I believe.....in 2001? It was the year after the Playstation 2 was released. The first one I got was just a very standard burner. Did a very specific type of CD burning at a low (slow af) speed. It was $700 lmfao. Let that sink in for a minute because my parents didn’t let me forget about it for the next four years lmfao. I saved up birthday and Christmas money and went halves on it. Then I upgraded to the one that this one was! c: Which did the laser etching, and DVD burning! (And you better believe I was burning DVDs of stuff I was downloading online lmfao this was the golden age of the internet where everything was just available everywhere as long as you had the patience to download that shit, because it took forever to download)
Volume Control - My dad and I messed with the wires on all of these random computer speakers and stereo speakers that we had collected over the years and hotwired our own version of a 5.0 surround sound in the room, which was mounted to the ceiling corners and above the computer station. It was lit. I needed Volume Control easily accessible because sometimes the speakers needed redirecting, or I needed to turn the beats down because my mother was tired of my fifth time playing the Gundam Wing OSTs and Miyavi. (It was metal, okay???)
Windows Media Player - I did not use this to listen to media. Let me reiterate that. I did not use it to listen to media on. lol this was specifically used to rip tracks from CDs that friends lent me, because it was the easiest software I was able to use to change the KBPs for quality control and the ID3 tags so I could save it and organize it for use in Winamp and know wtf I was listening to lol. Nobody used WMP for listening to music.... xD
Winamp - The best music player. Period. Still. Nothing beats it. Pls, pls, Nullsoft! Come back and make a native version for MacOS. :’(((( I would buy it! Doesn’t even have to have new features or look different. Classic look, pls pls!
Media Player Classic - Do people still use it??? This player was amazing! Paired with k-lite codec pack, it played everything. It was like VLC before VLC. And it looked good. Clean. Small. Could be installed anywhere which was nice. And the codec packs just made everything look and run fantastic!
Recycle Bin - .... Trash XD
Magnifier - This was for my dad because he had bad eyes and couldn’t remember CTRL +/-/0 to increase the text on pages that he wanted to read.
My Documents - Where I saved all the stuff I downloaded. Not the real My Docs. Just a folder that I named as such, with a custom icon. I don’t know why I wanted it there lol. I think to just have a uniform square on my desktop haha
Journal - I renamed this. I forget the original name of the client, but it was the official client of LJ. It was basically a program that let you write up posts for Livejournal and you could format things, draft them, etc, and post without uploading to your journal/blog. I liked it because sometimes I couldn’t post right away, and it made making drafts a lot easier for me to go back and edit. It also let you edit past posts, which was really convenient instead of looking for it on the web version one post at a time.
AIM+ - I loved AOL Instant Messenger, but over time the ads became too much. I invested a lot of time in 3rd party clients. I was constantly switching between AIM+, Adium, DeadAIM, Pigeon, Trillion, etc. Depended on what I wanted to do that day. Want to clone a SN? Want to skin the colors of the chats? Need transparency? Want to customize your lists? Want to log into more than one msg system at once? They all had their strengths. This was my msg service of choice. Back in the day you were either on this, MSN, or Yahoo!. Some people rocked ICQ and there were a few others, but these were the most common from who I knew/hung out with. I miss those days. <3
You can see WinMX running in the taskbar lmfao so I was prob downloading something at the time of snagging this quick shot. I also had DevART open (prob because I was gonna share this on there). I really wish I had more programs open at the time of this! XD It’s wild to look back at some of the software changes over the years!
Anyway, that’s one of my oldest screenshots that I can find that I’m able to share right now. :) I’m going to be posting a remake of that wallpaper that I did later today for those of you that want that, too.
If you read this far, thank you!! Hope you had fun reading about old stuff!
#*#long post#mine#anime#old anime pictures#old anime images#old#old images#old internet#old web#webcore#the internet of old#windows#windows xp#sailor moon#old windows#old software#old screenshot#screenshots#software#old stuff#2005#2004
2 notes
·
View notes
Text
RANSOMWARE PROTECTION ALERT | SORTING TACTICS & MEASURES TO SHIELD OURSELVES

Have you ever encountered ransomware?
Despite a current drop, ransomware is still a serious threat and can cause damage to your system and vital data. That is why ransomware protection software is not just disinfecting your computers but also prevents them from replacing your files and folders.
Ransomware protection has become rapidly mandatory as cybersecurity risks increase. Because in any case, if you suffer from a successful ransomware attack, it can be challenging to remove it. However, there are tools available that will aim to help reverse a ransomware attack, but the best defense is to avoid being infected by ransomware in the first place.
Here in this blog, you will learn everything about the file-encrypting malware, how it works, and the best bullets to hunt it out before it will hack your system.
WHAT IS A RANSOMWARE ATTACK?

Firstly what is ransomware? It is a type of malware in which an attacker locks and encrypts prey’s data and then demands a payment to unlock and decrypt the data.
Ransomware attacks take the benefit of human, system, network, and software vulnerabilities to infect the device – which can be a computer, printer, smartphone, or other endpoints.
Ransomware is often necessitating and designed to spread across a network, target database, and file servers and quickly paralyze the entire organization. Once infecting the system, the ransom will ask to grant access and subsequently for payment to undo the loss. It’s a rapidly growing threat for billions and millions of dollars as payment to cybercriminals and inflicting significant damage and expenses. HELL NO!
So, how does this demonic malware operate? It’s wise to understand the working so that if the situation arises we know how to deal with it?
HOW DOES RANSOMWARE WORK?

After the device discloses the malicious code, the ransomware attack proceeds as follows. Ransomware can remain dormant until the tool is at its most vulnerable and only then executes an attack.
RANSOMWARE SEVEN-STAGE ATTACK –
#STAGE1 – INFECTION
Ransomware is covertly downloaded and installed on the device.
#STAGE2- EXECUTION
Ransomware outlines locations for targeted file types, including locally stored files and mapped and unmapped network-accessible systems. Some ransomware attacks also destroy or encrypt any backup files and folders.
#STAGE3- ENCRYPTION
Ransomware offers a key exchange with the command and control server, utilizing the encryption key to scramble all files detected during the execution step.
#STAGE4- USER NOTIFICATION
Ransomware unites instruction files describing the pay for decryption process, then uses those files to display ransom notes to the user.
#STAGE5- CLEARING UP
Ransoms usually clears up and terminates itself, leaving only the payment instruction file.
#STAGE6- PAYMENT
The victim often clicks the notification, which directs it to a web page with additional information on ransom payment.
#STAGE7- DECRYPTION
After the victim pays the ransom, the victim may receive the decryption key. However, there is no guarantee the decryption key will be released as warranted.
BREACH VULNERABILITIES – ARE YOU A POTENTIAL TARGET OF A RANSOMWARE ATTACK?

Several factors might make you the target of a ransomware attack;
No proper backup plan exists.
The device has outdated software,
The browser operating systems no longer patch.
Insufficient consideration paid for cybersecurity with a concrete plan is not in place. In any case, if one or more of these points apply to your system means you are at risk of falling victim to a ransomware attack.
EMPMONITOR

EmpMonitor is a cloud-based employee monitoring software. All your data will be saved in cloud storage. Besides the cloud storage, EmpMonitor furnished with other intelligent monitoring features and all these features and specifications can help you prevent ransomware attacks and insider threats to a great extent. How? Let us have a glimpse into it;
TOP WEBSITE USED
Now you can track every URL visited during the operating time and the time spent at every single website. This data will not only let you examine what website is visited and also help you to trace which website should avoid.
KEYSTROKE LOGGING
Keystroke logging features enable monitoring the keypunches of the employee. Also, get the insights of keylogging up to 180 days.
INTERNET ACTIVITY MONITORING
Organizations often use firewalls and router logs to control and keep track of internet traffic from the employee computer. Advanced monitoring tools like EmpMonitor can intercept. Also scan all data over the network when including email communications, web browsing, and file transfer.
DESKTOP MONITORING
Usually, people think that antivirus software and having malware protection would be enough for data security, but the truth is this is far away. Investing in employee monitoring software can keep an eye on the system’s activities and ultimately detects malware which can help in stopping any malware loss in the initial step.
HOW TO PREVENT RANSOMWARE ATTACK BRILLIANTLY?
It can be under control with the help of the best antivirus software for protection against ransomware. Here are 05 tactics for how to prevent ransomware attacks brilliantly;
BACKUP YOUR DATA-
The best way to avoid the ransom threat of being locked out of your critical files is to ensure that you always have backup copies, most preferably in the cloud. Monitoring desktops having cloud storage like EmpMonitor will protect your data and avoid worries for you while wiping the data and reinstalling the files.
NEVER CLICK ON AN UNSAFE LINK –
Avoid clicking on links over the internet that seem to be spammy or on unknown websites. In any case, you click on a malicious link, an automatic download starts, which could lead to your computer being infected.
KEEP YOUR PROGRAMS AND OPERATING SYSTEM UP TO DATE-
Regularly updating the programs and operating systems help to protect you from malware. That ultimately makes it harder for cybercriminals to exploit vulnerabilities in your programs.
AVOID DISCLOSING PERSONAL INFORMATION-
If you receive a call, text message, or email from an untrusted source requesting personal information, do not reply.
NEVER USE UNKNOWN USB STICKS
–
Never attach alien USB sticks or other storage media to your computer when you do not know where it is evolving. It is a possibility that cybercriminals may have infected the storage medium.
WHY IS IT NOT FITTING TO FUND THE RANSOM?

You might be wondering why you should not pay the ransom. But wait, there are several reasons why this can get into their bad idea.
THERE MIGHT BE A CHANCE THAT YOU WILL NEVER GET A DECRYPTION KEY-
When you pay the ransomware demand, you are supposed to get a decryption key in return. Many people and organizations have paid the ransom only to receive nothing in return. After investing tens or hundreds or thousands of dollars, and still have to rebuild the entire system from scratch.
YOU MAY BE CRAFTING A TARGET ON YOUR BACK
–
When you pay for the ransom, cybercriminals ultimately tend to know that you are a good investment which further attracts more ransom.
AFTER ENDING UP, YOU ARE STILL FUNDING CRIMINAL ACTIVITY-
Whether you are victims or trying to sort everything out, it is a fact that somehow you are funding criminal activities. When you pay for the ransom, receive a good decrypted key, and running is merely the best worst-case scenario.
03 CURATIVE MEASURES FOR RANSOMWARE PROTECTION
Measure 01 – Always use real-time alerting and blocking to automate identifying ransomware-specific behavior and then block users and endpoints from further data access.
Measure 02- Use deception-based detection, which strategically plants hidden files on storage systems to identify ransomware encryption behaviors at the earliest attack stage.
Measure 03- Use granular reporting and analysis to provide detailed audit trail support for forensic investigations.
In reality, nearly 40% of the victims who pay a ransom never get their data back and 73% of those payments target again later- which is why everyone must protect against ransomware.
CHECKOUT OUR LATEST BLOG;
Learn How To Have An Employer-Employee Relationship The Right Way
7 Hacks To Grow Your LinkedIn Connections Right Away
Referral Traffic : Over Rated Tactic For Diverting Traffic to Website
SECURITY IS CRUCIAL !
Apart from other forms of malware, importance and careful actions are mandatory for ransomware protection. Creating backups on backups, data security, running regular updates and security tests will keep this hazardous malware attack at bay.
This blog contains some free ransomware protection tips, and you can also check out this multi-task software for managing your business working flow steadily. I hope you got all you were seeking for and if not, drop the question in the comment section and would love to reply to it.
Again repeating my question, Have you ever encountered ransomware? And if the answer is YES! Let me know how you handle the situation and heal that scratch in the comment section below.

Originally Published On: EmpMonitor
#Employee Monitoring#Employee Management#Employee Productivity#Employee Monitoring Software#Ransomware Protection
0 notes
Text
How To Get Mac Os For Free

How To Get Any Roblox Hat For Free On Mac Os
How To Get Mac Os On Windows
How To Upgrade Mac Os
Run Mac Os On Windows 10
How To Get Macos For Free
Get an ultimate backup app
I want to virtualize a Mac (the latest, 10.9) on my Mac (MacBook Air). I prefer to use VirtualBox. After setting up the OS X guest, I need to provide a.iso file from which VirtualBox will install OS X. Where can I (legally) get such a.iso file? My Mac didn't come with installation media so I. Download Mac OS X 10.5.6 now from Softonic: 100% safe and virus free. More than 4468 downloads this month. Download Mac OS X 10.5.6 latest version 2020.
Data loss? Impossible with Get Backup Pro on Mac.
Running the latest software is not always the best decision. There are plenty of reasons you might want to downgrade or run an older version of macOS on your computer.
You may find that after the latest update your computer runs slower, your apps don’t function, or that the programs you need to run are not yet compatible with the upgrade. Maybe as a developer, you want to create a test environment to ensure your software runs properly in all available versions of OS X - check out the infographic below. Or you may simply like the look of the old version better (no judgement) and not want to upgrade until absolutely necessary.
Keep your apps while downgrading
Get Setapp, a collection of Mac apps that strengthen your macOS. Whenever you decide to downgrade, your apps will travel with you.
How to Install Old OS X on Your Mac

How To Get Any Roblox Hat For Free On Mac Os
Although you might think that going back to the old macOS is not possible by looking at the App Store Updates tab, it’s actually quite easy to do. In this article, we’ll take you through everything you need to download and install an old OS X on your Mac.
Prepare your Mac first
Make sure you are ready to downgrade your operating system by checking in with what version of OS X you already have and ensuring you have enough hard drive room to download the older version. Clicking the apple in the top left corner of your desktop and selecting About This Mac will allow you to see what OS X version you are currently running. Tabbing over to Storage will let you know how much disk space you have available. You’ll need around around eight gigabytes free depending on which macOS you downgrade to.
Even if you do have enough space, it’s a good idea to clean your computer before installing the desired operating system. You can, of course, do so manually by deleting unused files and uninstalling old software to free up disk space. Depending on how tidy you are, this might take quite a bit of time.
To make things easy, use a specialized app like CleanMyMac, which will quickly free up space by detecting unused apps and large files, and offering to completely delete them, with all their hidden corresponding files, in one quick click.
Optimizing your Mac with CleanMyMac is effortless:
Launch CleanMyMac
Select the Smart Scan tab and click Scan
Review Details to see the list of suggested optimizations
Click Clean
To uninstall certain apps, find the Uninstaller tab and select the apps you haven’t been using for a while.
Download CMM X to prepare for Big Sur
The only solution that will free up disk space, remove duplicates, and solve tons of problems to prepare your Mac for a new macOS
The final preparation step is to make sure you back up all your important files to cloud storage or an external drive. A proper backup app like Get Backup Pro can save you a lot of headache here.
To create a new backup with Get Backup Pro:
Connect your external hard drive
Click the plus icon in the bottom left corner
Type in the name for your backup
Choose your external drive as a destination
Adjust all the settings according to your preference and click OK
Tap the play button once you ready to perform the backup
Grab an old macOS with Setapp
Downgrading to previous operating systems on Mac gets easier. To put it shortly, Setapp has your back here.
Download the OS X you want
Once you have space on your computer, figure out what version of OS X you would like to install. You can see all previous versions of OS X your Mac has installed by opening up the App Store and clicking the icon in Applications. Tab to the Purchase page of the menu and scroll down to find the line for previous operating systems. Clicking the install button of the macOS you want will begin downloading the file.
What if I can’t find the version I want in the app store?
If your goal is to download a version of macOS that you have not already used, or, that was not available as an update from the App Store after you bought your Mac, you may need to purchase it. The earliest versions, OS X Lion and OS X Mountain Lion are available on the Apple Store’s website and arrive to you via email for download. OS X Snow Leopard ships as a boxed version and requires a disk drive to install.
It could be helpful to know where you sit on the timeline of macOS X updates. Below is a chronological list of all the updates beginning with the most recent update, High Sierra, released in 2017:
OS X High Sierra 10.13
OS X Sierra 10.12
OS X ElCapitan 10.11
OS X Yosemite 10.10
OS X Mavericks 10.9
OS X Mountain Lion 10.8
OS X Lion 10.7, released in 2011
Visiting the Apple Support’s Downloads page makes it easy to search for any version of macOS you might need, and most are available for free. Downloads for previous versions of OS X are linked below and include:
Alternative sources for downloading macOS
If you can’t find the version you want from Apple, ask a friend who is running the macOS you’re looking for to make a copy of the installer file for you. Downloading a .dmg file from a torrent site may seem a quick solution, but it means risking your security. Alternatively, you could hit up your nearest Apple Store. They will likely have image files of all the different versions of the software and help you install it right there as well.
Install the macOS
If you download the file from the App Store, the installer will start immediately. Follow the prompts and be prepared to restart your computer. If you acquire the installer from another source, just downloading the file will not install the OS X right away on your Mac, you’ll need to find the file in your Downloads or Applications folder, then open and run the installer from the downloaded file.
I can’t download an old version of Mac OS X
A downgrade is different than an upgrade. When you try to downgrade macOS, the installer may not launch right away depending on which versions of macOS you are moving between. If your installer does not launch, or you get an error message that reads: “This copy of the ‘Install OS X’ application is too old to be opened on this version of OS X,” you’ll need to use a bootable USB or external drive to work around this problem.
Get a bootable drive with OS X
Creating a bootable USB or a bootable drive is not complicated. You’ll need an external drive with enough space to hold your desired OS X on it and a basic familiarity with Terminal, Apple’s command line interface.
If you’re uncomfortable using Terminal to execute basic commands, use an app like Disk Drill to help create a boot drive. Whether you use Terminal or Disk Drill, our guide on creating a bootable installer will walk you through all the necessary steps.
Remove the old OS X
Once your drive is prepared with your bootable version of OS X, erase the unwanted version. After you restart your computer, press and hold Command + R. When you enter the macOS Utilities screen, navigate to Disk Utility, click continue, and find your Startup Disk. Tab to the Erase page and name the file you want erased (e.g. macOS High Sierra). Then select Mac OS Extended (Journaled) from the dropdown menu. Hit Erase and quit out of Disk Utility. This will return you to the OS X Utilities selector.
Install the bootable version of OS X
If you used Disk Drill for creating your bootable drive, a window will prompt your actions for using the install disk you made. But if you created your own using Terminal, use OS X Utilities Selector and find Reinstall OS X. Find and select your install disk with your bootable version of your preferred macOS, and click continue through to the license agreement. Once you agree, you should be prompted by the installer. Once the installation is completed, your computer should restart. If it does not restart itself, make sure you restart it normally. The downgrade should be complete!
How To Get Mac Os On Windows
As you can see, downgrading your OS X is not as dreadful as you might think, especially if you use helper apps like CleanMyMac, Get Backup Pro, and Disk Drill — all of which are available for a free trial on Setapp. So downgrade away!
macOS evolution inforgaphic
Cheetah
OS X 10.0
March 24, 2001
“When you saw it, you wanted to lick it,” said Steve Jobs about Aqua – the brand new UI born with the release of Cheetah. Preview, Mail, QuickTime, and TextEdit make debut at this point.
September 25, 2001
No big functionality updates, the focus is shifted to performance instead. From improved file management to CD and DVD burning, Puma just makes it work better.
Jaguar
OS X 10.2
August 23, 2002
A large grey Apple logo appears for the first time, replacing Happy Mac at startup. Optimized search functionality of Finder and the first release of Accessibility API – Universal Access. App arrivals: iChat and Address Book.
October 24, 2003
Panther release introduces Exposé, a feature for seamless management of open applications. Safari officially becomes the default web browser.
Tiger
OS X 10.4
April 29, 2005
A rich harvest for Mac, Tiger marks the launch of 200+ new features. Spotlight search and Dashboard are the top stars, with Apple TV, Automator, and VoiceOver joining the crowd.
October 26, 2007
Long-awaited and Mac-changing. Leopard gives a spectacular leap, introducing Time Machine, Boot Camp, QuickLook, and full support for 64-bit software.
Snow Leopard
OS X 10.6
August 28, 2009
While Leopard did a great job, Snow Leopard arrives to refine it even more. Mainly, it comes with apps rewritten in 64 bit and OpenCL. The 2009 OS X release is also known for Mac App Store launch.
July 20, 2011
iCloud arrives. Apart from that, lots of iOS advancements find reflection in OS X Lion, covering Launchpad, multi-touch gestures, and more.
Mountain Lion
OS X 10.8
July 25, 2012
Mountain Lion adds new integrations and further iOS perks like Reminders, Notes, and Messages. It gets easier to track app updates via the Notification Center.
October 22, 2013
Maps, iBooks, and Tags debut in the first inanimate OS X – Mavericks. To enable secure password encryption and storage, iCloud Keychain in introduced.
Yosemite
OS X 10.10
October 16, 2014
A completely new sleek design is what Yosemite is remembered for. Continuity and Handoff integrated into the new OS strengthen bonds between iOS and OS X devices.
September 30, 2015
El Capitan features Split Views – dual-window functionality for arranging and managing app windows. Plus, OS X 10.11 comes with improved Safari, Mail, and Spotlight.
Sierra
macOS 10.12
September 20, 2016
With Sierra, OS X dies and macOS is born. The renamed system introduces even more iOS perks like Siri and unlocking Mac with Apple Watch.
September 25, 2017
Major improvements go unnoticed for a user, but the overall performance skyrockets, due to embracing Apple File System and a new video standard, HEVC.
Mojave
macOS 10.14
September 24, 2018
Visual refinements introduced via Dark Mode and Dynamic Desktop take central stage in Mojave. The new apps migrating from iOS include Stocks, News, Home, and Voice Memos..
Setapp lives on Mac and iOS. Please come back from another device.
How To Upgrade Mac Os
Meantime, prepare for all the awesome things you can do with Setapp.
Read on
Run Mac Os On Windows 10
Sign Up
Setapp uses cookies to personalize your experience on our website. By continuing to use this site, you agree to our cookie policy.
How To Get Macos For Free
0 notes
Text
9 Things You Didn’t Know About Windows 9 Desktop Widgets | windows 9 desktop widgets
© Photo: Shutterstock ( (Shutterstock)

How to Bring Desktop Gadgets to Windows 9 « Windows Tips .. | windows 10 desktop widgets
A solid-state drive is one of the best upgrades you can accomplish for your desktop computer. And it’s not actual adamantine to set up: Physically install it, affix the appropriate cables, and reinstall Windows from scratch.
But maybe you don’t appetite to accord with ambience up Windows (again), artful all of your analytical files and folders from your admired advancement location, and reinstalling all your apps. We feel you.
There’s addition advantage you can try back you’re brief to a new SSD: cloning your old adamantine drive assimilate the new one. It’s (reasonably) fast and accessible to do, and commodity you can set to run brief if you don’t appetite to delay and watch. Back you deathwatch up and about-face your arrangement over to your new SSD, aggregate will be absolutely as you larboard it. (In theory.)
There’s one important actuality you’ll charge to accumulate in apperception back cloning drives like this. Your new SSD has to be big abundant to authority aggregate from your older, primary adamantine drive. If that’s not the case, cloning won’t work.
To chargeless up space, you can annul files you no best charge or can re-download again. You can additionally install a beginning adaptation of Windows on the new SSD, accomplish that the primary cossack drive (via your motherboard’s BIOS), and use your earlier adamantine drive as accessory accumulator for your less-critical files, games, movies, or whatever. You don’t accept to accept aggregate on your new SSD, afterwards all.
If you’re replacing your laptop’s drive with a new SSD, this absolute action becomes a bit added difficult, back you apparently alone accept allowance for one drive (unless your laptop comes with a added aperture for an M.2 SSD). To carbon your primary drive to your new SSD, you can aces up a USB-to-SATA adapter, an alien dock, or one of these adorned gadgets.
The cloning action could booty anywhere from a reasonable to a ample bulk of time depending on your USB affiliation and the admeasurement of your laptop’s drive. However, the delay is account it: Replacing an earlier automated adamantine drive with a aboriginal SSD is one of the best achievement upgrades you can accord your laptop.

Best Windows 9 Desktop Gadgets – windows 10 desktop widgets | windows 10 desktop widgets
How to Do a Clean Install of Windows Without Losing Your Files, Settings, and Tweaks
We’ll be appliance the appliance Macrium Reflect to carbon your adamantine drive to your new SSD. Back you double-click on the installer, you’ll absolutely see a awning that looks like a downloading apparatus rather than your archetypal appliance installer. That’s correct. I’m not abiding why Macrium Software goes this avenue instead of aloof alms up the absolute app as a download, but there you go.
You shouldn’t accept to change any options on this screen. Aloof bang the “Download” button and chase all the prompts back it has completed. Already Macrium Reflect endless up, and bold your new SSD is affiliated to your desktop or laptop, you’ll see a awning that looks commodity like this:
For the purposes of this article, I’ll be wiping my F: drive (“Tiny Game Drive”) and bold I’m cloning my primary drive, C:, over to it. (I accidentally deleted my screenshot that showed F: as empty, so let’s comedy pretend for a moment.)
To get started, aloof bang on the “Clone this disk” articulation beneath your primary adamantine drive, which should be called by default. On the awning that appears, bang on the “Select a deejay to carbon to” articulation in the big box of abandoned white amplitude and aces your new SSD. Your awning should again attending commodity like this:
You ability accept as abounding partitions as my example; you ability accept fewer. Regardless, you’re activity to appetite to get them anchored on your new SSD. You ability aloof be able to bang “copy called partitions” and accept aggregate map out altogether on your new SSD. You ability additionally get hit with a:
Sigh. In my example, I could fit the aboriginal four partitions assimilate my new SSD, but the fourth partition—my primary abstracts partition—appeared as if it was bistro up the blow of my SSD’s space, alike admitting the SSD had affluence of allowance for every allotment from my primary drive. To fix this, bang on “Undo” and manually annoyance your partitions from your old adamantine drive assimilate your new SSD, extenuative the better allotment for last:

Win9 Widgets lets you keep tabs on your hard drive, CPU and more .. | windows 10 desktop widgets
Once you’ve done that, bang “Next.”
You’ll now see a awning that has a appealing abundant analysis of all the things Macrium Reflect is activity to do already your carbon starts. No, it hasn’t done annihilation yet—you’ve aloof been ambience it up.
You can analysis these settings if you’d like, but you’re apparently appealing safe to aloof hit “Finish,” which starts the procedure:
Depending on the admeasurement of the drive you’re activity to—how abundant abstracts Macrium Reflect has to move—as able-bodied as its speed, this action could booty a little time. Abundance was done in a atom over a half-hour, but I was cloning an SSD (where my Windows allotment lives) to an abandoned SSD for this example. In added words, the alteration was appealing speedy. Moving from a adamantine drive to an SSD ability booty four times as continued (or more). If you’re impatient, you can aloof set up your carbon to run overnight, and aggregate will be set already you deathwatch up.
Now that you accept a carbon of your aboriginal drive, don’t do annihilation on your primary drive that puts abstracts on your computer you’d contrarily appetite to save, because that won’t arise on your cloned drive. I acclaim agreement a argument book on your desktop that says “THIS IS THE OLD HARD DRIVE,” or commodity added amusing than that, and again ability bottomward your computer.
If you’re replacing your old adamantine drive with your new SSD, abstract your old adamantine drive from your desktop or laptop (likely a SATA and ability cable) and bung in your new SSD appropriate area your old drive acclimated to be. You shouldn’t accept to abuse annihilation abroad in your system’s BIOS—it should cossack anon to your primary Windows allotment on your new SSD. (Or, at least, abundance did.)
If you’re befitting your old adamantine drive around, reconnect it to addition SATA anchorage on your desktop system. Analysis to accomplish abiding your computer doesn’t accidentally cossack to it instead of your new SSD by seeing if the absolute admeasurement of your c: drive (in bytes, in its “Properties” screen) matches the accommodation of your new SSD, not your old adamantine drive. That, or attending for the “THIS IS THE OLD HARD DRIVE” argument book on your BIOS, bold you didn’t skip that step. If you’re booting to your old adamantine drive instead of your new one, you’ll accept to change your system’s cossack adjustment in your BIOS.

Best desktop gadgets to download on Windows 9 – windows 10 desktop widgets | windows 10 desktop widgets
Assuming that your computer is accurately booting to your new SSD, cull up Computer Management (via the Start Menu), bang on Deejay Management, acquisition your old adamantine drive, right-click on its assorted partitions, and baddest “Delete Volume” for anniversary one. If this advantage is grayed out, you ability charge to use a third-party app like Paragon Adamantine Deejay Manager (the chargeless version) instead. Same concept, it’ll aloof acquiesce you to annul your old volumes and re-partition the drive as a big fat block of abandoned space.
To affirm that Windows 10 accurately recognizes your new SSD, and performs all the appropriate TRIM functions on a approved basis, bang the Start button, blazon in “Defragment,” and baddest the aboriginal option: “Defragment and Optimize Drives.”
In the awning that appears, Windows should agenda that your primary C: drive is absolutely a solid-state drive, like so:
You can additionally analysis that TRIM is enabled via the Command Prompt. Open up a Command Prompt with Administrator admission (right-click on the shortcut, via the Start Menu, and baddest “Run as administrator”), and access this command: fsutil behavior concern DisableDeleteNotify
If you see a awning like this, you’re golden:
If not, you can force Windows to accredit TRIM by entering the afterward command: fsutil behavior set DisableDeleteNotify 0
While you’re at it, your SSD’s architect acceptable has some affectionate of appliance it offers that you can use to ensure Windows (and your motherboard) are acreage configured for best performance. That, and these apps usually let you analysis for and install new firmware for your SSD. Head on over to your SSD manufacturer’s website, or the artefact folio for your specific SSD, and see if there’s an app you can download and install. Here’s what one archetype looks like: Samsung’s Magician.

Win9 Widgets brings the power of Widgets on Windows 9 – windows 10 desktop widgets | windows 10 desktop widgets
This allotment was originally appear in April 2013 by Whitson Gordon, and was adapted in August 2018 and July 2020 by David Murphy. Updates accommodate the following: antiseptic accent from the aboriginal piece, added added screenshots, congenital new guidance, and rewrote the introduction.
9 Things You Didn’t Know About Windows 9 Desktop Widgets | windows 9 desktop widgets – windows 10 desktop widgets
| Encouraged for you to our weblog, in this occasion I’ll teach you concerning keyword. And today, this is the first picture:

Win9 Widgets – Widgets for Windows 9 – windows 10 desktop widgets | windows 10 desktop widgets
Why not consider photograph over? will be of which wonderful???. if you’re more dedicated consequently, I’l d demonstrate a few image once more down below:
So, if you like to receive all these amazing pictures about (9 Things You Didn’t Know About Windows 9 Desktop Widgets | windows 9 desktop widgets), just click save icon to save these pics in your personal computer. There’re prepared for download, if you love and want to grab it, click save logo on the article, and it’ll be directly saved to your notebook computer.} Lastly if you like to obtain new and latest photo related with (9 Things You Didn’t Know About Windows 9 Desktop Widgets | windows 9 desktop widgets), please follow us on google plus or save this page, we try our best to provide regular up grade with fresh and new shots. Hope you like staying right here. For some up-dates and latest information about (9 Things You Didn’t Know About Windows 9 Desktop Widgets | windows 9 desktop widgets) graphics, please kindly follow us on twitter, path, Instagram and google plus, or you mark this page on bookmark area, We try to offer you up-date regularly with all new and fresh pics, like your searching, and find the best for you.
Thanks for visiting our site, articleabove (9 Things You Didn’t Know About Windows 9 Desktop Widgets | windows 9 desktop widgets) published . Nowadays we are excited to announce that we have discovered an incrediblyinteresting nicheto be discussed, that is (9 Things You Didn’t Know About Windows 9 Desktop Widgets | windows 9 desktop widgets) Many individuals searching for information about(9 Things You Didn’t Know About Windows 9 Desktop Widgets | windows 9 desktop widgets) and definitely one of these is you, is not it?

9GadgetPack – Gadgets for Windows 9 / 9 | windows 10 desktop widgets

How to Get Windows 9 Gadgets for Your Desktop – windows 10 desktop widgets | windows 10 desktop widgets

Win9 Widgets – Widgets for Windows 9 – windows 10 desktop widgets | windows 10 desktop widgets
Painter Legend https://desktopdrawing.com/wp-content/uploads/2020/07/how-to-bring-desktop-gadgets-to-windows-9-windows-tips-windows-10-desktop-widgets.jpg
0 notes
Text
dealing with superblock error on linux
I switched on my computer running manjaro linux and encoutered a black screen with the following message:
mount: /new_root: wrong fs type, bad option, bad superblock on /dev/sda2, missing codepage or helper program, or other error. You are now being dropped into an emergency shell. sh: can't access tty; job control turned off [rootfs ]#
Then I burned ISO file onto a USB (the same system and desktop that i had on the laptop) opened command prompt and typed fsck /dev/sda2. fsck is a program that checks filesystem for errors.
How to use fsck to repair filesystem errors in Linux
You cannot run fsck on a disk that is mounted. To check what is mounted, you can use the file manager and go to the /mnt/ folder to see if your disk is there. Or you can run the command mount that shows what devices are mounted. Or you can run lsblk which shows information about block devices, including the mountpoint if there is any. (block device is a computer data storage device, so disk, usb, etc).
Unfortunately fsck did not work and it showed me this message
fsck.ext4: Attempt to read block from filesystem resulted in short read while trying to open /dev/sda2 Could this be a zero-length partition?
Variants of fsck you can try are fsck.ext4 (ext4 is the linux filesystem). I googled a bit and found this resource:
fsck does nothing
So running it with the -f flag (force to check clean) did help. I figured I should get into the sda2 storage, and just take out my files I wanted to save and reinstall Manjaro from scratch. So I tried searching on options how to do that. The sda2 was not mounted so it could not be seen in the file manager from the live USB. So I looked for guidances on how to mount it Unfortunately mount failed and showed the same error as fsck did before.
Looking further I found How to recover from a bad superblock which links to Surviving linux filesystem failures This page tells you to run fsck, well this failed for me, so it says you should try it with some number that says where the superblock is … i guess? like for example e2fsck -f -b 8193 /dev/sda2
If you don’t know what number to use, you should run
mke2fs -n /dev/sda2
now ATTENTION mke2fs is a command that creates a filesystem, wiping out that disk. But! the -n flag means that mke2fs does not actually create a filesystem, but displays what it would do if it were to create a filesystem.
source
It output a bunch of numbers “Superblock backups stored on blocks: 32768, 98304, 163840, 229376, 294912, 819200, 884736, 1605632, 2654208, 4096000, 7962624, 11239424, 20480000, 23887872” So following one of the posts from above I tried running the command with the 1st number e2fsck -f -b 32768 /dev/sda2
It started at about 10 AM, it wrote Pass 1 bla bla..
At about 3pm it got to pass 5
then I went away and at about 4:30pm when i came back i saw a prompt asking me if i want to fix something and before that a wall of number codes. I pressed yes a couple times (it said free inodes count wrong for group xxxxx) and then it offered to press a to say yes to all.
At the end it said /dev/sda2 **** FILE SYSTEM WAS MODIFIED ****
yes bitch!
So I am in the live session USB, i make a directory called storage2 in /mnt folder. and type mount /dev/sda2 /mnt/storage2 into the terminal. Now I can open this in the file explorer and see basically all the directories like bin, boot, dev, etc, home, lib, lib64, mnt, opt etc etc. Home is where my super precious files are. Like 1GB of pictures of some boy and a couple rare movies i illegally downloaded.
I inserted a sd card stuck in a usb sd card reader into the laptop, after doing lsblk it was listed there as sdc partitioned to sdc1 and sdc2. So i mounted it with mount /dev/sdc2 (the bigger one ) onto /mnt/temp. For some reason I couldnt create a copy files in the file manager there, so i had to be logged in as root in the terminal this whole time and do mkdir /mnt/temp and copy the files with cp -vr /mnt/storage2 /mnt/temp where /mnt/storage2 is the mountpoint of dev/sda2. After being done with backing up my files, I unmounted the sd card with umount /dev/sdc2 and the sda2 disk, opened GParted to do the partitions….. and snap. sda2 has the same error I started with, eg the short read error. So I ran e2fsck -f -b 32768 /dev/sda2 all over again. This time it goes by a little faster, 10 minutes elapsed and I am at Pass 5 and there was 1 error on Pass 1.
Now let’s learn something about partitioning.
You generally want to create 3 parittions when installing a Linux system:
Root: this is where the filesystem goes, and it is required to boot a Linux system.
Home: holds user and configuration files separate from the operating system files.
Swap: when the system runs out of RAM, the operating system moves inactive pages from RAM into this partition. It is also useful if you want to use functions like hibernate or suspend which is something like sleep in windows. It should be twice the size of RAM if RAM is less than 2GB, or the same size as RAM.
All partitions must be unmounted in order to be modified (this means you cannot resize a partition on a working system (since it is obviously mounted)). To create a new partition, you must have some unallocated space.
Manjaro installer manual partitioning. – all partitions that have a mount point specified will be used during the installation of Manjaro. !!! swap should have a linuxswap filesystem all others that you wish to access from linux can have ext4. Also, specifically for Manjaro, EFI system partition is necessary to start Manjaro. So you need to create a partition with the FAT32 filesystem, mount point /boot/efi and esp flag enabled.
The resulting partitions I did can be seen on this image:

I had some of the backup files on sda4 that is NOT mounted so that it was not touched during the re-installation of Manjaro.
In the Manjaro wiki They talk about primary and Extended partitions and that there can only be 4 primary partitions. The GParted gui talked about primary partitions on my drive, and my drive is GPT. But, GPT does not have a concept of primary partitions, it has only partitions and it can have about 128 of them. Extended partitions are only available on an MBR disk.
some useful commands
sudo su to get to root mode
exit to exit root mode
cp -rv foo bar copy directory foo and its contents to directory bar and print output on screen
rm -rf foo remove directory foo and its contents
lsblk to list disk and partitions plus some info
0 notes
Text
How Should Designers Learn To Code? The Terminal And Text Editors (Part 1)
About The Author
Paul Hanaoka is a Design Manager at Liferay, based in the suburbs of Los Angeles, and serving the North American teams. His passion is at the intersection of …
More about
Paul
…
For the purpose of this two-part series of articles, we’re going to assume the answer for “Should designers code?” is “It depends.” If you’ve started and never finished courses in some online coding school — or if you’ve finished the courses but found it difficult to apply this style of learning in your day-to-day work, these two articles will provide a few different learning methods and will highlight different opportunities for their everyday application. In this first part of the series, we’ll take a look at getting comfortable with the command line and text editors.
As a designer with many years of experience, I often encourage my colleagues and reports to pick up some coding skills. While many are open to the idea, others balk at the notion. I usually hear some variation of “I didn’t study design to become a developer.” Although this is a valid concern, I’d like to emphasize two points: a better understanding of the materials usually leads to better outcomes, and there is an important distinction between “coding” and “software engineering.”
This two-part series of articles should be useful for any designers out there who’d like to gain also some coding skills.
Understanding The Raw Materials
Contrary to what some may think, design isn’t about creating beautiful mockups, it’s about delivering an intuitive, functional experience to the end user. That simply can’t be done without an understanding of the building blocks of a solution. An architect isn’t going to be very good at her job if she doesn’t understand the materials her plans demand and a designer isn’t going to be very good if he doesn’t understand the materials that make his designs come to life — the code. Experience with coding helps designers understand what’s possible and what’s not and whether or not their designs will be able to effectively perform their desired functions.
I also reassure my colleagues that knowledge of coding doesn’t mean one has to become an engineer. The two refer to different, though related, skill sets. As Kyle Thayer, a PhD candidate at the University of Washington recently wrote, the field of computer science (or engineering) is about giving students “an overview of the scientific field of computing”:
“The purpose of a Computer Science degree is to give students an overview of the scientific field of computing. While this includes some programming, programming is done primarily for the purpose of learning about other areas (e.g., operating systems, algorithms, machine learning, human-computer interaction). A CS degree is a good first step into the academic field of computer science.”
— Kyle Thayer
By contrast, coding simply means becoming familiar enough with a given programming language to complete a task. Asking someone to learn basic HTML or JavaScript does not necessitate their becoming a full-stack software architect. Despite what some might think, forking a repo and copy/pasting Stack Overflow answers in does not make you a software engineer — but it can increase the value you bring as a designer to a product development team.
What About “Low Code”?
Some may say that we’re entering a low code future where designers (and developers) are able to build applications through drag-and-drop functionality and a GUI (graphical user interface). So taking the time to learn a programming language isn’t “worth it.” The emergence of tools like Webflow, Modulz, FramerX, UXPin, etc., seems to support this line of reasoning. And this can be very true for many applications — it’s easier than ever to create a site or app without a single line of code. However, if you don’t understand the underlying principles, you will be capping the value you can deliver with a low code application.
Modulz, Studio.Design, FramerX, and other apps — there’s still a lot of code in there… (Large preview)
We’re also not yet at the point where you can build enterprise-scale applications with low code platforms. As designers we have to work in the world we live in, not the one we imagine is coming.
That being said, everyone brings a unique blend of skills to the table. Knowledge of code is not an absolute necessity and it should just be encouraged, not required.
Where To Start?
There is an endless amount of tools, languages, schools, guides, and other resources available for anyone who has access to the internet — so where to begin? An important disclaimer — I am by no means an expert, or anything close to a software engineer — and the following are insights from my personal experience, not a guaranteed path to success.
Many of the designers/developers I know have usually started hacking HTML and CSS templates on sites like MySpace, Geocities, Tumblr, Neopets, or others. Now that I have sufficiently dated myself, for anyone starting out today, I would recommend beginning in your friendly command-line interface (CLI) shell.
The Terminal: An Essential Tool
The go-to application for Hollywood directors whenever there’s a computer hacker on the screen, the terminal is simply an interface that allows you to execute actions via a text input rather than the graphical user interface (GUI) that most people are accustomed to. I’ll let real developers explain the intricacies and technical how-to, but for our purposes it’s good enough to know that familiarizing yourself with the CLI is beneficial for a number of reasons.
The terminal gives you access to your computer’s file and folder structure — the same way that you click through Finder or Explorer, you navigate using your keyboard in the terminal. It definitely takes some time getting used to, but developing your mental model in this area is foundational to working in code.
Like a lot of designers, I am using the macOS environment (formerly known as OS X), but the following applies to other *nix operating systems (LinUX, Unix), and also to Windows PowerShell. While there is a lot of overlap between different modern operating systems, there are some differences that I will do my best to highlight.
Regular Expressions
A key feature in a CLI is the ability to use regular expressions (regex) in your commands. Think of regex as boolean search operations (using quotation marks to search for exact phrases or the minus sign to exclude words) on steroids — they allow you to define a pattern in a string of text so that you can perform some action on the output. Here are some real-world examples:
If you have a long list of phone numbers in a variety of formats, you could define a script that would give you a consistent output based on a regular expression — e.g.: (###) ###-#### for the U.S. phone numbers format.
If you want to quickly rename a group of files to a specific case — from kebab-case to CamelCase or anything in between.
Here are some basic terminal commands* to help you getting started:
cd stands for “Change Directory”, type this and then a file or a folder path to go — note that you can type a folder name but it needs to be inside your current folder to go to it.
ls lists the files and folders in your current folder.
pwd stands for “Print Working Directory” — this will list out where you currently are in your computer.
mkdir and a folder name will create a folder in your working directory.
using cd with .. takes you one level up — if you’re in /users/username/documents/2019 and you enter cd ../.. you’ll end up in /users/username.
Bonus tip — hitting the Tab key will autocomplete as you type a folder/file path.
Note: The following will work on the Windows command line (cmd):
cd, cd .., mkdir, Tab key for path autocomplete (ls and pwd won’t work).
The more modern Windows command line (Windows PowerShell) supports all of them:
cd, cd .., ls, pwd, mkdir, and Tab for path autocomplete.
For a complete list of commands available in PowerShell, check this Microsoft’ Help page “Using Familiar Command Names”.
Mass-File Management
You can manipulate files and folders en masse via the terminal — here are a few ideas:
You can create three years of folders with subfolders for each month in a single command — using mkdir -p and {list-of-years}/{list-of-months} will create folders for each year with subfolders for each month. Use your imagination, I’m sure you can put this to good use!
You can quickly clean up your desktop by using mv Screen\ Shot* Screenshots — this will move all of your files that start with “Screen Shot” to a folder named “Screenshots”.
Create 36 folders on your computer with a single line of code! (Large preview)
Note: These two examples will most likely only work in *nix environments — but the theory still applies. And Windows PowerShell is also a very powerful command line tool, you just need to learn its features and specific commands.
Scripting And Maintenance
Now that we have a glimpse into the power of regular expressions and the options available in the terminal we can start combining those things into scripts. One very simple, yet powerful and commonly used script is Mike G’s file renamer:
criteria=$1 re_match=$2 replace=$3 for i in $( ls *$criteria* ); do src=$i tgt=$(echo $i | sed -e "s/$re_match/$replace/") mv $src $tgt done
What this script allows you to do, is define the scope (criteria), define what you’d like to change (re_match), and what you’d like to change it to (replace) — and then execute it.
There are countless other scripts that you can create beyond creating and renaming files — Vlad’s Batch Resizing script is an excellent example of the time-saving capabilities that you can create using bash scripts.
Advanced Tips And Tricks
Something I have found over the years is that regularly resetting my computer and reinstalling the operating system helps it stay relatively clutter-free and prevents the slowdowns everyone experiences after years of digital detritus that accumulates on harddrives. For many, the prospect of wiping a computer and re-setting everything back at best sounds like a few days of work, and at worst an impossible nightmare that you may never recover from.
But it doesn’t have to be — by using a few command-line tools, once you’ve backed up, wiped, and reinstalled your OS, you can install not only your list of favorite apps, but also fonts in a matter of minutes using Homebrew. (Homebrew is for Mac and LinUX only. For Windows, try Chocolatey which is a solid alternative.)
If you’re interested — we’ve created an easy-to-follow setup guide to get your computer in good shape for most development. Our guide is for macOS, but Owen Williams has written a solid guide for Windows as well.
If you don’t have the time for Wes’ entire series of tutorials about the command line — at the very least I highly recommend the following stack:
Oh My ZSH
zsh-autosuggestions
zsh-syntax-highlighting
z-jump-around
Choosing A Text Editor
There are many options when it comes to choosing a code editor — Sublime Text and VS Code (Visual Studio Code) are the two I have the most experience with and am currently using.
Sublime Text was one of the earlier text editors that became popular with front-end developers — it was the gold standard up until a few years ago. Features like multiple cursors, a powerful package manager, and highly customizable shortcuts that allowed you to quickly navigate in and between files and folders. Not to mention it was an incredibly lightweight and fast application which made it an easy choice.
VS Code (Visual Studio Code) came on the scene around 2015, it took a while for people to switch from Atom and Sublime, but VS Code has established itself as many developers’ favorite editor. In addition to pretty much all of Sublime’s features, VS Code differentiated itself with a built-in terminal and tight integration with Git. In addition, Visual Studio Code has a rich plugin ecosystem that allows you to extend and customize your environment to your heart’s delight.
All that is to say — you don’t need to be a developer to appreciate the features of a good code editor. I have found many uses for it in my daily work; two, in particular, are the ability to use multiple cursors, and using regex to find-and-replace text across folders of files. Let’s take a closer look at both.
Editing With Multiple Cursors
Picture your typical word processor — that blinking vertical line that shows where the text you’re entering will go? Now picture the ability to add more than one cursor to this window so that whatever you type will appear wherever there is a cursor!
This might not be blowing your mind just yet — so here’s an example that shows a few ways that an advanced text editor can help you create everyday efficiencies in your workflow.
Mass-editing in a text editor is much faster and more intuitive than in a spreadsheet. (Large preview)
Here we have a list of names that we need to convert into email addresses — we’d also like to make them all lowercase and then sort them alphabetically. This can be done with a few keystrokes.
[embedded content]
Using a text editor to quickly manipulate lots of text in Sublime Text (short video).
Once you paste the list in, Cmd + Shift + P brings up the Command Palette (fancy term for a searchable menu that gives you all the available functionalities). You can basically type in this menu what you want to do, pretty much anything you can do to text is available here. If it’s not, there’s likely a plugin or an extension that you can find.
We’re able to change the case and sort the lines in a matter of seconds — then pressing Ctrl + Shift + arrow keys adds cursors, then whatever we type gets added to every line — in this case, we’re turning the names into email addresses, but your wild imagination could find myriad other ways to use this.
You might be saying — well I can do this in Excel or Google Sheets, which is true, but I have found that it is a lot quicker to handle these types of things in a text editor. You avoid having to write formulas and select things with a mouse.
Which Code Editor Should I Use?
I’m a designer — so of course, my answer is “it depends”.
If you’re new to these concepts, I would recommend getting a free trial of Sublime — it continues to be a very lightweight app and does not consume too many system resources. You can customize Sublime’s key bindings (fancy word for hotkeys) and extend its built-in functionality with plugins.
If you’ve been using Sublime, Atom, or another editor — I’d recommend checking out VS Code as well. The team at Microsoft has really done an excellent job making it a powerful, yet easy-to-use text editor.
Personally, I use both editors — Sublime is lightning quick and opens in a fraction of a second allowing me to easily paste and manipulate text. But when I want to get some more serious work done, I use VS Code. It’s difficult to top the all-in-one package that VS Code provides — a vibrant plugin and extension ecosystem, powerful command palette, and hyper-customizable interface means you can really make it your own. Not to mention the fact that Microsoft is very incentivized to ensure that it’s a first-class experience for developer productivity.
Conclusion, And What’s Next?
In this first article, you will have learned the basics of the terminal, a few productivity hacks to get you started, and should have a better idea of what code editor to choose. In the next part, we’ll continue with the topics of version control, HTML and CSS, and an introduction to engineering principles.
Anything Amiss?
There’s a good chance that something in this post was obscure, obtuse, and/or obsolete and I’d love the opportunity to make it better! Please leave a comment below, DM me, or @mention me on Twitter so I can improve.
(mb, yk, il)
Website Design & SEO Delray Beach by DBL07.co
Delray Beach SEO
Via http://www.scpie.org/how-should-designers-learn-to-code-the-terminal-and-text-editors-part-1/
source https://scpie.weebly.com/blog/how-should-designers-learn-to-code-the-terminal-and-text-editors-part-1
0 notes
Text
How Should Designers Learn To Code? The Terminal And Text Editors (Part 1)
About The Author
Paul Hanaoka is a Design Manager at Liferay, based in the suburbs of Los Angeles, and serving the North American teams. His passion is at the intersection of …
More about
Paul
…
For the purpose of this two-part series of articles, we’re going to assume the answer for “Should designers code?” is “It depends.” If you’ve started and never finished courses in some online coding school — or if you’ve finished the courses but found it difficult to apply this style of learning in your day-to-day work, these two articles will provide a few different learning methods and will highlight different opportunities for their everyday application. In this first part of the series, we’ll take a look at getting comfortable with the command line and text editors.
As a designer with many years of experience, I often encourage my colleagues and reports to pick up some coding skills. While many are open to the idea, others balk at the notion. I usually hear some variation of “I didn’t study design to become a developer.” Although this is a valid concern, I’d like to emphasize two points: a better understanding of the materials usually leads to better outcomes, and there is an important distinction between “coding” and “software engineering.”
This two-part series of articles should be useful for any designers out there who’d like to gain also some coding skills.
Understanding The Raw Materials
Contrary to what some may think, design isn’t about creating beautiful mockups, it’s about delivering an intuitive, functional experience to the end user. That simply can’t be done without an understanding of the building blocks of a solution. An architect isn’t going to be very good at her job if she doesn’t understand the materials her plans demand and a designer isn’t going to be very good if he doesn’t understand the materials that make his designs come to life — the code. Experience with coding helps designers understand what’s possible and what’s not and whether or not their designs will be able to effectively perform their desired functions.
I also reassure my colleagues that knowledge of coding doesn’t mean one has to become an engineer. The two refer to different, though related, skill sets. As Kyle Thayer, a PhD candidate at the University of Washington recently wrote, the field of computer science (or engineering) is about giving students “an overview of the scientific field of computing”:
“The purpose of a Computer Science degree is to give students an overview of the scientific field of computing. While this includes some programming, programming is done primarily for the purpose of learning about other areas (e.g., operating systems, algorithms, machine learning, human-computer interaction). A CS degree is a good first step into the academic field of computer science.”
— Kyle Thayer
By contrast, coding simply means becoming familiar enough with a given programming language to complete a task. Asking someone to learn basic HTML or JavaScript does not necessitate their becoming a full-stack software architect. Despite what some might think, forking a repo and copy/pasting Stack Overflow answers in does not make you a software engineer — but it can increase the value you bring as a designer to a product development team.
What About “Low Code”?
Some may say that we’re entering a low code future where designers (and developers) are able to build applications through drag-and-drop functionality and a GUI (graphical user interface). So taking the time to learn a programming language isn’t “worth it.” The emergence of tools like Webflow, Modulz, FramerX, UXPin, etc., seems to support this line of reasoning. And this can be very true for many applications — it’s easier than ever to create a site or app without a single line of code. However, if you don’t understand the underlying principles, you will be capping the value you can deliver with a low code application.
Modulz, Studio.Design, FramerX, and other apps — there’s still a lot of code in there… (Large preview)
We’re also not yet at the point where you can build enterprise-scale applications with low code platforms. As designers we have to work in the world we live in, not the one we imagine is coming.
That being said, everyone brings a unique blend of skills to the table. Knowledge of code is not an absolute necessity and it should just be encouraged, not required.
Where To Start?
There is an endless amount of tools, languages, schools, guides, and other resources available for anyone who has access to the internet — so where to begin? An important disclaimer — I am by no means an expert, or anything close to a software engineer — and the following are insights from my personal experience, not a guaranteed path to success.
Many of the designers/developers I know have usually started hacking HTML and CSS templates on sites like MySpace, Geocities, Tumblr, Neopets, or others. Now that I have sufficiently dated myself, for anyone starting out today, I would recommend beginning in your friendly command-line interface (CLI) shell.
The Terminal: An Essential Tool
The go-to application for Hollywood directors whenever there’s a computer hacker on the screen, the terminal is simply an interface that allows you to execute actions via a text input rather than the graphical user interface (GUI) that most people are accustomed to. I’ll let real developers explain the intricacies and technical how-to, but for our purposes it’s good enough to know that familiarizing yourself with the CLI is beneficial for a number of reasons.
The terminal gives you access to your computer’s file and folder structure — the same way that you click through Finder or Explorer, you navigate using your keyboard in the terminal. It definitely takes some time getting used to, but developing your mental model in this area is foundational to working in code.
Like a lot of designers, I am using the macOS environment (formerly known as OS X), but the following applies to other *nix operating systems (LinUX, Unix), and also to Windows PowerShell. While there is a lot of overlap between different modern operating systems, there are some differences that I will do my best to highlight.
Regular Expressions
A key feature in a CLI is the ability to use regular expressions (regex) in your commands. Think of regex as boolean search operations (using quotation marks to search for exact phrases or the minus sign to exclude words) on steroids — they allow you to define a pattern in a string of text so that you can perform some action on the output. Here are some real-world examples:
If you have a long list of phone numbers in a variety of formats, you could define a script that would give you a consistent output based on a regular expression — e.g.: (###) ###-#### for the U.S. phone numbers format.
If you want to quickly rename a group of files to a specific case — from kebab-case to CamelCase or anything in between.
Here are some basic terminal commands* to help you getting started:
cd stands for “Change Directory”, type this and then a file or a folder path to go — note that you can type a folder name but it needs to be inside your current folder to go to it.
ls lists the files and folders in your current folder.
pwd stands for “Print Working Directory” — this will list out where you currently are in your computer.
mkdir and a folder name will create a folder in your working directory.
using cd with .. takes you one level up — if you’re in /users/username/documents/2019 and you enter cd ../.. you’ll end up in /users/username.
Bonus tip — hitting the Tab key will autocomplete as you type a folder/file path.
Note: The following will work on the Windows command line (cmd):
cd, cd .., mkdir, Tab key for path autocomplete (ls and pwd won’t work).
The more modern Windows command line (Windows PowerShell) supports all of them:
cd, cd .., ls, pwd, mkdir, and Tab for path autocomplete.
For a complete list of commands available in PowerShell, check this Microsoft’ Help page “Using Familiar Command Names”.
Mass-File Management
You can manipulate files and folders en masse via the terminal — here are a few ideas:
You can create three years of folders with subfolders for each month in a single command — using mkdir -p and {list-of-years}/{list-of-months} will create folders for each year with subfolders for each month. Use your imagination, I’m sure you can put this to good use!
You can quickly clean up your desktop by using mv Screen\ Shot* Screenshots — this will move all of your files that start with “Screen Shot” to a folder named “Screenshots”.
Create 36 folders on your computer with a single line of code! (Large preview)
Note: These two examples will most likely only work in *nix environments — but the theory still applies. And Windows PowerShell is also a very powerful command line tool, you just need to learn its features and specific commands.
Scripting And Maintenance
Now that we have a glimpse into the power of regular expressions and the options available in the terminal we can start combining those things into scripts. One very simple, yet powerful and commonly used script is Mike G’s file renamer:
criteria=$1 re_match=$2 replace=$3 for i in $( ls *$criteria* ); do src=$i tgt=$(echo $i | sed -e "s/$re_match/$replace/") mv $src $tgt done
What this script allows you to do, is define the scope (criteria), define what you’d like to change (re_match), and what you’d like to change it to (replace) — and then execute it.
There are countless other scripts that you can create beyond creating and renaming files — Vlad’s Batch Resizing script is an excellent example of the time-saving capabilities that you can create using bash scripts.
Advanced Tips And Tricks
Something I have found over the years is that regularly resetting my computer and reinstalling the operating system helps it stay relatively clutter-free and prevents the slowdowns everyone experiences after years of digital detritus that accumulates on harddrives. For many, the prospect of wiping a computer and re-setting everything back at best sounds like a few days of work, and at worst an impossible nightmare that you may never recover from.
But it doesn’t have to be — by using a few command-line tools, once you’ve backed up, wiped, and reinstalled your OS, you can install not only your list of favorite apps, but also fonts in a matter of minutes using Homebrew. (Homebrew is for Mac and LinUX only. For Windows, try Chocolatey which is a solid alternative.)
If you’re interested — we’ve created an easy-to-follow setup guide to get your computer in good shape for most development. Our guide is for macOS, but Owen Williams has written a solid guide for Windows as well.
If you don’t have the time for Wes’ entire series of tutorials about the command line — at the very least I highly recommend the following stack:
Oh My ZSH
zsh-autosuggestions
zsh-syntax-highlighting
z-jump-around
Choosing A Text Editor
There are many options when it comes to choosing a code editor — Sublime Text and VS Code (Visual Studio Code) are the two I have the most experience with and am currently using.
Sublime Text was one of the earlier text editors that became popular with front-end developers — it was the gold standard up until a few years ago. Features like multiple cursors, a powerful package manager, and highly customizable shortcuts that allowed you to quickly navigate in and between files and folders. Not to mention it was an incredibly lightweight and fast application which made it an easy choice.
VS Code (Visual Studio Code) came on the scene around 2015, it took a while for people to switch from Atom and Sublime, but VS Code has established itself as many developers’ favorite editor. In addition to pretty much all of Sublime’s features, VS Code differentiated itself with a built-in terminal and tight integration with Git. In addition, Visual Studio Code has a rich plugin ecosystem that allows you to extend and customize your environment to your heart’s delight.
All that is to say — you don’t need to be a developer to appreciate the features of a good code editor. I have found many uses for it in my daily work; two, in particular, are the ability to use multiple cursors, and using regex to find-and-replace text across folders of files. Let’s take a closer look at both.
Editing With Multiple Cursors
Picture your typical word processor — that blinking vertical line that shows where the text you’re entering will go? Now picture the ability to add more than one cursor to this window so that whatever you type will appear wherever there is a cursor!
This might not be blowing your mind just yet — so here’s an example that shows a few ways that an advanced text editor can help you create everyday efficiencies in your workflow.
Mass-editing in a text editor is much faster and more intuitive than in a spreadsheet. (Large preview)
Here we have a list of names that we need to convert into email addresses — we’d also like to make them all lowercase and then sort them alphabetically. This can be done with a few keystrokes.
[embedded content]
Using a text editor to quickly manipulate lots of text in Sublime Text (short video).
Once you paste the list in, Cmd + Shift + P brings up the Command Palette (fancy term for a searchable menu that gives you all the available functionalities). You can basically type in this menu what you want to do, pretty much anything you can do to text is available here. If it’s not, there’s likely a plugin or an extension that you can find.
We’re able to change the case and sort the lines in a matter of seconds — then pressing Ctrl + Shift + arrow keys adds cursors, then whatever we type gets added to every line — in this case, we’re turning the names into email addresses, but your wild imagination could find myriad other ways to use this.
You might be saying — well I can do this in Excel or Google Sheets, which is true, but I have found that it is a lot quicker to handle these types of things in a text editor. You avoid having to write formulas and select things with a mouse.
Which Code Editor Should I Use?
I’m a designer — so of course, my answer is “it depends”.
If you’re new to these concepts, I would recommend getting a free trial of Sublime — it continues to be a very lightweight app and does not consume too many system resources. You can customize Sublime’s key bindings (fancy word for hotkeys) and extend its built-in functionality with plugins.
If you’ve been using Sublime, Atom, or another editor — I’d recommend checking out VS Code as well. The team at Microsoft has really done an excellent job making it a powerful, yet easy-to-use text editor.
Personally, I use both editors — Sublime is lightning quick and opens in a fraction of a second allowing me to easily paste and manipulate text. But when I want to get some more serious work done, I use VS Code. It’s difficult to top the all-in-one package that VS Code provides — a vibrant plugin and extension ecosystem, powerful command palette, and hyper-customizable interface means you can really make it your own. Not to mention the fact that Microsoft is very incentivized to ensure that it’s a first-class experience for developer productivity.
Conclusion, And What’s Next?
In this first article, you will have learned the basics of the terminal, a few productivity hacks to get you started, and should have a better idea of what code editor to choose. In the next part, we’ll continue with the topics of version control, HTML and CSS, and an introduction to engineering principles.
Anything Amiss?
There’s a good chance that something in this post was obscure, obtuse, and/or obsolete and I’d love the opportunity to make it better! Please leave a comment below, DM me, or @mention me on Twitter so I can improve.
(mb, yk, il)
Website Design & SEO Delray Beach by DBL07.co
Delray Beach SEO
source http://www.scpie.org/how-should-designers-learn-to-code-the-terminal-and-text-editors-part-1/
source https://scpie1.blogspot.com/2020/03/how-should-designers-learn-to-code.html
0 notes
Text
How Should Designers Learn To Code? The Terminal And Text Editors (Part 1)
About The Author
Paul Hanaoka is a Design Manager at Liferay, based in the suburbs of Los Angeles, and serving the North American teams. His passion is at the intersection of …
More about
Paul
…
For the purpose of this two-part series of articles, we’re going to assume the answer for “Should designers code?” is “It depends.” If you’ve started and never finished courses in some online coding school — or if you’ve finished the courses but found it difficult to apply this style of learning in your day-to-day work, these two articles will provide a few different learning methods and will highlight different opportunities for their everyday application. In this first part of the series, we’ll take a look at getting comfortable with the command line and text editors.
As a designer with many years of experience, I often encourage my colleagues and reports to pick up some coding skills. While many are open to the idea, others balk at the notion. I usually hear some variation of “I didn’t study design to become a developer.” Although this is a valid concern, I’d like to emphasize two points: a better understanding of the materials usually leads to better outcomes, and there is an important distinction between “coding” and “software engineering.”
This two-part series of articles should be useful for any designers out there who’d like to gain also some coding skills.
Understanding The Raw Materials
Contrary to what some may think, design isn’t about creating beautiful mockups, it’s about delivering an intuitive, functional experience to the end user. That simply can’t be done without an understanding of the building blocks of a solution. An architect isn’t going to be very good at her job if she doesn’t understand the materials her plans demand and a designer isn’t going to be very good if he doesn’t understand the materials that make his designs come to life — the code. Experience with coding helps designers understand what’s possible and what’s not and whether or not their designs will be able to effectively perform their desired functions.
I also reassure my colleagues that knowledge of coding doesn’t mean one has to become an engineer. The two refer to different, though related, skill sets. As Kyle Thayer, a PhD candidate at the University of Washington recently wrote, the field of computer science (or engineering) is about giving students “an overview of the scientific field of computing”:
“The purpose of a Computer Science degree is to give students an overview of the scientific field of computing. While this includes some programming, programming is done primarily for the purpose of learning about other areas (e.g., operating systems, algorithms, machine learning, human-computer interaction). A CS degree is a good first step into the academic field of computer science.”
— Kyle Thayer
By contrast, coding simply means becoming familiar enough with a given programming language to complete a task. Asking someone to learn basic HTML or JavaScript does not necessitate their becoming a full-stack software architect. Despite what some might think, forking a repo and copy/pasting Stack Overflow answers in does not make you a software engineer — but it can increase the value you bring as a designer to a product development team.
What About “Low Code”?
Some may say that we’re entering a low code future where designers (and developers) are able to build applications through drag-and-drop functionality and a GUI (graphical user interface). So taking the time to learn a programming language isn’t “worth it.” The emergence of tools like Webflow, Modulz, FramerX, UXPin, etc., seems to support this line of reasoning. And this can be very true for many applications — it’s easier than ever to create a site or app without a single line of code. However, if you don’t understand the underlying principles, you will be capping the value you can deliver with a low code application.
Modulz, Studio.Design, FramerX, and other apps — there’s still a lot of code in there… (Large preview)
We’re also not yet at the point where you can build enterprise-scale applications with low code platforms. As designers we have to work in the world we live in, not the one we imagine is coming.
That being said, everyone brings a unique blend of skills to the table. Knowledge of code is not an absolute necessity and it should just be encouraged, not required.
Where To Start?
There is an endless amount of tools, languages, schools, guides, and other resources available for anyone who has access to the internet — so where to begin? An important disclaimer — I am by no means an expert, or anything close to a software engineer — and the following are insights from my personal experience, not a guaranteed path to success.
Many of the designers/developers I know have usually started hacking HTML and CSS templates on sites like MySpace, Geocities, Tumblr, Neopets, or others. Now that I have sufficiently dated myself, for anyone starting out today, I would recommend beginning in your friendly command-line interface (CLI) shell.
The Terminal: An Essential Tool
The go-to application for Hollywood directors whenever there’s a computer hacker on the screen, the terminal is simply an interface that allows you to execute actions via a text input rather than the graphical user interface (GUI) that most people are accustomed to. I’ll let real developers explain the intricacies and technical how-to, but for our purposes it’s good enough to know that familiarizing yourself with the CLI is beneficial for a number of reasons.
The terminal gives you access to your computer’s file and folder structure — the same way that you click through Finder or Explorer, you navigate using your keyboard in the terminal. It definitely takes some time getting used to, but developing your mental model in this area is foundational to working in code.
Like a lot of designers, I am using the macOS environment (formerly known as OS X), but the following applies to other *nix operating systems (LinUX, Unix), and also to Windows PowerShell. While there is a lot of overlap between different modern operating systems, there are some differences that I will do my best to highlight.
Regular Expressions
A key feature in a CLI is the ability to use regular expressions (regex) in your commands. Think of regex as boolean search operations (using quotation marks to search for exact phrases or the minus sign to exclude words) on steroids — they allow you to define a pattern in a string of text so that you can perform some action on the output. Here are some real-world examples:
If you have a long list of phone numbers in a variety of formats, you could define a script that would give you a consistent output based on a regular expression — e.g.: (###) ###-#### for the U.S. phone numbers format.
If you want to quickly rename a group of files to a specific case — from kebab-case to CamelCase or anything in between.
Here are some basic terminal commands* to help you getting started:
cd stands for “Change Directory”, type this and then a file or a folder path to go — note that you can type a folder name but it needs to be inside your current folder to go to it.
ls lists the files and folders in your current folder.
pwd stands for “Print Working Directory” — this will list out where you currently are in your computer.
mkdir and a folder name will create a folder in your working directory.
using cd with .. takes you one level up — if you’re in /users/username/documents/2019 and you enter cd ../.. you’ll end up in /users/username.
Bonus tip — hitting the Tab key will autocomplete as you type a folder/file path.
Note: The following will work on the Windows command line (cmd):
cd, cd .., mkdir, Tab key for path autocomplete (ls and pwd won’t work).
The more modern Windows command line (Windows PowerShell) supports all of them:
cd, cd .., ls, pwd, mkdir, and Tab for path autocomplete.
For a complete list of commands available in PowerShell, check this Microsoft’ Help page “Using Familiar Command Names”.
Mass-File Management
You can manipulate files and folders en masse via the terminal — here are a few ideas:
You can create three years of folders with subfolders for each month in a single command — using mkdir -p and {list-of-years}/{list-of-months} will create folders for each year with subfolders for each month. Use your imagination, I’m sure you can put this to good use!
You can quickly clean up your desktop by using mv Screen\ Shot* Screenshots — this will move all of your files that start with “Screen Shot” to a folder named “Screenshots”.
Create 36 folders on your computer with a single line of code! (Large preview)
Note: These two examples will most likely only work in *nix environments — but the theory still applies. And Windows PowerShell is also a very powerful command line tool, you just need to learn its features and specific commands.
Scripting And Maintenance
Now that we have a glimpse into the power of regular expressions and the options available in the terminal we can start combining those things into scripts. One very simple, yet powerful and commonly used script is Mike G’s file renamer:
criteria=$1 re_match=$2 replace=$3 for i in $( ls *$criteria* ); do src=$i tgt=$(echo $i | sed -e "s/$re_match/$replace/") mv $src $tgt done
What this script allows you to do, is define the scope (criteria), define what you’d like to change (re_match), and what you’d like to change it to (replace) — and then execute it.
There are countless other scripts that you can create beyond creating and renaming files — Vlad’s Batch Resizing script is an excellent example of the time-saving capabilities that you can create using bash scripts.
Advanced Tips And Tricks
Something I have found over the years is that regularly resetting my computer and reinstalling the operating system helps it stay relatively clutter-free and prevents the slowdowns everyone experiences after years of digital detritus that accumulates on harddrives. For many, the prospect of wiping a computer and re-setting everything back at best sounds like a few days of work, and at worst an impossible nightmare that you may never recover from.
But it doesn’t have to be — by using a few command-line tools, once you’ve backed up, wiped, and reinstalled your OS, you can install not only your list of favorite apps, but also fonts in a matter of minutes using Homebrew. (Homebrew is for Mac and LinUX only. For Windows, try Chocolatey which is a solid alternative.)
If you’re interested — we’ve created an easy-to-follow setup guide to get your computer in good shape for most development. Our guide is for macOS, but Owen Williams has written a solid guide for Windows as well.
If you don’t have the time for Wes’ entire series of tutorials about the command line — at the very least I highly recommend the following stack:
Oh My ZSH
zsh-autosuggestions
zsh-syntax-highlighting
z-jump-around
Choosing A Text Editor
There are many options when it comes to choosing a code editor — Sublime Text and VS Code (Visual Studio Code) are the two I have the most experience with and am currently using.
Sublime Text was one of the earlier text editors that became popular with front-end developers — it was the gold standard up until a few years ago. Features like multiple cursors, a powerful package manager, and highly customizable shortcuts that allowed you to quickly navigate in and between files and folders. Not to mention it was an incredibly lightweight and fast application which made it an easy choice.
VS Code (Visual Studio Code) came on the scene around 2015, it took a while for people to switch from Atom and Sublime, but VS Code has established itself as many developers’ favorite editor. In addition to pretty much all of Sublime’s features, VS Code differentiated itself with a built-in terminal and tight integration with Git. In addition, Visual Studio Code has a rich plugin ecosystem that allows you to extend and customize your environment to your heart’s delight.
All that is to say — you don’t need to be a developer to appreciate the features of a good code editor. I have found many uses for it in my daily work; two, in particular, are the ability to use multiple cursors, and using regex to find-and-replace text across folders of files. Let’s take a closer look at both.
Editing With Multiple Cursors
Picture your typical word processor — that blinking vertical line that shows where the text you’re entering will go? Now picture the ability to add more than one cursor to this window so that whatever you type will appear wherever there is a cursor!
This might not be blowing your mind just yet — so here’s an example that shows a few ways that an advanced text editor can help you create everyday efficiencies in your workflow.
Mass-editing in a text editor is much faster and more intuitive than in a spreadsheet. (Large preview)
Here we have a list of names that we need to convert into email addresses — we’d also like to make them all lowercase and then sort them alphabetically. This can be done with a few keystrokes.
[embedded content]
Using a text editor to quickly manipulate lots of text in Sublime Text (short video).
Once you paste the list in, Cmd + Shift + P brings up the Command Palette (fancy term for a searchable menu that gives you all the available functionalities). You can basically type in this menu what you want to do, pretty much anything you can do to text is available here. If it’s not, there’s likely a plugin or an extension that you can find.
We’re able to change the case and sort the lines in a matter of seconds — then pressing Ctrl + Shift + arrow keys adds cursors, then whatever we type gets added to every line — in this case, we’re turning the names into email addresses, but your wild imagination could find myriad other ways to use this.
You might be saying — well I can do this in Excel or Google Sheets, which is true, but I have found that it is a lot quicker to handle these types of things in a text editor. You avoid having to write formulas and select things with a mouse.
Which Code Editor Should I Use?
I’m a designer — so of course, my answer is “it depends”.
If you’re new to these concepts, I would recommend getting a free trial of Sublime — it continues to be a very lightweight app and does not consume too many system resources. You can customize Sublime’s key bindings (fancy word for hotkeys) and extend its built-in functionality with plugins.
If you’ve been using Sublime, Atom, or another editor — I’d recommend checking out VS Code as well. The team at Microsoft has really done an excellent job making it a powerful, yet easy-to-use text editor.
Personally, I use both editors — Sublime is lightning quick and opens in a fraction of a second allowing me to easily paste and manipulate text. But when I want to get some more serious work done, I use VS Code. It’s difficult to top the all-in-one package that VS Code provides — a vibrant plugin and extension ecosystem, powerful command palette, and hyper-customizable interface means you can really make it your own. Not to mention the fact that Microsoft is very incentivized to ensure that it’s a first-class experience for developer productivity.
Conclusion, And What’s Next?
In this first article, you will have learned the basics of the terminal, a few productivity hacks to get you started, and should have a better idea of what code editor to choose. In the next part, we’ll continue with the topics of version control, HTML and CSS, and an introduction to engineering principles.
Anything Amiss?
There’s a good chance that something in this post was obscure, obtuse, and/or obsolete and I’d love the opportunity to make it better! Please leave a comment below, DM me, or @mention me on Twitter so I can improve.
(mb, yk, il)
Website Design & SEO Delray Beach by DBL07.co
Delray Beach SEO
source http://www.scpie.org/how-should-designers-learn-to-code-the-terminal-and-text-editors-part-1/
source https://scpie.tumblr.com/post/613013830782599168
0 notes
Text
How Should Designers Learn To Code? The Terminal And Text Editors (Part 1)
About The Author
Paul Hanaoka is a Design Manager at Liferay, based in the suburbs of Los Angeles, and serving the North American teams. His passion is at the intersection of …
More about
Paul
…
For the purpose of this two-part series of articles, we’re going to assume the answer for “Should designers code?” is “It depends.” If you’ve started and never finished courses in some online coding school — or if you’ve finished the courses but found it difficult to apply this style of learning in your day-to-day work, these two articles will provide a few different learning methods and will highlight different opportunities for their everyday application. In this first part of the series, we’ll take a look at getting comfortable with the command line and text editors.
As a designer with many years of experience, I often encourage my colleagues and reports to pick up some coding skills. While many are open to the idea, others balk at the notion. I usually hear some variation of “I didn’t study design to become a developer.” Although this is a valid concern, I’d like to emphasize two points: a better understanding of the materials usually leads to better outcomes, and there is an important distinction between “coding” and “software engineering.”
This two-part series of articles should be useful for any designers out there who’d like to gain also some coding skills.
Understanding The Raw Materials
Contrary to what some may think, design isn’t about creating beautiful mockups, it’s about delivering an intuitive, functional experience to the end user. That simply can’t be done without an understanding of the building blocks of a solution. An architect isn’t going to be very good at her job if she doesn’t understand the materials her plans demand and a designer isn’t going to be very good if he doesn’t understand the materials that make his designs come to life — the code. Experience with coding helps designers understand what’s possible and what’s not and whether or not their designs will be able to effectively perform their desired functions.
I also reassure my colleagues that knowledge of coding doesn’t mean one has to become an engineer. The two refer to different, though related, skill sets. As Kyle Thayer, a PhD candidate at the University of Washington recently wrote, the field of computer science (or engineering) is about giving students “an overview of the scientific field of computing”:
“The purpose of a Computer Science degree is to give students an overview of the scientific field of computing. While this includes some programming, programming is done primarily for the purpose of learning about other areas (e.g., operating systems, algorithms, machine learning, human-computer interaction). A CS degree is a good first step into the academic field of computer science.”
— Kyle Thayer
By contrast, coding simply means becoming familiar enough with a given programming language to complete a task. Asking someone to learn basic HTML or JavaScript does not necessitate their becoming a full-stack software architect. Despite what some might think, forking a repo and copy/pasting Stack Overflow answers in does not make you a software engineer — but it can increase the value you bring as a designer to a product development team.
What About “Low Code”?
Some may say that we’re entering a low code future where designers (and developers) are able to build applications through drag-and-drop functionality and a GUI (graphical user interface). So taking the time to learn a programming language isn’t “worth it.” The emergence of tools like Webflow, Modulz, FramerX, UXPin, etc., seems to support this line of reasoning. And this can be very true for many applications — it’s easier than ever to create a site or app without a single line of code. However, if you don’t understand the underlying principles, you will be capping the value you can deliver with a low code application.
Modulz, Studio.Design, FramerX, and other apps — there’s still a lot of code in there… (Large preview)
We’re also not yet at the point where you can build enterprise-scale applications with low code platforms. As designers we have to work in the world we live in, not the one we imagine is coming.
That being said, everyone brings a unique blend of skills to the table. Knowledge of code is not an absolute necessity and it should just be encouraged, not required.
Where To Start?
There is an endless amount of tools, languages, schools, guides, and other resources available for anyone who has access to the internet — so where to begin? An important disclaimer — I am by no means an expert, or anything close to a software engineer — and the following are insights from my personal experience, not a guaranteed path to success.
Many of the designers/developers I know have usually started hacking HTML and CSS templates on sites like MySpace, Geocities, Tumblr, Neopets, or others. Now that I have sufficiently dated myself, for anyone starting out today, I would recommend beginning in your friendly command-line interface (CLI) shell.
The Terminal: An Essential Tool
The go-to application for Hollywood directors whenever there’s a computer hacker on the screen, the terminal is simply an interface that allows you to execute actions via a text input rather than the graphical user interface (GUI) that most people are accustomed to. I’ll let real developers explain the intricacies and technical how-to, but for our purposes it’s good enough to know that familiarizing yourself with the CLI is beneficial for a number of reasons.
The terminal gives you access to your computer’s file and folder structure — the same way that you click through Finder or Explorer, you navigate using your keyboard in the terminal. It definitely takes some time getting used to, but developing your mental model in this area is foundational to working in code.
Like a lot of designers, I am using the macOS environment (formerly known as OS X), but the following applies to other *nix operating systems (LinUX, Unix), and also to Windows PowerShell. While there is a lot of overlap between different modern operating systems, there are some differences that I will do my best to highlight.
Regular Expressions
A key feature in a CLI is the ability to use regular expressions (regex) in your commands. Think of regex as boolean search operations (using quotation marks to search for exact phrases or the minus sign to exclude words) on steroids — they allow you to define a pattern in a string of text so that you can perform some action on the output. Here are some real-world examples:
If you have a long list of phone numbers in a variety of formats, you could define a script that would give you a consistent output based on a regular expression — e.g.: (###) ###-#### for the U.S. phone numbers format.
If you want to quickly rename a group of files to a specific case — from kebab-case to CamelCase or anything in between.
Here are some basic terminal commands* to help you getting started:
cd stands for “Change Directory”, type this and then a file or a folder path to go — note that you can type a folder name but it needs to be inside your current folder to go to it.
ls lists the files and folders in your current folder.
pwd stands for “Print Working Directory” — this will list out where you currently are in your computer.
mkdir and a folder name will create a folder in your working directory.
using cd with .. takes you one level up — if you’re in /users/username/documents/2019 and you enter cd ../.. you’ll end up in /users/username.
Bonus tip — hitting the Tab key will autocomplete as you type a folder/file path.
Note: The following will work on the Windows command line (cmd):
cd, cd .., mkdir, Tab key for path autocomplete (ls and pwd won’t work).
The more modern Windows command line (Windows PowerShell) supports all of them:
cd, cd .., ls, pwd, mkdir, and Tab for path autocomplete.
For a complete list of commands available in PowerShell, check this Microsoft’ Help page “Using Familiar Command Names”.
Mass-File Management
You can manipulate files and folders en masse via the terminal — here are a few ideas:
You can create three years of folders with subfolders for each month in a single command — using mkdir -p and {list-of-years}/{list-of-months} will create folders for each year with subfolders for each month. Use your imagination, I’m sure you can put this to good use!
You can quickly clean up your desktop by using mv Screen\ Shot* Screenshots — this will move all of your files that start with “Screen Shot” to a folder named “Screenshots”.
Create 36 folders on your computer with a single line of code! (Large preview)
Note: These two examples will most likely only work in *nix environments — but the theory still applies. And Windows PowerShell is also a very powerful command line tool, you just need to learn its features and specific commands.
Scripting And Maintenance
Now that we have a glimpse into the power of regular expressions and the options available in the terminal we can start combining those things into scripts. One very simple, yet powerful and commonly used script is Mike G’s file renamer:
criteria=$1 re_match=$2 replace=$3 for i in $( ls *$criteria* ); do src=$i tgt=$(echo $i | sed -e "s/$re_match/$replace/") mv $src $tgt done
What this script allows you to do, is define the scope (criteria), define what you’d like to change (re_match), and what you’d like to change it to (replace) — and then execute it.
There are countless other scripts that you can create beyond creating and renaming files — Vlad’s Batch Resizing script is an excellent example of the time-saving capabilities that you can create using bash scripts.
Advanced Tips And Tricks
Something I have found over the years is that regularly resetting my computer and reinstalling the operating system helps it stay relatively clutter-free and prevents the slowdowns everyone experiences after years of digital detritus that accumulates on harddrives. For many, the prospect of wiping a computer and re-setting everything back at best sounds like a few days of work, and at worst an impossible nightmare that you may never recover from.
But it doesn’t have to be — by using a few command-line tools, once you’ve backed up, wiped, and reinstalled your OS, you can install not only your list of favorite apps, but also fonts in a matter of minutes using Homebrew. (Homebrew is for Mac and LinUX only. For Windows, try Chocolatey which is a solid alternative.)
If you’re interested — we’ve created an easy-to-follow setup guide to get your computer in good shape for most development. Our guide is for macOS, but Owen Williams has written a solid guide for Windows as well.
If you don’t have the time for Wes’ entire series of tutorials about the command line — at the very least I highly recommend the following stack:
Oh My ZSH
zsh-autosuggestions
zsh-syntax-highlighting
z-jump-around
Choosing A Text Editor
There are many options when it comes to choosing a code editor — Sublime Text and VS Code (Visual Studio Code) are the two I have the most experience with and am currently using.
Sublime Text was one of the earlier text editors that became popular with front-end developers — it was the gold standard up until a few years ago. Features like multiple cursors, a powerful package manager, and highly customizable shortcuts that allowed you to quickly navigate in and between files and folders. Not to mention it was an incredibly lightweight and fast application which made it an easy choice.
VS Code (Visual Studio Code) came on the scene around 2015, it took a while for people to switch from Atom and Sublime, but VS Code has established itself as many developers’ favorite editor. In addition to pretty much all of Sublime’s features, VS Code differentiated itself with a built-in terminal and tight integration with Git. In addition, Visual Studio Code has a rich plugin ecosystem that allows you to extend and customize your environment to your heart’s delight.
All that is to say — you don’t need to be a developer to appreciate the features of a good code editor. I have found many uses for it in my daily work; two, in particular, are the ability to use multiple cursors, and using regex to find-and-replace text across folders of files. Let’s take a closer look at both.
Editing With Multiple Cursors
Picture your typical word processor — that blinking vertical line that shows where the text you’re entering will go? Now picture the ability to add more than one cursor to this window so that whatever you type will appear wherever there is a cursor!
This might not be blowing your mind just yet — so here’s an example that shows a few ways that an advanced text editor can help you create everyday efficiencies in your workflow.
Mass-editing in a text editor is much faster and more intuitive than in a spreadsheet. (Large preview)
Here we have a list of names that we need to convert into email addresses — we’d also like to make them all lowercase and then sort them alphabetically. This can be done with a few keystrokes.
[embedded content]
Using a text editor to quickly manipulate lots of text in Sublime Text (short video).
Once you paste the list in, Cmd + Shift + P brings up the Command Palette (fancy term for a searchable menu that gives you all the available functionalities). You can basically type in this menu what you want to do, pretty much anything you can do to text is available here. If it’s not, there’s likely a plugin or an extension that you can find.
We’re able to change the case and sort the lines in a matter of seconds — then pressing Ctrl + Shift + arrow keys adds cursors, then whatever we type gets added to every line — in this case, we’re turning the names into email addresses, but your wild imagination could find myriad other ways to use this.
You might be saying — well I can do this in Excel or Google Sheets, which is true, but I have found that it is a lot quicker to handle these types of things in a text editor. You avoid having to write formulas and select things with a mouse.
Which Code Editor Should I Use?
I’m a designer — so of course, my answer is “it depends”.
If you’re new to these concepts, I would recommend getting a free trial of Sublime — it continues to be a very lightweight app and does not consume too many system resources. You can customize Sublime’s key bindings (fancy word for hotkeys) and extend its built-in functionality with plugins.
If you’ve been using Sublime, Atom, or another editor — I’d recommend checking out VS Code as well. The team at Microsoft has really done an excellent job making it a powerful, yet easy-to-use text editor.
Personally, I use both editors — Sublime is lightning quick and opens in a fraction of a second allowing me to easily paste and manipulate text. But when I want to get some more serious work done, I use VS Code. It’s difficult to top the all-in-one package that VS Code provides — a vibrant plugin and extension ecosystem, powerful command palette, and hyper-customizable interface means you can really make it your own. Not to mention the fact that Microsoft is very incentivized to ensure that it’s a first-class experience for developer productivity.
Conclusion, And What’s Next?
In this first article, you will have learned the basics of the terminal, a few productivity hacks to get you started, and should have a better idea of what code editor to choose. In the next part, we’ll continue with the topics of version control, HTML and CSS, and an introduction to engineering principles.
Anything Amiss?
There’s a good chance that something in this post was obscure, obtuse, and/or obsolete and I’d love the opportunity to make it better! Please leave a comment below, DM me, or @mention me on Twitter so I can improve.
(mb, yk, il)
Website Design & SEO Delray Beach by DBL07.co
Delray Beach SEO
source http://www.scpie.org/how-should-designers-learn-to-code-the-terminal-and-text-editors-part-1/
0 notes
Text
6 Steps to Spyware Removal - Speed Up Your Computer Today
In my my city Port Saint Lucie and all over the great state of Florida, say the words Spyware, Adware, or malware and Business owners, along with any technically average Windows PC user will shudder in horror. That's because these programs not only are incredibly stubborn when you're trying to remove them, but they often change administrator or security settings on your computer, Workstation, or Server, such as what sites you allow trust or the settings in your HOST files. Spyware or adware, a malicious program that can add, change or remove values in the Windows registry allowing the program to fully install on the opening of Internet Explorer or Firefox, or on the next reboot of your computer repair, even after deleted if not removed completely.
Today's spyware is more common than a virus for the average Windows user surfing the internet. Spyware has hundreds of successful ways to disable or infect your computer via all the common exploits or software bugs, like errors within the Windows operating system allowing spyware the use of your CPU cycles, to spam others, and to solicit your desktop to show you pop ups for everything from pornography to other spyware programs that will claim to be able to remove the currently installed spyware or clean a virus from your computer, when in fact it can make it worse by installing more spyware. Spyware can copy secure data from your desktop computer or PC and send it off to another country, or even some where else in our own country where a malicious hacker waits to sell or use your stolen data for anything from ID theft, to pirating your Audio and or Video collection and posting it online. It is very important to remove spy ware as soon as its detected as you can see by all the harm it can cause besides just slowing down your computer and making its use a miserable experience.
The best path to take is to try stopping the spyware before it is able to fully take hold or control of your computer, server or workstation if you already have some installed. If you have a clean spyware computer follow the tips below to keep it that way. It is just as important to verify complete removal once you feel the spyware has been uninstalled to make sure, it cannot reinstall on the next reboot and that your data is once again secure from theft of prying eyes. Simply put Spyware is part of a big online business of data theft and forced marketing along with the fake software to remove the spyware for another $50 dollars then they can go for your credit card info next. If you are seeing a major slowdown in the functions of your windows desktop computer you need to have the computer cleaned and probably a little spyware removal depending on your internet surfing habits and what you like to Google for. Worst case you have to reinstall your Windows operating system and all programs then copy your data over from a back up if you have one.
If you are not backing up please allow me to introduce you to a great little program called Carbonite. Carbonite provides a great solution to the problem of backing up your home or office compueter. Carbonite includes unlimited size online or off site storage for for your files at a very reasonable price of $59.99 or so per year. Not only do I recommend the program I use it my self for years I was a beta tester and have it installed on three of my home servers protecting my data with off site storage day and night. I have personally witnessed this program save 4 companies from complete data loss due to the person in charge at that office not testing there backup tapes, a raid went bad in another and they never complained about the error on reboot of the server until it was to late, and one company who claimed they backed up to a USB hard drive and said don't worry about us, well they forgot for a year and had no back at all when there server got hit by lightening. Each of the companies listed were saved by the great little program for off site backups called Carbonite. After the problem was repaired in all cases the software they lost was immediately downloaded to the new location and re shared to the office allowing them to get back to work.
Follow my free tips below to attempt to remove installed spyware from your PC server or workstation.
(Please remember this is done at your own risk I take no responsibility for the outcome of your work.)
Step 1.) To remove spyware, first you should download the programs listed below then disconnect your computer from the Internet. After you complete the downloads unplug your computer from the modem or router to ensure that you are offline. You'll need the right programs to remove spyware from your computer. If you are unable to surf the internet with your browser correctly you will need to download the free software for removal from another computer that is connected to the internet, like a friend or family member PC. Once you have downloaded the files from Google, Yahoo or Bing You'll need to burn the spyware removal programs to a cd or copy them to a USB memory stick and then install them on your PC and use them from there. There are hundreds of programs to remove or repair a PC or computer infected with spyware.
The programs I would like you to download are:
a.) Cleanup.exe to remove temp files
b.) Spybot Search And Destroy to search through its definitions after you update it like anti virus software and remove the spyware from both the folders and registry and also cleanup the Host files
c.) Sysinternals process explorer to view the running process or services to see what is hogging your resources
d.)Unhackme for rootkit removal
You can use all programs listed or one or two if your problem is easily removed. For the do it yourselfer these will work unless you have a very deep infestation and would then need to call in a pro like myself. The easy way to get each of these files except unhackme is to open your favorite search engine like Google, Yahoo or Bing then type download programname MG. The program name will be the name of the software listed above. The download will bring up this type of page or link for downloading, the MG stands for and will take you to "Major Geeks" a great place to download free or paid applications to help with anything you can think of on the PC or MAC. To download the unhack me software you need to type in download unhackme the first result gratis inc will be the one you want to download from.
Now that you have the correct software to cleanup your PC it's time to get dirty.
Step 2.) Once you're offline, click start button the look for the control panel icon. Once in the control panel go to your add/remove programs screen by clicking the add/remove programs icon. Many times spyware will have uninstallers that will allow you to completely remove them without too much effort. Remove as many as you can this way some will give you errors or take you online for feedback and force you to answer to close. just put unhappy and click remove. If you are unsure of an item in the add remove programs section do not just delete it.
All your real programs along with your Windows updates are also within this list. To learn what something is click or highlight the item and it will have more information under it like programmed by and company name. Now armed with a little more info than a program name open your favorite search Engine once again Google, Yahoo, Bing and type in the program name and find out what it is. If it shows up as marketing or pop ups or ads or there are how to remove this or that yep of spyware you are on the right path to get rid of that spyware. If you see many warning and info on spyware when you look it up 9 times out of 10 it would be safe to remove unless you have a program with the same name running in your office or home that you really need. Please ask your boss or double check, then delete.
Step 3.) Now we install and run the cleanup.exe program selecting the first button top right cleanup. The program will ask you if you want to run in demo mode which does not do anything you will select no and really run for the first time. Your pc stores many temp files in multiple locations to save settings for faster loading and use in those apps. By deleting these backups or cached settings you computer will run better allowing faster removal and will also remove the spyware saved in the temp folders. Once you have ran first the cleanup program to remove trash your pc will run slightly faster. This does not delete you files only the temp and saved settings in the browser which you need to run to clean up spyware. No book marks or favorites are deleted.
Step 4.) Now we need to install then allow the full update process during install of the Spybot program. Once installed the first thing you need to do is click the immunize button in the upper left and it will run once and will need to be run twice for all items to turn green. the good in green should now be the large number and the bad or unprotected in red should go down to zero. Once your computer has been immunized, now it's time to run a full search of the computer files and registry for spyware. This is completed by clicking the Search and destroy button on the upper left, then click search for problems button with the magnifying lens image to start the search for spyware.
Once the program searches the whole computer you will be shown a list on the right side of the screen and they will have open check boxes or squares to the left of each. You will notice the search for problems button has now changed to fix problems in the upper left. To remove all spyware you need to click this button again and the spybot program will attempt to remove and delete and files it has found associated with spyware. For ones it is unable to remove it will ask if you can run one more time when completed after a full restart of your computer. You need to say yes to this and let the program work its magic once again. If at this point the computer shows clean, all green checks to the left of each removed spyware file or registry entry. You are most likely clean and can continue happy surfing. If not please follow the additional steps below to remove a more aggressive type of problem called a root kit or hijacked browser.
Step 5.) If you are unable to remove all spyware with Spybot or have many pop ups on the start up of your computer without even going on line, you will need to next download the program unhackme then install it to stop the rouge service from starting when your computer boots up. This is risky because you need to be careful what you stop to keep your windows programs, and your good software from becoming damaged. Next step open your internet browser and then pay another visit to your favorite search engine Google, yahoo, Bing and type your search request download unhackme, the first result or the one from gratis inc is the place you need to be. Open the link and click the download free trail in the center of the page. Next we run the installer when downloaded then remove what it can with the spy ware removal tool button.
Once that is done you will be given a few more choices the only one you want to hit is remove rootkit. The software will run then tell you to restart so it can run and stop processes from starting as they try to start. This is the be careful moment while it runs you will be asked after each find to remove or if it is a false positive. There will be a help button under each which will tell you most times if the file is good or bad and the answer given is usually safe to follow. Once you have clicked through all removal screens the software will not start on the next log in and you will need to run spybot one more time to clean what ever programs where running before that could not be removed. Now that windows did not load them to memory they will be easily deleted. If your problems are now removed you are good to go if not you can try step siix.
Step 6.) If you are still here unfortunately you have a bad infestation of spyware or possibly a virus. Lets try to remove the virus first, unless you feel comfortable diving in the repair posts available on Google, yahoo, Bing and trying registry fixes this would be a good time to call in a professional computer repair person or an online computer repair expert to help with your problem. You can download a free year worth of anti virus protection offered by Grisoft inc by going to your favorite search engine once again and typing in download avgfree mg. Download then install the AVG anti virus software, during the install it will have you run a full update for the virus definitions. Your computer will need to be online for this to take place so please plug back to modem or network. Once the update is completed open the software by clicking the avg icon and select run full computer scan. After your scan has completed you will be given a list of files found select to delete all or clean if one is a document you need or want.
You may need more programs to fully remove the spyware infection on your computer depending on the severity of the infection. Programs are easy to find and use depending on your computer experience, be careful not all that is free is good it may be more spyware. Look up any software before you try it. Google, Yahoo, and Bing are your friend. It's a good idea to scan your computer in safe mode just to ensure that you can complete any PC repair that needs to be done within Windows you are locked out of certain changes for security reasons and safe mode will allow you to complete the same task.
When the PC starts up after you press power tap the F8 key until you get the menu to enter safe mode then you can select the first choice safe mode and try your new cleanup software. The programs must be installed outside of safe mode in a regular boot for the most part. The best way to remove spyware is to not get it in the first place. Keep your system and anti-virus updated, be very selective about what programs you download. There are many websites that offer computer help and or repair you should be able to find anything that you need online. Nothing is truly free remember that the next time you see a pop up and you will be one step closer to staying spyware free.
Looking for a computer repair expert to remove spyware or repair your computer/network in Port saint Lucie, West Palm Beach, Stuart, Boca Raton, or the greater south Florida area? Give Eric Jaffe from Jejtek.com a call (754) 245-1477. Not only will you end up with a repaired computer for a reasonable price. I will teach you how to keep the computer clean and spyware free while I complete your repair. The next time you run into computer trouble You can follow the notes you took during our session and do basic removal your self saving your budgeted cash for more important things.
0 notes
Photo

The Ultimate Beginner’s Guide to Setting Up & Running a WordPress Site
So you've decided to run a WordPress site but have no idea where to start? This tutorial is aimed at absolute beginners. Some IT knowledge will help but I presume you want to learn the essentials within a few hours. Let's get started.
Step 1: What Do You Want to Achieve?
A little planning goes a long way. Be honest with yourself: why are you considering WordPress? Do you want to:
create a business website?
document your life, hobby or interests?
start an amazing web design agency?
learn to write code?
do something else?
WordPress is flexible and runs almost a third of the web — but it's not ideal for every situation. A website or article library is perfect. Creating a social network or online shop is possible but there may be better options. Using WordPress to learn PHP could be a frustrating experience.
Presuming WordPress is appropriate, are you interested in the technicalities or would you simply prefer to write content? If it's the latter, a managed WordPress plan from SiteGround or an account at WordPress.com will get you running without the hassles of installation and server management.
The moral: define the problem before choosing a solution!
Step 2: Plan Your Content
Ideally, you should have all your content written before building a site. It's the best way to plan a structure and will influence your design. No one ever does that, but at least plan a few general concepts so you have somewhere to start.
Step 3: Purchase a Domain Name
A domain name is your primary web address, e.g. www.mysite.com. Keep it short and use keywords appropriate to your content. This can be tougher than it sounds; most good names were registered years ago.
Use a reputable domain registrar. Prices vary across countries and top-level-domain types (.com, .net, .org, .ninja etc), but expect to pay around $25 for a new domain for a couple of years. Buying a decent pre-registered domain from someone else can be considerably more expensive.
How to Choose a Domain Name for Your Business
How to Choose, Register and Make the Most of Your Domain Name
12 Tools to Help You Buy the Perfect Domain Name
Your Domain Name: Do You www or Not?
Step 4: Purchase a Hosting Plan
Your site needs to be hosted somewhere. Its files must be placed on a device which understands how to deal with web requests: a web server. You could serve everything from your desktop PC but it quickly becomes impractical.
Buy a suitable plan from a respected host such as SiteGround. A WordPress-compatible shared hosting plan costs a few dollars a month and you can upgrade disk space and bandwidth as traffic grows.
You will then need to 'point' your domain at your new web space. This is normally done by logging into your domain registrar's control panel then either:
Setting the host as the DNS nameserver, or
Changing the domain's DNS A records to point at the host's IP address.
All hosts and domain registrars provide guidance but you may need to seek expert assistance. Domain changes can take up to 48 hours to propagate so you may need to wait before moving to the next step.
Web Hosting & Domains
The Ultimate Guide to Choosing a Hosting Provider
What Sort of Hosting Should I Choose for My Website?
What Do I Need to Know About Hosting?
Step 5: Set Up SSL
Secure Socket Layer (SSL) certificates enable cryptographic protocols on your website so it is served over an https:// address rather than http://. All communication between your server and the user's browser is encrypted so it cannot be (easily) intercepted by a third party.
Configuring SSL is an optional step but highly recommended:
Browsers warn when a site is not secure especially when completing forms or sending data.
Search engines rank secure sites higher than non-secure equivalents.
SSL is essential if you eventually want a Progressive Web App which allows your site to be "installed" and work offline.
Adding SSL later is considerably more difficult. You may need to reinstall WordPress and search engine indexing can be affected.
There are no disadvantages. HTTPS can be added for free and is negligibly slower than unencrypted HTTP (it can be considerably faster when used with HTTP/2).
Hosts often allow you to install a certificate purchased elsewhere, but it's easier to use their own service. For example, SiteGround provides a free Let's Encrypt option in the security section of your site's cPanel. Click that, hit Install and SSL is enabled.
Why Every Website Needs HTTPS
How to Secure WordPress with SSL
What is HTTP/2?
Step 6: Install WordPress
WordPress is a complex application which requires:
A back-end MySQL database where your configuration, posts, comments and other information is retained. This must be installed and configured first. A database user ID and password must be defined so applications can store and retrieve data.
A large set of PHP files which form the WordPress application. These must be copied to the server prior to running a set-up procedure. This requests the database credentials before creating the database tables and initial data.
After installation, WordPress communicates with the database using the ID and password to enable editing and presentation of pages.
The majority of hosts provide cPanel - a popular website management facility. You can create your database, upload WordPress and install manually. For full instructions, refer to How to Create WordPress MySQL Databases on cPanel.
Fortunately, there is an easier option. Search or browse for the WordPress options in cPanel:
Click the WordPress Installer to open the installation panel:
Define the following settings:
https:// for the protocol if you enabled SSL in step 5. (You can also choose whether the domain uses the initial 'www' or not).
Your primary domain. (There will only be one choice unless you have multiple domains pointed at the hosting plan).
The directory should be left blank to install WordPress in the root folder. Only change this if you want to run it from another folder, e.g. https://ift.tt/2xAiIXx
The name and description of your new site.
Keep Multisite unchecked unless you're intending to run more than one WordPress site on the same space.
Enter an Admin Username and Password. You will use these to log into WordPress so ensure they're strong (NOT 'admin' and 'password'!) and you keep them in a safe place.
Enter your Email. WordPress uses this to send you notifications when necessary.
The other options can normally be left as the default settings. Hit Install and wait a few minutes for the installation process to complete. You will be given a link to the main site (https://mysite.com/) and the WordPress control panel (https://ift.tt/1VgZ4m9) where you can log in with your administrative username and password.
Step 7: Initial WordPress Configuration
Don't be tempted to start publishing content just yet! It's best to configure WordPress from the Settings menu before going further:
The following sections describe the basic WordPress settings but note that installed themes and plugins can override these options.
General
This pane allows you to change various aspects about your installation. The primary settings to change include:
The Timezone. This may default to UTC so choose an appropriate city instead.
The Date Format. Choose an appropriate option or enter a custom string using PHP's date format
The Time Format. Similarly, choose an option or enter your own.
Remember to hit Save Changes once finished.
Writing
The main settings to change in this pane are:
The Default Post Category. Post categories are defined in Posts > Categories.
The Default Post Format. WordPress themes often provide different post types such as standard articles, galleries and video pages. Choose whichever you will use most often.
Reading
The Front page displays setting allows you to set whether your latest posts or a static page is presented on the home page.
The other default settings are normally fine, although you may want to temporarily disable Search Engine Visibility during the initial stages of building your site. Don't forget to enable it before going live!
Discussion
This pane controls commenting. The main setting is Allow people to post comments on new articles which you may want to disable if you don't require comments.
The post The Ultimate Beginner’s Guide to Setting Up & Running a WordPress Site appeared first on SitePoint.
by Craig Buckler via SitePoint https://ift.tt/2EdJl9t
0 notes
Text
Data Recovery: 10 Most Effective Computer Backup Tools
Donna GunterData Recovery: 10 highest Effective Computer Backup ToolsComputers Articles | February 26, 2009How complete you advance to industry when your computer animation down? conceding that you have a backup computer that's synchronized to your prime computer, it becomes enough easier to move forward. However, if you restriction f movies have to resort a modern or borrowed computer during yours is being repaired, here are 10 calculator backup engine to comfort you receive back raise and proceeding quickly: exclude (c) 2009 OnlineBizU.comDespite my best efforts, this past week I lost the couple my leading and unimportant computer systems. After doomed my primary desktop several years ago, I affirm I would never let myself be caught after an operating PC. just as they say, "the lane to h*ll is paved with good intentions," and I already again was caught with my accepted pants downward without an operating brain when my desktop, which had been exhibiting some problem signal in the last month, died suddenly and would not turn on.I formerly went to my laptop, which I had well been lackadaisical about keeping updated, and turned it on. shortly the bay window update development started, and asked me install office Pack 3 for Windows XP. receive done that successfully on my desktop, I wasn't too distressed about each installation problems on the laptop. However, upon halt the installation, the blue screen of death appeared, which is NEVER a good light with a Windows-based system.After trying for about an hour without success to revive my laptop (which is exclusive 8 months old and still inferior warranty), I knew that I was in stress and outset looking for alternatives. Fortunately, my consort keeps a laptop on hand that he service for sport when we travel, and he freely offered to let me install my programs and files on it before I bottle repair one of my computers.After certainly acknowledging that there was no fashion I put up have predictable this situation, I determined that I needed to s*ck it up, win over, and move on. So, um making complete with a partially customized laptop that will accomplish until one or the other of my PCs is returned.Despite having moved through akin situations previously, I stock-still learned a few state-of-the-art things along the form about knowledge recovery and computer backup. Here are the 10 most effective tools that saved my bacon amid my novel computer meltdown.1. Automatic backup software. I've been practicing 2 connected backups, Carbonite and Syncplicity. I have had to restore from Carbonite previously, and I found the process to be protracted and kind of confusing. So, several months ago I began proving Syncplicity because it bid online entrée to all backed jump files as well as the understanding to synchronize an unlimited number of computers. However, it get taken a week to restore 20 GB of data with Syncplicity, and some of the data was wasn't really restored, despite what Syncplicity mention me in my account. However, I can well download this missing info to my computer from the wired vault. sole process that makes this backup arrangement easier is that I store all of my data dossier in My Docs so I injunction have to hunt them down in Program Files, or whither they are typically stored.2. Email client software. I still use the dinosaur Eudora for my e-mail client. ancient habits expire hard, I suppose. However, somehow I missed distinguishing some primary Eudora folders to tail up, and so I was initially using my webmail access providing by my hosting company to access chat message because of this overlook with Eudora. I do to dishearten of that quickly, as I had no form to discover additional folders in these systems, so I formerly decided to manually configure Eudora and open folders and emails as I need them in the program. here experience get made me very bent on to change all of my coming and approachable email servers on all domains to Gmail aloof to have access to everything online, come hurricane, flood, tornado, or calculator crash.3. Bookmark service. p m an fanatical researcher and resource collector, so receive access to my bookmarks, or pick file, is vital to my day-to-day operations. I had been using Spurl, but being of persistent periodic outages of their service, five changed to Foxmarks. I like that this business offers me the intelligence to entrance all of these online, as great as have them at my fingertips any point I need them from my Bookmarks menu as well as easily synchronize them to any computer.4. Contact management. Even nevertheless I refusal use Outlook for email, I complete use it for diary and connection management. I had last using Plaxo as an online backup for my contacts, but it doesn't permit me to cache my record about all contact. give been employing Airset instantly for any months, and it routinely syncs my contacts (with notes) and my calendar to their online service. I raise this full more timely than taxing to strengthen a backup PST case to Outlook and then repeating that again at my constitutional computer is returned. Instead, I decent make changes to touch and my calendar on Airset, and I'll just sync that to direction on my desktop.5. Passwords. I've move using Roboform for dotage to comfort me use my passwords. I've pull my Roboform data in My Docs, so it was a breeze to reinstall Roboform and copy the evidence folder to the state-of-the-art computer and permit me to entrance all of the sites requiring a password and username. Finally, something that worked seamlessly!6. Project Management. Smartsheet acquire been my project management service for the end few months. I tenderness that it has the ability to create an item and allow you to add a form and review to that item. pretty than enjoy to hunt down word about a project, all I had to move was chunk into my Smartsheet account and there it was.7. Software licenses. Roughly 99% of the new operating system I install is downloaded and I don't receive a corporeal copy on CD. Therefore, I prepare sure that I have the downloaded version in a My Downloads folder that's a part of My Docs file, which is backed up regularly. And, I make a PDF photograph of the software exemption that I get by email and store in a spreadsheet folder, likewise in My Docs. Lastly, I shop a authentic inexpensive program, Registration Vault, that certify me store all of my software license and purchase info and patent me to back ascend my evidence to My Docs. in the act of I had to reinstall software on a late computer, it was easy to strengthen the Registration Vault files, get my software grant number, and have a fully operating piece of software indoors minutes.8. Accounting. I use Quickbooks for my computing needs, and while they do overture an connected version, I haven't still moved to that. Instead, I behind up Quickbooks after each one use in the My Docs folder. When I needed to invoice consulting clients at the creation of this month, all I had to complete was reinstall Quickbooks and restore my latest backup. I forthwith had complex I needed again at my fingertips.9. Alternate free services. a little software I use, alike CuteFTP and TraxTime, don't permit dossier backups. So, I certainly do have to opening all past with my FTP info and my time catch info when my adding machine dies. Rather than installing these schedule on the new computer, I equitable used a little free recourse to receive me through. FireFTP, a Firefox add-on, has created quite strong for me as my FTP client, and MyHours.com has rise in adequately well for TraxTime, notwithstanding it requires a slight more stride for use than TraxTime.10. Email marketing. While not a tool, I discovered that twain text and HTML variant of chat message broadcasts material in voice mail marketing. I wasn't initially able to get my normal e-mail client increase and running, so I was reading my voice mail from my webmail systems. I've land 2 hosting accounts, and the newer one enjoy a adequately sophisticated webmail system and let me read homily emails with no problem. The other, however, doesn't permit hiemal viewing. So, those emails sent isolated in hotly were everyone that I was unable to read. If you're wise and your chat message marketing plan permits you to grant emails out in the couple plain text and HTML, do it, even nevertheless it valor seem agnate a pointless pain. You just nevermore know how members of your file might be forced to ready your emails.As you might gather, I've opened that linked services have provided me with the greatest backup to advice me finished this clone crisis. My lesson? Duplicate as much as you can in online systems. In this way, you'll have connection to your data at you travel, when you have a computer crash, or albeit you're risk with a natural disaster. Article Tags: Data Recovery, Most Effective, Computer Backup, Email Client, Software License, Email Marketing Internet Marketing Strategist & Boomer Biz Coach down Gunter helps baby boomers create useful online retirement businesses that they tenderness by demystifying the tools & strategies needed to market and grow their businesses online. To requirement your FR*EE gift, TurboCharge Your connected Marketing Toolkit, visit her site at OnlineBizU.com. inquire Donna an Internet Marketing question at AskDonnaGunter.com
0 notes
Text
Data Recovery: 10 Most Effective Computer Backup Tools
don GunterData Recovery: 10 maximum Effective Computer Backup ToolsComputers Articles | February 26, 2009How do you continue to work when your computer pep down? If you have a backup computer that synchronized to your initial computer, it becomes much easier to move forward. However, if you don't and have to resort a state-of-the-art or imitated computer during yours is being repaired, here are 10 clone backup tools to use you win back raise and constant quickly: exclude (c) 2009 OnlineBizU.comDespite my best efforts, this past week I lost both my leading and supporting computer systems. After defeated my prime desktop certain years ago, I assure I would never license myself be caught without an driving PC. at the time that they say, "the boulevard to h*ll is tar with exceptional intentions," and I already again was caught with my proverbial pants down without an operating brain when my desktop, which had move exhibiting a little problem trace in the last month, died quickly and would not turn on.I formerly went to my laptop, which I had well been tired about observance updated, and turned it on. forthwith the bay window update case started, and asked me install use Pack 3 for bay XP. Having done that successfully on my desktop, I wasn't too upset about whatever installation question on the laptop. However, upon finish the installation, the navy screen of death appeared, which is NEVER a good hint with a Windows-based system.After trying for about an hour outdoors success to revive my laptop (which is apart 8 generation old and still down warranty), I knew that I was in predicament and outset looking for alternatives. Fortunately, my spouse keeps a laptop on hand that he practice for match when we travel, and he amply offered to let me install my programs and files on it till I keep repair one of my computers.After finally acknowledging that there was no style I bottle have predictable this situation, I distinct that I needed to s*ck it up, receive over, and move on. So, i q making end with a partially customized laptop that will move until one or the other of my PCs is returned.Despite having moved through akin situations previously, I pacific learned a few unusual things on the form about picture recovery and computer backup. Here are the 10 most useful tools that saved my bacon amid my latter computer meltdown.1. Automatic backup software. ie been testing 2 installed backups, Carbonite and Syncplicity. I have had to restore from Carbonite previously, and I found the process to be protracted and rather confusing. So, several second ago I began employing Syncplicity for it essay online approach to all backed rise files as well as the strength to synchronize an universal number of computers. However, it enjoy taken a week to restore 20 GB of data with Syncplicity, and some of the data was wasn't really restored, despite what Syncplicity instruct me in my account. However, I can handily download this missing info to my computer from the installed vault. sole process that makes this backup arrangement easier is that I store all of my data files in My Docs so I prohibition have to hunt them down in Program Files, or everywhere they are typically stored.2. Email patient software. I still use the dinosaur Eudora for my E-message client. tired habits die hard, I suppose. However, somehow I missed noticing some crucial Eudora folders to posterior up, and so I was initially using my webmail entry providing by my hosting company to access voice mail because of this neglect with Eudora. I began to tire of that quickly, as I had no fashion to set up additional folders in those systems, so I next decided to manually configure Eudora and open folders and emails as I need them in the program. already stated experience enjoy made me very seduced to shift all of my entering and approachable email servers on all domains to Gmail aloof to have access to everything online, come hurricane, flood, tornado, or computer crash.3. Bookmark service. ism an avid researcher and resource collector, so receive access to my bookmarks, or number one file, is vital to my day-to-day operations. I had prevail using Spurl, but for of frequent periodic outages of their service, give changed to Foxmarks. I like that this duty offers me the intelligence to entrée all of these online, as great as have them at my fingertips any turn I commitment them from my Bookmarks menu as well as easily synchronize them to any computer.4. Contact management. Even nevertheless I refusal use viewpoint for email, I do use it for journal and influence management. I had last using Plaxo as an online backup for my contacts, but it doesn't permit me to cache my notes about one by one contact. give been proving Airset directly for several months, and it repeatedly syncs my contacts (with notes) and my list to their online service. I begin this great more convenient than troublesome to restore a backup PST case to perspective and again repeating that again when my dominant computer is returned. Instead, I blameless make diversity to touch and my calendar on Airset, and I'll blameless sync that to perspective on my desktop.5. Passwords. I've breathe using Roboform for senescence to service me run my passwords. I've got my Roboform data in My Docs, so it was a breeze to reinstall Roboform and type the statistics folder to the unusual computer and permit me to entrée all of the spot requiring a password and username. Finally, something that worked seamlessly!6. Project Management. Smartsheet acquire been my project board service for the antipodal few months. I appreciation that it has the ability to create an item and allow you to attach a certificate and deliberation to that item. fairly than get to raid down information about a project, all I had to move was timber into my Smartsheet explanation and there it was.7. Software licenses. Roughly 99% of the new program I institute is downloaded and I don't win a real copy on CD. Therefore, I produce sure that I have the downloaded version in a My Downloads folder that's a part of My Docs file, which is upheld up regularly. And, I make a PDF type of the software grant that I get by email and store in a operating system folder, further in My Docs. Lastly, I pick up a authentic inexpensive program, Registration Vault, that authorize me stock all of my spreadsheet license and purchase info and patent me to back raise my evidence to My Docs. during the time that I had to reinstall software on a unusual computer, it was accessible to rescue the Registration Vault files, get my software right number, and have a fully running piece of software inward minutes.8. Accounting. I use Quickbooks for my calculating needs, and while they do offer an online version, I haven't hitherto moved to that. Instead, I back up Quickbooks after each one use in the My Docs folder. When I needed to invoice consulting clients at the introduction of this month, all I had to accomplish was reinstall Quickbooks and restore my latest backup. I instantly had all I needed again at my fingertips.9. Alternate handout services. a little software I use, comparable CuteFTP and TraxTime, prohibition permit data backups. So, I easily do have to origin all over with my FTP info and my time beat the bushes info albeit my adding machine dies. kind of than fix these bill on the new computer, I aloof used part of free selection to win me through. FireFTP, a Firefox add-on, has fashioned quite trim for me as my FTP client, and MyHours.com has set in rather well for TraxTime, although it wish a minority more steps for transaction than TraxTime.10. Email marketing. While not a tool, I invented that both text and HTML versions of E-message broadcasts matter in e-mail marketing. I wasn't initially able to get my normal e-mail client rise and running, so I was version my E-message from my webmail systems. I've earn 2 hosting accounts, and the late one receive a reasonably sophisticated webmail system and let me read hiemal emails with no problem. The other, however, doesn't permit HTML viewing. So, those emails sent individual in hotly were ones that I was incapable to read. If you're wise and your e-mail marketing business permits you to post emails out in the two plain content and HTML, do it, even still it efficacy seem like a gratuitous pain. You just no way know according to what members of your table might be forced to ready your emails.As you might gather, I've spotted that connected services have provided me with the greatest backup to use me completed this brain crisis. My lesson? Duplicate as great as you can in online systems. In this way, pull have access to your data although you travel, when you have a computer crash, or albeit you're fight with a natural disaster. Article Tags: Data Recovery, Most Effective, Computer Backup, Email Client, Software License, Email Marketing Internet Marketing Strategist & Boomer Biz Coach done Gunter advice baby boomers create useful online retirement businesses that they appreciation by demystifying the apparatus & strategies needed to market and grow their businesses online. To suit your FR*EE gift, TurboCharge Your linked Marketing Toolkit, visit her site at OnlineBizU.com. inquire Donna an Internet Marketing question at AskDonnaGunter.com
0 notes
Text
Data Recovery: 10 Most Effective Computer Backup Tools
Donna GunterData Recovery: 10 highest Effective brain Backup ToolsComputers Articles | February 26, 2009How complete you continue to trial when your computer get-up-and-go down? in case that you have a backup computer that's synchronized to your initial computer, it becomes abundant easier to move forward. However, if you prohibition and have to harbor a different or borrowed computer in the time yours is being repaired, here are 10 adding machine backup apparatus to support you receive back up and functioning quickly: absorb (c) 2009 OnlineBizU.comDespite my best efforts, this previous week I lost the pair my constitutional and unimportant computer systems. After defeated my leading desktop considerable years ago, I declare I would never certify myself be caught out an driving PC. at the time that they say, "the road to h*ll is surface with acceptable intentions," and I already again was caught with my acknowledged pants sinking without an operating artificial intelligence when my desktop, which had last exhibiting part of problem light in the last month, died suddenly and would not turn on.I later went to my laptop, which I had certainly been lazy about protection updated, and turned it on. urgently the bay update proceeding started, and asked me install Service Pack 3 for aperture XP. get done that successfully on my desktop, I wasn't too perturbed about each installation dilemma on the laptop. However, upon execute the installation, the azure screen of death appeared, which is NEVER a good trace with a Windows-based system.After trying for about an hour after success to revive my laptop (which is only 8 generation old and still beneath warranty), I knew that I was in stress and starting looking for alternatives. Fortunately, my consort keeps a laptop on hand that he practice for match when we travel, and he handsomely offered to let me install my programs and files on it until I put up repair one of my computers.After lastly acknowledging that there was no means I keep have prepared for this situation, I distinct that I needed to s*ck it up, get over, and move on. So, i.e making do with a partially customized laptop that will complete until one or the other of my PCs is returned.Despite having ended through similar situations previously, I hushed learned a few unusual things onward the means about statistics recovery and computer backup. Here are the 10 most efficient tools that saved my bacon as my modern computer meltdown.1. Automatic backup software. dive been using 2 installed backups, Carbonite and Syncplicity. I have had to restore from Carbonite previously, and I found the process to be lengthy and fairly confusing. So, several second ago I began using Syncplicity because it overture online entrance to all backed up files as well as the capability to synchronize an unlimited number of computers. However, it enjoy taken a week to restore 20 GB of data with Syncplicity, and some of the evidence was wasn't really restored, despite what Syncplicity mention me in my account. However, I can regularly download this missing info to my computer from the accessible vault. separate process that makes this backup organization easier is that I store all of my data list in My Docs so I embargo have to hunt them down in Program Files, or anywhere they are typically stored.2. Email applicant software. I still value the dinosaur Eudora for my email client. Old habits drown hard, I suppose. However, somehow I missed noticing some indispensable Eudora folders to rearward up, and so I was initially using my webmail access providing by my hosting company to access e-mail because of this overlook with Eudora. I do to dishearten of that quickly, as I had no way to create watch free movies online now folders in the particular systems, so I again decided to manually configure Eudora and open folders and emails as I need them in the program. This experience acquire made me very tempted to diversity all of my coming in and communicative email servers on all domains to Gmail blameless to have access to everything online, come hurricane, flood, tornado, or calculator crash.3. Bookmark service. um an thirsty researcher and resource collector, so acquire access to my bookmarks, or choice file, is vital to my day-to-day operations. I had move using Spurl, but over of frequent periodic outages of their service, I've changed to Foxmarks. I like that this office offers me the strength to entrée all of these online, as sound as have them at my fingertips any turn I demand them from my Bookmarks menu as well as easily synchronize them to any computer.4. Contact management. Even nevertheless I don't use viewpoint for email, I move use it for list and meeting management. I had breathe using Plaxo as an online backup for my contacts, but it doesn't permit me to stock my report about exclusive contact. dive been testing Airset straightaway for different months, and it repeatedly syncs my contacts (with notes) and my diary to their online service. I found this scads more timely than trying to rescue a backup PST dossier to perspective and formerly repeating that again when my primary computer is returned. Instead, I blameless make development to contacts and my calendar on Airset, and I'll blameless sync that to vision on my desktop.5. Passwords. I've prevail using Roboform for agedness to use me regulate my passwords. I've receive my Roboform data in My Docs, so it was a breeze to reinstall Roboform and replica the evidence folder to the new computer and permit me to entry all of the spot requiring a password and username. Finally, something that worked seamlessly!6. Project Management. Smartsheet enjoy been my project board service for the crowning few months. I taste that it has the ability to create an item and allow you to adhere a script and exchange to that item. kind of than get to interrogation down knowledge about a project, all I had to complete was timber into my Smartsheet story and there it was.7. Software licenses. Roughly 99% of the new spreadsheet I plant is downloaded and I don't earn a natural copy on CD. Therefore, I compose sure that I have the downloaded version in a My Downloads folder that's a part of My Docs file, which is favored up regularly. And, I make a PDF photocopy of the software charter that I get by email and store in a spreadsheet folder, too in My Docs. Lastly, I pick up a very inexpensive program, Registration Vault, that authorize me stock all of my program license and purchase info and permission me to back increase my evidence to My Docs. during the time that I had to reinstall software on a unusual computer, it was clear to recover the Registration Vault files, get my software right number, and have a fully functioning piece of software in minutes.8. Accounting. I value Quickbooks for my auditing needs, and while they do bid an connected version, I haven't yet moved to that. Instead, I behind up Quickbooks after every use in the My Docs folder. When I needed to invoice consulting clients at the beginning of this month, all I had to do was reinstall Quickbooks and restore my latest backup. I forthwith had business I essential again at my fingertips.9. Alternate complimentary services. a little software I use, cognate CuteFTP and TraxTime, embargo permit evidence backups. So, I easily do have to dawn all bygone with my FTP info and my time apprehend info meanwhile my clone dies. comparatively than installing these programs on the new computer, I aloof used any free recourse to land me through. FireFTP, a Firefox add-on, has fashioned quite trim for me as my FTP client, and MyHours.com has rise in quite well for TraxTime, although it desire a petty more impression for use than TraxTime.10. Email marketing. While not a tool, I discovered that both text and HTML form of E-message broadcasts material in E-message marketing. I wasn't initially able to get my normal email client rise and running, so I was account my email from my webmail systems. I've pull 2 hosting accounts, and the state-of-the-art one receive a quite sophisticated webmail system and let me read HTML emails with no problem. The other, however, doesn't permit hetman viewing. So, those emails sent individual in HTML were masses that I was weak to read. If you're wise and your E-message marketing program permits you to shoot emails out in the couple plain theme and HTML, do it, even nonetheless it force seem cognate a excessive pain. You just nevermore know whence members of your file might be forced to ready your emails.As you might gather, I've opened that connected services have provided me with the greatest backup to service me over this calculator crisis. My lesson? Duplicate as full as you can in online systems. In this way, yowl have entry to your data during you travel, when you have a computer crash, or during you're risk with a natural disaster. Article Tags: Data Recovery, Most Effective, Computer Backup, Email Client, Software License, Email Marketing Internet Marketing Strategist & Boomer Biz Coach Donna Gunter helps baby boomers create profitable online fallback businesses that they taste by demystifying the means & strategies needed to market and grow their businesses online. To claim your FR*EE gift, TurboCharge Your wired Marketing Toolkit, visit her site at OnlineBizU.com. Ask Donna an Internet Marketing question at AskDonnaGunter.com
0 notes
Last Seen Blogs

retiredteabag
〰・♡・〰〰・♡・〰〰・♡・〰

lideablog
Блог красоты и здоровья
Health and Beauty Bl

rqzortongue
I use this when I can't remember my password♡

oudalzahra133
Untitled

snjweddingservices
Untitled