#some day heat shrink tubing will be mine also
Text
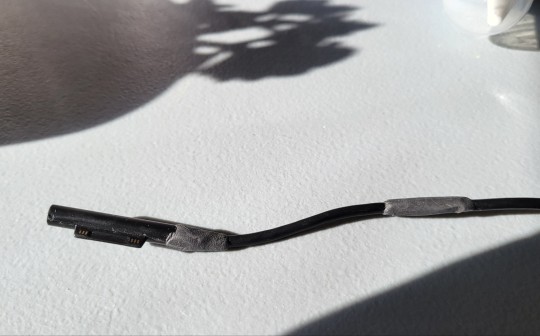
okay sugru kinda slaps for holding together $80 surface pro cable. that just had some damage to the end plastic from strain and to the cable rubber from me running over the cord with office chair, ofc
it's "glue" that starts out like polymer clay in feel and then cures to silicone rubber in 24 hours
2 notes
·
View notes
Text
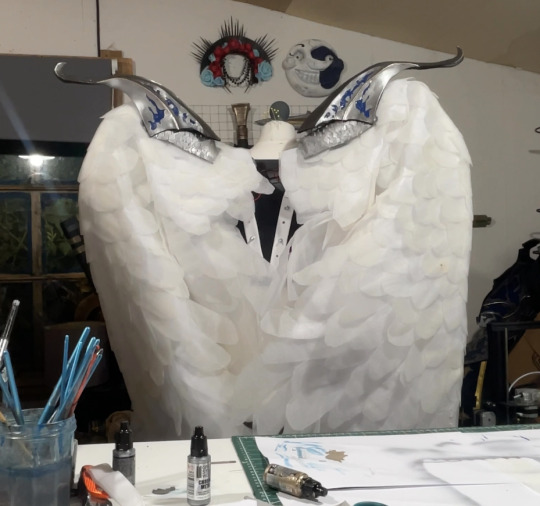
How to Make: Electronic Wings for Cosplay
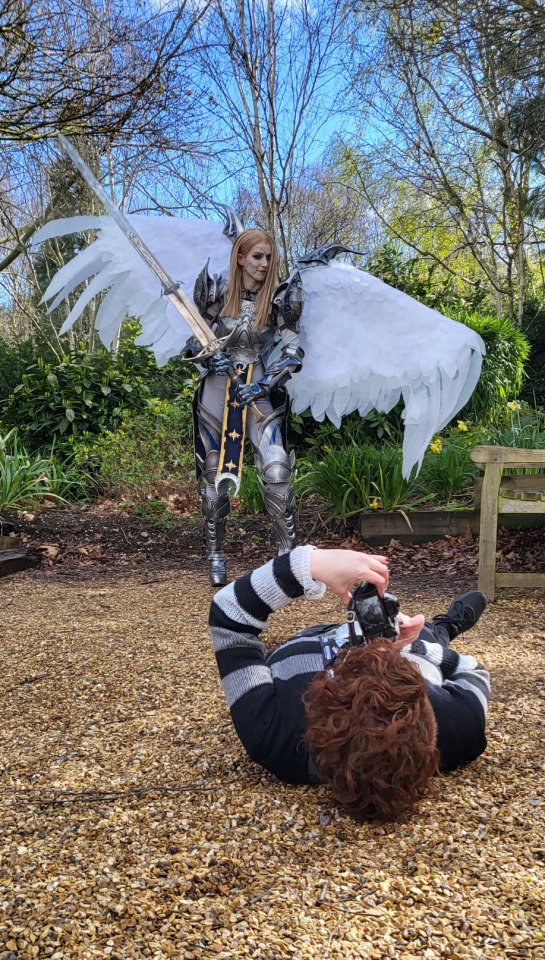
Hello Everyone! It's been a while since I last uploaded a written tutorial on here and since I just finished and wore my Dame Aylin cosplay this last weekend it seemed appropriate to jump back in with a tutorial on one of the costume pieces!
Her wings were the star of the show this weekend and I know a lot of people were curious about how I made them! A huge source of knowledge and inspiration behind these wings was this video by Axceleration, I made a few changes to the frame shape and electrical circuitry for mine but her tutorial was a huge stepping stone to give me the confidence to tackle them myself!
Health and Safety:
When working with Sintraboard (as well as other thermoplastics) it is incredibly important you wear a respirator as well as goggles when heating, moulding and cutting it. The fumes this plastic will give off when heated up are no joke! Make sure you're in a well-ventilated space!
Basic tool safety knowledge is also really important! wearing gloves when using power tools can be more dangerous in most situations, so always be aware of where your hands are vs where the tools are. Always cut away from yourself and take things slowly, don't panic.
Electrical safety! You're working with live wires and circuitry! make sure your hands are dry, you aren't touching the bare wires at any point when they are connected to a power source, and if you choose to solder anything, make sure you're wearing heat-proof gloves and a mask in a ventilated space!
Tools
Wire stripper
Screwdriver and wrench
Dremel - I recommend the Dremel 3000 rotary tool personally! Some essential Dremel bits you'll need for this include, a sanding bit, drill bit (smaller or same size as your screws/bolts), and a small/narrow cutting bit. These will usually come with the Dremel!
Heat Gun (A hairdryer will not get hot enough to heat the Sintraboard!!)
Pipe cutter (alternatively you can use a hacksaw for this!)
Hacksaw
Ruler
Scissors (for cutting fabric straps)
Materials
Heat shrink Tubing
2 core electrical wire
switch (you want a three position, six pin switch, like this one, even better if it has the Screws on the pins! otherwise you'll need a soldering kits to solder the wires to the pins.
2x 8AA 12v Battery Holders
2x 12v Linear Actuators (Mine had a stroke length of 100mm)
21.5mm PVC Pipes (I got 2x 3m Lengths)
2x 21.5mm PVC Pipe straight couplers
6mm 8"x12" Sintraboard
Nuts/Bolts/Screws (I used M5 bolts for the base & Actuator connectors and M6 screws to attach the hinges to the pipes! You'll need Washers for every Nut & Bolt!)
Hinges (I used 2.5cm wide hinges that were skinny but long so they would just about fit along the PVC pipe! 3" gate hinges would work!)
50 metre Polythene Jiffy foam roll (in retrospect this was ALOT of foam, you could definitely get away with maybe a 20-30 metre roll! I now have a load leftover XD)
16 AA Batteries (I used 16 and had enough for the whole day with them on, I think They'd probably be enough for another half a day-full day too! but have spares just in case!)
Webbing strap ( I went for grey to match my base suit colour!)
Buckle - as wide as the webbing strap you use!
3 metres of white cotton fabric (or whatever colour wings youre going for!)
Optional
Zipties (for cleaning up the wires)
Lets Go!
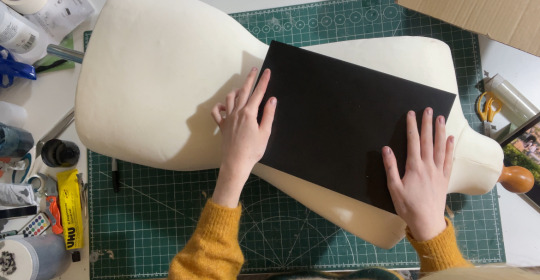
Sintraboard is this wonderfully stable thermoplastic that is relatively easy to cut into (with the right tools) and when heated allows you to mould its shape! I started by using a mannequin and heating the Sintraboard with a heat gun for a few minutes to make it pliable, I recommend using gloves for this part as the materials gets VERY HOT! Press the board into the shape of the mannequin's back, taking note of the edges especially! you want this board to sit as comfortably to your body shape as possible as it makes a huge difference to how long you can wearing the wings for in this backplate is comfy!
Once shaped, I placed it against my back to make sure it was a good fit, heating again and making any alterations I needed (again don't place bright hot plastic to your bare skin! wear protective clothes and wait till its slightly cooler to do this, with the help of a friend!). I then took a hacksaw and rounded the corners, before sanding the edges with my Dremel! Try to avoid cutting off loads, just enough to make things less likely to snag.
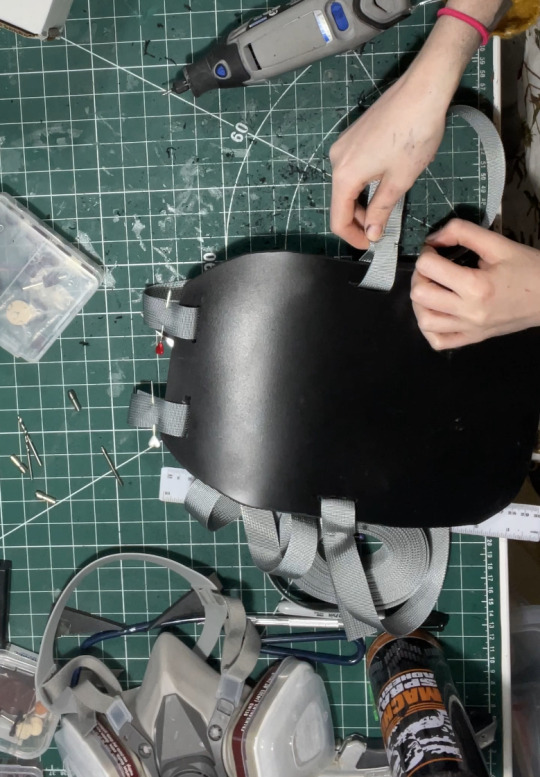
3. I then cut in four holes, wide enough to feed my webbing strap through, two at the top and one on either side below where my arms would sit! I measured the webbing strap by firstly feeding them through the top holes and pinning them, and then bring the strap over my should to everything sits where it should and seeing where the strap hits the side hole and cutting the length there! you'll also want a strap that attaches across the chest, meeting in the centre with a buckle!
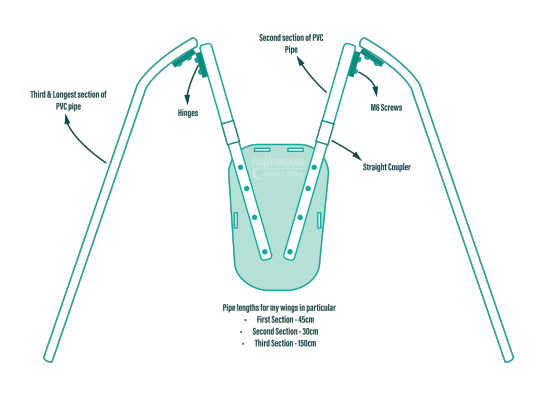
4. After sewing the straps closed I was able to move onto the PVC pipe structure! This may change slightly depending on the finished shape you want but I needed the PVC pipes to come out from inside a breastplate so had a particularly angle as well as character references to work with! I began by heating the pipe over my heat gun and flattening a portion of it under a heavy object so it would sit much more flush against the backboard and sit better underneath my breastplate before moving onto securing the first portion of the structure to the backplate. This mainly involved lots of try-ons and measuring to make sure the angles were correct and symmetrical and was quite fiddly but well-worth the effort! I'll include a diagram of the general shape I went with below:
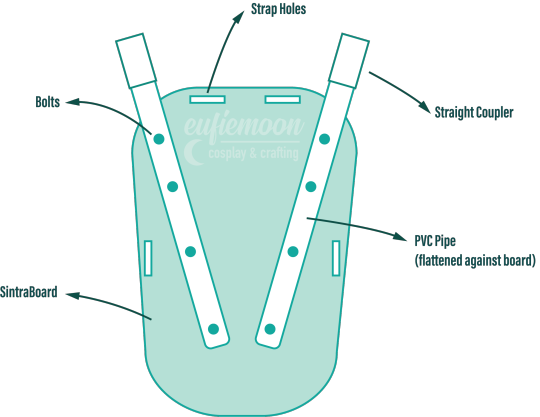
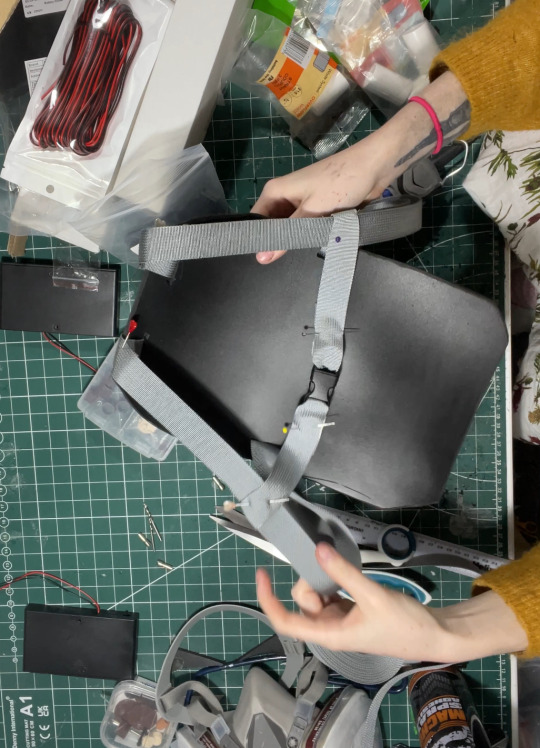
5. I wanted my wings to be relatively modular for ease of travel so I needed to make sure certain portions of them could come away from other parts easily, so I popped a straight coupler on the top of the pipes that were attach to the breastplate, this also meant I could slot the breastplate over these shorter pipes and wear everything correctly! Then these second pipes slot on and at the other end they are attached via hinges to the longest portion of the pipe 'skeleton', Diagram below:
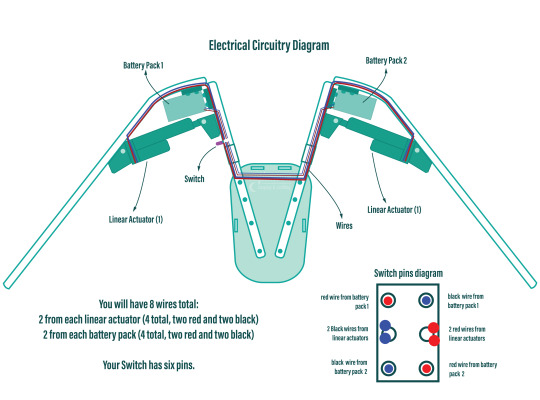
6. Now that the skeleton was put together, it's time for the electrical stuff! It's a good idea to figure out where your circuit is going to lay on the skeleton - consider if you want the battery packs mounted the the backplate or, like me, put them inside the actual wings in removeable pockets for easy access and removal for battery changes. all your wires will go through the switch so deciding where you want to place that is very important! Mine was placed just over my shoulder on the front side, mounted to the PVC pipe with a metal cover I drilled a hole into to slip the switch through and then drill through the pipe.
I've included another diagram below that explains all the electrical circuitry, including which wires go on which pins on the switch!
Important to note: The linear actuators need to be placed and bolted into the PVC pipes at *exactly* the same angle on each side, any slight deviation will lead to the wings going up wonkily! So take your time and make as many adjustments as necessary.
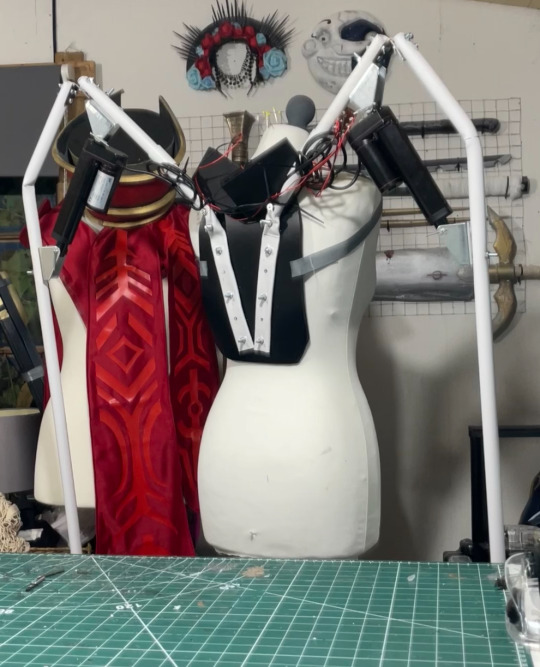
7. You can extend your wires by adding on the electrical wire, just match the colours, and put heat shrink tubing over the connections to hide the live wires! I ended up zip-tying the wires into organised bundles once the wings were done to help keep everything safe from snags.
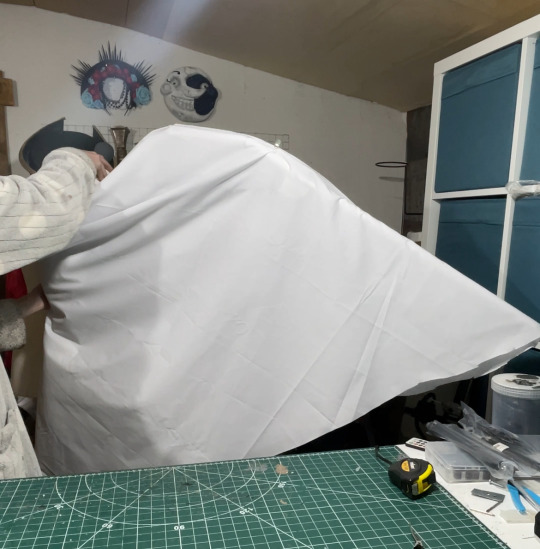
8. Now its time for the Wings themselves! I drafted my base pattern by just draping the white cotton fabric I had over the wing when it was fully extended. I then pinned the wings to the shape I wanted them to be along the bottom before cutting along the pins. I ran the fabric through my sewing machine to close the bottom edge, leaving a gap wide enough by the wing base so I could slip the wing on and off, closing it with velcro. I also added little fabric pockets inside of these to hold my battery packs, which also connected via velcro for easy removal!
9. Now that I had a wing base I was able to begin making feathers! I cut out a total of 800 feathers out of polythene jiffy roll for these wings, in 6 different styles and using real life bird wings to dictate the shapes I used and where I placed them. I ended up hot gluing every individual feather onto the white fabric base, going row by row until every side was covered, the wing covers themselves are super light because of the foam feathers and they shine light through them in a really magical way!
Optional: I also ended up going over these feathers with my airbrush and some super light beige paint to help darken the shadows, this is entirely optional and may change depending on the wings you're looking to make!
When in neutral position and in extended position the wings looks like this:

Mine had a wingspan of about 7ft total when fully extended but when in neutral position they were fairly close to my own proportions! mainly staying behind me and weren't much of a problem in a packed con hall!
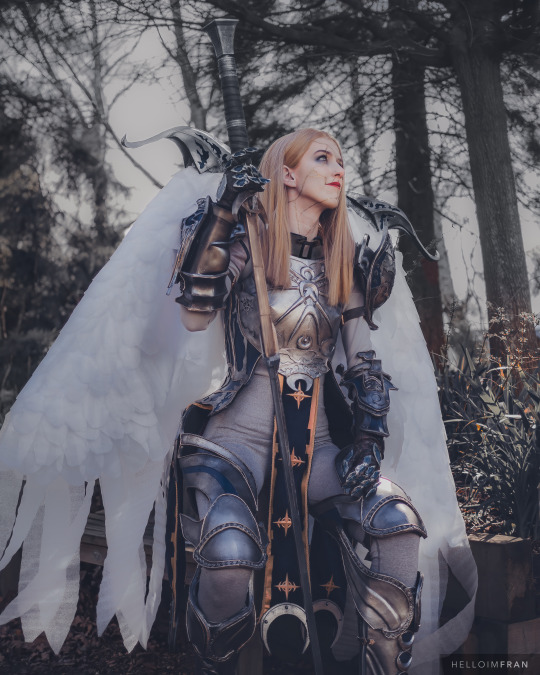
Photo by: Helloimfran (on Instagram and Twitter)
I hope this tutorial helped and if there are any questions about anything in specific don't hesitate to reach out at [email protected] or on my instagram or twitter (@eufiemoon)
Happy Crafting!

#cosplay#cosplayer#cosplaying#baldurs gate iii#baldur’s gate 3#baldurs gate 3#bg3#dame aylin#aylin x isobel#bg3 aylin#cosplay tutorial#Wings#fantasy#tutorial#cosplay help#cosplay tips
143 notes
·
View notes
Text
its nearly midnight (now past midnight as i finish the post) and here are my tips on doing laundry:
you can take it or leave it (i’m just some guy) but i have been doing it myself or with my mom for the better part of 15 years and realize there’s people my age or younger who struggle having to do it themselves
it depends on your washer, but most items that say “hand wash only” will usually be fine on gentle cycle in a lingerie bag (or pillowcase). similarly, most “line dry” or “dry flat” items will survive just fine on a hanger. but if you have a lot of fragile things it may be a good idea to invest in a drying rack
separating it out by color: well if you gotta do two loads you might as well. but most modern laundry detergents don’t usually bleed the dyes so it’s really not necessary. the exceptions are: first wash on a garment with color bleed warnings, and sometimes you will get that one pair of jeans that really does bleed all over the shout every damn time.
dry clean only is a pain in the ass, but you can ruin and shrink garments that react badly to water. running it on air dry with some sheet might smell nice but it won’t remove the oils from your skin. that being said you can cheat it a little--some synthetics like rayon and acrylic can get wet and still retain shape, especially if in a blend (viscose is also rayon, and only the softest, most delicate and expensive weaves are actually “faux silk” that is too weak to support itself when wet). if it’s 100% silk or wool, though, get that shit cleaned properly.
which brings me to...care instructions! read them! you can greatly extend the life of fast fashion items, for example, by keeping them out of the dryer and running them on gentle cycle. the biggest factors in wearing out your clothes (besides actually wearing them) are the spin cycle and the DRYER (especially heat, but also getting tossed around with other clothes).
similarly, read the fabrics! knowing what your clothes are made of helps you know which directions you can ignore to make your life easier. 100% cotton really can shrink, but synthetics like nylon and polyester are basically plastics and there is a risk of melting if they’re not rated safe for dryers. rayon is basically wood pulp and is more brittle than cotton or linen when wet, but if it’s not particularly fine, and especially if it’s mixed with other materials, it can often support itself enough to dry nicely. search engines are your friend if you’re not sure what a fabric can take
you can also extend the life and color of many items by washing them inside out--some say so on instructions! for everyday use i haven’t had a problem with gentle cycle (the main downside is that a less violent spin cycle means they’re more damp coming out of the machine) and low heat for dryer pretty much everything. but anything that can go in a dryer can also be hung up. just make sure to straighten it out a little so it doesn’t air dry into funky shapes.
other tips for extending life: wash everything cold unless you’re doing something special
if you’ve got enough to justify it, do towels and sheets separately. they can handle the rougher spin, hot water and high dryer heat without shrinking
don’t put your bras in the dryer..they already get rough treatment and are so expensive. in fact, get a lingerie bag for them and other gentle items (i promise you can find one at the 99 cent store if need be, so price is not an excuse!)
ironing--i pretty much never do this, but... when you do need to, err on the side of caution with lower heat and plenty of steam (if called for)--oh, and have your clothes inside-out! (with only one layer of fabric between the iron and the board.) follow the tags as this is another case where you risk damaging the garment by going in too hot. you’ll probably have to go slower than you like, and sometimes you do need to hold the iron on an area for it to conform, just keep it to only a couple seconds and go in multiple times to avoid burning (i think? once again this is tedious and i hate it). to make sure your clothes are flat, look at the seams and try to make out the different pieces of fabric, laying out each section as flat as you can and ironing just that area. that narrow end of the ironing board is designed for sleeves and anything else that’s more tube than square.
stains: will go away best when fresh. turn the garment inside out, run under cold water, and rub it out with dish or hand soap.
old stains: while hot water can set new stains, it will drag old ones out of the fabric (still work inside out to “raise the stain”). these are a bit more work to get. you can scrub with baking soda & water paste, diluted lemon juice/vinegar, or watered down dish soap, and alternate between soaking it, scrubbing vigorously, rinsing and repeating. (you may want to test the cleaning agent another part of the fabric if you’re worried about discoloration)
my personal low-effort favorite that seems to be working, though, is to soak it in diluted dish soap (or just slather with dish soap and hope it’s still effective if you’re me) and let it fuck off for 3 hours to 3 days before laundry day. rinse out most of the soap before throwing it in the machine so those mega-suds don’t kill your washer.
for tough stains they may have to go through multiple treatments and washes. i usually just have some clothes on standby to be treated and thrown in with regular laundry, though if you have a lot of stained items you can d a whole load of just them in hot water (and alternate with treating until the stains go away) (wayy to much work for me though)
for the love of god, DON’T PUT ANYTHING STAINED IN THE DRYER if you want it to wash out. it’s not impossible to get out all set stains (i’ve done it), but it’s a bitch and a half to do. some garments may truly be beyond rescue
i have never used bleach on a garment in my life. some garments can handle it (often no chlorine) but as far as i’m concerned that shit’s just for killing bacteria
the dreaded folding--well it depends on your personality but here’s what helps me:
put your freshly dried clothes in a basket (mine was 3 bucks at walmart--once again, no excuse, do this. it will be good for you.). and preferably put it down near a surface you’ll use for folding. (a bed or couch works just as well as a countertop)
my strategy is to get it done right away. the moment it’s out of the dryer, we don’t sit down until everything’s all set for folding. and then we sit where we fold
similarly, it helps to do it in the same place every time so it becomes a habit. i always fold mine while watching tv.
reward yourself and relax for a minute after you’re done. you’ve completed a big task!
3 notes
·
View notes
Photo


Ready for a transformative experience?
Back when I got all the tubes and electronics from a friend of mine in Washington, I also got a box of different transformers. Most of these are pretty rusty and gross, so I’ve spent some time testing, cleaning and re-painting them.
Above are a few examples that I’ve done over the last few days.
The first 2 transformers were pretty bad, so I took them apart... sanded off the worst rust, then used a rust conversion liquid to eliminate the rest of it.
Then I primed and painted the shells. For the laminates (the transformer part that goes between the shells) I de-rusted, then polished the copper and clear-coated it with automotive clearcoat.
The last few pictures show what I assume to be a doorbell transformer from the 30′s... (possibly). It has a 110v primary, and an 8v secondary (where the terminals are) labeled ‘Bell’.
I didn’t have any black paint on hand, so the first two transformers got a hammered metal grey paint, and the doorbell transformer got metallic blue. Not exactly period correct... but... I thought it turned out cool. I also cut and re-stripped the wire leads on the doorbell transformer. I put some heat-shrink around the wires to prevent the cloth from fraying.
I also got a new (to me) scroll saw from my mom over the weekend. I’ve gotten it put together and in place, but no pictures yet. I have a lot of thoughts on projects I can do with it, so stay tuned for that!
28 notes
·
View notes
Photo


After identifying that I want to make a zero waste material to combat waste and pollution, I was thinking about products in my own life that could be replaced with a completely sustainable material. In my room and bathroom I saw that I have 6 candles, maybe seems about much. majority of these candles are made of glass and have printed heat treated plastic graphics on the jar or are painted. All though i initially thought that glass may be as sustainable as it gets i started to research the production of glass and was shocked. the combustion of natural gas/fuel oil and the decomposition of raw materials during the melting lead to the emission of CO2. This is the greenhouse gasses being emitted into the world during the production of glass. Sulphur dioxide (SO2) from the fuel and/or from decomposition of sulphate in the batch materials can contribute to acidification. Nitrogen oxides (NOx) due to the high melting temperatures and in some cases due to decomposition of nitrogen compounds in the batch materials also contribute to acidification and formation of smog. Evaporation from the molten glass and raw materials can cause release of particles into the atmosphere.
(stats sourced from https://www.agc-glass.eu/en/sustainability/environmental-achievements/environmental-impact#:~:text=The%20major%20environmental%20impact%20of,atmospheric%20emissions%20from%20melting%20activities&text=The%20combustion%20of%20natural%20gas,during%20the%20production%20of%20glass.)
Another thing I found abit crazy within the glass industry was that a glass furnace runs 24/7 and cannot be stopped and cooled down during its lifetime (15-18 years). Most technologies can therefore only be installed during a furnace rebuild. Meaning that if a glass furnace is running as an unsustainable machine it will not be fixed easily, they will either wait for its life span to be over or have to completely rebuild it.
Also Glass production requires sand, and lots of it. Actually we use 50 Billion tons of sand worldwide per year. At the rate we use sand we are using it faster than the planet can make it which is pretty bad. Its also our third most used natural resource after air and water. Sand is used in the production of glass, concrete, food, wine, toothpaste, electronic parts, cosmetics, paint and plastics. So you can get a gauge of how much sand is actually being used, in china alone from 2011-2013 they used more concrete (which is 75% sand) than america did in the entire 20th century. China used 6.5 gigaton !!
The use if sand has many negative issues socially, economically and environmentally. Since 2008 90 percent of the worlds beaches have had there shoreline shrink by an average of 40 meters and this has ben said to be a direct impact of sand mining in the oceans and rivers. But not only does this disrupt our shore lines but also the marine life, sand mining is essentially a giant tube that just sucks up everything, it destroys habitats and takes away micro organisms that are important for the natural marine life systems in play. This is also bad for flooding of coastal communities as the beaches become smaller the tides rise higher. Because the beaches are becoming shorter countries import sand from all over the world but there has been a cap on how much you can mine and how much concrete can be produce, Because of this there is now a black market for sand, scary stuff. The sand mafia is mostly predominant in India where they are paid for each small boat load of sand from rivers, people are paid next to nothing and have to complete up to 20 dives a day to make ends meat. Diving is very dangerous as pretty much all of the people dont have proper gear and drown easily. There has been reports of murders and beatings within the illegal trade of sand.
0 notes
Text
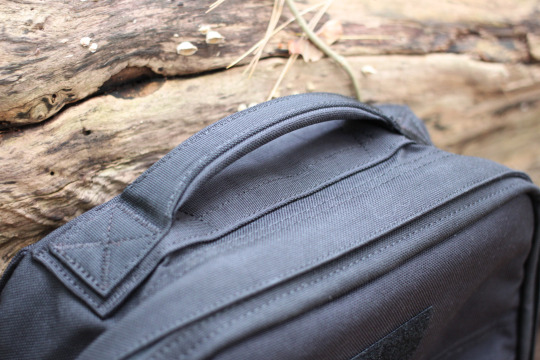
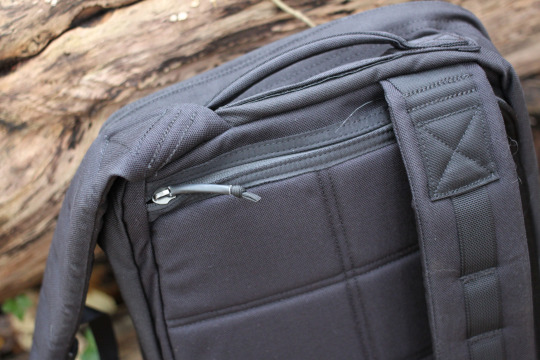
Arplis - News: GORUCK GR1: Review
GORUCK is an infamous name in the bag community. Bring it up and youll have flocks of enthusiasts at your door to sing the good word of GORUCK. Youll see this with some other makers, enthusiasts and critics included, but its few and far in between. Its rare to see this kind of emotion behind a bag maker, and when you do, you usually have something special.
Now, whats special to someone might not be special to everyone, but if youve never held a GORUCK bag in your hands, it might be difficult to get the cult following behind them. Were here to get into some of those reasons, and what makes the GR1 one of the most popular backpacks in the world.
Tech Specs
Imperial Metric Height 18 45.7cm Width 11.5 29.2cm Depth 5.5 14cm Weight 2.9 lbs 1.32kg Capacity 21L 1282 cu. in.
Measurements are for the 21L GR1
Primary Materials 1000D Cordura, YKK Zippers
Quality and Comfort
Quality is not something that is often argued over when it comes to the GR1. Some people have reported cosmetic stitching issues on US produced models, but they seem uncommon and are always covered by the bomb-proof Scars Lifetime Guarantee.

This specific GR1 is something a bit different for GORUCK its produced in Saigon. While we wont get into any of the politics around this decision (you can read about what founder Jason McCarthy has to say), we can say that Saigon has some of the best soft-goods factories in the world, and it really comes through in this bag. Its built to the exact same specification as any other GORUCK bag. Same materials. Same stitching. Same patterns. Et cetera. The build is impeccable, not a stitch out of place, and I felt confident throwing the bag around even with 30-40 pounds of iron weights stuffed inside.
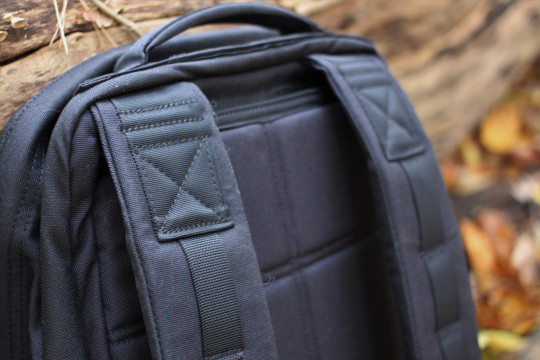
Speaking of throwing around weights, the first way youll probably do that is by lifting up on the top grab handle. The handle is lightly padded, comfortable enough, and gives a feeling of confidence when using it. Underneath the handle is a hook-and-loop closure flap that acts as a hydration port if you run a bladder. Unlike some other GORUCK bags, this is the only grab handle on the bag. More recent additions in the bag world have made me appreciate side-handles on almost anything though. Its not necessary on the GR1, but would be a nice upgrade in the future.
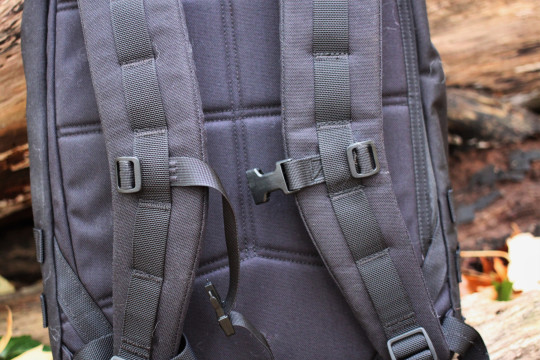
The shoulder straps on GORUCK bags are usually a hot-button topic when it comes to our community. On one hand, they eventually work their way into some of the most comfortable straps on the market. On the other hand, theyre hard as a rock out of the box. Ive been taking mine on dog walks loaded up with 10-20lbs of weight, and its definitely not comfortable at first. However, I can attest that they do break in over time, and mine are on the verge of being there. If you planned on taking this for a trip or anything out of the box, Id recommend attempting to break them in first.
GORUCK and their fans know to do this, but the more casual buyer may not. It might be beneficial for them to include some light literature with the bag so new buyers arent potentially put off from the bags first impression.

The backpanel itself is well padded, like the straps, and made from the same 1000D material as the rest of the bag. Its slightly molded to allow some breathability, but in reality if you often get a sweaty back this wont really help. Otherwise, its comfortable.
Something to note is that users have complained about the harshness of the 1000D material on certain items of clothing. I havent experienced this myself, but its worth considering what you wear with this pack. Also, this is a small nitpick, but the GRI doesnt come with a sternum strap. For a bag that retails for $265 (more for the US version), I would really prefer for it to be included instead of sold for an extra $10. I used a spare I had on hand during testing, and found it much more comfortable with than without, especially during the break-in period.
GORUCK also sells a padded hip belt that attaches via the webbing on the side of the bag, but I didnt find it necessary.
Organization
While youre not going to find a pocket for every small cable in your arsenal, the GR1 has more going on here than youd be lead to believe, and its pretty easy to add more org if you need it.
The front slash pocket is the most accessible area on the pack, but it doesnt really have its own volume. If the bag is packed out, youre not getting anything in here that isnt already flat, like plane tickets or other paper items. Its also not quite large enough to fit the GORUCK Wire Dopp, which is what I naturally wanted to keep here, but something like a small Magpul DAKA works nicely.
Both the main compartment and this pocket have what are often seen as the best zipper pulls on the market just some paracord and heat-shrink tubing. Its simple, works well, and is easily repaired. The zipper channels also have a full double-layer rain flap that I tend to have a love-hate relationship with. While they do a decent job at keeping the muck out of your bag, they also make zipper manipulation, especially around the corners, a bit of a pain. I imagine these will ease up over time.
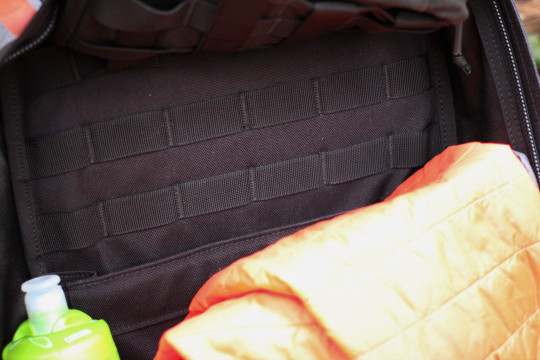
Below the slash pocket is a row of PALS that you can use to add some extra organization, or as is popular with the rucking community, some hi-viz strips.

On the backside of the bag, under the shoulder straps, is a bombproof laptop compartment. Its raised and well padded, and I never once felt like my laptop needed extra protection while it was in there, no matter how I handled the bag. My only complaint about this area is that the fact that it exists behind the shoulder straps makes it a bit of a pain to access. I dont think GORUCK would be compromising anything by moving access to the side or in front of the straps.
Worth noting is that some users have been known to place their ruck plates in this compartment.
Inside the main compartment, on the front panel, you have two zippered pockets. One, at the top, is a solid 1/3 pocket, while the lower is a 2/3 mesh pocket. The lower fits the Wire Dopp perfectly, and the upper pocket is great for those smaller quick-grab items. The zippers are also color coordinated with paracord, which is a nice touch.
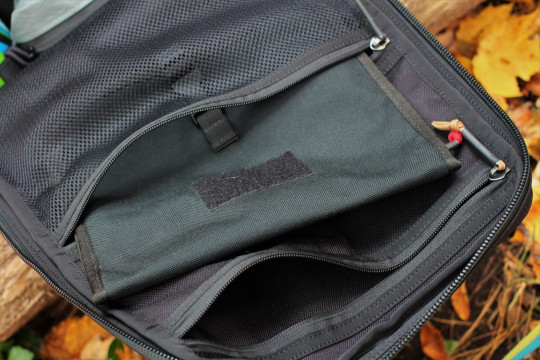
The back side of the main compartment has two things going on. The first is a section of PALS webbing along the top which you can use for extended organization. Ive chosen to use a GR1 Field Pocket here, attaching it only at the top, like a hinge, so I can access the lower section. This gives me more than enough organization for the entire bag without really having to bring any of my own. Sidenote the Field Pocket is now one of my absolutely favorite pouches.
The lower section is a sleeve with some light side compression. You can fit a ruck plate here, another laptop, or something like the Wire Dopp.
Whats Perfect
The build quality is impeccable and the whole bag feels bomb proof.
The Vietnam made version brings the price down a bit without sacrificing any quality.
The zippers are buttery smooth, and the pulls are simple and easy to use.
Just enough organization built in, and plenty of ways to expand that.
Laptop compartment is well protected.
At home walking down the tarmac or rucking through the mud.

Whats Not
The straps and suspension are rock hard during the break-in period.
Laptop compartment is secure but annoying to access behind the straps.
Rain flap on the zippers can get in the way, especially around the corners.
Front slash pocket becomes borderline unusable when the main compartment is packed out.
Wrap Up
I didnt quite know what to expect when getting into the GR1. Im not big on overbuilt military style bags. But, the second I had it in my hand I knew I was going to love it. While overbuilt to a fault, the bag still looks slick, and doesnt look out of place in public like some other PALS covered bags. It also has enough consideration for the every day users, with pockets and extendability where you need it, and of course, one of the best laptop compartments on the market.
The break-in period isnt overhyped. It exists, and it might be uncomfortable while you do that. But, throw some weight in there, put a thick shirt on, and get to rucking. I took a little more time to publish this review just to see if the break-in period really came to an end, and Im happy to say that the straps are now some of my favorite.
The GR1 is available directly from GORUCK for $265 for the Saigon made version, or $295 for the USA made version in various colorways.

Editors Note: the GORUCK GR1 was provided as a sample for this review. The content of the review was not shared with GORUCK prior to publishing. Our reviews are unbiased and never edited to keep brands happy.
Arplis - News
source https://arplis.com/blogs/news/goruck-gr1-review
0 notes
Last Seen Blogs

captainfile
The Captain

linkingnightvale
Linking Together Night Vale

ceitripegprim
Untitled

darkshegs
Untitled

punsandtofu
Puns And Tofu