#sorry if these are already giffed I have like hundreds of videos downloaded & gifs edited in my laptop & I am releasing all of those slowly
Text
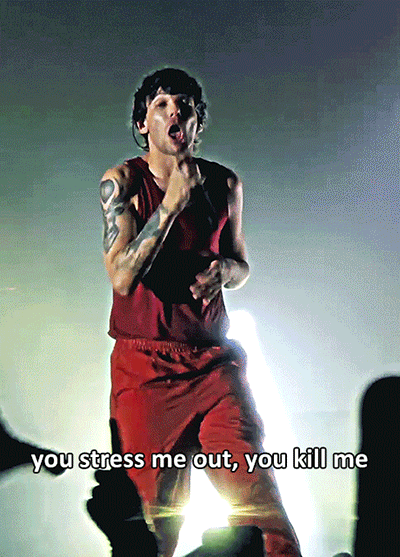
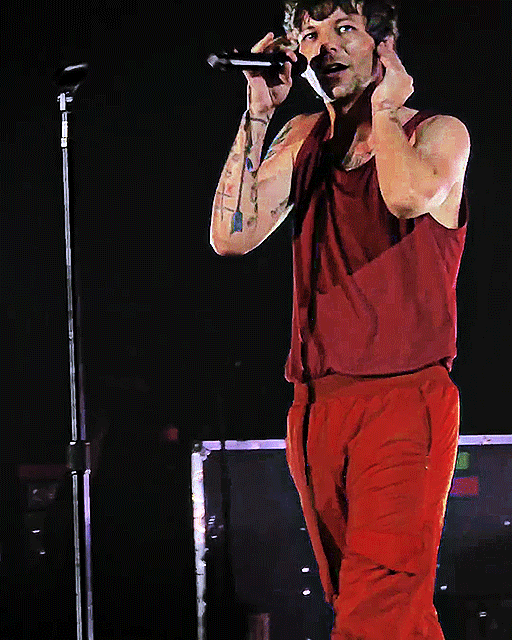
Faith in the Future World Tour - Panama City – 02.05.2024
#dailytomlinson#hlcreators#hltracks#hljournal#artistsof1d#dailymusicians#tomlinsonedits#hldaily#tomlinsonsource#louis tomlinson#my gifs#scheduled#tw flashing#FITFWT GIFS#fitfwt Panama City#sorry if these are already giffed I have like hundreds of videos downloaded & gifs edited in my laptop & I am releasing all of those slowly
59 notes
·
View notes
Text
🌻 a gif tutorial by: me! 🌻
i know there are so so many WONDERFUL tutorials out there, but i can’t say no to a very kind anon so!!! here we go. hopefully this is helpful for someone out there! if anyone doesn’t do well with picture tutorials and would find it more helpful for me to do a video, i would also be happy to try that too!!
this is definitely not the fastest way to do it, i’m sure, just the way i’ve always done it and i’m bad at learning new things so ldkjfoiw also i’m using photoshop cc 2021 (tho this method should work for any version of photoshop i think) and i use video frames to layers to gif just as an fyi
step 1: get whatever media you’re giffing! i use torrents and direct downloads. that’s how i’ve always giffed, i’ve never tried capping so i can’t help with that. sorry!
step 2: make clips of the scenes your fc is in! i have a folder dedicated to the character the fc is playing and keep all my clips in there. when i do movies, i typically only do about 12 clips at a time because it just feels less overwhelming for me. when i do a show, i only clip one episode at a time for the same reason. i use quicktime to clip, but i know some people use VLC and i’m sure there are other options out there to try, too! again, this is just what i’ve always used so i’m comfortable with it and know how it works.
when i clip, i try to start the clip a few seconds before the scene my subject is in and a few seconds after just to make sure i’m getting every single frame.
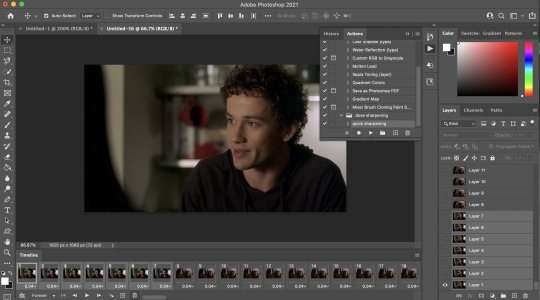
step 3: import video frames to layers! so once you have photoshop open, go to file > import > import video frames to layers
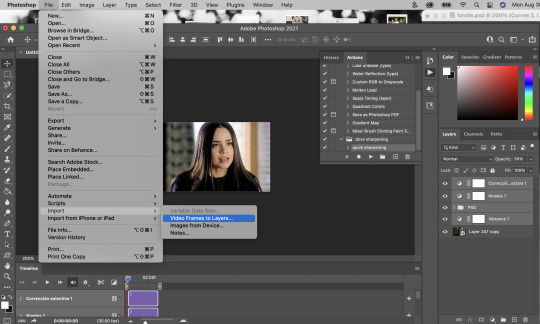
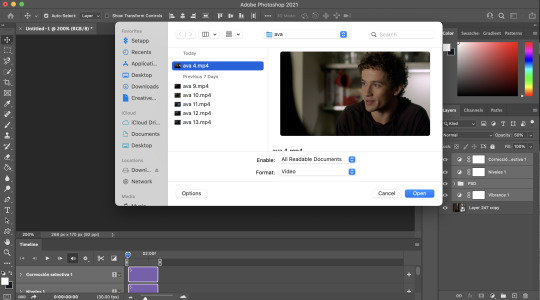
then go to your folder where you have all your clips saved and choose the one you want. i took this one out of my trash because the rest of the gifs i have to do in this episode are in the dark and that was gonna be too annoying to me lkdjfkslofw so i’m just re-making one i already did a few days ago. i’m giffing sofia carson and you can see that my clip starts on someone else’s face so i can make sure i have every frame of hers!
step 4: select the range for your gif! just like with clipping, i try to get a few frames before and a few frames after of the fc i’m working on so that i don’t miss anything. if you aren’t interested in giffing them in every single second (which is totally fine, i know a lot of people prefer not to!) then you don’t need to be as concerned with it

because i’m using a direct download, i’m not going to limit my frames to every 2. it’ll be really fast and choppy. if you screen recorded, i would suggest limited to every 2 frames and then going through and deleting each duplicate frame (when i giffed via screen recording, i found that every 6 frames or so was a duplicate). this will make sure your gif is smooth and exactly the same as one made from a direct download. it IS time consuming though, so i recommend doing a direct download/torrent if possible! if you ever need help finding downloads or need something torrented and converted for you, please feel free to message me and i’ll be happy to help!!
step 5: delete the frames you don’t need! this is the time to delete any extra frames at the beginning, end, and any duplicates
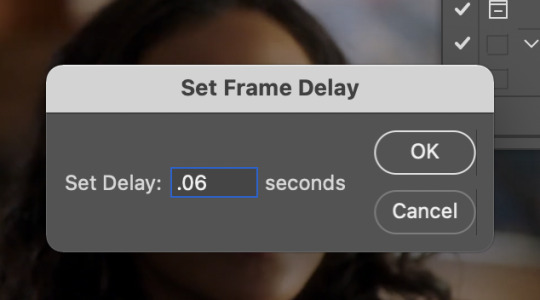
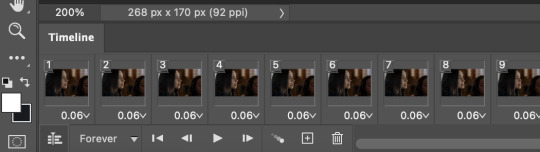
step 6: set your speed! you can do this later if you want, but i like to do it as soon as all my extra frames are deleted. my personal preference is typically .06 seconds for most of my gifs. if they’re on the shorter side (under 35 frames), i’ll do .07-.09. i know some people have very strong feelings on gif speed lskdfjpwe i do not. it’s all about what feels best for you! .06 is where i feel my gifs feel the best, but there are plenty of beautiful gifs that are slower or faster!
step 7: crop it! as you can see above, i set my W x H ratio to 268px x 170px. this is a size i really like, but you can make yours smaller or larger. i do suggest using the W x H ratio setting to set it to your specific pixel measurements because it cuts out having to resize after cropping.
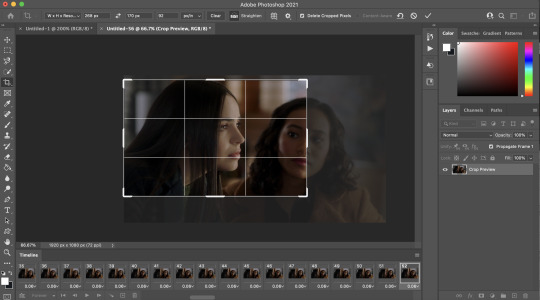
also, i have a few hundred frames in this one particular gif that i’m going to cut down in the next step. however, i know that she remains pretty much in the same place throughout the frames which is why i’m cropping them all at once. if it’s a gif where you get a few hundred frames that you’re going to turn into multiple gifs and the person moves around a lot, definitely only crop one gif at a time!
step 8: delete the frames you aren’t using! everyone has a different way of deciding how many frames their gifs are. for me, if they’re talking, i actually go and watch the segment i’m giffing to see what they’re saying, read their lips as i go through each frame, and crop it there. it’s a little more time consuming i guess but i feel like it gives me the best results. totally optional, though! if the person is NOT talking, then i typically just try to make it between 60-80ish frames and base it on facial expressions or body language. sometimes it’s more, sometimes it’s less! again just comes down to what your preference is.

step 9: convert to timeline! basically just press that lil highlighted button down there next to the “forever” and convert to timeline. pretty self explanatory
step 10: sharpening! this is where i use my sharpening action which is linked right here. i’ve been using it for a while now and i really love it! i’ve tried other sharpening actions since i made it and they just don’t make me as happy as this one lol
hit play on your action:
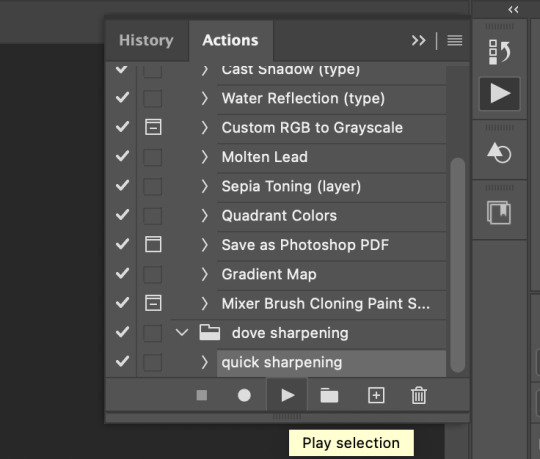
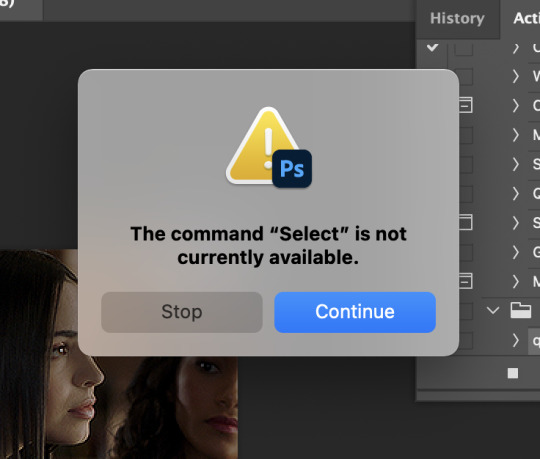
for my action, i get this popup twice and just hit “continue” and it keeps going through the steps with no problem
step 11: COLORING!!! get your psd and slap it on! i have different one base psd that i use for almost everything and will edit it to fit whatever scene/show/movie i’m working on. i’ll also save different versions of it based on the media i’m giffing. for example, the lighting on liv & maddie is SUUUUUPER different from the writing on pll: the perfectionists. so i have a “liv” psd and a “loralie” (name of my char that i use sofia for, idk why i named the first psd after liv and not my char but whatever ldkfjsoi) psd. same base, same layers, just different levels. i also will often combine psds! i’ll put my base down and then add layers from other psds or create new ones to fit whatever scene i have going!
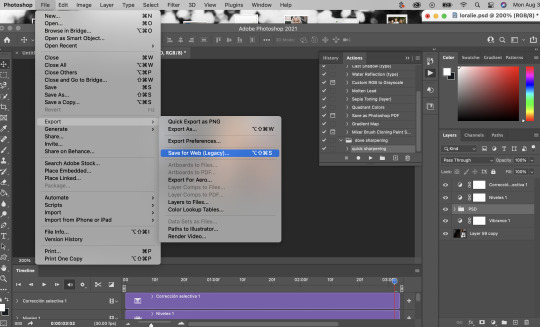
step 12: save your gif! go to file > export > save for web (legacy)...
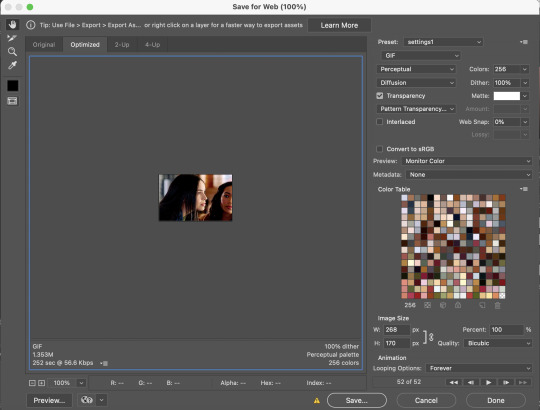
people use different settings for saving their gifs, too. these are my personal settings. i really like them and feel they work for my gifs. feel free to copy them or play around with your own settings! just make sure it’s always on the 256 colors
step 13 (optional): preview! i like to hit the preview button just to make sure i like my gif before i save it. if i don’t like it (coloring looks off, too fast/too slow, feels like it cuts off in a weird place) i’ll hit cancel and undo everything until i’m back to wherever i need to fix it.
step 14: save your gif, yay!! YOU DID IT!!!! save that beautiful gif and feel so proud of yourself!!

step 15 (optional): if you’re making multiple gifs from the segment you imported, go back and cntrl/cmmnd + z everything until you’re back to having allllll the frames again. delete the frames of the gif you just made (in this case, it would be 52) and start again from step 8!
i hope this made sense and was helpful for anyone! please let me know if there’s anything you need clarification on!!
34 notes
·
View notes
Text
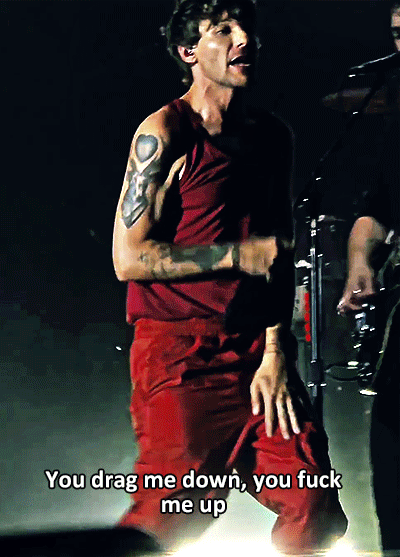
Smiley Louis - Faith in the Future World Tour - Panama City – 02.05.2024
#dailytomlinson#hldaily#tomlinsonsource#hlcreators#hltracks#hljournal#artistsof1d#tomlinsonedits#louis tomlinson#my gifs#scheduled#tw flashing#FITFWT GIFS#fitfwt Panama City#sorry if these are already giffed I have like hundreds of videos downloaded & gifs edited in my laptop & I am releasing all of those slowly
33 notes
·
View notes
Text

Faith in the Future World Tour - Panama City – 02.05.2024
#dailytomlinson#hldaily#tomlinsonsource#hlcreators#hltracks#hljournal#artistsof1d#tomlinsonedits#louis tomlinson#my gifs#scheduled#tw flashing#FITFWT GIFS#fitfwt Panama City#sorry if these are already giffed I have like hundreds of videos downloaded & gifs edited in my laptop & I am releasing all of those slowly
27 notes
·
View notes
Last Seen Blogs

postjentacular
postjentacular
postjentacular
postjentacular

kaspbrak-eds
Delaney Michele is going to hell

eirhnakiiblog
Untitled
