#spring boot jpa crud operations
Explore tagged Tumblr posts
Visit Tumblr Blog
Explore Tumblr blogs with no restrictions, modern design and the best experience.
Last Seen Tumblr Blogs


Fun Fact
BuzzFeed published a report claiming that Tumblr was utilized as a distribution channel for Russian agents to influence American voting habits during the 2016 presidential election in Feb 2018.
Text
java full stack
A Java Full Stack Developer is proficient in both front-end and back-end development, using Java for server-side (backend) programming. Here's a comprehensive guide to becoming a Java Full Stack Developer:
1. Core Java
Fundamentals: Object-Oriented Programming, Data Types, Variables, Arrays, Operators, Control Statements.
Advanced Topics: Exception Handling, Collections Framework, Streams, Lambda Expressions, Multithreading.
2. Front-End Development
HTML: Structure of web pages, Semantic HTML.
CSS: Styling, Flexbox, Grid, Responsive Design.
JavaScript: ES6+, DOM Manipulation, Fetch API, Event Handling.
Frameworks/Libraries:
React: Components, State, Props, Hooks, Context API, Router.
Angular: Modules, Components, Services, Directives, Dependency Injection.
Vue.js: Directives, Components, Vue Router, Vuex for state management.
3. Back-End Development
Java Frameworks:
Spring: Core, Boot, MVC, Data JPA, Security, Rest.
Hibernate: ORM (Object-Relational Mapping) framework.
Building REST APIs: Using Spring Boot to build scalable and maintainable REST APIs.
4. Database Management
SQL Databases: MySQL, PostgreSQL (CRUD operations, Joins, Indexing).
NoSQL Databases: MongoDB (CRUD operations, Aggregation).
5. Version Control/Git
Basic Git commands: clone, pull, push, commit, branch, merge.
Platforms: GitHub, GitLab, Bitbucket.
6. Build Tools
Maven: Dependency management, Project building.
Gradle: Advanced build tool with Groovy-based DSL.
7. Testing
Unit Testing: JUnit, Mockito.
Integration Testing: Using Spring Test.
8. DevOps (Optional but beneficial)
Containerization: Docker (Creating, managing containers).
CI/CD: Jenkins, GitHub Actions.
Cloud Services: AWS, Azure (Basics of deployment).
9. Soft Skills
Problem-Solving: Algorithms and Data Structures.
Communication: Working in teams, Agile/Scrum methodologies.
Project Management: Basic understanding of managing projects and tasks.
Learning Path
Start with Core Java: Master the basics before moving to advanced concepts.
Learn Front-End Basics: HTML, CSS, JavaScript.
Move to Frameworks: Choose one front-end framework (React/Angular/Vue.js).
Back-End Development: Dive into Spring and Hibernate.
Database Knowledge: Learn both SQL and NoSQL databases.
Version Control: Get comfortable with Git.
Testing and DevOps: Understand the basics of testing and deployment.
Resources
Books:
Effective Java by Joshua Bloch.
Java: The Complete Reference by Herbert Schildt.
Head First Java by Kathy Sierra & Bert Bates.
Online Courses:
Coursera, Udemy, Pluralsight (Java, Spring, React/Angular/Vue.js).
FreeCodeCamp, Codecademy (HTML, CSS, JavaScript).
Documentation:
Official documentation for Java, Spring, React, Angular, and Vue.js.
Community and Practice
GitHub: Explore open-source projects.
Stack Overflow: Participate in discussions and problem-solving.
Coding Challenges: LeetCode, HackerRank, CodeWars for practice.
By mastering these areas, you'll be well-equipped to handle the diverse responsibilities of a Java Full Stack Developer.
visit https://www.izeoninnovative.com/izeon/
2 notes
·
View notes
Text
Best Java Full Stack Learning Path | Complete Roadmap
The Ultimate Guide to Becoming a Java Full Stack Developer
Java Full Stack Development is a highly sought-after skill, requiring expertise in both front-end and back-end technologies. This guide provides a structured roadmap to help you become a proficient Java Full Stack Developer.
Master Core Java
Before diving into full-stack development, you must have a solid foundation in Core Java. Key topics include syntax, data types, object-oriented programming (OOP), exception handling, collections framework, multithreading, and Java 8+ features such as lambda expressions and streams API. Understanding these concepts will help you write efficient and scalable Java applications.
Learn Front-End Development
A Full Stack Developer must be proficient in front-end technologies to build interactive and user-friendly applications. Start by learning HTML, CSS, and JavaScript, which form the foundation of web development. Then, move on to modern front-end frameworks like React.js and Angular to build dynamic and responsive web applications. Learning TypeScript is also beneficial, especially for Angular development. Platforms like FreeCodeCamp, MDN Web Docs, and YouTube tutorials provide excellent resources to master front-end technologies.
Backend Development with Java & Spring Boot
Java is widely used for back-end development, and Spring Boot is the go-to framework for building enterprise-level applications. Key concepts include JDBC (Java Database Connectivity), Spring MVC (Model-View-Controller), RESTful API development, and Spring Data JPA for database operations. Additionally, learning Spring Security for authentication and authorization, and understanding microservices architecture for scalable applications is essential.
Database Management (SQL & NoSQL)
Databases are a crucial part of any full-stack application. A Full Stack Developer should be proficient in SQL databases (MySQL, PostgreSQL, Oracle) and NoSQL databases (MongoDB, Firebase, Cassandra). Important topics include database normalization, writing SQL queries (JOIN, GROUP BY, INDEXING), and using ORM tools like Hibernate for efficient data handling.
Version Control & Deployment
Version control and deployment skills are essential for collaborative development and efficient software deployment. Learn Git and GitHub to manage your code, collaborate with teams, and track changes. Additionally, understanding containerization with Docker and Kubernetes, CI/CD tools like Jenkins and GitHub Actions, and cloud platforms like AWS, Azure, and Google Cloud will help you deploy applications effectively. Resources like GitHub Docs, DevOps courses, and online tutorials will help you master these tools.
Build Real-World Projects
The best way to reinforce your skills is by building real-world projects. Some project ideas include: ✔ E-commerce Website (Spring Boot + React/Angular) ✔ Blog Application (User Authentication, CRUD Operations) ✔ Library Management System (Spring Boot + MySQL) ✔ Online Book Store (Hibernate ORM + REST API)
We provide industry-driven master’s programs designed to help you excel in high-demand fields.
Start learning today, take one step at a time, and stay updated with the latest trends in Java Full Stack Development.
0 notes
Text
Highlight popular frameworks like Spring, Hibernate, and Apache Kafka.
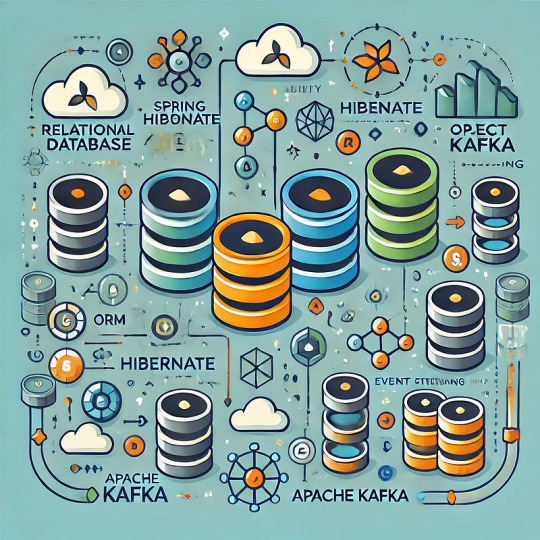
Database Design Best Practices for Full-Stack Developers: Leveraging Popular Frameworks Database design is the backbone of scalable and efficient web applications.
While understanding best practices is essential, the right frameworks can simplify and enhance implementation.
For full-stack developers, frameworks like Spring, Hibernate, and Apache Kafka offer powerful tools to build robust, performant, and maintainable database systems. This article explores how these frameworks align with database design principles and why they’re widely used in the industry.
Spring: Streamlining Database Operations Spring Framework is a popular Java-based framework that provides a comprehensive programming model for enterprise applications.
It excels in simplifying database interactions and transaction management.
Key Features:
Spring Data JPA:
Spring Data JPA abstracts data access, enabling developers to interact with databases without writing complex SQL queries.
It supports CRUD operations and complex queries through method naming conventions.
Transaction Management: Spring offers declarative transaction management, ensuring database operations adhere to ACID (Atomicity, Consistency, Isolation, Durability) properties.
Scalability: With Spring Boot, developers can build microservices that connect to databases, ensuring scalability and high performance.
Alignment with Database Design Best Practices:
Data Integrity: Spring ensures data consistency through robust transaction management, preventing partial updates during failures.
Scalability: Spring Boot’s lightweight and modular architecture makes it easy to scale database-connected applications.
Ease of Maintenance: Spring’s repository pattern reduces boilerplate code, making applications more maintainable.
Hibernate:
Simplifying
Object-Relational Mapping Hibernate is a powerful ORM (Object-Relational Mapping) framework that bridges the gap between object-oriented programming and relational databases.
By automating the mapping of objects to database tables, Hibernate eliminates the need for manual SQL queries.
Key Features:
Entity Mapping: Hibernate maps Java objects to relational database tables, reducing the complexity of working with relational data.
Lazy and Eager Loading:
Hibernate provides control over how data is fetched, allowing developers to optimize queries based on use cases.
Caching:
Hibernate supports first-level (session-level) and second-level (application-wide) caching to improve performance.
HQL (Hibernate Query Language):
Hibernate offers a query language similar to SQL but designed for object-oriented data retrieval.
Alignment with Database Design Best Practices:
Normalization: Hibernate supports relationships like One-to-Many and Many-to-Many, ensuring normalized schema designs.
Query Optimization:
With HQL and caching, Hibernate optimizes query performance and reduces database load.
Data Integrity: By managing relationships and constraints, Hibernate helps maintain referential integrity between tables.
Apache Kafka:
Enabling Scalability and Real-Time Data Processing Apache Kafka is a distributed event-streaming platform that is often used in applications requiring high scalability and real-time processing.
Unlike Spring and Hibernate, Kafka is not directly tied to database interactions but complements them by enabling asynchronous data processing and scalability.
Key Features:
Event Streaming: Kafka allows systems to publish and subscribe to event streams in real time.
Scalability: Kafka’s distributed architecture makes it ideal for scaling data processing workloads across multiple servers.
Decoupling Services: Kafka acts as a messaging intermediary, allowing microservices to interact asynchronously without being tightly coupled.
Event Replay:
Kafka retains event logs, enabling replay of past events for recovery or debugging purposes.
Alignment with Database Design Best Practices:
Scalability:
Kafka handles high-volume data streams, distributing workload across multiple servers and reducing bottlenecks.
Data Backup and Recovery:
Kafka’s event logs provide a mechanism for disaster recovery and fault tolerance.
Real-Time Processing: By decoupling services, Kafka ensures that database operations don’t slow down other parts of the system.
How These Frameworks Complement Each Other These frameworks can be used together to build comprehensive systems that adhere to database design
best practices:
Spring and Hibernate:
While Spring manages transactional consistency and database interactions, Hibernate simplifies the mapping of object-oriented code to relational databases.
Spring and Kafka: Spring Boot integrates seamlessly with Kafka, enabling event-driven architectures and asynchronous data flows.
Hibernate and Kafka: Kafka can act as an intermediary between services, while Hibernate ensures normalized and optimized relational data storage.
Practical Examples of Framework Usage Spring and Hibernate: In a shopping cart application, Spring Data JPA can handle data access while Hibernate manages relationships between entities like User, Order, and Product.
Spring and Kafka:
In a real-time stock trading platform, Kafka can stream stock price updates to microservices, and Spring Boot applications can persist these updates to the database.
Kafka for Event-Driven Systems: In an e-commerce system, Kafka can capture events like order placement, stock updates, and payment processing, ensuring that the database remains consistent while handling high traffic.
Conclusion
Frameworks like Spring, Hibernate, and Apache Kafka empower developers to implement database design best practices with ease.
Whether it’s ensuring data integrity, optimizing performance, or enabling scalability, these tools simplify complex tasks and enhance application robustness.
By leveraging these frameworks, full-stack developers can focus on building innovative solutions without compromising on the quality of their database designs.

0 notes
Text
Setting up a local PostgreSQL database for a Spring Boot JPA (Java Persistence API) application involves several steps. Below, I'll guide you through the process:
1. Install PostgreSQL:
Download and install PostgreSQL from the official website: PostgreSQL Downloads.
During the installation, remember the username and password you set for the PostgreSQL superuser (usually 'postgres').
2. Create a Database:
Open pgAdmin or any other PostgreSQL client you prefer.
Log in using the PostgreSQL superuser credentials.
Create a new database. You can do this through the UI or by running SQL command:sqlCopy codeCREATE DATABASE yourdatabasename;
3. Add PostgreSQL Dependency:
Open your Spring Boot project in your favorite IDE.
Add PostgreSQL JDBC driver to your pom.xml if you're using Maven, or build.gradle if you're using Gradle. For Maven, add this dependency:xmlCopy code<dependency> <groupId>org.postgresql</groupId> <artifactId>postgresql</artifactId> <version>42.2.24</version> <!-- Use the latest version --> </dependency>
4. Configure application.properties:
In your application.properties or application.yml file, configure the PostgreSQL database connection details:propertiesCopy codespring.datasource.url=jdbc:postgresql://localhost:5432/yourdatabasename spring.datasource.username=postgres spring.datasource.password=yourpassword spring.jpa.properties.hibernate.dialect=org.hibernate.dialect.PostgreSQLDialect spring.jpa.hibernate.ddl-auto=update
5. Create Entity Class:
Create your JPA entity class representing the database table. Annotate it with @Entity, and define the fields and relationships.
For example:javaCopy code@Entity public class YourEntity { @Id @GeneratedValue(strategy = GenerationType.IDENTITY) private Long id; private String name; // other fields, getters, setters }
6. Create Repository Interface:
Create a repository interface that extends JpaRepository for your entity. Spring Data JPA will automatically generate the necessary CRUD methods.
For example:javaCopy codepublic interface YourEntityRepository extends JpaRepository<YourEntity, Long> { // custom query methods if needed }
7. Use the Repository in Your Service:
Inject the repository interface into your service class and use it to perform database operations.
8. Run Your Spring Boot Application:
Run your Spring Boot application. Spring Boot will automatically create the necessary tables based on your entity classes and establish a connection to your PostgreSQL database.
That's it! Your Spring Boot JPA application is now connected to a local PostgreSQL database. Remember to handle exceptions, close connections, and follow best practices for security, especially when dealing with sensitive data and database connections
Call us on +91-84484 54549
Mail us on [email protected]
Website: Anubhav Online Trainings | UI5, Fiori, S/4HANA Trainings
youtube
0 notes
Text
Spring Boot - CRUD operations using JPA
Spring Boot – CRUD operations using JPA
In this article, we will use the JPA (Java Persistence API) with Spring Boot for insert, update, delete and read operations. We are using in-memory H2 database, but the same can be changed for any other relational database. Project Structure We can use Spring Tool Suite(STS) to create a Spring starter project and choose the h2 and jpa dependencies. We can also use Spring Initializr for the same…
View On WordPress
#Data Access Using JPA with Spring Boot#jpa spring boot#Spring Boot CRUD operations using JPA#spring boot jpa#spring boot jpa crud operations
0 notes
Text
Spring Boot Online Training: Mastering the Power of Java Framework
Are you ready to take your Java programming skills to the next level? Look no further than Spring Boot Online Training! In this comprehensive training program, you will unlock the full potential of the Spring Boot framework and gain expertise in building robust, scalable, and efficient Java applications. Join us on this exciting journey and become a Spring Boot master!

Why Choose Spring Boot Online Training?
When it comes to developing Java applications, Spring Boot online course has emerged as one of the most popular frameworks in the industry. Its simplicity, flexibility, and powerful features make it a preferred choice for developers worldwide.
By enrolling in our Spring Boot Online Training, you will reap the following benefits:
Expert Guidance: Learn from seasoned industry professionals who have hands-on experience with Spring Boot development. They will provide you with valuable insights and practical knowledge to excel in your Java projects.
Comprehensive Curriculum: Our training program covers all aspects of Spring Boot, from the basics to advanced concepts. You will delve into topics such as dependency injection, data persistence, security, RESTful APIs, and more.
Hands-on Projects: Gain practical experience by working on real-world projects that simulate the challenges faced by developers in the industry. This will enhance your problem-solving skills and prepare you for the demands of the professional world.
Interactive Learning: Our training sessions are designed to be engaging and interactive. You will have the opportunity to ask questions, participate in discussions, and collaborate with your peers, fostering a dynamic learning environment.
Flexible Schedule: We understand that your time is valuable. Our online training allows you to learn at your own pace and convenience. Access the course materials anytime, anywhere, and progress through the modules according to your schedule.
Course Outline
Our Spring Boot Online Training is structured to provide you with a comprehensive understanding of the framework. Here is a sneak peek into some of the key topics covered:
1. Introduction to Spring Boot
Overview of Spring Boot and its advantages
Setting up the development environment
Creating a simple Spring Boot application
2. Spring Boot Essentials
Working with Spring Boot starters
Understanding auto-configuration
Configuring application properties
3. Building RESTful APIs with Spring Boot
Creating REST controllers
Handling HTTP requests and responses
Implementing CRUD operations
4. Data Persistence with Spring Boot
Integrating with relational databases
Using Spring Data JPA for data access
Implementing database queries and transactions
5. Security in Spring Boot Applications
Securing RESTful APIs with Spring Security
Authentication and authorization mechanisms
Implementing role-based access control
6. Testing and Deployment
Writing unit and integration tests
Continuous integration and deployment with Spring Boot
Best practices for application deployment
Who Should Attend?
Spring Boot Online Training is suitable for a wide range of individuals, including:
Java developers looking to upgrade their skills
Software engineers interested in learning Spring Boot
Web developers seeking to build robust Java applications
Professionals working on enterprise-level projects
No matter your level of experience, this spring boot training program will equip you with the knowledge and expertise to harness the full potential of Spring Boot in your Java projects
0 notes
Text
Many To One(Uni-directional) Relational Mapping with Spring Boot + Spring Data JPA + H2 Database
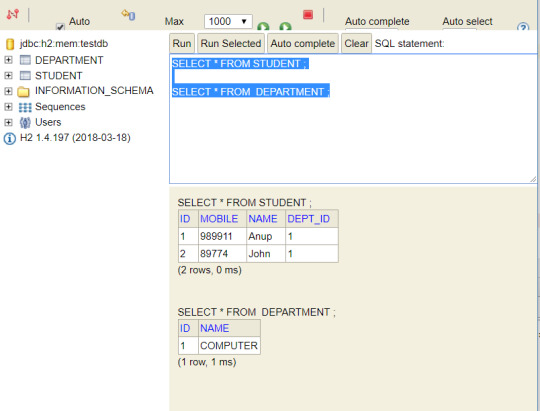
In this tutorial , we will see Many To One mapping of two entities using Spring Boot and Spring Data JPA using H2 database. GitHub Link – Download Tools: Spring BootSpring Data JPAH2 DatabaseIntelliJ IDEAMaven We have two entities Student and Department. Many students are part of one Department (Many To One). This is called Many To One mapping between two entities. For each of this entity, table will be created in database. So there will be two tables created in database. create table address (id bigint generated by default as identity, name varchar(255), primary key (id)); create table student (id bigint generated by default as identity, mobile integer, name varchar(255), address_id bigint, primary key (id)); alter table student add constraint FKcaf6ht0hfw93lwc13ny0sdmvo foreign key (address_id) references address(id); Each table has primary key as ID . Two tables has Many To One relationship between them as each department has many students in them. STUDENT table has foreign key as DEPT_ID in it. So STUDENT is a child table and DEPARTMENT table is parent table in this relationship. FOREIGN KEY constraint adds below restrictions - We can't add records in child table if there is no entry in parent table. Ex. You can't add department ID reference in STUDENT table if department ID is not present in DEPARTMENT table.You can't delete the records from parent table unless corresponding references are deleted from child table . Ex. You can't delete the entry DEPARTMENT table unless corresponding students from STUDENT table are deleted . You can apply ON_DELETE_CASCADE with foreign key constraint if you want to delete students from STUDENT table automatically when department is deleted. If you want to insert a student into STUDENT table then corresponding department should already be present in DEPARTMENT table.When any department is updated in DEPARTMENT table then child table will also see the updated reference from parent table Now we will see how can we form this relationship using Spring data JPA entities. Step 1: Define all the dependencies required for this project 4.0.0 org.springframework.boot spring-boot-starter-parent 2.1.1.RELEASE com.myjavablog springboot-jpa-one-to-many-demo 0.0.1-SNAPSHOT springboot-jpa-one-to-many-demo Demo project for Spring Boot 1.8 org.springframework.boot spring-boot-starter org.springframework.boot spring-boot-starter-test test org.springframework.boot spring-boot-starter-web org.springframework.boot spring-boot-starter-tomcat org.springframework.boot spring-boot-starter-data-jpa org.apache.tomcat tomcat-jdbc com.h2database h2 org.springframework.boot spring-boot-starter-test test colt colt 1.2.0 org.springframework.boot spring-boot-maven-plugin spring-boot-starter-data-jpa – This jar is used to connect to database .It also has a support to provide different JPA implementations to interact with the database like Hibernate, JPA Repository, CRUD Repository etc. h2 – Its used to create H2 database when the spring boot application boots up. Spring boot will read the database configuration from application.properties file and creates a DataSource out of it. Step 2: Define the Model/Entity classes Student.java package com.myjavablog.model; import org.springframework.stereotype.Repository; import javax.annotation.Generated; import javax.persistence.*; import java.util.Optional; @Entity @Table(name = "STUDENT") public class Student { @Id @GeneratedValue(strategy = GenerationType.IDENTITY) private Long id; @Column private String name; @Column private int mobile; @ManyToOne(cascade = CascadeType.ALL) @JoinColumn(name = "DEPT_ID") private Department department; public Long getId() { return id; } public void setId(Long id) { this.id = id; } public String getName() { return name; } public void setName(String name) { this.name = name; } public int getMobile() { return mobile; } public void setMobile(int mobile) { this.mobile = mobile; } public Department getDepartment() { return department; } public void setDepartment(Department department) { this.department = department; } } Department.java package com.myjavablog.model; import javax.persistence.*; import java.util.List; @Entity @Table(name = "DEPARTMENT") public class Department { @Id @GeneratedValue(strategy = GenerationType.IDENTITY) private Long id; @Column private String name; public Long getId() { return id; } public void setId(Long id) { this.id = id; } public String getName() { return name; } public void setName(String name) { this.name = name; } } Below are the Annotations used while creating the entity classes - Spring Data JPA Annotations - @Entity - This annotation marks the class annotations.@Table - This annotation creates table in database.@Id - It creates primary key in table.@GeneratedValue - It defines primary key generation strategy like AUTO,IDENTITY,SEQUENCE etc.@Column - It defines column property for table.@ManyToOne - This annotation creates Many to One relationship between Student and Department entities. The cascade property (CascadeType.ALL) defines what should happen with child table records when something happens with parent table records. On DELETE, UPDATE , INSERT operations in parent table child table should also be affected. Only @ManyToOne annotation is enough to form one-to-many relationaship. This annotation is generally used in child entity to form Unidirectional relational mapping.@JoinColumn - You can define column which creates foreign key in a table. In our example, DEPT_ID is a foreign key in STUDENT table which references to ID in DEPARTMENT table. Step 3: Create the JPA repositories to query STUDENT and DEPARTMENT tables StudentRepository and AddressRepository implemets JpaRepository which has methods to perform all CRUD operations. It has methods like save(), find(), delete(),exists(),count() to perform database operations. package com.myjavablog.dao; import com.myjavablog.model.Student; import org.springframework.data.jpa.repository.JpaRepository; import org.springframework.stereotype.Repository; @Repository public interface StudentRepository extends JpaRepository { public Student findByName(String name); } package com.myjavablog.dao; import com.myjavablog.model.Address; import org.springframework.data.jpa.repository.JpaRepository; import org.springframework.stereotype.Repository; @Repository public interface AddressRepository extends JpaRepository{ } Step 4: Create the class BeanConfig to configure the bean for H2 database This class creates a bean ServletRegistrationBean and autowires it to spring container. This bean actually required to access H2 database from console through browser. package com.myjavablog; import org.h2.server.web.WebServlet; import org.springframework.boot.web.servlet.ServletRegistrationBean; import org.springframework.context.annotation.Bean; import org.springframework.context.annotation.Configuration; @Configuration public class BeanConfig { @Bean ServletRegistrationBean h2servletRegistration() { ServletRegistrationBean registrationBean = new ServletRegistrationBean(new WebServlet()); registrationBean.addUrlMappings("/console/*"); return registrationBean; } } Step 5: Last but not the least, You need to define application properties. #DATASOURCE (DataSourceAutoConfiguration & #DataSourceProperties) spring.datasource.url=jdbc:h2:mem:testdb;DB_CLOSE_ON_EXIT=FALSE spring.datasource.username=sa spring.datasource.password= #Hibernate #The SQL dialect makes Hibernate generate better SQL for the chosen #database spring.jpa.properties.hibernate.dialect =org.hibernate.dialect.H2Dialect spring.datasource.driverClassName=org.h2.Driver #Hibernate ddl auto (create, create-drop, validate, update) spring.jpa.hibernate.ddl-auto = update logging.level.org.hibernate.SQL=DEBUG logging.level.org.hibernate.type=TRACE server.port=8082 server.error.whitelabel.enabled=false Step 6: Create the spring boot main file package com.myjavablog; import com.myjavablog.dao.DepartmentRepository; import com.myjavablog.dao.StudentRepository; import com.myjavablog.model.Department; import com.myjavablog.model.Student; import org.springframework.beans.factory.annotation.Autowired; import org.springframework.boot.CommandLineRunner; import org.springframework.boot.SpringApplication; import org.springframework.boot.autoconfigure.SpringBootApplication; import org.springframework.data.jpa.repository.config.EnableJpaRepositories; import java.util.Arrays; @SpringBootApplication public class SpringbootJpaOneToManyDemoApplication implements CommandLineRunner { @Autowired private DepartmentRepository departmentRepository; @Autowired private StudentRepository studentRepository; public static void main(String args) { SpringApplication.run(SpringbootJpaOneToManyDemoApplication.class, args); } @Override public void run(String... args) throws Exception { //Unidirectional Mapping Department department = new Department(); department.setName("COMPUTER"); departmentRepository.save(department); Student student = new Student(); student.setDepartment(departmentRepository.findDepartmentByName("COMPUTER")); student.setName("Anup"); student.setMobile(989911); Student student1 = new Student(); student1.setDepartment(departmentRepository.findDepartmentByName("IT")); student1.setName("John"); student1.setMobile(89774); studentRepository.saveAll(Arrays.asList(student,student1)); } } Step 7: Now run the application Run the application as a java application or as spring boot application spring-boot:run Once you run the application records will be inserted to tables as below -

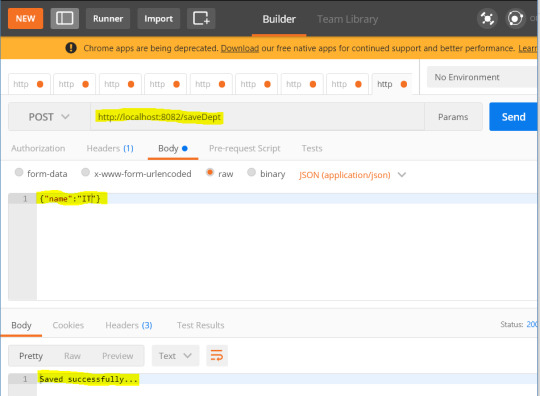
Step 8: This application also has REST endpoints to expose the services as below - Save department -

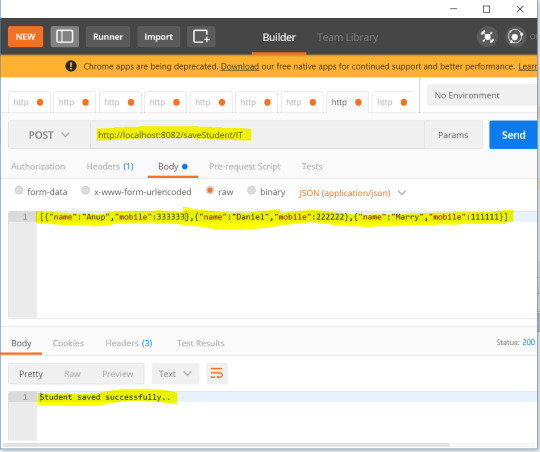
Add students under created department -

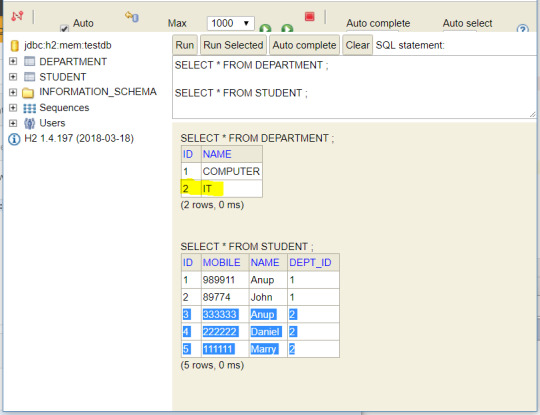
We can check database entries to cross verify -

Read the full article
0 notes
Text
Monitoring using Spring Boot 2.0, Prometheus, and Grafana (Part 1 REST API)
ICYDK: In part 1, we will be creating a REST API for CRUD operations using Spring Boot 2.0, JPA, H2 Database, and SWAGGER UI for documentation. We will be creating a simple application offering CRUD operations over REST for a person entity we shall be using https://goo.gl/DtvG1x #DataIntegration #ML
0 notes
Link
Learn and use the most popular ORM Frameworks in easy steps
What you’ll learn
Master the concepts of ORM,Spring Data JPA and Hibernate
Perform CRUD operations against a database with two simple steps
Configure auto generated IDs for the Primary Key fields
Realize the power of Spring Data Finder methods
Load data from database with out implementing any code or SQL
Learn and use JPQL – Java Persistence Query Language
Execute native sql queries from your Spring Data Application
Use Paging and Sorting
Learn the different types of Hibernate Mappings
Implement Component Mapping
Implement Inheritance Mapping
Master Hibernate Associations and implement all the four types of associations
See Hibernate caching in action
Learn and manage Transactions
Work on a mini Patient Scheduling application
Requirements
Knowledge of Spring Framework and Spring Boot
Or Should have completed my Spring Framework in easy steps course
Description
Are you a java spring developer interested in mastering Springs powerful and easy to use ORM framework? Are you a java developer who want to create complete data access layer in two simple steps ? then this Spring Data JPA using Hibernate course is for you.It is a complete hand’s on course with quizzes,assignments and a mini project at the end.
Spring data JPA removes all the boiler plate coding that we write to create Data Access Layer for our applications while using JPA and ORM tools like Hibernate.And with the power of spring boot there is zero xml or java based configuration required.
Hibernate is the most popular object-relational mapping framework and the most used JPA providers. Hibernate maps our java classes to database tables.It offers component mapping,inheritance mapping and supports various associations among objects.
Spring data JPA makes it super easy to use there powerful features of Hibernate by removing all the configuration and use of low level APIs.Spring Data makes it possible to remove the DAO implementations entirely – the interface of the DAO is now the only artifact that needs to be explicitly defined.
Every section in the course is loaded with hands on examples.You will also work on assignments at the end of each section.You will also work on a mini project at the end of the course.
After taking this class, developers will be able to build faster, more flexible and easier to maintain application persistence layers with Spring Data JPA Using Hibernate.
What Will I Learn?
Master the concepts of ORM,Spring Data JPA and Hibernate
Perform CRUD operations against a database with two simple steps
Configure auto generated IDs for the Primary Key fields
Realize the power of Spring Data Finder methods
Load data from database with with out implementing any code or SQL
Learn and use JPQL – Java Persistence Query Language
Execute native sql queries from your Spring Data Application
Use Paging and Sorting Learn the different types of Hibernate Mappings
Implement Component Mapping
Implement Inheritance Mapping Master Associations and use all the four types of associations
See Hibernate caching in action
Learn and manage Transactions
Work on a mini Patient Scheduling application
Who this course is for:
Anyone who wants to learn the concepts and work hands on Spring Data JPA using Hibernate
Students who have taken my Spring Course and who want to master Spring Data JPA and Hibernate
Students who want to create Data Access Layer in simple steps
Student who want to master JPA and Hibernate using Spring Data
Created by Bharath Thippireddy Last updated 8/2019 English English
Size: 1.52 GB
Download Now
https://ift.tt/2HoNbMn.
The post Spring Data JPA Using Hibernate appeared first on Free Course Lab.
0 notes
Video
youtube
Spring Boot Tutorial 22 - CRUD Operations with JPA Repository
0 notes
Text
A Java Full Stack Developer is proficient in both front-end and back-end development, using Java for server-side (backend) programming. Here's a comprehensive guide to becoming a Java Full Stack Developer:
1. Core Java
Fundamentals: Object-Oriented Programming, Data Types, Variables, Arrays, Operators, Control Statements.
Advanced Topics: Exception Handling, Collections Framework, Streams, Lambda Expressions, Multithreading.
2. Front-End Development
HTML: Structure of web pages, Semantic HTML.
CSS: Styling, Flexbox, Grid, Responsive Design.
JavaScript: ES6+, DOM Manipulation, Fetch API, Event Handling.
Frameworks/Libraries:
React: Components, State, Props, Hooks, Context API, Router.
Angular: Modules, Components, Services, Directives, Dependency Injection.
Vue.js: Directives, Components, Vue Router, Vuex for state management.
3. Back-End Development
Java Frameworks:
Spring: Core, Boot, MVC, Data JPA, Security, Rest.
Hibernate: ORM (Object-Relational Mapping) framework.
Building REST APIs: Using Spring Boot to build scalable and maintainable REST APIs.
4. Database Management
SQL Databases: MySQL, PostgreSQL (CRUD operations, Joins, Indexing).
NoSQL Databases: MongoDB (CRUD operations, Aggregation).
5. Version Control/Git
Basic Git commands: clone, pull, push, commit, branch, merge.
Platforms: GitHub, GitLab, Bitbucket.
6. Build Tools
Maven: Dependency management, Project building.
Gradle: Advanced build tool with Groovy-based DSL.
7. Testing
Unit Testing: JUnit, Mockito.
Integration Testing: Using Spring Test.
8. DevOps (Optional but beneficial)
Containerization: Docker (Creating, managing containers).
CI/CD: Jenkins, GitHub Actions.
Cloud Services: AWS, Azure (Basics of deployment).
9. Soft Skills
Problem-Solving: Algorithms and Data Structures.
Communication: Working in teams, Agile/Scrum methodologies.
Project Management: Basic understanding of managing projects and tasks.
Learning Path
Start with Core Java: Master the basics before moving to advanced concepts.
Learn Front-End Basics: HTML, CSS, JavaScript.
Move to Frameworks: Choose one front-end framework (React/Angular/Vue.js).
Back-End Development: Dive into Spring and Hibernate.
Database Knowledge: Learn both SQL and NoSQL databases.
Version Control: Get comfortable with Git.
Testing and DevOps: Understand the basics of testing and deployment.
Resources
Books:
Effective Java by Joshua Bloch.
Java: The Complete Reference by Herbert Schildt.
Head First Java by Kathy Sierra & Bert Bates.
Online Courses:
Coursera, Udemy, Pluralsight (Java, Spring, React/Angular/Vue.js).
FreeCodeCamp, Codecademy (HTML, CSS, JavaScript).
Documentation:
Official documentation for Java, Spring, React, Angular, and Vue.js.
Community and Practice
GitHub: Explore open-source projects.
Stack Overflow: Participate in discussions and problem-solving.
Coding Challenges: LeetCode, HackerRank, CodeWars for practice.
By mastering these areas, you'll be well-equipped to handle the diverse responsibilities of a Java Full Stack Developer.
0 notes
Link
0 notes
Text
Here are all the reasons to choose Spring Boot over Spring Framework!
Why Choose Spring Boot over Spring Framework?

Let’s get started with some basics of Spring framework as well as Spring Boot!
Spring is a popular Java based framework to build web and enterprise applications. Spring Framework provides a wide variety of features that address the modern business needs. Spring Framework gives flexibility to configure beans in multiple ways like XML, Annotations and JavaConfig. As the number of features increased so did complexity. Task of spring application configuration became tedious and error-prone.
Spring team created Spring Boot to address the configuration complexity.
Spring Boot is not here to compete with Spring or Spring MVC, on the contrary it makes it easier to use them.
Spring Boot makes it easy to develop Spring-powered, production grade applications and services with minimum hassle. It narrows down Spring platform so that new or existing users can quickly get to the required bits. What’s more! Spring Boot makes it easy to build stand alone, production-grade Spring based Applications that can be “just run”.
Let’s Skim Through Some of the Noteworthy Features
ü Stand alone application development
ü Embedded Tomcat, Jetty or Undertow
ü Provides narrow ‘starter’ dependencies to simplify your build configuration
ü Auto configuration of Spring and 3rd party libraries wherever possible
ü Renders production ready features such as metrics, health checks, and external configuration
ü No code generation or XML configuration
Modules
Here is a quick overview of modules for you to understand Spring Boot better!

Spring Boot
Main library provides features that support other parts of Spring Boot, they include:
1. The SpringApplication class, rendering static convenience methods that makes it easy to create a stand alone application. Its only work is to create and refresh an appropriate Spring ApplicationContext.
2. A choice of container for Embedded web applications
3. Externalized Configuration Support
4. ApplicationContext initializers that include support for sensible logging defaults
Spring-boot-auto configuration
Spring Boot can configure sizeable parts of common applications based on content of their classpath. A single @EnableAutoConfiguration annotation activates auto configuration of Spring Context. Auto configuration tries to deduce which beans a user might need. Moreover, auto configuration will always back down when the user starts to define their own beans.
Spring-boot-Starters
Spring Boot starters are a set of convenient dependency descriptors that can be included in the application. It’s a one stop shop for all Spring related technology which you need without having to go through the hassle of copy pasting loads of dependency descriptors.
Spring-Boot-cli
Spring command line application compiles and runs Groovy source, making it absolutely easy to write minimal code to get the application running. Furthermore, it can also watch files automatically recompile and restart when they change.
Spring-Boot-Actuator
Actuator endpoints allow you to monitor and interact with your application. Spring boot actuator furnishes the infrastructure required for actuator endpoints. This module being out of the box provides a number of endpoints including HealthEndpoint, EnvironmentEndpoint, BeansEndpoints etc.

Spring-Boot-Actuator-autoconfigure
This module provides auto configuration for actuator endpoints depending on content of classpath and a set of properties. It includes configuration to expose endpoints over HTTP or JMX. It will back down as soon as the user starts to define their own beans just like Spring Boot AutoConfigure.
Spring-Boot-Test
This module comprises core items and annotations that can be helpful for testing your application.
Spring-Boot-Test-Autoconfigure
This module, like other Spring Boot auto configuration modules, provides auto configuration for tests on the basis of classpath. It contains a number of annotations to automatically configure a slice of the application that needs to be tested.
Spring-Boot-Loader
It renders the secret sauce which allows you to build a single jar file that can be launched using java-jar. Generally, you need not use this module directly, but instead with the Gradle or Maven plugin.
Spring-Boot-Devtools
The module provides additional development-time features like automatic restarts for a smooth application development experience. Developer tools are disabled while running a full packaged application.

After all the information given above, the question remains Why Opt for Spring Boot?
Here are some convincing reasons for you to take a well informed decision!
Auto Configuration
Spring and Spring MVC applications have a lot XML or Java Bean Configuration to carry out. Spring Boot has brought about a new thought process around this.
How about auto-configuring a Data source when Hibernate jar is on classpath?
How about auto-configuring a Dispatcher Servlet when Spring MVC jar is on classpath?
There may be provisions to override the default auto configuration. Spring Boot looks at frameworks available on the classpath and existing configuration for the application. It furnishes basic configuration needed to configure the application with these frameworks based on the above information. This is called Auto configuration.
Spring Boot Starter Projects
While developing a web application, you need to identify the frameworks to be used, versions of those framework and more importantly how to connect them. According to documentation, starters are set of convenient dependency descriptors that can be included in your application. It’s a one-stop-shop for all Spring related technology that is needed.
For instance, let’s consider Spring Boot Starter Web. If you want to develop a web application or an application to expose restful services, Spring Boot Starter Web is the perfect option. You can create a quick project using Spring Initializr.
Any typical web application will use the following dependencies:
Ø Spring - core, beans, context, aop
Ø Web MVC - Spring MVC
Ø Jackson - for JSON Binding
Ø Validation - Hibernate Validator, Validation API
Ø Embedded Servlet Container - Tom cat
Ø Logging - logback, slf4j
What’s interesting here? Spring Boot Starter Web has all these dependencies pre packaged. A developer need not worry about these dependencies or their compatible versions.
Simplified Higher Level Abstractions
One of the primary goals of Spring Boot is to make everything easier.
Spring portfolio has its own strong Web MVC framework, Spring Security framework but its other projects majorly aim to provide higher level abstractions to make their use easier.
For illustration, Spring Data JPA makes the use of JPA easy by providing APIs to perform CRUD operations, Sorting and Pagination without the requirement to implement them yourself. Spring AMPQ or Spring for Kafka renders higher level of abstractions for you to work easily with RabbitMQ or Kafka without writing low-level boilerplate code.
Micro-services and Cloud Native Friendly
The latest trend now is the microservice architecture and organizations prefer their deployment in Cloud environments such as AWS, CloudFoundry etc.
Generally, Spring Boot applications are developed as self-contained deployment units and by using its Profiles concept, the same application can be deployed in multiple environments without any changes in code.
Moreover, SpringCloud modules provide an amazing set of features necessary to build Cloud Native microservices.
Addresses Modern Enterprise Needs
Requirements of modern enterprise applications are changing constantly and rapidly. Waiting for 3-4 years release cycle to get new features is not feasible. Frameworks with rapid release cycles are required to support business needs.
At its core, Spring is just a Dependency Injection container.
But the actual power of Spring is its rich set of portfolio projects. Be it using NoSQL databases, wanting a robust Security Framework, integration with Social platforms, Big Data Frameworks or streaming platforms like Kafka, everything is taken care of.
Was the article helpful? Visit www.kodytechnolab.com now to hire Spring Boot services for your next project!
0 notes
Text
Many To One(Uni-directional) Relational Mapping with Spring Boot + Spring Data JPA + H2 Database
In this tutorial , we will see Many To One mapping of two entities using Spring Boot and Spring Data JPA using H2 database. GitHub Link – Download Tools: Spring BootSpring Data JPAH2 DatabaseIntelliJ IDEAMaven We have two entities Student and Department. Many students are part of one Department (Many To One). This is called Many To One mapping between two entities. For each of this entity, table will be created in database. So there will be two tables created in database. create table address (id bigint generated by default as identity, name varchar(255), primary key (id)); create table student (id bigint generated by default as identity, mobile integer, name varchar(255), address_id bigint, primary key (id)); alter table student add constraint FKcaf6ht0hfw93lwc13ny0sdmvo foreign key (address_id) references address(id); Each table has primary key as ID . Two tables has Many To One relationship between them as each department has many students in them. STUDENT table has foreign key as DEPT_ID in it. So STUDENT is a child table and DEPARTMENT table is parent table in this relationship. FOREIGN KEY constraint adds below restrictions - We can't add records in child table if there is no entry in parent table. Ex. You can't add department ID reference in STUDENT table if department ID is not present in DEPARTMENT table.You can't delete the records from parent table unless corresponding references are deleted from child table . Ex. You can't delete the entry DEPARTMENT table unless corresponding students from STUDENT table are deleted . You can apply ON_DELETE_CASCADE with foreign key constraint if you want to delete students from STUDENT table automatically when department is deleted. If you want to insert a student into STUDENT table then corresponding department should already be present in DEPARTMENT table.When any department is updated in DEPARTMENT table then child table will also see the updated reference from parent table Now we will see how can we form this relationship using Spring data JPA entities. Step 1: Define all the dependencies required for this project 4.0.0 org.springframework.boot spring-boot-starter-parent 2.1.1.RELEASE com.myjavablog springboot-jpa-one-to-many-demo 0.0.1-SNAPSHOT springboot-jpa-one-to-many-demo Demo project for Spring Boot 1.8 org.springframework.boot spring-boot-starter org.springframework.boot spring-boot-starter-test test org.springframework.boot spring-boot-starter-web org.springframework.boot spring-boot-starter-tomcat org.springframework.boot spring-boot-starter-data-jpa org.apache.tomcat tomcat-jdbc com.h2database h2 org.springframework.boot spring-boot-starter-test test colt colt 1.2.0 org.springframework.boot spring-boot-maven-plugin spring-boot-starter-data-jpa – This jar is used to connect to database .It also has a support to provide different JPA implementations to interact with the database like Hibernate, JPA Repository, CRUD Repository etc. h2 – Its used to create H2 database when the spring boot application boots up. Spring boot will read the database configuration from application.properties file and creates a DataSource out of it. Step 2: Define the Model/Entity classes Student.java package com.myjavablog.model; import org.springframework.stereotype.Repository; import javax.annotation.Generated; import javax.persistence.*; import java.util.Optional; @Entity @Table(name = "STUDENT") public class Student { @Id @GeneratedValue(strategy = GenerationType.IDENTITY) private Long id; @Column private String name; @Column private int mobile; @ManyToOne(cascade = CascadeType.ALL) @JoinColumn(name = "DEPT_ID") private Department department; public Long getId() { return id; } public void setId(Long id) { this.id = id; } public String getName() { return name; } public void setName(String name) { this.name = name; } public int getMobile() { return mobile; } public void setMobile(int mobile) { this.mobile = mobile; } public Department getDepartment() { return department; } public void setDepartment(Department department) { this.department = department; } } Department.java package com.myjavablog.model; import javax.persistence.*; import java.util.List; @Entity @Table(name = "DEPARTMENT") public class Department { @Id @GeneratedValue(strategy = GenerationType.IDENTITY) private Long id; @Column private String name; public Long getId() { return id; } public void setId(Long id) { this.id = id; } public String getName() { return name; } public void setName(String name) { this.name = name; } } Below are the Annotations used while creating the entity classes - Spring Data JPA Annotations - @Entity - This annotation marks the class annotations.@Table - This annotation creates table in database.@Id - It creates primary key in table.@GeneratedValue - It defines primary key generation strategy like AUTO,IDENTITY,SEQUENCE etc.@Column - It defines column property for table.@ManyToOne - This annotation creates Many to One relationship between Student and Department entities. The cascade property (CascadeType.ALL) defines what should happen with child table records when something happens with parent table records. On DELETE, UPDATE , INSERT operations in parent table child table should also be affected. Only @ManyToOne annotation is enough to form one-to-many relationaship. This annotation is generally used in child entity to form Unidirectional relational mapping.@JoinColumn - You can define column which creates foreign key in a table. In our example, DEPT_ID is a foreign key in STUDENT table which references to ID in DEPARTMENT table. Step 3: Create the JPA repositories to query STUDENT and DEPARTMENT tables StudentRepository and AddressRepository implemets JpaRepository which has methods to perform all CRUD operations. It has methods like save(), find(), delete(),exists(),count() to perform database operations. package com.myjavablog.dao; import com.myjavablog.model.Student; import org.springframework.data.jpa.repository.JpaRepository; import org.springframework.stereotype.Repository; @Repository public interface StudentRepository extends JpaRepository { public Student findByName(String name); } package com.myjavablog.dao; import com.myjavablog.model.Address; import org.springframework.data.jpa.repository.JpaRepository; import org.springframework.stereotype.Repository; @Repository public interface AddressRepository extends JpaRepository{ } Step 4: Create the class BeanConfig to configure the bean for H2 database This class creates a bean ServletRegistrationBean and autowires it to spring container. This bean actually required to access H2 database from console through browser. package com.myjavablog; import org.h2.server.web.WebServlet; import org.springframework.boot.web.servlet.ServletRegistrationBean; import org.springframework.context.annotation.Bean; import org.springframework.context.annotation.Configuration; @Configuration public class BeanConfig { @Bean ServletRegistrationBean h2servletRegistration() { ServletRegistrationBean registrationBean = new ServletRegistrationBean(new WebServlet()); registrationBean.addUrlMappings("/console/*"); return registrationBean; } } Step 5: Last but not the least, You need to define application properties. #DATASOURCE (DataSourceAutoConfiguration & #DataSourceProperties) spring.datasource.url=jdbc:h2:mem:testdb;DB_CLOSE_ON_EXIT=FALSE spring.datasource.username=sa spring.datasource.password= #Hibernate #The SQL dialect makes Hibernate generate better SQL for the chosen #database spring.jpa.properties.hibernate.dialect =org.hibernate.dialect.H2Dialect spring.datasource.driverClassName=org.h2.Driver #Hibernate ddl auto (create, create-drop, validate, update) spring.jpa.hibernate.ddl-auto = update logging.level.org.hibernate.SQL=DEBUG logging.level.org.hibernate.type=TRACE server.port=8082 server.error.whitelabel.enabled=false Step 6: Create the spring boot main file package com.myjavablog; import com.myjavablog.dao.DepartmentRepository; import com.myjavablog.dao.StudentRepository; import com.myjavablog.model.Department; import com.myjavablog.model.Student; import org.springframework.beans.factory.annotation.Autowired; import org.springframework.boot.CommandLineRunner; import org.springframework.boot.SpringApplication; import org.springframework.boot.autoconfigure.SpringBootApplication; import org.springframework.data.jpa.repository.config.EnableJpaRepositories; import java.util.Arrays; @SpringBootApplication public class SpringbootJpaOneToManyDemoApplication implements CommandLineRunner { @Autowired private DepartmentRepository departmentRepository; @Autowired private StudentRepository studentRepository; public static void main(String args) { SpringApplication.run(SpringbootJpaOneToManyDemoApplication.class, args); } @Override public void run(String... args) throws Exception { //Unidirectional Mapping Department department = new Department(); department.setName("COMPUTER"); departmentRepository.save(department); Student student = new Student(); student.setDepartment(departmentRepository.findDepartmentByName("COMPUTER")); student.setName("Anup"); student.setMobile(989911); Student student1 = new Student(); student1.setDepartment(departmentRepository.findDepartmentByName("IT")); student1.setName("John"); student1.setMobile(89774); studentRepository.saveAll(Arrays.asList(student,student1)); } } Step 7: Now run the application Run the application as a java application or as spring boot application spring-boot:run Once you run the application records will be inserted to tables as below -

Step 8: This application also has REST endpoints to expose the services as below - Save department -
Add students under created department -

We can check database entries to cross verify -
Read the full article
0 notes
Text
Many To One(Uni-directional) Relational Mapping with Spring Boot + Spring Data JPA + H2 Database
In this tutorial , we will see Many To One mapping of two entities using Spring Boot and Spring Data JPA using H2 database. GitHub Link – Download Tools: Spring BootSpring Data JPAH2 DatabaseIntelliJ IDEAMaven We have two entities Student and Department. Many students are part of one Department (Many To One). This is called Many To One mapping between two entities. For each of this entity, table will be created in database. So there will be two tables created in database. create table address (id bigint generated by default as identity, name varchar(255), primary key (id)); create table student (id bigint generated by default as identity, mobile integer, name varchar(255), address_id bigint, primary key (id)); alter table student add constraint FKcaf6ht0hfw93lwc13ny0sdmvo foreign key (address_id) references address(id); Each table has primary key as ID . Two tables has Many To One relationship between them as each department has many students in them. STUDENT table has foreign key as DEPT_ID in it. So STUDENT is a child table and DEPARTMENT table is parent table in this relationship. FOREIGN KEY constraint adds below restrictions - We can't add records in child table if there is no entry in parent table. Ex. You can't add department ID reference in STUDENT table if department ID is not present in DEPARTMENT table.You can't delete the records from parent table unless corresponding references are deleted from child table . Ex. You can't delete the entry DEPARTMENT table unless corresponding students from STUDENT table are deleted . You can apply ON_DELETE_CASCADE with foreign key constraint if you want to delete students from STUDENT table automatically when department is deleted. If you want to insert a student into STUDENT table then corresponding department should already be present in DEPARTMENT table.When any department is updated in DEPARTMENT table then child table will also see the updated reference from parent table Now we will see how can we form this relationship using Spring data JPA entities. Step 1: Define all the dependencies required for this project 4.0.0 org.springframework.boot spring-boot-starter-parent 2.1.1.RELEASE com.myjavablog springboot-jpa-one-to-many-demo 0.0.1-SNAPSHOT springboot-jpa-one-to-many-demo Demo project for Spring Boot 1.8 org.springframework.boot spring-boot-starter org.springframework.boot spring-boot-starter-test test org.springframework.boot spring-boot-starter-web org.springframework.boot spring-boot-starter-tomcat org.springframework.boot spring-boot-starter-data-jpa org.apache.tomcat tomcat-jdbc com.h2database h2 org.springframework.boot spring-boot-starter-test test colt colt 1.2.0 org.springframework.boot spring-boot-maven-plugin spring-boot-starter-data-jpa – This jar is used to connect to database .It also has a support to provide different JPA implementations to interact with the database like Hibernate, JPA Repository, CRUD Repository etc. h2 – Its used to create H2 database when the spring boot application boots up. Spring boot will read the database configuration from application.properties file and creates a DataSource out of it. Step 2: Define the Model/Entity classes Student.java package com.myjavablog.model; import org.springframework.stereotype.Repository; import javax.annotation.Generated; import javax.persistence.*; import java.util.Optional; @Entity @Table(name = "STUDENT") public class Student { @Id @GeneratedValue(strategy = GenerationType.IDENTITY) private Long id; @Column private String name; @Column private int mobile; @ManyToOne(cascade = CascadeType.ALL) @JoinColumn(name = "DEPT_ID") private Department department; public Long getId() { return id; } public void setId(Long id) { this.id = id; } public String getName() { return name; } public void setName(String name) { this.name = name; } public int getMobile() { return mobile; } public void setMobile(int mobile) { this.mobile = mobile; } public Department getDepartment() { return department; } public void setDepartment(Department department) { this.department = department; } } Department.java package com.myjavablog.model; import javax.persistence.*; import java.util.List; @Entity @Table(name = "DEPARTMENT") public class Department { @Id @GeneratedValue(strategy = GenerationType.IDENTITY) private Long id; @Column private String name; public Long getId() { return id; } public void setId(Long id) { this.id = id; } public String getName() { return name; } public void setName(String name) { this.name = name; } } Below are the Annotations used while creating the entity classes - Spring Data JPA Annotations - @Entity - This annotation marks the class annotations.@Table - This annotation creates table in database.@Id - It creates primary key in table.@GeneratedValue - It defines primary key generation strategy like AUTO,IDENTITY,SEQUENCE etc.@Column - It defines column property for table.@ManyToOne - This annotation creates Many to One relationship between Student and Department entities. The cascade property (CascadeType.ALL) defines what should happen with child table records when something happens with parent table records. On DELETE, UPDATE , INSERT operations in parent table child table should also be affected. Only @ManyToOne annotation is enough to form one-to-many relationaship. This annotation is generally used in child entity to form Unidirectional relational mapping.@JoinColumn - You can define column which creates foreign key in a table. In our example, DEPT_ID is a foreign key in STUDENT table which references to ID in DEPARTMENT table. Step 3: Create the JPA repositories to query STUDENT and DEPARTMENT tables StudentRepository and AddressRepository implemets JpaRepository which has methods to perform all CRUD operations. It has methods like save(), find(), delete(),exists(),count() to perform database operations. package com.myjavablog.dao; import com.myjavablog.model.Student; import org.springframework.data.jpa.repository.JpaRepository; import org.springframework.stereotype.Repository; @Repository public interface StudentRepository extends JpaRepository { public Student findByName(String name); } package com.myjavablog.dao; import com.myjavablog.model.Address; import org.springframework.data.jpa.repository.JpaRepository; import org.springframework.stereotype.Repository; @Repository public interface AddressRepository extends JpaRepository{ } Step 4: Create the class BeanConfig to configure the bean for H2 database This class creates a bean ServletRegistrationBean and autowires it to spring container. This bean actually required to access H2 database from console through browser. package com.myjavablog; import org.h2.server.web.WebServlet; import org.springframework.boot.web.servlet.ServletRegistrationBean; import org.springframework.context.annotation.Bean; import org.springframework.context.annotation.Configuration; @Configuration public class BeanConfig { @Bean ServletRegistrationBean h2servletRegistration() { ServletRegistrationBean registrationBean = new ServletRegistrationBean(new WebServlet()); registrationBean.addUrlMappings("/console/*"); return registrationBean; } } Step 5: Last but not the least, You need to define application properties. #DATASOURCE (DataSourceAutoConfiguration & #DataSourceProperties) spring.datasource.url=jdbc:h2:mem:testdb;DB_CLOSE_ON_EXIT=FALSE spring.datasource.username=sa spring.datasource.password= #Hibernate #The SQL dialect makes Hibernate generate better SQL for the chosen #database spring.jpa.properties.hibernate.dialect =org.hibernate.dialect.H2Dialect spring.datasource.driverClassName=org.h2.Driver #Hibernate ddl auto (create, create-drop, validate, update) spring.jpa.hibernate.ddl-auto = update logging.level.org.hibernate.SQL=DEBUG logging.level.org.hibernate.type=TRACE server.port=8082 server.error.whitelabel.enabled=false Step 6: Create the spring boot main file package com.myjavablog; import com.myjavablog.dao.DepartmentRepository; import com.myjavablog.dao.StudentRepository; import com.myjavablog.model.Department; import com.myjavablog.model.Student; import org.springframework.beans.factory.annotation.Autowired; import org.springframework.boot.CommandLineRunner; import org.springframework.boot.SpringApplication; import org.springframework.boot.autoconfigure.SpringBootApplication; import org.springframework.data.jpa.repository.config.EnableJpaRepositories; import java.util.Arrays; @SpringBootApplication public class SpringbootJpaOneToManyDemoApplication implements CommandLineRunner { @Autowired private DepartmentRepository departmentRepository; @Autowired private StudentRepository studentRepository; public static void main(String args) { SpringApplication.run(SpringbootJpaOneToManyDemoApplication.class, args); } @Override public void run(String... args) throws Exception { //Unidirectional Mapping Department department = new Department(); department.setName("COMPUTER"); departmentRepository.save(department); Student student = new Student(); student.setDepartment(departmentRepository.findDepartmentByName("COMPUTER")); student.setName("Anup"); student.setMobile(989911); Student student1 = new Student(); student1.setDepartment(departmentRepository.findDepartmentByName("IT")); student1.setName("John"); student1.setMobile(89774); studentRepository.saveAll(Arrays.asList(student,student1)); } } Step 7: Now run the application Run the application as a java application or as spring boot application spring-boot:run Once you run the application records will be inserted to tables as below -
Step 8: This application also has REST endpoints to expose the services as below - Save department -

Add students under created department -
We can check database entries to cross verify -

Read the full article
0 notes
Text
Monitoring using Spring Boot 2.0, Prometheus, and Grafana (Part 1 REST API)
ICYMI: In part 1, we will be creating a REST API for CRUD operations using Spring Boot 2.0, JPA, H2 Database, and SWAGGER UI for documentation. We will be creating a simple application offering CRUD operations over REST for a person entity we shall be using https://goo.gl/2VaxFd #DataIntegration #ML
0 notes