#templatetags
Explore tagged Tumblr posts
Visit Tumblr Blog
Explore Tumblr blogs with no restrictions, modern design and the best experience.
Last Seen Tumblr Blogs


Fun Fact
There were a total of 171.5 billion posts on Tumblr in 2019.
Text
JavaScript Template Literals Explained
In contrast to ES5 and earlier, the new ES2015/ES6 feature known as Template Literals enables you to work with strings in a novel manner. A template literals is a special kind of string literal that allows us to embed expressions within them. This makes it possible to dynamically generate text based on data values. It is similar to using an inline function call with the function keyword. At first appearance, the syntax appears to be fairly straightforward; simply use backticks in place of single or double quotes: const a_string = `something` They stand out because they offer many characteristics that standard strings constructed with quotations do not, namely: - They provide a fantastic syntax for defining multiline strings. - They offer a simple method for interpolating variables and expressions in strings. - They enable the creation of DSLs with template tags (DSL stands for domain specific language; for instance, Styled Components in React utilise it to define CSS for a component). Let's examine each of these in more depth.
Multiline strings
Before ES6, you had to use the character at the end of a line to generate a string that covered two lines: const string = 'first part second part' This enables a string to be created on two lines, although it is only displayed on one line: first part second part You need to manually put n at the end of each line to render the string on several lines as well, as in the following example: const string = 'first linen' + 'second line' Multiline strings are significantly easier when using template literals. In order to add a new line to a template literal after it has been opened using the backtick, simply hit enter without using any special characters. const string = `Hey this string is awesome!` Remembering that space has significance, do the following: const string = `First Second` will result in a string that looks like this: First Second Having an empty first line and adding the trim() method directly after the closing backtick, which will remove any space before the first character, is a simple remedy for this issue: const string = ` First Second`.trim()
Interpolation
It is simple to interpolate variables and expressions into strings using template literals. The ${…} syntax is used to accomplish this: const myVariable = 'test' const string = `something ${myVariable}` //something test You can include anything, including expressions, inside the ${} symbol: const string = `something ${1 + 2 + 3}` const string2 = `something ${doSomething() ? 'x' : 'y'}`
Template tags
One feature that may seem less useful to you at first is tagged templates, but it's actually utilised by several widely used libraries, like Styled Components and Apollo, the GraphQL client/server library, so it's crucial to grasp how it functions. In Styled Components, CSS strings are defined using template tags: const Button = styled.button` font-size: 1.5em; background-color: black; color: white; ` A GraphQL query schema in Apollo is defined by template tags: const query = gql` query { ... } ` The gql template tag and styled.button tags that are highlighted in those examples are merely functions: function gql(literals, ...expressions) {} This function outputs a string that can represent the outcome of any calculation. The content of the template literals tokenized by the interpolations of the expressions are contained in the array literals. All interpolations are contained in expressions. let's take and above example : const string = `something ${1 + 2 + 3}` literals is a two-item array. The first is something, the string up until the first interpolation, and the second is nothing, the space between the first interpolation's finish (there is only one) and the string's conclusion. expressions in this instance are a single item array with the value 6. One that is more intricate is: const string = `something another ${'x'} new line ${1 + 2 + 3} test` Here, literals is an array with the following initial item: ;`something another ` the second is: ;` new line ` and the third is: ;` test` expressions in this instance consist of a two-item array, x and 6. The power of this type of feature lies in the fact that the function to which those values are supplied can do anything with them. The simplest illustration is to combine literals and expressions to mimic what the string interpolation does: const interpolated = interpolate`I paid ${10}€` likewise, here's how interpolation functions: function interpolate(literals, ...expressions) { let string = `` for (const of expressions.entries()) { string += literals + val } string += literals return string } We hope that you found these tips helpful! We’d love to hear what you think about them. Please leave any comments below or contact us directly at Read the full article
0 notes
Photo

Creating a recent posts feature on a django blog application Up next,we are creating a recent posts feature on our Python,DJango and Tailwindcss application. But first, read how to implement a featured Image feature on a blog application here https://codesnnippets.com/how-to-add-a-featured-image-feature-to-a-python-django-and-tailwind-css-blog-application-django-part-7/ #pythonframework #djangomodel #djangoviews #djangoapp #djangoproject #programming #webdevelopment #templatetags (at Lilongwe, Malawi) https://www.instagram.com/p/CUr6lnAjBib/?utm_medium=tumblr
#pythonframework#djangomodel#djangoviews#djangoapp#djangoproject#programming#webdevelopment#templatetags
0 notes
Text
Introducing Template Namespaces
We’ve reworked templates to filter by namespace! Namespaces are meant for easier grouping in the UI.

From a template creator perspective, template creation still works the same; however, you now have the ability to explicitly define a template namespace. For Screwdriver cluster admins, you will need to migrate existing templates in your database to the new schema in order for them to be displayed correctly in the new UI. These steps will be covered below.
Screwdriver Users
For Screwdriver template users, you can still use templates the same way.
jobs: main: template: templateNamespace/[email protected] requires: [~pr, ~commit]
In the UI, you can navigate to the template namespace page by clicking on the namespace or going to /templates/namespaces/<namespace>. Any templates with no defined template namespace will be available at /templates/namespaces/default.
Template owners
To create a template with a designated namespace, you can either: Implicitly define a namespace (same as before) Explicitly define a namespace Use the default namespace (same as before)
Templates will still be used by users the same way.
Implicit namespace
Screwdriver will interpret anything before a template name’s slash (/) as the namespace. If you define a sd-template.yaml with name: nodejs/lib, Screwdriver will store namespace: nodejs and name: lib.
User’s screwdriver.yaml:
jobs: main: template: nodejs/[email protected] requires: [~pr, ~commit]
Explicit namespace
You can explicitly define a template namespace. If you do, you cannot have any slashes (/) in your template name.
Template yaml snippet:
namespace: nodejs name: lib ...
User’s screwdriver.yaml:
jobs: main: template: nodejs/[email protected] requires: [~pr, ~commit]
Default namespace
If you don’t explicitly or implicitly define a namespace, Screwdriver will assign namespace: default to your template. Users will still use your template as you defined it, but it will be grouped with other templates with default namespaces in the UI.
Template yaml snippet:
name: lib
User’s screwdriver.yaml:
jobs: main: template: [email protected] requires: [~pr, ~commit]
Screwdriver Cluster Admins
Database Migration
This feature has breaking changes that will affect your DB if you already have existing templates. In order to migrate your templates properly, you will need to do the following steps:
1. Make sure you’ve updated your unique constraints on your templates and templateTags tables to include namespace.
2. Set a default namespace when no namespace exists.
In postgresql, run:
UPDATE public."templates" SET namespace = 'default' WHERE name !~ '.*/.*'
3. Set implicit namespaces if users defined them. This requires two calls in postgres, one to split by namespace and name, the second to remove the curly braces ({ and }) injected by the regexp call.
UPDATE public."templates" SET namespace = regexp_matches(name, '(.*)/.*'), name = regexp_matches(name, '.*/(.*)') WHERE name ~ '.*/.*'
UPDATE public."templates" SET namespace = btrim(namespace, '{}'), name = btrim(name, '{}')
Compatibility List
Template namespaces require the following minimum versions of Screwdriver:
screwdrivercd/screwdriver:v0.5.396
screwdrivercd/ui:v1.0.297
screwdrivercd/launcher:v4.0.117
screwdrivercd/store:v3.1.2
screwdrivercd/queue-worker:v1.12.18
Contributors
Thanks to the following people for making this feature possible:
jithin1987
lusol
tkyi
Screwdriver is an open-source build automation platform designed for Continuous Delivery. It is built (and used) by Yahoo. Don’t hesitate to reach out if you have questions or would like to contribute: http://docs.screwdriver.cd/about/support.
1 note
·
View note
Text
Model Versioning with Diff’s in Django v3_1
Created: March 20, 2021
Modified: March 22, 2021
What we start with is a simple model that has two fields; a title and a body. What we end up with is a collection of modifications done that allows us to see what changed in both fields for each modification performed. This is enabled by a plugin called django-simple-history and then leveraged with diff behind the scenes to give readability into what changed between the title and the body from version to version. In this article we will be leveraging the diff command in Ubuntu with Django version 3.1 via a command line utility that captures the output and then we use it to show in the view template after it has been cleaned up and made ready for HTML. At this point there is no caching and assumes your website will have very little traffic. More on that possibility in a later article.
Continuing with the document called Custom item URL’s in Django v3_1, get your app started
1. Start the Hyper-V in the Windows Search bar
2. Double click the name Ubuntu Server 20.4 LTS and it should launch a screen that is a terminal
3. Login if required, in other words if it is not already logged in
4. Change into the ~/OneDrive/code/example.com/git/project
5. Update to the latest version of Django
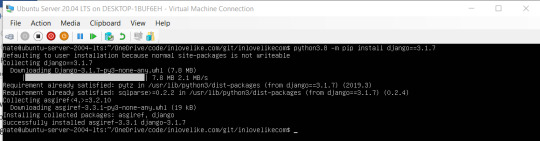
a. python3.8 -m pip install django==3.1.7
6. Run the server on the 8000 port
a. python3.8 manage.py runserver 0:8000
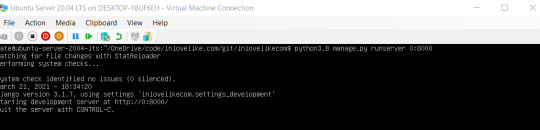
7. Load the site in your browser
a. http://192.168.0.12:8000/
Continue to build the poems app
1. Run the install command and get the django-simple-hijstory module installed
a. python3.8 -m pip install django-simple-history
2. Modify the project/project/settings_development.py and add to the INSTALLED_APPS
3. Add the HistoryRequestMiddleware to the MIDDLEWARE variable in the same document so we can automatically track changes done by each user within the history.
4. Add HistoricalRecords() call to the Poem model poems/models.py
5. Run the migrations to get the database ready
a. python3.8 manage.py makemigrations

b. python3.8 manage.py migrate

6. As found by referencing Kite [1] and Stack Overflow [2] and several other sources as mentioned at the end of the document to make this code concise; here’s how to get the diff of a change made by capturing the output of the command line from within your new view method in poems/views.py. This presumes your Poem will have multiple lines to compare with.
7. Add the following to poems/templatetags/poem_tag_extras.py as found on Stack Overflow [12]
8. Modify the poems/templates/poems/item.html to reflect all the changes of the item
9. Now run the populate_history command to get all the Poem data imported relative to the fixture we loaded in the previous article..

There you have it, a site that shows the differences between each version of change due to modifying either the title or the body of the Poem record. Thank you for reading this document. Please reach out to me by TXT message at 250-368-1324 and let me know if you had any questions and I will update where the article needs to be clarified.
Sources:
Note to the sources; Thank you very much! I really appreciate the contributions you each have made to the Python and Django community. If by chance I have used your research material in error, please contact me at the above-mentioned TXT number and I will refactor the article to coincide with any agreements I may have misunderstood. My apologies in advance.
[1] https://www.kite.com/python/answers/how-to-get-output-from-a-shell-command-in-python
[2] https://stackoverflow.com/questions/23929235/multi-line-string-with-extra-space-preserved-indentation
[3] https://getbootstrap.com/docs/4.0/utilities/text/
[4] https://stackoverflow.com/questions/3877623/in-python-can-you-have-variables-within-triple-quotes-if-so-how
[5] https://stackoverflow.com/questions/46781136/syntax-error-near-unexpected-token-when-using-multiple-input-streams-from-zc
[6] https://stackoverflow.com/questions/7011066/get-the-last-element-of-the-list-in-django
[7] https://stackoverflow.com/questions/11481499/django-iterate-number-in-for-loop-of-a-template
[8] https://docs.python.org/3/tutorial/controlflow.html
[9] https://stackoverflow.com/questions/23929235/multi-line-string-with-extra-space-preserved-indentation
[10] https://stackoverflow.com/questions/1107737/numeric-for-loop-in-django-templates
[11] https://docs.python.org/3/library/pprint.html
[12] https://stackoverflow.com/questions/13358063/template-tag-or-filter
[13] https://www.djangoproject.com/download/
[14] https://www.programiz.com/python-programming/methods/list/reverse
#django#django3.1#django3#python3#python#diff#process#compare#versioning#version history#history#trackchanges#bootstrap
0 notes
Text
me: oh i love coding im good at coding i have made many websites
also me: Hey wheres the squiggly bracket... {TemplateTags}? Whwre’d she go im too lazy
6 notes
·
View notes
Text
python app에 관하여 (introspection, INSTALLED_APPS)
ORIGINAL SOURCE : https://seddonym.me/2018/06/12/installed-apps/
If you’ve ever built anything using Django, you’ll be used to including apps in your INSTALLED_APPS setting:
# settings.py INSTALLED_APPS = [ 'django.contrib.auth', 'myapp', ]
This is something we take for granted, but it’s not always obvious why we need to do this. For something we use so routinely, it’s a concept we’re surprisingly vague about.
So, what are Django apps for? Why do we need to install them? Why can’t they just be plain old Python packages? Before you read on, think for a moment and try to answer these questions for yourself.
What apps are for: a general rule
Here’s a general rule for the purpose of a Django app:
Apps are for introspection.
When you declare a particular Python package as an app (by including it in INSTALLED_APPS), you allow your project to ‘look into itself’ (i.e. introspect) and discover and enable functionality within that package.
By way of contrast, look at an aspect of Django that doesn’t use the apps system: middleware. Middleware classes can sit anywhere in your project, but they need to be explicitly configured:
MIDDLEWARE = [ 'myapp.middleware.MyMiddleware', ]
In contrast, features which use the apps system (e.g. models) don’t need any specific configuration to let the framework know about them other than app installation.
Some examples
Models: The most obvious one; Django looks for any models module within your package and handles the necessary database migrations.
Admin: You register models in the Django Admin Site within an admin module.
Template tags: You may include a templatetags package to allow loading of custom template tags.
Template directories: Assuming you have configured your TEMPLATES setting with APP_DIRS as True, Django will know about any files within a templates subdirectory in your app.
Celery tasks: If you’re using Celery, you can include your tasks in a tasks.py and Celery will automatically pick them up.
Autodiscovery
Notice that all of these examples follow a similar pattern: for each piece of functionality, Django looks in every installed app for a particular module/directory name; if it’s there, it will use it. This is the foundation of Django’s pluggable architecture; providing a package is in your Python path, adding it to INSTALLED_APPS allows it to hook in to other parts of the system.
This process is called autodiscovery, and there is a built in function for it: django.utils.module_loading.autodiscover_modules. To use, simply call it with the name of the module you want, and Django will import any modules that have that name (providing they are in INSTALLED_APPS, of course). For example, to import every module named foo.py, just call:
from django.utils.module_loading import autodiscover_modules autodiscover_modules('foo')
Tip
A good place to call autodiscover_modules is in the ready() method of your application configuration class.
# myapp/__init__.py from django.apps import AppConfig as BaseAppConfig from django.utils.module_loading import autodiscover_modules class AppConfig(BaseAppConfig): name = 'myapp' def ready(self): autodiscover_modules('products') default_app_config = 'myapp.AppConfig'
Understanding INSTALLED_APPS can improve your Django
Why is knowing this useful? If you understand the fundamental concept of what an app is, you should be able to structure your projects better. Apps should be pluggable, discoverable modules, so design them accordingly.
That means if you have a large amount of interdependent functionality, there really is no need to split it up into multiple apps. You’re probably better off splitting up the code into a manageable file structure. For example, there’s nothing special about models.py other than it gets automatically imported during certain model-related tasks. To make things more manageable, you could turn models.py into a subpackage within your app, distribute the models within different files inside it, and import those models within the models/__init__.py.
Conversely, if parts of your project could be designed as plugins, consider making them apps (even if they don’t declare any models). Let’s say you have a site that defines a range of different products by inheriting from a base Product class. Rather than manually importing them, or configuring them in your settings, you could have your core products app autodiscover modules named products. This would allow you to have separate, per-product apps that declare their products in products.py files. (For more ideas about this, you may like to watch my talk on Encapsulated Django.)
To sum up, the concept of a Django app is a powerful one that goes beyond mere models. It’s the magic that allows the framework to find out about what’s inside your project. Knowing this can help you understand how certain things get imported, and give you confidence to be inventive in the way you architect your code.
0 notes
Text
Custom django template tag
This note shows how i created my custom template tag in django.

This was my issue. On my django view, I have a function that render these two sets of data to the template. But on the template, I will not be able to loop these data on the same table.
So I decided to create a custom django template tag in order to solve this problem.
Inside my django app directory, I created another directory named **templatetags **and also I created a file/module named **strategy.py **(the filename/module name can be anything you want).

Note: The name of the module file is the name you’ll use to load the tags later, so be careful to pick a name that won’t clash with custom tags and filters in another app.
According to django documentation. The app should contain a templatetags directory, at the same level as models.py, views.py, etc. If this doesn’t already exist, create it - don’t forget the __init__.py file to ensure the directory is treated as a Python package.

In the strategy.py **file/module, I’ve made a function that merge the two sets of data rendered. I used **zip, zip() is a python built-in function. We pass it two iterables, like lists, and it enumerates them together. You can also refer to this documentation.
Note: To be a valid tag library, the module must contain a module-level variable named register that is a template.Library instance, in which all the tags and filters are registered.

Now the tag was ready, so I load it on the template..
Just keep in mind that a {% load %}statement will load tags/filters for the given Python module name, not the name of the app.

And then, in order to display the data to the table..
That all!
Reference: https://docs.djangoproject.com/en/1.10/howto/custom-template-tags/
0 notes
Text
Custom django template tag
This note shows how i created my custom template tag in django.
This was my issue. On my django view, I have a function that render these two sets of data to the template. But on the template, I will not be able to loop these data on the same table.
So I decided to create a custom django template tag in order to solve this problem.
Inside my django app directory, I created another directory named templatetags and also I created a file/module named strategy.py (the filename/module name can be anything you want). Note: The name of the module file is the name you’ll use to load the tags later, so be careful to pick a name that won’t clash with custom tags and filters in another app.

According to django documentation. The app should contain a templatetags directory, at the same level as models.py, views.py, etc. If this doesn’t already exist, create it - don’t forget the __init__.py file to ensure the directory is treated as a Python package.
In the strategy.py file/module, I’ve made a function that merge the two sets of data rendered. I used zip, zip() is a python built-in function. We pass it two iterables, like lists, and it enumerates them together. You can also refer to this documentation.

Note: To be a valid tag library, the module must contain a module-level variable named register that is a template.Library instance, in which all the tags and filters are registered.
Now the tag was ready, so I load it on the template..

Just keep in mind that a {% load %}statement will load tags/filters for the given Python module name, not the name of the app.
And then, in order to display the data to the table..
That all!
Reference: https://docs.djangoproject.com/en/1.10/howto/custom-template-tags/
0 notes
Text
Sparks 4.5, then 4.6
Sparks got a new version which includes all the generic templates tags and filters I made for 1flow. I will use them in other projects, thus they ended up here in sparks, for a one and only django fire-up-and-deploy dependancy.
By the way, these template tags are compatible with Django 1.4 → 1.7.
0 notes
Link
Django's templating syntax and Handlebars.js's expressions have overlapping syntax, i.e. `{{ stuff }}`, that makes it very difficult to create templates that utilize both frameworks. I spent the evening coding this **templatetag** django-application that allows you to use both in a seamless manner.
5 notes
·
View notes
Text
Custom item URL’s in Django v3_1
This article explains how to setup custom item URL’s such as /poem-My%20Favorite%Place-1 in order to allow Search Indexes such as Google to get to your website from the root / directory for all the content. I am running a test right now to see if this is more efficient for the Search Indexes or not.
Get the app started in your webserver so you can do changes and check immediately
1. Start the Hyper-V in the Windows Search bar
2. Double click the icon that looks like a screen under the Ubuntu Server 20.04 LTS tab in the middle
3. Login if required
4. Launch the server
5. Change into the ~/OneDrive/code/example.com/git
6. python3.8 manage.py runserver 0:8000
7. Load the site in your browser
8. http://192.168.0.12:8000/
Build the poems app
1. python3.8 manage.py startapp poems
2. Modify the poems/views.py
a. from django.shortcuts import get_object_or_404
b. from .models import Poem
c. def index(request):
d. poems_created = Poem.objects.exclude(hidden=True).order_by('created').reverse()
e. options = {
f. 'poems': poems_created,
g. }
h. return render(request, 'poems/index.html', options)
i.
j. def item(request, poem_id):
k. poem = get_object_or_404(Poem, pk=poem_id)
l.
m. options = {
n. 'poem': poem,
o. 'poem_id': poem_id,
p. }
q. return render(request, 'poems/item.html', options)
3. Add a new directory called templates in the root of the project at the same level as poems
4. Create a file called templates/theme.html
a. {% load static %}
b. <!doctype html>
c. <html lang="en">
d. <head>
e. <title>My Poems</title>
f. <link rel="stylesheet" href="https://stackpath.bootstrapcdn.com/bootstrap/4.5.0/css/bootstrap.min.css" integrity="sha384-9aIt2nRpC12Uk9gS9baDl411NQApFmC26EwAOH8WgZl5MYYxFfc+NcPb1dKGj7Sk" crossorigin="anonymous">
g. <script src="https://stackpath.bootstrapcdn.com/bootstrap/4.5.0/js/bootstrap.bundle.min.js" crossorigin="anonymous"></script>
h. </head>
i. <body class="d-flex flex-column h-100">
j. {% block content %}
k. {% endblock %}
l. </body>
m. </html>
5. Modify the poems/models.py
a. from django.db import models
b.
d. class Poem(models.Model):
e. title = models.CharField(max_length=255)
f. body = models.TextField()
g.
h. def str(self):
i. return self.title
6. Make the migrations and run them
a. python3.8 manage.py makemigrations
b. python3.8 manage.py migrate
7. Create a template for the poems app index page at poems/templates/poems/index.html
a. {% extends 'theme.html' %}
b. {% load static %}
c. {% load poem_tag_extras %}
d. {% block content %}
e. <main role="main" class="flex-shrink-0 pt-2">
f. <div class="container-md">
g. <h1>My Poems</h1>
h. <ul class="list-group">
i. {% for poem in poems %}
j. <li class="list-group-item d-flex justify-content-between">
k. <span class="bold"><a href="{{ poem|poem_item_url:request }}">"{{ poem.title }}"</a></span>
l. </li>
m. {% endfor %}
n. </ul>
o. </div>
p. </main>
q. {% endblock %}
8. Create a template file for each Poem item at poems/templates/poems/item.html
a. {% extends 'theme.html' %}
b. {% load static %}
c. {% load poem_tag_extras %}
d. {% block content %}
e. <main role="main" class="flex-shrink-0 pt-2">
f. <div class="container-md">
g. <h1><a href="/">My Poems</a></h1>
h. <div class="col mb-4">
i. <div class="card h-100 my-2 mx-3">
j. <div class="card-body" id="poem-{{poem.id}}">
k. <a name="poem-{{poem.id}}"></a>
l. <h5 class="card-title">{{ poem.title }}</h5>
m. <div class="card-text">{{ poem.body|linebreaks }}</div>
n. </div>
o. </div>
p. </div>
q. <h4><a href="/#poems">View All Poems</a></h4>
r. </div>
s. </main>
t. {% endblock %}
9. Create a new directory for the custom template tag used in the poems/index.html document at the poems/templatetags/poem_tag_extras.py. Also don’t forget to create a init.py document so it loads the directory properly.
a. from django import template
b. import re
c. import urllib
d. from poems.models import Poem
e.
f. register = template.Library()
g.
h. @register.filter(takes_context=True)
i. def poem_item_url(poem, request):
j. if type(poem) == Poem:
k. poem_id = poem.id
l. poem_title = poem.title
m. else:
n. return False
o.
p. host = request.META['HTTP_HOST']
q.
r. if "inlovelike" in host:
s. host = "https://" + host + "/"
t. else:
u. host = "http://" + host + "/"
v.
w. return host + "poem-" + urllib.parse.quote_plus(poem_title)[:255] + "-" + str(poem_id)
10. Modify the poems/admin.py to include the Poem model
a. from django.contrib import admin
b. from .models import Poem
c.
d. admin.site.register(Poem)
11. Modify your project name’s app urls.py file (Eg. /myapp/myapp/urls.py) so that it includes the shorthand (Eg. /poem-My%Title-1)
a. from django.urls import include, path, re_path
b. from poems import views as poem_views
c.
d. urlpatterns = [
e. …
f. re_path(r'^poem-.*-(?P<poem_id>\d+)$', poem_views.item, name="poem_item"),
h. # path('poems/', include('poems.urls')),
i. ]
12. Create a fixture for the import of some dummy data to play with in the interface at /myapp/fixtures/poems_poem.json
a. [{"model": "poems.poem", "pk": 1, "fields": {"title": "My First Poem", "body": "Here\r\nI\r\nStart"}}, {"model": "poems.poem", "pk": 2, "fields": {"title": "My Second Poem", "body": "This\r\n\Is\r\nA\r\nPoem"}}}]
13. Run the loaddata command to get your content into the database
a. python3.8 manage.py loaddata poems_poem.json
Now here is a project that has poems linked to the nested pages off the root directory of the homepage.
PS. This is live in action on https://inlovelike.com, please do take a look.
PSS. The file paths mentioned now have links to code so you can copy/paste them more simply. I do not have a template yet for Tumblr to create an article. If and when I do, they will be inline code example.
#python3#django3#django#python#poems#poem#programming#tutorial#howto#json#fixtures#urls#regular expressions#regex#bootstrap
0 notes