#this is only possible due to the elixir of hill giant strength
Text
Act 3 of bg3 is just tenderly kissing monk players on the lips
#w the gear and feats i have im straight up able to do like#120 damage minimum if i dont miss#and thats leaving out dependant bonuses like breezeswift speed#or things like having haste cast on me and using wholeness of body#this is only possible due to the elixir of hill giant strength#but also that means if i spice things up w the elixir of cloud giant strength i do even more damage?#i have a solid hit chance rn and thatll get better next time i get a feat because im going to pop my dex right the fuck up#add in things like cull the weak and open hand monks are a fucking beast
0 notes
Text
Order of the Immortal Mystic
Intro
To see how good a subclass is, I've decided to try and go through Tactician solo and see if it's possible for that subclass to beat the game, and if not, how far they can make it. The only restrictions I gave myself are to not multiclass, no tadpoles, and to not abuse Elixirs of Hill Giant Strength. Multiclassing would defeat the purpose of seeing how good the class is, and using Elixirs of Hill Giant Strength take away some of the impact of planning ability scores.
To start off this hopefully comprehensive series, I decided to make the brilliant decision of going with the Order of the Immortal Mystic (simply "Immortal" going forward), a modded class based on the Mystic UA of 5e. The class has various balancing changes, and with the Mystic Expansion addon which I chose to use (which will be obvious why soon) gives the class plenty of options. For this subclass, and any future Mystic runs, I've decided to limit myself to the Psionic Disciplines that are tied to the class.
For race, I decided to try Duergar out of pure luck, and this turned out to be run saving. I didn't realize it upon picking them, but Duergar get at will Invisibility at level 5, which was so important for some of the bigger fights with a lot of enemies.
The Acts
Act 1: The early levels of this act are spent like any other run, with most exp coming from social encounters and talking your way out of fights. Once I hit level 4, things became a lot easier as Mystics gain access to an early +1 shortbow which uses their Int modifier, and when paired with the Psionic Weapon focus, is way better than any of their Psionic Talents. To help with some of the encounters, I decided to get branded, plus it helps deal with Priestess Glut. After that, I continued through the story until I hit level 5, where I then headed to the Zentharims to get the Titanstring Bow, which when paired with the Club of Hill Giant Strength and Gloves of Dexterity became my best damage option and let me take care of most the encounters with little trouble. The hardest fight of Act 1 was easily the Nere fight, which required me to team up with Nere to stand a chance, however even he died during it. Despite some difficulties, the fight was still beatable after 1 or 2 attempts. The other notable fight of this act was the Creche, which required me to use the Iron Flask from easiler to help mop up the rest of the Gith while I mowed down the Inquisitor. After that, I started Act 2.
Act 2: For most of this act, it was quite a breeze. Most of the harder fights can be talked out of which still granted good exp. The only notable encounter for most of the act was the attack on Last Light Inn, which took about 5 attempts due to Isobel dying constantly. It wasn't until I got a good turn in and was able to take out Marcus in 1 turn that I was able to succeed. The rest of the act was smooth sailing, including the Moonrise Tower assault, a fight that I was really worried about. Before the assault, I also obtained the Shar's Blessings to Intelligence, Wisdom, and Charisma, which made my attacks even better since I was using the bow that used my Intelligence modifier. I was also able to hit level 8 and 9, where I grabbed Sharpshooter. Even the Kethric rooftop fight was easy, and I was able to take care of the small encounters with ease in the Mind Flayer Colony, where I also went ahead and obtained the Resonance Stone for any future boss fights I may have trouble with. Then I got to the Apostle of Myrkul... This fight was incredibly difficult. I honestly thought it was impossible for a good bit. It was impossible to outdamage the healing from the necromites, and the combination of Gaze of the Dead (which he had despite only being tactician difficult?) and Call of the Damned meant I was supremely screwed. After a few hours of just trying and trying, I finally found the solution. The only way that I found to beat him was to find an area where he couldn't pull me using Call of the Damned and to spam Mind Thrust, a Psionic Talent that dealt 2d10. That strategy mixed with a good bit of health potions eventually let me defeat him, especially since he stops spawning the necromites at round 22. After that, I headed to Act 3, where my build would change drastically.
Act 3: Throughout the game, I had been collecting hella loot and gold, saving up as much as I could because I knew that once I got to Act 3, I'd be spending a lot of money on new gear. To make a long story short (I'll explain the gear at the end as this was my end game set up), I went from a Sharpshooter archer to a spear wielding GWM user. While this made me more susceptible to getting hit, I also had a much higher AC, jumping from 22 to 27. This + the Cloak of Displacement meant I was never getting hit. After doing a variety of quests, I finally got to level 12, bumping my Dex to 20 (and thus my armor to 28), and decided to fight some bosses.
Act 3 Bosses:
Cazador: I went into this fight assuming it would be the hardest one, however the fight was more odd than anything. The first few turns was quite annoying, as Chatterteeth kept casting Eyebite: Asleep and I kept failing. Once he was taking care of, the fight was mainly a breeze. Cazador and most of the enemies didn't actually try to attack me, except for the occasional Call Lightning, so I was free to just wipe the Sacrifices out before killing Cazador.
Orin: This fight was very similar to Cazador. The first few rounds consisted of me using Blade Flurry to bypass Sanctuary and kill all of the worshippers before hitting Orin a lot until she died. There were a few times where she got some good hits in or poisoned me, but I was able to use Psionic Restoration if things ever started looking hairy.
Steel Watcher Titan: This fight was extremely tedious. The Steel Watchers have immunity to Psychic damage, which meant my damage output was awful. On top of that, they had the ability to use Hellfire, which overrode any Fire resistance I may have. Luckily they didn't use Hellfire too often, so I was able to eventually widdle them away.
Viconia: I regret not doing this fight earlier since it would have granted me a +2 Intelligence. The fight itself was similarly tedious to the Steel Watch Titan, but for different reasons. While the former was tedious due to lack of damage, this fight was tedious due to the sheer number of enemies. I was actually able to kill Viconia on Turn 2, but then I spent a bunch of time just killing the random Shar worshippers.
Raphael: Another user of Hellfire, and the only fight that took me multiple times. I freed Hope to be nice, but she was mostly useless. I do feel a bit bad about this fight as I think I somewhat cheesed it, however fighting it legitimately was getting me nowhere. I luckily had 4 scrolls of Disintegrate, and just zapped the pillars before using Psionic Restoration to wait out his Hellfire spells. Once he was down to just Multiattacks, I took care of him easily.
Gortash: Probably the easiest fight. I snuck up behind him before hitting him real hard with a Devastating Strike. I then did this again next turn and it was over. I even got the Fancy Footwork achievement which was cool.
Ansur: This was the final boss of Act 3 before the endgame, and it honestly wasn't too hard. Thanks to Adaptive Body, I was able to be immune to all of his lightning attacks. I would occasionally be knocked prone and have to reuse my Energy Immunity, but other than that it was easy.
Final Fight: After fighting my way to the brain stem, I finally made it to the final fight. The fight was actually quite fast, and showed how strong the Immortal Mystic could be. Using Devastating Strike and the Resonance Stone, I carved my way to the Netherbrain, using a Globe of Invulnerability to help Orpheus concentrate. Once at the Netherbrain, it was even faster. I used my first turn to get to the brain, and on turn 2, I used Surge of Action to hit the brain with 4 max level Devastating Strikes, ending it.
Final Build:
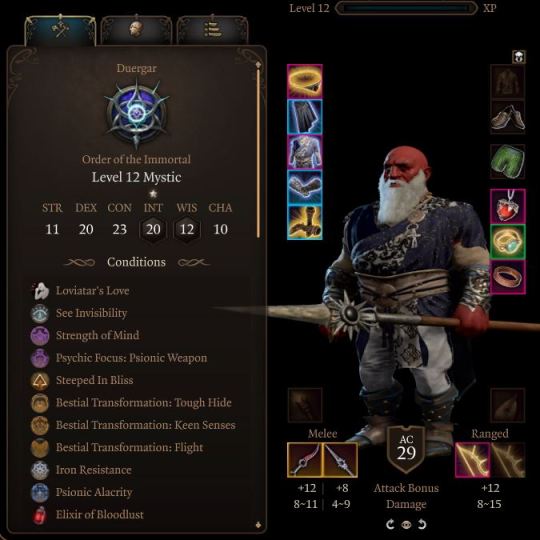
I switched between two builds: the dual-wielding build shown here and a GWM built that used Longinus. Both played the same way, but the dual-wielding build was more consistent and did similar damage. However, if I were to replay this Order again, I think I’d stick with GWM simply for the cool look of an unarmored man with a simple spear.
Combat was fairly simple. I simply used Devastating Strike for 2 Psi Points every attack and used my bonus action for Slice and Dice. The Fount of Knowledge and Longinus made it so all of this was free, and I could reserve Psi Points for survivability or big burst damage.
Gear:
Head - Fount of Knowledge: Granted 2 Psi Points per turn, allowing for basically free Devastating Strikes.
Cloak - Cloak of Displacement: Made it nearly impossible for enemies to hit us thanks to our very high AC.
Armor - Cloth of the Goliath: Helped survivability by offering damage reduction equal to our Intelligence modifier as well as 2 AC.
Bracers - Bracers of Defense: +2 AC to be even more immortal.
Boots - Evasive Shoes: +1 AC to be even more immortal.
Necklace - Amulet of Greater Health: Our Unarmored Defense was based on Dexterity and Constitution, so this helped ease the MADness.
Ring 1 - Whispering Promise: A free Bless thanks to Ring of Regeneration, though I probably should have replaced it since I bought the 5k gold stone statue which also gave free Bless.
Ring 2 - Ring of Regeneration: I felt this fit thematically plus it isn't too bad of an option.
Melee Weapons - Bloodthirst/Longinus: Bloodthirst made enemies vulnerable to Piercing, which when paired with the Resonance Stone, meant any non-immune enemy was screwed. Longinus granted a Psi Point back on hit, which worked with the dagger, meaning we were very self-sufficient, rarely running out.
Ranged Weapon - Deadshot: Reduced number to crit, which is always nice for a class like this.
Overall Thoughts: Order of the Immortal was quite the bumpy ride. Levels 1-4 were very difficult, however that was too be expected. Once I hit level 5, it was mostly smooth sailing thanks to Psionic Alacrity granting Extra Attack. Levels 8-9 started to get tough again, as the damage was falling off near the end of Act 2, but everything picked up once again in Act 3, becoming an actual breeze. Thanks to various Psionic Disciplines, Immortal played a lot like a Paladin, yet somehow even more powerful. Through most of Act 3, I mainly used a GWM build, but eventually switched to dual-wielding as I felt it was more consistent all while having roughly a 30 AC and resistance to damage when needed. Overall, I'd rate this an A tier subclass.
Pros:
Very powerful late game, very consistent and high damage.
Can easily switch between being a melee and ranged character.
Damn near unkillable.
Cons:
Somewhat weak early and mid game.
Screwed if fighting an enemy with Psychic immunity.
Gear is super important.
Psionic Disciplines: Here is where I'm going to rate each Discipline from 1-5, and give a small thought about each one. This is coming from the viewpoint of a Lone Wolf Run, so some that are more ally based will rate lower.
Adaptive Body: 4/5
Psychic Focus: Not really useful since you can just send things to camp.
Environmental Adaptation (2 Psi Points): A cheap buff, but these conditions aren't too common so not super useful.
Adaptive Shield (3 Psi Points): Nice for when you're about to suddenly take a huge bit of elemental damage.
Energy Adaptation (5 Psi Points): The fact it takes Concentration makes it pretty bad.
Energy Immunity (7 Psi Points): The fact it takes Concentration doesn't matter as Immunity is great, especially in certain fights.
Bestial Form: 5/5
Psychic Focus: Just barely better than useless.
Bestial Claws (1 Psi Point): Not the worst offensive option since it's a to-hit, but still not great.
Bestial Transformation (Varies): Makes this Discipline a must take. Gives a handful of amazing buffs.
Brute Force: 1/5
Psychic Focus: Not many Athletic checks that really matter other than shoving.
Brute Strike (1 Psi Point): An ok damage boost, but requiring your bonus actions means it'll rarely be used.
Knock Back (1 Psi Point): Can sometimes be useful to push enemies off cliffs, but that's about it.
Mighty Leap (1 Psi Point): Nice for when you gotta go far distances over gaps.
Feat of Strength (2 Psi Points): Similarly to the Psychic Focus, not many checks where this will matter unless you're shoving.
Celerity: 5/5
Psychic Focus: A nice little boost, but rarely the best option.
Rapid Step (1 Psi Point): Good for when you gotta cross the battlefield in one turn.
Agile Defense (2 Psi Points): Solid early on, but by the late game, you'll have better things to spend your bonus action on.
Blur of Motion (2 Psi Points): More useful outside of combat to sneak past vision cones.
Surge of Speed (2 Psi Points): Another nice ability early on, but falls off later on.
Surge of Action (5 Psi Points): A slightly shittier Action Surge is still a really good ability.
Corrosive Metabolism: 3/5
Psychic Focus: 2 Resistances is nice, especially somewhat common elemental damage types.
Corrosive Touch (1 Psi Point): Needs a rider ability to be worth it.
Venom Strike (1 Psi Point): Poisoning an enemy is nice, but the damage is bad and Poison isn't great.
Acid Spray (2 Psi Points): The damage is good but there are better things to use your reaction on.
Breath of the Black Dragon (5 Psi Points): Solid damage and one of the few AOE's immortal gets, but it falls off.
Breath of the Green Dragon (7 Psi Points): Would be fantastic if it wasn't Poison damage.
Crimson Harvest: 3/5
Psychic Focus: Good for Act 2, but not much else.
Transfusion (1 Psi Point): The healing part is nice, but the damage isn't there.
Crimson Eruption (3 Psi Points): A nice little AOE, but somewhat risky since it's centered on you and this is more of a caster Discipline.
Blood Frenzy (5 Psi Points): A solid ability, however Immortal already gets temp HP every turn, so not the most useful.
Sanguine Infusion (6 Psi Points): The damage resistance is kinda mid, but the advantage on saves is good.
Diminution: 3/5
Psychic Focus: Not really great, but isn't completely useless.
Miniature Form (2 Psi Points): Very rarely gonna be useful.
Toppling Shift (2 Psi Points): Knocking an enemy prone with just a bonus action is nice, especially if you're built for melee.
Sudden Shift (5 Psi Points): Great for when you're about to get crit to hell.
Microscopic Form (7 Psi Points): Good for when you need to run away, but you'll rarely want to at this level.
Giant Growth: 2/5
Psychic Focus: Nice for when you want to kite enemies with a pole arm.
Ogre Form (2 Psi Points): Solid buffs, but the fact it's concentration means you'll probably drop it a lot at early levels.
Giant Form (7 Psi Points): Not the worst thing to concentrate on, but at later levels, you'll probably have something else you'll want.
Iron Durability: 4/5
Psychic Focus: Basic, but great at early levels.
Iron Hide (1 Psi Point): A shittier Shield spell is still a great ability throughout the game.
Steel Hide (2 Psi Points): A solid ability, especially early on before your AC gets good.
Iron Resistance (7 Psi Points): If you know you're gonna be against a specific damage type, then it's a good ability to use.
Psionic Restoration: 2/5
Psychic Focus: Very quickly become negligable, especially since it only applies to Disciplines.
Mend Wounds (1 Psi Point): Not a great use of your action in combat, but a nice out-of-combat option to top yourself off.
Restore Health (2 Psi Points): Very situational, and there's Antidotes for a reason.
Restore Life (5 Psi Points): Completely useless in a Lone Wolf run.
Restore Vigor (7 Psi Points): You can buy Remove Curse scrolls, and if you're stunned or petrified in Lone Wolf, you might as well pack it up.
Psionic Skirmishing: 5/5
Psychic Focus: Not bad if you're using two weapons.
Slice and Dice (2 Psi Points): Quite strong as it's two attacks for one bonus actin, but it's worth mentioning that this uses your main hand weapon rather than your offhand.
Energy Infusion (3 Psi Points): Not great since it requires your bonus action, but if you have nothing better, then go for it.
Psionic Alacrity (5 Psi Points): A requirement for any weapon build.
Blade Flurry (5 Psi Points): Excellent if you get surrounded or if you're fighting an enemy with Sanctuary since this bypasses it.
Psionic Weapon: 5/5
Psychic Focus: Always gonna be good, but especially early on.
Ethereal Weapon (1 Psi Point): Not great, but not the worst if you want to be a weapon user without using Psionic Skirmish.
Lethal Strike (1 Psi Point): A solid damage boost, but you'll have better things to use your bonus action on.
Devastating Strike (1 Psi Point): Worth taking for this alone as it lets you LARP as a paladin with psychic damage and ranged weapons.
Augmented Weapon (5 Psi Points): The damage adds up and the bonus to hit means you'll rarely miss.
Soul Reaper: 4/5
Psychic Focus: Probably the best late game Focus as it makes you feel immortal.
Soul Harvest (1 Psi Point): An ok damage option, especially since it gets a solid boost on enemies with less than half HP.
Soul Grip (3 Psi Points): I never used this ability.
Souleater (5 Psi Points): Incredibly useful in late Act 1 if you can get it to chain, especially since it refreshes actions from Elixir of Bloodlust or Surge of Action.
Doom (6 Psi Points): When it's useful, it's very useful.
Titanic Presence: 4/5
Psychic Focus: Incredibly useful, especially to avoid dropping concentration.
Provoke (1 Psi Point): In Lone Wolf, this is the last thing you want.
Titan's Rage (3 Psi Points): A super solid option for melee builds, also somewhat invalidates the resistances from Iron Durability.
Intervene (3 Psi Points): Useless in Lone Wolf.
Menacing Presence (3 Psi Points): Also useless in Lone Wolf.
Titanic Leap (5 Psi Points): Great for closing the gap + knocking enemies prone means your melee attacks are more likely to crit.
0 notes
Last Seen Blogs

abokarm
abokarm

lovmaturespeedo
Untitled

ilovescaraandvioletandmorfid
Untitled

toto-wolff
CHODIUM RIGHTS

solecitoflores
Sin título