#tips phpmyadmin wordpress
Explore tagged Tumblr posts
Visit Tumblr Blog
Explore Tumblr blogs with no restrictions, modern design and the best experience.
Last Seen Tumblr Blogs


Fun Fact
In February 2021, Tumblr had 518.6 million blog accounts.
Text
Choose the Right Web Hosting
Thinking of switching web hosting providers but worried about losing your website or breaking something important? You're not alone. Many website owners hesitate to make the move because they’re unsure about how the process works. But the truth is, with the right steps, you can move your website to a new host safely and easily — even as a beginner.
In this guide, we’ll walk you through a simple and safe way to transfer your website, while also helping you choose the right web hosting for long-term success. If you ever need quick assistance, feel free to call +91 9818 62 9898.
Why People Change Web Hosting Providers
Before we dive into the steps, let’s understand why someone might need to move their website:
Slow website performance
Frequent downtime or server issues
Poor customer support
Limited features or outdated technology
High renewal costs
If any of these issues sound familiar, it’s a clear sign that you need to move on and choose the right web hosting provider. For expert help during the switch, call us directly at +91 9818 62 9898.
Pre-Move Checklist: What You Need to Prepare
To ensure a smooth transfer, gather the following:
Access to your current hosting account
Access to your domain registrar
A backup of your website files and database
Login credentials for your new hosting provider
Some time (ideally during non-peak hours)
If you get stuck at any point, just dial +91 9818 62 9898 — our team is here to help.
Step-by-Step Guide to Move Your Website Safely
Step 1: Choose the Right Web Hosting Provider
The first and most important step is to choose the right web hosting for your current and future website needs. Look for:
99.9% uptime guarantee
High server speed
Free migration services
24/7 support
User-friendly dashboard
Not sure which provider is right for you? Get a quick recommendation by calling +91 9818 62 9898.
Step 2: Backup Your Website Files and Database
Always create a full backup before migrating.
For WordPress: Use plugins like All-in-One WP Migration or Duplicator to back up both files and database.
For non-WordPress sites: Download your files via FTP and export your database using phpMyAdmin.
Need help taking a backup? Reach out at +91 9818 62 9898.
Step 3: Upload Files to the New Host
Once your new host is ready, it’s time to upload:
WordPress Users:
Install WordPress on the new host
Import the backup using your chosen plugin
Non-WordPress Sites:
Upload via FTP
Recreate the database and import your .sql file
For technical support, don’t hesitate to call +91 9818 62 9898.
Step 4: Update Database Settings
If your website is database-driven (like WordPress), update the config file with new database credentials.
For WordPress, modify wp-config.php with:
sql
CopyEdit
define('DB_NAME', 'new_db_name'); define('DB_USER', 'new_db_user'); define('DB_PASSWORD', 'new_db_password'); define('DB_HOST', 'localhost');
Not sure where to find these details? We’re one call away at +91 9818 62 9898.
Step 5: Preview the Website on New Host
Before changing your domain settings, preview your site using:
A temporary URL (provided by your new host)
Hosts file modification (advanced users)
Ensure everything works — images load, forms submit, pages function properly. If you see issues, give us a call at +91 9818 62 9898 for quick troubleshooting.
Step 6: Change Domain DNS Settings
Now it’s time to go live.
Log in to your domain registrar
Update the DNS (nameservers) to your new host’s settings
Wait for DNS propagation (can take 24–48 hours)
During this period, avoid editing the website. If you're unsure how to do this, call +91 9818 62 9898 and we’ll walk you through it.
Step 7: Test After DNS Propagation
After DNS has updated, test your site:
Load pages
Test forms
Check mobile responsiveness
Verify email services (if connected to domain)
Pro Tips for a Smooth Migration
Migrate during low-traffic hours
Inform your visitors if there will be downtime
Keep your old host active for at least a week
Clear browser and site cache after the move
Always double-check backups
Need guidance through any of these steps? Talk to our web experts at +91 9818 62 9898.
Final Thoughts
Switching your hosting might feel scary, but it’s easier than it looks — especially when you follow the right steps. The key is to be prepared, follow a structured process, and above all, choose the right web hosting that meets your performance and support expectations.
Whether you're unhappy with your current provider or just want to upgrade, now is the perfect time to make the move. And if you ever feel stuck, don’t worry — just call +91 9818 62 9898, and we’ll guide you every step of the way.
Want expert help with your hosting migration? Call us now at +91 9818 62 9898 and get started without stress.
0 notes
Text
Jika Anda adalah seorang pengguna WordPress yang sering mengalami masalah dengan koneksi database, maka Anda berada di tempat yang tepat. Koneksi database yang bermasalah dapat menjadi sangat menjengkelkan, terutama jika Anda tidak memiliki pengetahuan teknis yang cukup untuk mengatasinya. Artikel ini akan memberikan tips dan trik yang dapat Anda gunakan untuk mengatasi masalah koneksi database pada WordPress. Apa itu Koneksi Database? Sebelum kita membahas lebih jauh tentang cara mengatasi masalah koneksi database pada WordPress, penting untuk memahami apa itu koneksi database. Dalam konteks WordPress, koneksi database mengacu pada hubungan antara situs web Anda dan database yang digunakan untuk menyimpan semua informasi situs web Anda, seperti konten, pengaturan, dan pengguna. Setiap kali seseorang mengunjungi situs web Anda, WordPress akan melakukan koneksi ke database untuk mengambil informasi yang diperlukan dan menampilkannya kepada pengunjung. Koneksi database yang bermasalah dapat menyebabkan situs web mengalami kinerja yang lambat atau bahkan tidak dapat diakses sama sekali. Penyebab Masalah Koneksi Database pada WordPress Ada beberapa penyebab umum masalah koneksi database pada WordPress. Beberapa di antaranya termasuk: Informasi Pengaturan Database yang Salah: Salah satu penyebab umum masalah koneksi database adalah kesalahan dalam mengisi informasi pengaturan database pada file wp-config.php. File ini menyimpan detail tentang database yang digunakan oleh situs web Anda, dan jika informasinya tidak benar, WordPress tidak akan dapat terhubung ke database. Konflik Plugin: Beberapa plugin WordPress mungkin tidak kompatibel satu sama lain atau dengan tema WordPress yang Anda gunakan. Konflik ini dapat menyebabkan masalah koneksi database. Database Terlalu Besar: Jika database WordPress Anda terlalu besar, hal ini dapat mempengaruhi kinerja situs web Anda. Koneksi database mungkin menjadi lambat atau bahkan putus jika database terlalu besar untuk ditangani oleh server. Server Database yang Tidak Stabil: Kadang-kadang, masalah koneksi database disebabkan oleh masalah pada server database itu sendiri. Ini bisa terjadi jika server database mengalami kelebihan beban atau jika ada masalah dengan konfigurasi server. Cara Mengatasi Masalah Koneksi Database pada WordPress Jika Anda mengalami masalah koneksi database pada WordPress, berikut adalah beberapa langkah yang dapat Anda lakukan untuk mencoba mengatasi masalah tersebut: 1. Periksa Informasi Pengaturan Database Langkah pertama yang harus Anda lakukan adalah memeriksa informasi pengaturan database pada file wp-config.php. Pastikan bahwa informasi seperti nama pengguna, kata sandi, dan nama database sudah benar. Anda juga dapat mencoba membuat pengguna dan database baru jika diperlukan. 2. Nonaktifkan Plugin yang Mungkin Menyebabkan Konflik Jika Anda baru-baru ini menginstal atau memperbarui plugin, coba nonaktifkan plugin tersebut dan periksa apakah masalah koneksi database teratasi. Jika masalahnya hilang setelah menonaktifkan plugin tertentu, maka plugin tersebut mungkin tidak kompatibel dengan tema atau plugin lain yang Anda gunakan. Anda dapat mencoba mencari alternatif plugin yang serupa atau menghubungi pengembang plugin untuk meminta bantuan. 3. Periksa dan Perbaiki Database Anda Jika database WordPress Anda terlalu besar atau rusak, masalah koneksi database dapat terjadi. Anda dapat menggunakan plugin seperti WP-Optimize atau phpMyAdmin untuk membersihkan dan memperbaiki database Anda. Pastikan Anda melakukan backup database sebelum melakukan perubahan apa pun. 4. Periksa Server Database Jika masalah koneksi database terjadi secara konsisten, ada kemungkinan bahwa masalahnya terletak pada server database itu sendiri. Anda dapat menghubungi penyedia hosting Anda untuk memeriksa apakah ada masalah dengan server yang digunakan. Jika perlu, Anda juga dapat mempertimbangkan untuk memindahkan situs web Anda ke server yang lebih stabil atau memperbarui paket hosting Anda.
Kesimpulan Mengatasi masalah koneksi database pada WordPress bisa menjadi tugas yang menantang, tetapi dengan pengetahuan dan langkah-langkah yang tepat, Anda dapat mengatasinya dengan sukses. Selalu ingat untuk melakukan backup data sebelum melakukan perubahan apa pun pada situs web Anda, dan pastikan untuk menghubungi tim dukungan hosting Anda jika Anda memerlukan bantuan tambahan.
0 notes
Link
#Reset password admin Wordpress#tips phpmyadmin wordpress#astuce phpmyadmin#gérer wordpress avec phpmyadmin
0 notes
Text
Tips for WordPress Security - WP File Access Manager

A year ago and a half instructed us that WordPress security ought not be messed with using any and all means. Somewhere in the range of 15% and 20% of the world's high traffic destinations are fueled by WordPress. The way that it is an Open Source stage and everyone approaches its Source Code makes it an enticing prey for programmers.
Most assaults are originating from Russia, Germany, Poland and India including, yet not restricted to:
SQL Injections
Clickjacking
Shrouding
Blackhole Exploit Kit assaults
Secret word and Login brake endeavors
Truly, if an able ace of the content focuses on your site, there is actually no real way to forestall an interruption. What you are going to peruse beneath are some preparatory moves you can make to rapidly limit the danger to a satisfactory level. In the event that your WordPress site is all around ensured chances are a programmer would favor picking another, simpler casualty.
Beginning with the more clear ones:
1. Disregard utilizing "administrator" as your username.
A significant number of the assaults focus on the default WordPress username with bruteforce, secret key breaking robots. Initial step is to change your "administrator" or "manager" username from the WordPress Administration Panel.
- Go to mysql instrument (phpmyadmin)
- Find your information base
- Go to wp_users and peruse for "administrator"
- Under user_login segment, change it to something different.
This normally prompts the accompanying...
2. Pick a solid secret phrase
Pick a secret phrase that incorporates different upper and lowercase letters, just as images, for example, "!@#$%^&*()" Go to Users->Your Profile and change it through the "New secret word" field at the base. This will make it path harder to break it down. Ensure you do likewise for your ftp Cpanel facilitating account secret key and don't utilize a similar one you utilized in WordPress.
3. Oftentimes reinforcement your information base
You heard this one preceding. Do ordinary reinforcements or you will inevitably think twice about it. You may lose the entirety of your work if being hacked. Additionally, recollect to reinforcement each time you make changes. You can do that using a plugin or physically.
4. Continuously Update your WordPress
There is definitely no motivation to remain on the more established renditions when there is another one accessible. WordPress refreshes contain bug fixes, weakness fixes and cover security blemishes found by the huge WordPress people group. Same goes for refreshing topics. It is simple and effective. All things considered, it is the best and least demanding approach to keep your page from malevolent exercises, which are undoubtedly as aftereffect of an undermined and not completely refreshed application, site, exploitable php contents, and so forth All the old variants of your applications can be considered as a potential security openings. They can just be utilized by the aggressor, who is (more often than not) a robotized bug.
5. Secure your WP-CONFIG.PHP record.
Move your wp-config.php document one registry up from the WordPress root. WordPress will search for it there in the event that it can't be found in the root index. Additionally, no one else will have the option to peruse the record except if they have SSH or FTP admittance to your worker.
There are various significant plugins you ought to think about introducing:
6. Login LockDown
This is valuable plugin, ensuring you against beast power secret phrase break assaults. It monitors the IP address of each fizzled login endeavor. You can arrange the plugin to cripple login endeavors for a scope of IP tends to when a specific number of bombed endeavors is reached.
7. Secure WordPress
Secure WordPress is a simple to introduce thorough plugin dealing with number of things, including:
- Hides your WP adaptation.
- Removes blunder data on login page.
- Removes center update, plugin update and subject update data for non-administrators.
- Blocks inquiries possibly destructive to your WordPress site
- Adds a virtual index.php plugin catalog.
- Many others...
8. Shot Proof WordPress Security
Crash safe, exhaustive plugin, covering numerous parts of an assault - XSS, RFI, CRLF, CSRF, Base64, Code Injection and SQL Injection hacking endeavors. As per the official portrayal - "The BulletProof Security WordPress Security plugin is intended to be a quick, straightforward and a single tick security plugin to add .htaccess site security insurance for your WordPress site."
All things considered, in the event that you keep WordPress bone stock, you're passing up a ton of additional capacities, which is the reason we're here today to educate you concerning the absolute best plugin out there.
WP File Access Manager. It allows you to share files for your desired people. You can hide them from specific number of people as well. All with some more cool features like:
· Protect every single file
· Bulk amount of protect by your file type
· No restrictions
· Allow or dis-allow users
· Allow or dis-allow by role
· Allow by login status
· Well documented
The customer support is super active. It is created by ThemeNcode. ThemeNcode is an Envato elite author. Full support will always be insured.
The most important fact is that the plugin “WP File Access Manager” which has all these cool features is very very light-weight. It won’t load any extra script on the front end. So no problem about the loading time also.
It will work with every single WordPress plugins and the latest WordPress version.
To learn more check out the plugin at codecanyon.
https://codecanyon.net/item/wp-file-access-manager/26430349
Just click on these link now and get the perfect deal with these awesome plugin. This will help to protect you site every single day.
0 notes
Link
Create a Package of Your Starting Site
Start by installing and activating the plugin on the site you want to clone—your starting site.
Now go to Duplicator in the admin menu to access the duplicator screen.

To clone your site, you need to create a package. Click the Create New button to start the process. This will open the new package screen.
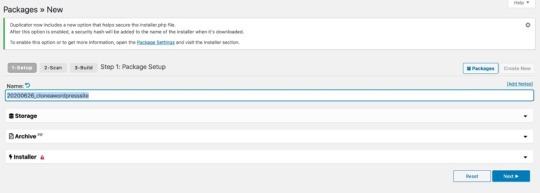
Give your package a name and click the Storage tab to choose where you want to store it. With the free version of the plugin, you can store it on your server where your website is hosted. If you buy the premium version of the plugin, you have cloud storage options like Dropbox and Google Drive.

Open the Archive tab to choose to archive database tables and files. To run a quick clone, you can leave this as the default and move on to the next step.

Click the Next button to continue.
The plugin will then scan your site to check that it can be duplicated. If there are any issues, it will generate a notice and warn you.
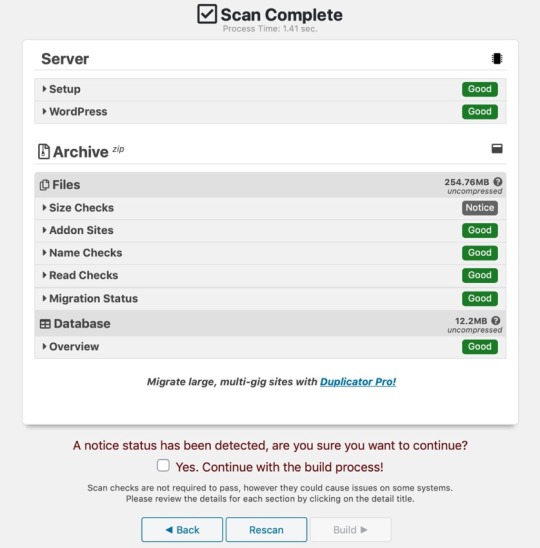
Here the plugin has flagged the fact that there are two very large files in the uploads folder. I can choose to omit those from the package if I want or to leave them in and run the risk of having problems when I import the package to my new site. If you’re using good hosting, you shouldn’t have a problem. We recommend SiteGround for reliable WordPress hosting.
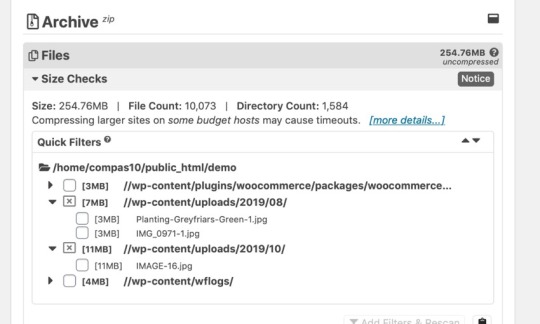
If you do filter some files, click the link to rescan your site before building your package, so the installer file has the right metadata about the size and contents of your package.
If you’ve received notices and you’re happy to continue, check the box. Then (and this applies if you haven’t got any notices too), click the Build button to build your package.
The plugin will start the process of building a package and show you a progress screen.

Once it’s done, it will show you a success screen with a link to download the files. You’ll need the archive and the installer, so download them both.
Import the Package to Your New Site
Now it’s time to import the package from your old server and use it to populate your new site.
You’ll need FTP access to your new server as you’ll have to upload the installer and archive files to it. Upload them to a new empty directory inside your root directory, such as yourdomain.com/duplicate.
Important: don’t install WordPress on the new server. The installer will install it for you with any customisations you had in the starting site.
You’ll find the installer and archive files on your computer, in your downloads folder, or wherever you saved them to. The installer is a PHP file called installer.php, and the archive is a zip file. Don’t unzip that file: upload it as a zip file.
You should now have two files in that directory: the installer and the archive.
Note: Make sure the zip file is fully downloaded before you copy it to your server, and that it’s fully copied before you go to the next part of the process.
In your new site, go to newdomain.com/folder/installer.php in your browser, where folder is the name of the directory you uploaded the files to.

Note: If you get an error message, it’s probably because you went to this screen before the zip file had fully uploaded to your server. Just wait, and refresh when it’s done.
This will take you to the first screen in the import process. If you want to configure the import, you can expand the tabs and explore the options; otherwise just leave things as they are. Check the terms & notices checkbox and click the Next button.
The plugin will extract the archive file and take you to the Install Database screen.
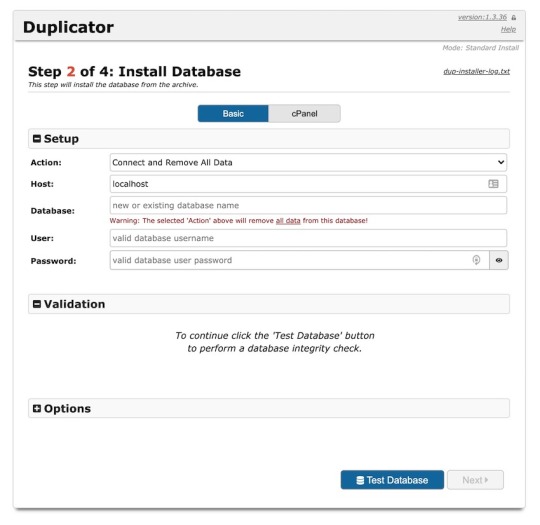
Here you have the option to create a new database or to remove all data from an existing database and overwrite it. As your server doesn’t have WordPress installed yet, you’ll be creating a new database. Type in the name of the new database and the username and password you’ve already set up with your hosting provider.
Tip: If you’re having problems connecting to create a database, try creating a new empty database in phpMyAdmin, and then use that database and its user with Duplicator's option to replace an existing database.
Select the options you want, and click the Test Database button. When the test runs okay, click the Next button.
You’ll see a popup checking whether you want to proceed. Click the OK button.
The Duplicator plugin will then install the database and take you to the Update Data screen.

Change the URL and path to the new site if you want to. Right now, they’ll be in the folder where you put the installer and zip files. You’ll probably want to edit those fields and use the root directory, though. Then click the Next button.
You’ll then be taken to the Duplicator installer's final screen, which tells you to log in to your new WordPress site and delete all installer files. This is important for security reasons.

If you keep the auto delete checkbox checked, the plugin will automatically delete those files the first time you log in to your new site. Your login details will be the same as they were for your old site.
Now log in to your new site, and you’ll find it’s identical to your old site. You’ve successfully cloned your WordPress site.
Cloning a WordPress Site in a Multisite Network
If you run a multisite network and want to clone one or more of the sites in it, this is even easier. Cloning sites in your network is useful when you want to create a similar site, maybe for another part of your business. Or maybe you have a base site that you use as a template for new sites in your network, and you want to clone that.
To clone sites in your WordPress multisite network, use the NS Cloner—Site Copier plugin.

Start by installing the plugin and network activating it.
Then go to NS Cloner in the WordPress admin menu. Select the site you want to clone, and give the cloned version of the site a name.
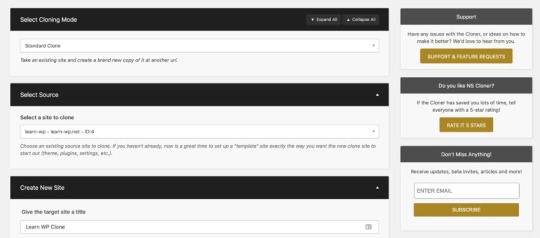
Then scroll down and click the Clone button.
The plugin will run the cloning process and give you a success message telling you it’s done. This could be quick for a small site but could take a while for a large site with lots of files. If you need to, go and make a coffee while you wait.

And that’s it! You now have a duplicate of your site on the new location in the network. You can now log in to the new site and make any adjustments you need to in order to perfect your new site.
Summary
Being able to easily clone your site without having to manually copy files and database tables to your new WordPress installation will save you lots of time if you need to move your site or create a copy of it in a new location.
Whether you’re copying your site to a fresh WordPress installation or cloning a site within a multisite network, the steps above will show you how to create a carbon copy of your site.
0 notes
Photo

How to Clone a WordPress Site
Sometimes you might need to clone your WordPress site. Maybe you want to use it as a template for a new site, or you want to make a copy of your old site on new hosting or a new domain.
Sometimes you don’t actually need to duplicate your site. If you’re moving it to new hosting or a new domain, you might find that following our guide to moving your WordPress site to a new domain gives you all the advice you need.
WordPress
How to Copy a WordPress Site From One Domain to Another
Rachel McCollin
WordPress
How to Migrate a WordPress Site
Rachel McCollin
But if you do need to make a copy of your WordsPress site, there are a few ways to do it.
In this tutorial, I’ll show you two ways to clone your WordPress site. The first is for a standalone site, and the second is for a site in a WordPress multisite network.
So let’s start with a standalone site, with one website and one WordPress installation.
Cloning Your WordPress Site with a Plugin
The easiest way to clone your WordPress site is to use the Duplicator plugin, which is free. This lets you create a package containing all the data relating to your site, and then import that to another location and clone the site there.
Create a Package of Your Starting Site
Start by installing and activating the plugin on the site you want to clone—your starting site.
Now go to Duplicator in the admin menu to access the duplicator screen.
To clone your site, you need to create a package. Click the Create New button to start the process.
This will open the new package screen.
Give your package a name and click the Storage tab to choose where you want to store it. With the free version of the plugin, you can store it on your server where your website is hosted. If you buy the premium version of the plugin, you have cloud storage options like Dropbox and Google Drive.
Open the Archive tab to choose to archive database tables and files. To run a quick clone, you can leave this as the default and move on to the next step.
Click the Next button to continue.
The plugin will then scan your site to check it can be duplicated. If there are any issues, it will generate a notice and warn you.
Here the plugin has flagged the fact that there are two very large files in the uploads folder. I can choose to omit those from the package if I want or to leave them in and run the risk of having problems when I import the package to my new site. If you’re using good hosting, you shouldn’t have a problem. We recommend SiteGround for reliable WordPress hosting.
If you do filter some files, click the link to rescan your site before building your package, so the installer file has the right metadata about the size and contents of your package.
If you’ve received notices and you’re happy to continue, check the box. Then (and this applies if your haven’t got any notices too), click the Build button to build your package.
The plugin will start the process of building a package and show you a progress screen.
Once it’s done, it will show you a success screen with a link to download the files. You’ll need the archive and the installer, so download them both.
Import the Package to Your New Site
Now it’s time to import the package from your old server and use it to populate your new site.
You’ll need FTP access to your new server as you’ll have to upload the installer and archive files to it. Upload them to a new empty directory inside your root directory, such as yourdomain.com/duplicate.
Important—don’t install WordPress on the new server—the installer will install it for you with any customisations you had in the starting site.
You’ll find them on your computer, in your downloads folder or wherever you saved them to. The installer is a PHP file called installer.php and the archive is a zip file. Don’t unzip that file: upload it as a zip file.
You should now have two files in that directory—the installer and the archive.
Note: Make sure the zip file is fully downloaded before you copy it to your server, and that it’s fully copied before you go to the next part of the process.
In your new site, go to newdomain.com/folder/installer.php in your browser, where folder is the name of the directory you uploaded the files to.
Note: If you get an error message, it’s probably because you went to this screen before the zip file had fully uploaded to your server. Just wait and refresh when it’s done.
This will take you to the first screen in the import process. If you want to configure the import, you can expand the tabs and explore the options, otherwise just leave things as they are. Check the terms & notices checkbox and click the Next button.
The plugin will extract the archive file and take you to the Install Database screen.
Here you have the option to create a new database or to remove all data from an existing database and overwrite it. As your server doesn’t have WordPress installed yet, you’ll be creating a new database. Type in the name of the new database and the username and password you’ve already set up with your hosting provider.
Tip: If you’re having problems connecting to create a database, try creating a new empty database in phpMyAdmin then use that database and its user with Duplicator's option to replace an existing database.
Select the options you want then click the Test Database button. When the test runs okay, click the Next button.
You’ll see a popup checking you want to proceed. Click the OK button.
The Duplicator plugin will then install the database and take you to the Update Data screen.
Change the URL and path to the new site if you want to. Right now they’ll be in the folder where you put the installer and zip files. You’ll probably want to edit those fields and use the root directory though. Then click the Next button.
You’ll then be taken to the Duplicator installer's final screen, which tells you to login to your new WordPress site and delete all installer files. This is important for security reasons.
If you keep the auto delete checkbox checked, the plugin will automatically delete those files the first time you log in to your new site. Your login details will be the same as they were for your old site.
Now log into your new site and you’ll find it’s identical to your old site. You’ve successfully cloned your WordPress site.
Cloning a WordPress Site in a Multisite Network
If you run a multisite network and want to clone one or more of the sites in it, this is even easier. Cloning sites in your network is useful when you want to create another similar site, maybe for another part of your business. Or maybe you have a base site that you use as a template for new sites in your network and you want to clone that.
To clone sites in your WordPress multisite network, use the NS Cloner—Site Copier plugin.
Start by installing the plugin and network activating it.
Then go to NS Cloner in the WordPress admin menu. Select the site you want to clone and give the cloned version of the site a name.
Then scroll down and click the Clone button.
The plugin will run the cloning process and give you a success message telling you it’s done. This could be quick for a small site but could take a while for a large site with lots of files. If you need to, go and make a coffee while you wait.
And that’s it! You now have a duplicate of your site on the new location in the network. You can now log in to the new site and make any adjustments you need to to perfect your new site.
Summary
Being able to easily clone your site without having to manually copy files and database tables to your new WordPress installation will save you lots of time if you need to move your site or create a copy of it in a new location.
Whether you’re copying your site to a fresh WordPress installation or cloning a site within a multisite network, the steps above will show you how to create a carbon copy of your site.
The Best WordPress Themes and Plugins on Envato Market
Explore thousands of the best WordPress themes ever created on ThemeForest and leading WordPress plugins on CodeCanyon. Purchase these high-quality WordPress themes and plugins and improve your website experience for you and your visitors.
Here are a few of the best-selling and up-and-coming WordPress themes and plugins available for 2020.
Inspiration
23+ Best WordPress Portfolio Themes for Creatives
Brenda Barron
WordPress
20+ Best WordPress Slider & Carousel Plugins of 2020
Daniel Strongin
WordPress
20 Best WordPress Calendar Plugins and Widgets (+5 Free Plugins)
Daniel Strongin
WordPress Themes
28+ Best Responsive WordPress Themes (For Sites in 2020)
Brenda Barron
WordPress
17 Best WPBakery Page Builder (Visual Composer) Addons & Plugins of 2020
Daniel Strongin
WordPress Themes
25+ Best Coaching & Consulting WordPress Themes (2020)
Brenda Barron
by Rachel McCollin via Envato Tuts+ Code https://ift.tt/3g9lTrD
0 notes
Text
Speed Up WordPress: 11 Performance and Optimization Tips
Almost 30% of the whole web keeps running on WordPress.
WordPress execution issues are notable.
The truth of the matter is, you have seconds, if not parts of a second, to persuade clients to remain on a website page.

At the point when a website page's stacking time increments from only 1 to 3 seconds, the likelihood of the client leaving a webpage ascends by 32%. In the event that you stretch the heap time to 5 seconds, skips increment significantly to 90%.
Notwithstanding the impact on client experience and guest maintenance, site speed effects site arrangement in web indexes.
Google has clarified that it gives particular treatment to locales that heaps quicker. Every other factor being equivalent if your site is quicker than your competitor's, Google will support you in the rankings.
The essential offenders include:
Executing various contents
Downloading designs and other inserted components
Rehashed HTTP solicitations to the server
Pulling data from the WordPress database
Here are 25 hints that answer the inquiry, how to accelerate WordPress and quit losing potential clients.
1. Pick a High-Quality Wordpress Hosting Provider
In the event that your site is on shared web facilitating with possibly many different destinations vieing for similar assets, you may notice baffling website speed.
For littler locales, shared web facilitating can be totally worthy, if it is facilitated by a trustworthy supplier that incorporates adequate memory.
When you start hitting generally 30k month to month guests or more, think about moving to a committed server or at any rate, a virtual private server (VPS). Both of these anticipate an "awful neighbor" from hoarding the majority of the common assets. Specialists additionally suggest searching for a server that is physically found near your intended interest group. The less separation your information needs to travel, the snappier it will arrive.
Many facilitating organizations are offering shared WordPress facilitating bundles. These frequently furnish lower stockpiling alternatives yet with quicker and increasingly committed equipment bundles. Far and away superior, an oversaw server facilitating arrangement is frequently less expensive and more comprehensive than other accessible alternatives.
2. Apply WordPress Updates Promptly
To any security proficient, applying refreshes rapidly appears to be an easy decision. Nonetheless, by and by, about 40 percent of WordPress locales are running the most recent adaptation. Programming refreshes frequently incorporate speed changes notwithstanding security upgrades, so make certain to refresh ASAP.
Updates apply to WordPress Security modules too. Some may state they are much progressively basic to keep up as they are frequently the main impetus for speed bottlenecks and security vulnerabilities. It is prescribed to check every day for accessible updates.
Get some much needed rest and depend on Backup and Recovery
3. Evade Bloated Themes
Pick a WordPress subject in view of speed. It doesn't mean you need to decide on a no frills site, however don't go for a "pretty much everything" subject either. Numerous business WordPress topics come stuffed with highlights that don't get utilized. Those highlights, put away on the server in an inactive state can make a delay execution.
The default Twenty Fifteen, for instance, offers a lot of usefulness, including portable first, while staying streamlined and trim. Search for a WordPress subject that gives what you need and just what you need.
4. Utilize a Caching Plugin
Reserving your webpage can significantly accelerate your site and is among the most basic fixes on this rundown.
With a reserving module, duplicates of recently produced pages are put away in memory where they can be immediately recovered whenever they are required. Reserving a website page is a lot quicker than questioning the WordPress database on various occasions and stacking from the source. It is additionally more asset agreeable.
Reserving modules are savvy enough to invigorate the stored duplicate if the substance of the page is refreshed. Prescribed storing modules to accelerate WordPress incorporate WP Super Cache (free), W3 Total Cache (free), and WP Rocket (paid, yet the quickest in tests).
a cell phone showing the wordpress logo
5. Advance Images
Guarantee that pictures are in a proper configuration (PNG or GIF for illustrations, JPEG for photographs) and no bigger than they should be. This is probably the simplest approaches to accelerate WordPress.
Pack them to make pictures littler so they will download faster for the end-client. You can do this physically before you transfer pictures or mechanize the procedure with a module, for example, WP Smush. With WP-Smush, any pictures you transfer to your WordPress site will naturally be compacted.
Know about higher goals screens when improving your pictures. Use @2x (and varieties) code in the event that you expect to coordinate the most elevated goals pictures for explicit gadgets.
6. Think about a CDN
A substance conveyance system, or CDN, is a geologically disseminated gathering of servers that work together to convey content rapidly. Duplicates of your static site substance are reserved in the CDN. Static substance incorporates things like pictures, templates, and JavaScript documents.
At the point when a client's program requires a specific bit of substance, it is stacked from the nearest hub of the CDN. For instance: if the client is in the UK, and your site is facilitated in the U.S. the information doesn't have to travel the Atlantic to arrive at the client. Rather, it is served up by a close by CDN hub.
For high-traffic destinations, a CDN offers extra benefits. Without a CDN, the majority of your pages are served from a solitary area, setting the full load on a solitary server. With a CDN, server burden is circulated over numerous destinations other than your own. A CDN can likewise help shield from security dangers, for example, appropriated forswearing of administration (DDoS) assaults.
A CDN isn't a WordPress facilitating administration. It is a different administration that can be utilized to use execution. Cloudflare is a well known decision for little sites since it offers a free form. StackPath (once in the past MaxCDN) isn't free (it begins at $9/month) yet includes an apprentice benevolent control board and interfaces with most well known WordPress storing modules.
7. Design Lazy Loading
Why spend important data transfer capacity (and time) stacking pictures that your guest can't see?
Sluggish stacking powers just pictures that are "over the overlay" (before a client needs to look) to stack quickly and postpones the rest until the client looks down.
Languid stacking is particularly important if a page contains various pictures or recordings that can hinder your site. Similarly as with numerous WordPress speed supporters, there are modules for this.
The most mainstream incorporate BJ Lazy Load and Lazy Load by WP Rocket.
speedometer speaking to wordpress speed enhancement
8. Best WordPress Speed Plugins
Your WordPress database stores the majority of your site content. That incorporates blog entries, corrections, pages, remarks, and custom posts, for example, structure content.
It is likewise where topics and modules track their information and settings. As your site develops, so does the database, thus does the measure of overhead required by each table in the database. As the size and overhead increment, the database turns out to be less proficient. Advancing it every now and then can ease this issue. Consider it like defragmenting a hard drive.
You can improve your database through your facilitating control board's SQL WordPress database apparatus. For some, this is phpMyAdmin.
In the case of utilizing phpMyAdmin, click the container to choose all tables in the database. At that point at the base of the screen pick "improve table" starting from the drop menu.
Tzn again, you can introduce a module, for example, WP-Optimize or WP-DB Manager. The modules have the favorable position that they will expel extra, unneeded things notwithstanding improving the rest of the information.
Why sit around and space putting away things like destroyed or unapproved remarks and stale information?
9. Give Your Plugins a Checkup
Each module you add to your site includes additional code. Many include more than that since they can stack assets from different spaces. A lousy module may stack 12 outer documents while a streamlined one makes due with a couple.
When choosing modules, just pick those offered by built up designers and that are suggested by confided in sources. In the event that you are scanning for modules inside the WordPress storehouse, a fast check is to perceive what number of other individuals are additionally utilizing the equivalent module.
On the off chance that you discover a module is easing back your site, at that point look for another that does likewise work all the more productively.
Instruments like Pingdom (look in document solicitations segment) and GTmetrix (take a gander at the Waterfall tab) can enable you to locate the most exceedingly terrible guilty parties.
10. Expel Unnecessary Plugins
Each module devours assets and diminishes site speed. Try not to leave old, unused modules in your database. Just, erase them to improve WordPress execution.
tidying up code can improve wordpress execution
11. Set an Expires Header for Static Resources
A terminates header is an approach to advise programs not to try to re-get content that is probably not going to be changed since the last time it was stacked. Rather than getting a new duplicate of the asset from your web server, the client's program will use the neighborhood duplicate put away on their PC, which is a lot faster to recover.

You can do this by including a couple of lines of code to your root .htaccess document as depicted in this helpful article by GTmetrix. For more in-depth information about WP Speed Optimization. I highly recommend this website Read More
0 notes
Text
The Most Effective Method to Introduce WordPress with Bluehost
Here are the steps to how to install WordPress on Bluehost using Marketplace. Installing WordPress with Marketplace

1. Login to your Bluehost cPanel account. 2. Find the Website section and select Install WordPress. 3. Click the Install button. 4. Choose the domain name to install it to. In the field next to the domain, you can enter a subfolder such as ‘blog’ or leave it blank if you want the site’s main page to be the blog. 5. If necessary, you can edit the email address, username and password for the new WordPress installation. Click “advanced options” and you can change those settings. 6. Read through the license and service agreements and check the boxes. 7. Select the Install Now button. If you have already installed a fresh WordPress and looking for a solution to transfer your local/dev setup to BlueHost.
Migrating WordPress to BlueHost
1. To start, log into your current host and use a provided program (such as phpMyAdmin) to export your site’s database. 2. Use your preferred FTP program (such as Filezilla or Cyberduck) to download and save your wp-content folder (a.k.a. the files that make up your WordPress site.) Of course, You won’t need to download files if your existing site is on local 3. Login to your Bluehost control panel. 4. Install WordPress using the Marketplace, one-click install tool. 5. Create an FTP account in your Bluehost control panel so you can upload your files to your new WordPress site folder. When creating your FTP account, keep in mind that you might want to change its designated directory to something easily identifiable. 6. Launch your preferred FTP program and open a new connection. Log in with your new FTP account info. 7. Overwrite the existing wp-content folder with the one you downloaded from your previous host. 8. Open phpMyAdmin in the Database section of your Bluehost cPanel. 9. Select the database to which you want to import your data. You may need to look up this information. (To do so, go to the File Manager in your control panel and open your public_html folder. Then scroll down to find the wp-config file, right-click the icon, select “Code Edit”, and then “Edit.” In the code edit window, scroll down to identify the database you should use. 10. Back in your phpMyAdmin window, once you’ve selected the correct database, you will see a list of tables. Drop these tables before you import your new data by selecting the “Check All” option at the bottom of the list and then selecting “Drop.” 11. Now it’s time to import! Go to the “Import” tab in phpMyAdmin. Choose “Browse your computer” and find the SQL database file that you exported from your previous site. (It should be named something similar to “bluepm1_wor2.sql”.) Make sure the SQL format is selected and click “Go.” 12. Here is an important step after you import your database. After your database is imported, check to learn the new table names. If your table names begin with ‘wp_’ then you don’t need to make any changes. However, sometimes your tables will import with a name like ‘wrp-‘ Go to your file manager and open the wp-config file in your public_html folder. 13. Right click on wp-config, select “Code Edit”, and then select “Edit.” 14. Scroll down until you find the line “Stable Prefix” line. Edit it to read ‘wp_’. 15. Now that you have your database and site files, it’s time to put everything on your temporary URL. This is how you move your site without any downtime.* First, in your phpMyAdmin site, select wp-options from the menu on the left of the screen. Then, select “Edit” on the “site url” line. (This will typically be line .) Paste in the temporary URL provided to you when you created your Bluehost account and click “Go.” (Tip: if you’re not sure what it is, it can be found in your Bluehost welcome e-mail.) *Note: all of these previous steps can help anyone move their WordPress site. The following steps are for those are want to move their WordPress site without any downtime. 16. Repeat Step 11 for your “Home” line in wp-options. (This is typically line 36.) 17. Now it’s time to see if your work has paid off. Enter the temporary URL into your internet browser and check to see if your site is there. If so, you’re nearly done! 18. Log into your WordPress admin site to save your Permalinks. Go to “Permalinks” under the “Settings” tab of the dashboard and click “Save Changes.” 19. Before you can move from the temporary URL to your permanent one, you must change the nameservers associated with your domain to point to Bluehost. This can be done in the domain manager of your domain registrar, whether it be with Bluehost or another registrar. Use the following: NS1.BLUEHOST.COM and NS2.BLUEHOST.COM. (This indicates that your site is hosted at Bluehost.com. The DNS change can take anywhere from a few hours to several days to propagate. Once it is finished you will be able to use your domain on your new site.) 20. Once the DNS change in complete, log into your WordPress admin site and go to “General” under the “Settings” tab. Then, enter your domain into the “WordPress Address” and “Site Address” fields, and click “Save Changes.” 21. The last step is to enter your domain URL into your internet browser to check to see if your site is live. If so, then congratulations! You have successfully moved your WordPress site to Bluehost. These steps will remain more or less the same for most hosting providers. As you may have already expected, migrating WordPress first time can feel to be a little overwhelming, but once you do it, you would realise it is not much difficult either.
0 notes
Text
17 top plugins and extensions for SEO
There are so many great plugins available, and it’s difficult to choose which are the best for you.
To help you decide which tools will make your work easier and more productive, I’ve asked SEO experts to share what they use.
Per the experts, I compiled this list of 17 of the best plugins and extensions for SEO — and they’re all free.
Here are the top plugins and extensions recommended by experienced SEOs
1. SEO TextOptimizer
Free extension
This plugin is perfect for those who deal with content. SEO TextOptimizer lets you measure the quality of texts you create for your website based on how search engines would evaluate it.
The tool shows you topics you should develop as well as those you’d better eliminate for search robots to understand the text is relevant to the specific queries. The plugin also suggests you a list of words you could add to improve your content. The best thing is that you don’t need great SEO expertise to use it.

2. SEOquake
Free extension
With SEOquake plugin, you can easily analyze your key SEO metrics. Moreover, the tool provides SEO audit, backlinks analysis, and other useful functions.

One of the factors why SEO professionals choose this tool is that you can get a comprehensive analysis of a SERP and even export its results. There’s a bar appearing below each search result which provides you with key metrics such as traffic, Alexa rank, social media shares, etc.

3. BuiltWith
Free extension
This extension lets you find what a website you are visiting at the moment is built with. It’s created to help developers, designers, and researchers to discover the technologies other pages are implementing and choose those they want to use for their sites.
The plugin tracks:
Widgets
Frameworks
Advertising
Publishing
Hosting
Analytics
Content Delivery Network
Document Standards
Experts also say it’s great you can easily get global trends on using specific technologies.

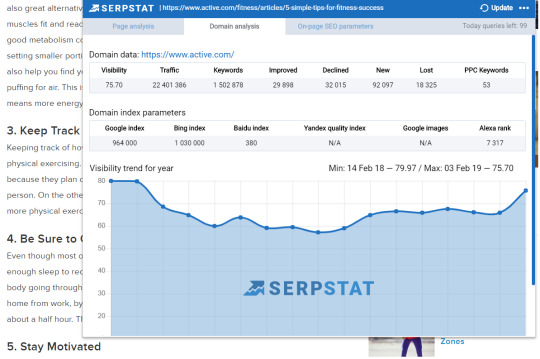
4. Serpstat Plugin
Free extension
It’s an extension which helps you conduct SEO analysis of a page. Serpstat Plugin provides the most critical information on keywords, traffic, and page visibility. You can also get the report on the top 10 keywords for which your page ranks at the top of search results.
Serpstat SEO & Website Analysis Plugin has now three tabs: Page Analysis, On-page SEO parameters, and Domain Analysis. Here are the most crucial parameters you’ll get with the plugin:
Domain’s traffic.
Domain’s visibility trend for a year.
The number of results on Google, Bing, and Baidu.
The number of images on Google Image Search.
Alexa Rank.
Page speed.
Site start date.
Meta tags.
The number of shares on social media networks (Facebook and Pinterest).
The plugin is free, but to use it, you need to create your Serpstat account, if you don’t have one yet.
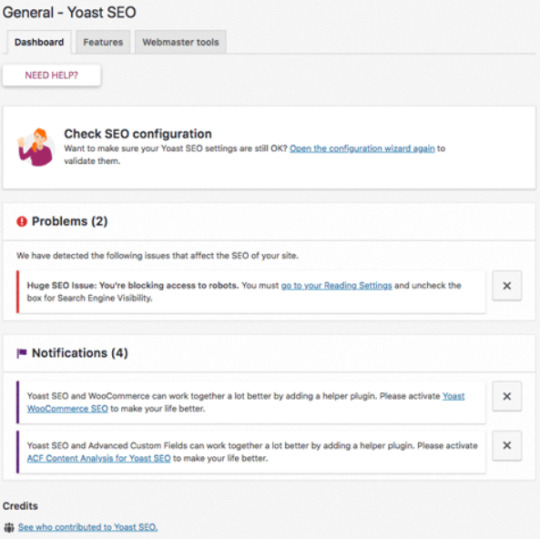
5. WordPress SEO by Yoast
WordPress plugin
This incredibly popular plugin by Yoast helps experts with on-site SEO needs. The tool will let you:
Add meta keywords, title, and description to your posts.
Provide clear site navigation for crawlers and users.
Analyze your on-page SEO. You can check your content, descriptions, and keywords.
See what your snippets will look like.
Create SEO-friendly Facebook Open Graph.
This WordPress plugin has a very quick and easy-to-use interface.
6. WAVE Evaluation Tool
Free extension
This tool evaluates web content accessibility within Chrome and Firefox browsers. WAVE provides 100% secure and private accessibility reporting. The plugin checks password-protected, intranet, sensitive or dynamically generated web pages.
7. Spark Content Optimizer
Free extension
Spark Content Optimizer is a tool designed to help you develop your site’s search experience. The plugin provides you with easy access to such a crucial data as:
Monthly traffic.
The performance of your site for all the keywords.
The technical audit which analyzes more than 40 hard-to-find issues.
Information on backlink authority.

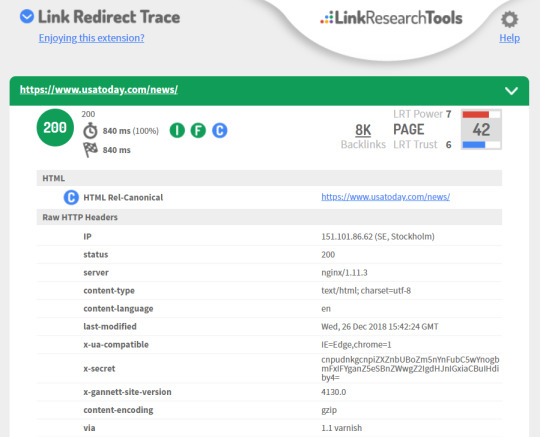
8. Link Redirect Trace
Free extension
It’s a great tool for tracking redirect path. The tool analyzes HTTP Headers, rel-canonicals, robots.txt, link power, etc. You can use Link Redirect Trace extension to analyze your competitors, your on-page and off-page SEO, and other critical factors.
Here are the main tasks this plugin can help you cope with:
Identify and fix problems in your on-page/off-page SEO.
Analyze your competitors’ links.
See the redirect chain and fix problems to make your load time faster.
After your site was redesigned or migrated, you can check your links.
Check links from affiliate and advertising networks.
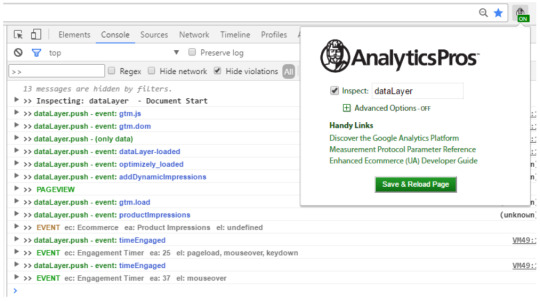
9. Ap – Data Layer Inspector+
Free extension
This plugin is a perfect toolkit for digital analysts. This add-on lets you monitor, debug, get detailed data not having to switch between the page, the code, and the developer console.
With this tool, you can inspect the dataLayer in real time, insert code into the page, analyze GA hits, ignore hits to individual properties, etc.
10. User-Agent Switcher
Free extension
The tool will help you switch quickly between user-agent strings. If you want to test how your page responds to different browsers, this plugin will let you do it. Due to User-Agent Switcher, you can browse with predefined user-agents or add your own ones.

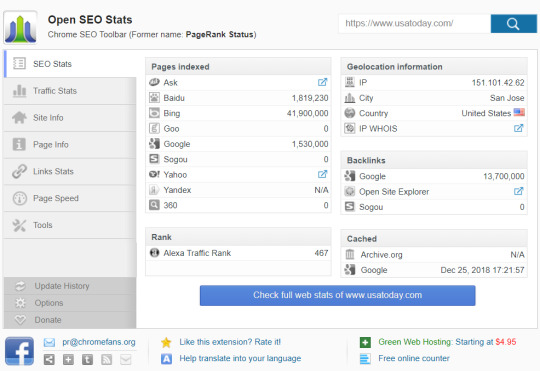
11. Open SEO Stats
Free extension
This extension provides quick access to the most important SEO stats. The tool will show you:
Traffic stats. Graphs from Alexa Rank, Quantcast Rank, Compete Rank.
Information on your backlinks.
Cached pages.
Indexed pages. You’ll see the number of pages indexed in Google, Bing, Yahoo, Baidu, Yandex, etc.
Geolocation information, such as country, city, and IP address.
The shares on social websites.
Meta information, such as title, meta keywords, description, canonical tags, internal links, external links, and more.
12. Velvet Blues
Free WordPress plugin
This plugin will be handy for those who move their WordPress website to another domain and need to update internal links and references to pages. The plugin helps you fix the problem and change old links on your website. Experts say it’s great that you can find and replace any URL in your WordPress database without having to use phpMyAdmin directly.
With Velvet Blues Plugin, you can:
Update links which are embedded in excerpts, content, or custom fields.
Choose whether you want to update links for attachments or not.
View the number of items updated.
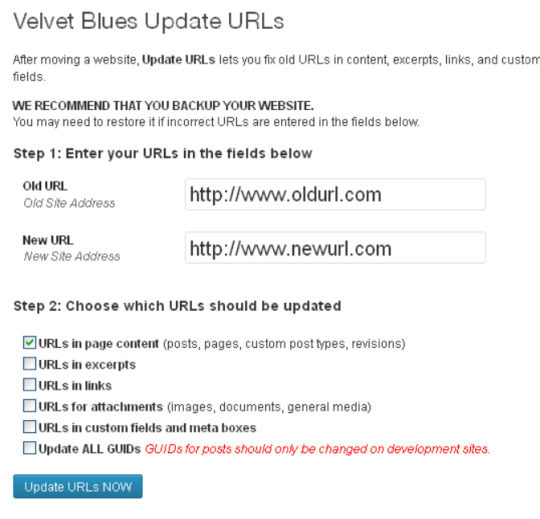
Install it only when you need to fix something and then uninstall it. The plugin treats everything it finds.
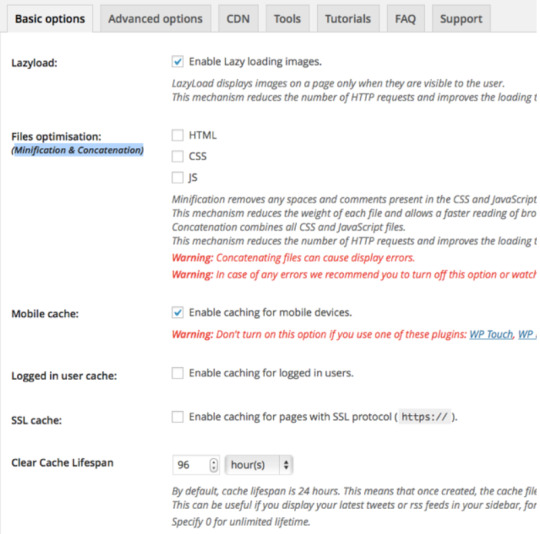
13. WP Rocket
Free WordPress plugin
Experts consider this plugin to be one of the best caching tools. Using WP Rocket to cache pages, your page load time decreases, and indexing improves. Moreover, the tool lets users reduce the weight of HTML, CSS, and JavaScript files.
With WP Rocket, you can optimize your images, so that they’ll get loaded only when visitors scroll down the page. Such an action contributes to improving page speed.
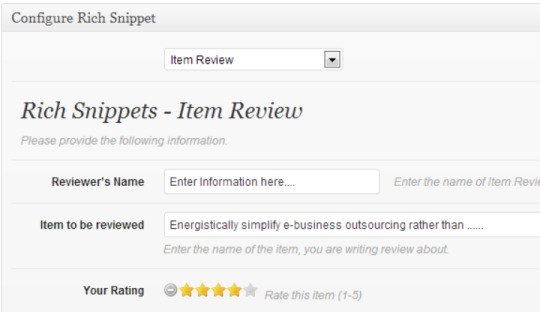
14. All In One Schema.org Rich Snippets
Free WordPress plugin
This tool will be useful for those who want to get rich snippets for their web pages. The plugin is created to help you make your page stand out in Google, Bing, and Yahoo search results.
All In One Schema.org Rich Snippets supports most content types released by Schema.org. Here are eight different content types for which you can add schema:
Review
Event
People
Product
Recipe
Software Application
Video
Articles
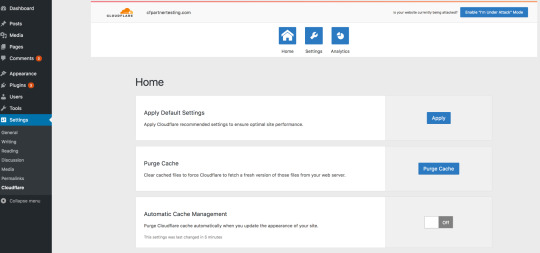
15. Cloudflare’s plugin for WordPress
Free WordPress plugin
This free plugin helps to accelerate page loading time, improve your SEO, and protect against DDoS attacks.
Cloudflare plugin adds value for SMEs/Medium sized businesses, making it very easy to setup CDNs, DDoS Protection, and allow them to utilize edge SEO technologies like service workers.
16. WhatRuns
Free extension
This extension lets you find out what runs any website. You, ll get all the technologies used on websites you visit:
CMS
WordPress plugins
Themes
Analytics tools
Frameworks
Moreover, you can even get notified when websites start using new tools and services if you follow them.

17. Grammarly
Free extension
There are both free and paid access available for this plugin. The tool underlines your grammar, spelling, or punctuation errors for you to correct them. It also suggests you synonyms for overused words and gives you tips on how you can improve your texts. To get the most out of this plugin, you’d better use a paid version, as it’ll get you access to the most critical issues.
Choose the best for you
Remember that the more extensions you download, the slower your browser becomes. That’s why it’s essential to know which ones exactly are perfect for you.
Free WordPress plugins and Chrome extensions will help you make your work easier, but you may spend quite a significant time looking for those which are really useful for you. So, this list should have helped you circle out the tools you’ll try to implement into your working process.
Want more SEO tools?
Check out these articles as well:
7 social media monitoring tools to check out in 2019
8 free technical SEO tools you probably haven’t heard of
Four tools to discover and optimize for related keywords
What people search for: Tools for trends
The top 10 tools for getting an insight into your website analytics
Tools to assist your SEO check-up
…. And many more!
The post 17 top plugins and extensions for SEO appeared first on Search Engine Watch.
from Digtal Marketing News https://searchenginewatch.com/2019/02/08/17-top-plugins-extensions-seo/
0 notes
Text
What Are Some Best Ways To Optimize Your WordPress Site's Database? Find Out Here!
With about 40.6% of WordPress websites running live on the internet, it has become a popularly used content management system used today. Even though it is known to deliver high-performance and fast websites, WordPress development can be highly affected if the database used isn’t maintained properly.
Like every other platform, WordPress too makes use of a database to store various data and information related to your website. It can contain a wide array of information, such as -
Web page content and blogs.
Forms.
User comments and links.
WordPress themes and plugins settings.
Custom posts, etc.
If your database is overburdened with data, the loading time will automatically increase. Thus, you must include database maintenance and optimization as part of the WordPress development services you avail. Furthermore, these tips will help you optimize your database.
How To Optimize WordPress Website’s Database?
1. Regularly backup your database
Optimizing your database is essential but that doesn’t mean you can afford to mess up with the database without having created a backup. If things go downhill during database optimization, you should be able to undo the changes and get your website content back.
To backup your database, you have multiple options as mentioned below -
Do manual backup from your hosting account’s Cpanel.
Access the WordPress admin panel and export all content.
Use a WordPress development backup plugin to create a backup.
In case you are not confident with performing the backup operation yourself, you need to contact a WordPress website development company to do the job efficiently.
2. Remove unwanted content and post revisions
It is best practice to get rid of the unwanted data that is overburdening your database. Make sure you delete the blogs, pages, comments, redundant categories, etc. carefully.
Moreover, one of the advantages of WordPress CMS is that it has an in-built revision system. So, in case you create numerous drafts for a post, all the versions are saved in the database. If someone wants to load an earlier version, they can get it easily. However, it can unnecessarily add to your database burden. You can try removing the data that you no longer need using plugins like WP-Optimize.
3. Remove unwanted plugins and themes
The WordPress themes and plugins-related data are usually stored in WP-content. However, some content might be stored in the database if the WordPress themes and plugins are complex. A WordPress website development company can help you take care of these things in a better way.
4. Optimize database table and use optimization tool
Optimizing your database tables is necessary so that the WordPress development process can be carried out nicely. You can do it by accessing your hosting account and running optimization queries on the table from PHPMyAdmin.
Or, you can use the in-built database optimization tool available at its core. For that, one has to be technically proficient. If you are unable to do it yourself, contacting a WordPress website development company can be most beneficial.
These are a few ways using which you will be able to optimize your WordPress database the right way. Make sure you create a backup first and then perform these steps. Furthermore, take help from a professional WordPress development company like Auxesis Infotech and maintain your database effectively.
0 notes
Text
What is cPanel? The Complete Guide to cPanel for Beginners
cPanel is one of the most common Web hosting account control panels in Linux. It lets you handle all resources easily in one location. Today cPanel is the industry standard and is well known to most web developers.
Intuitive and simple to use, cPanel empowers you to handle a full performance Web hosting account. Whether it is creating new FTP users and email addresses or tracking tools, subdomains are developed and software enabled.
What is cPanel hosting?
cPanel hosting is essentially Linux Web hosting that includes cPanel installation. CPanel has its advantages and disadvantages but in most situations it works pretty well and makes a sensible choice when you’re looking for a control panel solution. Here’s what you should do:
Pros:
Easy to learn
Easy to use
Saves time and money
Tried and tested
Includes software auto installers
Plenty of tutorials/support available online
Cons:
Number of features can be overwhelming
Relatively easy to accidentally change important settings
Some hosts run outdated software
Can cost more and is rarely offered with free hosting
Alternatives to cPanel
There are thousands of alternatives to cPanel out there and because each hosting company is different, you’ll need to consult with each potential host to get an idea of what control panel solutions they’re using. Here at Hostinger, we’ve built our own custom control panel, which is compatible with all web hosting plans. This shares some parallels with cPanel and helps us to be more versatile when tailoring to our users ‘ needs.
Yet cPanel hosting is something you can also find at our sister company Hosting24. Annual and longer plans include a free domain name, so you can get all the ingredients to make a single purchase on the internet!
Essentially, whether you are using cPanel or an alternative doesn’t really matter, as long as you are able to achieve what you want. If you need to do something different on your control panel then double check with the provider.
cPanel Tutorial: How to Use cPanel
Different cPanel configurations have different features but the good news is that browsing around and getting to know each of the different sections is pretty easy. Normally, when you first log in, you will see some metrics that log your resource usage (such as your CPU usage, your storage space available and your memory usage). It can provide a convenient way to keep an eye on the overall performance of your web site.
Once you’ve become comfortable with the success of your website, it’s time to take a look at the various modules. We gave a description of the most common cPanel modules below.
File Modules:
cPanel File Modules
Preferences:
cPanel Preferences
Databases:
cPanel Databases
If your website uses a content management system (CMS) then it will use a database to store posts, settings and other information. This section, then, is all about managing those databases. Common modules include:
MySQL Database Wizard
MySQL Databases
phpMyAdmin
Remote MySQL
Web Applications:
cPanel Web Applications
This is typically where your cPanel installation will allow you to install different types of software. It includes everything from blogs and portals to CMSs and forums. Common modules include:
Drupal
Joomla
phpBB
WordPress
Domains:
cPanel Domain
It’s not uncommon for webmasters to use one hosting account for multiple sites or to set up subdomains and redirects. This is the section in which you can manage that. Common modules include:
Addon Domains
Aliases
DNS Manager
Preview Website
Redirects
Subdomains
Metrics:
cPanel Metrics
If you run a website then you will want to keep an eye on its results. That is where the modules for the metrics come in. Therefore, it’s all about giving you access to powerful information that can help you make better decisions about how your website functions. Modules include:
Awstats
Bandwidth
CPU and Concurrent Connection Usage
Errors
Raw Access
Visitors
Webalizer
Webalizer FTP
Security:
cPanel Security
For most webmasters, security is a big concern, particularly if they are storing sensitive information such as usernames, passwords or financial information. It module will allow you to keep an eye on your hosting account’s main security settings Modules common to use include:
Hotlink Protection
IP Blocker
Leech Protection
SSH Access
SSL/TLS
Software:
cPanel Software
These modules are largely about PHP and Perl and aren’t necessarily needed unless you’re a more advanced user. Common modules include:
Softaculpis Apps Installer
Optimize Website
Perl Modules
PHP PEAR Packages
CloudFlare
PHP Version Selector
Advanced:
cPanel Advanded
As the title suggests, these settings are also more useful for advanced users. Common modules include:
Apache Handlers
Cron Jobs
Error Pages
Indexes
MIME Types
Track DNS
Email:
cPanel Email
Not all web hosting packages include email, but if your package includes both email and cPanel then this is where you’ll administer all of those email accounts. Common modules include:
Address Importer
Apache SpamAssassin
Autoresponders
Default Address
Email Wizard
Encryption
Forwarders
Global Filters
MX Entry
Track Delivery
User Filters
Conclusion
In short, cPanel is one of Linux ‘ most common web hosting control panels, showing key performance metrics for your server and allowing you to access a number of modules including Files, Preferences, Databases, Web Applications, Domains, Metrics, Protection, Software, Advanced and Email modules.
Above all, cPanel hosting is basically Linux hosting which includes the installation of cPanel, making it a popular choice among webmasters. But there are plenty of alternatives out there, so if cPanel isn’t for you then you’re sure to find an acceptable control panel.
https://www.casbay.com/blog/tips-sharing/what-is-cpanel-the-complete-guide-to-cpanel-for-beginners/
0 notes
Photo

Transfer WordPress Site to New Hosting: 10 Tips
Migrating your WordPress site to a new hosting provider might be easier than you think. Follow these 10 tips to help make it run smoothly.
If you’re planning to transfer your WordPress site to a new hosting provider, it’s important to get it right.
Moving your site may feel daunting. And it is a big step: it involves moving all your files and your database, and getting your domain name to point to your new hosting provider.
But it doesn’t have to be difficult. A quality hosting provider like Siteground will help you transfer your site with minimal hassle, and get you quickly up and running with your new, faster site.
So if you’re thinking of switching, here are our tips to help make the process smoother and avoid any headaches.
1. Find the Right Hosting Provider
Switching hosting providers is something you don’t want to do too often. Once you’ve found a provider, you’ll normally find it cheaper if you sign up to an annual plan instead of a monthly one. And you don’t want to risk your site being unavailable if you move your hosting again and again. You also don’t want to spend any more time than you need to making the switch.
So take time to identify the right hosting provider for you. Look at your site stats: how much sever space you need, how many sites you’re running or plan to run, and how many visitors you get each day.
It’s also important to choose a provider who knows WordPress inside out. The WordPress.org website recommends hosting providers that they trust: that are reliable and understand how WordPress works. Don’t be tempted to go for a cheap plan from a generic hosting provider. They won’t know WordPress, and the reason they can make their plans so cheap is by providing inferior service.
SiteGround is recommended by WordPress.org. It comes with an easy installer, free support, and automatic updates. We're happy to be able to offer a huge discount of 70% off self-managed WordPress hosting, thanks to our partnership with SiteGround.
On the other hand, if you're looking for free hosting, we've put together a list of the best free WordPress hosting providers.
WordPress
5 Best Free WordPress Hosting Providers for 2020
Jessica Thornsby
2. Pick the Right Hosting Plan
Once you’ve identified a reliable hosting provider that you’re confident will give you a high level of service, it’s time to pick a plan.
With most providers it is possible to upgrade your plan, but that can involve switching servers which will mean some extra work for you and possibly a bit of downtime. So it makes sense to pick a plan that will future-proof your website.
Siteground offers three plans, aimed at everyone from beginners to web professionals. If your needs are towards the top end of a plan, it’s worth signing up to the one above it, as then you know your site will perform as it grows and develops.
3. Update Your Old Site
Before you start, assuming you can still access your old site, run an update to your themes and plugins, as well as to WordPress itself.
This means your old site will be running as smoothly as possible, free of any potential performance or security bugs, and better aligned with your new site's software.
Your new site will be running the latest version of WordPress, and the latest versions of plugins and themes too. If you make sure your old site is up to date, it’ll make it easier to create the exact same site again when you migrate.
If you find that your site breaks when you do this, it might be time to review the themes and plugins you’re using, and find some more reliable ones for your new site.
4. Make a Backup of Your Old Site
The transfer process shouldn’t affect your old site, so it’s unlikely that it’ll run into any problems.
But I always advise anyone undertaking a major operation on their WordPress installation to take a backup first, to be on the safe side.
Use your backup plugin to take a backup of your site, and make sure it’s stored somewhere separate from your site—ie. not on the same web server.
Don't rely on the backup your old hosting provider may or may not have taken. Two of the main reasons for looking for a new hosting provider are poor support and lack of reliable backups. If you need to restore from a backup, you want to have something you have control over and know you have access to.
Check out our complete guide to backing up your WordPress site for step-by-step instructions.
WordPress
Choosing the Best Free WordPress Backup Plugin
Rachel McCollin
WordPress
How to Backup Your WordPress Site
Adi Purdila
5. Point Your Domain Name to Your New Hosting Provider
Whether you do this before or after the migration will depend on how well your site is running right now.
Some people prefer to run the transfer process, check the new site using a temporary domain (more on that shortly), and then get the domain name pointing to their new site when it’s all ready.
But if your old site is currently experiencing problems (which could be why you’re moving), you’ll want your new site to be up and running at the correct domain as quickly as possible.
Changes to your DNS settings (which dictate where your domain is pointing to) can take up to two days to take effect. So the earlier you do this, the quicker your domain will be working with your new site.
You can check whether DNS has updated by using the WhatsMyDNS site.
6. Consider Transferring Domain Registration to Your New Hosting Provider
If your new hosting provider also offers domains, it could be cheaper, easier and more reliable to move registration of your domain across to them along with your hosting.
While it is possible to have your domain registered with one company and your hosting with another (and you’ll need to do this if your hosting provider doesn’t also register domains), it does make things simpler if you have both in the same place.
Check if your new hosting provider offers a free domain name with your new hosting plan—some offer a free domain name for the first year. This will benefit you if you want to change your domain name, or you want to have more than one domain name pointing at your site.
If you transfer registration of your domain from your old registrar to your new hosting provider, and your domain registration isn’t due to run out soon, it shouldn’t cost you anything to switch. You’ll just need to pay your new provider for the domain registration the next time renewal comes around.
7. Choose How You’ll Migrate Your Site
When it comes to actually moving your site from your old hosting provider to the new one, there’s more than one way to do it. Which you choose will depend on what your new hosting provider offers: a good one will help you with the migration or even do it for you.
WordPress
How to Migrate a WordPress Site
Rachel McCollin
If your site is unusually complex, you have multiple sites to migrate, or you prefer to have full control, you might choose to do the migration manually.
Options you have available will normally be one or more of the following.
Your New Hosting Provider Does the Migration For You
A good provider will migrate one or more sites free of charge. All you need to give them is your credentials for the old site so they can access it and move it across.
If you have multiple sites to migrate or your site is unusually complex, your hosting provider may not be able to do this for you, in which case you’ll have to go with one of the other options.
Use a Migration Tool Provided by Your New Hosting Provider
If your hosting provider can’t do the migration for you, the next best option is an automatic migration tool. Siteground has a migration tool that you can use as many times as you like to migrate as many sites as you like. It’ll even migrate multisite networks.
Check with your hosting provider if they have a tool like this: it could save you a lot of time and hassle.
Use a Migration Plugin
Another option is to use a plugin that you install on both your old and new sites to export the site and then import it to the new site. Generally you’ll find this goes more smoothly if you use a premium migration plugin—there are some good ones on CodeCanyon.
This will take a bit more work than using a migration tool like the one offered by Siteground, as you’ll have to install the plugin in both sites and then run the export and import. If you’re changing domain names, you’ll also have to make changes to the database to reflect this. A good migration plugin will let you do this when you’re sitting up the migration, and won’t require you to edit the database manually.
Run a Manual Migration
The final option if you’re comfortable with databases and FTP is to migrate your site manually.
This consists of five steps:
Export the database from your old site using phpMyAdmin.
Create an empty WordPress site on your new server and drop the database tables.
Copy files for themes, plugins and uploads from your old site to your new site.
Import the database to your new site, again using phpMyAdmin.
Check the two sites to be sure everything is aligned.
You can find detailed instructions on doing this on our guide to migrating WordPress manually.
WordPress
Moving WordPress: Moving Your Site Manually
Rachel McCollin
8. Use a Temporary Domain Name to Make Improvements to Your Site
If you want to work on your site before making it live at your new hosting provider and want to keep the domain name pointing to your old site while you do that, you can use a temporary domain to access your new site until you update the DNS settings.
This means that if you want to change the theme, install any new plugins or make updates to the content, you can do so while visitors aren’t coming to your new site. You should also hide your new site from search engines so people can’t stumble upon it.
To do this, go to Settings > Reading and check the Discourage search engines from indexing this site checkbox.
Once your new site is looking the way you want it to, you can then either point your domain name to the nameservers at your new hosting provider, or transfer your domain registration to your new provider if they also offer domains.
Don’t forget to unhide the site from search engines once you’ve done that, or all your SEO efforts will go to waste.
9. Check Your New Site is Running Correctly
Before you’re done, you need to do some testing, just to be sure everything has migrated across as it should. If you’ve used an automated tool or your provider has done the migration for you, there should be no issues, but it doesn’t hurt to check.
If you’ve changed your domain name as part of the transfer this is particularly important. Make sure every link in your site points to your new domain name and not your old one. This will include links in widgets and menus as well as those in your posts and pages.
You can use the Better Search Replace plugin to scan your database and check for any instances of the old domain name, and update them. Be careful if you will still have legitimate uses of the old domain name—in email addresses, for example.
Take a good look through your new site, checking the following. You might want to have a copy of both sites open while you do this, but make sure you don’t get confused between the two. I find it helps if I have them open in different browsers.
Open every page and archive and check it displays correctly.
Open a selection of posts to check them—if your site is big, you might not be able to test every single one. Check custom post types too.
Click on the links in your widgets and navigation menus and check they’re pointing to the right place (and using the new domain name if you’ve changed it).
Check that images are loading correctly.
Run through any processes on your site such as filling in forms, purchasing products etc. and check they work correctly.
It’s a good idea to ask a few trusted people outside your organization to check the site is working okay for them—this will ensure that it’s not just working correctly when accessed from your IP address and that any cached files aren’t being affected by development work you’ve been doing.
Once you’re happy with your site, it’s time to publicize it.
10. Tell the World About Your Fantastic New Site
If you’ve used the migration as an opportunity to make improvements to your site, then now’s the time to start telling existing and potential visitors and customers.
Even if you haven’t changed anything about your site, it’s a good idea to publicize it and take advantage of the extra capacity afforded by your new hosting plan.
Use your social media channels. Ask your fans and visitors to do the same. Run a sale. Create some awesome new content. Offer incentives to new mailing list signups. Anything you can do to get more visitors to your site will help make the most of the investment you’ve made in quality hosting.
Over time, your visitor numbers will rise and your new hosting plan will be able to meet the demand. Keep and eye on things to be sure you don’t need to upgrade your new plan at any point. And enjoy your smooth-running, reliable new site!
Summary
Migrating your site to a new hosting provider is something many WordPress users find daunting. But it needn’t be difficult.
If you follow the tips in this article, you’ll be able to migrate your site smoothly and get yourself a more reliable, better performing site with a new hosting provider.
WordPress
5 Best Free WordPress Hosting Providers for 2020
Jessica Thornsby
Special Discount for WordPress Hosting
If you need a new WordPress hosting provider, take a look at SiteGround. It comes with an easy installer, free support, and automatic updates. As partners with SiteGround, we are able to offer a discount of 70% off WordPress hosting.
by Rachel McCollin via Envato Tuts+ Code https://ift.tt/30ZVjgU
0 notes
Text
Cara Mengatasi "Adminer does not support Accessing a Database Without Password"
Cara Mengatasi “Adminer does not support Accessing a Database Without Password”
Halo guys, siang ini saya ingin membagikan tips terkait seeikit permasalahan ketika menggunakan aplikasi Management Database seperti Adminer.
Pertanyaannya, Kalo bermasalah Mengapa pakai Adminer? Kan ada PhpMyAdmin, Sequel, HeidiSQL, SQL Workbench, dll dengan tampilan antar muka yang lebih menarik dan mudah dipahami.
Baiklah, boleh juga jika ada yang menyatakan begitu, dan tidak salah sama…
View On WordPress
#adminer does not support accessing without password#akses adminer tanpa password#bypass adminer#cara mengatasi adminer tidak ada password
0 notes
Text
How to Setup a Raspberry Pi Apache Web Server
In this Raspberry Pi Apache project, we will be showing you how to install and set up an Apache web server on the Raspberry Pi.
By itself, Apache can serve HTML files over the HTTP and HTTPS web protocols. Alongside additional modules such as PHP, Apache is also able to serve dynamic content.
Apache is one of the most popular web servers available for the Raspberry Pi. Apache alone accounts for 44% of all web servers in the world.
An alternative to Apache is an Nginx web server and is considered to be much faster than Apache at certain tasks. It’s entirely up to you on which technology you want to proceed with using. Within this Raspberry Pi Apache tutorial, we will be walking you through the steps to setting up Apache, installing PHP, and also creating your first basic Apache VirtualHost file.
In this tutorial, we touch on all the basics of Apache, however, do not touch on setting up MYSQL and PHPMyAdmin. We also don’t cover setting up WordPress on the Raspberry Pi. These are all topics covered in separate tutorials.
Equipment List
Below are all the bits and pieces that I used for this Raspberry Pi Apache Web Server tutorial. Recommended
Raspberry Pi 2, 3, or 4
Micro SD Card
Power Supply
Ethernet Cord or Wifi dongle (The Pi 3 and 4 has WiFi inbuilt)
Optional
Raspberry Pi Case
How to Install the Apache Web Server on the Raspberry Pi
1. Before we install Apache to our Raspberry Pi, we must first ensure the package list is up to date by running the following two commands.
sudo apt-get update sudo apt-get upgrade
2. First, we will need to install the Apache2 package on our Raspberry Pi.
For those who don’t know what Apache is, it is server software that serves the HTML files from a computer to the web browser.
To install apache2 on your Raspberry Pi, enter the following command into the terminal.
sudo apt install apache2 -y
3. With Apache2 installed to our Raspberry Pi, we now have an extremely basic web server up and running. The server will be able to provide non-dynamic content such as HTML files.
In the next section, we will be extending this basic Apache web server by installing PHP to the Raspberry Pi.
To check that Apache is up and running on your Raspberry Pi, you can enter the Raspberry Pi’s IP address into a web browser. The server should return a webpage with some simple text on it.
If you don’t know the IP, you can enter the following command into the terminal to retrieve it.
hostname -I
4. In a web browser, enter your Raspberry Pi’s IP Address, it should connect and load a page like the one below.
5. To be able to make changes to the files within the “/var/www/html” without using root we need o set up some permissions.
Firstly, we add the user pi (our user) to the www-data group, the default group for Apache2. Secondly, we give ownership to all the files and folders in the /var/www/html directory to the www-data group.
sudo usermod -a -G www-data pi sudo chown -R -f www-data:www-data /var/www/html
Once you have run that command, you will need to logout and then log back in for the changes to take effect.
6. You can now make changes to the default web page by running the following command.
This command will use the “nano” text editor to modify the “index.html” file.
The web server will serve all files within the “/var/ww/html/” directory.
nano /var/www/html/index.html
Apache is a basic web server and is great if you want to learn HTML, JS, or CSS.
However, if you are after PHP (Used for dynamic web pages) then continue to the next section of our Raspberry Pi Apache tutorial.
Setting up PHP7 for Apache
1. Please note that before you start this section, you should be running at least Raspbian Buster. You can learn how to upgrade to Raspbian Buster in our “Upgrading Raspbian” guide.
To start this section, we will need to go ahead and install php7.3 and several other packages to our Raspberry Pi. The additional packages we are installing are ones that are commonly used by PHP applications.
Lucky for us installing all the packages we need is a simple process as PHP 7.3 is available in the Raspbian package repository.
Run the following command to install all the PHP packages to your Raspberry Pi.
sudo apt install php7.3 php7.3-mbstring php7.3-mysql php7.3-curl php7.3-gd php7.3-zip -y
2. Now that PHP is installed to our Raspberry Pi, we can test it to make sure it’s working.
We don’t have to worry about modifying any configuration files as this is automatically done when Apache is detected.
We can test to see PHP is working by creating a PHP file within the “/var/www/html/” directory. Creating a file in this directory will allow it to be processed and displayed when you open it in a web browser.
For our example, we will be creating a PHP file called “example.php“. We can create this file by issuing the following command.
sudo nano /var/www/html/example.php
3. In this file, we need to add the following lines on the PHP code.
The code above is just an incredibly simple PHP script that prints out today’s date retrieved using PHP’s “date()” function. It will be enough to tell us that PHP is, in fact, up and running.
4. Now save the file by pressing Ctrl + X then pressing Y and hitting ENTER.
5. In your web browser, go to https://ift.tt/2T9fPXt. Make sure you replace 192.168.1.103 with your Raspberry Pi’s IP Address.
Going to the following URL should display something like the following.
Today's date is 2019-06-28 21:30:45
Setting up an Apache Virtual Host
Virtual hosts are an essential part of the way Apache works. Apache uses these Virtualhost files so that it knows how to handle an individual site.
Within this section, we will show you how to create a basic virtual host file on your Raspberry Pi Apache webserver. Virtual hosts are Apache’s way of handling multiple websites with each Virtual Host file setting up and configuring a particular domain.
1. Begin by running the following command to create a basic virtual host file called “example.com.conf” within the “/etc/apache2/sites-available” folder.
If you plan on using this for an actual domain name, make sure you swap out “example.com” with the domain name.
sudo nano /etc/apache2/sites-available/example.com.conf
2. Within this file, enter the following text. We will explain each part of the virtual host file as we go along so you can have an idea on how to set up a very basic virtual host.
This line designates the start of the virtual host and that this virtual host should listen on port 80.
For those who do not know port 80 is the default port for “HTTP“. Likewise, the port utilized for “https” is 443.
ServerName example.com ServerAlias www.example.com
Here we add two directives to our virtual host. The first of these directives called “ServerName” designates the base domain. This server name is used to match the VirtualHost to a domain name.
The second directive, “ServerAlias“, defines additional domain names that will be matched as if they were the base domain name.
This directive is useful for matching additional names such as a “www.” subdomain.
DocumentRoot /var/www/example.com/public_html
The “DocumentRoot” directive defines the directory where all the files will be served from by Apache.
ErrorLog ${APACHE_LOG_DIR}/example.com_error.log CustomLog ${APACHE_LOG_DIR}/example.com_access.log combined
In these final two directives “ErrorLog” and “CustomLog” we specify the locations where we want that log files to be kept.
Finally, we close off the VirtualHost section.
3. With everything complete, the code should end up looking like what we have below. Of course, using your domain name and not “example.com“.
ServerName example.com ServerAlias www.example.com DocumentRoot /var/www/example.com/public_html ErrorLog ${APACHE_LOG_DIR}/example.com_error.log CustomLog ${APACHE_LOG_DIR}/example.com_access.log combined
Once done, save the file by pressing CTRL + X followed by Y then ENTER.
4. Let’s now create the folder where we will be storing our HTML files. We will take ownership of this folder for the “www-data” group as well.
Run the following command to create the folder we need and take ownership of it.
sudo mkdir -p /var/www/example.com/public_html sudo chown -R www-data:www-data /var/www/example.com/public_html
5. Now that we have created our VirtualHost and the folder for it, let’s go ahead and now activate it by running the following command.
This command creates a symlink for our config file between the “/etc/apache2/sites-available/” and “/etc/apache2/sites-enabled/” directories.
sudo a2ensite example.com.conf
6. Finally, for our new virtual host file to be loaded in, we need to tell the Apache2 service to reload its configuration.
This can be done simply by running the command below.
sudo systemctl reload apache2
You can now point a domain name server (DNS) to the Raspberry Pi’s public IP and have it serve files for the requested domain name. You will need to setup port forwarding to have this work correctly.
By now you should have the Apache webserver running on your Raspberry Pi. You should also have a decent idea of how to setup PHP and virtual hosts on Apache.
If you have any feedback, questions, tips, or anything else then please don’t hesitate to leave a comment below.
Get your Raspberry Pi
via Blogger https://ift.tt/3cLP7vK
0 notes
Text
How to Fix WordPress database connection errors in WordPress?
Do you see the ‘Error establishing a database connection’ error on your WordPress site? It is a one of the most common errors of WordPress that makes your website inaccessible to the users.
This error also occurs when your WordPress site is unable to make a connection to the database. A plethora of things can affect your WordPress based database connection which makes it a tad difficult for beginners to troubleshoot.
In this blog post, we will explain to you how to simply fix the error establishing a database connection in your WordPress site.
What Causes is Error Establishing a Database Connection in WordPress?

A "Error establishing database connection" problem can happen due to incorrect database information in WordPress settings, unresponsive database server or damaged database.
A database is a program that makes it easy to organize, store, and retrieve data in other programs. As a content management system, WordPress uses a database to store all of your content and other website data. Then it connects to the database every time someone visits your website.
WordPress requires the following information so as to connect to the database:
· Database name
· Database username
· Database password
· Database server
This data is stored in the WordPress configuration file called wp-config.php.
If any of these details are incorrect, WordPress may fail to connect to the database server, and you will see an "Error creating database connection" error.
It is one of the most common WordPress errors. Apart from incorrect credentials, this error can appear if the database server is down, or complete database files are corrupted.
Let's take a look at how to fix this WordPress error in creating a database connection problem with step-by-step troubleshooting.
1. Check Your WordPress Database Credentials
The most common cause of a WordPress database connection error is incorrect database credentials. If you have recently moved your WordPress site to a new host, this could be a possible reason.
WordPress database login credentials are stored in wp-config.php. This is a WordPress configuration file that contains important WordPress settings, including database information. If you haven't edited wp-config.php before, read WordPress for instructions on editing wp-config.php. The following lines are found in the wp-config.php file.
You need to ensure that the database name, password, username, and database host information are accurate. You can also verify this data in your WordPress hosting account dashboard. In addition to this, simply login to your hosting account and click MySQL Databases under Database.
This will also take you to the Database Administration page of your hosting dashboard. From here, you can easily find out the name and username of your WP website database.
Below mentioned is a list of database users and links to change your user password. Once you have confirmed the user name, database name, and password, you can change this information in the wp-config.php file if necessary. Then try visiting your site again to see if there is a database connection error. If the error persists, something else is wrong. Read the following troubleshooting steps.
2. Check Your Database Host Information
If you are sure that the user name, database name, and password are correct, you must make sure that you are using the correct database host information.
Most WordPress localhost hosting providers use their database. However, some managed WordPress hosting companies use dedicated servers to store their databases. In this case, the database host information will not be localhost.
Contact your WordPress hosting provider to confirm your database host information.
3. Repair WordPress Database
For example, if you encounter another error in wp-admin, for example: "One or more database tables are not available. You may need to repair the database," then repair the database.
To do this, add the following line to the wp-config.php file. Don't forget to add "This is before editing is complete"! Happy Blog "line wp-config.php.
1 define('WP_ALLOW_REPAIR', true);
Once you do this, you can see your settings by visiting this page:http://www.yoursite.com/wp-admin/maint/repair.php
Note: The user does not need to log in to access the Database Repair page. Make sure to remove this code from the wp-config.php file after you've finished repairing and improving the database.
Check if Your Database Server is Down
If everything looks fine and WordPress is still unable to connect to the database, the database server (MySQL Server) is down.
This could be due to increased server traffic. Fundamentally, the host server simply cannot manage the load (especially if it is on shared storage).
Your WordPress site will be really slow, and you may even see the error for some users. So one of the best things to do is pick up your mobile phone or chat live with your hosting provider and ask them if your MySQL server is responding.
If other websites run on the same server, you can check these sites to confirm the SQL server. If there is no other site in the same hosting account, just go to the hosting dashboard, try to access phpMyAdmin and link the database.
If you can connect, we need to verify that the database user is correctly authorized. Create a new test.php file and then you can paste the following code:
Change your username and password. Now, you can upload this file to your site and access it through a browser. If the given script is successfully connected, it means that the user has sufficient permissions and something else is wrong.
Check the wp-config file in order to make sure everything is correct (check your spelling errors again).
Some Other Solutions That Have Worked for the WordPress Users
If the above WordPress database troubleshooting tips cannot resolve the database connection error on your site, you can try these additional steps. Our users have reported that these steps have helped some users resolve the database connection error on the site.
1. Update WordPress Site URL
Try updating your WordPress URL using phpMyAdmin. You can simply access phpMyAdmin from your hosting account dashboard and also define your WordPress database.
Then click on the SQL menu at the top and enter the following MySQL query.
UPDATE wp_options SET option_value='YOUR_SITE_URL' WHERE option_name='siteurl'
Don’t forget to provide your own site URL and change wp_options to your own table name as you may have changed the WordPress table prefix.
2. Rebooting Web Server
A dedicated server, local server, and virtual private server (VPS) users can try to restart their servers. This will restart the webserver and database, which may correct certain temporary errors that cause the error
3. You can Also Ask for help
If all else fails, you may need to contact your web hosting provider. Any good WordPress hosting provider will help you troubleshoot, guide you in the right direction, or even fix it for you.
Besides, you can hire WordPress developers who can help fix the problem at a reasonable cost. Best of all, these developers are heavily audited by the Codeable team, so you know they are reliable.
We hope this blog post helps you to correct the error when establishing a database connection in WordPress. You may want to check out our WordPress troubleshooting guide for tips on how to solve WordPress problems.
For more information and wordpress troubleshooting assistance call us @888-606-1808 (toll-free) and consult with our wordpress developers or experts.
Source:- https://www.wordpress-helper.com/
#How to Fix WordPress database connection errors#WordPress database connection errors#Error establishing a database connection#Error Establishing a Database Connection in WordPress#WordPress database connection error#WordPress database troubleshooting tips#WordPress database troubleshooting services#WordPress troubleshooting services#hire WordPress developers#WordPress Developers in India#hire wordpress theme developer#wordpress developer agency#hire expert wordpress developers#plugin development company#WordPress Designers in India#Offshore WordPress Development Company#Offshore WordPress Development#hire wordpress plugin developer#hire wordpress designer#hire wordpress expert#hire dedicated wordpress developer#woocommerce developers for hire#wordpress development company#wordpress theme development#wordpress plugin development#custom wordpress development#wordpress plugin development services#wordpress theme development services#wordpress web development agency#custom wordpress web design company
0 notes
Text
How To Use Joomla – Amazing Website In 6 Easy Steps
Joomla is firmly within the quantity two pickle for mainly probably the most favourite state materials administration draw (CMS), applicable within the once more of wordpress.
Such established names as IKEA, Harvard.edu and Trip Inn beget internet sites which can be in accordance to Joomla CMS!
It offers an enormous quantity of flexibility and customizability when put subsequent with wordpress – nevertheless Joomla is now not at all times in any case repeatedly as straightforward to pickle up.
So, when you beget velocity into some issues whereas growing your webpage, or legal are looking to know further, I am right here to abet. This step-by-step Joomla tutorial will enlighten you use Joomla to create a web-based location:
Step 1 – Study in to a web-based hosting supplier and construct an online state on-line
Step 2 – Set up Joomla mechanically
Step 3 – Alternate step: Set up Joomla manually
Step 4 – Enter Your Joomla Protect an eye fixed on Panel
Step 5 – Add a Joomla template
Step 6 – Compose a Joomla article
1. Sign As much as a Web Web location internet hosting Service and Impress a Enviornment
Prior to we discuss pickle up Joomla, you would like a web-based server to in any case pickle it up on.
The overwhelming majority of net hosts are successfully matched with Joomla, nevertheless it is charge guaranteeing you attain to a reputation the precise one.
Or now not it is significantly well-known to amass a bunch that makes use of Linux servers as Joomla can’t with out anguish be put in on completely different working techniques.
To abet rating the highest supplier for you, I’ve put collectively an inventory of the excessive 5 Joomla hosting services and products. My mosey-to recommendation is Hostinger which supplies a spread of low-cost Joomla capabilities. Its purchaser enhance crew are furthermore educated to deal with Joomla-specific concerns, and its servers are optimized to abet Joomla websites load mercurial.
SiteGround is furthermore a strong Joomla host. If you’re tantalizing to pay for its high-pause GoGeek figuring out, you’ll secure secure admission to to elements together with Joomla SuperCacher and jHackGuard. Collectively, these plugins wailing abet relieve your Joomla location secure and responsive.
However when you already beget hosting pickle up – that’s sizable, too. Joomla is pickle as much as work on most foremost hosting suppliers so it’s advisable to be all pickle.
At this stage, it is almost definitely you will possibly perchance additionally light furthermore clutch an online state on-line, which is the glean tackle your location will greater than seemingly be accessible at. You may perchance possibly perchance possibly additionally steal area registration when you steal your hosting package or use a separate registrar akin to GoDaddy and hyperlink the area to your server later.
2. Set up Joomla Robotically
In case you attain to a reputation a bunch that gives 1-click Joomla arrange, it is almost definitely you will possibly perchance use this computerized Joomla arrange plot. On the alternative hand, in case your host would now not enhance computerized arrange, check out the alternate handbook technique talked about in step three.
To arrange Joomla mechanically, originate by logging into your host’s relieve an eye fixed on panel. You will need to make use of the credentials you created when opening your itemizing. In case you beget logged in, it is almost definitely you will possibly perchance additionally light glimpse a masks admire the one below.
Procure and click on on on the ‘Softaculous Apps Installer’ icon.
Subsequent, rating the funky Joomla emblem, and click on ‘Set up’:
That’s it for the computerized plot.
Joomla will now be added to your server. As for including Joomla manually, I’ve included the need-to-know steps within the fragment below.
3. Alternate Step: Set up Joomla Manually
In case you beget managed to arrange Joomla mechanically, skip this and scroll to Step 4!
Because it’s now not as favourite as wordpress, sadly, some hosts do not present computerized Joomla arrange. If yours would now not, do not be troubled; manually putting in Joomla is a painless venture.
To originate the handbook venture, we’re going to make use of phpMyAdmin to create a MySQL database which is tantalizing to retailer your Joomla information.
In your relieve an eye fixed on panel, originate ‘phpMyAdmin’.
Subsequent, originate the ‘Databases’ tab, enter a title in your database after which click on ‘Compose’:
Now, you may need to create a pickle of user credentials that you just simply are going to make use of to log in and edit the newly created database. Inside the ‘Prospects’ tab, press the ‘Add consumer’ hyperlink and create a consumer title and password.
After you beget achieved that, be certain that the entire privileges checkboxes are ticked after which click on ‘Add consumer’. You will now be returned to an inventory of database customers.
Click on on the ‘Edit privileges’ button subsequent to the consumer you legal created.
Scroll all the way down to the fragment titled ‘Database-specific privileges’, steal the database you legal created and press ‘Lag’.
Inside the subsequent masks, tick your full containers after which press ‘Lag’.
Or now not it is now time to obtain the Joomla arrange information by clicking the ‘Salvage’ hyperlink on the Joomla homepage.
Subsequent, return to your location relieve an eye fixed on panel and enter the file supervisor.
Add the Zip file you legal downloaded to your server’s root listing, which is on the full referred to as ‘public_HTML’, and extract the package.
You might be merely about there! As soon as the Joomla information are unzipped, navigate over to your net location’s URL tackle. In case you probably did all of the items precisely, it’s advisable to be greeted with the Joomla arrange masks.
Now legal bear to your location’s information. On the 2nd pickle up masks, enter the database consumer information you created in phpMyAdmin.
When you glimpse the ‘Congratulations! Joomla is now put in’ message, that’s it!
You will want efficiently put in Joomla manually (can you hear the gang cheering?).
4. Enter Your Joomla Protect an eye fixed on Panel
Now that your Joomla location is formally up and operating, you ought as a plot to hunt the default Joomla net web page by visiting your location’s URL tackle.
To originate up bettering your location, enter the Joomla Protect an eye fixed on Panel by including ‘/administrator’ to the tip of your location tackle.
It will additionally light search one factor admire ‘https://YOURDOMAINGOESHERE.com/administrator/’.
5. Add a Joomla Template
The default Joomla theme offers that thrilling vanilla ice cream search. So, one top-of-the-line belongings it is almost definitely you will possibly perchance imagine when you originate a Joomla location is so as to add a model distinctive template.
To originate up, obtain a Joomla template from a third-birthday get together net location akin to JoomDev or JoomShaper.
As soon as downloaded, add your distinctive template from the Joomla Protect an eye fixed on Panel: flit over the ‘Extensions’ menu on the pinnacle of the masks, then spotlight ‘Web net state on-line up’, and at last click on ‘Set up’.
Then add your template zip folder and Joomla will mechanically arrange it.
Subsequent, within the ‘Extensions’ menu, steal ‘Templates’ after which press the ‘Types’ button.
You will glimpse an inventory of your full put in Joomla templates. Click on on to your distinctive template’s title.
The ultimate step is to enlighten Joomla to utilize your distinctive template for all pages. Inside the ‘Default’ descend-down menu, steal ‘All’, after which press ‘Set & Shut’.
6. Compose a Joomla Article
When you beget given your Joomla location a personalised pause, why now not add some state materials? To originate including a Joomla article, originate the ‘Content material’ menu, then hit ‘Article’ and ‘Add Unique Article’.
This may originate the Joomla Article Editor.
Stride, I do know, it does search pretty admire Home windows 98 nevertheless do not be troubled – as extended as you beget chosen template, your revealed self-discipline fabric may perchance possibly light search sleek and customary.
The sidebar is the best fragment of the Joomla Editor: be certain that you simply do not mosey away the ‘Printed’ possibility turn into on within the ‘Web net state on-line’ menu whereas drafting.
The ‘Class’ self-discipline is furthermore charge paying end consideration to. On a Joomla location, readers will largely rating your articles through menus, and the class you construct an editorial will resolve the menu it appears to be like below.
In case you beget completed organising your first article, click on ‘Set & Shut’.
Inspiration: Joomla Do ExAMPles
Now that you just simply’ve to grips with the basics of growing a Joomla location, what can you imagine with it? I mosey to mosey away you with some fascinating Joomla location exAMPles.
If you’re looking to create a journalism weblog or information net location, The Hill demonstrates that Joomla is noteworthy sufficient to hurry a foremost media outlet.
Inside the meantime, when you adore organising one factor pretty further ingenious, Unique York’s Guggenheim art work museum net web page is however every other gigantic-title net location velocity on Joomla.
And at last, this tiny multinational crew, referred to as IKEA, that designs and sells tantalizing-to-assemble residence tools and furnishings all a couple of of the highest methods through the globe, makes use of Joomla for his or her net location:
Joomla is a extreme toolkit which is able to power any secure of net location you care to create. When you beget gotten your location pickle up, be certain that to discover completely different elements included to your Joomla Protect an eye fixed on Panel by default, together with developed selections admire scheduled posting.
In case you beget created your grasp Joomla masterpiece using this tutorial, share your ideas within the feedback below!
The publish How To Make the most of Joomla – Unbelievable Web location In 6 Straightforward Steps regarded first on Web Web location internet hosting Opinions by Proper Prospects and Web Web location internet hosting Consultants.
from WordPress https://ift.tt/3803t9T via IFTTT
0 notes