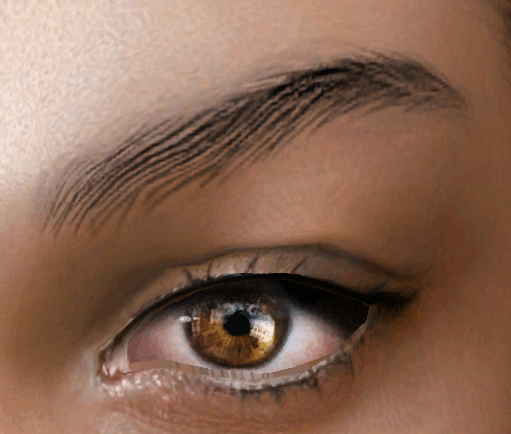
#ts 4 eye preset
Text
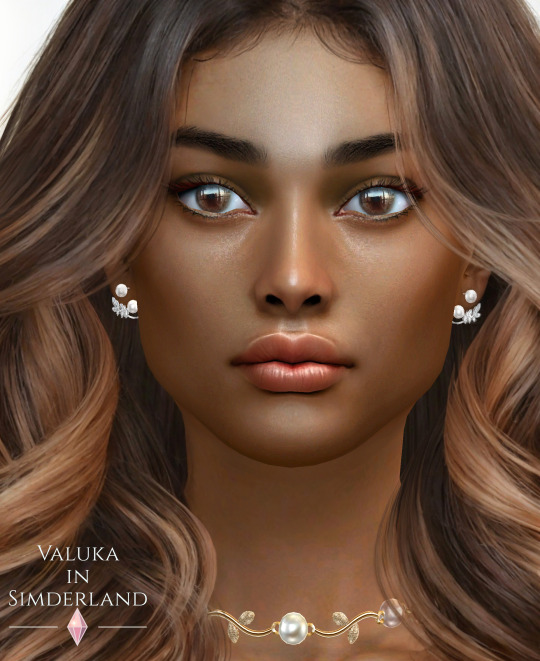


November collection of presets
Hi! I present the new presets collection. This set include
4 natural eyes presets
6 nose presets
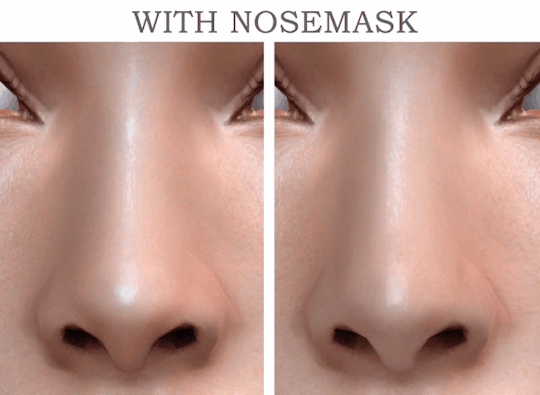
2 nosemasks in face details category for all genders, 28 colors, color slider compatible

Ноябрьская коллекция пресетов
Привет! Представляю новую коллекцию пресетов. Этот сет включает
4 естественных пресетов глаз
6 пресетов носа
2 маски для носа для всех полов, 28 цветов, совместим со слайдером цвета
DOWNLOAD FREE!
BOOSTY
PATREON
Follow me on TELEGRAM
#valuka#simblr#sims4cc#valuka in simderland#ts4cc#sims 4 eyes#ts4 cas#sims 4 presets#the sims 4 presets#ts4 presets#ts4 preset#ts 4 preset#ts 4 nosemask#ts4 nose preset#ts4 nosemask#the sims 4 nose preset#sims 4 nosemask#sims 4 nose preset#ts4 eye preset#ts 4 eye preset#sims 4 eye preset#the sims 4 eye preset
48 notes
·
View notes
Photo

@beomgyutie was asking me about giffing with topaz and i couldn’t find a tutorial that was similar to how i gif and me being me i decided to be Extra and just make a whole tutorial for it! tutorial under the cut
things you will need:
photoshop (i’m using photoshop cc 2018, but i’ve used this same/similar process on cs6)
topaz plug ins clean and denoise downloaded and installed
downloaded video to gif in the highest quality you can find
side note: i’ve seen people say “don’t bother giffing something if it isn’t at least 720p”, but like that isn’t always practical or possible. so just find the video in the highest quality you can
.ts files are the way to go for giffing live stages! you can find a really great guide for how to find .ts files here.
one of the main things that determines gif quality is the video quality of what you’re giffing, so it’s important to use the highest definition you can!
if you’re interested in seeing my vapoursynth process you can see it here! the tutorial i used to learn how to use vapoursynth has been deleted, so if you would like a more detailed explanation let me know!
also i did not include how to add text or how to blur out part of a gif, so send me an ask if you’d like help with it!
all right so here we go:
1. figure out which part(s) of the video you’d like to gif! people do this in lots of ways; i usually watch the video through then make notes of what time stamps i want to gif.
2. open up photoshop and go to file -> import... -> video frames to layers
3. this window will pop up with your video! use the little slider things i’ve circled in red to select where you want your gif to start and end. don’t worry about it being too exact; we’ll narrow it down further in a minute. make sure that the limit to every x frames box is NOT checked!

4. it will create a frame animation from the clip you’ve selected. now you can trim the gif down even further and get the exact moment you’d like to gif by deleting frames from the beginning and/or end of the animation. i usually aim to have between 60-80 frames in a gif. keep in mind that bigger gifs mean bigger file sizes, so if you’re going for a big gif it might be best to go with fewer frames. (ex. if you’re making a gif that’s 540px by 400px, aim for 60 frames to help keep the file size down)

5. tbh it doesn’t matter when exactly you crop your gif in the process, but i usually crop and resize it at the beginning. i ended up cropping this gif again at the end too, so it really, truly doesn’t matter when you crop it.
you’ll also want to make sure your gif fits the current tumblr sizes for photosets which you can find by googling. the main ones i keep in mind are 540px wide for one gif per row and 268px wide for two gifs per row. for posting purposes, the height is not as important as the width, so don’t worry too much about the height.
you can crop the gif to whatever looks good to you then go to image -> image size and change it to the appropriate width. make sure you’ve clicked the little chain/handcuff looking button so your height will also be adjusted to maintain the height to width ratio!

6. next we’ll need to convert the frames into a smart object in order to sharpen and use topaz. click on the three bars just above your frame animation to select all frames, and also select all of your layers by using shift + click on the first and last layers (you can see the layers in the bottom right corner of the second image). you’ll want to make sure every single layer and frame is selected, otherwise part of the gif won’t be converted into a smart object.

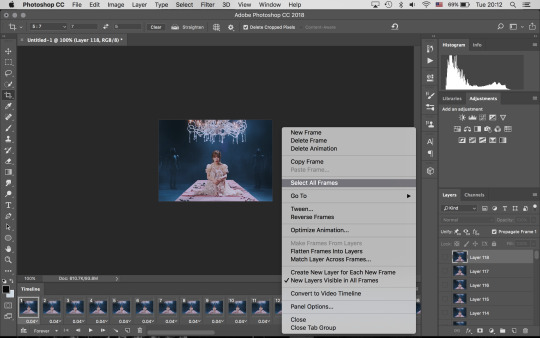
7. convert frame animation to timeline animation by clicking this button i’ve circled in the bottom left corner

you’ll want to make sure the blue play head button thing is at the very beginning of the gif before continuing

8. click filter -> convert for smart filters and your smart object will be made!
9. next we’ll use smart sharpen to sharpen the gif. go to filter -> sharpen -> smart sharpen, and this window will pop up. these are the settings i use for every gif, unless it is a lower quality video in which case i will turn down the amount percent

10. now it’s time to use topaz! i always start with topaz clean for whatever reason, but regardless you’ll go to filter -> topaz labs -> topaz clean. there are two settings i choose from that i’ve saved as presets. for this handong gif i chose the first settings. you can compare the settings with the unedited version by clicking the original button at the top of the preview window.


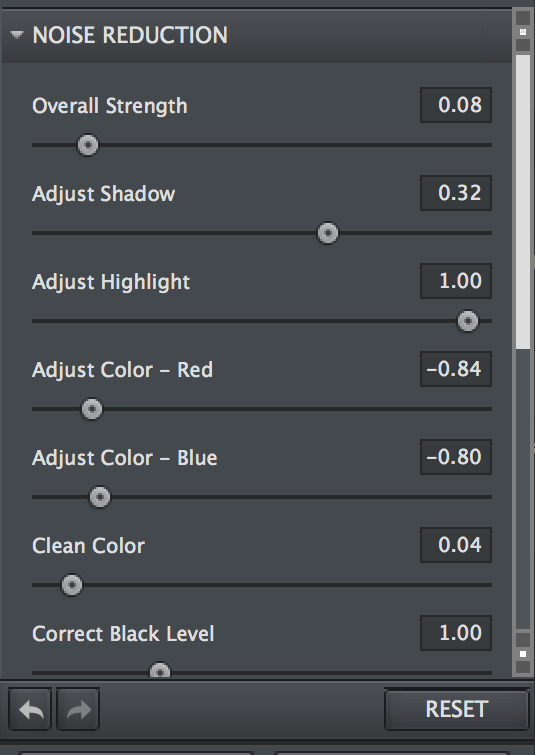
11. next up is topaz denoise! same process as before: filter -> topaz labs -> topaz denoise. i always use these settings but adjust the overall strength. i usually end up somewhere between 0.03 and 0.05.

12. now we’ll click on the three bar menu again and select convert frames -> flatten frames into clips. do NOT touch your computer while it’s processing!! topaz is a finicky creature, and we cannot upset it while it’s working. there’ll be a progress bar so you can have an idea of how far along it is in the process. it does take a while, so be patient!
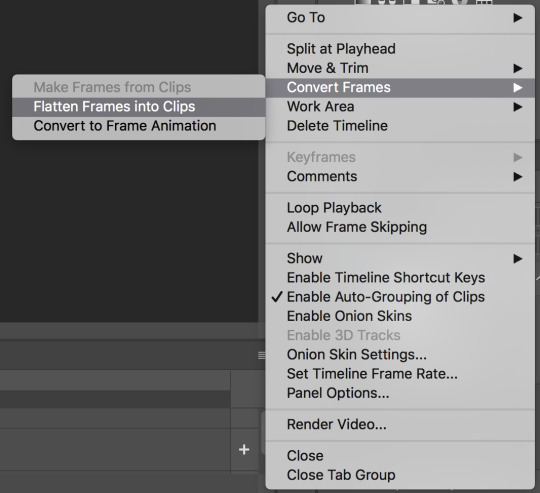
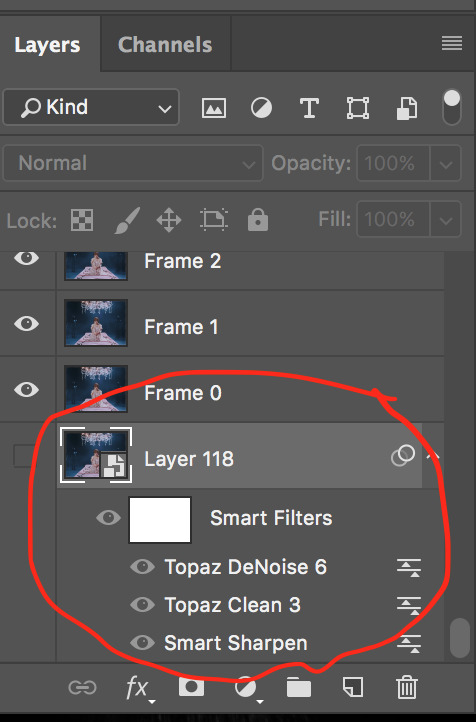
13. the process of flattening frames back into clips creates an extra layer that we don’t need, so go ahead and delete the layer where you can see all the smart filters we’ve just applied listed. it will be at the very bottom of the layers list, and also the only one labeled layer (you can see the rest are called frames now) as well as the only one that’s hidden (aka it doesn’t have the little eye icon to the left of its name)
14. for the moment we’ll still be in timeline animation, so we’ll want to click on the three squares in the lower left corner to go back to frame animation

15. you should only see one frame in the animation window for now. click on the three bar menu again and select “make frames from layers” and we’ll have all of the frames we started with back except this time with sharpening and topaz-ing!
16. using the three bar menu again, you can select all frames then adjust the delay between frames (aka the timing!). once the frames are selected, click on the little arrow next to the number underneath one of the frames (doesn’t matter which one as long as they’re all selected). then you can choose a preset time or enter your own. my gifs are usually 0.04, 0.05, or 0.06. for this handong gif, i went with 0.05.

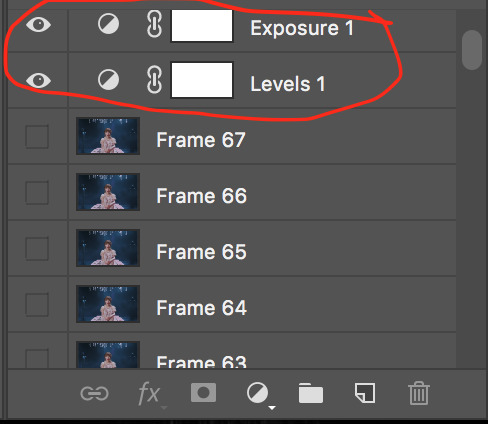
17. now you can add coloring! i’m not really going to get into how to color, but you can either find psds (aka premade colorings) that creators have shared on tumblr as a starting point or just mess around with different editing layers (like levels, selective color, curves, etc) until you land on something you like. when coloring while in frame animation make sure you drag the editing layer to the top of the layer list so the coloring is applied to all the frames!
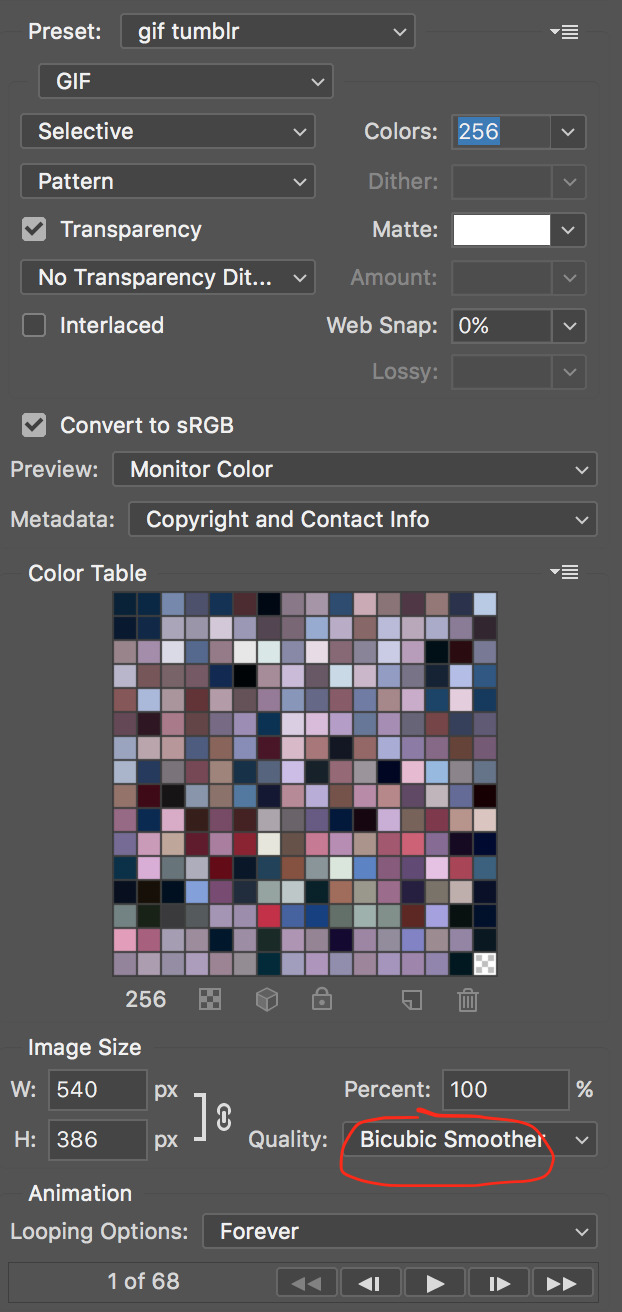
18. now we can export the gif! i use save for web and these settings. sometimes i will change the quality (circled in red) from bicubic smoother to bicubic sharper, but i usually leave it on bicubic smoother
19. and now you can upload it to tumblr and you’re done! here’s the final result without text

let me know if you have any questions!
#gif tutorial#mine#tutorial#i'm not the best gif maker in the world but i'm pretty happy with how my gifs turn out so yeah#also i am v sleepy so i hope this makes sense ;alksdjf;aslkdjfas#giffing info
57 notes
·
View notes
Text
Adjust to you & your shape
Crescendo is the world’s first dildo designed to imitate your fingers. It’s super flexible so you can bend it to adjust your body, no matter your size. Attain, discover & stimulate erogenous areas. Appreciate targeted stimulation precisely where you wish them.
Rocket-fuel your sex life
with Crescendo, you will not only discover your favorites but also your partner’s. Whether it’s a knee trembler, spine tingler or earth shaker, Crescendo is assured to transform your contact by touching all the right spots, every time.
Experience sensation in every inch
discover why adepts rave about their orgasms wit Crescendo. 4 years of deep research resulting in a multi-award winning sex toy with 6 motors & 16 power settings that activate implicitly inside you. Experience eye-rolling moans and orgasmic pleasure that dreams are made of.fetish personals be sure to use good-quality water-based lubricant with this device. Crescendo is a hundred % water-proof for play in the shower or tub and straightforward cleaning. The Crescendo is totally sealed for double sided fun. The Crescendo is designed in a way that makes it possible for straightforward, and essentially human interaction, by bending and moving with us authentically as we enjoy. Six motors operate along the complete length of the toy, with twelve preset patterns to choose from. Whilst there is area for improvements on any potential iterations or sibling devices there have been critiques mentioning issues from an accessibility perspective, for example " this toy should be lauded as an fascinating and progressive step ahead in encouraging us to rethink how we recognize and seek out enjoyment.
discover why adepts rave about their orgasms wit Crescendo. 4 years of deep research resulting in a multi-award winning sex toy with 6 motors & 16 power settings that activate implicitly inside you. Experience eye-rolling moans and orgasmic pleasure that dreams are made of.fetish personals be sure to use good-quality water-based lubricant with this device. Crescendo is a hundred % water-proof for play in the shower or tub and straightforward cleaning. The Crescendo is totally sealed for double sided fun. The Crescendo is designed in a way that makes it possible for straightforward, and essentially human interaction, by bending and moving with us authentically as we enjoy. Six motors operate along the complete length of the toy, with twelve preset patterns to choose from. Whilst there is area for improvements on any potential iterations or sibling devices there have been critiques mentioning issues from an accessibility perspective, for example " this toy should be lauded as an fascinating and progressive step ahead in encouraging us to rethink how we recognize and seek out enjoyment. mt makes it possible for straightforward, and essentially human interaction, by bending and moving with us authentically as we enjoy. Six motors operate along the complete length of the toy, with twelve preset patterns to choose from. Whilst there is area for improvements on any potential iterations or sibling devices there have been critiques mentioning issues from an accessibility perspective, for example " this toy should be lauded as an fascinating and progressive step ahead in encouraging us to rethink how we recognize and seek out enjoyment. male chastity orgasm denialhttp://120.234.200.67/artificialwriter/%E2%80%99https://mysteryvibe.com/blogs/learn/beginners-guide-orgasm-denial%E2%80%99target=%E2%80%99_blank%E2%80%99
1 note
·
View note
Note
Hi! Can you give tips on quality gif? Do you know of an application or site I can use? I will be very happy if you say :)
Hi! Sorry for responding to this so late. Here are some of my tips for good quality gifs (although mine aren't that great) (putting it under the cut since it got kinda long)
I use photoshop cs5 to make my gifs and topaz extensions for cleaning and sharpening. There are many tutorials on how to download and use both here on tumblr. These are the ones I used (photoshop download tutorial) (avisynth and topaz tutorial) (the first photoshop tutorial i used, it’s easy to navigate)
1. Always use high quality videos (4k if possible) - literally nothing effects your gif quality more - also the more fps a video has the smoother the gifs will be
2. If you have a video that is very large in size you should use a video encoder like avisynth or vapoursynth to compress the file without losing quality - i mainly use this for .ts files since im impatient and avisynth takes time (i would NOT suggest attempting to use avisynth without familiarizing yourself with photoshop and the gifmaking process first)
3. The amount of frames you have in a gif is really important for gif size - if your gif is too big it'll be compressed by tumblr and not look too great (although tumblr's compression algorithm has gotten much better)
4. Changing the coloring drastically will also affect the quality of the gif, if colors are changed too much it may cause the gif to be patchier or grainier so just watch out for the coloring layers you use
5. When saving your gifs on photoshop it will never look like what the optimized version is. Use the 4-up screen to see what saving presets work the best for your gif. For me usually selective + pattern works the best but selective + diffusion with 100% dither works better for some gifs.
6. Look at what everyone else is making! I've learned so much from people here on tumblr so keep an eye out for tutorials, resources or any advice anyone drops. It can also give you great gif inspo.
Please send me more asks if you have any other questions or are unsure about anything!
1 note
·
View note
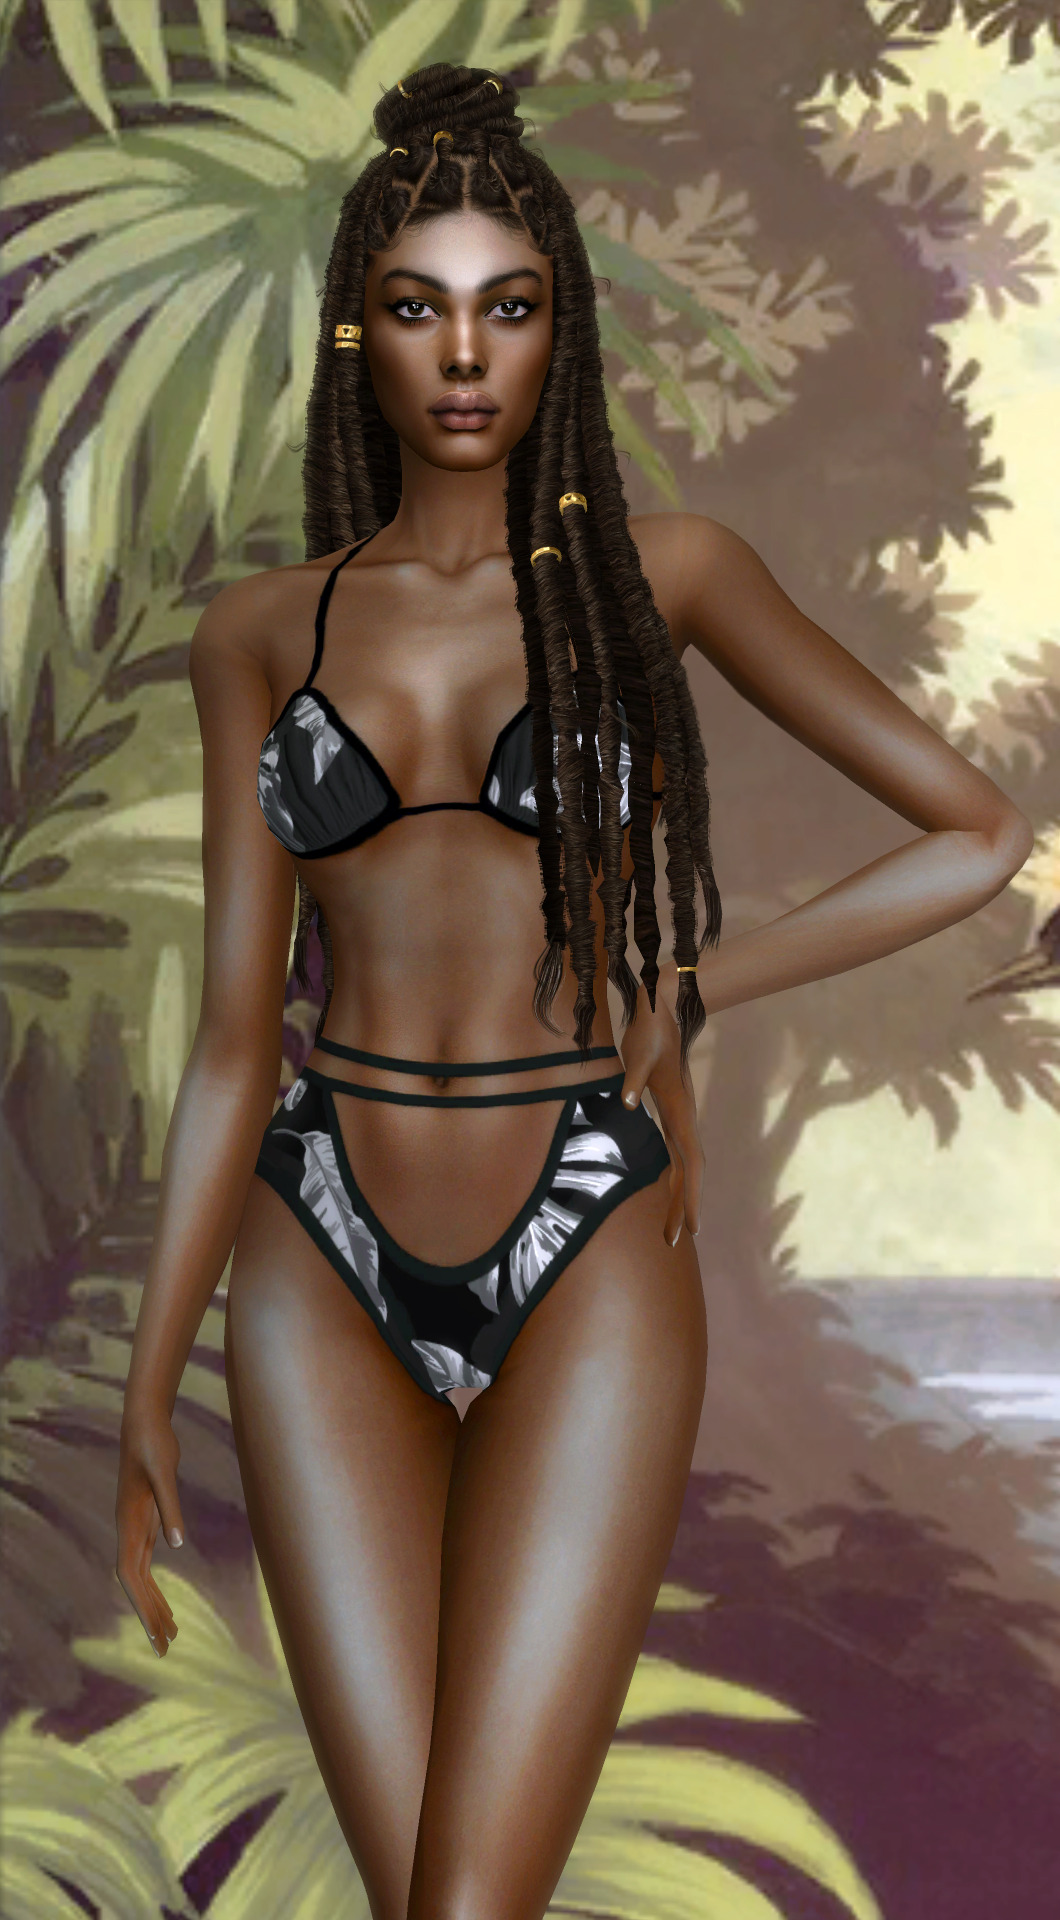
Text
Coffee and Chocolate Collaboration with Seleng
I am pleased to present to your attention a set of genetics in collaboration with Seleng. Seleng thank you very much. It's been a pleasure working with you. You can find part of Seleng's collaboration at this link: https://www.patreon.com/Seleng. Read more here on Tumblr

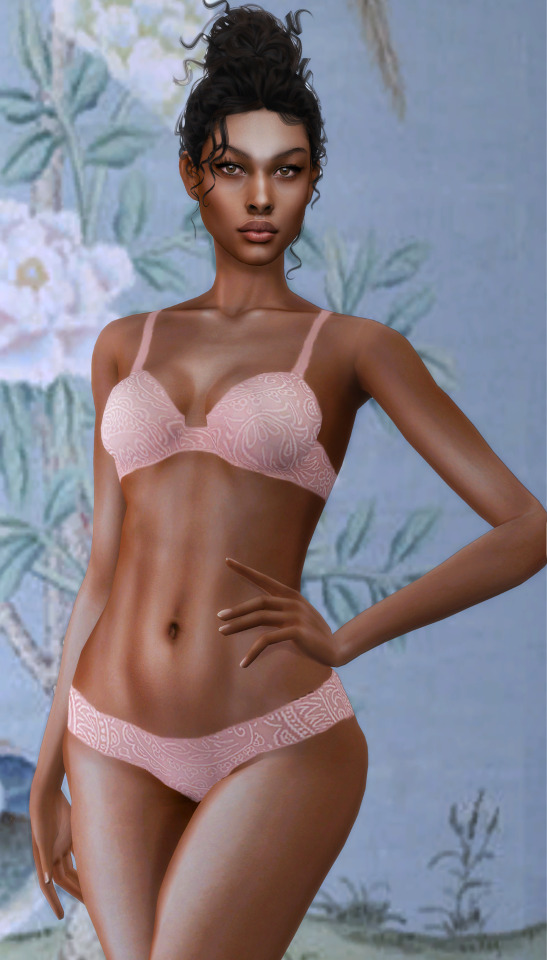
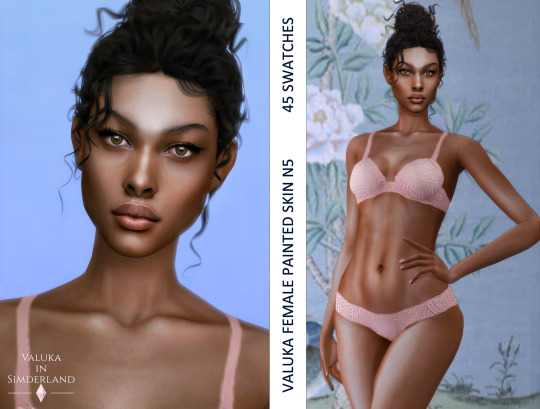


This set includes:
Valuka Female Painted Skin N5
45 colours. Highly anatomical. Thumbnail for identification. You can find it in skindetails category. HQ texture.
Valuka Female Overlay Skin N5
3 brightness levels. Compatible with all EA skintones. Works with all make up. Highly anatomical. Thumbnail for identification. You can find it in skindetails category. HQ texture.
Valuka Body Preset N4
This is the new body preset for female from teen to elder. Custom thumbnail. Highly anatomical. You can find it in body category.
Valuka nose presets N6, N7, N8, N9, N10
Nose presets for female from teen to elder.
Valuka eyes N19
Costume make up category. 15 colours. All genders and ages. Thumbnail for identification. HQ compatible
Valuka eyes N20
Costume make up category. 40 colours. All genders and ages. Thumbnail for identification. HQ compatible
Valuka brows N14
Brows category. 30 colours. All genders and ages. Thumbnail for identification. HQ compatible
DOWNLOAD Patreon early access
Thanks for all CC creators! Especially @s-e-l-e-n-g, @magic-bot, @obscurus-sims, @mmsims, @sonyasimscc, @leahlillith, @jarusims, @simshouseirisnovak
#valuka#valuka in simderland#sims4cc#simblr#ts4cc#sims 4 cc#ts4 cc#sims4 cc#ts4 custom content#the sims 4 skin#sims 4 skin#ts4 skin#ts 4 cc#ts 4 skin#sims 4 preset#ts4 preset#sims 4 eyes#sims 4 lenses#sims 4 brows#ts4 eyes#ts4 lenses#ts4 brows#ts4 body preset#sims 4 body presets
601 notes
·
View notes
Last Seen Blogs

watermelonhouse
Storage container homes Factory

motherofsmoke
Mother Of Smoke

hoziersbb
nothin fucks w me

yanavaseva
Yana's tumblr

tmma1869
Wolri Leonis