#ubuntu 18.04
Text
Véget ér az Ubuntu 18.04 LTS támogatása

2023. május 31-én véget ér az Ubuntu 18.04 LTS Bionic Beaver standard öt éves támogatási ideje, vagyis sem biztonsági frissítések, sem újabb csomagok nem érkeznek hozzá. Ezután a dátum után Ubuntu Pro előfizetéssel (ami, ahogy mi is megírtuk, személyes felhasználásra 5 gépig ingyenes) elérhetővé válik a kiterjesztett biztonsági támogatás (ESM), amelynek keretében a 18.04 további 5 évig, 2028. áprilisig kap biztonsági frissítéseket.
A támogatás végéről és a kiterjesztett támogatásról az Ubuntu blogján olvashatsz bővebben.
0 notes
Text
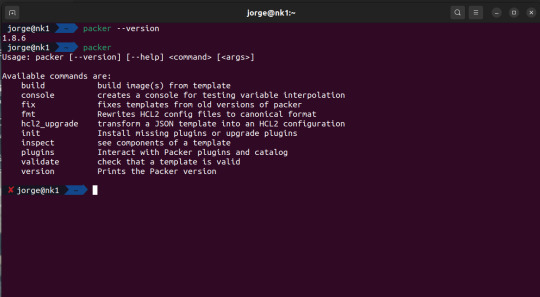
Instalar Packer en Ubuntu 22.04/20.04/18.04/16.04
Packer es una herramienta de código abierto para crear imágenes de máquinas idénticas para múltiples plataformas, pero que se usa mucho para las nubes como AWS, GCP, Azure, vmware, virtualbox, etc. Hoy veremos como instalarla en Ubuntu 22.04/20.04/18.04/16.04.
1. Pre-requisitos:
sudo apt update
sudo apt -y install apt-transport-https ca-certificates curl software-properties-common
2. Importe la…
View On WordPress
0 notes
Text
Install apache mysql phpmyadmin ubuntu 18.04

#Install apache mysql phpmyadmin ubuntu 18.04 how to#
#Install apache mysql phpmyadmin ubuntu 18.04 install#
#Install apache mysql phpmyadmin ubuntu 18.04 update#
#Install apache mysql phpmyadmin ubuntu 18.04 password#
If you have decided not to use the root user, type: $ sudo mysql In case of already configured password-based authentication for root user, type: $ mysql -u root -p To do so, log in again to the MySQL prompt. To access phpMyAdmin not as a root user but as a user created specifically for this purpose, there is nothing to do but create one.
#Install apache mysql phpmyadmin ubuntu 18.04 password#
Configure the Password for the dedicated MySQL user Once done, use the password previously chosen to authenticate yourself as root user in the phpMyAdmin interface. If everything was done correctly, the authentication method for the root user will be changed and the screen displayed will be similar to the following: +-+-+-+-+ In this way, the server will be notified that the authentication method for the root user has to be updated.Ĭheck if the changes are saved by retyping: SELECT user, authentication_string, plugin, host FROM er Instead of password, enter a password that you will have to remember.Ĭonfirm the changes you just made by typing: FLUSH PRIVILEGES To change the authentication type from auth_socket to mysql_native_password and use a password to log in to the root user, type: ALTER USER 'root' 'localhost' IDENTIFIED WITH mysql_native_password BY 'password' | mysql.sys | *THISISNOTAVALIDPASSWORDTHATCANBEUSEDHERE | mysql_native_password | localhost | | ssion | *THISISNOTAVALIDPASSWORDTHATCANBEUSEDHERE | mysql_native_password | localhost | | user | authentication_string | plugin | host | Here you can clearly see how the root user has an auth_socket authentication type. To do so, open the MySQL prompt $ sudo mysqlĬheck the authentication methods for each MySQL user by typing: SELECT user, authentication_string, plugin, host FROM er Ī list of all authentication methods for MySQL users is now displayed. To log in as MySQL root via phpMyAdmin change the authentication method. Configuring the Password for the MySQL root accountĪccessing as a MySQL root user requires an authentication auth_socket instead of a simple password. You can either choose to configure only one of these two users or both. instead log in as a MySQL user root or as a database manager via phpMyAdmin interface. To use phpMyAdmin, do not log in as the user created automatically during the installation. To apply all the changes, restart Apache by typing: $ sudo systemctl restart apache2 Managing access privileges To do so type in: $ sudo phpenmod mbstring The only thing you will need to do is activating the PHP mbstring extension. Once the installation is completed, a phpMyAdmin configuration file will be added here: /etc/apache2/conf-enabled/nf The Just like beforehand, enter a new password, press TAB to select Ok and press Enter. Now enter and confirm a password for the application. Enter a new password, press Tab to select OK and press Enter. You are now required to enter a password for the administrator database. Once pressed Enter, the following screen will be displayed: If you do not press the spacebar, the files required for installation will not be transferred. To select it, press the spacebar and then press Enter. Select apache here, but be careful, the red dash does not select apache 2.
#Install apache mysql phpmyadmin ubuntu 18.04 install#
$ sudo apt install phpmyadmin php-mbstring php-gettextīy typing Y and pressing Enter to confirm.
#Install apache mysql phpmyadmin ubuntu 18.04 update#
PhpMyAdmin is on the standard Ubuntu repository.įirst update the apt index, and then download and install phpMyAdmin: $ sudo apt update In case of a local server, go to the next step and open the terminal of your server. If you haven’t done so yet, following our guide is recommended to securely connect with the SSH protocol.
#Install apache mysql phpmyadmin ubuntu 18.04 how to#
In this guide you will learn how to install phpMyAdmin and how to secure its access on Linux Ubuntu 18.04.įirst, connect to your server via an SSH connection. PhpMyAdmin is a GUI (Graphic User Interface) that allows to create, store and edit entire databases created with MySQL.
0 notes
Text
Ssl for localhost phpmyadmin ubuntu 18.04

Ssl for localhost phpmyadmin ubuntu 18.04 how to#
Ssl for localhost phpmyadmin ubuntu 18.04 install#
Ssl for localhost phpmyadmin ubuntu 18.04 password#
Ssl for localhost phpmyadmin ubuntu 18.04 download#
Now that you have your local CA, run the command below to generate local SSL certificates using mkcert command. But man, that is a lot to ask of folks for something that most reasonable people would call a necessity in modern day public schools. Create Locally Trusted SSL Certificates with mkcert on Ubuntu 18.04. Though, there’s nothing less than noble about Litt taking this on his back and the community pitching in to show him the ropes. At first, it will ask to choose web server as following screenshot. You will be prompted for few configuration options.
Ssl for localhost phpmyadmin ubuntu 18.04 install#
A school without a computer lab in this day and age is a dramatically underfunded school. Next, install the phpMyAdmin package from the default Ubuntu repositories with the below command: sudo apt install phpmyadmin php-mbstring php-gettext. While it’s totally heartwarming to see teachers doing the whole Stand and Deliver super-inspiring thing, doing whatever it takes to make sure that the kids they are responsible for get a proper education, we can’t help but wonder why that has to be the case in the first place. Now, the school is working with no less than 70 computers after just over a year. The total cost for the lab in the end? A grand total of $0. Then, with some assistance from the LUG, he turned them into Ubuntu machines.Īfter the first 18 computers were up and running in classrooms - and proving popular with students and teachers alike - Litt’s principal put him on special assignment, giving him four hours a week off to find more computers, clean them up, and get them running Ubuntu in classrooms. Litt got some donated computers from a local non-profit and wiped the drives - in most cases, this was enough to fix whatever was wonky with the machine. A friend in a Linux Users Group (LUG) mentioned a workaround - computers running a Linux OS wouldn’t cost anyone a dime. GRANT ALL PRIVILEGES ON *.Litt knew that the kids needed a computer lab to be well-rounded, but also that there was no money in the budget to set one up. In case you could not log in to phpMyAdmin with root user create another userĬREATE USER ' IDENTIFIED BY ' password'
Ssl for localhost phpmyadmin ubuntu 18.04 how to#
In this tutorial, we will explain how to install and secure phpMyAdmin on Ubuntu 18.04 server. So, it very important part of any system administrator to secure phpMyAdmin from unauthorized user. It is done by Improving your server’s package index and also using the apt packages to overcome the files and install those on the system. With phpMyAdmin, you can also set up database replication between multiple MySQL hosts easily through the web browser. If phpMyAdmin doesn't load please edit the following file. Install phpMyAdmin from the default Ubuntu repositories. Solution 1 Change PhpMyAdmin Login Page URL in Apache 2 Ubuntu In ubuntu, default phpmyadmin login url can be located at apache configuration that name nf.
Ssl for localhost phpmyadmin ubuntu 18.04 password#
Enter the password and re-enter it again to confirm.ģ. While executing the commands, it asks for the webserver selection, we select Apache2 and select ENTER. Choose apache2 and click OK.Īgain it will ask for the password for PHPMyAdmin. apt install phpmyadmin php-mbstring php-gettext. Let’s have a look at the command to install phpMyAdmin. We are using the apt package management system.
Ssl for localhost phpmyadmin ubuntu 18.04 download#
We will use apt install command to download and install the package from default Ubuntu repositories. The next step is to install the phpMyAdmin package. Sudo phpenmod mbstring & sudo systemctl restart apache2ĭuring the installation, a box will appear to choose the web server that should be automatically configured to run PHPMyAdmin. As of now, we have installed the LAMP stack in the system. Sudo apt install phpmyadmin php-mbstring php-gettext Step.1: Open the terminal and type the following commands one by one Using phpMyAdmin, we can create, delete, rename, edit databases, tables, fields, and also we can directly execute any SQL commands. It allows the database administrators to manage single or multiple database servers either from a local or remote system using a web browser. PhpMyAdmin is a free, open-source web-based database management tool written using PHP programming language.
0 notes
Text
How to remove nvidia drivers ubuntu 18.04

#How to remove nvidia drivers ubuntu 18.04 how to
#How to remove nvidia drivers ubuntu 18.04 install
ubuntu-drivers commandįirst, update the repository index to refresh the available Nvidia drivers. Install Nvidia driver from Ubuntu repository i. Reboot the system post the installation and then validate the driver installation by going again to the Additional Drivers tab. If your Ubuntu system has UEFI secure boot enabled, you may need to configure secure boot and enroll the MOK key in your system’s firmware. Then, wait for the installation to complete. Choose The Driver VersionĮnter the password to authenticate the driver installation.
#How to remove nvidia drivers ubuntu 18.04 install
Choose the suitable driver version you want to install or the recommended one (top of the list) and then click Apply Changes. This tab will display the available driver versions for your graphic card. Go to Activities > Software & Updates > Additional Drivers. Install Nvidia drivers from Official site 1. Install Nvidia drivers from Ubuntu repositoryĤ. We can install the Nvidia drivers in multiple ways and from different sources.Ģ. Nouveau is an open-source display driver for Nvidia cards and it is developed through reverse engineering of the Nvidia driver. sudo lshw -C display Graphic Card Informationįrom the above output, you can see that the system has an Nvidia graphics card and it uses Nouveau drivers. Let us find the graphics card attached to your system.
#How to remove nvidia drivers ubuntu 18.04 how to
Here, we will see how to install Nvidia drivers on Ubuntu 20.04/ Ubuntu 18.04. Nvidia and AMD manufactured graphics cards are the most commonly used graphics cards in laptops or desktops. Graphics cards either come with a system board or attached to the system board via a PCI-E slot. All Desktops and Laptops come with a graphics card for displaying images over a monitor.
0 notes
Text
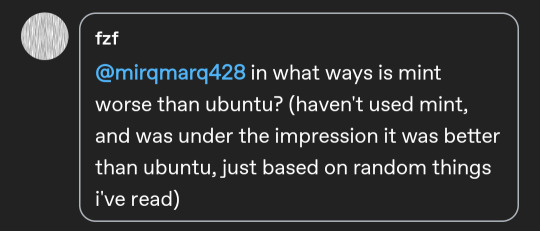
Replying to @fzf
I have no strong personal feelings about mint. It happened to be a good first distro for me, and i like the colors. My disrecommendation of it comes in bullet points:
Mint is touted as a "windows-like environment" on account of the Cinnamon desktop. However, Cinnamon and windows 10 have deceptively little in common beyond the general layout - iv said this before and I'll say it again: don't give people a knockoff of what they're used to, give them something new to learn.
Mint disables, disallows, discourages, and distrusts snap packages. While iv seen a huge amount of hate for these, and the technology had a rough start, they're not any more of a pain than flatpak (and way better than appimages, yikes). In fact, removing them from what was otherwise an Ubuntu system causes more problems than it fixes - for months last year it was a pain to run Chromium on mint because the Deb was broken and snaps were disabled (iirc - might be misremembering. either way the snap war is not a good cause imo)
Release speed - when i got started with Mint in march of 2020, I downloaded mint 19.04 cause that was the version on the website. Mint 19.04 is based on Ubuntu 18.04 which had a 4.18 kernel. Everyone else in 2020 had a 5.2 kernel at least. There is a balance between stable and up-to-date, and Ubuntu has mastered it. Mint, by necessity, lags behind Ubuntu. Heck, there's even the time the mint devs had to beg users to update because of a security issue, and found that most users had never bothered updating!
Ubuntu (gnome) is different from both macos but windows interface in obvious ways that encourage a paradigm shift in desktop usage.
Snap packages are extremely meh, but they ain't here to steal ur freedums (yet).
Ubuntu has the second best software compatibility of any Linux (best is Arch), and a lot of pkgbuilds in the AUR are just extracting debs from Ubuntu ppas anyway so it's really close. Ubuntu tells you to update and makes it easy with the popup which you can close or banish.
So yeah. Mint is just slightly worse Ubuntu
21 notes
·
View notes
Text

blinged out and going to the ~mall~ with @combat-epistemologist so they can buy more Perfectly Generic Clothes With No Attributes. and also jamba juice
lapel pin is a gay pride x-wing from @ashleyrguillory!! rings are: 2 puzzle rings from the puzzlering.co guy (EDIT: sorry for fucking up the url like three times his name is norman greene and i have bought his rings from both the norcal ren faire and the dickens faire in daly city), 1 snake ring from norcal ren faire, and my mit class ring. the bracelet is a leatherman tread and my little Ring Of Keys moment includes a keychain level, a leatherman squirt (the edition they discontinued ;-; with the wire strippers ;-;), an ubuntu 18.04 live usb (you never know when you'll need an emergency ubuntu), and a vintage key i got from an infosec researcher guy i met at a robotics friend's party. he was like, yeah i collect old keys and locks so now my friends are constantly giving me weird old keys and i have a ring of like 200 of them. do you want some. and if i've learned something from children's fantasy literature it's that if someone offers you a weird old key you say thank you and accept the quest hook
#keys guy also gave me like 3 dozen eggs#from the Too Many Backyard Chickens#the trashcan speaks#posting my fit as if i have any idea how to take a good selfie#shopping w combat-epistemologist is so funny bc they like. care about what shit is in style for some reason#and im like. This.#not pictured: my boots from thursday boots that i bought myself as a Finished My Fucking Thesis present with the purple tumblr shoelaces
26 notes
·
View notes
Text
Como instalar Terraform en Ubuntu 22.04|20.04 |18.04
Como instalar Terraform en Ubuntu 22.04|20.04 |18.04
El equipo de Terraform ofrece repositorios de paquetes para Linux basado en Debian, que nos permitirán instalar Terraform usando la herramienta de administración de paquetes apt.
1- Actualizamos
sudo apt update && sudo apt install software-properties-common gnupg2 curl
2- Cargamos la clave GPG del repositorio
curl https://apt.releases.hashicorp.com/gpg | gpg --dearmor > hashicorp.gpg
sudo…

View On WordPress
0 notes
Text

Ubuntu Linux version 18.04 LTD will EOL this month's end unless you buy extended support. Here is how to upgrade Ubuntu 18.04 to 20.04 LTS or 22.04 LTS.
-> How To Upgrade Ubuntu 18.04 to 20.04 LTS using command line
-> How to upgrade from Ubuntu 20.04 LTS to 22.04 LTS
31 notes
·
View notes
Text
Annoying "Unsupported Browser" msg
@staff
Today, I began receiving messages that my browser was not supported and that the effects of using it could be unpredictable.
Ironically, I AM using the Firefox Browser (on my laptop as well as my android).
The Firefox 108.0.1 - 64bit browser laptop version is for the Ubuntu-Linux OS ver. 18.04.
It is the most recent version.
I don't plan on changing my OS to Windows XX.X just so I'm able to use a browser that Tumblr "supports"!
If you'd like to delete my account(s) for me, then go ahead.
At least let me know you going to do it, ahead of time, eh?
However, if you had any sense about browser user issues, you'd widen your range of acceptable browsers that would include Linux OS's that use Firefox browsers at 64 bit capability.
Please reply so I know you don't have an AI sending these messages out, un-monitored.
Best,
Rick White
a mostly happy 10+ year user of Tumblr...
9 notes
·
View notes
Text
XLHO.ST - Хостинг провайдер о котором вы мечтали
Хэлоу! Ты уже знаком с нами?
Я тебе сейчас всё расскажу.
Наш хостинг XLHO.ST существует с 2008 года.
Мы предоставляем такие услуги как:
Администрирование
Виртуальные серверы
Выделенные серверы
Самые лучшие дата - центры:
Нюрнберг (Германия)
Фалькенштайн (Германия)
Хельсинки (Финляндия)
Ашберн (США)
Большой выбор операционных систем:
Windows Server 2012 R2
Windows Server 2019
CentOS 7
CentOS Steam 8
CentOS Steam 9
Rocky Linux 8
Rocky Linux 9
Ubuntu 18.04
Ubuntu 20.04
Ubuntu 22.04
Debian 10
Debian 11
Fedora 36
А также вы можете подключить свой ISO образ
Все различные способы оплаты:
Visa
Mastercard
МИР
PayPal
PerfectMoney
Qiwi
Юмани
Webmoney
Bitcoin
Litecoin
USDT
Если вы не нашли подходящей вам платёжной системы, напишите нам.
На нашем сайте вы можете найти тарифы таких типов:
S-10 vCPU
Процессор - 1x Intel Xeon
Память - 2 GB
Накопитель - 20 GB NVMe SSD
IP-Адреса - 1 IPv4, /64 IPv6
Порт - 1 Gbit/s
Размещение - Германия, Финляндия
$10 в месяц
Также в линейки виртуальных серверов присутствуют тарифы с выделенными ядрами:
S-110 CPU
Процессор - 2x AMD EPYC
Память - 8 GB
Накопитель - 80 GB NVMe SSD
IP-Адреса - 1 IPv4, /64 IPv6
Порт - 1 Gbit/s
Размещение - Германия, Финляндия, США
$49 в месяц
В линейке выделенных серверов тоже присутствуют два типа тарифов:
D-10 SSD
Процессор - E3-1246v3
Память - 32 GB DDR3
Накопители - 2x 240 GB SSD
IP-Адреса - 1 IPv4, /64 IPv6
Порт - 1 Gbit/s
Размещение - Германия
$60 в месяц
А так же:
D-20 SATA
Процесс��р - E3-1246v3
Память - 32 GB DDR3
Накопители - 2x 2 TB SATA
IP-Адреса - 1 IPv4, /64 IPv6
Порт - 1 Gbit/s
Размещение - Германия
$60 в месяц
Как вы уже поняли по названию данные тарифные планы отличаются типами накопителей.
Одни SSD диски, другие SATA диски.
Мы рекомендуем нашим клиентам именно SSD диски так как эти диски быстрее чем SATA диски.
Но если вам нужно больше и подешевле всё-таки стоит взять именно SATA диски.
Вы можете связаться с нами:
Email [email protected]
Telegram @xlho_st
Онлайн чат
Система тикетов
Это и многое другое ты найдёшь на нашем сайте https://xlho.st/
2 notes
·
View notes
Text
In this tutorial, you will learn how to get free VPS no credit card with RDP (remote desktop protocol) for lifetime. This platform is similar to Google Colab and it is an educational platform. This is not disconnected while using like Colab. We us it to create an Ubuntu VPS with RDP access. This is a complete tutorial, stay until the end. Don’t miss any steps. You can find all the code and guideline at the description.
1Sign up to Goormide Platform2Create a Container to Run VPS3Setup Desktop Environment and Stabilized RDP Connection4Setup Port Forwarding and Connect RDP524/7 Free VPS with RDP Access | Goormide Alternative
Sign up to Goormide Platform
In the home page, click “Get Started” button. You will redirect to login page. You can directly login using your Google, Facebook and GitHub or click sign up link. They ask additional information if you want you can skip that.
Goormide Sign Up
Create a Container to Run VPS
After sign in, go to the dashboard and click on “Create new container”. You can create up to 5 contains for your educational purposes. In the new page, type a name and description about your project.
Select a region and set visibility mode as private. if you use it as public anyone can access your VPS so keep it as private.
Leave default settings for template, deployment and GPU. Change stack as Python and select preferred OS for you. In this tutorial I use Ubuntu 18.04.
After settings all of these, click “create” button at the top right conner of the page.
Now your container is being ready to deploy. After the container has successfully created, click “Run Container” button.
Setup Desktop Environment and Stabilized RDP Connection
Goormide is starting now. In this part, carefully watch the video without skip. You will be redirected to Goormide workshop.
First, update list of packages using following command.
sudo apt update
Now, install VNC server using this command.
sudo apt -y install vnc4server
Next, Install Ubuntu desktop environment for RDP use.
sudo apt install xfce4 xfce4-goodies -y
Here, selects a region by number for keyboard layout. Type more to get another region as well. Then type the number of the region and press enter. Again, select keyboard layout with language using numbers.
To set a password for VNC server type this code. Then, enter your password and verify it by reentering. It is not visible due to security reason, don’t get confused just type and press enter.
vncpasswd
Set up VNC viewer resolution using this command line. Now, the process is finished don’t closed the terminal window. You can use any resolution for this.
sudo vncserver -geometry 1366x768
Setup Port Forwarding and Connect RDP
Download VNC Viewer
Go to the Goormide dashboard using a new tab. Click a setting icon of the container. You will redirect to a new page. Under port forwarding, click “new” button to add a new record. Use custom port type and add internal port as 5901 then click “done” button.
Now copy the server IP under command of the newly added tab. Then open VNC viewer application and enter server IP that you copied, after click “connect” button. If you don’t have VNC viewer check the description for download link. Enter your password that you set in step 3.
Now your Ubuntu VPS is finished. Enjoy it. If this video is helpful for you press like button and share with our friends. Subscribe the channel for more videos like this. Thank you for watching Minex.
24/7 Free VPS with RDP Access | Goormide Alternative
You can use Google Cloud Platform and Oracle Cloud to get free VPS with RDP access.
https://www.minextuts.com/free-vps-24-7-on-gcp-with-turbo-vnc-viewer-rdp-access/
All these platforms (Groomide, Oracle Cloud, Google Cloud Platform) gives small VPS. If you want a powerful premium cheap VPS server, check these providers.
Check Premium VPS Providers and Discounts
CHECK HERE
0 notes
Text
"PIO — это сопроцессор ввода-вывода — простой процессор со своей системой команд, который можно программировать на ассемблере, чтобы реализовать протокол какого-то интерфейса без задействования основных ядер"
Добавлю интересную информацию :).
Читаю эту статью, и комментарии:
19.05.24
https://habr.com/ru/articles/538994/
Разбираюсь с безопасной загрузкой на макбуке да и в прочем, да Андрей?...
Сейчас копаю дистрибутив "kaos". Не понимаю какого... и туда андрюша добрался?... Андрюша, ведь в grub опции не просто так существуют, и опции для обеспечения безопасности. А тут мне последнее время почти все дистрибутивчики которые валялись у меня в рюкзаке на дисках, просят не трогать сеть, или "я не загпужусь", да андрюша?
По четвергу пятнице и вчерашнем дне еще напишу.


Некоторые фото. Да распаковал так же диски от Pulko Mandy :).
Оказалось аж 3 штуки :)), 17 числа распаковал :(, стало интересно :)
Пожалуй возьму что нибудь отсюда в дополнение:

Из справки по дистрибутиву tails. Да, как бы я Haiku/BeOS не любил но у меня пока не тот уровень, когда можно код писать, как пирожки, да и в принципе вообще ... Есстественно там нужно много ковырять и конфигурировать под каждую железку и писать драйвера т.к. клава на макбуке да и почему то броадкомовский чип не обнаружился... Да и smbios все дела, ethernet over power...
Да в общем то добавлю еще важного, я потерял где то вообще все что я наковырял по безопасной загрузке, но видимо оставлю здесь. Очень хорошая вещь. Grub2 очень конфигурируем, и помогает вот такими вещами закрывать дыры, от таких выродков как у меня застенных 👇.
Кстати, почти никто такие длинные списки в сети не делает, только глубоко копнув, или на новостных ресурсах пишут, с разворотом всего списка того чего накопили, ну и в принципе даже там узко. Ладно, если бы чертила не обстреливал ультразвкком и другими вещами то это было бы как у всех тех кого пытаются взламывать, - нормально работоспособно конфигурировалось, да Андрюшка?, и решалось бы быстро, а так черт превращает в овоща, и убивает.
Еще хочу взять электро скейт, точнее посмотреть съездить. Даже 80 рублей, не особо то и дорого, но если развалюха то не особо и поездишь, но и на этом фоне допишу о стандартизации скейтов снизу. И возможно еще раз перепощу, что бы далеко потом не копать со смартфона, да андрюша?... возможно спарсю вылезу в сеть как буду уезжать этот блог, и сохраню, и удоалю. А оттуда уже посмотрим. Кстати, фото олного изображения, очень веселое :), оставил здесь... да и еще хотел кое что написать если не написал. Я фотки с видео некоторые все же сохранил... макбук аллюминиевый, и действительно аллюминий работает, а то у меня диски не определялись, а тут определились, но пришлось хорошо закрыть фольгой, т.к. ошибки так и валились даже с этим диском, откуда списывал, да Андрюша? Да и благо там не так много дыр закрывать....
0 notes
Text
So installieren Sie Pantheon unter Ubuntu 18.04 LTS
Im Internet sind zahlreiche Desktop-Umgebungen für Linux verfügbar. Pantheon ist eine davon, die Standard-Desktop-Umgebung in Elementary OS.
In der Zwischenzeit wird Gnome die Standard-Desktop-Umgebung in Ubuntu 18.04 sein. Gnome ist eine der beliebtesten Linux-Desktop-Umgebungen auf dem Markt.
Es ist die Standard-Desktop-Umgebung auf vielen großen Linux-Distributionen wie Fedora, Debian, Oracle…

View On WordPress
0 notes
Text
how to install vpn server on ubuntu 18.04
🔒🌍✨ Obtén 3 Meses GRATIS de VPN - Acceso a Internet Seguro y Privado en Todo el Mundo! Haz Clic Aquí ✨🌍🔒
how to install vpn server on ubuntu 18.04
Configuración VPN en Ubuntu 18.04
La configuración de una red privada virtual (VPN) en un sistema operativo Ubuntu 18.04 es una forma segura y eficaz de proteger tus datos mientras navegas por internet. Ubuntu es uno de los sistemas operativos más populares en el mundo Linux, y configurar una VPN en él es bastante sencillo.
Hay varias formas de configurar una VPN en Ubuntu 18.04, una de las formas más comunes es a través de la red VPN OpenVPN. OpenVPN es un software de código abierto que te permite crear conexiones VPN seguras y privadas. Para configurar OpenVPN en Ubuntu 18.04, primero necesitas instalar el paquete OpenVPN en tu sistema. Puedes hacerlo a través del terminal utilizando el comando "sudo apt-get install openvpn".
Una vez que hayas instalado OpenVPN, necesitarás configurar los archivos de configuración de tu VPN. Estos archivos generalmente son proporcionados por el proveedor de servicios VPN y contienen la información necesaria para conectarte a su red. Puedes colocar estos archivos en el directorio /etc/openvpn/ para facilitar su acceso.
Después de haber configurado los archivos de OpenVPN, puedes conectarte a tu VPN ejecutando el comando "sudo openvpn nombre_del_archivo.conf". Una vez conectado, tu tráfico de internet estará encriptado y tu conexión será mucho más segura.
Configurar una VPN en Ubuntu 18.04 es una forma efectiva de proteger tu privacidad y seguridad en línea. Con unos simples pasos y configuraciones, puedes navegar por internet de forma segura y sin preocupaciones. ¡Asegúrate de mantener tus archivos de configuración seguros y disfruta de una conexión segura gracias a tu VPN en Ubuntu 18.04!
Servidor VPN en Ubuntu 18.04
Un servidor VPN en Ubuntu 18.04 es una excelente manera de garantizar la seguridad y privacidad de tus conexiones de red. Con una VPN, puedes acceder a Internet de forma segura y protegida, evitando que terceros intercepten tus datos sensibles.
Para configurar un servidor VPN en Ubuntu 18.04, puedes utilizar software como OpenVPN, que es una opción popular y confiable. Primero, debes instalar el paquete OpenVPN en tu servidor Ubuntu utilizando el gestor de paquetes apt-get. Luego, puedes generar los certificados de seguridad necesarios y configurar el archivo de configuración de OpenVPN.
Es importante recordar que una vez que tu servidor VPN esté en funcionamiento, debes administrarlo de manera adecuada para garantizar su seguridad. Esto incluye la actualización regular del software y la supervisión de las conexiones para detectar posibles intrusiones o actividades sospechosas.
Además de proteger tu privacidad en línea, un servidor VPN en Ubuntu 18.04 también te permite acceder a contenido restringido geográficamente y navegar por Internet de forma anónima. Sin embargo, es fundamental asegurarse de seguir las mejores prácticas de seguridad cibernética para evitar posibles vulnerabilidades en tu servidor VPN.
En resumen, configurar un servidor VPN en Ubuntu 18.04 es una forma efectiva de proteger tus conexiones de red y navegar por Internet de manera segura y privada. ¡Hazlo hoy mismo y disfruta de una experiencia en línea más segura y libre!
Pasos instalación VPN en Ubuntu 18.04
Para instalar una VPN en Ubuntu 18.04, sigue estos sencillos pasos. Primeramente, abre una terminal en tu sistema Ubuntu. A continuación, asegúrate de tener instalado el paquete de red OpenVPN escribiendo el comando "sudo apt-get install openvpn". Una vez completada la instalación, descarga los archivos de configuración de tu proveedor VPN.
Después de descargar los archivos, cópialos en el directorio "/etc/openvpn/". Esto te permitirá acceder fácilmente a ellos desde la terminal. Abre la terminal y navega hasta el directorio donde colocaste los archivos de configuración.
El siguiente paso es iniciar la conexión VPN. Para ello, escribe el comando "sudo openvpn nombre_del_archivo_configuracion.ovpn". Reemplaza "nombre_del_archivo_configuracion" con el nombre del archivo que descargaste.
Una vez ejecutado el comando, te pedirá que ingreses tus credenciales de VPN. Introduce tu nombre de usuario y contraseña y la conexión VPN se establecerá exitosamente.
Para comprobar que estás navegando a través de la VPN, abre tu navegador web y visita un sitio como "whatismyip.com" para verificar la dirección IP desde la cual estás accediendo a Internet. Deberías ver la dirección IP de la VPN en lugar de tu dirección IP real.
¡Listo! Ahora tienes tu VPN configurada en Ubuntu 18.04 y puedes navegar de forma segura y privada. Recuerda desconectarte de la VPN cuando no la necesites para no consumir recursos innecesarios de tu sistema. ¡Disfruta de una conexión segura y privada en tu Ubuntu 18.04!
Tutorial VPN Ubuntu 18.04
Un tutorial de VPN para Ubuntu 18.04 es una guía útil para aquellos que desean proteger su privacidad y seguridad en línea mientras utilizan este sistema operativo. Una VPN, o red privada virtual, cifra su conexión a internet y redirige su tráfico a través de servidores seguros, ocultando su dirección IP real y protegiendo sus datos de miradas indiscretas.
Para empezar, primero debe seleccionar un proveedor de VPN confiable y descargar su software para Ubuntu 18.04. Una vez instalado, podrá conectar su VPN y elegir entre diferentes ubicaciones de servidor para enmascarar su ubicación real.
Es importante recordar que una VPN no solo protege su privacidad, sino que también le permite acceder a contenido restringido geográficamente, como sitios web y servicios de transmisión. Esto es especialmente útil para aquellos que desean ver ciertos programas o acceder a sitios bloqueados en su región.
Además, configurar una VPN en Ubuntu 18.04 es relativamente sencillo gracias a las numerosas guías en línea y al soporte de la comunidad. Si sigue las instrucciones paso a paso y realiza las configuraciones necesarias, podrá disfrutar de una navegación segura y anónima en la web.
En resumen, un tutorial de VPN para Ubuntu 18.04 es una excelente manera de proteger su privacidad en línea y desbloquear contenido restringido, brindándole una experiencia de navegación más segura y versátil.
Guía completa VPN Ubuntu 18.04
Una VPN, o red privada virtual, es una herramienta útil para proteger tu privacidad y seguridad en línea. En este artículo, te ofreceremos una guía completa sobre cómo configurar y utilizar una VPN en Ubuntu 18.04.
Primero, es importante elegir un proveedor de VPN confiable que se adapte a tus necesidades y presupuesto. Una vez que hayas seleccionado un proveedor, descarga e instala su software en tu sistema Ubuntu 18.04.
Después de instalar la aplicación de VPN, ábrela e inicia sesión con tus credenciales. A continuación, elige un servidor al que te gustaría conectarte. Algunos proveedores de VPN ofrecen servidores especializados para actividades específicas, como streaming o descargas torrent.
Una vez que te has conectado con éxito a un servidor, tu conexión a Internet estará cifrada y tu dirección IP real estará oculta. Esto ayuda a proteger tu información personal de miradas no deseadas y a navegar por la web de forma anónima.
Recuerda que una VPN no es una solución mágica para todos los riesgos de seguridad en línea, pero puede ser una herramienta eficaz para proteger tu privacidad. Siempre es importante utilizar contraseñas seguras, mantener tu software actualizado y ser consciente de las amenazas en línea.
En resumen, configurar y utilizar una VPN en Ubuntu 18.04 es una forma sencilla de mejorar tu seguridad y privacidad en línea. ¡Explora tus opciones y comienza a proteger tu conexión hoy mismo!
0 notes
Last Seen Blogs

tgrrrbby97
Scotch Bonnet Bby🔥🌚

gourav2029
Untitled

wavepro
WAVEPRO

umichnursingglobal
Michigan Nursing Abroad

dokidobe
yellow.dr.monv