#ventilated bags manufacturers
Text
Ventilated FIBC Bags
Alpine FIBC PVT.LTD. is a best manufacturer, exporters and suppliers of high quality Ventilated FIBC Bags & FIBC Ventilated Bags in India, USA, Germany, France, UK, Italy, Canada, Spain, Netherlands, Portugal, Greece, Sweden, Argentina, Chile, Poland. These Bags are specially designed to store food items like potatoes, onions etc. The ventilated fabric permits the required air flow through the fabric into the bag, thus preventing spoilage due to moisture and mold build-up. Usage of FIBC Ventilated Bags have eased the common supply chain issues of handling, storing and transporting food items, commonly witnessed with the 25/50 kg woven sack bags.
0 notes
Text

#Ventilated FIBC Bags#Ventilated FIBC Bags Manufacturers & Suppliers India#Packing Solutions#Packaging Solutions#Packing Plastipacks#Bulk Container Bags#Ventilated FIBC Bags at Best Price in India#Ventilated FIBC Bags in India#Ventilated FIBC Bags Supplier in Ahmedabad#Ventilated FIBC Bags Manufacturer in India#Ventilated FIBC Bags Manufacturer#Ventilated FIBC Bags Supplier and Manufacturer in Ahmedabad#Ventilated FIBC Bags Manufacturer from Ahmedabad
0 notes
Text
Music of the Heart [J.YH] - thirty-five | what a feeling
You were glad that security didn’t randomly decide to stop you because they would have asked a bunch of questions, such as: why do you have a bunch of tools that look like you’re planning on building a bomb? Or sabotaging an elevator? Or driving a bus over 55 mph for most of a movie starring Keanu Reeves? Or doing some other heinous act?
And then you’d have to explain that - like a lot of musicians - you liked a particular set of pickups, and you liked replacing them yourself, and you liked your tools, and you were going to be a goblin and take them all the way from your house to your job just to do it. Would it have been easier to take the bass home and do it?
Who the fuck knows? Maybe.
But it wouldn’t be nearly as fast.
You had to stop yourself from skipping at the thought of a new instrument as you walked down the hall to the studio, where you knew your bass would be, shiny and brand new.
You walked into the recording room to find no one inside. Surprising. Unsurprising was finding your bass on the table as Maddox said he had left it.
You smiled and put your stuff down quickly, excited like a kid on christmas. You always loved getting a new instrument, and you loved pulling it apart even more.
You ripped open the box hurriedly, getting stabbed by one of the extra large staples that held it shut. But that didn't deter you since you had all your shots and tetanus couldn’t touch you. You put your finger in your mouth to clean the blood.
You pulled the bass out and turned it around. A classic Fender Precision Bass in a sparkling custom sage green color. Something sturdy for the many hours it would be played on hundreds of tracks in the future. Such a beautiful color, such lovely flecks that made it glitter in the light, you had researched for hours and already knew what it was going to sound like…
Now to take it apart.
You took your bag of bass-modding tricks out of your backpack and opened it. Whoever invented the battery powered electric drill was a genius. You revved it for no one in particular: the sound of fun. You made short work of all the screws that held the pickguard on and set them aside; you’d need them for the new pickguard you bought. You checked the potentiometers as you pulled them out of their holes on the pickguard. You were thankful that the manufacturers hadn’t cut the wires too short, since that always made them a pain in the ass when it came time to put the whole thing back together. In your mind, you thanked whoever cut the wires, what an absolute gem of an individual. The soldering looked good, that was always a good sign; nothing worse than having bad soldering come apart in the middle of playing a song.
Too bad you had to get rid of it, you smiled to yourself. A+ for soldering though, whoever did it, they had done a really good job. Nice and clean.
You took out the new pickguard you had and unwrapped it. You had actually had it sitting in the bottom of your closet for a while now since you bought it on a whim and had no bass to put it on. It was a purple faux mother of pearl number that reflected the light beautifully and would look gorgeous against the sage green body of this bass. You pulled the knobs off the potentiometers, put them through the pickguard, put the knobs back on, and unsoldered the spots where the wires of the pickups were soldered to the potentiometers. You were glad the ventilation in the room was so good and hoped that no one got mad at you for doing this. With the potentiometers unsoldered and cleaned up, you set it aside so you could fuck with the pickups. Easy peasy.
You unboxed the pickups you bought and looked them over, unwrapping the wires so they were straight and put them down. You - as carefully as you could - took the factory pickups out of the bass, and held them up against each other. There was a marked difference, you felt. You rooted in your bag of stuff for the multimeter you brought with you. You were always curious about this kind of thing: you checked the voltage of the factory pickups… 10.35k ohms, that was pretty normal. And you checked your new ones… 10.67. Little bit better. But while the magnets in the factory ones had wider diameters, the ones you bought were heavier.
You laughed to yourself. Time for it’s glow up.
Of course you were going to replace them.
Your phone, having sat on the table this whole time, inert, lit up with a message.


You laughed. Of course he had a crush on Jennifer Beals as a kid. Of course.
You got back to your bass, you were almost done.
You took the screws that came in the box and screwed the new ones into place and soldered their wires to the potentiometers. It was excruciatingly difficult to wait patiently for it to cool, you were excited to see it all put back together and be able to play it. After a few minutes of waiting, you put the new pickguard back and screwed it on. You put all the strings back, and grabbed the small amp by the wall and plugged it in: it made noise, so you were successful, now you just needed to tune it.
Whatever many minutes of tuning later, you could finally play it and played a song.
Someone knocked on the door.

previous | main cast | masterlist | next
Send an ask or leave a comment if you want to be added to the tag list! 🎵
luvvvx • iamthehotdemon • hrts4hanniehae • rachs-words •
#Yunho#Jeong Yunho#Ateez#Ateez smau#Ateez fic#Ateez au#music industry au#enemies to lovers#childhood friends to lovers#reader fic#ᴍᴜsɪᴄ ᴏғ ᴛʜᴇ ʜᴇᴀʀᴛ
16 notes
·
View notes
Text

Hazard 4 Blastwall Hardshell Sling Pack
Hazard 4 Blastwall Sling Pack boasts a multitude of features, making it a highly functional and versatile choice for gear organisation and protection. With its lightweight shell/pad construction, padded walls, and modular dividers, you can efficiently arrange and safeguard your belongings.
Additionally, the pack offers a dedicated rear compartment for laptops or hydration bladders, an admin organiser panel for pens, multi-tools, SD cards, tablets, and more, as well as multiple MOLLE webbing for attaching extra gear.
For comfort, the main strap is padded with 3-D air mesh, and the abrasion-resistant moulded back pad not only adjusts to your spine but also enhances ventilation, ensuring a pleasant carrying experience even during extended use.
Manufactured from durable Cordura 1000D nylon or 600D polyester, with reinforced stitch patterns for added strength and longevity, this tactical sling bag is built to withstand the rigours of everyday use.
Whether you're carrying cameras, drones, laptops/tablets, or using it for motorcycle excursions, Hazard 4 Blastwall Sling Pack is the perfect companion for your adventures.
Find out more at Military 1st online store.
http://mil1.st/BSPBSSCPUK
Enjoy free UK delivery and returns! Swift delivery to Ireland, the US, Australia, and across Europe.
#hazard 4 california#military 1st#hazard4#hazard4california#prepared4anyhazard#backpack#slingpack#shellpack#photogear#airsoft#softair#camouflage#camo#gear#gearporn#tactical#tactical gear#tacticool#hiking#hike#outdoors#trekking#wilderness#get outside#opt outside#into the woods#preppers#survival#adventure photography#gear up for action
9 notes
·
View notes
Text
Residential Premium Inflatable Jump House
Inflatable jump houses have become a staple at parties, events, and backyard gatherings, providing endless entertainment for kids and adults alike. However, with a wide variety of options available in the market, choosing the perfect inflatable jump house can be a daunting task. This guide aims to help you make an informed decision by outlining key factors to consider and recommending a top-notch inflatable jump house that stands out in the crowd.

Size Matters:
The first and foremost consideration when choosing an inflatable jump house is its size. Determine the available space in your backyard or the venue where you plan to set it up. Ensure that the jump house fits comfortably within the designated area, leaving enough room for safe play. Additionally, consider the number of children or participants the jump house is designed to accommodate.

Safety Features:
Safety should be a top priority when selecting an inflatable jump house. Look for features such as reinforced stitching, high-quality materials, and secure anchor points to ensure stability. The jump house should also have proper ventilation to prevent overheating, and safety netting to prevent accidental falls.

Theme and Design:
Inflatable jump houses come in a variety of themes and designs, ranging from classic bouncy castles to elaborate obstacle courses. Consider the preferences of the target age group and the theme of your event. Whether it's a princess castle, a superhero adventure, or a tropical paradise, choosing a jump house that aligns with the event's theme can enhance the overall experience.
Durability and Quality:
Invest in a high-quality inflatable jump house that is made from durable materials. The durability of the jump house is essential to ensure its longevity and safety. Check customer reviews and testimonials to gauge the reputation of the manufacturer and the quality of their products.
Ease of Setup and Storage:
Choose an inflatable jump house that is easy to set up and take down. Look for models that come with user-friendly instructions, and consider the time and effort required for inflation and deflation. Additionally, check if the jump house comes with a convenient storage bag, making it easy to transport and store when not in use.
2 notes
·
View notes
Text
Desperate Europeans Return to the World’s Oldest Fuel for Warmth
Source: Bloomberg.
‘It’s back to the old days’ as demand for firewood soars due to gas shortage.
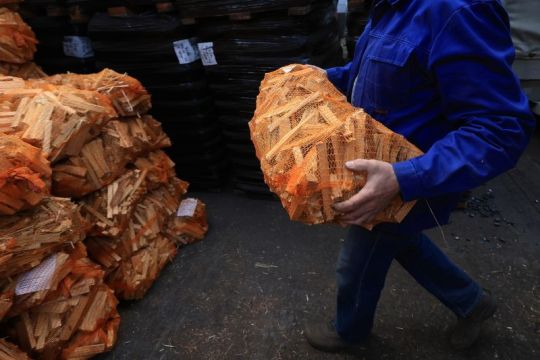
A supplier unloads bags of firewood at the Hans Engelke Energie OHG depot in Berlin, on Oct. 5.Photographer: Krisztian Bocsi/Bloomberg
October 8, 2022 at 12:00 AM CDT
Not far from Berlin’s Tempelhof airport, Peter Engelke is putting up a new security gate at his warehouse because of concerns about desperate people pilfering his stock. The precious asset at risk is firewood.
Engelke’s actions reflect growing anxiety across Europe as the continent braces for energy shortfalls, and possibly blackouts, this winter. The apparent sabotage of the Nord Stream gas pipeline is the latest sign of the region’s critical position as Russia slashes supplies in the standoff over the war in Ukraine.
At a summit in Prague on Friday, European Union leaders fell short of agreeing on a price cap for gas amid concerns that any such move could threaten supplies to the region. As much as 70% of European heating comes from natural gas and electricity, and with Russian deliveries drastically reduced, wood — already used by some 40 million people for heating — has become a sought-after commodity.

Peter Engelke next to a pile of wood pellets at his company's depot in Berlin, on Oct. 5.Photographer: Krisztian Bocsi/Bloomberg
Prices for wood pellets have nearly doubled to 600 euros a ton in France, and there are signs of panic buying of the world’s most basic fuel. Hungary even went so far as to ban exports of pellets, and Romania capped firewood prices for six months. Meanwhile, wood stoves can now take months to deliver.
Aside from concerns about shortages, the energy crisis is intensifying a surge in living expenses, with euro-zone inflation hitting double digits for the first time ever in September. Strapped households across the region are increasingly faced with choosing between heating and other essentials.
“It’s back to the old days when people wouldn’t have the whole house heated,” said Nic Snell, managing director at British wholesale firewood retailer Certainly Wood. “They’d sit around the fire and use the heat from the stove or open fire and go off to bed. There will be a lot more of that this winter.”
The trend has meant a boom in demand for Gabriel Kakelugnar AB, a manufacturer of high-end tiled stoves costing an average of 86,000 Swedish kronor ($7,700). The stoves can keep a room warm for 24 hours because of its intricate construction using different channels that hold and distribute the heat.
“During the pandemic, people started to invest more in their homes. That has now of course escalated,” said Jesper Svensson, owner and managing director of the company that’s located less than an hour drive from Sweden’s biggest nuclear reactor.
Orders have surged more than fourfold, and customers now have to wait until March for delivery, compared with as little as four weeks a year ago.

A Kungsholm tiled stove by Gabriel Kakelugnar AB.Source: Gabriel Kakelugnar AB
For many Europeans, the key concern is doing whatever it takes to stay warm in the coming months. The worry has become ever more pressing as the winter chill gets nearer, and the desperation for heat could create health and environmental issues.
Related: People in Poland Are Burning Trash to Stay Warm This Winter
“We are worried that people will just burn what they can get their hands on,” said Roger Sedin, head of the air quality unit at the Swedish Environmental Protection Agency, warning against poor ventilation and trying to burn wet firewood. “We can see very high pollution levels when you have people burning wood who don’t know how to do it correctly.”
Particulate matter can end up deep in the lungs and cause heart attacks, strokes and asthma, he said, adding that the risk is particularly acute in urban areas.
“You need to think about your neighbors,” Sedin said.
Inexperience is also evident in Germany, where the country’s association of chimney sweeps is dealing with a flood of requests to connect new and old stoves, and customers are inquiring about burning horse dung and other obscure fuels.
There are also signs of hording. In France, Frederic Coirier, chief executive officer of Poujoulat SA, which makes chimney flues and produces wood fuels, said some clients have bought two tons of wood pellets, when less than one ton is normally enough to head a home for a year.
“People are desperate for wood, and they are buying more than usual,” said Trond Fjortoft, founder and CEO of Norwegian wood seller Kortreist Ved. “Usually it happens when it starts to get cold, ‘someone says, oh we should order some wood.’ This year, that started in June” — around the time Russia slashed gas supplies.

Wood pellets loaded onto a conveyor at the Hans Engelke Energie depot.Photographer: Krisztian Bocsi/Bloomberg
In Berlin, the crisis creates unsettling echoes of the desolation following World War II. With fuel in short supply, residents chopped down nearly all the trees in the central Tiergarten park for heating.
While Berliners aren’t going to such extremes now, concerns about staying warm are widespread. Engelke not only put up an extra security gate to protect logs, coal briquettes and heating oil, he also had to stop taking on new customers.
“We’re looking ahead to winter with great concern,” he said.
— With assistance by Benoit Berthelot, Kari Lundgren and Will Mathis
@vague-humanoid @charpointer
21 notes
·
View notes
Text
Expert Tips for Staying Warm and Comfortable While Camping in Cold Weather
Camping in cold weather can be a magical experience, but it also comes with the challenge of staying warm and comfortable in low temperatures. With the right preparation and techniques, you can enjoy your outdoor adventure without shivering through the night. In this blog, we will share expert tips to help you stay warm, cozy, and comfortable while camping in cold weather.
Choose the Right Sleeping Gear: Investing in high-quality sleeping gear is essential for a warm and comfortable night's sleep:
a. Sleeping Bag: Opt for a cold-weather sleeping bag with a temperature rating lower than the expected nighttime temperatures. Look for insulation material such as down or synthetic fibers, and ensure the bag is the right size for your body to minimize empty space that can lead to heat loss.
b. Sleeping Pad: Use an insulated sleeping pad to provide an extra layer of insulation between you and the cold ground. Foam or air-filled pads with higher R-values offer better insulation.
c. Liner and Blankets: Consider using a sleeping bag liner or adding extra blankets or quilts for additional warmth. These can be easily layered or adjusted based on temperature fluctuations.
Layer Your Clothing: Proper layering is crucial to regulate body temperature and trap warmth:
a. Base Layer: Start with a moisture-wicking base layer made of synthetic or wool material. This layer will help keep your body dry by wicking away sweat.
b. Insulating Layer: Add a middle layer of insulating material, such as fleece or down, to trap body heat. This layer should be thicker and provide insulation even when wet.
c. Outer Shell: Wear a waterproof and wind-resistant outer shell to protect against the elements. Look for jackets and pants with breathable fabrics that allow moisture to escape.
d. Head, Hands, and Feet: Don't forget to wear a warm hat, gloves, and thick socks to prevent heat loss from extremities. Consider using hand and foot warmers for extra warmth.
Create a Cozy Campsite: Transform your campsite into a warm and comfortable haven:
a. Tent Selection: Choose a four-season tent designed to withstand cold temperatures and strong winds. Ensure it has a rainfly for added protection against moisture.
b. Insulate the Tent: Place a thick groundsheet or tarp underneath your tent to provide insulation from the cold ground. Use a tent footprint to protect the tent floor.
c. Seal Tent Openings: Before sleeping, close all tent openings tightly to prevent drafts. Use a door sweep or draft stopper to seal the bottom of the tent door.
d. Heat Source: Safely use a tent heater, hot water bottle, or heated blanket to add warmth inside the tent. Ensure proper ventilation and follow manufacturer instructions.
Fuel Your Body: Stay warm from the inside out by consuming warm and high-calorie foods:
a. Hot Drinks: Enjoy warm beverages such as tea, coffee, or hot cocoa to keep your body warm and hydrated. Use an insulated thermos to keep drinks hot for longer periods.
b. High-Calorie Foods: Consume calorie-dense meals and snacks that provide sustained energy and warmth. Consider foods like oatmeal, soups, stews, nuts, and energy bars.
c. Hydration: Stay hydrated by drinking plenty of water, as dehydration can affect your body's ability to regulate temperature. Use an insulated water bottle to prevent freezing.
Stay Active and Move: Engage in physical activities to generate body heat and improve circulation:
a. Exercise: Perform light exercises or stretching inside the tent to generate body heat before getting into your sleeping bag.
b. Warm-up Period: Take a short walk or perform simple exercises outside the tent before entering
to warm up your body and get your blood flowing.
c. Layer Adjustments: As you become active or engage in physical activities, adjust your clothing layers to prevent overheating and excessive sweating.
Proper Ventilation: Maintaining proper ventilation inside your tent is crucial to prevent condensation and moisture buildup:
a. Crack the Tent Door: Leave a small opening or crack in the tent door or window to allow for airflow. This helps reduce condensation and keeps the air fresh.
b. Use Tent Vents: Utilize any built-in vents or openings in your tent to promote airflow and minimize condensation.
c. Dry Wet Gear: Hang damp clothes or gear outside the tent or in a designated vestibule area to prevent moisture buildup inside.
Stay Dry: Keeping dry is essential for staying warm in cold weather conditions:
a. Waterproof Gear: Ensure all your outerwear, including jackets, pants, and boots, are waterproof or water-resistant. Apply a waterproof treatment to prolong their effectiveness.
b. Pack Rain Gear: Carry a lightweight rain jacket and rain pants to protect yourself from unexpected rain or snow showers.
c. Change of Clothes: Pack extra sets of dry clothes in case your clothing gets wet. Changing into dry clothes before sleeping is essential for warmth and comfort.

4 notes
·
View notes
Text
A Clean Firearm is a Happy Firearm…
Everyone has their own opinions on how to clean their firearm, how often to clean them and what kind of cleaning supplies they prefer to use. I will be the first one to say it, but no method is perfect nor is any particular method the “correct” way to clean and lubricate a firearm. My cleaning methods and periodicity have changed many, many times over the years. Even the materials and tools I’ve used have also changed. As time progresses, there are always going to be newer products that come to market as well as newer cleaning tools that “claim” to do a better job. Of course this can be a very subjective subject…so let’s get started with my take on this hotly contested subject of firearm cleaning.

First off, Brownells will have virtually anything and everything a person may want or need to throw into their range box or workbench for keeping their firearms clean and happy. A few of my favorite items came from Brownells and they are the one piece nylon coated steel cleaning rods from Dewey Manufacturing. I first found out about these cleaning rods during my service rifle competition days. These rods have nice rotating nylon handles that rotate smoothly as you push your cleaning patches or brush down the bore. I also have a number of small portable cleaning kits and bore snakes from Otis. I tend to throw these in my range bags during trips. For bore solvents, I’ve always had a bottle of Sweets 7.62 bore solvent in my workbench, but it’s horrible to smell and you need a lot of ventilation when using it. I also keep a bottle of Hoppe’s No. 9 bore solvent which conversely has a wonderful smell in comparison. Who cares how well it works, so long as it smells great while cleaning, right? Slip 2000 gun oil has been my gun oil of choice up until fairly recently. Slip 2000 does a great job of adhering to the metallic surfaces and lubricating the moving parts. Wilson Combat however makes a tackier gun grease that I’ve used wherever grease is preferred over oil. More recently I’ve come to find some modern lubricants from small companies such as Aegis Gun care and Liquid Drip. Aegis gun care makes a really nice cleaning solution and lubricant. Liquid Drip makes a one in all CLP like gun oil that’s quickly replaced my other gun oils.

So how often do I clean my firearms? Well, the answer to that question largely depends upon the type of firearm, its use and number of rounds. The other variable to this question is whether it’s a collectible firearm/antique or something modern. When it comes to my old milsurp firearms that tend to be quite collectible, such as my M1 Garands, at a minimum I will run a few oily patches down the bores to protect the barrel from corrosion. Periodically I’ll take them apart for a thorough cleaning, but this isn’t necessary all that often unless I’m shooting matches. Taking an M1 Garand apart constantly can cause the stock lockup to get loose over time. Now my modern AR rifles will get cleaned whenever they start to get really dirty…I truly don’t have a set periodicity with the cleaning of my AR rifles. My hunting rifles get cleaned at the end of each hunting season, then seasoned/sighted in as the beginning of the hunting season. Probably the most cleaned firearm would be my EDC pistols. These collect lint very quick, so a weekly wipe down at a minimum is performed. After each range session they are thoroughly cleaned and function tested before going back into the rotation.

So are these cleaning schedules right for you? That’s your decision, but these methods of cleaning have worked for me for many, many years. I’ve known some people who ill totally break down their firearm, even after firing just 1-2 magazines through their firearm. Nothing wrong with this, but in my opinion, it’s quite unnecessary. Whatever you’re looking for to keep your firearms clean and happy, be sure to check out Brownells!

3 notes
·
View notes
Text
Heat Insulation Strips knowledge
Common models and dimensional tolerances of Heat Insulation Strips
(1) The common models of Heat Insulation Strips are: type I, type C, and type T.
Other models such as Y-type and YF type are made according to customer requirements.
Note: type I, C and t Heat Insulation Stripss can be based on the section of the Heat Insulation Strips
Shape recognition.
(2) The width of the Heat Insulation Strips depends on the customer's needs, and common ones are
14.8mm、16mm、18.6mm、20.0mm、22.0mm、
24.0mm, 28.0mm, etc
If the width is < =20mm, the allowable tolerance is ± 0.05mm; if the width is >20mm, the allowable tolerance is ± 0.1mm
(3) Thickness of Heat Insulation Strips > =1.8mm
If the width of the Heat Insulation Strips is > =20mm, the thickness of the Heat Insulation Strips is > =2mm, and the allowable tolerance is ± 0.05mm
(4) The angle of the Heat Insulation Strips is 4.2mm, and the allowable tolerance is ± 0.05mm. IV. characteristics and storage precautions of the Heat Insulation Strips
It is best to store the Heat Insulation Strips in a dry and ventilated environment at room temperature, because the characteristics of polyamide are that it will become soft and its size will become larger in a high temperature or humid environment, so that the Heat Insulation Strips cannot pass through the profile cavity; In low temperature environment, the Heat Insulation Strips will become brittle and smaller, and it is easy to crack when threading, which leads to
The profile is scrapped. In addition, the storage time of the thermal Heat Insulation Strips should not exceed one year. If the storage time is too long, the thermal Heat Insulation Strips will slowly absorb the moisture in the air, and the thermal Heat Insulation Strips will degrade and become very brittle, resulting in the non use of the thermal Heat Insulation Strips
Packaging of Heat Insulation Strips

There are two kinds of Heat Insulation Strips packaging, one is straight strip packaging, the other is roll strip packaging.
Straight strip packaging:
(1) 100 pieces / bag
(2) 50 pieces / bag
(3) Each 6.02M
Roll packing: it depends on the model, specification and delivery quantity
Heat Heat Insulation Strips product label
1. Name, address and contact information of the manufacturer
2. Trademark
3. Product name
4. Quantity, length and specification of each piece
5. Production date, inspection batch number and inspector code
Heat insulating strip laser coding
Marks shall be printed on the side of the Heat Insulation Strips. The mark shall appear at least once every 500mm. Mark: Specification and model, national standard number and manufacturer.
Quotation of Heat Insulation Strips
The thermal Heat Insulation Strips are quoted by meter, and the ton price is taken as the calculation basis and assessment basis. Due to different shapes and weights per meter, the difficulty of production is also different.
I-shaped strips are converted according to the ton price and the weight of different grams. The pricing method of special-shaped Heat Insulation Stripss (C, t, y, etc.) is: ton price * difficulty coefficient = ton price of special-shaped strips (special shaped bar ton price /1000000) × MEG weight = price per meter of special-shaped strips (the difficulty coefficient of C and t types is tentatively set at 1.05, and other special-shaped strips are to be determined)
For example, if a special-shaped strip weighs 120g in grams and the difficulty coefficient is 1.2, and the ton price of the I-shaped strip is 50000 yuan / ton, the ton price of the special-shaped strip is 50000*1.2=60000 yuan / ton, which is converted into the price per meter (60000/1000000) × 120 = 7.2 yuan / meter
Heat Insulation Strips mold
In addition to the existing mold specifications and models on the company's mold list, if there is a new mold, the mold drawing must be sent back to the company first, and the order can be received only after the company's technology department determines that the mold can be opened. The review cycle of the mold drawing is 1-2 months, and the mold opening cycle depends on the difficulty. The cost of new mold opening varies according to the degree of difficulty, and the mold opening cost is $8000-12000. If there is a special mold (it is very difficult to open the mold), the mold opening fee will be negotiated separately.
Insulated strip container
1 container volume
Internal volume of 20 foot container: 5.69 m * 2.13 m * 2.18 m, maximum cargo weight 17.5 tons
Internal volume of 40 foot container: 11.8 m * 2.13 m * 2.18 M. the upper limit cargo weight is 22 tons
2 packing scheme
20 foot container:
(1) The length is 5.69m, and the straight bar cannot be installed
(2) Take c-28.0 as an example:
500 meters per roll
Weight per meter gram: 90.4g
Outer diameter 1m
Thickness 0.15m
There are 2 rolls in each row, 5 rows, and 14 high rolls in each row, totaling 140 rolls.
Installable weight =140 × five hundred × 0.0000904 tons =6.328 tons
40 foot container
(1) Straight strips can be installed at the front of the container for 6.1 meters, and coiled strips can be installed at the back of the container for 5.7 meters
(2) Take c-28.0 as an example: straight bar:
50 pieces per piece
Volume: 0.048m ³
If the allowance of 0.5m height left on the top of the container is not included in the volume, 400 straight bars can be installed (447 in theory)
Straight bar weight =400 × fifty × six × 0.0000904 tons
=10.848 tons
Roll strip:
The coil can hold 6.328 tons with the same weight as the 20 foot container
Total installable weight =17.176 tons
2 notes
·
View notes
Text
Effective tips to select the ecology unit
Ecology units improve indoor air quality, reduce energy consumption, and enhance comfort, benefiting individuals, businesses, and the environment. If you are looking into buying an ecology unit from an expert ecology unit manufacturer, it is essential to know that it is unavoidable for commercial kitchens to avoid the accumulation of grease, heat, odor, grease-laden vapors, and other pollutants, to effectively remove them from air circulation is proven to be a tough endeavor for cooking operations.
The biggest benefit of these units is that they can handle tough operating conditions and will remove all the exhaust pollutants with ease without compromising the air circulation in the space.
There are several processes in the filtration stage of the ecology units. The gas from the exhaust must pass through the electrostatic precipitator ESP, aluminum pleated pre-filter, carbon filters, and a very fine filter. This is to enable the removal of odor. The unit helps in the removal of smoke, oil, or any grease material as it has been meticulously designed to make sure the kitchen space is free from them all. This is why it is essential to choose a high-quality manufacturing unit.
The right stages of fine filters allow the elimination of the particulate pollutants that get sent into the air circulation by electrostatic precipitators in total. The pleated filters, metal washable filters, and high-capacity bag filters all play a role in it. For the applications with a set of light loading of particulates, the key would be the usage of stages of fine filters. For these cases, it is inevitable to notice that routine cleaning, maintenance, and replacement should be conducted to maintain efficient performance and safety.
While cooking in commercial kitchens, odors can arise due to the excess of organic compounds. These compounds are not going to be removed by the solutions that were provided before because they’re still in the gas phase. The easiest solution to remove these odors is by activated carbon-applied infiltration cells like canisters or metal cassettes.
The exhaust hood design offers efficient performance and energy-optimized ventilation systems by correctly choosing and sizing exhaust hoods. In the next step, the plume growth will be collected by the hood and removed by the suction of the exhaust fan.
When selecting an ecology unit from a trusted ecology unit manufacturer in UAE, prioritize factors like energy efficiency, air purification capabilities, noise levels, and maintenance requirements. By carefully considering these aspects, individuals and organizations can ensure optimal indoor air quality while minimizing environmental impact and operating costs.
#ecology unit#ecology unit manufacturer in UAE#ecology unit manufacturer#ecology unit manufacturer in dubai
0 notes
Text
Uses and applications of ventilated bags
Raw Food Products such as fresh vegetables, fruits, and other organic goods, are prone to damage if care is not taken to ensure proper ventilation or to ward off excess moisture. There's also the risk of contamination from external sources. Similar issues occur with transporting other products that need to breathe in order to stay fresh such as firewood, kindling, loggings etc.
If you're looking for the perfect FIBC packaging solution for storing and transporting fresh goods, FIBC Ventilated Bags manufactured by India's leading Ventilated Bags manufacturer, BCI, are the answer for you!
These Ventilated Bags are an effective yet economic FIBC packaging solution to protect sensitive materials during storage and transport.
A Ventilated FIBC Bag is a specially designed FIBC Bag with air vents along the woven fabric on its body. This is a kind of mesh fabric that allows easy air-flow to the contents inside and prevents moisture build-up.
Ventilated big bags have multiple applications across a cross-section of industry, used mostly for materials that are needed to keep dry and breathing. A practical example is fresh produce, which when freshly harvested, contains moisture. If vegetables and fruits are allowed to retain this moisture in sealed packaging, they won’t survive the transit. Thus, ventilated FIBCs are used to pack, store, and move products like these.
Perishable agricultural goods like onions and potatoes find great usage in ventilated big bags that don't allow the products to sprout or get moldy. Breathable bulk bags offer perfect bulk packaging and transportation solutions for products that tend to get wasted due to moisture formation.
With capacity ranging from 500 to 4000 pounds, Ventilated Big Bags allow up to 45% of ventilation and are available with a safety factor of 5:1, as per ISO 21898 norms. The safety factor indicates that such bags can hold 5 times the specified SWL.
The most prominent advantage of ventilated bags is undoubtedly its moisture protection feature that can protect your product from retaining moisture and getting moldy, resulting in wastage.
Like all FIBCs, ventilated bags can also have customized filling and discharge mechanisms (spout top/ bottom, duffle top/ bottom) to suit your needs along with varied color options.
Ventilated bags, like the standard FIBCs, are stackable and can be fitted optimally in limited storage space.
FIBC ventilated bags are equally low maintenance and an economic choice like their standard counterpart.
100% recyclability is also a major plus of ventilated big bags.
We manufacture these bags from strong woven plastic with evenly distributed vents. This ensures optimum breathability through controlled air circulation during storage and transport. As a premium Ventilated Bags manufacturer in India, we understand your challenges in keeping the products safe and in good condition throughout the packaging journey. We are committed to offer a stress-free packaging solution for our customers at every step of the way through any necessary customisation required.
0 notes
Text
How to Care for Your Lesa Collection Leather Waistcoat: Expert Tips

Leather waistcoats are timeless pieces that add a touch of sophistication to any outfit. At Lesa Collection UK, we pride ourselves on providing high-quality leather garments that are designed to last. However, proper care is essential to maintain their elegance and durability. In this guide, we'll share expert tips on how to care for your Lesa Collection leather waistcoat, ensuring it remains a staple in your wardrobe for years to come.
Why Proper Care Matters
Leather is a natural, durable material that can look even better with age if cared for correctly. Improper maintenance can lead to dryness, cracking, and other forms of damage. By following the right care routine, you can preserve the quality, texture, and appearance of your leather waistcoat.
What You'll Need for Leather Care
Before you start caring for your leather waistcoat, make sure you have the following supplies:
Soft, lint-free cloths
Mild soap or specialized leather cleaner
Leather conditioner
Distilled water
A soft-bristled brush
Leather protector spray
Step-by-Step Guide to Caring for Your Lesa Collection Leather Waistcoat
1. Read the Care Label
Always start by checking the care label on your leather waistcoat. This label provides manufacturer-specific instructions and recommendations tailored to the type of leather used in your waistcoat.
2. Perform a Spot Test
Before applying any cleaning or conditioning product, perform a spot test on a hidden area of the waistcoat. This ensures that the product won't damage or discolor the leather.
3. Dust and Brush Off Dirt
Use a soft-bristled brush or a dry, lint-free cloth to gently remove any surface dust and dirt. Regular dusting prevents buildup that can lead to scratches and deterioration.
4. Clean the Leather
Mix a small amount of mild soap or leather cleaner with distilled water. Dampen a soft cloth with the solution and wring out any excess liquid. Gently wipe down the waistcoat, focusing on any stained or soiled areas. Avoid soaking the leather, as excessive moisture can cause damage.
5. Remove Soap Residue
After cleaning, use a clean, damp cloth to wipe away any soap residue. Make sure all cleaning solution is removed to prevent it from drying on the leather and causing a dull finish.
6. Dry the Waistcoat Naturally
Allow your leather waistcoat to air dry in a well-ventilated area away from direct sunlight and heat sources. Using artificial heat, such as a hairdryer, can cause the leather to dry out and crack.
7. Condition the Leather
Once the waistcoat is completely dry, apply a leather conditioner. Conditioning leather is crucial to keep it soft and supple. Use a soft cloth to apply the conditioner in circular motions, ensuring even coverage. Allow the conditioner to absorb fully before wearing the waistcoat.
8. Apply a Leather Protector
Consider using a leather protector spray to shield your waistcoat from water and stains. Apply the protector according to the manufacturer’s instructions, usually by spraying it evenly over the entire surface and allowing it to dry.
Tips for Maintaining Your Leather Waistcoat
Regular Cleaning and Conditioning
Regular maintenance is key to preserving your leather waistcoat. Clean and condition it every few months, or more frequently if you wear it often. This routine helps maintain the leather's natural oils and prevents it from becoming dry and brittle.
Proper Storage
Store your leather waistcoat in a cool, dry place. Use a padded hanger to help it retain its shape and avoid plastic covers, which can trap moisture and promote mildew growth. A breathable garment bag is ideal for long-term storage, protecting the waistcoat from dust and environmental damage.
Avoid Harsh Chemicals
Never use harsh chemicals or household cleaners on your leather waistcoat. These can strip the leather of its natural oils and cause damage. Stick to products specifically designed for leather care.
Handle Stains Immediately
Address stains as soon as they occur to prevent them from setting into the leather. For oil-based stains, sprinkle cornstarch or talcum powder on the area and let it sit overnight before brushing it off. For other stains, use a damp cloth and mild soap to gently clean the area.
Protect from Water and Heat
Leather and water don’t mix well. If your waistcoat gets wet, blot the excess water with a clean cloth and allow it to air dry. Avoid exposing your leather waistcoat to direct heat sources, which can cause it to dry out and crack.
Avoid Prolonged Sun Exposure
Prolonged exposure to direct sunlight can cause leather to fade and dry out. Store your waistcoat in a shaded, cool place to preserve its color and suppleness.
Common Mistakes to Avoid
Over-Saturating the Leather
Using too much water or cleaner can saturate the leather and cause it to become stiff or damaged. Always use a damp, not wet, cloth and wring out excess liquid before cleaning.
Skipping the Conditioning Step
Conditioning is a critical part of leather care that should not be skipped. Without regular conditioning, leather can dry out and become brittle over time.
Using Incorrect Products
Only use products specifically designed for leather care. Household cleaners, detergents, and even some commercial stain removers can harm leather.
Exposing to Direct Heat
Avoid drying your leather waistcoat with direct heat sources such as hairdryers or radiators. Let it air dry naturally to prevent damage.
Conclusion
Caring for your Lesa Collection leather waistcoat is essential to maintain its beauty and durability. By following these expert tips, you can ensure your waistcoat remains a stylish and cherished part of your wardrobe for years to come. Regular cleaning, conditioning, and proper storage are key to preserving the quality and appearance of your leather garment.
For more leather care tips and to explore our collection of high-quality leather waistcoats, visit our website at Lesa Collection UK.
Keep your leather waistcoat looking its best with these professional care tips and enjoy its timeless appeal for many years.
0 notes
Text
Expert Tips: How to Clean Your Leather Jacket Like a Pro

At Lesa Collection USA, we understand the allure of a beautifully crafted leather jacket. Whether it’s a timeless biker jacket or a chic bomber, leather jackets are an investment in style and quality. To keep your leather jacket looking as good as new, proper cleaning and maintenance are essential. In this comprehensive guide, we’ll provide you with expert tips on how to clean your leather jacket like a pro. These steps are designed to help you maintain your jacket’s elegance and durability, ensuring it remains a staple in your wardrobe for years to come.
Why Proper Cleaning Matters
Leather is a natural, durable material that requires special care. Improper cleaning can lead to drying, cracking, and irreversible damage. By cleaning your leather jacket correctly, you not only preserve its appearance but also extend its lifespan. This guide will help you avoid common mistakes and ensure your jacket stays in top condition.
What You'll Need to Clean Your Leather Jacket
Before you start, gather these essential supplies:
Soft cloths or microfiber towels
Mild soap or specialized leather cleaner
Leather conditioner
Distilled water
A soft-bristled brush
Having the right tools at your disposal makes the cleaning process smoother and more effective.
Step-by-Step Guide to Cleaning Your Leather Jacket
1. Read the Care Label
Always begin by checking the care label on your leather jacket. Manufacturers provide specific instructions based on the type of leather used. Adhering to these guidelines will prevent accidental damage.
2. Perform a Spot Test
Test any cleaner or conditioner on a small, hidden area of the jacket first. This ensures that the product won’t damage or discolor the leather. Wait for the tested area to dry before proceeding.
3. Dust Off the Jacket
Use a soft-bristled brush or a dry microfiber towel to gently remove surface dust and dirt. This step helps prevent scratches during cleaning and ensures that the cleaner can penetrate the leather evenly.
4. Prepare the Cleaning Solution
Mix a small amount of mild soap or leather cleaner with distilled water. Distilled water is preferable because it lacks the impurities found in tap water, which can harm the leather.
5. Clean the Jacket
Dip a soft cloth into the cleaning solution and wring out any excess liquid. Gently wipe down the entire jacket, paying special attention to soiled areas. Use light, circular motions to avoid over-saturating the leather. Too much moisture can damage the material.
6. Wipe Away Excess Soap
After cleaning, use a clean, damp cloth to remove any soap residue. Make sure all the cleaning solution is wiped away to prevent it from drying on the leather and causing a dull appearance.
7. Dry the Jacket Naturally
Allow your leather jacket to air dry naturally. Avoid using heat sources like hair dryers or radiators, as these can cause the leather to dry out and crack. Hang the jacket in a well-ventilated area away from direct sunlight.
8. Condition the Leather
Once the jacket is completely dry, apply a leather conditioner. Conditioning is crucial as it restores moisture to the leather, keeping it soft and preventing it from becoming brittle. Use a soft cloth to apply the conditioner in circular motions, ensuring an even coverage. Allow the conditioner to absorb fully before wearing the jacket.
Tips for Maintaining Your Leather Jacket
Regular Cleaning
Even if your jacket doesn’t appear dirty, regular cleaning is essential. Dirt and oils from your skin can build up over time, leading to deterioration. Aim to clean your jacket every few months, or more frequently if you wear it often.
Proper Storage
Store your leather jacket in a cool, dry place. Use a padded hanger to help it maintain its shape and avoid plastic covers that can trap moisture and promote mildew growth. A breathable garment bag is ideal for long-term storage, protecting the jacket from dust and environmental damage.
Avoid Harsh Chemicals
Never use harsh chemicals or household cleaners on your leather jacket. These products can strip the leather of its natural oils and cause damage. Stick to products specifically designed for leather care.
Protect from Water and Heat
Leather and water are not a good mix. If your jacket gets wet, blot the excess water with a clean cloth and allow it to air dry. Avoid direct heat sources, which can cause the leather to dry out and crack.
Handle Stains Immediately
Address stains as soon as they occur to prevent them from setting into the leather. For oil-based stains, sprinkle cornstarch or talcum powder on the area and let it sit overnight before brushing it off. For other stains, use a damp cloth and mild soap to gently clean the area.
Use a Leather Protector
Consider using a leather protector spray to add a layer of defense against stains and water damage. These sprays can help repel liquids and keep your jacket looking pristine.
Common Mistakes to Avoid
Over-Saturating the Leather
Using too much water or cleaner can saturate the leather and cause it to become stiff or damaged. Always use a damp, not wet, cloth and wring out excess liquid before cleaning.
Skipping the Conditioning Step
Conditioning is a critical part of leather care that should not be skipped. Without regular conditioning, leather can dry out and become brittle over time.
Using Incorrect Products
Only use products specifically designed for leather care. Household cleaners, detergents, and even some commercial stain removers can harm leather.
Exposing to Direct Sunlight
Prolonged exposure to direct sunlight can cause leather to fade and dry out. Store your jacket in a shaded, cool place to preserve its color and suppleness.
Conclusion
Caring for your leather jacket doesn’t have to be complicated. By following these expert tips from Lesa Collection USA, you can clean your leather jacket like a pro and keep it looking its best. Regular maintenance, proper cleaning, and the right products are key to preserving the quality and appearance of your leather jacket.
Remember, a well-maintained leather jacket is more than just an item of clothing – it’s a timeless piece that can elevate any outfit. Invest the time in caring for your jacket, and it will continue to serve you stylishly for many years to come.
For more leather care tips and to explore our range of high-quality leather jackets, visit our website at Lesa Collection USA.
Stay stylish and keep your leather looking its best!
0 notes
Text
How to Extend the Lifespan of Your Mobile and Laptop: Maintenance Tips and Tricks
In today's fast-paced digital world, our mobile phones and laptops are indispensable. They keep us connected, facilitate our work, and entertain us. Given their importance, it’s crucial to ensure they remain in good working condition for as long as possible. Here, we’ll explore practical maintenance tips and tricks to extend the lifespan of your mobile and laptop.
Regular Cleaning
Exterior Cleaning
Dust and grime can accumulate on your devices, affecting their performance and appearance. Regularly clean your mobile and laptop exteriors using a microfiber cloth. For tougher spots, slightly dampen the cloth with water or a mixture of water and isopropyl alcohol. Avoid using harsh chemicals or excessive moisture, as these can damage the devices.
Screen Maintenance
The screens of your devices are particularly vulnerable to scratches and smudges. Use a screen protector to safeguard your mobile phone’s display. For laptops, close the lid when not in use to prevent dust accumulation and accidental damage. Clean the screens gently with a microfiber cloth to avoid scratching.
Battery Care
Optimal Charging Practices
Battery health is vital for the longevity of your devices. Avoid keeping your mobile or laptop plugged in constantly, as overcharging can reduce battery life. Instead, aim to keep the charge between 20% and 80%. Use manufacturer-recommended chargers to ensure optimal charging efficiency and safety.
Battery Calibration
Occasionally, it’s beneficial to calibrate your battery. For mobiles, let the battery drain completely and then charge it to 100%. For laptops, a full discharge and recharge cycle every few months can help maintain accurate battery readings.
Software Updates
Operating System Updates
Keeping your mobile and laptop operating systems up to date is crucial for security and performance. These updates often include patches for vulnerabilities and improvements in efficiency. Regularly check for updates and install them promptly to ensure your devices run smoothly.
Application Updates
Similarly, updating your apps can enhance functionality and security. Developers frequently release updates to fix bugs and add new features. Enable automatic updates on your devices, or check for updates manually in the app store.
Safe Handling Practices
Protective Cases and Covers
Invest in quality protective cases for your mobile and laptop. These can help prevent damage from accidental drops and bumps. For laptops, consider using a padded sleeve or bag when transporting them.
Avoiding Overheating
Excessive heat can harm internal components and shorten your devices’ lifespans. Avoid using your mobile or laptop on soft surfaces like beds or couches that can block ventilation. Use a cooling pad for your laptop if you notice it running hot during intensive tasks.
Regular Backups
Data Backup
Regularly backing up your data ensures that you don’t lose important information in case of a device failure. Use cloud services like Google Drive, iCloud, or Dropbox for your mobile phone. For laptops, consider using an external hard drive or a reliable cloud backup service.
System Backups
In addition to data backups, creating system backups can save you from the hassle of reinstalling the operating system and applications if something goes wrong. Both Windows and macOS offer built-in tools for creating system backups.
Manage Storage Space
Clear Unnecessary Files
Over time, your devices can accumulate a lot of unnecessary files and applications, which can slow them down. Regularly go through your mobile and laptop to delete unused apps, old files, and duplicate photos. Use built-in storage management tools to identify and remove junk files.
Use External Storage
For laptops, consider using external storage devices for large files like videos and high-resolution photos. This not only frees up space but also improves the performance of your laptop by reducing the load on its internal storage.
Professional Maintenance
Regular Check-Ups
Just like any other piece of technology, your mobile and laptop can benefit from professional check-ups. Visit a reliable repair service annually to have your devices inspected and cleaned internally. This can help identify potential issues before they become serious problems.
Repairs and Upgrades
If you encounter hardware issues or need upgrades, such as increasing your laptop’s RAM or replacing a mobile battery, professional repair services are recommended. DIY repairs can sometimes do more harm than good if not done correctly.
Conclusion
By following these maintenance tips and tricks, you can significantly extend the lifespan of your mobile phone and laptop, ensuring they remain reliable and efficient for years to come. Regular cleaning, proper battery care, software updates, safe handling, regular backups, storage management, and professional maintenance are key practices that can make a huge difference.
For professional and reliable mobile repair services, consider GoFix. They offer expert solutions for various mobile issues, ensuring your device is in safe hands. Trust GoFix to keep your mobile running smoothly, allowing you to focus on what matters most.
0 notes
Text
Common Challenges in Bulk Handling and How to Overcome Them
Bulk handling systems are essential for industries that manage large quantities of materials, such as agriculture, mining, and manufacturing. These systems streamline operations, improve efficiency, and ensure safety. However, they come with their own set of challenges. In this blog, we will explore some common issues faced in bulk handling and provide practical solutions to overcome them.
1. Material Spillage
Challenge: Material spillage is a frequent problem in bulk handling systems. It occurs when materials overflow or escape from conveyors, hoppers, or bulk bag loaders. Spillage not only results in material loss but also creates safety hazards and requires additional cleanup efforts.
Solution: To mitigate material spillage, ensure that all equipment is properly sealed and maintained. Installing skirting and sealing systems around conveyors can help contain materials. Regularly inspecting and maintaining equipment, such as conveyors and hoppers, will also reduce the likelihood of spillage.
2. Equipment Blockages
Challenge: Blockages in bulk handling systems can occur due to various reasons, such as material clumping, oversized particles, or foreign objects. These blockages disrupt the flow of materials and can cause downtime, leading to decreased productivity.
Solution: Implementing a bag opener is an effective way to prevent blockages caused by clumped materials. A bag opener ensures that materials are properly loosened and dispersed before entering the system. Additionally, regular monitoring and cleaning of equipment, along with the use of screens or filters, can prevent foreign objects from causing blockages.
3. Dust Generation
Challenge: Dust generation is a significant issue in bulk handling operations, especially when dealing with fine or powdery materials. Excessive dust can lead to health hazards for workers, environmental pollution, and equipment wear and tear.
Solution: To control dust, use enclosed conveyors and transfer points wherever possible. Installing dust collection systems, such as baghouses or filters, can capture and contain dust particles. Regularly maintaining and inspecting these systems ensures they function effectively. Additionally, using a bulk bag loader with dust-tight connections can help minimize dust during the loading process.
4. Inconsistent Material Flow
Challenge: Inconsistent material flow can lead to operational inefficiencies and affect the overall productivity of bulk handling systems. This issue is often caused by variations in material properties, such as moisture content, particle size, or density.
Solution: To achieve consistent material flow, it is essential to understand the properties of the materials being handled. Adjusting the speed and angle of conveyors, as well as using flow aids like vibrators or air cannons, can help maintain a steady flow. Regularly calibrating and adjusting equipment settings based on material characteristics is also crucial.
5. Equipment Wear and Tear
Challenge: Bulk handling equipment is subject to constant wear and tear due to the abrasive nature of many bulk materials. Over time, this can lead to equipment failure, increased maintenance costs, and unexpected downtime.
Solution: Using high-quality, durable materials for equipment components that come into direct contact with bulk materials can extend the lifespan of the machinery. Implementing a proactive maintenance schedule, including regular inspections and part replacements, will help identify and address wear and tear before it leads to equipment failure.
6. Handling Hazardous Materials
Challenge: Handling hazardous materials, such as chemicals or toxic substances, presents unique challenges in terms of safety and regulatory compliance. Ensuring the safe transfer and storage of these materials is paramount.
Solution: Equip bulk handling systems with safety features, such as containment and ventilation systems, to prevent exposure to hazardous materials. Providing specialized training for employees on how to handle and respond to spills or accidents involving hazardous materials is essential. Using a bulk bag loader designed for hazardous materials can also improve safety by minimizing manual handling and exposure.
Conclusion
While bulk handling systems are vital for efficient material management, they come with their own set of challenges. By addressing issues such as material spillage, equipment blockages, dust generation, inconsistent material flow, wear and tear, and hazardous material handling, businesses can improve the efficiency and safety of their operations. Utilizing tools like a bag opener and a bulk bag loader can play a significant role in overcoming these challenges. Regular maintenance, proper equipment selection, and employee training are key components in ensuring the smooth operation of bulk handling systems.
0 notes
Last Seen Blogs

fefe-marty
Light and Shadow

eduplianceworld-blog
Edupliance | Live webinars HR, Payroll,Education & Technology

dulcet-dream
whats UP

ii501
Untitled

rileywheare-blog
Music Ringtone