#vintage WD 40 ad
Photo

2K notes
·
View notes

Link
Remove Stickers
Mineral oil is a good solvent for removing glues from non-porous surfaces. Use it to remove price tags from dishware and furniture, for example. Or, use it to remove a bumper sticker from a car without damaging the paint job.
Remove Temporary Tattoos
What seemed funny at the club on Friday night looks terrible on Monday morning before work. Pour mineral oil on a rag and gently rub the ink off before stepping into the morning staff meeting.
Remove Oil and Latex Paint and Primer From Skin
Using a rag that has been dipped in mineral oil, gently rub the paint spots in a circular motion to remove them from skin. Also, if you apply mineral oil to your skin before painting, the little paint specks rub right off.
Important note: this is why mineral oil and latex condoms are a bad idea. Do not use mineral oil as a personal lubricant if you are using barrier-style birth control made of latex.
Wood Conditioner
Many commercial lemon oil furniture polishes are just mineral oil with lemon scent. Plain old mineral oil will give your wood the exact same look without the added smell and cost.
Season Wood Cutting Boards and Kitchen Tools
Oil-treated wood is more hygienic. Dried out wood develops tiny cracks which are a favorite hiding spot for bacteria. To extend the life of wood cutting boards, utensils, and salad bowls, wipe them down with a liberal application of mineral oil. Reapply oil until the wood cannot absorb any more. Wipe off excess oil with a rag. Mineral oil is a superior coating for wood cooking tools because, unlike olive or vegetable oils, it won't go rancid.
Silence a Floor Creak
Pour a small amount of oil into the squeaky joint and wipe up the excess.
Quiet a Squeaky Door
Apply to door hinges and hardware instead of WD-40.
Untangle a Necklace
Is your favorite gold or silver chain in a knot? Before paying a jeweler to fix your necklace, dip the knot into mineral oil. Then use a pin to work the oily knot open.
Preserve Eggs
I love to hate-watch the show Doomsday Preppers. What an amazing time suck. However, one great tip I gleaned from all the crazy is how to preserve eggs without refrigeration for months using mineral oil. http://prepared-housewives.com/preserve-eggs-with-mineral-oil/
Brighten Linoleum Counters
A Wise Bread editor discovered this old-school tip by accident. While seasoning wood cutting boards, he dripped mineral oil onto his vintage linoleum kitchen counters and discovered that the oil refreshed the color of the faded linoleum! Be aware that the vibrant colors revealed by oil only last about three weeks before fading, and constant application of mineral oil to linoleum will make it break down. So, only use this tip on special occasions like photo shoots or holiday parties when you really need your kitchen to look extra-gorgeous.
https://www.wisebread.com/30-unexpected-uses-for-mineral-oil
0 notes
Text
The Ultimate Deal On Alarm Services
Most people install garage doors and forget about their maintenance though they use them regularly day-in and day-out. If you want to note that your garage door functions smoothly without problems, and then there are some things you should do regularly.
You must provide a good squirt towards the rollers, hinges, roller tracks and latches by using a penetrating solvent like WD-40. You may also work with a citrus based solvent alternatively. You must lubricate the pulleys seen on extension springs and also the bearings that you simply see on torsion spring openers. If you find the torsion spring rusty and binding up, then you will need to wipe some oil onto it. Once you wipe each of the parts clean, then apply the light type of oil like 3-in-one lubricant towards the parts.
If you find a roller or hinge getting struck, then you can soak it in kerosene for quite a while. Make use of a vintage toothbrush to clear the deposits inside the cracks. Steel wool will be highly helpful in removing any rust. Once you wipe every one of the parts thoroughly, use a lubricant. If your garage door is operated by a chain drive or screw drive, then consider applying the same lubricant for the full length.
Check if the weather stripping along the sides with the garage door is alright. You should probably adjust the entranceway whether it is jamming up against the sides. Under worst conditions, you will have to replace the elements stripping. If your wooden garage door does not have a weather stripping, ensure that the bo0ttom is properly sealed or painted. You may also consider adding weather strapping if needed. Spring or fall is a superb time for it to attend tot eh annual maintenance of garage doors.
If you inspect your garage door regularly and troubleshoot little problems as they sneak in, you'll have a very trouble-free garage door. This will allow you to avoid expensive repairs. Property owners can simply tackle routine maintenance themselves.
Most garage doors be determined by big, thick springs to start and close properly. You will find the springs mounted over the opening or fixed alongside the roller track on each side. Visually inspect the spring from time for you to time and detect any indications of wear. If you find the springs squeaking while opening or closing the entranceway, utilize a lubricant. If the springs are simply workout or perhaps the squeaking continues after lubricating, then you may probably have to call a garage door professional. Remember, tampering with all the springs yourself without any appropriate implements could be dangerous being that they are under heavy tension and will cause serious injuries.
youtube
Metal cables are used to connect the spring towards the door bottom on either sides. If you find the cable worn or frayed, then you can let a garage door expert inspect it and give feedback into it. It is not far better to wait until the cables break.
You will find brackets on either side in the door this agreement the cables are connected. These brackets are under heavy tension. Examine if they are firmly attached to the door. If not, call an expert for help. It is not advisable to loosen or adjust the bracket yourself. Newer kinds of garage doors feature tamper proof brackets that prevent non-professionals from adjusting them.

You should be careful while working with your garage door yourself to avoid pinched fingers. You should never stick your fingers between your sections while trying to lower the door. If this happens, it's most likely how the fingers are pinched. Make use from the handles always to manually lift or lower the garage door.
0 notes
Text
Here's A Quick Way To Solve A Problem With Alarm Services
Most people install garage doors and forget about their maintenance though they use them regularly day-in and day-out. If you want to observe that your garage door functions smoothly without any problems, and then there are a couple of things you have to do regularly.
You need to give you a good squirt to the rollers, hinges, roller tracks and latches using a penetrating solvent like WD-40. You may also utilize a citrus based solvent alternatively. You need to lubricate the pulleys found on extension springs and also the bearings that you simply see on torsion spring openers. If you find the torsion spring rusty and binding up, you will must wipe some oil on it. Once you wipe every one of the parts clean, then apply a light type of oil like 3-in-one lubricant for the parts.
If you find a roller or hinge getting struck, then you can soak it in kerosene for quite a while. Make use of a vintage toothbrush to clear the deposits inside the cracks. Steel wool will probably be highly attractive removing any rust. Once you wipe all of the parts thoroughly, work with a lubricant. If your garage door is operated by way of a chain drive or screw drive, then consider applying the same lubricant for the full length.
Check whether the weather stripping along the sides in the garage door is alright. You should probably adjust the threshold if it's jamming against the sides. Under worst conditions, you will need to replace weather stripping. If your wooden garage door won't have a weather stripping, guarantee the bo0ttom is properly sealed or painted. You may also consider adding weather strapping if required. Spring or fall is an excellent time and energy to attend tot eh annual maintenance of garage doors.

If you inspect your garage door regularly and troubleshoot little problems as they sneak up, you will have a trouble-free garage door. This will assist you to avoid expensive repairs. Property owners can readily tackle routine maintenance themselves.
Most garage doors depend upon big, thick springs to spread out and close properly. You will find the springs mounted over the opening or fixed alongside the roller track on either side. Visually inspect the spring from time and energy to time and detect any signs and symptoms of wear. If you find the springs squeaking while opening or closing the doorway, start using a lubricant. If the springs are simply workout or the squeaking continues after lubricating, then you can probably need to call a garage door professional. Remember, tampering using the springs yourself with no appropriate implements might be dangerous since they will be under heavy tension and will cause serious injuries.
youtube
Metal cables are utilized to connect the spring to the door bottom on either sides. If you find the cable worn or frayed, then you can certainly let a garage door expert inspect it and present feedback on it. It is not advisable to hold back until the cables break.
You will find brackets on either sides with the door that the cables are connected. These brackets are under heavy tension. Examine whether are firmly attached towards the door. If not, call an experienced for help. It is not preferable to loosen or adjust the bracket yourself. Newer types of garage doors include tamper proof brackets that prevent non-professionals from adjusting them.
You should be careful while coping with your garage door yourself to avoid pinched fingers. You should never stick your fingers involving the sections while wanting to lower the threshold. If this happens, it's almost certainly the fingers are pinched. Make use of the handles always to manually lift or lower the garage door.
0 notes
Text
What exactly Things To Do Regarding Home Improvement
In modern-day economic climate, the best way in order to obtain a different household is usually to improve often the one anyone already own. Anyone may not get able to market your own home for the price tag a person ought to have. Instead regarding tackling the real estate fears, why not better your current home? Keep reading regarding some beneficial home enhancement tips.
You can give your cooking area a great old modeled look simply by shopping for older tins. Flea trading markets and even music shops are usually rich in vintage caffeine, tea and even candy tins that make excellent minor hard drive spaces to get your own items. Employ them in order to disguise your utensils, snacks, flour as well as sugar. Add little homemade labels to the best labeling what each is made up of.
Decals are a fantastic facelift for monotonous household furniture and appliances; getting them off is a new various story. If you're out of concepts on the way to eliminate old stickers coming from surfaces the right after suggestion is sure to help assist. Spray the stickers an individual wish to get rid of with WD-40 spray. Try to help lift the edges to be able to get the fresh directly below. Let the idea take a seat within the solution for some sort of moment as well as two together with then softly scrape typically the decal having an old credit rating card or a clear plastic cutlery.
If you happen to be re-painting a smaller space, some because an undersized bed room or living room, make use of mild hues. Lighter colors in the partitions is going to reflect more light, making typically the space experience lighter and even larger. Furthermore, think about making use of two shades involving the same color in whipping, which will make the room come to feel much longer or even taller.
Believe concerning installing some sort of bathtub if the home doesn't always have one. Not only are showers more accessible than bath tubs, you can certainly in addition save much whole lot more normal water by utilizing them, mainly if your household is substantial. Five small showers make use of less than a 1 fourth the water that this requires to help soak around typically the bath.
If you are contemplating of getting a brand-new package, sit down in often the hot tub in advance of purchasing it. You might embarrass myself, nevertheless sometimes tubs may well seem much larger compared to that they actually are usually. Several récipient are could not end up being arrived or have a extremely high restocking price, so ensure you will be pleased with typically the tub ahead of buying.
In case you have a large, wide open kitchen, consider construction or even getting a removable cooking area area. An tropical isle can easily be covered with tile, granite, or perhaps pebble covers, making it an ideal excess surface for setting up dishes, serving food, concluding homework, or as a good makeshift mini-bar that goes wheresoever you need the idea for you to. Quite a few models contain storage space features like drawers, hooks, and built-in lowering blocks.
In the event you live throughout the sizzling climate, replace your own initial glass doors together with low-E a glass, which make that less difficult and more inexpensive to amazing your current property inside grilling summertime. Though the installation may be a little bit costly when you pay an individual to do it, you might recoup your own personal costs in energy savings by way of the conclusion of typically the summer.
Simply by adding top molding, an individual will turn out to be upgrading the home together with a crisp and clean in addition to refreshing look that is definitely interestingly high-impact. At only around a dollar for each square foot, you may waste money about molding of which works with the window lean, floor in addition to baseboards. That glimpse will be timeless and effortlessly adds value for you to the home, even immediately after quite a few years.
In case you are strengthening the appearance and experience involving your cooking area by adding a granitic counter top, look at individual mosaic glass as a substitute regarding a single bit slab. Granite slabs of countertop length can cost as much as $5000, and sometimes even more. Instead, install foot-long granite tiles. For often the same amount of room, adding stone tiles is going to only hit you up for a small amount of hundred dollars.
Invest in porcelain tile flooring. Helpful Tips To Help Your current Home Business will be a thing that most people observe when in your household, when anyone want for you to capture their particular attention, employ ceramic tile. Corian, ceramic or even standing floor tiles are both equally interesting and even durable and even come in a variety of styles and surface finishes. Another as is of which they happen to be much easier to clean in comparison with carpet.
As soon as repainting often the exterior connected with your residence, usage vinyl sheeting and even hiding tape to keep away from having paint on undesired areas, many of these as your windows. Work with drop linen to shield your drive, porch, in addition to shrubs through dripping color. You will also want to apply 3-inch masking cassette to be able to shield this trim whilst you might be painting them the home siding on the residence.
Before you order an individual new kitchen cupboards, draw a plan of your current kitchen area that shows the spot coming from all plumbing, outlets, gadgets, microsoft windows, and just about all various other obstacles. This may make sure your new cabinets are a perfect fitting. A lot of retailers will develop a good design plan for a person cost free if you obtain your cabinets from them all.
Here is Effective Tips To Help Your current Home Business for working along with contractors! If you happen to be obtaining work done, become sure to advise the top of the crew in the event that you are not really joyful! From the ideal earth, everybody would likely realize and do accurately what you would like, the way you want it performed! In the event that is definitely not necessarily the fact, communicate to the head with the crew! A person are paying out the particular expenses, and you will be in cost. In case you usually are content, converse up. When items may work out your specialist, there are tons regarding other individuals to decide on by.
Learn where to switch the natural gas away before you begin almost any home-improvement job. You will need to know this in case there is a leak when compromising fireplaces, kitchens or anything of which uses the gas traces. Usually be very careful when working close to natural gas lines to stay away from risky problems.
To boost strength performance in addition to conserve drastically on your bills, take into account upgrading single bout home windows using newer vitality successful ones. Helpful Tips To Help Your Home Business make in brand-new windows now will very easily buy itself over time period as your utility bills may be lower and, of course , your home will become more comfy.
Guard surfaces with a new protecting throughout virtually any home improvement plans. Floors must be protected with the tarp as well as painters plastic in case a person can be painting. To get different plans that contain hammering or even tearing along walls as well as cabinetry, covers just about all areas to protect them by scratches and deterioration, like the walls.
The concepts you've just read through will allow you to a lot as a person go with regards to enhancing your residence. Home improvement is more cost efficient than a person could understand.
0 notes
Text
How Much It Would Cost To Build A PC As Powerful As The Xbox One X?How Much It Would Cost To Build A PC As Powerful As The Xbox One X?xbox 360
New Post has been published on https://www.gamerzcourt.com/how-much-it-would-cost-to-build-a-pc-as-powerful-as-the-xbox-one-xhow-much-it-would-cost-to-build-a-pc-as-powerful-as-the-xbox-one-xxbox-360/
How Much It Would Cost To Build A PC As Powerful As The Xbox One X?How Much It Would Cost To Build A PC As Powerful As The Xbox One X?xbox 360
We’re reaching that remarkable point of time in the console life-cycle where the PC space democratizes—a point where almost any modern hardware configuration is about good enough to deliver a console-worthy experience. In the previous generation, we reached this point in 2012. That was the year that the GTX 650 and the Radeon HD 7750—from Nvidia and AMD respectively—released. Both were bargain-priced GPUs in the 100-dollar range which offered the opportunity to run just about every seventh-gen title at high/ultra at at least 720p, a qualitative step up from the console experience.
For $ 100, you could suddenly make all those titles like Far Cry 3 that chugged on Xbox 360 and PS3, completely playable and a feast for the eyes. As far as the base eighth-gen platforms—and the Xbox One in particular—are concerned, we’ve already reached that point this gen, with Ryzen-based APUs providing very compelling integrated performance on the one hand, and the likes of the GTX 1050 raising the bar where entry-level discrete graphics performance is concerned. But there is a slight issue with this narrative: The mid-cycle refreshes, and specifically, the Xbox One X. Priced higher than any other console on the market and built with native 4K gaming in mind, the One X packs considerable hardware heft, above and beyond what’s possible with entry-level PC kit.
Nevertheless, between competitively priced Raven Ridge quad-core processors and prices coming down on Polaris parts, it is possible to build a system from scratch that’s competitive with the Xbox One X.
RAM: 16 GB Patriot DDR4 at 2666 MHz
Price at the time of writing this feature: $ 99.99
RAM speed doesn’t have a tremendous impact on performance as long your other pieces of hardware are adequate. 2666 MHz is the sweetspot as far as squeezing in a few extra frames per second without breaking teh bank. Moreover, the 16 GB capacity is greater than the One X’s 12 GB shared memory pool.
GPU: XFX 580 XXX Edition
Price at the time of writing this feature: $ 199
Though the RX 590 came out recently, its greater performance is accompanied by higher pricing. Our aim here is to match the Xbox One X’s performance. The 6.2 TFFLOP RX 580 is the closest analogue to the One X’s 6 TFLOP Vega-based GPU. While the RX 580’s memory bandwidth is nominally lower at 256 GB/S, keep in mind that the One X’s memory is shared, with the CPU also needing access. Having actually had an RX 580 for some time—and looking at benchmark figures—the card hands in 4K performance that’s roughly in line with the One X, allowing for 4K/30 FPS gameplay with console-quality settings. Don’t let ads and listicles fool you into thinking that you need a GTX 1080 Ti to game in 4K: 580-class hardware—even the venerable GTX 970—can give you reasonable, console-quality experiences.
CPU: Ryzen R3 2200G
Price at the time of writing this feature: $ 95
From about 2011 onwards, the CPU space was incredibly boring: AMD’s anaemic, powerhungry Bulldozer and Piledriver-based parts fared worse than Core i3’s in gaming and for year after year, Intel, with no compelling reason to innovate, stretched out its “tick-tock” cycle to such an extent that even today, a Sandy Bridge 2500k from 8 years ago can tackle modern games just fine. 2011’s the year Battlefield 3 came out. Now imagine running that on a 2003-vintage processor. That is how stagnant the CPU market was until AMD got its act together and outed the Ryzen architecture in 2016. Ryzen parts offer single-threaded performance that’s broadly comparable to their Intel counterparts at lower pricepoints. And significantly for us, they’re a lot faster than the eight-core Jaguar processor in the One X. A combination of 50 percent higher IPC and higher clockspeeds mean that this Raven Ridge R3 hands in decisively better single and multithreaded performance compared to the One X, while remaining well within our budget.
Storage: WD Blue 1 TB 7200 RPM HDD
Price at the time of writing this feature: $ 48
Sure, an SSD would be a qualitative step up in expereince, but this is all about matching the One X, and as storage options get cheaper, the reliable default—the 7200 RPM HDD becomes even more affordable. You get what you pay for here. Overall performance and load times are neither spectacular nor awful. Thanks to the faster processor in our build, games will load somewhat faster than on the One X.
Motherboard: Asus Prime A320M-K
Price at the time of writing this feature: $ 59
The motherboard is a part that says a lot about your builds. As a rule of thumb, I opt for entry-level no-frills mobos that get the job done. With a processor that already runs circles around the One X’s, there’s no need for an “extreme” motherboard with OC options and an appropriately “extreme” price tag. We just need something that’ll fit our processor, GPU, and RAM module without going up in flames. Asrock is a reliable brand for that.
PSU: Seasonic S12II
Price at the time of writing this feature: $ 55
The S12II is the standby PSU for midrange builds. The bronze-rated 520W piece offers more than adequate juice to power the (relatively) efficient RX 580 and Ryzen R3 combo with some headroom for OC’ing the 580 a little. Backed by a 10 year warranty, the S12II has a solid record of not exploding violently.
Keyboard and mouse: Logitech MK550
Price at the time of writing this feature: $ 44
We are most definitely not in the “Lookit the shiny lights!” school of thought when it comes to peripherals. In all honesty, who actually wants randomly coloured lights to impinge on what’s happening onscreen? The one thing in your build that should be emitting bright shiny lighting is your monitor. With that being said, this Logitech Wireless Keyboard/Mouse duo is more than adequate: the lack of wiring will also reduce some clutter on your desk.
Controller: Xbox Wireless Controller
Price at the time of writing this feature: $ 40
While keyboard and mouse input is how you’re likely going to use this system, there are plenty of console ports (the Dark Souls games for starters), that benefit immensely from having a controller. And let’s admit it here: it’s just more comfortable to have your paws around a controller. As this is a build to offer direct parity with Xbox One X, the controller we’ve included is (unsurprisingly) the Xbox controller, a simple plug and play affair on PC.
Operating System: Windows 10 Home Edition
Price at the time of writing this feature: $ 139
Ah, here’s an unavoidable extra: the operating system. A Windows 10 Home Edition license will cost you an extra $ 139 dollars.
Wifi Dongle: TP-Link
Price at the time of writing this feature: $ 10
It goes without saying that you’ll be needing an internet connection and while our motherboard pick does (obviously) have an ethernet port, you’ll want to pick up a cheap USB Wifi dongle for wireless connectivity. This no-frills TP-Link dongle gets the job done—though there’s not much more to say about it.
Case: Thermaltake Versa
Price at the time of writing this feature: $ 39
A case holds your parts together and, unless you’re literally using a sealed wooden box, most entry level cases will have adequate airflow for acceptable CPU and GPU temps. If space isn’t an issue, a smart idea is to buy a relatively large case like the Versa for enhanced air circulation.
Final price: $ 827.99
Well, that’s a wrap. Our final price point is a bit higher than what the Xbox One X goes for sale for. However, do keep in mind that we’re factoring in the cost of peripherals and the OS as well—take those out of the picture and suddenly, you’re within spitting distance of the One X and, of course, you retain all the flexibility of PC as a platform. The official Microsoft website is selling the console anywhere from $ 449 to $ 499, so, in short, the Xbox One X from a purely technical perspective is much cheaper than a similarly powerful PC.
Video Game News, Reviews, Walkthroughs And Guides | GamingBolt
0 notes
Text
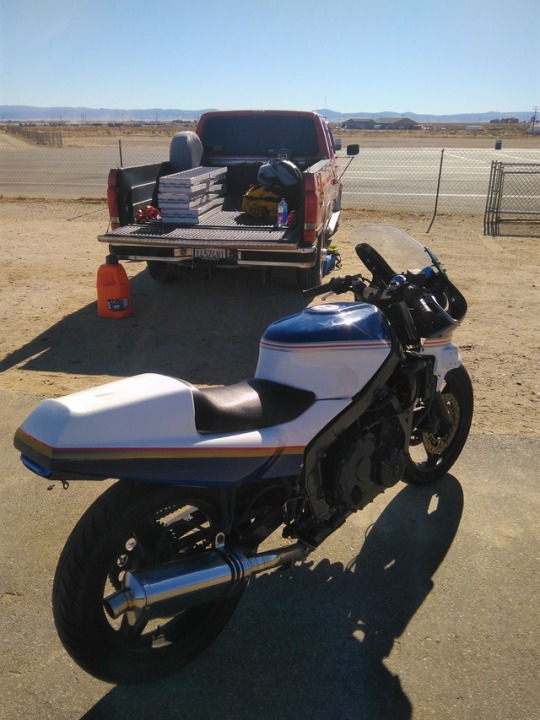
Track Day for Old Blue
Old Blue is my 1987 Honda CBR600 F1, the Hurricane. This bike and me go way back. I found her on Craigslist. I still clearly remember the day I bought her for $1200 and rode home. I had not ridden a motorcycle for twenty years, yet, the economic need for affordable transportation pushed me to this guy’s house on the outskirts of Atlanta, at dusk, fifteen miles from where I lived. Old Blue was as forgiving as she was gracious. My clutch and throttle control was raw but she never stalled out. I remember that to keep myself calm and focused I repeated the mantra “We are one, rider and bike.” and then I kept a steady, slow pace home through the darkness, breathing a sigh of relief when we got there. She got me safely back that first night and then went on to carry me over 40,000 miles on every back road through fifteen states between Atlanta, Georgia and New York, New York. After every trip I would replace, upgrade or improve certain parts. Adding a pair of high beam spot lights here, new petcock there, a completely upgraded digital speedometer and engine temperature gauge. Always something better, piece by piece after each trip and before the next. I would estimate that only twenty percent of that motorcycle I bought in March 2012 still remains, replaced with little pieces of myself.
The natural challenge for this motorcycle and myself was to take her out on a track day. Begin that familiar nervous feeling of trying anything new. Sport bikes within the last ten years will all go above one hundred and fifty miles an hour in capable hands. My 1987 Honda CBR’s top factory speed was one hundred and thirty-five. Add on top of that my skill level and I’d be lucky to exceed one hundred and ten. It’s not the speed that is dangerous on a track it is the speed differential. I looked long and hard for a group that catered to vintage bikes and left ego far from the track. I found it in the Spooktrackular classic track day sponsored by the Cretins Motorcycle Club. Just the tongue in cheek name was inviting and aligned with my dad joke sense of humor.
There are minimum safety requirements for the rider and the motorcycle before you are permitted to ride the track. Leather riding gear, either two piece or one piece, Snell rated helmet, track boots and gloves are all required. The motorcycle also has to pass a basic safety inspection. Things like all lenses must be taped over, no oil or fluid leaks of any kind, mirrors and license plates must be removed, anything that could vibrate off. As a beginner, though, it is understood you are not really going to be riding the razor’s edge. There’s no need to wire bolts or secure oil filters. This all made common sense to me. On the track you would be going three or four times faster than anything permitted on roads, by removing cross traffic or just cars of any kind your focused attention will be one hundred percent on riding technique, cornering and getting the most out of your bike. Having bits and pieces of other bikes litter the track or lay oil slicks anywhere will go unnoticed that when combined with speed would have immediate disastrous effects. Beginners are given due leeway and grouping them together put the highest risk into one manageable mass. While the intermediate and expert riders could be free to explore their upper envelope limits without the risk of a beginning level motorcycle dropping a muffler in the middle of turn three.
Three anxieties played prominent the day before the track ride. I did not want to break any safety rules, none of which I had practical understanding of. I mean I could read the rules, of course, but none of them were grounded in experience. I did not want to ruin or wreck my motorcycle. To me she was one of kind. I did not want to be “That Guy” the one that is just a little late, the one holding up the show which is actually comprised of parts of the other two anxieties with a little aspect of its own thrown in for good measure. All of this anxiety and nervousness were unfounded of course. I read somewhere that when you are nervous it is just because you care. If that is true then I must have cared about this more than anything.
It is five am on the morning of track day. I woke up in my tent in the bed of my truck. Everything is silent. Even the coyotes I heard howling four hours ago have quieted down. I open the tent to look around and the paddock is pitch dark, illuminated only by the night stars. This was the beginning of my day. The nervous energy insisted that I should get into my track suit. I had no idea how long that process would take. The suit has to be close fitting to do any good but made from leather, it was very stiff and awkward to get into, each put on movement needed a great deal of effort. I started in on the task, while trying to keep quiet for the others still sleeping nearby in their tents. After twenty minutes of wrestling, it was done and I crawled out of the tent and got my boots on. I was a full three hours early. There’s no way I’m going to be “that guy” now. The next couple hours were just me passing time. I was so green at this activity that I didn’t even know how to pretend to look busy. I sat on the tail gate of my truck, had a light breakfast and drank coffee and watch the track pit area wake up. Here were professional racers just arriving with their track bikes on trailers. Pulling into open spots, setting up shade tents and getting their motorcycles on pit stands. These bikes were so specialized they did not even have kickstands. Every nonessential part removed to reduce weight. Nearby was a group of Harley Dyna riders braced against the cool morning with their hoodies up and coffees in their hands. Rider’s families emerged from trailers and children from age five to preteens passed the time by riding scooters through the paddock while their fathers put all their focus on their motorcycles. Across the way was a local coffee shop setting up for a brisk morning’s business of being the only place available for a pastry and a coffee, at least until the track cafe opened at eight. Scattered throughout were every conceivable type of sport motorcycle that has been built in the past thirty years. By now the pit area was flush with the early morning sun and in full track day activity. The loud speakers installed high on telephone poles came alive with music. It took a moment but I recognized the sound track from “On Any Sunday” That familiar tingling sensation on the back of my neck put the exclamation point on a perfect moment. The morning sun, the kids on scooters, the motorcycles, smell of fuel and race leathers all swirling together.

I had to break the spell and get Old Blue over to the bike inspection. I had no idea what to expect. Would thirty year old motorcycle even pass? I walked her over to where folks had lined up and the race inspectors gave each bike a review. The inspector took one look at my bike and said, “Hurricane! Wow! I used to race these back in the day!” He was primarily looking for stray fluid leaks and pointed out my right fork seal. “You’ll have to cover that up, if that blows you’ll put fork fluid all over the track. Just take a rag and a couple zip ties and secure it here and here.” He said pointing to the spot above and below the fork seal. Then he turned his attention to my throttle. “This needs to snap back faster. You may need to replace or modify the throttle but for now just squirt some WD-40 in their. If you go down you don’t want your bike going on without you or worse spinning your tire into your leg. Get those two things corrected and then bring it back here for another look.” I pushed the bike back to my truck and hurriedly set up the rag cover on the fork and worked in some spray lubricant into the throttle until it snapped back with reasonable responsiveness. Then started up and rode back to the inspector. Checking her over, “Good! Good, see that throttle response is fine now and the fork cover looks excellent. You’re good to go.” and he put a sticker with the number three on the front fairing indicating I was in group three, the beginner’s group.
By that time the mandatory rider’s meeting was about to start. It was being held in the track cafe. Early as usual, I found a seat and watched the other riders filter in. What I thought was going to be a very formal laundry list of safety procedures, instead was a pump up the crowd session and the safety talk boiled down to three things. Enter the track and stay on the left until the first turn. This was drilled into the crowd and was all about mitigating the speed differential. As bikes would be coming down a long straight away hitting their maximum speeds they would be naturally aligned to the right of the track to set up for the first turn. Having someone enter from the pit at a much lower speed and swing into their path would be a disaster for all. Next point was when exiting the track keep at speed but move to the left and raise your hand and do so from as early as turn seven. This would tell the riders behind you what you intend to do. Finally, there was review of the flags, red meaning accident and everyone off the track, checkered is the end of the group’s session and black meaning you’re leaking fluid stop, immediately at first safe point. There were a few more but those were the ones I focused on. Meeting over, the track instructors asked all beginners to stay behind. We were about ten riders in total and the instructors explained how they would introduce all of us to the track. We’d begin with a slow review ride of the track with one instructor in the lead and another at the rear to familiarize us with the turn lines and just get through that first nervous adrenaline phase. “I could go on and on about a lot of different information but you’re not going to remember any of it, it’s better to just get out there, remember the safety points and have fun.”
I went back to the truck to wait for my group’s turn or “heat”. First up was group 1, the professionals, then would come group 2 modern, the intermediates on modern motorcycles, group 2 vintage and finally my group 3, beginners. They each lined up at the track entrance and waited for the all clear then filed onto the track. Racing down the straightaway at peak RPM, each motorcycle’s sound was unique. Some engines were high and sounded like a jet engine flying by. Others were low pitched growlers whose bass tones hit you in gut. Everyone had that distinctive Doppler effect, as the bike approached the pit area the pitch grew and grew and until it hit peak pitch then suddenly the sound dropped away as the motorcycle disappeared around turn one. Each group was give 3 warning calls by the announcer, “Ten minute call out to group three, ten minutes!” That was for me and being preoccupied with nervous energy I put on my helmet and gloves, got on Old Blue and started up. “Five minute call out to group three, five minutes!” I sat there with the engine running, giving the old carburetor system plenty of warm up time. “Two minutes for group three, two minutes!” I watched for the instructor and seeing him roll over to the track entrance I followed suit putting myself in third position behind one other beginner. The other beginners lined up behind me. The instructors asked that we go in single file so we could see the corner lines more easily. The ten or so engines filled the air with noise and vibration, The group on the track, 2 vintage got the checkered flag ushering them off the track. Flag men around the track signaled back the all clear and ahead of me the lead instructor started forward. I eased out the clutch, rolled on the throttle and glided in measured safe distance cadence behind the rider in front of me. A short entrance ease way and we were on the track. The grin under my helmet was ear to ear. We cruised through turn one and then into the long sweeper of turn 2 and up the hill to turns three, four and five. The turn banks were at a much more pronounce angle than could be seen from track side and even though the first lap was introductory and promised to be slow, slow was probably in the sixty to seventy-five mile and hour range just to stay in line through the banked curve. I was careful to fall back from the rider I was following. It felt like I was naturally riding aggressive.
The instructor exited off the track and we were given free reign as a group. I increased speed through the corners holding my own and just as the thought crossed my head, “this isn’t so bad, I seem to have got this pretty good for a first timer…” five other bikes passed me in rapid fire. I was the slowest person on the track. That ego slam was quickly followed by guilt. Was I getting in the way and being a speed bump? I refocused attention and tried to decipher the cornering lines doing my best to look deep into each curve and avoid hyper attention to what was right in front of me. Powering through the corners to give my Honda the traction she needs. On the straightaway I would put in some juice but still very conservative, unsure how much braking it would take to safely get through turn one and the quick succession of turns after that.

And then it was over. Our beginner heat was done. The three checkered flags located at different spots on the track went out and I could see the one nearest me easily. Each of us raised our left hand while maintaining speed and exited to pit row. Soon afterward the beginners all met at the class room. My point of freak out was quickly addressed. I ask the instructor about my concern of being in other’s way. He quickly squashed it. “It is their responsibility to pass you, don’t worry about it. The track is wide and the passing areas are all over the place. You just focus on learning the lines, looking into the corner, being smooth and consistent, the speed with come later.”

There are no relative markers of speed on the track. On normal roads there are markers everywhere, other cars, speed limit signs, your own speedometer both on the vehicle and in your head. All giving you information, how fast you’re going relative to traffic, the safe speed to take the corner coming up how much risk you have to be snagged by a cop. All of that goes away. I read before coming on the track and followed advise to mask my speedometer so I wouldn’t have that distraction. Without mirrors I had no idea who was behind me or if I was impeding their path, another distraction removed. All I had to worry about was to try and get the turn lines right and ride consistent and smooth. If I don’t do anything unexpected or jerk through a corner, the riders behind me will be able to safely set a pass line around me. The focus narrows to just the sound of my engine, look as far into the corner as possible and decide which line to take. For the newbie with no experience that blank slate brings its own confusion. How fast should I take this corner? I have no idea. Where’s the traction envelope? Again, I got nothin’. What line should I focus on? Good story, you got Cliff Notes on that? Without input on any of these things it is my inherent reaction to respond with less speed. I am just not one of those guys who jumps in with both feet into the deep end of the pool. I have to start easy and work my way up to the edge of the envelope.
The second heat felt really good. I could now see the cones on the side of the track for what they were, reference points. One was at the apex of each turn and based on that I made my beginner’s attempts at learning how to corner for speed. Other series of cones were at the entrance to each turn to give a reference point of when to brake and or change gears. From them I was able to start to explore the path toward higher acceleration. I knew I could continue to accelerate right up to those cones and begin braking as they came near. I knew my Honda could handle much more than I was asking of her just based on the performance as viewed against those two reference points. The Hurricane even surprised me when I finally got a good approach and exit out of turn nine and into the straight away, I hit the throttle at about seven thousand rpm with yet a lot of straightaway in front of me so I pushed her even further. I had never heard Old Blue sound like that, she was ten thousand rpm and the Hurricane was waking up and asking for more. From experience I know that seven thousand rpms on the Honda is about ninety miles an hour. Eight thousand pushes me over a hundred miles an hour so ten thousand rpms is probably in the one hundred and ten mile an hour range. Although at the time there was only surprise at the new sounds coming from the engine and the firm stable feel of the suspension as we screamed across the straight away toward turn 1. This is what we were there for. To push the limits and feel good about it. This time though the heat was cut short by a red flag as someone’s muffler had fallen off. All the riders raised left hands and exited. I was not disappointed, I was exalting in the feeling of having performed solidly despite being just the second time on the track.


My heat was separated by a forty-five minute interval as the other groups rode. The advanced with their blistering sounds of one hundred eighty miles per hour or more and knee drag cornering were followed by intermediates on modern bikes that from my unaccustomed eyes looked just as intimidating as the advanced. Then the intermediates on vintage bikes with their cornucopia of engine sounds that were highlighted by the announcer. The announcer really enjoyed their day, bringing all of us calm with fun comments and his genuine awe and appreciation for both the variation of motorcycles on the track and the talent of the riders. Where necessary chastising those that crossed the safety lines presented at the early morning rider’s meeting. No comment wasted as each statement was a subconscious learning of what to do, what not to do, what to look for and spark that seed of appreciation.
The third heat was coming up and I was feeling much more comfortable. I didn’t have the need to get myself in position on the first call. I waited until five minutes prior to start up Old Blue. The starter cranked but the engine didn’t fire. Three attempts each progressively longer told me the old bike was feeling a bit winded by all the activity and the battery was lagging on being recharged. On the fourth attempt the engine finally turned. That alone made my third heat heavily conservative. Old Blue wasn’t giving up, but I didn’t want to push her. We went in nice and slow on heat 3, just for the experience of learning together. The track instructor road in front of me signaling to follow as he showed me the lines but several times he had to wait for me to catch up. My envelope chasing enthusiasm was gone for the day, replaced by concern for the mechanical soundness of the old Hurricane. Still I learned a tremendous amount just by following the coach for the sixty seconds that we rode like that. The third heat went the full fifteen minutes and the Honda kept it together and finished. My confidence was gone. I decided to pack it in rather than push the old girl.
I have a winch in the back of my truck that makes loading easy and safe. After securing a couple lashings, a bit of nostalgia swept over me and I patted the tank as one might pat a horse. “We did good today, it was a good day.” We’d ridden several thousand miles together, even taking on seven hundred miles in one day and there was certainly a connection in that endurance. Today was a different kind of connection. One that we’ll have to do again before I can really describe it for you.

0 notes
Text
How To Rebuild your Five-Leaf and Turn it into a Hemi Type Suspension for Improved Hook and Handling
We don’t care what the Brand Xers say, we know the vintage Mopar suspension system (torsion bars and leaf springs) works quite well when set up properly. When adding big doses of power (like our ’65 Coronet that’s receiving an 825hp Street Hemi), a serious suspension upgrade is critical for improved control and road holding. In three of our previous installments using our Project Hemi Coronet, the front suspension (PST), steering (Borgeson) and unibody (US Car Tool) were strengthened for responsive steering and handing, and to prevent body twist from the torque of our new Elephant engine.
This time we’ll beef up the rear suspension. Previously, we rebuilt the ’68 B-Body Dana 60 and outfitted it with Wilwood 12.19-inch rear disc brakes. All along we’ve strived to maintain a stock-looking suspension for when someone takes a peek underneath, yet have a responsive, good-handling B-Body that’ll hang in the turns with today’s cars. Sure, there’s no argument that modern aftermarket suspension systems can outperform our vintage stock setups, but what we’re doing here will return much more responsive handling and traction than just a stock rear suspension rebuild.
A little more before we move out back. Up front we replaced the wimpy rubber with tough poly bushings. Now, with poly bushings in the rear we’ll have much less deflection amongst all the suspension components. Also up front we used thicker 1.03-inch diameter torsion bars (stock is 0.92 inch) and add a Hellwig 1 3/8-inch front sway bar. To stiffen the rear suspension to match the front mods, we’ll be adding leaves to the stock five-leaf setup and a Hellwig 7/8-inch rear sway bar. Back in the 1990s the Dodge’s stock leaves were re-arched for that period-correct stance (the rear raised 1- to 2-inch higher than the front). Here, we’ll be adding two-leaves left (seven-leaves total) and three-leaves right (eight total) for not only the right look, but even better performance than the muscle cars of the era that came equipped with the Hemi rear suspension (six leaves left and seven leaves on the right).
Looking through my new Classic Industries catalog, I noticed many performance parts, besides a wide range of restoration offerings for our A-, B-, and E-Body cars. In the rear suspension section, I noticed ’64-’74 Hemi-type (six leaves l/s, seven leaves r/s), ’66-’76 Hotchkis geometry corrected (1-inch lower) and ’66-’71 HD lower leaf springs (two per side). Yearning to maintain that right stance, we decided on the HD Lower Leaf Springs. By adding a pair (two leaves) of the HD Lower Leaf Springs to each side of our re-arched stock leaves, we can have Hemi-type rear suspension for our “Cool Blue” Coronet. We also ordered the ’67-’74 Leaf Spring Rebuild set to properly rebuild and detail the original units. Rounding out the package are QA1 double adjustable shocks to separately adjust compression and rebound for the ultimate ride, handling, and traction for our intended type of street or strip driving.
We’ve been building Project Cool Blue to be a low-key, stealthy/stock-looking B-Body bruiser. We went with a pump-gas Street Hemi rather than a period-correct cross-ram Race Hemi to hide the 825hp elephant under the stock flat hood. Having an old-school muscle car that can safely handle, hook, and brake on today’s roads is important, plus we won’t be afraid if a modern muscle car pulls up alongside us.
Until the next installment with Cool Blue, check out these latest workings as we continue to inch closer to completing this exciting project car.
Prepping The Chassis For Big-Block/Hemi Power:
Prepping The Chassis For Big-Block/Hemi Power
B-Body Front Suspension Rehab:
B-Body Front Suspension Rehab
Installing Wilwood 12.19 DynaLite Front Brakes:
Installing Wilwood 12.19 DynaLite Front Brakes
Upgrading To Wilwood’s 4-Wheel Disc Master Cylinder:
Upgrading To Wilwood’s 4-Wheel Disc Master Cylinder
Mopars Need Extra Help With Heat–Here’s How To Fix It:
Mopars Need Extra Help With Heat–Here’s How To Fix It
Steer Without Fear! How To Upgrade Your Mopar Steering Box:
Steer Without Fear! How To Upgrade Your Mopar Steering Box
Dyno Testing The 825hp Barton Street Hemi:
Dyno Testing The 825hp Barton Street Hemi
Install a Stealth In-Tank 1000-HP Fuel System:
Install a Stealth In-Tank 1000-HP Fuel System
Refurbishing a 1968 B-body Dana 60:
Refurbishing a 1968 B-body Dana 60
Big Disc Brakes That Fit With 15-inch Wheels:
Big Disc Brakes That Fit With 15-inch Wheels
In order to maintain that old-school stance we decided to rebuild and beef up the original leaf springs we re-arched 25 years ago. When we learned Classic Industries offers a leaf-spring rebuild kit and HD Hemi-type lower leaves, we began our mission to create an extra HD Hemi rear suspension. Notice amongst the disassembled springs the rust and deteriorated liners and bushings.
The front eye bushings, sleeves, and outer shell were pressed and cut out. The majority of bad handling and response is caused from worn, dry-rotted suspension bushings, and bad shocks.
We individually wire brushed and sanded the leaves until there was no surface rust evident. Each leaf was coated with OER Corrosion Barrier 77 (K86118 $59.99 quart) in satin black we ordered from Classic Industries. A coating of this stuff is said to be flexible, non-porous, and will not crack, chip, flake, or peel — perfect for leaf springs.
Here’s the left (MN41019, $179.99) and right pair (MN41022, $179.99) of 1966-’71 HD Lower Leaf Springs. You can turn your five-leaf suspension into Hemi-type suspension (six-leaves left, seven-leaves right). We’re going one more leaf, seven-leaves left and eight-leaves right like we did on my ’67 R/T test mule. It’s been tested and proven for better hook and handling.
This reproduction ’67-’74 Leaf Spring Rebuild kit (MN7008, $109.99) enables you to freshen your old American-made leaf springs and make them look like-new again. The kit includes the metal straps with rubber insulators, plastic, and galvanized steel interliners. If you want, a local spring shop can re-arch your stock springs to your desired ride height.
These poly bushings will control the forces in the pivot points of the leaf spring suspension with much less deflection than rubber bushings that wear out and deform in a short period of time. This poly kit (MN41001G, $44.99) will help keep the leaf springs functioning well for years withstanding high temps and deterioration from the elements.
The front spring hanger brackets and shock plates were lightly cleaned up and coated with the OER Corrosion Barrier 77. We left the original 50-something-year-old undercoating in place. For that clean look, check out the reproduction Lower Shock Washers/nuts (MN31110, $14.99) from Classic Industries.
With a tap and die set we chased the original nuts and bolts. By hand, with a small wire brush, we lightly cleaned up the stock U-bolts, shock, and front hanger bolts and nuts as to not remove the original black oxide finish. The hardware was repeatedly soaked with WD-40 and cleaned with WD-40 dampened shop towels to maintain that natural look.
We’ve been saving these 2- and 4-degree angle shims for over 20 years in case we needed them to attain proper pinion angle. After the suspension settles down we’ll check the pinion angle. Optimum pinion angle will help traction during launch at the dragstrip. Once “Cool Blue” is sorted out with some seat time, we’ll drive the ’65 to the track for some strip testing — can’t wait!
Hotchkis makes these strong, stock-length shackles (H17367, $81.99) for classic Mopars. Classic Industries sells them at the best price we’ve seen. The shackle bars are thicker and stronger than stock. Complete with Grade 8 hardware and bolts that feature a machined shoulder to prevent over-tightening and squeezing the poly bushings.
QA1 Shocker Stars (MD48903, $239.99 each) have proven themselves in skidpad and dragstrip testing using a ’67 R/T test mule. They’ll make a drastic difference in handling and road-holding. The double-adjustable feature allows you to dial-in for better traction at the dragstrip, handling on the road, autocross or open-track events.
We picked up this threaded adjustable pinion snubber at the Mopars at Englishtown roughly 10 years ago. Its threads allow for infinite adjustment compared to an outdated unit that has only three 1-inch adjustments. Adjusted correctly at the strip (resting against the floorpan), it prevents axle twist and wheelhop to plant your tires to the pavement.
The addition of this Hellwig Products 7/8-inch sway bar (MB2660, $219.99) to our Hemi-fied rear suspension package will bring us close to today’s standards in cornering performance. This high-quality American-made sway bar package will greatly reduce body roll for crisper handling to hold your classic to the road in an emergency situation.
By adding two leaves left and three leaves to the right side of our five-leaf suspension, we needed a longer center bolt that holds the leaf spring package together. We found longer leaf spring center bolts available online. The bottom bolt is 1-inch longer and looks close enough to stock for what we’re doing here.
The galvanized steel and plastic interliners were put in place between each leaf before clamping and bolting the spring package together. Here we’re assembling the left-side springs with seven leaves.
With old leaf springs like ours, the main and the shackle eyelet (seen here) will need to be cleaned out for the poly bushing to fit. It was also necessary for us to clean out the eyelets in the subframe for the shackle bushings to fit.
Be sure to use the supplied polyurethane grease for added bushing life and movement at the pivot points. We coated the inside and outside diameter of the poly bushings to also lubricate the bolts, sleeves, and eyelets to outperform rubber bushings for many years.
The sleeve inside of the main eyelet bushing was coated with high-temp, high-pressure wheel bearing grease. This will protect the bolt and sleeve from excessive wear against each other during pivot movement.
The rebuilt leaf-spring suspension was bolted to the ’68 B-Body Dana 60 we rehabbed and outfitted with Wilwood 12.19-inch Dynalite disc brakes. The aforementioned U-bolts, shock plates, and hanger brackets were only tightened enough so the leaves can swivel to ease installation lining up the shackles and hanger brackets.
The Hotchkis shackles were loosely installed without the bottom bolt. Again, be sure to use plenty of the supplied polyurethane grease. Once the leaf’s rear eyelet is lined up in position with the shackle lower boltholes, the bolt can be easily installed.
Like most of you, we’re grunts without a lift. We’ve found it easiest to roll the whole rear end and suspension setup under the car for installation. The car needs to be lifted high enough for the tires to clear the quarter-panels.
Once rolled underneath into position, the leaf springs rear eyelets will easily tilt into position to place the lower bolt through the lower shackle boltholes and eyelet bushings. Leave the shackle nuts loose (as seen) until the front spring hanger brackets are bolted in place.
Our trusty old Lincoln hi-lift (21 inches) floor jack was positioned under the differential to lift up the suspension assembly to line up the hanger bracket studs with the four holes in the frame. We firmly pushed forward on the rearend moving it enough so an assistant could start the nuts for the hanger bracket studs.
We connected the Inline Tube high-quality stainless steel flex line (PN SH503, $25) required for disc brakes like our Wilwood 12.19-inch super stoppers.
The QA1 Shocker Star double adjustable shocks will also adjust for ride quality, not simply better road and track performance. Their poly bushings are thinner than stock rubber, so we added two 1/8-inch-thick washers to prevent shock rattle.
The U-bolts and front hanger nuts were tightened to stock torque specs (U-bolts 50 ft-lb hanger nuts 30 ft-lb). The main eyelet and shackle bolts were only snug tightened (5-10 ft-lb) until the car is at rest with its drivetrain installed. Sharp-eyed folks riding behind will not see the large S on the differential cover, but spot the clean-looking aluminum shocks.
We love the look of leaf-spring suspension with stock-length shackles. We feel our proven setup with the extra leaves, poly bushings, and adjustable QA1 shocks work well and look cool in today’s world. The wimpy-looking studded snow tires have to go! We’ll replace them with a 275/60R15 drag radial on a 15×8 rim to fill-in the wheelwells for that cool look.
The post How To Rebuild your Five-Leaf and Turn it into a Hemi Type Suspension for Improved Hook and Handling appeared first on Hot Rod Network.
from Hot Rod Network http://www.hotrod.com/articles/rebuild-five-leaf-turn-hemi-type-suspension-improved-hook-handling/
via IFTTT
0 notes
Photo
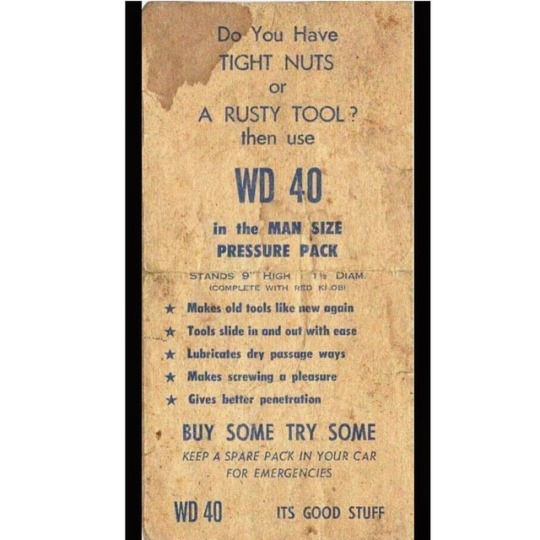
Nicely inappropriate vintage WD 40 advert circa 1956. How far we have come since those days 😂 🔨 🔨 #vintage #retro #advertising #commercial #ads #vintageads #vintageadvertising #oldskool #oldads #oldschool #wd40 #menshumor #koenjivintage (at South Melbourne Market)
#oldskool#oldads#retro#vintageadvertising#oldschool#wd40#koenjivintage#vintageads#menshumor#vintage#advertising#ads#commercial
0 notes
Text
How to Repair and Restore Your Vintage Gauge Cluster
We love the style and character in our old cars’ instrument panels, but time, neglect, and careless add-ons can degrade their operation. Here are some common problems with old instruments and how to fix them.
If your car is old enough to have an ammeter (that reads amps instead of volts), you probably don’t know that it was designed to read a maximum of 40 to 50 amps. If you’ve installed a high-amperage alternator, your ammeter and the wires around it are going to get hot and maybe melt—or worse, catch fire. The solution is to switch the gauge from amps to volts.
You can check your speedometer’s accuracy against a GPS app on your iPhone. If it reads fast, you need to add teeth to the gear attached to the other side of the cable that’s bolted to the transmission. Adding teeth slows the reading down, and subtracting teeth speeds it up.
If your speedometer needle bounces at low speed, it’s the cable. Pull it out of its casing and clean it with WD-40, then lube it with wheel-bearing grease. If it bounces and makes noise on the freeway, it’s in the speedometer itself. Take it to a reputable shop like Redline Gauge Works in Santa Clarita, California, for a repair.
If you’ve changed your transmission to something that uses a speed sensor instead of a speedometer cable, any speedometer can be converted to GPS. The odometer will be converted to a digital display and set to zero.
On most vintage gauge clusters, there’s a little box on the back that’s a points-style voltage regulator. When the points stick, the voltage can peg all the gauges at once then short them out. The fix is to replace the box with a solid-state voltage regulator.
Vintage gauge clusters are designed for 5 volts, not 12. Always use a voltage regulator to daisy-chain the power studs together to reduce the gauge input voltage.
The pointers can be saved with the correct application of basecoat in white and florescent red-orange paint. Send this job to a professional to preserve the balance of the pointer.
The numbers and hash marks on the gauge face can be restored by companies like Redline. They can also be customized to feature any artwork, color, or font you can imagine.
The glass on the face can be restored using 000 steel wool and Meguiar’s glass polish. The outer bezel can be sandblasted and painted or powdercoated back to factory colors.
If you have a factory tach, it isn’t going to work with an aftermarket tach signal. It is now possible to convert any factory tach to work with any aftermarket signal using a tach adapter and new internals. It’s not a DIY job, so send it out.
The post How to Repair and Restore Your Vintage Gauge Cluster appeared first on Hot Rod Network.
from Hot Rod Network http://www.hotrod.com/articles/repair-restore-vintage-gauge-cluster/
via IFTTT
0 notes
Last Seen Blogs

iraqim
Untitled

okinawagram
沖縄グラム.jp -okinawa-


bitterfxk
Peons, Assemble

themazerunnerrunning
The Glade