#vncserver
Explore tagged Tumblr posts
Visit Tumblr Blog
Explore Tumblr blogs with no restrictions, modern design and the best experience.
Last Seen Tumblr Blogs


Fun Fact
28.6 is the average number of monthly visits per US mobile user.
Text
Raspberry Pi per VNC fernsteuern: Desktopzugriff unter Windows leicht gemacht

Wenn du deinen Raspberry Pi komfortabel mit Maus und Tastatur bedienen möchtest, brauchst du mehr als nur den Zugriff über das Terminal. Zwar ist das Tool PuTTY ideal, um per SSH auf die Kommandozeile des Raspberry Pi zuzugreifen – doch wer grafische Anwendungen oder die Desktopoberfläche nutzen will, stößt hier schnell an Grenzen. Terminal-Tools erlauben nämlich keinen Zugriff auf Fenstertools oder grafische Benutzeroberflächen. https://youtu.be/mc8qa8dutNk In diesem Beitrag zeige ich dir Schritt für Schritt, wie du VNC auf deinem Raspberry Pi einrichtest und von einem Windows-PC aus eine Verbindung zur grafischen Oberfläche herstellst. Damit kannst du den Pi ganz bequem fernsteuern, als säßest du direkt davor – inklusive Desktop, Maus und Tastatur. Besonders ab dem Raspberry Pi 4B, auf dem sich die Desktop-Version von Raspberry Pi OS flüssig nutzen lässt, wird diese Methode richtig komfortabel.
Was heißt VNC?
VNC steht für Virtual Network Computing und ermöglicht die Fernsteuerung eines Computers über ein Netzwerk – inklusive grafischer Benutzeroberfläche. Anders als bei einem reinen SSH-Zugriff (z. B. über PuTTY), bei dem man nur die Kommandozeile sieht, kannst du mit VNC den kompletten Desktop deines Raspberry Pi auf einem anderen Gerät anzeigen lassen. Maus- und Tastatureingaben werden dabei in Echtzeit übertragen. VNC ist ideal, wenn du Anwendungen mit Fenstern und grafischen Elementen nutzen möchtest – etwa einen Webbrowser, ein Konfigurationstool oder die grafische Entwicklungsumgebung auf dem Raspberry Pi.
VNC auf dem Raspberry Pi aktivieren
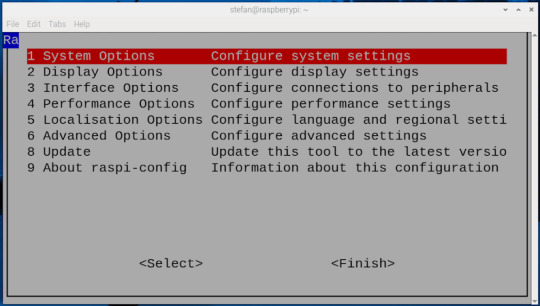
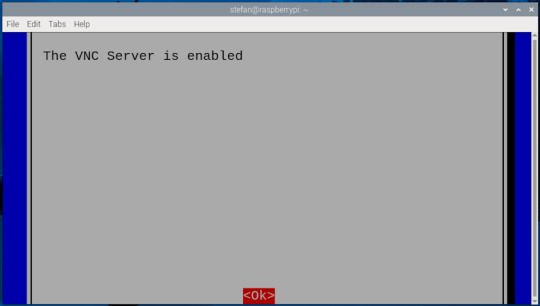
Bevor du dich per VNC mit dem Raspberry Pi verbinden kannst, muss die Funktion zunächst aktiviert werden. Das lässt sich auf zwei Arten erledigen – je nachdem, ob du bereits Zugriff auf die grafische Oberfläche des Pi hast oder lieber über die Kommandozeile arbeitest: Methode 1: Aktivierung über die grafische Oberfläche Wenn du einen Monitor, Maus und Tastatur direkt am Raspberry Pi angeschlossen hast, kannst du VNC ganz bequem über das Tool "Raspberry Pi Configuration" aktivieren. Dort findest du die Option unter dem Reiter "Interfaces", wo du den VNC-Server mit einem Klick einschalten kannst.

öffnen der Konfiguration über das Startmenü - Step1

aktivieren des Schalters VNC in der Konfiguration - Step 2 Methode 2: Aktivierung über die Kommandozeile Alternativ lässt sich VNC auch per Terminal aktivieren – z. B. über eine SSH-Verbindung mit PuTTY. Gib dazu einfach folgenden Befehl ein: sudo raspi-config


Die IP-Adresse des Raspberry Pi herausfinden
Damit du dich per VNC mit deinem Raspberry Pi verbinden kannst, musst du seine IP-Adresse im Heimnetzwerk kennen. Es gibt mehrere Möglichkeiten, diese zu ermitteln: - Über den Router: In der Geräte- oder Netzwerkübersicht deines Routers (z. B. Fritz!Box) findest du alle verbundenen Geräte samt IP-Adressen.

- Über die grafische Oberfläche: Bewege deine Maus über das Netzwerksymbol oben rechts neben der Uhr auf dem Desktop.
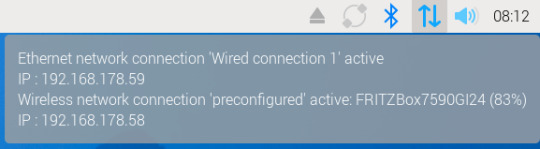
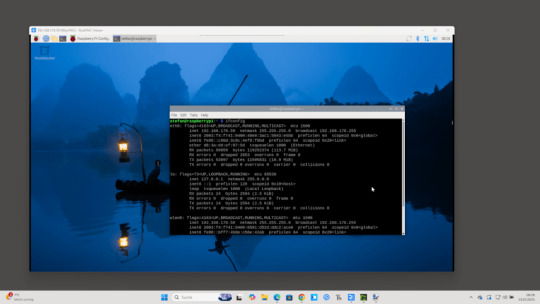
- Über das Terminal: Der schnellste Weg – besonders, wenn du direkt am Pi arbeitest oder per SSH verbunden bist – ist der Befehl: bashKopierenBearbeitenifconfig In der Ausgabe findest du unter dem Abschnitt wlan0 (WLAN) oder eth0 (LAN) die Zeile inet, z. B.: inet 192.168.178.59 – das ist deine IP-Adresse im Heimnetz.

Ich persönlich finde den Weg über ifconfig am einfachsten und zuverlässigsten.
VNC-Verbindung unter Windows 11 mit RealVNC Viewer herstellen
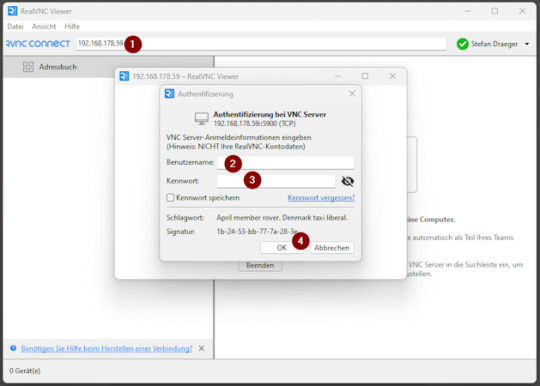
Um vom Windows-PC aus auf die grafische Oberfläche deines Raspberry Pi zuzugreifen, benötigst du einen VNC-Client. Eine der bekanntesten Lösungen ist der RealVNC Viewer, der einfach zu bedienen ist und gut mit Raspberry Pi OS harmoniert. Schritt 1: RealVNC Viewer herunterladen Lade dir den RealVNC Viewer über die offizielle Webseite herunter: 👉 https://www.realvnc.com/de/viewer/ ⚠️ Wichtig: Der RealVNC Viewer ist in der aktuellen Version nur als 14-tägige Testversion verfügbar. Danach ist eine kostenpflichtige Lizenz erforderlich, um alle Funktionen weiterhin nutzen zu können. Schritt 2: RealVNC Viewer installieren Nach dem Download führst du die Installationsdatei aus und folgst den Anweisungen. Die Installation dauert nur wenige Sekunden. Schritt 3: Verbindung zum Raspberry Pi herstellen - Öffne den RealVNC Viewer. - Gib in das Eingabefeld (1) oben die IP-Adresse deines Raspberry Pi ein (z. B. 192.168.178.59) und bestätige mit Enter. - Beim ersten Verbindungsaufbau erscheint ein Sicherheitsdialog – diesen kannst du bestätigen. - Melde dich mit den Zugangsdaten deines Raspberry Pi an (Standard: Benutzername (2) pi, Passwort (3) raspberry, sofern nicht geändert). - Nach dem Login (4) erscheint die Desktopoberfläche des Raspberry Pi in einem Fenster – fertig!
Verbindung erfolgreich hergestellt
Sobald die Verbindung steht, öffnet sich die Desktopoberfläche deines Raspberry Pi in einem neuen Fenster auf deinem Windows-PC. Du kannst dich nun ganz normal mit der Maus und Tastatur bewegen und den Pi bedienen, als würdest du direkt davor sitzen – inklusive aller grafischen Anwendungen und Tools.
In meinem Fall habe ich den Raspberry Pi über ein LAN-Kabel direkt mit dem Router verbunden, was eine deutlich stabilere und schnellere Verbindung ermöglicht als über WLAN. Gerade bei der Fernsteuerung mit VNC sorgt das für ein flüssigeres Nutzererlebnis ohne Verzögerungen oder Verbindungsabbrüche. Read the full article
0 notes
Text
CentOS - Setup and Configure VNC Server - How To

In this post we'll see how to setup and configure a VNC Server on a Linux CentOS 7.x server machine to allow remote connections from any VNC client - such as TightVNC, RealVNC and the likes. More specifically, we'll do that using the tigervnc-server software, a free tool that allows to do just that. Before proceeding, let's briefly recap what VNC is about.
Introduction
The acronym VNC stands for Virtual Network Computing and is a server-client protocol that allows a client machine (running a VNC client) to connect to and control a remote computer (powered by a VNC server). The software was originally developed by the Olivetti & Oracle Research Lab in Cambridge, UK as an open-source initiative and its source code is still available, as of today, under the GNU General Public License. Depending on the VNC server software, the client will connect to the currently active runtime desktop (such as some "modern" softwares like Teamviewer or AnyDesk) or to a stand-alone virtual desktop, just like the Windows Remote Desktop RDP protocol: the latter behaviour is arguably more powerful and secure, especially if we need to control a server machine, because each session will be a unique environment configured with the permissions and grants of the connected user. That's why we're chosing TigerVNC, which works exactly like that by starting parallel sessions of the machine desktop environment (Gnome, KDE or other GUI) on the connecting client VNC desktop: this basically means that a standalone virtual desktop will be created for each separate connection - which is precisely what we want.
Installing TigerVNC
Now that we know what are we talking about, let's see how we can setup and configure TigerVNC under our CentOS environment. The first thing to do is to install the tigervnc-server software package by opening a terminal session and issuing the following command with root privileges: Right after that, you should create a dedicated VNC user to connect with (with a dedicated password). To do that, type the following: We'll say it only once: never do that with the root user. Enabling VNC for the root user would create a serious security risk to your system that you'll generally want to avoid. Leaving the root user out of VNC and configuring a dedicated account with limited permissions instead - like the one in the above example - is definitely a better choice. Once you created the vncuser and its login password, you also need set a VNC-unique password for that user. This can be done with the following command: (the first line can be omitted if we are actually connected with vncuser beforehand). The next thing to do is to create a VNC configuration file for the vncuser: the fastest way to do that is to copy the VNC generic template file - located in the /lib/systemd/system/ folder - and then modify it according to our need: That "1" which we put in the new filename is the display number that will be used for that specific service instance. That's important to know, because it will also determine the TCP port that our VNC server will be listening to, which is 5900 + the display number: the first one will be 5901, then 5902 and so on. Right after the copy, you need to edit the new file using vi, nano or another text editor and replace the placeholder with the name of the user created a short while ago (vncuser in our scenario). Here's how the file should look after the update (minus the long commented part at the beginning): As soon as you do that, you can reload the VNC daemon and start the vncserver @1 with the commands below: Before proceeding, it could be wise to check if the service is running by issuing the systemctl status command... ... and create the symlink to have it always executed on system startup using the following command: Another check you can do before trying to connect to our server is to take a look to the active network sockets using the ss command: if everything works properly, you should see a VNC server running and listening on port TCP 5901. Here's the command to execute... ... And this should be the result: If you can see this, it means that everything has been setup correctly.
Firewall configuration
Since our VNC service is listening to port TCP 5901, you need to be sure that such port is open and accessible by external clients: therefore, if you have a firewall installed, you should create an appropriate rule to allow VNC clients to connect. How many ports to open will depend by how many instances of VNC servers you'll going to need: in our scenario, you only made 1, therefore you only need to open the first allocated VNC port: TCP 5901, just like we said. Here's the command to open that port on firewalld: Needless to say, you can also restrict that port for specific groups, IP addresses, network cards or other simple or complex firewall rules: that's entirely to you, depending on your network environment's configuration and how much you want to be safe.
Installing a GUI
If you already have GNOME, KDE or other desktop environments installed on our system you can skip this step, otherwise you'll need to add one: the TigerVNC server will start a parallel instance of a given desktop environment for each login session, meaning that we need to have one - otherwise it won't work. GNOME If you really want the great (but heavy-weight) GNOME, type the following: Xfce If you want a lightweight alternative, we can suggest Xfce - a free & open source desktop environment for Unix-like platforms which work perfectly with TigerVNC. Don't misunderstand us here, GNOME works fine as well, but it's quite space-and-resource-intensive: if you want to save resources on your server machine, Xfce would arguably be a better choice. To install it, type the following: Additional settings for Xfce If you've chosen to use Xfce, you'll also need to change the file to execute when the VNC session starts. To do that, edit the /home//.vnc/xstartup file and change the exec entry (usually line 4)from etc/X11/xinit/xinitrc to startxfce4, just like the following: That's about it.
Connecting with VNC Client
Now that everything
Troubleshooting
In case your client is unable to establish a working VNC connection, you need to checkup the following: Connection issues -> Firewall configuration: if you see pop-up errors saying that the client cannot connect to the remote host, you need to check your network & firewall configuration to be sure that there aren't blocking issues that could prevent the client from connecting to server port TCP 5901. Black screen with mouse -> YUM update or GUI reinstall: if you see a black screen with the mouse pointer working, that probably means that your VNC connection is working fine but there is something that prevents Desktop Environment GUI from starting properly. The best things you can try to fix such odd behaviour are: Perform a yum update to install the newest versions of TigerVNC and the GUI itself. Be sure to watch out for any issue during the install phase that could prevent them from installing/updating properly. Uninstall and reinstall the GUI using yum remove / yum group remove and yum groupinstall again. If it still doesn't work, you might want to try out a different GUI to see if the problem persists.
Conclusion
That's about it, at least for the time being: we hope that this guide could help other System Administrators who want to connect to their servers with the VNC protocol! Read the full article
0 notes
Text
Termux、AndronixでUbuntuをインストール
タイトルだけ読むと役に立ちそうに見えるかもしれませんが、ほぼ日記的なメモで、世間一般にはあまり役に立たない記事になっていると思います。
これまではAndroidタブレットにUserlandというアプリを使って、Debian+xfce環境をインストールしてたまに使っておりました。今はひょっとしたら改善されているのかもしれませんが、��の当時UserlandでもUbuntuをインストールして使いたかったのですが、Ubuntuをインストールしてxfceをインストールすると、themeファイルの一部が欠けてしまうのか、はたまた別の理由なのか、とにかくxfceの表示が乱れて上手くいかず、悪戦苦闘した結果、結局Ubuntuのインストールを諦めて、Debianとxfceの組み合わせで使っておりました。
ただこの環境でもxfceの動作があまり安定しておらず、例えばファイルブラウザのthunarを起動して、thunarからテキストファイルをダブルクリックしてテキストエディターを起動すると、thunarが強制終了。再度thunarを起動すると、先程起動したテキストエディターが強制終了…みたいなことが起きやすく、だんだんUserlandを使う機会が減っていきました。
Userlandで作ったLinux環境は、アプリを起動して使いたいLinux環境を選ぶだけで、Linux環境を立ち上げてVNCクライアントアプリまで自動で起動してくれるので、アプリとしては非常に使いやすいんですけれど、もっと動作が安定したUbuntu環境をAndroid上でも使いたいなぁ、と思ってググってみたところ、TermuxとAndronixというアプリのことを知り、今回試してみた次第。
Termuxアプリは色々なところで紹介されているので、詳しい使い方などは省きます。
Andronixアプリは、TermuxでUbuntuをインストールするのに必要なコマンドを生成してくれるアプリといった感じのもので、インストールしたいUbuntuやデスクトップ環境をAndronixで選んでいくと、最終的にTermuxで入力するコマンドがコピーされるので、Termux上でコマンドをペーストして実行すると、Ubuntuやxfceなどのインストールが簡単にできる、という感じ。
で、当初AndronixでUbuntuの18.04をインストールしてみたところ、aptでインストールできるFirefoxのバージョンが59という、一体いつのバージョンだよ…という状況で、多少はFirefoxのバージョンが古くても我慢する気ではいたんですが、流石に古すぎるのでUbuntu18.04は断念。なら最新に近いUbuntu 22.04ならFirefoxも最新に近いバージョンがインストールできるのでは?と思ってインストールしてみるも、xfce関連の動作や設定があまり上手くいかず、こちらも断念。結局、Ubuntu20.04とxfceという環境に落ち着きました。
ちなみに、Ubuntu20.04のaptでインストールされるFirefoxのバージョンは112と、かなり新し目でした。最初からUbuntu20.04にしとけば良かった…。

AndronixとTermuxでインストールしたUbuntu20.04+xfce環境は、UserlandのDebian+xfceと比べて非常に安定して使えます。ただ、いくつか個人的に気になる点があって、以下はそのメモです。
・fcitx-mozcが上手く動かない。
他のサイトにも書いてありましたが、インストールはちゃんと出来ているように見えるんですが、何度再インストールをしても上手くいきませんでした。通知アイコンがmozcに変わるところまではいくんですが、mozcの設定とかを選んでも起動しません。ターミナルでコマンドを打ち込んでも、エラーを表示することもなく、ただ起動しません。仕方がないので、日本語入力はfcitx-anthyを使うことにしました。こちらはちゃんと動きます。
・psコマンドが使えない
原因はさっぱり分かりませんが、procがマウントされていないとかなんとかのエラーが出ます。タスクマネージャーとかも起動はしますが、プロセス一覧などは表示されません。ただ、pgrepやpkillコマンドは使えるので、psコマンドが使えなくてもなんとかなる気はします。
・TermuxでのUbuntuの起動・終了が面倒
Termuxを起動して、bash start-ubuntu20.sh などと打ち込むとUbuntuが起動するので、さらに vncserver-start と打ち込むことで、やっとVNCクライアントアプリからUbuntu+xfceにアクセスできるようになります。
Ubuntuを終了する時は、Termuxアプリでまず vncserver-stop と打ち込んで終了するポート番号を入力してvncserverを終了、次に exit を入力してUbuntuを終了という手順が必要です。vncserverr-stopを実行しないでUbuntuを終了すると、次回Ubuntuを起動してvncserverを起動した時に、通常はポート1で起動するはずが、ポート2、ポート3…と別のポートでvncserverが起動することになって、VNCクライアントで接続するのが手間になります。
なので、うちではTermuxを起動したら、Ubuntuとvncserverを自動起動、Ubuntuを終了する際には、vncserverも自動終了するようにしてみました。
やり方は、Termuxは起動時に .bashrcファイルがあれば、それを読み込んで実行するらしいので、Termuxでテキストエディターのnanoが使えるなら nano .bashrc と打ち込んで.bashrcファイルに、bash start-ubuntu20.sh と入力して保存。これで次回からTermuxを起動するとUbuntuが自動的に起動します。
次は起動したUbuntu上の .profile を開いて、 vncserver-start を追加。これでUbuntuを起動した時に vncserver-start コマンドも自動化されます。さらに .profile の exit(){ などと書かれているところに pkill Xtigervnc とかを追加すると、UbuntuをTermux上で exit と打ち込んで終了する時に、起動中のvncserverも自動で終了してくれます。以下はうちの .profile の例。このやり方が正しいかどうかは定かではないので、やる場合は自己責任で。
#~/.profile: executed by Bourne-compatible login shells. if [ "$BASH" ]; then if [ -f ~/.bashrc ]; then . ~/.bashrc vncserver-start fi fimesg n 2> /dev/null || true exit() { #vncserver-stop pkill Xtigervnc if pgrep -f tiger >/dev/null;then unset -f exit exit else pkill dbus pkill ssh-agent pkill gpg-agent pkill pulseaudio unset -f exit exit fi }
vncserver-stop ではなく pkill Xtigervnc にしているところがミソ。まぁ、vncserver-stop でもダメではないんですが、Ubuntu終了時に起動しているvncserverをとにかく全部終了して欲しいだけなので、うちでは pkill Xtigervnc にしています。
・VNCクライアントの反応が鈍くなる
これはTermuxと直接関係はないんですけれど、VNCクライアントでUbuntuのデスクトップを表示させている場合、しばらくなにも操作をしていないと、VNCクライアント上の描画の更新が途切れがちになったり、マウスやキーボードの操作が遅れて反映されたりします。VNCサーバー側の仕様なのか、使用しているVNCクライアントアプリの仕様なのか、Androidの仕様なのか、よく分かっていませんけれど、解決方法はあります。
Ubuntuの画面が頻繁に更新されるように、なにか動画を再生し続けていれば良いのです。動画と言っても小さなGIFアニメを再生しっぱなしにするだけで良く、なのでうちではrubyで同じGIFアニメファイルをただ延々と再生するだけのプログラムを作って、常に画面の最前面に表示するオプションをONにして、画面の端っこに表示させたりしています。xffceの上側のパネルにはデジタル時計を秒数付きで常時表示させてはいるんですが、この程度の描画の変化・更新ではダメみたいで、小さめのGIFアニメならOKという感じです。
そんなこんなで、core i5のノートPCでXubuntuを使うのと比べると、Android上のUbuntu+xfce環境の動作は若干もっさり気味ですが、これまで使っていたUserlandのDebian+xfce環境よりも全然安定していて、これならAndroid上でUbuntuを使う場合は、UserlandからTermuxに完全に乗り換えできそうです。
0 notes
Video
vimeo
What is RealVnc? from Software Horsepower on Vimeo.
#RealVncConnect#FeaturesofRealVnc#RealVncSofware Real VNC is secured and compliance and is built keeping the security in mind. It balances the access and control the need with the complete secrecy that regulations want.
#remoteaccesssoftware #virtualnetworkingcomputing #topfeaturesofRealVNC #vncserver #realvncserver #choiceofconnectivity"
0 notes
Text
Ubuntu 16.04安装 GNOME3 + VNC
更新 Ubuntu 系统补丁:
sudo apt-get -y upgrade
开始:有一个更简单粗暴的办法是直接装 UBUNTU GNOME发行版,但是当我安装完UBUNTU16的时候,我真的不想重新装一遍系统。
所以就在原有基础上安装gnome3,很多人觉得用不习惯,其实桌面环境这个还是挺方便的。
sudo apt-get install gnome-shell sudo apt-get install ubuntu-gnome-desktop
值得注意的是,记得要在安装gnome-shell的时候选择那个gdm,不然开机默认还是unity
sudo apt-get install unity-tweak-tool sudo apt-get install gnome-tweak-tool
然后重启大发。搞定。
配置VNC服务器
安装VNC服务端 #sudo apt-get install vnc4server
开启VNC服务 #sudo vncserver
在此期间会要求设置VNCServer的密码,注意,最大长度为8位。 设置密码后,看到(连接VNC 用端口 1) New ‘****:1 (****)’ desktop is ****:1 (****代表主机名,注意那个:1)
关闭原桌面进程并生成新进程 sudo vncserver -kill :1
生成新的进程: sudo vncserver :1
重启服务器后,可能半天无法登录,这时,只需要等一会儿就行了
这时,登录ssh 会提示: 
这种情况,是后台以为你的服务器开了N 多个回话,攻击服务器,所以不要紧张,等一会就可以登录了。
Ubuntu 16 安装GNOME,和vncserver后只显示桌面,不显示菜单栏解决
一般的server操作系统是不安装图形系统的,这样的话,要想打开它的图形界面可以在server端上安装vncserver软件。然后再在本地机器(windows或linux)上安装一个vnc viewer就能显示图形界面。
最后我不得不安装另一个图形库Xfce4 $ sudo apt-get install xfce4
安装会提示有未更新的文件,用更新的来安装: $sudo apt-get update
然后修改配置文件~/.vnc/xstartup如下:
#!/bin/sh # Uncomment the following two lines for normal desktop: # unset SESSION_MANAGER # exec /etc/X11/xinit/xinitrc [ -x /etc/vnc/xstartup ] && exec /etc/vnc/xstartup [ -r $HOME/.Xresources ] && xrdb $HOME/.Xresources xsetroot -solid grey vncconfig -iconic & x-terminal-emulator -geometry 80x24+10+10 -ls -title "$VNCDESKTOP Desktop" & x-window-manager & sesion-manager & xfdesktop & xfce4-panel & xfce4-menu-plugin & xfsettingsd & xfconfd & xfwm4 &
然后重启vcnserver, # vncserver -kill :1 # vncserver
再在本地登录,成功!
0 notes
Text
Raspberry pi vnc viewer

Raspberry pi vnc viewer how to#
Raspberry pi vnc viewer install#
Raspberry pi vnc viewer password#
You will need the IP address from your Raspberry Pi, you will also need the username and password. Install the application, and enter in the details of your Raspberry Pi Now simply download the VNC Viewer application from (If you are not using the VuePilot Raspberry Pi image, it’s under Preferences > Raspberry Pi Configuration from the top menu)Ĭlick the “ Interfaces” tab and set VNC to Enable Step 1: Enable VNC Server Interfaceįrom your VuePilot Raspberry Pi open the “ System Configuration” application by double clicking the icon on the desktop. VNC is disabled by default on the VuePilot Raspberry Pi image, however you can enable it with just a few clicks which will give you the ability to perform remote desktop control of your device. To stop the VNC viewer, just close the application.Plugging in a keyboard and mouse to your VuePilot Raspberry Pi can be a hassle when the screen is on the other side of the building, the good news however is that the ability to remotely manage your Raspberry Pi device is built into the operating system and uses standard VNC software.
Raspberry pi vnc viewer install#
Back on the Ubuntu machine, install the VNC viewer client: Now, we can finally connect to the Pi with VNC. Once you do, you should see a line looking something like this:
Raspberry pi vnc viewer password#
You will be prompted to create a password for VNC login. But it looks like, this is not possible: Thanks to the good instructions here in the Support forum I managed the raspi device registration, enabled file transfer and remote terminal control. vncserver :1 -geometry 1024圆00 -depth 16 -pixelformat rgb565 I like to remote control a Raspberry Pi Zero W with TV like I could do in LAN with VNC - with keyboard and mouse as shown at the Raspi HDMI output. Adjust the geometry paramater to your desired display size. Next, start the VNC server on the Raspberry Pi. Now that we have logged in to the Raspberry Pi, we can setup VNC for remote access. You should get a prompt that looks like this: Type yes at the prompt, then enter the password for the user pi, ‘raspberry’ by default. RSA key fingerprint is xx:xx:xx:xx:xx:xx:xx:xx:xx:xx:xx:xx:xx:xx:xx:xx.Īre you sure you want to continue connecting (yes/no)? Now we can ssh to it:Īnd you should receive a message like this: So we know that the Raspberry Pi has IP address: 192.168.0.112. Service Info: OS: Linux Connecting over SSH The Raspberry Pi (running Debian) looks something like this:Ģ2/tcp open ssh OpenSSH 5.5p1 Debian 6+squeeze2 (protocol 2.0) The results will display every machine that could be identified on port 22. Be change to the specifics of your own network. For this task, we can use the Linux nmap (Network Mapper) utility. Click the Terminal icon on the top left of the desktop to open a terminal window. To do this, you have several options: Connect a keyboard, mouse, and monitor. However, if you don’t have a display for your Raspberry Pi, this isn’t an option. You will need to interact with your Pi in order to turn on the VNC server. If you have access to a display for your Raspberry Pi, this task is simple, in a terminal simply type:Īll the network interface configurations will be displayed, including the IP address. The first step is to locate the Raspberry Pi on your network. If not, see RPi Easy SD card setup Getting the IP address of the Raspberry Pi It assumes you have Debian for Raspberry Pi installed on an SD card. This process is easier if you have a display connected to the Raspberry Pi, but will also show the steps to connect with only Ethernet and power connected.
Raspberry pi vnc viewer how to#
This tutorial will demonstrate how to setup and connect to a Raspberry Pi over VNC from Ubuntu.
1 note
·
View note
Text
Remoter labs llc

#REMOTER LABS LLC HOW TO#
#REMOTER LABS LLC MAC OS X#
#REMOTER LABS LLC INSTALL#
#REMOTER LABS LLC PRO#
Nothing else on the App Store that I tried even came close - this app does everything and it does it all better than the competition" JG401 v3.8.6, USA I can't even count the number of times this little app has saved the day when I'm stuck in a meeting and can't get to a terminal to check on things.
"A great multipurpose tool for managing your machines.
Remoter gives you just about every option you'd need in a VNC client" (.) Setting things up is as simple as entering your VNC information and pressing connect.
says: "Remoter, (.) is currently on sale and is a pretty feature rich VNC app.
#REMOTER LABS LLC PRO#
If you're looking for an all-inclusive version without in-app purchases, please go to Remoter Pro (See icon link to the left) Remoter Pro doesn't replace Remoter VNC:.
This is not a Lite version, it's FULLY working for just $3.99 (Regular Price) (Only extras beyond VNC: like RDP, SSH and Telnet are in-app purchases).
The only Remote Desktop client you'll ever need!.
Optimized for the latest iOS! Trackpad / Mouse and Apple Pencil support!.
LIKE REMOTE RIPPLE? RATE AND REVIEW IT ON THE APP STORE!Īlso, we will appreciate if you review Remote Ripple in your blog, social networks, other Web sites or forums. Remote Ripple on Twitter: (press Follow to get updates) App page at Facebook: (press Like to see updates in your news feed) Virtualization systems (such as VMware and QEMU) often include built-in VNC servers, although they may not be enabled by default. Typically, it will offer you to enter new VNC password and will start sharing your desktop (or create new virtual desktop for you).
#REMOTER LABS LLC INSTALL#
Just install a VNC server from your package collection, and type something like vncserver or tightvncserver (or whatever command starts that particular VNC server). Most Linux distributions include a number of VNC servers as well. To enable it, go to System Preferences, choose Sharing, enable Remote Management, press Computer Settings, check “VNC viewers may control screen with password” and enter the password you will use when connecting. It's a part of Apple Remote Desktop service.
#REMOTER LABS LLC MAC OS X#
Mac OS X systems already have a VNC server included. You can download your free copy of TightVNC on its Web site. We strongly recommend TightVNC as it provides best performance and compatibility with Remote Ripple. If the target PC runs Windows, install a VNC server on it. To connect with Remote Ripple, make sure your target computer runs a sort of VNC server. Install Remote Ripple, and find your own use cases! Copy a file forgotten on a remote host (while Remote Ripple does not support direct file transfers, it can help in transferring files with other services like Dropbox or Google Drive). For example, you can use Remote Ripple as a remote control for your music or video player running on a PC. Control your home computers while laying in a lounge chair. Administer servers, workstations and virtual machines remotely.
#REMOTER LABS LLC HOW TO#
Assist in installing software, fix problems and demonstrate how to set up things. Provide remote support to your friends and family. Monitor what's happening on your computers while you're away (use View-only mode to prevent from interfering with the desktop). Remote Ripple allows you to do your work remotely. While direct connections via Internet may require some configuration, they guarantee best performance and independence from online services.įrom time to time, many of us need to access our “big computers” and use some “big software” installed on it. It does not use intermediate servers and does not route your data to third-party services. It works via Wi-Fi, 3G, 4G/LTE networks and connects straightly to your remote machines. Fast operation even on slow connections As compared to competing VNC viewers, Remote Ripple offers: It allows you to access, view and control your PC, Mac and Unix systems remotely. Fast remote desktop client from the developers of TightVNC.
0 notes
Text
Ubuntu install tigervnc server

#UBUNTU INSTALL TIGERVNC SERVER HOW TO#
#UBUNTU INSTALL TIGERVNC SERVER INSTALL#
#UBUNTU INSTALL TIGERVNC SERVER SOFTWARE#
The VNC server allows you to connect from the desktop as well as in the server.
#UBUNTU INSTALL TIGERVNC SERVER INSTALL#
Next, run apt command to install and configure the TigerVNC server. As long as the SSH port has been opened, you shouldn’t have to configure anything else (e.g. The procedure to install and configure TigerVNC on Ubuntu Linux can be described via:Login to the remote Ubuntu server via SSH:Install and configure the desktop environment, including Gnome or XFCE4. Remmina is convenient because it handles the SSH tunnel.
#UBUNTU INSTALL TIGERVNC SERVER SOFTWARE#
Enter the SSH settings under the SSH Tunnel tab. VNC is open-source client-server software that allows you to see the screen of the server computer and control it on one or more client computers no matter what. COMPUTERNAME.local:1, :1 corresponds to the display number above). Enter the VNC connection settings under the basic tab (e.g. If using Ubuntu 20.04 as the client machine, Remmina (a VNC client) is installed by default. Sudo systemctl enable systemctl start systemctl status Connect Using Remmina VNC Client Login to remote Ubuntu server using ssh command Install the desktop environment such as Gnome or XFCE4 using apt command Install and configure the TigerVNC. sudo mkdir /etc/vncĮxecStart=/usr/bin/vncserver -fg -depth 24 -geometry 1920x1200 -localhost no :%i This will create the typical Ubuntu desktop. & xrdb $HOME/.Xresources chmod 755 xstartupĬreate /etc/vnc/xstartup, edit the file, make executable. The fix comes from this post.Ĭreate ~/.vnc/xstartup, edit the file, make executable cd ~/.vnc Instructions found in other tutorials might work if you manually start the VNC server, but you will get a black screen if starting it as a service with GNOME (although it works with XFCE4). We want to run the VNC server as a system service (starts at boot), using GNOME (i.e. Vncserver -kill :1 Configure the VNC Server Test the installation by starting and then killing the server. TigerVNC supports virtual displays, is an active successor to TIghtVNC, and is easy to install from the Ubuntu repositories sudo apt install tigervnc-standalone-server Others can support virtual (remote) displays that are truly headless. controlling the visible logged-in desktop). Some VNC servers only support local VNC sessions (i.e. It was easy to set up a local VNC session, but going headless without a dummy adapter AND with the GNOME desktop was a challenge. no monitor plugged in) for Ubuntu 20.04 using GNOME was harder than anticipated. Install the OpenSSH server on the remote Ubuntu server that you want to access. Those who want to access their remote system securely over ssh, they can follow the given steps. Update apt database with apt-get using the following command.Creating a headless virtual VNC session (i.e. Enter the IP address along with port 5901 of the remote Ubuntu system where the VNC server is running. Install tigervnc-standalone-server Using apt-get In the following sections we will describe each method. There are three ways to install tigervnc-standalone-server on Ubuntu 20.04. This viewer may also be on a computer running other operating Note: This server does not need a display. The server generates a display that can be viewed with a vncviewer. This package provides a standalone VNC server to which clients can connect. Internet and from a wide variety of machine architectures. Not only on the machine where it is running, but from anywhere on the It is, in essence, a remoteĭisplay system which allows you to view a computing `desktop’ environment VNC stands for Virtual Network Computing.
#UBUNTU INSTALL TIGERVNC SERVER HOW TO#
In this tutorial we learn how to install tigervnc-standalone-server on Ubuntu 20.04. tigervnc-standalone-server is Standalone virtual network computing server Introduction
1 note
·
View note
Text
Ubuntu 16.04 vnc server xstartup gnome panel missing

UBUNTU 16.04 VNC SERVER XSTARTUP GNOME PANEL MISSING INSTALL
UBUNTU 16.04 VNC SERVER XSTARTUP GNOME PANEL MISSING UPDATE
UBUNTU 16.04 VNC SERVER XSTARTUP GNOME PANEL MISSING PASSWORD
UBUNTU 16.04 VNC SERVER XSTARTUP GNOME PANEL MISSING PLUS
UBUNTU 16.04 VNC SERVER XSTARTUP GNOME PANEL MISSING DOWNLOAD
enable firewall traffic on the vnc port (in the AWS console).
In that mindset, launching each component yourself makes it clearer what is doing what. It also matters whether you want things to run on the GPU, or the CPU. The responses here are good for getting one solution up and running, but I recommend understanding the basics of the different layers which result in a functioning GUI / OpenGL environment / remote desktop in Unix. I ran into the same problem, and ended up writing a how-to guide for myself ( ) If you want to return to a session later, specify this number in the port field of the xrdp login dialog box. Pay close attention to these status messages and make note of the VNC port number displayed. When you start a session, the port number is -1.ġ9) When the system connects, several status messages are displayed on the Connection Log screen.
UBUNTU 16.04 VNC SERVER XSTARTUP GNOME PANEL MISSING PASSWORD
sudo service xrdp restartġ7) On Windows, open the Remote Desktop Connection client, paste the fully qualified name of your Amazon EC2 instance for the Computer, and then click Connect.ġ8) When prompted to Login to xrdp, ensure that the sesman-Xvnc module is selected, and enter the username ubuntu with the new password that you created in step 8.
UBUNTU 16.04 VNC SERVER XSTARTUP GNOME PANEL MISSING INSTALL
First Install the xrdp with sudo apt-get install xrdp then edit the above mentioned file)ġ5) Look for the section and change the following text (then save and exit ). sudo cp /home/ubuntu/.xsession /etc/skelġ4) Open the xrdp.ini file to allow changing of the host port you will connect to. xsession to the /etc/skel folder so that xfce4 is set as the default window manager for any new user accounts that are created. echo xfce4-session > ~/.xsessionġ3) Copy. Sudo -E apt-get install -y ubuntu-desktopġ1) Install xrdp sudo apt-get install xfce4ġ2) Make xfce4 the default window manager for RDP connections. su ubuntuġ0) Install Ubuntu desktop functionality on your Linux instance, the last command can take up to 15 minutes to complete. sudo –iĩ) Switch back to the ubuntu user account and cd to the ubuntu home directory. Press the Enter key after typing the command passwd ubuntu, and you will be prompted to enter the new password twice. sudo /etc/init.d/ssh restartĨ) Temporarily gain root privileges and change the password for the ubuntu user to a complex password to enhance security. sudo vim /etc/ssh/sshd_configĦ) Change PasswordAuthentication to yes from no, then save and exit.ħ) Restart the SSH daemon to make this change take effect.
UBUNTU 16.04 VNC SERVER XSTARTUP GNOME PANEL MISSING UPDATE
Refer this guide to create permanent sessions as serviceĤ) Execute: sudo apt-get update sudo apt-get upgradeĥ) Because you will be connecting from Windows Remote Desktop, edit the sshd_config file on your Linux instance to allow password authentication. Now you can access GUI using IP/Domain and port 1įor AWS, you have to allow port 5901 on firewall Log file is /home/lonely/.vnc/ubuntu:1.log Starting applications specified in /home/lonely/.vnc/xstartup New 'ubuntu:1 (lonely)' desktop is ubuntu:1Ĭreating default startup script /home/lonely/.vnc/xstartup Xauth: file /home/lonely/.Xauthority does not exist You will require a password to access your desktops. "gnome-session & ".ģ) Create VNC password and vnc session for the user using "vncserver" command. $ sudo apt install gnome-panel gnome-settings-daemon metacity nautilus gnome-terminal vnc4serverĢ) Edit /usr/bin/vncserver file and modify as belowįind this line "# exec /etc/X11/xinit/xinitrc ".Īnd add these lines below. So run the vnc server also on same user instead of "awsgui" user.ġ) Install packages $ sudo apt update sudo apt install -no-install-recommends ubuntu-desktop Mostly because of ".vnc/xstartup" file on different user. Sudo iptables -A INPUT -p tcp -dport 5901 -j ACCEPT Mac VNC client can be downloaded from here:
UBUNTU 16.04 VNC SERVER XSTARTUP GNOME PANEL MISSING PLUS
In the vnc client, give public DNS plus ":1" (e.g.
UBUNTU 16.04 VNC SERVER XSTARTUP GNOME PANEL MISSING DOWNLOAD
You can download xtightvncviewer to view desktop(for Ubutnu) from here When you're done, hit Ctrl + C on the keyboard, type :wq and hit Enter. "Uncomment the following two lines for normal desktop." And on the second line add "sh" so the line reads exec sh /etc/X11/xinit/xinitrc. Then hit the Insert key, scroll around the text file with the keyboard arrows, and delete the pound (#) sign from the beginning of the two lines under the line that says Then run following commands and enter the login password for vnc connection: su - awsgui Run following commands to install ui and vnc server: sudo apt-get update Setting up ui based ubuntu machine on AWS. Sudo vim /etc/ssh/sshd_config # edit line "PasswordAuthentication" to yes Following are the steps to setup the GUI Create new user with password login sudo useradd -m awsgui
0 notes
Text
Vnc connect to gnome ubuntu

#VNC CONNECT TO GNOME UBUNTU HOW TO#
#VNC CONNECT TO GNOME UBUNTU INSTALL#
Now start the VNC server by running the vncserver command as a normal user.
#VNC CONNECT TO GNOME UBUNTU INSTALL#
sudo apt install tigervnc-standalone-server tigervnc-common tigervnc-xorg-extension tigervnc-viewer. From the Screen Sharing window, click on the toggle button as marked in the. To install TigerVNC server and other associated packages in Ubuntu, run the following command. Once Sharin g is enabled, click on Screen Sharing as marked in the screenshot below. Navigate to Sharing section and click on the toggle button as marked in the screenshot below to enable Sharing. Install VNC server 2.1 System updateīefore proceeding with the installation, please make sure that your server has been updated to the latest version. Open the Settings app from the Application Menu of Ubuntu 20.04 LTS. and I can connect to it using Tight vnc viewer from windows but the UI looks like But, I want to use the default desktop that ships with Ubuntu 18. In this experiment, we used a server with the Ubuntu 18.04 (Bionic Beaver) operating system, which uses SSH to access the local connection. For the VNC client on your computer, you can use the VNC Viewer application, such as Royal TSX. Internet connection is required to download software. Preparationįirst prepare an Ubuntu 18.04 server, which can remotely or directly operate the terminal on the screen via SSH.
#VNC CONNECT TO GNOME UBUNTU HOW TO#
VNC server has a lot of software, here is how to use TigerVNC to install VNC server. Different from the Windows operating system, you only need to activate the remote desktop on Linux, you must install VNC Server to be able to remote desktop in real time. VNC Server is the software used to execute VNC (Virtual Network Computing) desktop in Linux environment. Use your favorite VNC Viewer to connect to your localhost port 5900. Essentially, it is a remote display system that not only allows you to view the desktop environment on the currently running computer, but also view the remote "desktop" environment from computers with different architectures anywhere on the Internet. Since the key components arent bound to Ubuntu or GNOME, you can use your favorite. Install VNC server 2.1 System update 2.2 Install TigerVNC 2.3 Install Gnome 3 Desktop 2.4 VNC password setting 3. vnc directory and create a new file named xstartup containing the following: /bin/sh Start Gnome 3 Desktop -x /etc/vnc/xstartup & exec /etc/vnc/xstartup -r HOME/.Xresources & xrdb HOME/. vnc directory of the user’s home directory. VNC stands for Virtual Network Computing. The above command will create a file named passwd in the. Welcome to Shenhao's AI + Big Data Technology Tour blog-VNC remote graphical desktop configuration of Ubuntu 18.04 Gnome implementation You will see a text area where you can enter the server hostname (IP address). Welcome to Shenhao's AI + Big Data Technology Tour blog-VNC remote graphical desktop configuration of Ubuntu 18.04 Gnome implementation.
0 notes
Text
Ubuntu install tigervnc server

#Ubuntu install tigervnc server how to#
#Ubuntu install tigervnc server password#
To put krfb in view-only mode, untick Allow uninvited connections to control the desktop.
#Ubuntu install tigervnc server password#
To set a password, type a hard-to-guess password into the Password input box. To set krfb to request access each time, tick Confirm uninvited connections before accepting To configure krfb, go to System Settings > Sharing > Desktop Sharing > Configure. Because it's highly integrated with KDE, running it in other environments is difficult. Krfb is the default VNC server in Kubuntu. Have x11vnc start automatically via upstart in any environment ( To set x11vnc to only allow local connections, include the -localhost option. To put x11vnc in view-only mode, include the -viewonly option. To set x11vnc to continually listen for connections, include the -forever option. To set x11vnc to only listen for the next connection, include the -once option. To set x11vnc to request access each time when set without a password, include the -nopw -accept popup:0 options. Here a few settings that would be common to adjust depending on your environment: One may execute the following in a terminal: x11vnc -auth guess -forever -loop -noxdamage -repeat -rfbauth /home/USERNAME/.vnc/passwd -rfbport 5900 -shared Password written to: /home/USERNAME/.vnc/passwd Write password to /home/USERNAME/.vnc/passwd? /n y It will respond with: Enter VNC password: It is helpful to ensure you have uninstalled any other VNC programs first so that they don't interfere with x11vnc.Īs a quick proof of concept to test your connectivity, as per the man page, one may create a password file via: x11vnc -storepasswd It can be started while your computer is still showing a login screen. Also, it facilitates using in a minimal environment, as it has a tcl/tk based GUI. X11vnc is a VNC server that is not dependent on any one particular graphical environment. To allow connections from anywhere, open a terminal and run the command: gsettings reset network-interface To only allow local connections, open a terminal and run the command: gsettings set network-interface lo To put vino in view-only mode, untick Allow other users to control your desktop. To set a password, tick Require the user to enter this password:, and enter a hard-to-guess password. There's no way to set vino to only listen for the next connection.To set vino to request access each time, tick Allow other users to view your desktop in the Remote Desktop configuration window. Have x11vnc start automatically via upstart in any environment ( Preferences > Remote Desktop.Systemctl enable start subsequent users, change the 1 to the next increment (2 and then 3 and so on). Now we need to run the following commands: # Clean any existing files in /tmp/.X11-unix environmentĮxecStartPre=/bin/sh -c '/usr/bin/vncserver -kill %i > /dev/null 2>&1 || :'ĮxecStart=/sbin/runuser -l mysuer -c "/usr/bin/vncserver %i"ĮxecStop=/bin/sh -c '/usr/bin/vncserver -kill %i > /dev/null 2>&1 || :' Here’s an example with my username “myuser”: The file you should start with is “/etc/sysconfig/vncserver” which will refer you to Open that file You need to make two changes to that file which is simply replaving USER with your real username. CentOS and Redhat 7 have a new way of configuring VNC. We still need to configure the VNC server and our VNC access. Start X from the command line prior to connecting: I haven’t configured X to start on boot though as this is a server and rarely will be accessed using the GUI. Install VNCServer and the desktop environment on the remote server: This means we have no option but to use VNC in a secure manner – via SSH. In this article we only have SSH access to the server.
#Ubuntu install tigervnc server how to#
This tutorial demonstrations how to install and use VNC without direct access to the VNC server.
0 notes
Text
Vnc connect to gnome ubuntu

#VNC CONNECT TO GNOME UBUNTU HOW TO#
#VNC CONNECT TO GNOME UBUNTU INSTALL#
Enable vncserver manually, to generate a default configuration file.
#VNC CONNECT TO GNOME UBUNTU HOW TO#
I have reloaded the OS and the issue persists - this is a problem with my CLIENT machine (macOS), not the Linux VNC server (Fedora, Ubuntu, etc). How to Change the VNC Server Resolution in Linux 1. When trying to use it in the terminal it prints outs all caps letters: for example - 123456789 ~]$ BDECA When trying to use the 10-key to enter numbers in a text editor app I just get the "ding" error sound. Also, for whatever reason the 10-key does work in the calculator app in Linux, but nothing else. Is this a bug in GNOME perhaps? Worth mentioning that the 10-key does work in Windows and macOS when connected via VNC. First, update your software sources using apt. Go to HOME/.vnc Edit xstartup, and comment out the xterm and twm lines Add a line that starts up either KDE or GNOME (startkde, gnome-session). Open the terminal using the Ctrl + Alt + T keyboard shortcut.
#VNC CONNECT TO GNOME UBUNTU INSTALL#
To overcome this, you will have to install the Light Display Manager, or lightdm. Install a virtual network computing (VNC). Unfortunately, GDM does not usually work very well with the x11vnc server. I have disabled "Mouse Keys" but this has no effect and did not resolve the issue. Install the MATE desktop environment, a lightweight GUI based on GNOME 2 available as an extra for Amazon Linux 2. This will perform a disconnect from the VNC server but anything you leavethat. These are both physical machines, but I have not yet tried actually connecting the same keyboard to the Linux machines yet since I need the VNC connection to work. To close out of VNC Viewer or Chicken of the VNC, just close the VNC window. I recently discovered that the 10-key (numeric) part of my Mac keyboard no longer works on either desktop when connected via VNC. They both are using GNOME desktop: 41.1 for Fedora, and 40.5 for Ubuntu I use VNC (RealVNC "VNC Viewer" app) on my Mac to connect to Linux desktops: Fedora 35 & Ubuntu 21. and I can connect to it using Tight vnc viewer from windows but the UI looks like But, I want to use the default desktop that ships with Ubuntu 18.
0 notes
Text
Real vnc connect ubuntu 16.04

REAL VNC CONNECT UBUNTU 16.04 HOW TO
REAL VNC CONNECT UBUNTU 16.04 INSTALL
REAL VNC CONNECT UBUNTU 16.04 FULL
To make the communication secure, you must encrypt your server-client connection by using an SSH tunnel between the VNC server and the client. VNC is a clear text and insecure network protocol. How to connecting with a VNC client and ssh session We are going to use that one with the ssh command. Pass the -list option as follows to the vnserver:
REAL VNC CONNECT UBUNTU 16.04 HOW TO
$ vncserver -kill :* How to list VNC server sessions on Ubuntu Linux VNC server to kill all, instances (*) of TigerVNC, run: Here is what we see on the terminal window: Killing Xtigervnc process ID 9523. To klill a VNC server running at desktop at :1 Verify it with the ss command and pgrep command/ egrep command: $ vncserver -depth 32 -geometry 1680x1050 One can setup desktop bit depth such as 8, 16, 24, 32 and Desktop geometry in Type the following command to start the vnc server on Ubuntu: & xrdb $HOME /.Xresourcesĭbus-launch -exit-with-session gnome-session & How to start TigerVNC server #!/bin/sh # Start Gnome 3 Desktop & exec /etc /vnc /xstartup You need to create a file name ~/.vnc/xstartup using a text editor such as vim command or nano command: How to configuring Gnome 3 Desktop environment to use with VNC For example, create a VNC user account nixcraft that will need to access the system via VNC: $ sudo systemctl start gdm How to configuring the VNC serviceĪ sysadmin can create a new VNC user account too for the new desktop user using the useradd command and passwd command.
REAL VNC CONNECT UBUNTU 16.04 INSTALL
Type the following command to install Ubuntu Linux desktop: $ sudo apt install tigervnc-standalone-server tigervnc-xorg-extension tigervnc-viewer Type the following apt command or apt-get command to install tigervnc vnc server on your server: How to Install and Configure VNC on Ubuntu 18.04 or 18.10 Connect to VNC server from your desktop using SSH and vnc client.Install and configure the TigerVNC server.Install the desktop environment such as Gnome or XFCE4 using apt command.Login to remote Ubuntu server using ssh command.The procedure to install and configure VNC server on Ubuntu Linux is as follows: How to install and configure TigerVNC server on Ubuntu 18.04 LTS All you need is out of band management with an embedded VNC server in BMC. One can control Linux server or desktop when networking service is down. Access remote Linux desktop stored in the cloud-based system.Access files from home computer or work computer stored on a remote server.You must install TigerVNC server on Ubuntu server. Sample setup for installation of VNC server on UbuntuĪ VNC server located at 202.222.1.2 shares a desktop with other client computers or mobile devices over the Internet or LAN.
REAL VNC CONNECT UBUNTU 16.04 FULL
This page shows how to install and configure TigerVNC on Ubuntu 18.04/20.04/22.04 LTS Linux based system to get access to full Gnome 3 desktop. Some typical examples are TigerVNC, TightVNC, Vino (default for Gnome desktop), x11vnc, krfb (default for KDE desktop), vnc4server and more. There are many implementations of the VNC protocol for Linux or Unix like systems. One can use VNC to control or access Linux based desktop remotely. It is nothing but a Linux desktop sharing system or set of protocols for sharing desktop. Introduction: VNC is an acronym for Virtual Network Computing. How do I install and configure TigerVNC server on Ubuntu 18.04/20.04 for remote desktop access? How to enable Remote Desktop connection between two Ubuntu Linux systems (server and client) to access GUI? How to configure Virtual Network Computing (VNC) in Ubuntu Linux 18.04 LTS or 18.10 or 20.04/22.04 LTS server?
0 notes
Text
Konfiguracja VPS ( Instalowanie GUI, VNC, Chrome)
Poradnik pisany oryginalnie na serwerze discord przez moją osobę.
pominę etap wybierania hostingu, płatności.
(polecam ovh)
Rozdział 1 - Logowanie do serwera
w moim przypadku na ovh.pl mam dostęp w przeglądarce do "zdalnego pulpitu" ale opiszę sposób zrobienia tego "na około" aby ten poradnik był zgodny z każdym hostingiem
1. Uruchamiamy program putty , wpisujemy IP serwera po czym klikamy "Open" i logujemy się do systemu (dane powinny przyjść mailem, lub s�� podane w panelu Hostingu)

2. Na początek zmienimy hasło na takie które będziemy pamiętać w tym celu wpisujemy komendę
passwd
wpisujemy stare hasło po czym 2 razy nowe hasło.
Rozdział 2 - Instalacja GUI
1. uruchamiamy zestaw komend
sudo apt-get update && sudo apt-get upgrade
jeśli pojawi się okno z restartem to walimy pięścią w klawisz ENTER
2. Teraz zainstalujemy manager logowania(?) Slim
sudo apt-get install slim

jeśli wyskoczy nam pytanie Do you want to continue?
to wpisujemy Y (lub T jeśli system jest po polsku)
i klikamy ENTER
3. Pora na właściwą instalację GUI
Wpisujemy komendę
sudo apt-get install tasksel
albo
sudo apt install ubuntu-desktop
po czym uruchamiamy
sudo tasksel

zaznaczamy strzałkami i spacją "ubuntu desktop" i klikamy enter
no i w tym miejscu się zatrzymałem, potrzebuje VNC aby połączyć się z pulpitem ale zapomnialem jak go zainstalowalem dlatego tworzę poradnik aby drugim razem nie zapomnieć XD
część 2 - po roku
gnome mi nie działa na innym vps więc dalsza część poradnika będzie od nowa pod xfce
sudo apt-get update && sudo apt-get upgrade
sudo apt-get install xfce4
sudo apt-get install -y xfce4-goodies
sudo apt install tightvncserver
vncserver
wpisujemy haslo 2 razy jesli nas poprosi
vncserver -kill :1
nano ~/.vnc/xstartup
#!/bin/bash
xrdb $HOME/.Xresources
startxfce4 &
wklejamy te 3 linijki, kasujac poprzednie wpisy.
zapisujemy ctrl+O i klikamy enter
vncserver
gotowe. łączymy sie przez vncviewer IP:5901
[ jak pokazuje sie ze nie mozna zainstalowac firefoxa bo snap zablokowany to tu instrukcja jak zainstalowac ]
sudo apt install software-properties-common
sudo apt-add-repository "deb http://ppa.launchpad.net/ubuntu-mozilla-security/ppa/ubuntu focal main"
echo ' Package: * > Pin: release o=LP-PPA-mozillateam> Pin-Priority: 1001 ' | sudo tee /etc/apt/preferences.d/mozilla-firefox>
echo 'Unattended-Upgrade::Allowed-Origins:: "LP-PPA-mozillateam:${distro_codename}";' | sudo tee /etc/apt/apt.conf.d/51unattended-upgrades-firefox
sudo apt update
sudo apt install firefox
How to Install a Desktop (GUI) on an Ubuntu Server (phoenixnap.com)
0 notes
Text
0 notes
Text
Ubuntu14 配置GUI + VNC 远程访问
安装gnome桌面环境(一定要先装,否则会反复失败!)
安装x-windows的基础: #sudo apt-get install x-window-system-core (部分文件不成功,用#apt-get update)
安装登录管理器 #sudo apt-get install gdm
安装Ubuntu的桌面: #sudo apt-get install ubuntu-desktop
重启之后进入系统便有GUI了
配置VNC服务器
安装VNC服务端 #sudo apt-get install vnc4server
开启VNC服务 #sudo vncserver
在此期间会要求设置VNCServer的密码,注意,最大长度为8位。 设置密码后,看到(连接VNC 用端口 1) New ‘****:1 (****)’ desktop is ****:1 (****代表主机名,注意那个:1)
关闭原桌面进程并生成新进程 sudo vncserver -kill :1
生成新的进程: sudo vncserver :1
Ubuntu 14安装vncserver后只显示桌面,不显示菜单栏解决
一般的server操作系统是不安装图形系统的,这样的话,要想打开它的图形界面可以在server端上安装vncserver软件。然后再在本地机器(windows或linux)上安装一个vnc viewer就能显示图形界面。
最后我不得不安装另一个图形库Xfce4 $ sudo apt-get install xfce4
安装会提示有未更新的文件,用更新的来安装: $sudo apt-get update
然后修改配置文件~/.vnc/xstartup如下:
#!/bin/sh # Uncomment the following two lines for normal desktop: # unset SESSION_MANAGER # exec /etc/X11/xinit/xinitrc [ -x /etc/vnc/xstartup ] && exec /etc/vnc/xstartup [ -r $HOME/.Xresources ] && xrdb $HOME/.Xresources xsetroot -solid grey vncconfig -iconic & x-terminal-emulator -geometry 80x24+10+10 -ls -title "$VNCDESKTOP Desktop" & x-window-manager & sesion-manager & xfdesktop & xfce4-panel & xfce4-menu-plugin & xfsettingsd & xfconfd & xfwm4 &
然后重启vcnserver, # vncserver -kill :1 # vncserver
再在本地登录,成功!
解决图���都是空白的问题(安装一个好的主题): You can try installing the Greybird theme which is the default theme in Xubuntu with the command: #sudo apt-get install shimmer-themes Then choosing "greybird-git" (not Greybird!) from the XFCE settings
For the icon theme, use this command: #sudo apt-get install xubuntu-icon-theme Then choose the "Elementary XFCE Dark" theme (or similar) from the XFCE settings
在终端中输入xfwm4-settings打开“XFCE settings”
0 notes