#Raspberry pi vnc viewer
Explore tagged Tumblr posts
Visit Tumblr Blog
Explore Tumblr blogs with no restrictions, modern design and the best experience.
Last Seen Tumblr Blogs


Fun Fact
Tumblr Inc. is using 66 technologies for its website.
Text
Raspberry Pi per VNC fernsteuern: Desktopzugriff unter Windows leicht gemacht

Wenn du deinen Raspberry Pi komfortabel mit Maus und Tastatur bedienen möchtest, brauchst du mehr als nur den Zugriff über das Terminal. Zwar ist das Tool PuTTY ideal, um per SSH auf die Kommandozeile des Raspberry Pi zuzugreifen – doch wer grafische Anwendungen oder die Desktopoberfläche nutzen will, stößt hier schnell an Grenzen. Terminal-Tools erlauben nämlich keinen Zugriff auf Fenstertools oder grafische Benutzeroberflächen. https://youtu.be/mc8qa8dutNk In diesem Beitrag zeige ich dir Schritt für Schritt, wie du VNC auf deinem Raspberry Pi einrichtest und von einem Windows-PC aus eine Verbindung zur grafischen Oberfläche herstellst. Damit kannst du den Pi ganz bequem fernsteuern, als säßest du direkt davor – inklusive Desktop, Maus und Tastatur. Besonders ab dem Raspberry Pi 4B, auf dem sich die Desktop-Version von Raspberry Pi OS flüssig nutzen lässt, wird diese Methode richtig komfortabel.
Was heißt VNC?
VNC steht für Virtual Network Computing und ermöglicht die Fernsteuerung eines Computers über ein Netzwerk – inklusive grafischer Benutzeroberfläche. Anders als bei einem reinen SSH-Zugriff (z. B. über PuTTY), bei dem man nur die Kommandozeile sieht, kannst du mit VNC den kompletten Desktop deines Raspberry Pi auf einem anderen Gerät anzeigen lassen. Maus- und Tastatureingaben werden dabei in Echtzeit übertragen. VNC ist ideal, wenn du Anwendungen mit Fenstern und grafischen Elementen nutzen möchtest – etwa einen Webbrowser, ein Konfigurationstool oder die grafische Entwicklungsumgebung auf dem Raspberry Pi.
VNC auf dem Raspberry Pi aktivieren
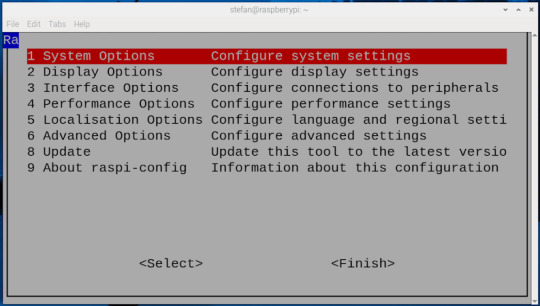
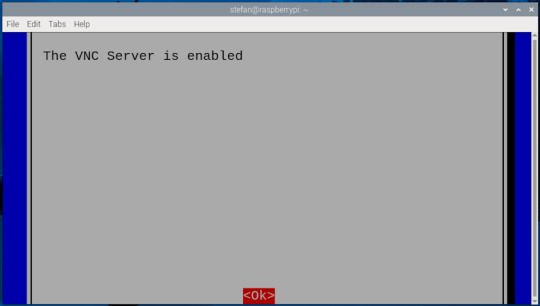
Bevor du dich per VNC mit dem Raspberry Pi verbinden kannst, muss die Funktion zunächst aktiviert werden. Das lässt sich auf zwei Arten erledigen – je nachdem, ob du bereits Zugriff auf die grafische Oberfläche des Pi hast oder lieber über die Kommandozeile arbeitest: Methode 1: Aktivierung über die grafische Oberfläche Wenn du einen Monitor, Maus und Tastatur direkt am Raspberry Pi angeschlossen hast, kannst du VNC ganz bequem über das Tool "Raspberry Pi Configuration" aktivieren. Dort findest du die Option unter dem Reiter "Interfaces", wo du den VNC-Server mit einem Klick einschalten kannst.

öffnen der Konfiguration über das Startmenü - Step1

aktivieren des Schalters VNC in der Konfiguration - Step 2 Methode 2: Aktivierung über die Kommandozeile Alternativ lässt sich VNC auch per Terminal aktivieren – z. B. über eine SSH-Verbindung mit PuTTY. Gib dazu einfach folgenden Befehl ein: sudo raspi-config


Die IP-Adresse des Raspberry Pi herausfinden
Damit du dich per VNC mit deinem Raspberry Pi verbinden kannst, musst du seine IP-Adresse im Heimnetzwerk kennen. Es gibt mehrere Möglichkeiten, diese zu ermitteln: - Über den Router: In der Geräte- oder Netzwerkübersicht deines Routers (z. B. Fritz!Box) findest du alle verbundenen Geräte samt IP-Adressen.

- Über die grafische Oberfläche: Bewege deine Maus über das Netzwerksymbol oben rechts neben der Uhr auf dem Desktop.
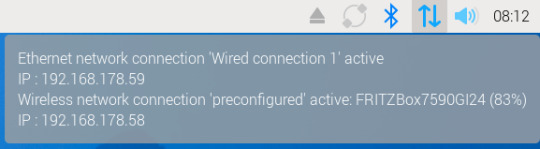
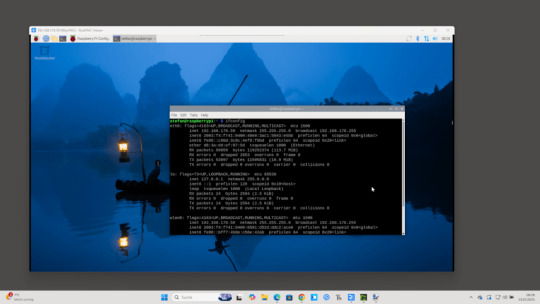
- Über das Terminal: Der schnellste Weg – besonders, wenn du direkt am Pi arbeitest oder per SSH verbunden bist – ist der Befehl: bashKopierenBearbeitenifconfig In der Ausgabe findest du unter dem Abschnitt wlan0 (WLAN) oder eth0 (LAN) die Zeile inet, z. B.: inet 192.168.178.59 – das ist deine IP-Adresse im Heimnetz.

Ich persönlich finde den Weg über ifconfig am einfachsten und zuverlässigsten.
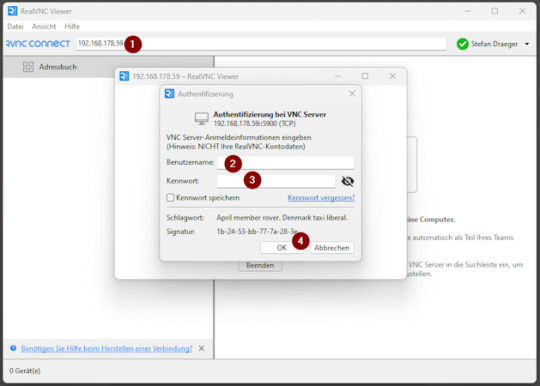
VNC-Verbindung unter Windows 11 mit RealVNC Viewer herstellen
Um vom Windows-PC aus auf die grafische Oberfläche deines Raspberry Pi zuzugreifen, benötigst du einen VNC-Client. Eine der bekanntesten Lösungen ist der RealVNC Viewer, der einfach zu bedienen ist und gut mit Raspberry Pi OS harmoniert. Schritt 1: RealVNC Viewer herunterladen Lade dir den RealVNC Viewer über die offizielle Webseite herunter: 👉 https://www.realvnc.com/de/viewer/ ⚠️ Wichtig: Der RealVNC Viewer ist in der aktuellen Version nur als 14-tägige Testversion verfügbar. Danach ist eine kostenpflichtige Lizenz erforderlich, um alle Funktionen weiterhin nutzen zu können. Schritt 2: RealVNC Viewer installieren Nach dem Download führst du die Installationsdatei aus und folgst den Anweisungen. Die Installation dauert nur wenige Sekunden. Schritt 3: Verbindung zum Raspberry Pi herstellen - Öffne den RealVNC Viewer. - Gib in das Eingabefeld (1) oben die IP-Adresse deines Raspberry Pi ein (z. B. 192.168.178.59) und bestätige mit Enter. - Beim ersten Verbindungsaufbau erscheint ein Sicherheitsdialog – diesen kannst du bestätigen. - Melde dich mit den Zugangsdaten deines Raspberry Pi an (Standard: Benutzername (2) pi, Passwort (3) raspberry, sofern nicht geändert). - Nach dem Login (4) erscheint die Desktopoberfläche des Raspberry Pi in einem Fenster – fertig!
Verbindung erfolgreich hergestellt
Sobald die Verbindung steht, öffnet sich die Desktopoberfläche deines Raspberry Pi in einem neuen Fenster auf deinem Windows-PC. Du kannst dich nun ganz normal mit der Maus und Tastatur bewegen und den Pi bedienen, als würdest du direkt davor sitzen – inklusive aller grafischen Anwendungen und Tools.
In meinem Fall habe ich den Raspberry Pi über ein LAN-Kabel direkt mit dem Router verbunden, was eine deutlich stabilere und schnellere Verbindung ermöglicht als über WLAN. Gerade bei der Fernsteuerung mit VNC sorgt das für ein flüssigeres Nutzererlebnis ohne Verzögerungen oder Verbindungsabbrüche. Read the full article
0 notes
Text
Raspberry PiをVNC Viewerでリモート操作できるようにする方法
VNCリモートアクセスの基本知識 VNC(Virtual Network Computing)は、ネットワークを通じてRaspberry PiのGUIデスクトップ画面を遠隔操作できる便利な技術です。 SSHがコマンドライン操作に限定されるのに対し、VNCはマウスやキーボードを使用した直感的な操作が可能です。 画面共有機能を活用すれば、複数人での共同作業も実現できます。 Raspberry PiでVNCを有効化する手順 Raspberry Pi OSには、RealVNCサーバーがプリインストールされています。 デスクトップ画面右上のメニューから「設定」→「Raspberry Piの設定」を開き、「インターフェイス」タブで「VNC」を有効化します。 設定変更後はRaspberry Piの再起動が必要です。 VNC Viewerのインストール方法 VNC…
0 notes
Text
Mixtile Edge 2 Kit– AI based bee detection and tracking
Here I describe usage of Mixtile Edge 2 Kit in agriculture, bee detection, which can be essential for health and survival of bees.
Story
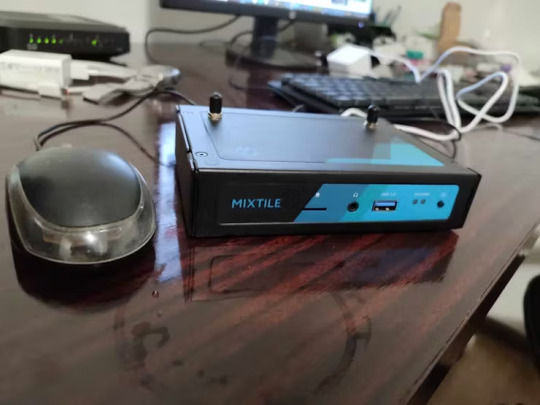
Mixtile is professional IoT hardware solution provider specialized in Linux and Android-based embedded systems.Mixtile Edge 2 Kit is high-performance ARM single board computer. It comes in variants of 2GB of LPDDR4 DRAM and 16GB eMMC Flash storage, or 4GB of LPDDR4 DRAM and 32GB eMMC Flash storage. This single board computer comes with preinstalled Android 11, and it runs Ubuntu Linux operating system in Android container. It comes with large connectivity options (Bluetooth, 4G/5G Cellular, GPS, and Lora, Zigbee and Z-Wave). For those, you will need module, but it comes with default onboard Wi-Fi connectivity, Gigabit Ethernet Port (RJ45) and Serial Port (RS-485). Because it comes with RS-485 port, which is industrial standard, and it comes within a strong metal case, it seems to me that it can be really used in industrial projects. I used official Raspberry Pi 5 power supply in order to power up my Mixtile Edge 2 Kit.So, an idea came to me why not to use it in agriculture, bee detection, which can be essential for health and survival of bees.This project will cover setting up Mixtile Edge 2 Kit, and custom photo dataset form video in order to train custom YOLOv5 bee detection model. YOLOv5 models must be trained on labelled data in order to learn classes of objects in that data.I gathered data from video and trained model on my PC.To train a model, I used python and typed in command line:
python train.py --img 640 --batch 16 --epochs 3 --data coco128.yaml --weights best.pt
My training results are summarized in the following table:
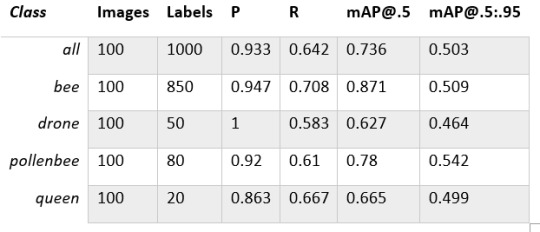
Training results
From this table you can see that images are divided into 4 detection classes:
Bee
Drone
Pollenbee
Queen
Example for each class is summarized in a table below:

Bee classes
1. Getting started
First, I will write about software part of the project, and later on steps of starting the recognition.
1.1 What is YOLOv5?
If you have been in the field of machine learning and deep learning for some time now, there is a high chance that you have already heard about YOLO. YOLO is short for You Only Look Once. It is a family of single-stage deep learning-based object detectors. It was written using Python language, and the framework used is PyTorch.
To ease control, I connected usb mouse to the one of three Mixtile Edge 2 Kit USB3 port. I used Ubuntu Linux for this project. Ubuntu on container is installed in Android system of Mixtile Edge 2 Kit by default. When you boot Mixtile Edge 2 Kit, you get Android OS. Since I wanted to access Edge 2 Kit remotely, and get easier control, I installed droidVNC server from this link:
It is an Android VNC server using Android 5+ APIs. It does not require root access.
I started the VNC server, connected with VNC Viewer and I got the following Android 11 screen:

Android 11
After that, I installed SimpleSSHD from this link:
SimpleSSHD is a SSH server Android app, based on Dropbear.It allows user access (user ssh) or full root access (by setting the login shell to /system/xbin/su) (if root is allowed).
After I installed SSH server, I connected to it via putty SSH terminal. Username and Password are root/root.
Com.hubware.ubuntu is ubuntu on a container and we are connected to it immidiately.
Now we are going to install required software.
First, you will need to upgrade Ubuntu by typing in the command: apt-get upgrade.
Second, I installed python by typing: apt-get install python.
You will also need pip, the package installer for Python.
2. Installing the YOLOv5 Environment
To start off we first clone the YOLOv5 repository and install dependencies. This will set up our programming environment to be ready to running object detection training and inference commands.
Install git: apt-get install git
Clone YOLOv5 repository:
git clone https://github.com/ultralytics/yolov5
Move to YOLOv5 folder:
cd yolov5
Install dependencies:
pip install -r requirements.txt
Wait some time to download and install all requirement packages, I waited 25 minutes, because there are a lot of python packages to install besides YOLOv5. YOLOv5 needs numpy package, scipy, OpenCV, etc.
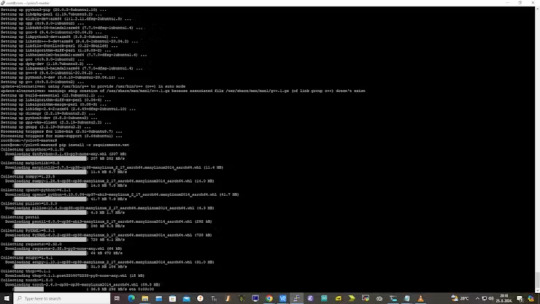
The putty connection and installation process looks like below:
I transferred my model best.pt to the yolov5 installation folder via SCP, with MobaXterm.
You can simply download my model immidiate by typing:
wget https://github.com/sdizdarevic/beedetectionyolov5/raw/main/best.pt
Also, download original video by typing:
wget https://sdizdarevic.typepad.com/cr/bees-orig.mp4
Now, the final step is detection, and we are interested in the “result” content video.
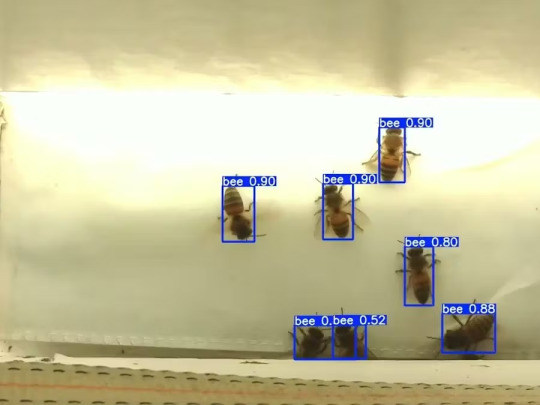
python3 detect.py --weights best.pt --source bees-orig.mp4
The process of detection looks like below:

In the last lines from last picture we can see the detected number of bees at any point in time.
The summarized short steps to follow are below:
git clone https://github.com/ultralytics/yolov5
cd yolov5
pip install -r requirements.txt
wget https://github.com/sdizdarevic/beedetectionyolov5/raw/main/best.pt
wget https://sdizdarevic.typepad.com/cr/bees-orig.mp4
python3 detect.py --weights best.pt --source
Demonstrated videos are on urls with detection finished completely on Mixtile Edge 2 Kit. Output video is in folder runs/detect/exp2.
Original video:
youtube
Result video:
youtube
Last, but not less important: If you want to safely turn off your Mixtile Edge 2 Kit, I recommend you to install Shutdown (no Root) application: https://play.google.com/store/apps/details?id=com.samiadom.Shutdown&hl=en.
3.Conclusion:
After testing I found out that the Mixtile Edge 2 Kit is designed with wide range of applications, from industrial applications, IOT devices, smart home automation, to more than capable AI and edge detection. It is low powered device, with a lot of built-in connectivity options.
I would like to thank amazing Mixtile people for creating this amazing peace of hardware and especially for sending me the Mixtile Edge 2 Kit. Also, Mixtile nurtures the open source values and software, and I believe more people and companies will be involved in making projects with this board.
All in all, I recommend this board for implementing types of projects I described here.
0 notes
Text
Raspberry pi vnc viewer

Raspberry pi vnc viewer how to#
Raspberry pi vnc viewer install#
Raspberry pi vnc viewer password#
You will need the IP address from your Raspberry Pi, you will also need the username and password. Install the application, and enter in the details of your Raspberry Pi Now simply download the VNC Viewer application from (If you are not using the VuePilot Raspberry Pi image, it’s under Preferences > Raspberry Pi Configuration from the top menu)Ĭlick the “ Interfaces” tab and set VNC to Enable Step 1: Enable VNC Server Interfaceįrom your VuePilot Raspberry Pi open the “ System Configuration” application by double clicking the icon on the desktop. VNC is disabled by default on the VuePilot Raspberry Pi image, however you can enable it with just a few clicks which will give you the ability to perform remote desktop control of your device. To stop the VNC viewer, just close the application.Plugging in a keyboard and mouse to your VuePilot Raspberry Pi can be a hassle when the screen is on the other side of the building, the good news however is that the ability to remotely manage your Raspberry Pi device is built into the operating system and uses standard VNC software.
Raspberry pi vnc viewer install#
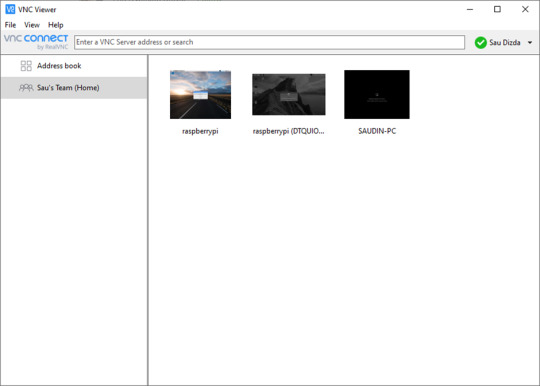
Back on the Ubuntu machine, install the VNC viewer client: Now, we can finally connect to the Pi with VNC. Once you do, you should see a line looking something like this:
Raspberry pi vnc viewer password#
You will be prompted to create a password for VNC login. But it looks like, this is not possible: Thanks to the good instructions here in the Support forum I managed the raspi device registration, enabled file transfer and remote terminal control. vncserver :1 -geometry 1024圆00 -depth 16 -pixelformat rgb565 I like to remote control a Raspberry Pi Zero W with TV like I could do in LAN with VNC - with keyboard and mouse as shown at the Raspi HDMI output. Adjust the geometry paramater to your desired display size. Next, start the VNC server on the Raspberry Pi. Now that we have logged in to the Raspberry Pi, we can setup VNC for remote access. You should get a prompt that looks like this: Type yes at the prompt, then enter the password for the user pi, ‘raspberry’ by default. RSA key fingerprint is xx:xx:xx:xx:xx:xx:xx:xx:xx:xx:xx:xx:xx:xx:xx:xx.Īre you sure you want to continue connecting (yes/no)? Now we can ssh to it:Īnd you should receive a message like this: So we know that the Raspberry Pi has IP address: 192.168.0.112. Service Info: OS: Linux Connecting over SSH The Raspberry Pi (running Debian) looks something like this:Ģ2/tcp open ssh OpenSSH 5.5p1 Debian 6+squeeze2 (protocol 2.0) The results will display every machine that could be identified on port 22. Be change to the specifics of your own network. For this task, we can use the Linux nmap (Network Mapper) utility. Click the Terminal icon on the top left of the desktop to open a terminal window. To do this, you have several options: Connect a keyboard, mouse, and monitor. However, if you don’t have a display for your Raspberry Pi, this isn’t an option. You will need to interact with your Pi in order to turn on the VNC server. If you have access to a display for your Raspberry Pi, this task is simple, in a terminal simply type:Īll the network interface configurations will be displayed, including the IP address. The first step is to locate the Raspberry Pi on your network. If not, see RPi Easy SD card setup Getting the IP address of the Raspberry Pi It assumes you have Debian for Raspberry Pi installed on an SD card. This process is easier if you have a display connected to the Raspberry Pi, but will also show the steps to connect with only Ethernet and power connected.
Raspberry pi vnc viewer how to#
This tutorial will demonstrate how to setup and connect to a Raspberry Pi over VNC from Ubuntu.
1 note
·
View note
Text
Raspberry pi vnc viewer

#RASPBERRY PI VNC VIEWER HOW TO#
#RASPBERRY PI VNC VIEWER INSTALL#
#RASPBERRY PI VNC VIEWER UPDATE#
Make sure the password that you set is no longer than 8 characters long. You will now need to set up a password for when you connect to the Raspberry Pi remotely via a VNC client. To start the configuration process, we need to run the command below. With the VNC server now installed to our Pi, let us now proceed to configure it.
#RASPBERRY PI VNC VIEWER HOW TO#
Now that you have the VNC server installed to your Raspberry Pi, we can now learn how to configure it so that it is ready for connections.ġ.
#RASPBERRY PI VNC VIEWER INSTALL#
sudo apt install tightvncserver Configuring the VNC Server on your Raspberry Pi Once your Raspberry Pi has finished installing all of the updates, we can move on to installing the VNC Server.Īs the tightvncserver package is available through the Raspbian repository, all we need to do is run the following command.
#RASPBERRY PI VNC VIEWER UPDATE#
To update the packages running on our device, we need to run the following two commands. Before we install the VNC software to our Raspberry Pi, we need to make sure our operating system is up to date. Installing the VNC Server Software on your Raspberry Piīy following this guide, you will find out how easy it is to install and configure a VNC server on your Raspberry Pi.ġ. We have also included written instructions below, so if you have trouble with the video feel free to use the steps below.Īdblock blocking the video? Support us by subscribing to our ad-free service. We go through all the steps from start to finish on getting this set up in no time at all. If you want to see how we install the VNC Server, then be sure to check out my video below. If you do not currently have an operating system installed be sure to check out our guide on using NOOBs to install an OS. This tutorial on setting up VNC was tested on a Raspberry Pi 4 that was running the latest available version of Raspberry Pi OS (Buster Version). To complete this tutorial on installing a VNC server on the Raspberry Pi, you will need the following equipment. While Vino implements the VNC protocol, it works by showing the current user’s desktop rather than creating the virtual desktop that TightVNC and other server software use. If you want to share your Raspberry Pi’s desktop, check out our guide on using Vino. One thing to note is that VNC creates a virtual desktop for the connection. If you just want a barebones command-line approach, then be sure to check out the tutorial on how to SSH into your Raspberry Pi. It is both lightweight, free, and open-source that makes it perfect for the device. TightVNC is the software that will allow us to set our Pi up to accept VNC connections easily. Setting up a VNC server on your Raspberry Pi is relatively straightforward and requires us to install and setup a single package called tightvncserver. This removes the need to use SSH as the only way of accessing your Raspberry Pi. For example, you can use it to view your Pi’s desktop without having a monitor attached to it. Using VNC on your Raspberry Pi has a variety of uses. This protocol works differently to the Remote Desktop Protocol that Windows uses. Wolfram Knowledgebase Curated computable knowledge powering Wolfram|Alpha.VNC is a special protocol that is designed to allow one device to control another remotely. Wolfram Universal Deployment System Instant deployment across cloud, desktop, mobile, and more. Wolfram Data Framework Semantic framework for real-world data.
0 notes
Text
Vnc viewer raspberry pi

VNC VIEWER RASPBERRY PI HOW TO
VNC VIEWER RASPBERRY PI INSTALL
VNC VIEWER RASPBERRY PI PASSWORD
VNC VIEWER RASPBERRY PI PC
VNC VIEWER RASPBERRY PI INSTALL
Some other distributions use different software install tools and possibly different init setup tools. Ubuntu) which uses Systemd start-up files. It should be similar for any other Debian based distribution (eg.
VNC VIEWER RASPBERRY PI HOW TO
The following are instructions on how to configure this on the Raspberry Pi (Debian based distribution). Installing a start-up script using Systemd
VNC VIEWER RASPBERRY PI PC
This includes running the Raspbian Desktop image on a PC as that does not included the commercial software. Real VNC is free to use for personal use on the Raspberry Pi, but does have restrictions if you want to do other things with it which may require a commercial license. Real VNC is a commercial version of VNC and needs to be licensed. As such it has no restrictions on use and you can view and modify the source code. For example you could use it so that you can have a status display on the main screen (via HDMI) with a different display used for the configuration which is displayed on a laptop.Īnother advantage of TightVNC is that it is FREE open source software. TightVNC is useful if you want to run something different to what is on the main screen. In this case when you move the mouse, or launch an application it displays the same output on a physically attached screen (normally HDMI) and on a remote client over the network. When most people think of a remote desktop tool then they usually think of the way that RealVNC operates. This differs from RealVNC which normally usually echos the default screen. The TightVNC server creates a different virtual window which is replicated on a different machine using the TightVNC client. Short of a very long cable one of the best ways of doing this is using the VNC protocol (Virtual Network Computing). The command line is a great way to manage a remote Linux computer if you don't mind typing in commands, but sometimes you need to be able to view a GUI. If you would prefer to use RealVNC then it is easily enabled through the raspi-config tool, this guide will be useful for those wanting to understand about creating other applications to run on start-up through systemd. The latest version of Raspbian now includes the RealVNC which is an alternative remote desktop tool. This is a guide to installing TightVNC on the Raspberry Pi. VNC is a graphical desktop sharing system that allows us to remotely control the desktop interface of our RPI (running VNC Server) from another computer or mobile device (running VNC Viewer).Remote GUI access to a Linux computer using Tightvnc with systemd We are going to use a VNC provider for that. Now that you know how to ssh into the RPI, we need to use it in GUI mode. There’s only a single step remaining to get in to your RPI’s desktop environment.
VNC VIEWER RASPBERRY PI PASSWORD
Ssh default settings, the password would be just raspberry You can wither use PuTTY if you are on windows or your terminal on a *nix system. Now, copy the IP of your RPI Step 3 - SSH in to your RPI (Headless mode) You need to find the connected list of devices of your router. Normally you can head over to 192.168.1.1 or if you are using a NETGEAR router. Give it a minute to settle down.Īfter that, we need to find the local IP of our RPI for us to be able to SSH into it. We need to connect the RPI to the router with an ethernet cable (RJ45) and boot it up. Safely eject, unplug the microSD card and chuck the microSD card in to the RPI’s slot. For us to be able to connect via ssh later, we need to create an empty file called ssh at the root of the drive (without any extension). Now, open the microSD drive in your Windows Explorer or Finder. Don’t do that 😀 Otherwise, you will find yourself doing this step over and over again. If you are using Windows, it will ask you to format the drive when opened with Windows Explorer. I used balenaEtcher since it was pretty straight forward to use. Once you have got the ISO downloaded we need to flash it to a microSD card. I would recommend selecting “with Desktop” option if you are planning to use it with a window manager. My choice of OS for the RPI is Raspbian since it’s easy to get started with and comes with a lot of tools out of the box.
0 notes
Text
In ENGLISH- Episode3- HOW TO DISPLAY RASPBERRY PI ON LAPTOP WITH VNC VEWEIR & RASPBERRY PI ONLY, WITHOUT USING ANY OTHER SCREEN.
In ENGLISH- Episode3- HOW TO DISPLAY RASPBERRY PI ON LAPTOP WITH VNC VEWEIR & RASPBERRY PI ONLY, WITHOUT USING ANY OTHER SCREEN.
The New Method to Setup Raspberry Pi (2022 Update) Remote control of raspberry pi. Dear Friends, Innthis blog we will proceed as how get display of raspberry pi either on our Laptop or on Mobile. Process id same for both. We need to Download “VNC Viewer” & “PuTTY” software on either Laptop or Mobile, first. Link for VNC Viewer & PuTTY software are as…

View On WordPress
#64 bit raspberry pi#HOW TO DISPLAY RASPBERRY PI ON YOUR LAPTOP#HOW TO GET IP ADDRESS OF RASPBERRY PI#HOW TO IP ADDRESS ON MOBILE#How to raspberrypi#how to raspbian#IP ADDRESS SCANNER#Mini Computer Raspberry Pi#PuTTY#Rasbian OS#RASPBERRY PI#Raspberry Pi 4#Raspberry pi desktop#Raspberry pi setup - 2022#Raspberrypi software Installation#raspbian#REMOTE CONTROL OF RASPBERRY PI ON LAPTOP#Screen#SSH#VNC VIEWER ON LAPTOP
1 note
·
View note
Text
How To Control Your Computer Using A Mobile Phone
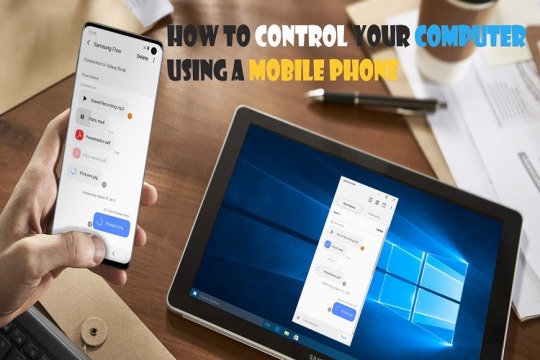
Having a remote control for your computer is advantageous in many ways. The remote control helps when you are not at home and need to access some essential files from your computer, you use a system excluding monitor, or you wish to control your home theater more easily.
To get a remote-control facility through a mobile phone, you can try a remote desktop client to gain content on your mobile or tablet from your PC. A desktop client is a good option, but using it for you may be complicated. If you are an upper-level user, you can go with it. If you consider a “mouse and keyboard” app, you will not get video or sound. After all, you will need a robust internet connection on devices to access remotely. Let’s see the fantastic tools for Android, iOS, and Windows Phone.
Google Chrome Remote Desktop
If you are an enthusiast of the Chrome web browser, using this app helps you control your PC remotely easily. To get its benefits, you will need to install the Google Chrome extension of this app on your Windows or OS X computer. Android and iPhone apps are available to access the data on your smartphonesfromyour computer.
Apart from accessing Chrome, you can access several things from your computer, feeling like you are getting the information by sitting in front of the PC. The interface of Google allows you to connect easily to your computers, even with mobile networks. You can also access the extension using other PCs’ OS.
Microsoft Remote Desktop
After a long time, you will use Microsoft’s official desktop client for accessing the PC remotely. This tool only allows you to access Windows machines. The remote access app is available for both Android and iOS and other platforms. The app also allows you to gain access to Windows Virtual Desktop using a secure channel. To get started with this tool, you will need to enable Remote Desktop on Windows 10.
Virtual Network Client (various)
Engineers and power users have used Virtual Network Client for a long time for remote access services. It is open as both free and paid for both desktops and mobile devices in a variety of clients because VNC is an open-source tool. The best way to choose the right one is based on flexibility and ease of use, depending on the situation. You can take advantage of it on both Mac and Windows. Use VNC Viewer on your Mac and TinyVNC on your Windows.
Remote Mouse
Remote Mouse provides a computer mouse and keyboard that you don’t get with the above tools. You can take advantage of this tool only on local Wi-Fi to view your computer monitor. You can download Remote Mouse for free from both Android and iOS platforms. The extra feature includes media control and the benefit of function keys. It is an excellent choice for those who want necessary access over their mobile phone or tablet.
Unified Remote
Unified Remote works mostly similar to Remote Mouse, but it combines more features than Remote Mouse. The additional features include wake on LAN support, voice commands, infrared, etc. However, this app is not compatible with Chromebooks and Chrome OS. But you can use it on Linux and Raspberry Pi. If we talk about its pricing, it is free on iOS, but you will have to pay for the Android version. Microsoft provides a free trial but charges for a full version.
Advanced options for power users If you are a power user and looking for some advanced options, you can go with Splashtop and TeamViewer. You get more features on this platform.
Harry Williams is an inventive person who has been doing intensive research in particular topics and writing blogs and articles for Fegon Group on Norton Products, Webroot Products, McAfee Products, Microsoft Office and many other related topics. He is a very knowledgeable person with lots of experience. To get in touch with the internet security service provider, just dial 844-513-4111.
SOURCE : Control Computer Using Mobile Phone
#Computer#Mobile Phone#Android#iOS#Windows#Google Chrome#Microsoft#Fegon Group#Fegon Group Reviews#8445134111#844-513-4111#network security#internet security
2 notes
·
View notes
Text
Listening Sculptures
So far I have the LEDs now connected only to the raspberry pi, and the python speech to text sketch running at the same time! so pretty good:
raspberry pi:
theres another post on here that takes u through it, but update it first (https://phoenixnap.com/kb/update-raspberry-pi) and use vnc viewer with the pi on the same network as the laptop (i.e. ur phone network)
LEDs:
using that library and had to turn off the audio in the config (https://learn.adafruit.com/neopixels-on-raspberry-pi/python-usage) (Sound must be disabled to use GPIO18. This can be done in /boot/config.txt by changing "dtparam=audio=on" to "dtparam=audio=off" and rebooting.)
main thing really is that the logic converter is just upping all the levels as the LEDs need a higher voltage.
0 notes
Text
Best vnc viewer for windows

Best vnc viewer for windows install#
Best vnc viewer for windows for android#
Best vnc viewer for windows code#
Best vnc viewer for windows trial#
Best vnc viewer for windows password#
Best vnc viewer for windows password#
NEW: VNC Viewer can now send the connection password to a VNC Server on Windows that is at the login screen.
NEW: Added support for Windows 11, MacOS Monterey and SUSE Linux Enterprise 15.
NEW: Screen Recording for computers running VNC Server 6.8.0+ and VNC Viewer 6.21.920+ with a Professional or Enterprise subscription.
Please note that this version removes support for Raspberry Pi OS (formerly Raspbian) Stretch 9.
SECURITY: Fixed a local privilege escalation security issue affecting VNC Server installations on Linux.
Please note that when upgrading, if you have enabled Quer圜onnect and have not changed your VNC Server's Permissions from the default value, your connections will now be required to be accepted by an end user on the remote computer.
CHANGED: Default permissions for VNC Server have been changed from "Administrative" to "Normal".
FIXED: Multiple keyboard layouts were not detected when running VNC Server 6.8.0 on Linux.
FIXED: DisconnectAction now works as expected when running VNC Server on macOS Big Sur and Monterey.
FIXED: VNC Server will now automatically use polling when DirectX failures are detected with portrait displays on Windows 11.
IMPROVED: Specific events are now logged to Event Viewer/syslog when screen recording is started and stopped during a remote access session.
IMPROVED: VNC Server's License Wizard has been updated to allow users to configure essential settings during first time setup including Authentication, Encryption and Access Control.
NEW: Added support for Raspberry Pi OS Bullseye, 32-bit and 64-bit.
Please note that this version removes support for Ubuntu 16.04. SECURITY: Improved security hardening and internal dependency updates. RealVNC strongly recommend using VNC Connect's cloud connectivity for connections over the Internet. REMOVED: "Test Direct Connection" functionality from VNC Server's Diagnostics. IMPROVED: Diagnostics now lists detected audio devices.įIXED: CREATOR OWNER account now works correctly when added to VNC Server's Users and Permissions.įIXED: Running VNC Server in User Mode could prevent subsequent use of Service Mode.įIXED: Group Policy refreshes/updates could interrupt active connections from VNC Viewers. IMPROVED: VNC Server on Windows can accept an increased number of simultaneous connections from audio-enabled VNC Viewers. IMPROVED: VNC Server better handles resuming from hibernation/low power states and re-establishes cloud connectivity in a shorter time. NEW: Added support for Ubuntu 22.04, RHEL/CentOS 9 and Windows Server 2022. This is a release of VNC Server and supporting programs for installation on remote computers you want to control.
Best vnc viewer for windows trial#
Free, paid and trial VNC Connect subscriptions available.Protection from unwanted access with end-user connection approval.Fast, effortless connections using RealVNC’s secure cloud service.Privacy with end-to-end encryption on all remote sessions.This option is available only on VNC® Connect Enterprise Device Access plans. A session can be started without a session code, but the device holder still needs to authenticate the session. DEVICE ACCESS lets IT teams pre-license a managed mobile device against their VNC Connect account.This option is available on VNC® Connect Professional and Enterprise Instant Support plans.
Best vnc viewer for windows code#
INSTANT SUPPORT lets you set up a session in a flash using a secure one-time code that’s unique to your session.
There are two ways to start a remote session: Read the FAQs here: VNC Server for Mobile - FAQs
Best vnc viewer for windows for android#
The app is available for Android and iOS/iPadOS. The VNC® Server mobile app from RealVNC® lets you securely share your mobile device’s screen with your IT technician or system administrator in just a few taps.
Best vnc viewer for windows install#
If you want to help another person, this is the app that you need to install while they install the QuickSupport app.VNC Server for Mobile now available in VNC Connect! It’s the counterpart to the TeamViewer Quick Support app that has similar functions. This is the app to use if you want to remotely control another Android phone. The app’s features include chat, a file transfer option, and a process list which allows for stopping processes. It’s not overly tough to use, as you just need to install this app on your cellphone, while the other person has to install the regular TeamViewer computer program. As the name suggests, this app is primarily about getting help from a person experienced with device repairs. TeamViewer Quick Supportįrom the developers of the famous TeamViewer program comes an app that lets you control your Android phone from a computer or even from another smartphone. Other benefits of using this app include the fact that it doesn’t need to be installed on an SD card, it lets you import and export your settings, and it can connect to other VNC servers (such as RealVNC and TightVNC).
0 notes
Text
Vnc teamviewer download

#Vnc teamviewer download install
#Vnc teamviewer download full
#Vnc teamviewer download software
#Vnc teamviewer download password
#Vnc teamviewer download windows 7
As I mentioned, for us RealVNC only has one serious competitor (considering resources vs stability vs cost).
#Vnc teamviewer download software
Compare the similarities and differences between software options with real user reviews focused on features, ease of use, customer service, and value for money. Other services that we have tested and considered in general have a huge latency and slowness problem. AnyDesk has 1017 reviews and a rating of 4.59 / 5 stars vs VNC Connect which has 100 reviews and a rating of 4.44 / 5 stars. Important points in our decisions about this: speed and stability, in RealVNC and VNC in general it is constant and depends more on your hardware and network configurations. This ubiquity of VNC is an enormous weight in decisions whenever we start a project that demands this type of service, precisely because it becomes familiar to our users and collaborators. Setup and Connect Add VNC Server to your remote devices and connect.
#Vnc teamviewer download install
You should check and install the RealVNC on you system.
#Vnc teamviewer download password
Sign in/up Sign in or Create an account (and claim a free 14-day trial). Then who will send me the password for the access of teamviewer then only VNC can work. Connect to and manage TeamViewer sessions. For access to various services provided on virtual machines, such as Mac Virtual or Cloud VM, VNC is an essential tool already provided with these services. Download Download and install VNC Viewer on your desktop. Using RDP, VNC, SSH based terminals, S/FTP or web-based interfaces. For other intranet tasks, we always use VNC for embedded or free options - as they are occasional non-commercial uses. For example, we use TeamViewer for customer support, but the new RealVNC cloud has similar functionality, possibly we will adopt it next year.
ngrok One command for an instant, secure URL to your localhost server through any NAT or firewall.There are many options, but remote access depends a lot on the type of task you want to solve.
An Intro to WebRTC’s NAT/Firewall Problem.
Jitsi (WebRTC): Sharing screen (read only and not unattended), more like Zoom.
Outline (Shadowsocks based): OpenVPN easier alternative.
I explain the most useful commands on Raspberry Pi, you can even download a cheat sheet with.
corkscrew: Tunneling SSH through HTTP proxies Xrdp SSH with X11 forwarding VNC Teamviewer NoMachine.
sshuttle: poor man's VPN: Just sshuttle -dns -r 0.0.0.0/0, for all networks/hosts.
sslh: Application Protocol Multiplexer (e.g.
Guacamole: Different: web-based client, you need to install the server somewhere.
VNC (RFB)/RDP/SPICE/NX (proprietary) clients.
Our built-in antivirus scanned this download and rated it as 100 safe. The most popular versions of the tool 10.0, 9.0 and 8.0. In users’ view, the software has the following benefits: users like the interface, it is very stable and is simple in use. Without firewall/NAT (on a LAN/forwarding ports/or NAT passthrough/Listening mode): TeamViewer 13.1 is available as a freeload on our software library.
AnyDesktop: I'm getting desk_rt_ipc_error errorĬlient or server port directly accessible *.
chrome remote desktop: Supporting to Windows client doesn't show the full-screen-grayed admin confirmation dialogs.
Using a middleware proprietary gateway: No need to connect directly to an IP+port. Using a repeater service/gateway (for firewalled/NATed hosts, both sides)
Jami * ( install) - Open Source, Peer-to-Peer, Audio, Video, Conferencing, Chat, and Screen Sharing System.
Guacamole is FOSS but I couldn't find any free service.Ģ021 update: MeshCentral (and Remotely) seems good alternatives. This free software is an intellectual property of TeamViewer. Free VNC Viewer from RealVNC gives you instant remote access to your Mac, Windows and Linux computers from anywhere in the world. It requires Java SE version 1.6 or later. A program for providing remote access to a computer that allows you to control the connected device.
#Vnc teamviewer download windows 7
The most popular versions among TeamViewerQS users are 12.0, 6.0 and 5.0. Download TightVNC Java Viewer (Version 2.8.3) TightVNC Java Viewer works on any system where Java is supported. Download VNC Viewer for Windows 7 (32/64 bit) Free. Download TeamViewerQS 5 from our software library for free.
#Vnc teamviewer download full
So far I couldn't find a Gitlab-like equivalent to TeamViewer-like options: A FOSS alternative with a trustworthy SaaS offering the middleware/repeater/gateway role. Provides full desktop interaction as well as file transfer for files regardless of their size.
0 notes
Text
Raspberry Pi, MQTT and RealVNC
When I got Sensecap S2103 LoRaWAN® CO2, Temperature, and Humidity Sensor, I was thinking to integrate it with commercial Scada HMI system. One of the reasons is because Sensecap S2103 is a set of sensors which are applicable in industrial applications. Later, an idea came to me why not to use Raspberry PI with screen - Human Machine Interface together with RealVNC to make Industrial – grade reusable application.
The best thing in this project Remote Access for your Raspberry Pi from Anywhere in the world via VNC connection, meaning you have Scada HMI system anywhere, on any device.
In this post I am going to show how to integrate Sensecap S2103 sensor and display collected data on Raspberry Pi display.
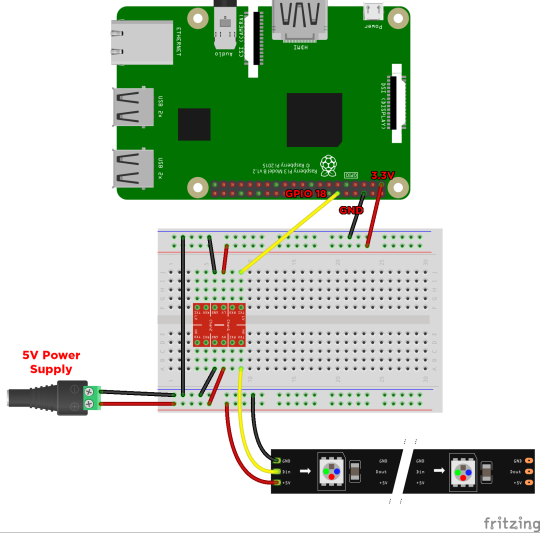
Since picture is worth a thousand words, block schematics below shows architecture of my project.

I will show data from SenseCap S2103 sensor on Home Assistant which is installed on reTerminal . I will not go step-by-step on configuration/installation of Home Assistant on reTerminal, but you can see great guide on seeedstudio wiki here https://wiki.seeedstudio.com/reTerminal_Home_Assistant/.
I used the guides from link above and Home Assistant Supervised installation/configuration method in order to have data displayed on reTerminal LCD.
Home Assistant acts as a central smart home controller hub by combining different devices and services in a single place and integrating them as entities. That means you can integrate various sensors and variouts services in one single place.
Process of installing Home Assistant Supervised on reTerminal is like following:
I am assuming that you already have installed Raspberry PI OS.
Install RealVNC https://www.realvnc.com/en/
Install docker
Visit Home Assistant OS Agent page, and install Home Assistant Agent V1.3.0. and also Home Assistant-Supervised
Install Portainer Docker management platform
On portainer dashboard make sure that Home Assistant primary containers are up and running
On a web browser, type the following URL homeassistant.local:8123
If everything is installed without problems, you can view Home Assistant Dashboard UI on your web browser and proceed with making your account
RealVNC server should come preinstalled no your SD card with Raspbian OS. If, for any reason this is not case with you, below are informations on how to Install the RealVNC for Raspberry pi.
How to Install the RealVNC on Raspberry Pi
Update the system repositories:
Open the terminal if you have direct access. Or, take an SSH session to the Raspberry Pi CLI. $ sudo apt-get update && apt-get upgrade
2. Install the RealVNC server:
$ sudo apt-get install realvnc-vnc-server.
3. Enable VNC server:
$ sudo raspi-config Got to Interfacing options Select VNC Answer Yes Select Finish to quit (or ESC)
Note: VNC runs on port 5900. You should open this port on all the middle devices to work the communication from your PC to the Raspberry Pi.
On PC side, you must install RealVNC Viewer, in ordes to access HMI remotely. Below is how RealVNC viewer loooks after installation.
First big part of the project is finished. Now we are going to configure SenseCAP sensor by using Sensecap MATE Android application. Again, amazing guideline can be followed on Seed's wiki: https://wiki.seeedstudio.com/Cloud_Chain/SenseCAP_Mate_APP/SenseCAP_APP/
The next step is to configure mqtt integration with Home Assistant and subscribe to SenseCAP data.
First, what you need to know is SenseCAP account API ID, Organization ID, and Access API keys. Nice quickstart can be found on sensecap page.
https://sensecap-docs.seeed.cc/data_openstream_quickstart.html
Got to https://sensecap.seeed.cc/portal/#/security, in order to create Access Key and view information about Organization ID.

By clicking on API ID, you can also see API keys information.
So, your important connectivity informations for Home Assistant, which will be important in order to connect to MQTT, are as below:
Host: sensecap-openstream.seeed.cc
User: org-<OrgID> (here you replace OrgID with your Organization id-example for this parameter will be org-428131654987987)
Password: here you insert your Acces Key which is in form XBA6E65464 (a combination of letters and numbers).
Client ID: org-<OrgID>-quickstart (example: org-428131654987987-quickstart)
After this, go to https://www.home-assistant.io/integrations/, which allows integration with a lot of services. You will need, of course MQTT. Enter MQTT in search box, and choose MQTT, as shown below:
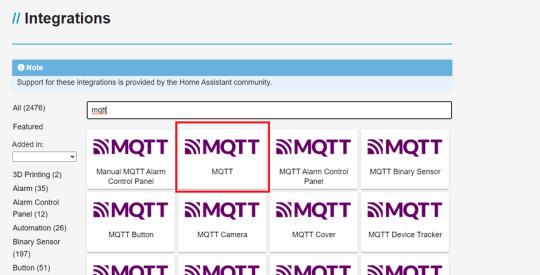
In Home Assistant now go to Settings->Devices & Services, Click add integration button and search MQTT. Now you enter the informations from above for MQTT connectivity:
Username= OrgID, password= client ID

Now, in order to test that MQTT connectivity works, click the CONFIGURE button and listen to the topic : device_sensor_data/OrgID/+/+/+/+
(example: device_sensor_data/428131654987987/+/+/+/+).
After few seconds, you will have response: vaule and timestamp in JSON format.
Since we want to show values of temperature, CO2 and humidity, we need to add multiple entities to store aquired sensor data, by editing the Home Assistant configuration file.
Go to the settings, click to Add-ons,search for File Editor, modify the YAML file /config/configuration.yaml by entering:
mqtt:
sensor:
- name: "Air Temperature"
state_topic: "/device_sensor_data/<orgID>/<DeviceEUI>/1/+/4097"
unit_of_measurement: "℃"
value_template: "{{ value_json.value }}"
- name: "Air Humidity"
state_topic: "/device_sensor_data/<orgID>/<DeviceEUI>/1/+/4098"
unit_of_measurement: "%RH"
value_template: "{{ value_json.value }}"
- name: "Air CO2"
state_topic: "/device_sensor_data/<orgID>/<DeviceEUI>/1/+/4100"
unit_of_measurement: "ppm"
value_template: "{{ value_json.value }}"
DeviceEUI is Unique identification of device eg. 2CF7F12000000001, and it can be found on the sensor itself.
Now the last step is create dashboard.
go to overview and find the "Edit Dashboard"

You can add cards as much as you want. I have added Gauge card, and subscribed to entities (temperature, CO2 and humidity).
Finally, the IoT dashboard is shown on your reTerminal Home assistant main screen.
Here below are few pictures for you to see how it looks like:


0 notes
Text
Presentation takeaways
Last week, we presented our altar to the URCPP group. I feel like we gave a great demonstration, and I also like how the audience received our work. Our audience asked not many questions, so I think we covered the main points in our presentation. After every group presented, some professors and students showed great interest in our altar with further questions. Even though this was presented in a small group, the interest in this idea showed me that this growing field of slow technology, HCI, etc has a future.
Although the presentation went great, there were some unseen troubles. The main problem was with controlling the Raspberry Pi remotely. When preparing our presentation, the goal was to use VNC viewer software on a laptop, allowing the Raspberry to be used through another computer. This was needed to run the required commands on the Raspberry Pi and start our program. This was not possible as we could not connect the Raspberry to WIFI but we were able to run the program and give a proper demonstration.
The takeaway from this presentation and demonstration is that this altar needs an easier way to be activated. First, using an external computer to control the Raspberry Pi is a huge step that no consumer would want to go through. Second, it is not ideal for the program to be run from a terminal. There needs to be a simple way, such as pressing an On button. Some feedback that we received from our audience was that, despite the small screen size, the images were visible to those sitting further away from the altar. Therefore, the size of our altar can be kept as is. Currently, we are in the last week of the program and we do not have enough time for any major extensions but, I think we could at least work to make minor improvements.
0 notes
Text
Windows 10 iot enterprise license cost 無料ダウンロード.Free Trials and Product Downloads
Windows 10 iot enterprise license cost 無料ダウンロード.Windows 10/11 Enterprise のライセンスを展開する

既存の EA によるサブスクリプションのライセンス認証の有効化.Download VNC Viewer for Windows | VNC® Connect
The free download can place up to 10 APs. More information and access to the full version can be found via the Fortinet Developer Network. More information on FNDN can be found here There are no additional license costs—Azure Virtual Desktop can be used with your existing eligible Microsoft or Windows per-user license. Reduce infrastructure costs by right-sizing virtual machines (VMs) and shutting them down when not in use. Increase utilization of VMs with Windows 10 and Windows 11 multi-session Follow Windows Insider
Windows 10 iot enterprise license cost 無料ダウンロード.Windows Insider
There are no additional license costs—Azure Virtual Desktop can be used with your existing eligible Microsoft or Windows per-user license. Reduce infrastructure costs by right-sizing virtual machines (VMs) and shutting them down when not in use. Increase utilization of VMs with Windows 10 and Windows 11 multi-session VNC® Connect consists of VNC® Viewer and VNC® Server. Download VNC® Viewer to the device you want to control from, below. Make sure you've installed VNC® Server on the computer you want to control. Windows. macOS 無料ダウンロード & セキュリティ; 教育; プリペイド カード; ライセンス; サイトマップの表示
The quick and easy way to connect to a Windows remote desktop from your tablet, PC, or smartphone. Educate, monitor and innovate — instantly connect to and control all your remote Raspberry Pi devices. Remotely configure and lock down programs using policy. Just run the installer on the device you want to control from and follow the instructions, or there's MSIs for remote deployment under Windows.
If you have a keyboard and mouse in front of you, use them as you would normally. If you're on a mobile device, then your touchscreen acts as a mouse trackpad, with gestures mapped to mouse buttons. See the on-board help! RealVNC Products. Solutions for Windows The quick and easy way to connect to a Windows remote desktop from your tablet, PC, or smartphone macOS Seamlessly connect to and support your macOS computers from any location or device Linux Powerful and fast access to your remote desktops in Linux Raspberry Pi Educate, monitor and innovate — instantly connect to and control all your remote Raspberry Pi devices Education Secure, easy-to-use remote access software for educational institutions Integrators and OEMs Build remote access into your own products and services Home subscribers Free for non-commercial use on up to 5 devices.
Communications Blog Business and technology insights to help evolve your remote access strategy Press releases All our latest product and company news Media coverage Publications we've featured in, and industry news related to remote access.
Careers Current opportunities We're hiring! Join our world-class, multi-disciplinary team in Cambridge, UK Employee benefits Details of our standard benefits package.
Sign in Sign out. Capabilities Summary Device access and instant support together cover every remote access use case Device access Access computers you own or manage at any time, from anywhere Instant support Quickly access anyone's computer without installing remote access software.
Provide a consolidated remote access strategy that evolves with your business Remote access tutorial New to remote access? Read our one-stop-shop tutorial Customer success stories Learn how our customers save time and money, increase efficiency and reduce risk Competitor comparisons See how we provide better value that TeamViewer, LogMeIn, Bomgar and more Marketing resources All our whitepapers, product brochures, ebooks and webinars in one place.
Our partners Resellers See a list of all our reseller partners around the world Distributors See a list of all our distributor partners around the world. For more information, please read our privacy policy. Got it. Windows macOS Linux Raspberry Pi iOS Android Solaris HP-UX AIX.
Download VNC Viewer Standalone EXE x86 SHA c67f28afc73f9ffceaa7bbdbceaa. Download VNC Viewer Standalone EXE x64 SHA 0bc4fa6d9dedd86cffacdaf1dd9dcfd. Download VNC Viewer MSI installers SHA a54f16aad5edda1cccffce9dad9f0a76e Related downloads Policy template files Remotely configure and lock down programs using policy. Download Vista and later Download , XP, Server Frequently asked questions. How do I control a remote computer? Do I need to license the software?
Just accept the EULA the first time you run. How do I connect? Start with the FAQ.
0 notes
Video
tumblr
In this video, you can see a QR Code reader I made as part of my Team Design Project last year. Even though the results are appearing on my gigantic laptop, don’t be fooled! This program is running full 1080p HD video using the tiny Raspberry Pi you might be able to make out next to my laptop! This code was made as part of a Museum Guide Robot, who uses QR codes to confirm it’s position on the museum floor.
This program reads the QR code using ZBar, and then converts that QR code into lateral and longitudinal distance from the camera, and the facing angle as well, which are flashing on the laptop screen. The laptop is connected to the Pi using VNC Viewer, which enables me to debug the Pi wirelessly.
In addition to these, I also made a sound file player and a text file reader for the robot as well, but they are not as glamorous as this.
0 notes
Text
In HINDI( हिन्दी में )-Episode 3-DISPLAY OF RASPBERRY PI ON LAPTOP or Mobile, WITH VNC VIEWER, PuTTY software & Raspberry Pi Only, without any other screen.
In HINDI( हिन्दी में )-Episode 3-DISPLAY OF RASPBERRY PI ON LAPTOP or Mobile, WITH VNC VIEWER, PuTTY software & Raspberry Pi Only, without any other screen.
Remote control of raspberry pi with VNC Viewer & PuTTY Software without the help of any other display screen, if you have Raspberry Pi & Laptop or Mobile only. The New Method to Setup Raspberry Pi (2022 Update) प्रिय मित्रों , आज हम रास्पबेरी पाई को लैपटॉप पर कैसे डिस्प्ले करतें हैं, इस बारे में पड़ेंगे | हमारे पास सिर्फ रास्पबेरी पाई है और एक लैपटॉप है. या मोबाइल पर भी same way में किया जा…

View On WordPress
#64 bit raspberry pi#HOW TO DISPLAY RASPBERRY PI ON YOUR LAPTOP#HOW TO GET IP ADDRESS OF RASPBERRY PI#HOW TO IP ADDRESS ON MOBILE#How to raspberrypi#how to raspbian#IP ADDRESS SCANNER#Mini Computer Raspberry Pi#No signal on Monitor#PuTTY#Rasbian OS#RASPBERRY PI#Raspberry Pi 4#Raspberry pi desktop#RASPBERRY PI ON LAPTOP REMOTE CONTROL#Raspberry pi setup - 2022#Raspberrypi software Installation#raspbian#Screen#SSH#VNC VIEWER ON LAPTOP
0 notes