#web perfromance testing
Explore tagged Tumblr posts
Visit Tumblr Blog
Explore Tumblr blogs with no restrictions, modern design and the best experience.
Last Seen Tumblr Blogs


Fun Fact
Mobile US users spent an average of 115.8 minutes on Tumblr app monthly.
Text
10 Excellent Tools You Must Apply In Web Performance Testing
Web Performance Testing Tools – Looking to test the heap pressure limit and execution of your web applications? Here are ten of the best web execution testing devices to guarantee that your application performs even in outrageous pressure and pinnacle traffic conditions.
This rundown incorporates authorized just as open source web performance testing apparatuses, yet you can discover free preliminary forms of most authorized instruments. Attempt your hand with these preliminary forms before you settle on your official conclusion. We should investigate them
Web Performance Testing Tools
WebLOAD
WebLOAD is a heap and web execution testing apparatus for web applications that empowers pressure and burden testing utilizing Adobe Flex, Ajax, HTML5, Oracle Forms, Microsoft .NET and different advancements. You can create load from on-premises machines or from the cloud.
The device is entirely simple to utilize, and it highlights programmed relationship, DOM-based account and playback, and different highlights. In view of JavaScript, the instrument underpins extensive scale testing with intricate and overwhelming client load conditions.
The instrument produces an unmistakable investigation of a web application's exhibition and usefulness, and it has a committed, solid customer base. It has additionally won a few honors. All the more essentially, it has a quite alluring evaluating and authorizing model.
WebLOAD has a broad scope of highlights and backings different web advancements, enabling you to perform load testing and copy gigantic client loads. You can rapidly manufacture tests, produce load and dissect the outcomes with a rich arrangement of reports that distinguishes explicit execution issues.
The heap situation is produced in JavaScript so you can make upgrades according to your necessities. The standard language is upgraded with inbuilt burden testing strategies and articles that offer HTTP usefulness, DOM usefulness, load techniques and the sky is the limit from there. The device additionally incorporates robotized relationship to discover and supplant session IDs, time and other powerful qualities.
Apache JMeter
An open source load testing device, Apache JMeter is additionally based on a Java stage. In spite of the fact that it is considered for the most part as a web exhibition testing apparatus, you can likewise coordinate it with the test plan. You can make load test and utilitarian test designs too. The apparatus can be stacked into a system or server so as to evaluate its execution under different working conditions.
Apache JMeter was first presented for web application testing, however today it is utilized for various different purposes too. It is especially valuable to test the execution of Java objects, Perl Scripts and Servlets and different assets.
The instrument can likewise test the execution of static assets, web dynamic dialects like ASP.NET, Java, and PHP, databases, questions, FTP servers and substantially more. It can mimic a substantial burden on server gatherings, singular servers, items or systems to evaluate its quality and execution under various sorts of burdens. You can utilize the JMeter to produce a graphical examination of your web application's execution or to test your server, article or content conduct under substantial simultaneous burden.
Apache JMeter can load and test the execution of a few sorts of servers/conventions:
· Web-HTTP, HTTPS
· FTP
· Cleanser/REST
· LDAP
· Database by means of JDBC
· Message-situated middleware through JMS
· MongoDB
· SMTP, POP3, and IMAP email
· Local directions and shell contents
· TCP
Different highlights of this instrument include:
100 percent Java virtue

Convenientce
A full multithreading system for simultaneous inspecting by different strings and examining of different capacities at the same time by string gatherings
· A GUI structure that empowers quicker investigating and test plan creation
· Storing and disconnected examination
· Test outcomes replaying
· Pluggable samplers for further testing capacities
· Pluggable clocks for a wide decision of burden insights
· Information representation and examination modules for personalization and extensibility
· Capacities to give dynamic test information or information control
· Scriptable samplers in JSR223-perfect and BSF-good dialects
HP LoadRunner
Hewlett Packard's LoadRunner is an available web exhibition testing apparatus that can comprehend and decide the execution of a framework under burden. A key favorable position of this instrument is that it can deal with and create a huge number of clients at the same time. It empowers you to assemble all execution related and foundation-based data.
LoadRunner comprises of different separate instruments: Virtual User Generator, Load Generator and Analysis, and Controller. It works by making a situation that contains the content that will be executed. The quantity of virtual clients required is additionally created, alongside different essentials for running the test and producing the normal outcomes. The quantity of virtual clients to be created could go from a couple of hundred to a couple of thousand.
The situation could be manual or objective arranged, in which the instrument naturally produces the situations dependent on recently determined objectives by the analyzer. The arrangement of activities to be performed are recorded onto the virtual client content. A heap generator is then used to run the clients, producing the essential dimension of burden on the framework. The procedures to be estimated are spoken to as exchanges. When the heap is created, the framework conduct is checked and broke down.
· Prescribed courses
· Web Services in Java Course
· Online Certification Course in Game Development in C++
· Online Certification Training in Ethical Hacking
· Preparing on Vegas Pro 13
· Judicious Web Performance Tester
The Rational Performance Tester from IBM is a computerized web act testing apparatus for web and server-based applications in which there is an info and yield process. The instrument produces a demo of the first exchange procedure, assembling and dissecting factual data to build proficiency. Any server or site spillage can be promptly distinguished and corrected, and it tends to be utilized to make a blunder free, viable distributed computing administration.
The device can recognize the nearness and underlying driver of bottlenecks in framework execution. It consolidates a few conveniences includes alongside point by point examination, streamlining test creation, lead age, and information accumulation procedures to guarantee that their web applications can suit the required client loads.

NeoLoad
NeoLoad by France-based Netosys is a Java-based web execution testing instrument that can be utilized for estimating and dissecting a site's act. It can likewise be utilized to dissect further strides to be taken dependent on the execution of the site and final product of the tests. This, thusly, improves and enhance the execution of your web application.
The instrument works by expanding the traffic on your site and after that breaking down the execution of the application under substantial burden. You get the chance to comprehend the limit of the application and what number of clients it can deal with at the same time. Written in Java, NeoLoad is accessible in French and English. It reenacts client action in web and portable applications too, and screens the foundation conduct. You can look over cloud-based burden generators for the execution test.
NeoLoad can be utilized for robotizing the total Web 2.0 suite, which incorporates Flex, Silver Light, Web Services, Web and Multimedia. The client can decide the quantity of burden generators that are required and the LGs from LAN. They can likewise reenact 2G-4G and WiFi versatile systems with varieties in flag qualities.
The device can be coordinated with outsider devices like Dynatrace, App Dynamics, Introscope and Site Scorpion for a profound jump investigation on servers. In any case, SLA setup isn't accessible on this instrument for breaking down the outcomes. At last, it is an exhibition testing answer for portable and web applications that can be utilized for running cloud-based tests. In the event that you or your execution group needs a device that can investigate and co-relate test results with crude information, NeoLoad would be an extraordinary decision. The instrument is perfect on working frameworks Solaris, Linux and Windows.
LoadUI
The following open source pressure test and web execution testing device in this rundown is LoadUI, once more to gauge the execution of a web application. The device works really well when it is coordinated with the soapUI practical testing instrument. It is a standout amongst the most intelligent and adaptable testing apparatuses as well, enabling you to make, refresh and design your tests while the application is tried. It gives a visual guide too for the client with a simplified component.
LoadUI is a long way from a static act apparatus. It offers propelled report creating and investigation producing highlights that let you inspect the genuine execution of the web application by including new information even as the application is being tried. You don't need to restart the device each time that you change or alter the application. LoadUI gets refreshed naturally in the interface. It is a cross-stage instrument, so it should work for any major working framework. It is additionally accessible for nothing, given that it is open framework.

WAPT
This specific web execution testing instrument can be utilized for intranet applications and sites. WAPT is short for Web Performance Testing Tool, and it goes about as a scale or breaking down device for estimating the yield and execution of a web application and related interface.
The apparatuses help measure the execution of any web-related interface, web administration or web application. You can utilize this apparatus to test the application execution in various situations and burden conditions.
The apparatus gives point by point data on the virtual clients and its yield to the clients amid burden testing. It is considered by numerous individuals to be a standout amongst the best and most practical apparatuses for investigating the execution of web administrations.
The WAPT instrument can likewise test the similarity of a web application with working frameworks and programs. It tends to be utilized for testing the similarity with Windows applications in specific cases.
0 notes
Text
Online Poker
My point listed here is that, yes, i'd have won the tactile hand if I had stayed in, but my cards weren't strong enough to beat mostplayers' cards and also require called my bluff. There was clearly no chance you merely need to just forget about those fingers and carry on playing for me personally to understand that my cards could have been the best of the hand, but thats poker and.
You ought to confirm that the exact same web site is authorized to formally to do US bank deals when you're about to begin your account along with any real cash Poker on the web webpage. It is grounds that is big tight part along side dissimilar debates and point of views and guidelines. You must check always their state and rules that are federal regulations. For humans living in extra countries i will urge them to test their countrys regulations on poker rooms and webpages. Before participating and starting playing along side any poker websites you need to explore your guidelines which can be regional appropriate formalities etc. make yourself simple and comfortable relating to any or all these aspects.
Take down notes- this might be an easy method that is fantastic keep your focus if you are not in a hand. Develop your shorthand that is own for records. For example, i would compose, "CC w/ junk" (cold calls with junk) if i have noted a player whom constantly comes in for just two bets with hands he shouldn't.
Enjoy at a speed that is reasonable. You a lot of time for you to react, if you take more time than permitted the "sitting out" function will require you away from that hand whenever you Enjoy Poker Online, poker space software enables. Invest the a lot of time on every hand you perform you may just irritate players around you and make yourself look indecisive and unprofessional though it is okay to pay time to think about your actions live playing live.
A player's poker money account is comprised of real cash and real chips in a certain poker game. Generally, players could transform their cash to potato chips and vice versa. This can be done any right time the gamer desires to do transactions except during a casino game.
I personally use a guideline to rebuy significantly more than never ever a few times. I've watched some players rebuy 20 or 30 times in a decreased purchase in competition, soon after the rebuy period is finished, just to bust out yet again following the rebuy duration has ended to allow them to be in it. This indicates stupid, but it happens, while the thing that is only it will, is add to the prize pool.
At the beginning of almost every Sit-N-Go, the piece that is best of advice would be to play extremely tight. Just play hands which can be GREAT as AA, KK, QQ, AK until there are at the least three players gone. There no doubt be three players gone in the 1st 20 mins because of the all in manic players. There are numerous YouTube videos showing on the web that is free Poker of all in maniacs going all in at the start of Sit-N-Go's wanting to double up straight away which can be quite funny! With them early, there will be only 6 remaining and top 3 make the money in the event that you simply settle-back and view and attempt to avoid getting into a confrontation. It's very easy to make the money then the moment 6 are kept, you switch gears and play aggressive all while watching yourself shore into a first place victory in the event that you play tight.
Done? Then do me a benefit in the event that you didn't try this workout and you also think you're ready to go to another part. Go directly to the bathroom, eliminate the roll of rest room paper, and put a print-out of this article on the spool. You may aswell put it to use, since you're perhaps not deploying it to master how to play winning poker that is online. Perfrom the exercise that is damn you proceed, please. It will just simply take an full hour, unless you're composing together with your legs.
The software for the device should be so that it can determine the winning likelihood of your decision that is future very. Often times playing poker you'll be forced in order to make some calls which are tough. Once you understand the chances of making an outcome that is good of these telephone calls is very helpful in continuing confidently about any of it. Calculator of odds should be imbibes within the device.
0 notes
Text
Running Hue on a Raspberry Pi Hadoop Cluster
Hadoopi - the Raspberry Pi Hadoop cluster
This project contains the configuration files and chef code to configure a cluster of five Raspberry Pi 3s as a working Hadoop running Hue.
This video shows how to set up and configure the cluster using this code.
youtube
The versions of installed Hadoop components are:
hadoop 2.6.4
hue 3.11.0
hbase 1.2.4
pig 0.12.1
hive 1.2.1
spark 1.6.2
livy 0.2.0
oozie 4.3.0
sqoop 1.99.4
solr 4.10.4
impala - not supported
Inspiration
Running Hadoop on Rasberry Pis is not a new idea, a lot of work has been done by individuals and I wanted to make sure their efforts were recognised. Their work and formed the basis of my attempts and inspired me to start the project.
Jamie Whitehorn - https://www.youtube.com/watch?v=n6ONKshWSMg
Jonas Widrikson - http://www.widriksson.com/raspberry-pi-2-hadoop-2-cluster/
Carsten Mönning - https://blogs.sap.com/2015/04/25/a-hadoop-data-lab-project-on-raspberry-pi-part-14/
Bram Vandewalle - http://www.becausewecangeek.com/building-a-raspberry-pi-hadoop-cluster-part-1/
DQYDJ - https://dqydj.com/raspberry-pi-hadoop-cluster-apache-spark-yarn/
Objectives
Learn
My day job uses the Cloudera distribution of Hadoop, which provides a great management interface, but that means I’m somewhat shielded from the inner workings of Hadoop configuration and tooling. I decided to put this distribution together to see if was feasible/practical to run Hadoop on a cluster of Raspberry Pis, but also to get more exposure to it’s tooling and configuration. At the same time I wanted a feature rich and easy to use “suite” of tools so I based the project around Hue. I also wanted it to be easily recreateable so used Chef.
Caveats
There are some caveates to bear in mind when using this tool.
No Impala - don’t think the Pi has enough power whilst running other Hadoop components - happy to receive pull requests :-)
No Sentry - access to the data on the cluster will be based around HDFS security
Not a production reference - it’s a learning exercise, given the performance of the cluster you really wouldn’t want to run anything “real” on there.
Teeny amount of memory so only basic stuff - The 1GB of ram on the Pi is a real limitation, you’re really only going to be able to one task at a time, so go easy on it
Its slowwwwwwwww - the combination of teeny amount of RAM, 4 cores and wifi networking means this is built for speed, be realistic with your expectations!
Setup requires basic linux command line fu and understanding of network configuration - you are going to be compiling applications, running chef code and possibly doing a little fault finding, you’ll need some basic linux sysadmin skills for this.
It’s compiles and configures correctly as of NOW - there are loads of dependencies on 3rd party libraries and packages, both when compiling binaries or configuring the cluster, but things get move, deleted or just change, you’ll need be able to diagnose problems and change settings.
Ask if you want help - github issues are ideal but please be clear in what attempts you have made to diagnose and fix.
The hardware
To build the cluster you are going to need:
5 x Raspberry Pi 3s
Nylon Spacers to stack the Pis
Acrylic Raspberry Pi case for base and lid to keep the dust off
Wireless Router - I’m using a TP-Link tl-wr802n travel router
Anker 60w 6 usb port hub
6 usb cables
5 x Samsung Evo+64GB micro sd cards
Computer for administering via ssh, running a webserver and a web browser to access Hue
Just a quick note on the micro sd cards, perfromance of cards can vary wildly, I was recommended the Evo+ cards as their performance at reading and writing small files was very good, you can check the performance of yours using https://github.com/geerlingguy/raspberry-pi-dramble/blob/master/setup/benchmarks/microsd-benchmarks.sh
Making Binaries
Although most of hadoop eco system is written in java and available in binary format, there are some components that need to be built for the target architecture for performance. As the Raspberry Pi is ARM based we simply can’t take the precompiled binaries and run them, we’re going to have to compile those. These are Hadoop (with the correct version of protobuf libraries that we will also need to build), Oozie and Hue.
Install the Rasbian Jessie Lite version dated 23/09/16 onto you sd card, the development of the project was based around this version.
http://downloads.raspberrypi.org/raspbian/images/raspbian-2016-09-28/
This version has a few “features” that are really useful, firstly it will auto expand the file system on first boot, secondly the SSH server is enabled by default (which is probably an error) but it means we can configure the Pi headless without the need of doing basic service config without the fuss of connecting a keyboard and monitor.
Compile protobuf
Locate you Pi’s ip address (via some form of network scan, or go through the fuss of connect a monitor and keyboard) then ssh to it as the pi user. then download and unpack the protobuf v2.5 source, tweak the build script so that it refers to the new location of the google test suite and build and install the libraries:
sudo -i apt-get update apt-get install dh-autoreconf wget https://github.com/google/protobuf/archive/v2.5.0.zip unzip v2.5.0.zip cd protobuf-2.5.0 vi autogen.sh
Change the references to the google test suite:
# Check that gtest is present. Usually it is already there since the # directory is set up as an SVN external. if test ! -e gtest; then echo "Google Test not present. Fetching gtest-1.5.0 from the web..." wget https://github.com/google/googletest/archive/release-1.5.0.zip unzip release-1.5.0.zip mv googletest-release-1.5.0 gtest fi
Then generate the build configuration files
./autogen.sh ./configure --prefix=/usr
Build and install protobuf
make make check make install
Compile Hadoop
We now need to compile the Hadoop binaries, download and unpack the Hadoop 2.6.4 source, tweak pom.xml so it bypasses the documentation generation as this fails on the Pi, apply the HADOOP-9320 patch and build the binary.
cd apt-get install oracle-java8-jdk wget http://apache.mirror.anlx.net/hadoop/common/hadoop-2.6.4/hadoop-2.6.4-src.tar.gz tar -zxvf hadoop-2.6.4-src.tar.gz vi hadoop-2.6.4-src/pom.xml
Disable the problem step in by adding the following to <properties>…</properties>
<additionalparam>-Xdoclint:none</additionalparam>
Next apply the HADOOP-9320 patch
cd hadoop-2.6.4-src/hadoop-common-project/hadoop-common/src wget https://issues.apache.org/jira/secure/attachment/12570212/HADOOP-9320.patch patch < HADOOP-9320.patch cd ~/hadoop-2.6.4-src/
Next install a whole bunch of build tools and libraries:
apt-get install maven build-essential autoconf automake libtool cmake zlib1g-dev pkg-config libssl-dev libfuse-dev libsnappy-dev libsnappy-java libbz2-dev
Then run the build using maven
sudo mvn package -Pdist,native -DskipTests -Dtar
Once build package the archive ready for deployment
cd hadoop-dist/target/ cp -R hadoop-2.6.4 /opt/hadoop-2.6.4 cd /opt tar -zcvf /root/hadoop-2.6.4.armf.tar.gz hadoop-2.6.4
Compile Hue
Download the Hue 3.11.0 source, unpack it, apply the necessary patches and tweak the spark_shell.py so it defaults to 256MB for spark driver and executor memory rather than 1GB.
Install the build dependencies:
apt-get install python-dev libsasl2-dev libxml2-dev libxslt-dev libkrb5-dev libffi-dev libldap2-dev libmysqlclient-dev libsqlite3-dev libgmp3-dev libssl-dev
Download and unpack the Hue source
cd /opt wget https://dl.dropboxusercontent.com/u/730827/hue/releases/3.11.0/hue-3.11.0.tgz tar -zxvf hue-3.11.0.tgz cd hue-3.11.0
Download the patch to fix the example loading issues with 3.11.0, patch the desktop/core/src/desktop/api2.py and desktop/core/src/desktop/tests_doc2.py files:
wget https://github.com/cloudera/hue/commit/b059cec5c55737af3ceeb3a8cb2c0ce4e4d94b4d.patch patch < b059cec5c55737af3ceeb3a8cb2c0ce4e4d94b4d.patch
Change the driverMemory and executorMemory defaults from 1GB to 256MB in desktop/libs/notebook/src/notebook/connectors/spark_shell.py
Then build the apps:
make apps
Then package them up:
cd /opt tar -zcvf /root/hue-3.11.0.armf.tar.gz hue-3.11.0
Compiling Oozie
Finally we need to compile oozie. Download the oozie 4.3.10 source and unpack it, we need to change the target java version to 1.8 in the pom.xml file, then build the binaries, download the ext-2.2. library (to enable the oozie web interface) and copy to the applicable folder and package the files.
Download the files and unpack:
cd apt-get install oracle-java8-jdk maven wget http://archive.apache.org/dist/oozie/4.3.0/oozie-4.3.0.tar.gz tar -zxvf oozie-4.3.0.tar.gz cd oozie-4.3.0/
Change the target java version to 1.8 in pom.xml, then set a few environment variables to stop the build process running out of memory, and build the binary:
export MAVEN_OPTS='-Xmx512m -XX:MaxPermSize=128m' bin/mkdistro.sh -DskipTests -Puber
Now download the ext-2.2 library and package the files:
cd /root/oozie-4.3.0/distro/target/oozie-4.3.0-distro/oozie-4.3.0 mkdir libext cd libext wget http://archive.cloudera.com/gplextras/misc/ext-2.2.zip cd /root/oozie-4.3.0/distro/target/oozie-4.3.0-distro/ tar -zcvf /root/oozie-4.3.0.armf.tar.gz oozie-4.3.0
Making the Compiled Files Available
Transfer the compiled binary files to you computer and start the python webserver to make them available to the Pis as you configure the cluster:
python -m SimpleHTTPServer
Installing and Configuring the Cluster
The cluster will comprise of 5 Raspberry Pis, 3 of them will be configured as worker nodes (worker01, worker02 and worker03) and have the HDFS Datnode and Yarn Nodemanager Hadoop components installed. The remaining two Pis will be setup as master01 and master02.
The master nodes will have the the Hadoop components:
master01
HDFS Namenode
Yarn Resource Manager
Hue
Hive
Pig
Oozie
Sqoop
master02
Hbase
Zookeeper
Spark & Livy
Solr
Networking
The cluster is setup to run on the 10.0.0.x network range:
10.0.0.11 - master01
10.0.0.12 - master02
10.0.0.21 - worker01
10.0.0.22 - worker02
10.0.0.23 - worker03
10.0.0.9 - administering computer running python webserver
The TP-Link router is setup in “WISP Client” mode so it bridges the two wifi networks from 10.0.0.x to 192.168.2.x that way I can set the cluster up so it has outbound internet connectivity from the 10.0.0.x network on via my 192.168.2.x network. The great advantage with this setup is the cluster and router can taken away from my 192.168.2.x network and use the cluster without having to reconfigure the network.
You can modify the network configuration by modifying the chef attributes or refactoring the network recipe. You may also want to add the nodes to your administering computer /etc/hosts file.
Code
The code for the projects is available over at https://github.com/andyburgin/hadoopi
Installing
Firstly write the Jessie Lite version dated 23/09/16 onto your sd cards. We will setup the Pis in turn, worker01-03 and then master02, for the final step when we setup master01 which will need all the Pi’s powered on as it modifies files on the HDFS file system. This means you’ll only need on pi connected to ethernet.
So insert the first sd card into one of your Pis, connect the ethernet cable and power it up, wait a minute whilst the Pi boots and SSH into the pi, you can determine the ip address of your pi by either using a network scanner or by connecting a monitor to the hdmi port.
Once we have ssh'ed into the Pi we need to update the system:
sudo -i apt-get update
Installed git and chef:
DEBIAN_FRONTEND=noninteractive apt-get -y install chef git
Clone the code from github to the Pi:
git clone https://github.com/andyburgin/hadoopi.git cd hadoopi
Set your wifi SSID and password as environment variables:
export WIRESSID=myssid export WIREPASS=mypassword
Then run chef against the worker01.json file
chef-solo -c solo.rb -j worker01.json
Wait for it to finish and:
poweroff
You now need to repeat these steps using a fresh sd card for worker02, worker03 and master02.
For the setup of master01 place the final sd card in the pi with the ethernet connection, setup the remaining 4 pis with the previously configured sd cards and power up all of the pis. As before ssh into the Pi you are configuring, update the system, install git & chef, clone the code, set you network SSID & password, then run:
chef-solo -c solo.rb -j master01.json
Then we need an extra chef run to install additional Hadoop components and configure files on the HDFS filesystem that runs across the cluster:
chef-solo -c solo.rb -j master01-services.json
Then ssh into all of the nodes (via their 10.0.0.x ip addresses):
poweroff
Starting and Stopping the Cluster and Installing Examples
As a one off exercise before we start the cluster lets install some test data into mysql for later testing with sqoop, we do this before we start the Hadoop services as this will require too many system resources to tun both. SSH to master01 where our mysql instance runs (this is required to hold Hue configuration data, but we can also use it to hold test data too) and run:
sudo -i git clone https://github.com/datacharmer/test_db.git cd test_db mysql < employees.sql mysql -u root -e "CREATE USER 'hduser'@'%' IDENTIFIED BY 'hduser';" mysql -u root -e "GRANT ALL PRIVILEGES on employees.* to 'hduser'@'%' WITH GRANT OPTION;" mysql -u root -e "FLUSH PRIVILEGES;"
Starting the Cluster
On master01 and master02 you will find some scripts in the /root/hadoopi/scripts folder. After powering on the cluster (you no longer need the ethernet connection as all nodes will connect to the wifi connection) start the cluster on master01 by issuing:
sudo -i cd ~/hadoopi/scripts ./master01-startup.sh
Then on master02 run:
sudo -i cd ~/hadoopi/scripts ./master02-startup.sh
Once those scripts have sucessfully run you are now ready to configure Hue.
Configuring Hue
We access hue via a web browser, point you we bbrowser your web browser at:
http://master01:8888/
The first time you hit the url you’ll be asked to create a Hue administrator user, the cluster is configured to work withe the “hduser” user, so make sure you use that with a password of your choice.
From the “Quick Start Wizard” select the “examples” tab and one by one install each of the examples. Frome the “Data Browser” menu take a look at the “Metastore Tables” to check Hive data is available and the “HBase” option to view the data there. Finally select one of the Dashboards under the “Search” menu to heck the Solr indexes are available.
Stopping the Cluster
Powering down the cluster is as easy as starting it, on master01 run:
sudo -i cd ~/hadoopi/scripts ./master01-stop.sh
Then on master02 run:
sudo -i cd ~/hadoopi/scripts ./master02-stop.sh poweroff
Finally on each of the worker nodes run:
sudo poweroff
From now on you can simply power on the cluster and run the startup scripts on master01 and master02 as root. Once you have finished using the cluster shut it down by running the stop script on master01 and master02, then running the “poweroff” command on each of the 5 nodes as root.
Hue Examples
I won’t go through every example using installed in hue, watching the vide will convey far more, but I’ll cover some of the key ones and allow you to explore. Please remember the Raspberry Pi has a teeny amount of memory and runs things very slowly, be patient and don’t submit more than one job at once, doing so will more than likely cause your jobs to fail.
Hive Examples
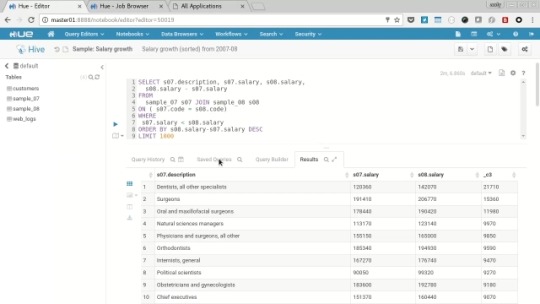
From the “Query Editor” menu select “Hive”, in the resulting query window select one of the example scripts e.g. “Sample Salary Growth” and hit the “play” button to submit the query.
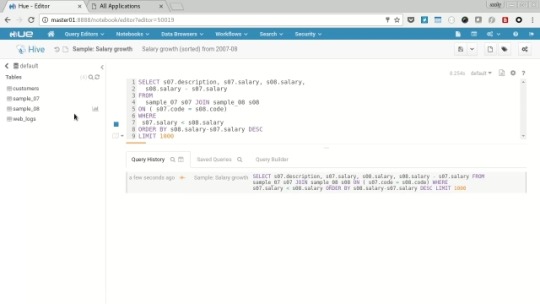
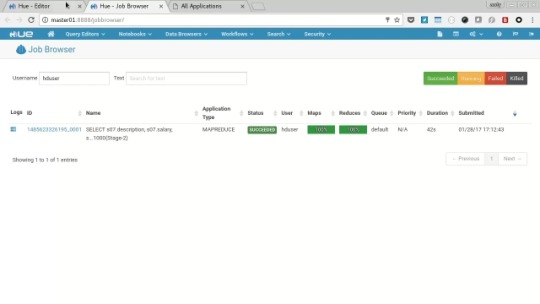
Choose the “Job Browser” icon and open in a new tab, watch the job transition from Accepted->Running->Succeeded.
Return to the original query tab and you’ll see the results displayed in the browser.
Pig Example
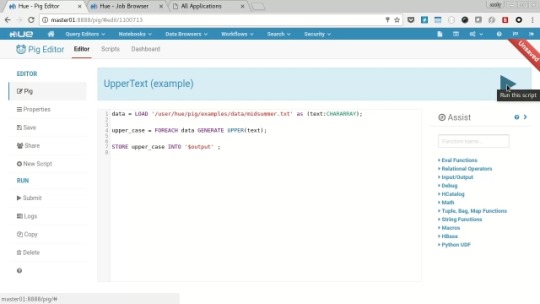
From the “Query Editor” menu select “Pig”, then select the “samples” tab and then the “Upper Text (example)”, in the resulting query editor amend the 2nd line to:
upper_case = FOREACH data GENERATE UPPER(text);
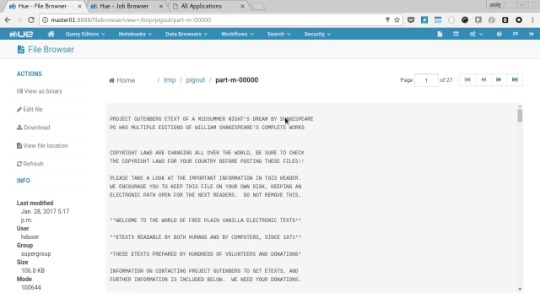
Click the play button to submit the query, you’ll be prompted to specify an output path, so choose “/tmp/pigout” and click “Yes”.
Go to the job browser and wait for the two generated jobs to finish, then click the “HDFS Browser” icon and navigate to /tmp/pigout and view on e of the “part-m-????” file and see the generated text.
Spark Notebooks
Spark notebooks are one of the best features of Hue, allowing you to edit code directly in the browser and run it via spark on the cluster. We’ll try out the three supported languages Python, Scala and R (we don’t have Impala support).
Select “Notebooks” menu and open the “Sample Notebook”, we’ll need to start a session for each language, we’ll try Python first so click the “context” icon to open the context menu and then choose “Recreate” next to the PySpark option, this creates a Spark job viewable via the job browser.

When the session is ready and the job is running, click the “play” icon next to each of the 4 examples and the cluster will calculate the result and display it in the browser, feel free to experiment with the results and edit the code.
When you have finished with the PySpark examples you need to kill the session/job, so on the context menu click “close” next to the PySpark menu.
To try the Scala examples click “Recreate” next to the Scala option on the context menu to create the session and associated job. When running you’ll be able to edit Scala code in the browser and interact with the results.

After trying both examples kill the session/job by closing the session on the context menu.
Skip over the Impala examples as they aren’t supported.
Start the R session by clicking “create” next to the option and when the job/session have started edit the path in the R sample to /tmp/web_logs_1.csv The R example doesn’t used HDFS so you’ll need to SSH onto each worker and run:
curl https://raw.githubusercontent.com/cloudera/hue/master/apps/beeswax/data/web_logs_1.csv -o /tmp/web_logs_1.csv
Back on the Notebook click the play icon next to the code and examine the output including plot.

Finally close the session on the context menu so the spark job ends.
Sqoop example
We’re going to use Sqoop to transfer the employee sample data we installed earlier into HDFS. To do this we’ll need to configure two Sqoop links and a Sqoop Job.
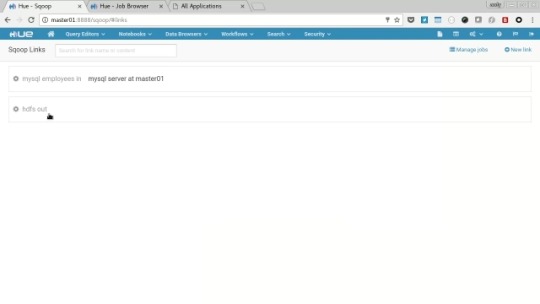
Create the first link by selecting the “Data Browser” and then “Sqoop”. Choose “Manage Links” then “Click here to add one”
Name: mysql employees in
Connector: generic-jdbc-connector
JDBC Driver Class: com.mysql.jdbc.Driver
JDBC Connection String: mysql://master01/employees
Username: hduser
Password: ******
Then click “Save”, choose “Manage Links” again to add the second link. Click “New Link” and enter the follwoing values:
Name: hdfs out
Connector: hdfs-connector
JDBC Driver Class:
JDBC Connection String:
Username: hduser
Password: ******
We need to then edit that link to complete setting it up, click “Manage Links” the the “hdfs out” link to bring up the edit page. Make the follwoing settings:
Name: hdfs out
HDFS URI: hdfs://master01:54310/
Finally click Save.
Next we need to configure the job, select “Click here to add one” and fill out the following:
Step 1: Information
Name: import employees from mysql to hdfs
From Link: mysql employees in
To Link: hdfs out
Step 2: From
Schema name: employees
Table name: employees
Table SQL statement:
Table column names:
Partition column name:
Null value allowed for the partition column:
Boundary query:
Step 3: To
Output format: TEXT_FILE
Compression format: NONE
Custom compression format:
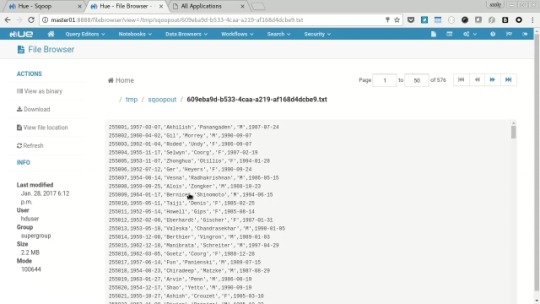
Output directory: /tmp/sqoopout
Start the job by clicking “Save and run”, navigate to the job browser and wait for the job to be submitted and run sucessfully. Then Navigate to hdfs browser and check the data in “/tmp/sqoopout”
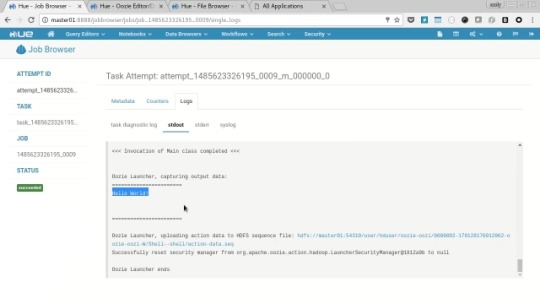
Ozzie Examples
There are many Ozzie examples installed, so I’ll only talk about a few of them here. Lets firstly run the Shell example. Select “Query Editors” from the menu and the “Job Designer”, next click the “Shell” example, you’ll be presented with the job editor. I for scroll down you’ll see a parameter to the “hello.py” command is “World!”.
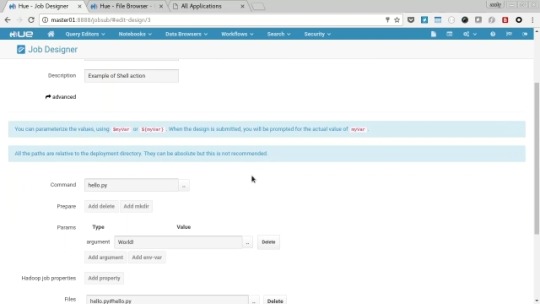
Click the “Submit” button (then confirm) and you’ll be presented with the workflow view of the job, wait for the job to run and and select the log icon next “hello.py”. In the resulting log you’ll see the phrase “Hello World!”
Next let’s look at amore complicated workflow, from the menu select “Workflows” -> “Editors” -> “Workflows”, on the resulting page select “Spark” and you’ll be presented with the job configuration page, for the spark workflow to run we will need to configure the settings for spark, click the “pen” icon to edit the job, next click the “cogs” icon on the spark step to access the steps properties. In the “Options List” filed enter:
--conf spark.testing.reservedMemory="64000000" --conf spark.testing.memory="128000000" --executor-memory 256m --driver-memory 256m --num-executors 1

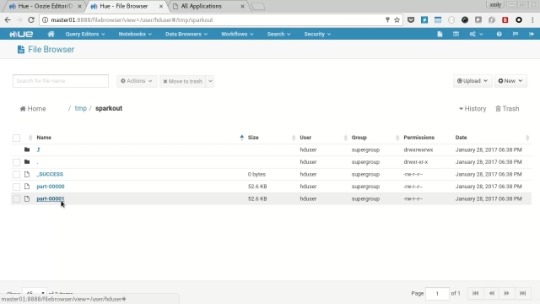
Click the “disk” icon to save the changs to the workflow and click the “play” icon to submit the job, enter “/tmp/sparkout” into the output field and hit “Submit”. Again you’ll be presented with the workflow view, wait for the job to finish and then use the hdfs browser to navigate to the “/tmp/sparkout” folder and view one of the data files to check the spark job copied the intended files.
Solr Dashboards
Select “Search” from the menu and then each of the dashboards in turn (Twitter, Yelp Reviews and Web Logs).
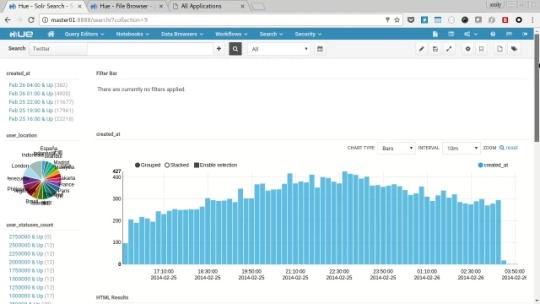
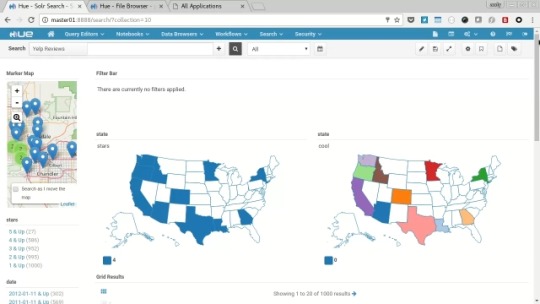
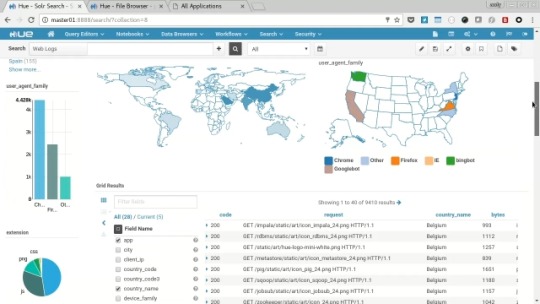
You’ll see each present a variety of charts, graphs, maps and text along with interactive filtering features to explore the data held in the solr search indexes.
Reminder, Power Off the Cluster
Once you have finished experimenting with the cluster please don’t just turn off the power, you rick corrupting your data and possibly the sd card. So follow the procedure of running the shutdown scripts on master01 and master02, then running the poweroff command on each of the pis before turning the power off.
Wrapup
I hope you have fun setting up and playing with the code, I learned a tonne of stuff setting it up and I hope you do too. If you have any improvements then please send pull requests to github, any problems and I'll respond to issues there too.
0 notes