#weed trimmer
Text
Heavy Duty 4 Stroke 50 Cc Brush Cutter With Weeder Attachment 2 Type Tiller - Krishitool.in
Book Now: https://www.krishitool.in/product_details/Heavy_Duty_4_Stroke_50_Cc_Brush_Cutter_With_Weeder_Attachment_2_Type_Tiller

Buy Heavy Duty 4 Stroke 50 Cc Brush Cutter With Weeder Attachment 2 Type Tiller online in India at wholesale rates. If you have been looking for Krishitool Brushcutters, your search ends here as you can get the best Brush Cutter in top cities and States such as Delhi NCR, Mumbai, Chennai, Bengaluru, Kolkata, Chennai, Pune, Jaipur, Hyderabad and Ahmedabad, Coimbatore, TamilNadu, Andhra Pradesh, Karnataka, Kerala, Vishakhapatnam, Assam, SALEM, hubli, MAHARASHTRA, orissa, Jharkhand, Kochi, Ernakulam, Kakinada, Goa, Vijayawada, Gujarat, Rajasthan, Madurai, UttarPradesh, Madhya Pradesh, Hyderabad, Punjab, Haryana, Chandigarh, Kurnool, Davanagere, Bilaspur, Tumkur, Tirupati, Chittoor, Satara etc. You can purchase Krishitool Grass Cutter of the finest quality and rest assured to get the best in terms of both durability and performance. If you are bothered about the Krishitool Brushcutter prices, you can be totally sure to get the best rates as Krishitool brings you genuine rates and quality assured products only from the best of brands with exclusive brand discounts you won’t find anywhere else.
#brush cutter price#kisankraft grass cutter#hand grass cutter machine#brush cutter weeder machine#grass cutting machine price#Wheat cutting machine#Wheat harvester#brushcutter machine#grass cutter#bush cutter#weed cutter#weed trimmer#Grass Trimmer#grass cutting machine#shrub cutter#paddy cutter#paddy cutting machine#lawn trimmer#kisankraft brushcutter#petrol brush cutter#brushcutter#paddy reaper#Machine to cut grass#brush trimmer#petrol grass trimmer#garden brush cutter#hitachi brush cutter#brush cutter heavy duty#grass cutter machine#shrub cutting machine
1 note
·
View note
Text
Hey Homeowner, what is that attached to the Weed Whacker?
Attach the Leverage Booster to Weed Whackers, Power Pole Saws, Hedge Trimmers, and Pole Saws and more.
Do you need one?
Ask your wrist, arm or shoulder!
Why Strain?
www.whystrain.com
Made in U.S.A.
youtube
#fishing#landscaping#lawn care#tree care#safety#outdoors#turboset#super ez work tool#why strain#tree#lawn#garden#homeowner#wrist#shoulder#pole pruner#weeds#line trimmer#hedge#trimmer#work#arborist#groundskeeper#D.I.Y.#injury#carpal tunnel#rotator cuff#elbow#tendonitis#saw
2 notes
·
View notes
Text
just a regular day at work 🤓 absolutely love trimming weed all day for shango 💋💨


24 notes
·
View notes
Photo
When we got married my wife and I received various things from our parents.
My FIL wanted a new Shop Vac for himself, so he gave me his old one which worked fine for me. He also gave me a used ladder I could use to clean gutters. He got a newer, lighter one for himself. There was even a janky old hand-me-down lawn mower I used for two seasons until it died and I finally bought a new one. My mom gave us cookware and cookbooks and I’m sure other stuff. My dad gave me some grilling things and an extra propane tank. My MIL showed up at the at our new house with a car load of cleaning supplies from Target so we didn’t have to go buy it all ourselves. She also bought a lot of baby clothes when we had kids.
All these things are nice for a young couple starting a new home. When my sons got out on their own, Sheila and I did what we could to help them get settled. It’s a nice way for me to justify something new for myself (like a car!) because old Toyotas, still reliable, went to the kids.
Now it seems the process has come full circle.
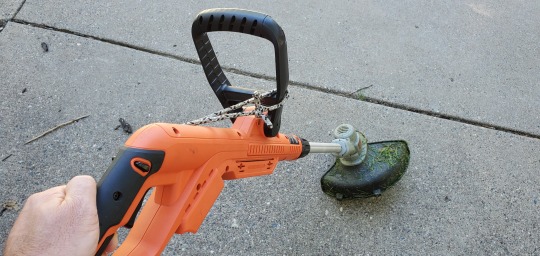
I have an old, corded weed trimmer. Because I’m lazy, I rarely use it because I hate dragging the 50 foot extension cord around the yard. When I bought it 20 years ago I probably saved $40, because I was too cheap to spring for a cordless one.
Jack had this old cordless trimmer, pictured above. He liked it recently bought one of a different brand so his lithium batteries are interchangeable across all his tools and yard devices.
So he gave it to me!
I love how nicely this thing works. I easily trimmed the edges of my yard until the battery wore out. There was a lot to do because I had really hated dragging around that extension cord with my old trimmer.
Not only did I get this hand-me-up for free, it came with dad-like advice.
“So dad, to get the most out of this thing, do as much weed trimming and edging as you can until the battery wears out. Plug it in to the charging device, then go mow the yard. When you’re done mowing it will be charged enough to finish the rest of the trimming and edging.”
35 notes
·
View notes
Text
I have just arrived in the US for the first time since 2019, opened Tumblr, and was immediately bombarded by ads
like literally every 3 posts
#they are for weed and ball hair trimmers#i understand now#i understand what y'all were taking about
7 notes
·
View notes
Text
god i hate hate hate lawn equipment droning and Loud and nearly everyone in my neighborhood hires this one company and there’s like 5 dudes with loud ass aggravating machines all fucking morning and it’s HELL
#what is the hearing equivalent of tearing your eyes out bc that’s what i want to do thank#lawn mowers themselves are not too bad they’re not great but they’re easier to deal with#leaf blowers and weed trimmers i’m goingn to kms
1 note
·
View note
Text

My Top Picks to Cordless Weed Trimmers for 2024:
#cordlessweedtrimmers #cordlessweedwhackers #cordlesstrimmers
0 notes
Text
5 Essential Tips for a Perfectly Manicured Lawn by Kahua's Lawn Services
A beautifully manicured lawn is the pride of any homeowner. At Kahua's Lawn Services, we understand the importance of a well-maintained yard and want to share five essential tips to help you achieve a perfectly manicured lawn throughout the year. Whether it's mowing, weed-whacking, tending to small hedges, or blowing and bagging leaves, these tips will ensure your lawn remains healthy and vibrant.
Proper Mowing Techniques: The cornerstone of a perfectly manicured lawn begins with proper mowing techniques. Invest in the best zero-turn mower or a riding lawn mower for larger yards, ensuring it's well-maintained. Regularly sharpen the mower blades to achieve clean cuts, promoting healthy grass growth. Adjust the mower's cutting height according to the grass type and weather conditions to prevent stress on the lawn.
Effective Weed-Whacking Practices: Gas weed whackers like the reliable Echo weed whacker are excellent tools for tackling edges, corners, and areas the mower can't reach. Incorporate regular weed-whacking sessions into your lawn care routine to eliminate unsightly weeds and maintain a polished look. Remember to wear protective gear and follow safety instructions when using gas, electric, or battery-powered weed whackers.
Trimming Small Hedges with Precision: Small hedge trimmers—whether cordless, electric, or gas-powered—are ideal for shaping and maintaining hedges. Use these tools with precision, focusing on even cuts to achieve a neat and uniform appearance. Regular trimming encourages healthy growth and defines the landscape of your yard.
Efficient Leaf Management: Blowing leaves with an electric leaf blower or bagging leaves with a lawn mower can be efficient methods to keep your lawn tidy. Use electric leaf blowers for smaller areas and bagging leaves with a lawn mower for larger spaces. Collecting leaves prevents them from suffocating the grass, allowing for proper air circulation and maintaining the lawn's health.
Maintenance and Repairs: Regular maintenance of your lawn care equipment is crucial. Ensure your gas weed whacker, hedge trimmer, and lawn mower receive professional service when needed. Look for reliable providers offering services such as lawn mower repair near you or riding lawn mower repair near you to keep your equipment in top condition.
By following these five essential tips and utilizing quality equipment like the best zero-turn mower, gas weed whacker, or small hedge trimmer, you can achieve and maintain a perfectly manicured lawn. At Kahua's Lawn Services, we're committed to helping you achieve a lush, healthy, and picturesque lawn all year round.
For all your lawn care needs, including mowing, weed-whacking, hedge trimming, and leaf management, trust Kahua's Lawn Services to deliver exceptional results. Contact us today for professional assistance and personalized lawn care solutions tailored to your needs.
Remember, a well-cared-for lawn not only enhances your property's aesthetics but also provides a serene space for relaxation and enjoyment. Let Kahua's Lawn Services be your partner in achieving a lawn you'll love coming home to.
#best zero turn mower#gas weed whacker#electric weed whacker#gasoline weed whacker#small hedge trimmer#small cordless hedge trimmer
1 note
·
View note
Text
@apocalopalyptic || Continued from here.
The fins flatten back with the sudden movement, head following as if to double check that Miranda was fully out of the arc of the launch. The excitement all at once made her eyes open wider — simple reaction — and one that she must have immediately regretted for how quickly she pulled her nictitating membranes over her eyes and kept them there. It gave her a haunting appearance, the lack of clarity and detail over her vision for the same frosted membrane appearing as though someone had stuck marbles into her sockets. But it didn't impair her vision, as difficult as it might have been to see through them from a distance, and it felt better than wholly keeping her eyes open.
Even as she lifted her head back up more normally, settling down, she kept her third eyelids closed. It did feel better now — less of a feeling on her gills, in her nose, in her eyes, less of the irritation of feeling it on and in her gills, of the hyper-awareness it brought to the sensation, the unbearable and unavoidable awareness of her skin and all the wrinkles within it, an awareness that was leaning from uncomfortable towards the painful. Better, though, was comparative. Still Miri kept shaking her hands, kept pulling her lips back until the corners of her mouth were nearly touching the actual corners of her jaw, waiting for the feeling to dissipate.

"Right, right, I-" Her voice was still doing things she wouldn't allow it to do. It was wandering back to the shrill, the frayed, making the vowels pop out hard against her teeth.
None of this was proper, none of this was becoming of who she allowed herself to be, who she was supposed to be, who she had any right to be. It wasn't right. She was supposed to remain calm and proper and denote her words with crystal perfection, leave nothing out of place, become as a living testimony of the crown. More and more, even as she flexed her gills and splayed them as wide as possible, wide enough that if Amira looked hard enough she would be able to see light coming in through the other side of Miranda's throat — she couldn't tell what she hated more, the lingering irritation or the fact that she couldn't put herself back on her leash.
She clenched her eyes shut again, pressed them down into pennies beneath the bone of her brow, tried to breathe. The sensation was dying still, easing enough that Miranda's arms began to still, her hands pulling tight to her chest instead. Again she tried to think of something else to say, someplace else to point herself, and again and again she failed.
All she ended up managing for all this work was a soft, tiny, ashamed, "Sorry."
#Glory and Gore || IC#apocalopalyptic#(( sliding over to a new post so that the reblog trimmer will play nice again-#(( miri *would* appreciate the weed facts! just. maybe try again in a bit#(( at least i can wholly guarantee miri's voice thing will come back later-#(( she likes using it. fun to be sarcastic with
1 note
·
View note
Text
When doing Yard Work, Why Strain?
#fishing#landscaping#lawn care#tree care#bass#freashwater fishing#safety#saltwater fishing#outdoors#walleye#arborist#pole saw#carpal tunnel#recreation#made in U.S.A.#groundskeeper#tree trimming#golf#golf courses#cemetary#grounds#weed whacker#line trimmer#hedge trimmer#lineman#utility#tendonitus#rotator cuff
2 notes
·
View notes
Photo


Does this weed-whacker component infringe this design patent? That’s the claim in this recently-filed complaint.
#Torvent#Techtronic#weed whackers#line trimmers#machinery#components#design patents#litigation#not ornamental
0 notes
Text
How to trim cannabis

What Is Bud Managing?
Bud managing is similarly as the name recommends — pruning your buds. Maybe a superior method for considering it is that you're manicuring around your buds.
So, you're attempting to eliminate all the overabundance plant material that isn't your buds.
Numerous cultivators fear managing, on the grounds that it can honestly be a great deal of work and a drawn-out task. Fledgling producers might ask why managing a bud is even important by any means.
Not with standing, master cultivators who produce quality item know that it's a fundamental endeavor.
Wet versus dry cannabis managing

There are two approaches to managing weed, each with pros and cons.
Wet cannabis managing
Wet managing happens across the board sitting: You'll chop down the plant, cut buds off branches — called "kicking" — trim the buds, and afterward put them on a drying rack, where they'll sit for a couple of days.
Pros
Eliminating sugar and fan leaves is simpler — they get wilted and evaporated in dry managing
With less dampness filled foliage connected to the blossoms, drying will happen all the more rapidly; this can be useful in muggy environments where form is a worry
In the event that you're tight on space, wet managing eliminates a heft of the plant first and foremost, so you don't need to hang entire plants up to dry
Managing wet will likewise give you a more tight and all the more stylishly satisfying eventual outcome
Many contend that since buds are stickier while being dealt with, trichomes stay in one piece, which jam terpenes and flavors in the end result
Cons
Wet managing is extremely tacky. Trichomes will get on your fingers, your managing shears, your body, everything. Gloves are suggested; scouring liquor or coconut oil is fundamental.
Dry cannabis managing
With dry managing, you'll chop down the plant and drape the entire thing to dry for a few days first. At the point when it's dry, you'll expel buds branches and trim them.
Pros
Keeping leaves on to start with makes the drying system more slow; this can be perfect in bone-dry environments, as a fast dry can cause overabundance terpene misfortune
It's much less chaotic — trichomes solidify as weed dries, diminishing how much get-on-everything tenacity
Cons
Those less-tacky, less-untidy trichomes are additionally more weak and inclined to breaking; you'll need to deal with your harvest with care to save trichomes and THC levels
Hanging whole plants occupies altogether more room than if you dispose of overabundance plant material first; ensure you have satisfactory drying space before dry managing
Pot managing apparatuses required
To manage weed, you will require:
Scissors (for managing buds)
Pruners (accommodating for huge branches)
Agreeable seat and region
A spotless surface, similar to a table
Plate/bowl and a spotless surface
Scouring liquor
Clothes
Legitimate garments (ones that can get tacky)
Amusement
The most effective method to manage cannabis buds
The most effective method to manage cannabis buds
After you've set up your drying room and managing region, and your weed plants are prepared to descend, now is the ideal time to get managing.
Whether managing wet or dry, the method involved with managing buds is something very similar.
Stage 1: Cut down the plant and cut off branches
Utilizing strong sets of pruning shears, cut off branches, separating the plant into more modest pieces until you get to the primary tail of the plant, which can get removed near the dirt.
Assuming dry managing, you'll hang the plant for drying now, either completely or its more modest branches. Look at more on drying here.
Drying plants will be prepared for managing when stems snap and don't twist — generally 3 after 7 days.
If wet managing, don't stress over drying yet and go to stage 2.
Stage 2: Eliminate fan leaves
Fan leaves are the notable cannabis leaves with five or seven places. The plant has had these leaves since it was in the vegetative stage. Fan leaves have almost no trichomes, so dispose of them.
In the case of managing wet, it very well might be speedier to delicately pull these off with your mind; however they can be cut off with scissors as well. On the off chance that dries managing, you'll have to clip them.
Stage 3: Buck buds from the branch
When fan leaves are off, cut off individual buds from branches, likewise called "kicking."
Clippers typically make a heap of buds to work on, either on a table or in a bowl or plate.
Make certain to save a different heap for branches, stems, and fan leaves, and manure them.
Stage 4: Trim buds
Now that you're down to simply buds, get to managing. Assuming buds are too large; separate them into more modest buds. A goliath bud could look magnificent, yet it won't dry as equally, making it helpless to shape.
To manage:
Trim the stem at the lower part of the bud as intently as you can without making the bud separate. You don't maintain that the stem should be uncovered anyplace however at the base.
Eliminate the crow's feet — these are the leaves at the base that seem to be little bird feet.
Trim off additional plant matter and nail treatment the bud. Point your scissors and keep them moving. Inevitably you won't actually consider it.
The objective is to remove all that isn't completely canvassed in trichomes. Make a uniform surface region around the buds. This incorporates bringing down red pistils the whole way to the foliage. Pistils have very little to zero trichomes.
Put all your completed buds in a different bowl or plate.
On the off chance that wet managing, you'll have to put your completed buds on a drying rack for a couple of days. Assuming dry managing, you'll need to bump up your buds for relieving.
0 notes
Text
“i work with cannabis!”
:D
“….at a corporate level!”
D:
#shoulda guessed when u said ‘cannabis’ and not just weed lol#respect to all the growers trimmers harvesters budtenders and dispo crews#respect to all the diy jobs#respect to people working with grassroots orgs to help free people who are jailed on minor drug charges#corporate? bro read the room 😂#.txt
1 note
·
View note
Text
HOW TO USE A WEED EATER PROPERLY
HOW TO USE A WEED EATER PROPERLY
Learn how to use weed eater, weed wacker, string trimmer. Many names for the same tool. Every landscaper, gardener, home owner should have one.
#Caliber8Tools#weedeater#weedwahcker#stringtrimmer

View On WordPress
#Caliber8 Tools#cordless weed#cordless weed eater#cordless weed trimmer with battery and charger#gardening tools and their uses#how to use a weed eater edger#how to use a weed trimmer#how to use a weed trimmer as an edger#landscaping tools for beginners#milwaukee weed eater review#weed eater string replacement#weed wacker string replacement
1 note
·
View note
Text
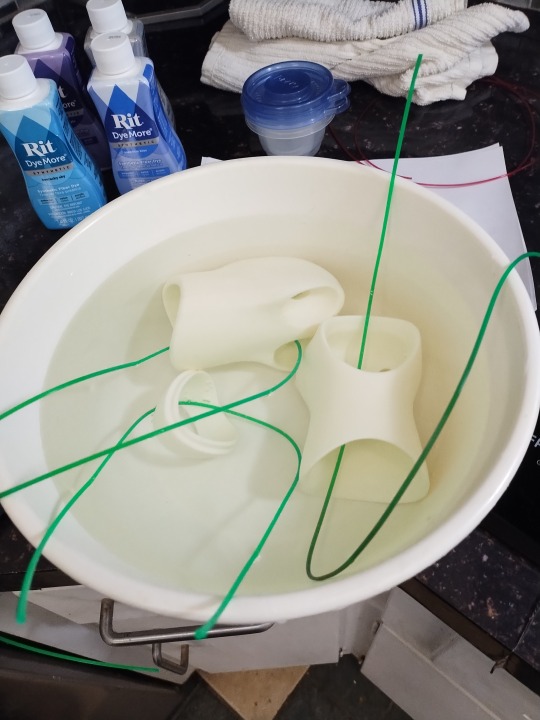
Dye, doll, dye
I did a dyeing thing - a white Resinsoul centaur (Dawn) and different vinyl shell parts of an Obitsu 50 cm body (whitey and super whitey).
What I used:
A big shiny pot. Life pro tip - if you have an induction cooktop, check your crappy pot that you ordered from Amazon right away. Amazon sellers are liars.

Lots of towels (water everywhere). Dye (RIT DyeMore is what I used, because it's specifically for synthetics), isopropyl (rubbing) alcohol and a melamine sponge (Magic Eraser) for oopsies, and weed whacker trimmer string for the parts. Plus coffee.

Strung doll parts. NOTE: before I dye resin or vinyl, I soak it in cold water for 10-15 minutes. Resin is porous. Water will help open the pores for a slightly more even dye distribution.

So one thing I see over and over that drives me CRAZY is people dumping the whole bottle of dye directly into the water.
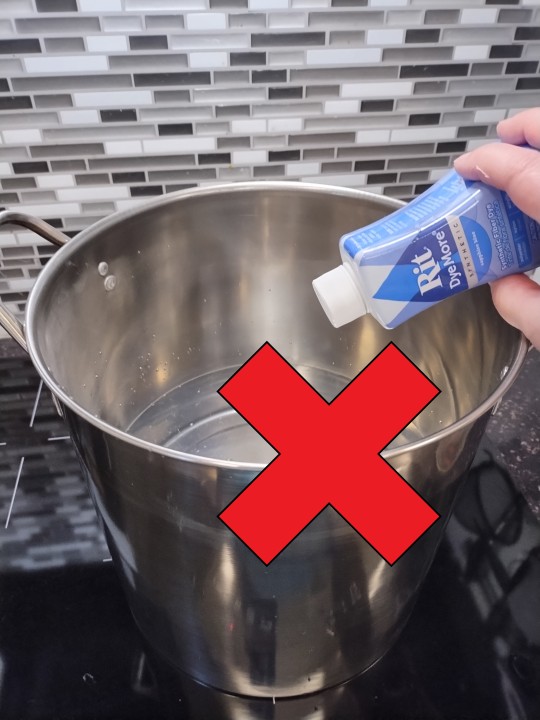
RIT has recipes. Here's the recipe for Fallen Star using "small" items:

It doesn't matter which small item you pick - the recipe is the same. For a more intense color, increase the amount of dye (Fallen Star is 2 teaspoons of Royal Purple, 1/2 teaspoon Frost Grey, 1/2 teaspoon Sapphire Blue per 4 cups of water). If you dump in the whole bottle, 1) you're wasting dye, and 2) you're not going to get the color that the dye is supposed to produce.

Dye measured - and then I measure one more batch in a separate cup. As stuff goes in the water, dye is absorbed and removed from the water - so you gotta add a little back. Like, an eyedropper at a time, a little.

I set the water to be just under a boil - no bubbling, but still painful when you accidentally stick a finger in there. It's soapy because RIT recommends adding a tiny bit of dish soap and a little salt to the dye bath to help disperse the color evenly.
Dunk:

The resin parts got 3 minutes each. The vinyl parts got 6 minutes.

Horse butt magnet came unglued, and there's something on the butt that prevented it from absorbing dye. I don't know what it is. I'll have to color correct with pastels. Also: the horse body was cast in two parts that were glued together, and the seams sanded. This became immediately apparent post-dye.
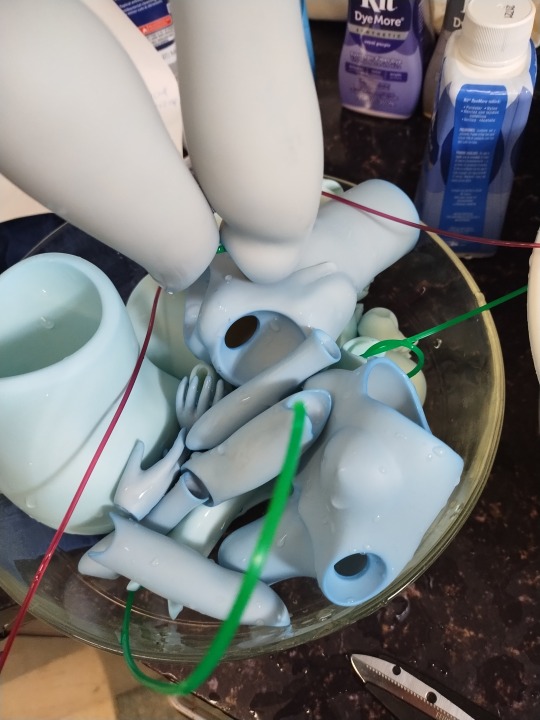
The floating blobs top left are vinyl thigh parts after 3 minutes in the dye bath. The darker blue human parts of vinyl parts after a six minute bath.
A few more things: whatever that butt glue was, it liquified in the pot and stuck to stuff. I am not happy about this.
Because parts are thinner in some places and thicker in others, when I pulled a part out of the bath, I would run it under cool water. Then I grabbed my melamine sponge and scrubbed areas where the dye was darker or absorbed funny. Isopropyl alcohol can also help remove some of the dye.
The dye continued to process, even after I rinsed all the parts. When I woke up the next morning, everything was an even more intense blue - especially the vinyl.
My self-imposed max time for resin in a hot water dye bath is 3 minutes. 2-part epoxy resin reacts quickly and hardens to equilibrium - NOT completion. When resin parts are put into almost-boiling hot water, the reaction is reactivated. The resin parts will shrink. I read on a resin manufacturer's website that after 20 minutes, the resin will become extremely brittle and fragile. From past experience, I know that 3 minutes in hot water is enough to make a resin part shrink.
Since the resin parts were dyed for 3 minutes each, this means I will NOT be attempting a gradation with dye. I'll use pastels instead.
But vinyl, however - vinyl can take some heat. Heh heh heh.
Next up: purple!
60 notes
·
View notes
Last Seen Blogs