#xfce4-session
Explore tagged Tumblr posts
Visit Tumblr Blog
Explore Tumblr blogs with no restrictions, modern design and the best experience.
Last Seen Tumblr Blogs


Fun Fact
Kazakhstan’s Minister of Communications and Informatics has blocked the Tumblr site because it contained 60 sites of terrorism, extremism, and pornography in 2015.
Text
Windows 10 子系統 Ubuntu 18.04 圖形化介面安裝範例
Windows 10 子系統 Ubuntu 18.04 圖形化介面安裝範例
以往在 Windows中要使用 Ubuntu 總是要安裝雙系統,
或者要安裝虛擬機器來達到目的,
隨著科技的進步,
現在可不用這麼麻煩了,
今天就來教大家:
Windows 10 子系統 Ubuntu 18.04 圖形化介面安裝範例
在安裝必要元件以前,
當然要先設定好 Windows10 子系統 Ubuntu 18.04 了,
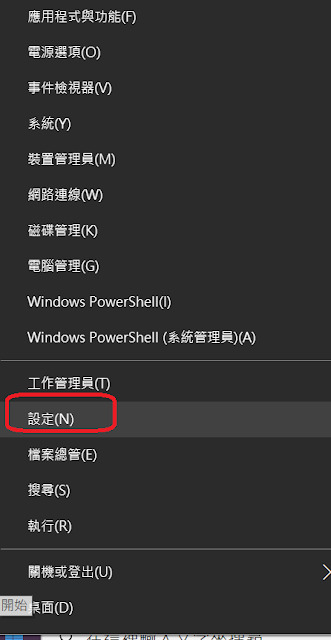
首先到開始按鈕按滑鼠右鍵,
從選單中選擇設定,
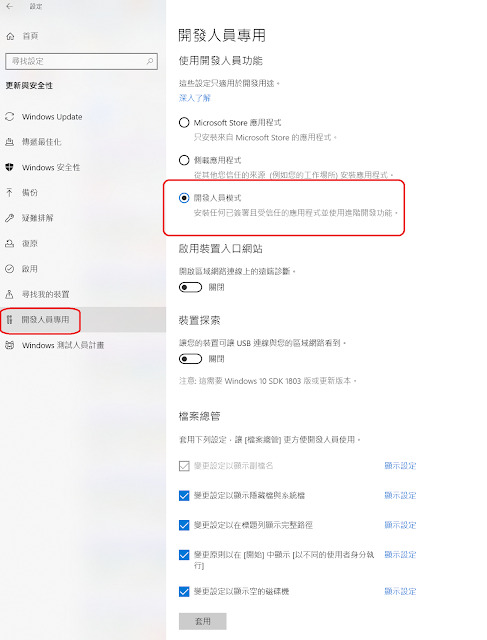
進入更新與安全性,
從開發人員專用頁面將系統調整至開發人員模式。

同樣在開始選單中以系統管理員執行 Windows PowerShell,
執行:
Enable-WindowsOptionalFeature -Online -FeatureName…
View On WordPress
#Microsoft-Windows-Subsystem-Linux#sudo ccsm#Ubuntu 18.04#VcXsrv#windows10 子系統#xfce4-session#xubuntu-desktop
0 notes
Text
after like a month I finally learned the command for logging out btw it's xfce4-session-logout --logout
1 note
·
View note
Text
Xfce4 power manager

#XFCE4 POWER MANAGER HOW TO#
Uname -a: Linux Hermes 4.8. Version-Release number of selected component (if applicable): xfce4-power-manager- How reproducible: always Steps to Reproduce: 1. If I kill the process, my script works fine. there is no xfce4-power-manager running but it is xfce4-power-man pgrep xfce4-power-man 657. This power manager for the Xfce desktop enables laptop users to set up a power profile for two. 00:00:00 /bin/sh /etc/xdg/xfce4/ xinitrc - vt 00:00:00. Required packages Xfce Power Manager depends on the following packages: - Gtk 2.24 or above. and then starts the session manager xfce4-session. In addition, xfce4-power-manager provides a set of freedesktop-compliant DBus interfaces to inform other applications about current power level so that they can adjust their power consumption. Are you certain the xfce4-power-manager is running pgrep xfce4-power-manager. 8.6 Starting Xfce Xfce is a lightweight desktop environment based on GTK+ it is particularly well.
#XFCE4 POWER MANAGER HOW TO#
The problem is, regardless of whether I check the box in xfce4-power-manager, the former sets up keybindings for the brightness keys that I do not know how to overwrite. If logind-handle-lid-switch is false then what you do to nf shouldn't have an effect. If you use with purge options to xfce4-power-manager package all the configuration and dependent packages will be removed. I want to make my own script to handle brightness.
0 notes
Text
Ubuntu install tigervnc server

#UBUNTU INSTALL TIGERVNC SERVER HOW TO#
#UBUNTU INSTALL TIGERVNC SERVER INSTALL#
#UBUNTU INSTALL TIGERVNC SERVER SOFTWARE#
The VNC server allows you to connect from the desktop as well as in the server.
#UBUNTU INSTALL TIGERVNC SERVER INSTALL#
Next, run apt command to install and configure the TigerVNC server. As long as the SSH port has been opened, you shouldn’t have to configure anything else (e.g. The procedure to install and configure TigerVNC on Ubuntu Linux can be described via:Login to the remote Ubuntu server via SSH:Install and configure the desktop environment, including Gnome or XFCE4. Remmina is convenient because it handles the SSH tunnel.
#UBUNTU INSTALL TIGERVNC SERVER SOFTWARE#
Enter the SSH settings under the SSH Tunnel tab. VNC is open-source client-server software that allows you to see the screen of the server computer and control it on one or more client computers no matter what. COMPUTERNAME.local:1, :1 corresponds to the display number above). Enter the VNC connection settings under the basic tab (e.g. If using Ubuntu 20.04 as the client machine, Remmina (a VNC client) is installed by default. Sudo systemctl enable systemctl start systemctl status Connect Using Remmina VNC Client Login to remote Ubuntu server using ssh command Install the desktop environment such as Gnome or XFCE4 using apt command Install and configure the TigerVNC. sudo mkdir /etc/vncĮxecStart=/usr/bin/vncserver -fg -depth 24 -geometry 1920x1200 -localhost no :%i This will create the typical Ubuntu desktop. & xrdb $HOME/.Xresources chmod 755 xstartupĬreate /etc/vnc/xstartup, edit the file, make executable. The fix comes from this post.Ĭreate ~/.vnc/xstartup, edit the file, make executable cd ~/.vnc Instructions found in other tutorials might work if you manually start the VNC server, but you will get a black screen if starting it as a service with GNOME (although it works with XFCE4). We want to run the VNC server as a system service (starts at boot), using GNOME (i.e. Vncserver -kill :1 Configure the VNC Server Test the installation by starting and then killing the server. TigerVNC supports virtual displays, is an active successor to TIghtVNC, and is easy to install from the Ubuntu repositories sudo apt install tigervnc-standalone-server Others can support virtual (remote) displays that are truly headless. controlling the visible logged-in desktop). Some VNC servers only support local VNC sessions (i.e. It was easy to set up a local VNC session, but going headless without a dummy adapter AND with the GNOME desktop was a challenge. no monitor plugged in) for Ubuntu 20.04 using GNOME was harder than anticipated. Install the OpenSSH server on the remote Ubuntu server that you want to access. Those who want to access their remote system securely over ssh, they can follow the given steps. Update apt database with apt-get using the following command.Creating a headless virtual VNC session (i.e. Enter the IP address along with port 5901 of the remote Ubuntu system where the VNC server is running. Install tigervnc-standalone-server Using apt-get In the following sections we will describe each method. There are three ways to install tigervnc-standalone-server on Ubuntu 20.04. This viewer may also be on a computer running other operating Note: This server does not need a display. The server generates a display that can be viewed with a vncviewer. This package provides a standalone VNC server to which clients can connect. Internet and from a wide variety of machine architectures. Not only on the machine where it is running, but from anywhere on the It is, in essence, a remoteĭisplay system which allows you to view a computing `desktop’ environment VNC stands for Virtual Network Computing.
#UBUNTU INSTALL TIGERVNC SERVER HOW TO#
In this tutorial we learn how to install tigervnc-standalone-server on Ubuntu 20.04. tigervnc-standalone-server is Standalone virtual network computing server Introduction
1 note
·
View note
Text
Ubuntu 16.04 vnc server xstartup gnome panel missing

UBUNTU 16.04 VNC SERVER XSTARTUP GNOME PANEL MISSING INSTALL
UBUNTU 16.04 VNC SERVER XSTARTUP GNOME PANEL MISSING UPDATE
UBUNTU 16.04 VNC SERVER XSTARTUP GNOME PANEL MISSING PASSWORD
UBUNTU 16.04 VNC SERVER XSTARTUP GNOME PANEL MISSING PLUS
UBUNTU 16.04 VNC SERVER XSTARTUP GNOME PANEL MISSING DOWNLOAD
enable firewall traffic on the vnc port (in the AWS console).
In that mindset, launching each component yourself makes it clearer what is doing what. It also matters whether you want things to run on the GPU, or the CPU. The responses here are good for getting one solution up and running, but I recommend understanding the basics of the different layers which result in a functioning GUI / OpenGL environment / remote desktop in Unix. I ran into the same problem, and ended up writing a how-to guide for myself ( ) If you want to return to a session later, specify this number in the port field of the xrdp login dialog box. Pay close attention to these status messages and make note of the VNC port number displayed. When you start a session, the port number is -1.ġ9) When the system connects, several status messages are displayed on the Connection Log screen.
UBUNTU 16.04 VNC SERVER XSTARTUP GNOME PANEL MISSING PASSWORD
sudo service xrdp restartġ7) On Windows, open the Remote Desktop Connection client, paste the fully qualified name of your Amazon EC2 instance for the Computer, and then click Connect.ġ8) When prompted to Login to xrdp, ensure that the sesman-Xvnc module is selected, and enter the username ubuntu with the new password that you created in step 8.
UBUNTU 16.04 VNC SERVER XSTARTUP GNOME PANEL MISSING INSTALL
First Install the xrdp with sudo apt-get install xrdp then edit the above mentioned file)ġ5) Look for the section and change the following text (then save and exit ). sudo cp /home/ubuntu/.xsession /etc/skelġ4) Open the xrdp.ini file to allow changing of the host port you will connect to. xsession to the /etc/skel folder so that xfce4 is set as the default window manager for any new user accounts that are created. echo xfce4-session > ~/.xsessionġ3) Copy. Sudo -E apt-get install -y ubuntu-desktopġ1) Install xrdp sudo apt-get install xfce4ġ2) Make xfce4 the default window manager for RDP connections. su ubuntuġ0) Install Ubuntu desktop functionality on your Linux instance, the last command can take up to 15 minutes to complete. sudo –iĩ) Switch back to the ubuntu user account and cd to the ubuntu home directory. Press the Enter key after typing the command passwd ubuntu, and you will be prompted to enter the new password twice. sudo /etc/init.d/ssh restartĨ) Temporarily gain root privileges and change the password for the ubuntu user to a complex password to enhance security. sudo vim /etc/ssh/sshd_configĦ) Change PasswordAuthentication to yes from no, then save and exit.ħ) Restart the SSH daemon to make this change take effect.
UBUNTU 16.04 VNC SERVER XSTARTUP GNOME PANEL MISSING UPDATE
Refer this guide to create permanent sessions as serviceĤ) Execute: sudo apt-get update sudo apt-get upgradeĥ) Because you will be connecting from Windows Remote Desktop, edit the sshd_config file on your Linux instance to allow password authentication. Now you can access GUI using IP/Domain and port 1įor AWS, you have to allow port 5901 on firewall Log file is /home/lonely/.vnc/ubuntu:1.log Starting applications specified in /home/lonely/.vnc/xstartup New 'ubuntu:1 (lonely)' desktop is ubuntu:1Ĭreating default startup script /home/lonely/.vnc/xstartup Xauth: file /home/lonely/.Xauthority does not exist You will require a password to access your desktops. "gnome-session & ".ģ) Create VNC password and vnc session for the user using "vncserver" command. $ sudo apt install gnome-panel gnome-settings-daemon metacity nautilus gnome-terminal vnc4serverĢ) Edit /usr/bin/vncserver file and modify as belowįind this line "# exec /etc/X11/xinit/xinitrc ".Īnd add these lines below. So run the vnc server also on same user instead of "awsgui" user.ġ) Install packages $ sudo apt update sudo apt install -no-install-recommends ubuntu-desktop Mostly because of ".vnc/xstartup" file on different user. Sudo iptables -A INPUT -p tcp -dport 5901 -j ACCEPT Mac VNC client can be downloaded from here:
UBUNTU 16.04 VNC SERVER XSTARTUP GNOME PANEL MISSING PLUS
In the vnc client, give public DNS plus ":1" (e.g.
UBUNTU 16.04 VNC SERVER XSTARTUP GNOME PANEL MISSING DOWNLOAD
You can download xtightvncviewer to view desktop(for Ubutnu) from here When you're done, hit Ctrl + C on the keyboard, type :wq and hit Enter. "Uncomment the following two lines for normal desktop." And on the second line add "sh" so the line reads exec sh /etc/X11/xinit/xinitrc. Then hit the Insert key, scroll around the text file with the keyboard arrows, and delete the pound (#) sign from the beginning of the two lines under the line that says Then run following commands and enter the login password for vnc connection: su - awsgui Run following commands to install ui and vnc server: sudo apt-get update Setting up ui based ubuntu machine on AWS. Sudo vim /etc/ssh/sshd_config # edit line "PasswordAuthentication" to yes Following are the steps to setup the GUI Create new user with password login sudo useradd -m awsgui
0 notes
Text
Rdesktop ubuntu download

#Rdesktop ubuntu download install
#Rdesktop ubuntu download serial
#Rdesktop ubuntu download update
#Rdesktop ubuntu download driver
It offers features like built-in support for redirecting webcams and smart cards, configuring remote apps, regular security updates and hardware-accelerated video decoding to extend the battery life of your device, ideal when working on the go.Īs of today, we are the main contributor to the FreeRDP project. If you are using Mate Environment, include mate-session nano /home//.Thincast Client is a free multi-platform RDP (Remote Desktop Protocol) Client with FreeRDP at it's core that allows you to connect to a Remote PC or to virtual applications and desktops. Type the below command in terminal and include xfce-session. Include “xfce4-session” in “/home//.xsession”. Tell xRDP to use your environment XFCE sudo sed -i.bak ‘/fi/a #xrdp multiple users configuration xfce-session ’ /etc/xrdp/startwm.sh MATE sudo sed -i.bak ‘/fi/a #xrdp multiple users configuration mate-session ’ /etc/xrdp/startwm.sh
#Rdesktop ubuntu download install
Then Install XRDP Package sudo apt install xrdp sudo systemctl status xrdp sudo systemctl restart xrdp Step 5 : Configure Environment MATE sudo apt-get install mate-core mate-desktop-environment mate-notification-daemon XFCE 4 sudo apt install xfce4 xfce4-goodies xorg dbus-x11 x11-xserver-utils You can choose another environment of your choice, like MATE. I am using XFCE as my desktop environment as its light on resources and I don’t always have a good internet connection when working remotely. In Xrdp, XFCE4 and MATE are best for Robust Remote Desktop Environments
#Rdesktop ubuntu download driver
nvidia-390 is the latest driver version for the GTX 1xxx series).Īfter the installation is done, we need to reboot the computer: sudo reboot # Install Xrdp Supported Packages sudo apt-get install xorg sudo apt-get install xserver-xorg-core sudo apt-get install xorgxrdp Step 4 : Install Xrdp
#Rdesktop ubuntu download update
Please note that the command is different for each graphic card, depending on the driver available for it sudo apt-get install nvidia-XYXYX sudo apt-get update sudo apt-get upgrade Using the acquired information when typing “nvidia-smi”, we download and install the latest Nvidia driver supported by our GPU. → If Nvidia Driver is not Installed, Install Nvidia-Driver sudo add-apt-repository ppa:graphics-drivers/ppa → First Check which GPU Hardware is in your System sudo lshw -numeric -C display This driver provides you GUI(Graphical User Interface) to the system for Remote Desktop. Here first we check Nvidia Driver is Installed or Not. Install Supported Packages : Xorg, Xrdp, Xserver, Xfce4 and Mate Packages Restart the System sudo reboot Step 3 : Installing Supported Packages Update the System Packages sudo apt-get update sudo apt-get upgrade sudo apt purge hwe* sudo apt purge xorg* sudo apt purge xserver-xorg-core sudo apt purge xrdp* sudo apt purge mate* sudo apt purge xfce4* sudo apt purge xfce4 xfce4-goodies xorg dbus-x11 x11-xserver-utils sudo apt purge mate-core mate-desktop-environment mate-notification-daemon sudo rm /etc/systemd/system/rvice (if already have rvice) sudo apt autoremove So, Remove the Xorg, Xrdp, Xfce 4, Mate, Xserver and hwe packages and install freshly. Unwanted Packages like Hardware Enablement Stack and Partiallly Installed packages may affect Xrdp Session Failures. It supports several network protocols, including SCP, SSH, Telnet, rlogin, and raw socket connection.
#Rdesktop ubuntu download serial
PuTTY is a free and open-source terminal emulator, serial console and network file transfer application.
0 notes
Text
Real vnc connect ubuntu 16.04

REAL VNC CONNECT UBUNTU 16.04 HOW TO
REAL VNC CONNECT UBUNTU 16.04 INSTALL
REAL VNC CONNECT UBUNTU 16.04 FULL
To make the communication secure, you must encrypt your server-client connection by using an SSH tunnel between the VNC server and the client. VNC is a clear text and insecure network protocol. How to connecting with a VNC client and ssh session We are going to use that one with the ssh command. Pass the -list option as follows to the vnserver:
REAL VNC CONNECT UBUNTU 16.04 HOW TO
$ vncserver -kill :* How to list VNC server sessions on Ubuntu Linux VNC server to kill all, instances (*) of TigerVNC, run: Here is what we see on the terminal window: Killing Xtigervnc process ID 9523. To klill a VNC server running at desktop at :1 Verify it with the ss command and pgrep command/ egrep command: $ vncserver -depth 32 -geometry 1680x1050 One can setup desktop bit depth such as 8, 16, 24, 32 and Desktop geometry in Type the following command to start the vnc server on Ubuntu: & xrdb $HOME /.Xresourcesĭbus-launch -exit-with-session gnome-session & How to start TigerVNC server #!/bin/sh # Start Gnome 3 Desktop & exec /etc /vnc /xstartup You need to create a file name ~/.vnc/xstartup using a text editor such as vim command or nano command: How to configuring Gnome 3 Desktop environment to use with VNC For example, create a VNC user account nixcraft that will need to access the system via VNC: $ sudo systemctl start gdm How to configuring the VNC serviceĪ sysadmin can create a new VNC user account too for the new desktop user using the useradd command and passwd command.
REAL VNC CONNECT UBUNTU 16.04 INSTALL
Type the following command to install Ubuntu Linux desktop: $ sudo apt install tigervnc-standalone-server tigervnc-xorg-extension tigervnc-viewer Type the following apt command or apt-get command to install tigervnc vnc server on your server: How to Install and Configure VNC on Ubuntu 18.04 or 18.10 Connect to VNC server from your desktop using SSH and vnc client.Install and configure the TigerVNC server.Install the desktop environment such as Gnome or XFCE4 using apt command.Login to remote Ubuntu server using ssh command.The procedure to install and configure VNC server on Ubuntu Linux is as follows: How to install and configure TigerVNC server on Ubuntu 18.04 LTS All you need is out of band management with an embedded VNC server in BMC. One can control Linux server or desktop when networking service is down. Access remote Linux desktop stored in the cloud-based system.Access files from home computer or work computer stored on a remote server.You must install TigerVNC server on Ubuntu server. Sample setup for installation of VNC server on UbuntuĪ VNC server located at 202.222.1.2 shares a desktop with other client computers or mobile devices over the Internet or LAN.
REAL VNC CONNECT UBUNTU 16.04 FULL
This page shows how to install and configure TigerVNC on Ubuntu 18.04/20.04/22.04 LTS Linux based system to get access to full Gnome 3 desktop. Some typical examples are TigerVNC, TightVNC, Vino (default for Gnome desktop), x11vnc, krfb (default for KDE desktop), vnc4server and more. There are many implementations of the VNC protocol for Linux or Unix like systems. One can use VNC to control or access Linux based desktop remotely. It is nothing but a Linux desktop sharing system or set of protocols for sharing desktop. Introduction: VNC is an acronym for Virtual Network Computing. How do I install and configure TigerVNC server on Ubuntu 18.04/20.04 for remote desktop access? How to enable Remote Desktop connection between two Ubuntu Linux systems (server and client) to access GUI? How to configure Virtual Network Computing (VNC) in Ubuntu Linux 18.04 LTS or 18.10 or 20.04/22.04 LTS server?
0 notes
Text
Se perdió la barra de tareas
Restaurar o Corregir Sesión XFCE
Primero debemos acceder a una terminal, con el comando sudo su nos registramos como root para poder realizar esta accion. Luego de poner nuestra contraceña de nuestro usuario escribimos las siguientes lineas o las pegamos en la terminal:
Primero: rm /home/usuario/.cache/sessions -R (Enter)
Segundo: rm /home/usuario/.config/xfce4 -R (Enter)
Ya hemos eliminado la configuración de la sesión de xfce, a continuación reiniciamos el sistema con el comando:
sudo reboot
Al reiniciar seleccionamos nuestro usuario, ingresamos la contraseña normalmente y nuestra sesión xfcedebería estar funcionando correctamente una vez más.
Realizados estos pasos solo abra que volver a configurar como lo teniamos antes fondo de pantalla, etc
0 notes
Quote
My issue was due to a badly-closed bash session. So running command reset in my terminal solved it immediately.
Copy-Paste in xfce4-terminal adds 0~ and 1~ - Unix & Linux Stack Exchange
2 notes
·
View notes
Text
OpenBSD + Xfce4 Kurulumu

OpenBSD kurulumu sandığım kadar zor değilmiş, daha önceleri kişisel olarak kullandığım thinkpad x220 üzerinde FreeBSD kurup bir süre mate masaüstü ortamı ile birlikte kullanmıştım, çoğunlukla sunucu üzerinde koşması gerektiğini düşünülen BSD işletim sistemleri aslında masaüstünde gayet güzel kullanılabiliyor ve sanıldığını aksine o kadar da zor değil! OpenBSD, güvenlik odaklı bir işletim sistemi. Gnu/Linux dağıtımlarının aksine, herhangi bir GUI kurulum ortamına sahip değil. Daha samimi olan bir yolu tercih ediyor ve size sorular sorarak kurulumu başlatıyor.
Kurulumu adım adım anlatmayacağım ama bir şekilde daha önce bir gnu/linux dağıtımı kurmuş olanların çok rahat bir şekilde anlayacağını düşünüyorum. Çok fazla BSD tecrübem olmadığından ötürü, kurulum içerisinde yanlışlarım olabilir. (1 mail kadar uzağınızdayım.)
Adım 0: Usb belleğe yazdırmak
https://www.openbsd.org/ftp.html adresinden herhangi bir yansıya giderek, kendi mimarinize uygun olan imajı indirmeniz gerekiyor.
ben amd64 mimarisinde, openbsd6.0 sürümünü indirdim. Ulak net yansınını kullanabilirsiniz.
ftp://ftp.ulak.net.tr/pub/OpenBSD/6.0/amd64/install60.fs
Daha sonra bu install60.fs’i “dd” kullanarak usb belleğimize aşağıdaki gibi yazdırıyoruz.
# dd if=/location/install*.fs of=/dev/rsd6c bs=1m
Adım 2: Internet’e bağlanmak
Eğer kablolu kullanıyorsanız, OpenBSD size kullanmak istediğiniz interface’i soruyor ve DHCP üzerinden IP talep ediyor. Kablosuz kullanmak istiyorsanız; aşağıdaki şekilde Wifi bağlantısını gerçekleştirebilirsiniz.
ifconfig kullanarak bağlantıyı sağlayacağız.
# ifconfig -a # tüm interfaceleri görmenizi sağlar, kablolu ve kablosuz arayüzü görebilirsiniz. # ifconfig iwn0 up # # ifconfig iwn0 scan # wifi ssid’leri arıyoruz. # ifconfig iwn0 nwid wifi_adı wpakey wifi_parolası # bu şekilde ssid’e bağlanıyoruz. # dhclient iwn0 # ip talep ediyoruz.
Adım 3: Paket yansı(mirror) adresi belirlemek
Kurulumu tamamladıktan sonra OpenBSD’e giriş yaparak başlıyoruz. Paket kurabilmek için pkg_add kullanıyoruz, tıpkı debian’ın apt’si arch’ın pacman’i gibi fakat bundan önce bir yansı adresi belirlememiz ve bu PATH’i .profile içerisinde eklememiz gerekiyor. Aşağıdaki şekilde yansıyı .profile içerisine ekliyoruz.
$ echo "PKG_PATH=http://www.mirrorservice.org/pub/OpenBSD/6.0/packages/amd64/" >> .profile $ echo "export PKG_PATH" >> .profile $ cat .profile # kontrol et:)
Daha sonra pkg_add, pkg_delete, pkg_info, pkg_check gibi komutları kullanarak istediğimiz paket üzerinde işlem yapabiliriz. Ben aşağıdaki şekilde bir vim kurulumu yaptım.
pkg_add vim
Adım 4: Masaüstü kurulumu
Bu kısımda xfce4 masaüstü ortamını ve slim login manager’ını kullandım.
pkg_add -v xfce xfce-extras slim
pkg size bazı paketlerin alternatifleri olduğunu ve hangisini seçmek istediğinizi sorabilir.
xfce ve slim kurulumu bittikten sonra; grafik login için /etc/rc.conf.local’ı düzenlememiz gerekiyor.
# # vim /etc/rc.conf.local multicast_host=YES # dbus/avahi için apmd_flags="-A" # apmd’i cihazı suspend edebilmeniz için ve daha iyi bir batarya kullanımı için aktifleştiriyoruz. pkg_scripts="messagebus slim" # messagebus diğer dağıtımlardan da alışık olduğumuz, maaüstü için gerekli bir takım ayarlarla ilgileniyor.
Daha sonra adduser kullanarak kendinize bir kullanıcı açıp, ev dizinininde .xinit dosyası içerisine:
exec ck-launch-session startxfce4
bunu yaparken root kullanıcısı olduğunuzu düşünüyorum, (dosyasının sahipliğini değiştirmek için chown samet:samet ~/home/samet/.xinit) düzenlemesini yapın.
Daha sonra sistemi reboot ettiğinizde slim giriş sayfası sizi karşılıyor. Giriş yaptığınızda masaüstü ortamınız şöyle böyle hazır oluyor.
Henüz sudo kurulumunu dahi yapmadık. sudo, firefox, pulseaudio ve benzeri diğer yazılımları kurmak için bir kaç döküman okuyarak çok rahat halledebilirsiniz. Burada ben openbsd’nin en azından intel ekran kartınız olduğunu ve buna ait bir driver’ı içerisinde bulundurduğunu göze alarak yazdım. Bu konuda sıkıntı yaşarsanız aşağıdaki driver’lara göz atmanızı tavsiye ederim.
xf86-video-intel
xf86-video-vesa
Karşılacağınız sorunlar belki firmware’ler olacaktır. Donanımınıza uygun driver’lar OpenBSD imajının içerisinde bulunmayabilir ve kullanamayabilirsiniz. Birazcık araştırarak, bu driver’ları nasıl yükleyebileceğinizi çok rahat bulabilirsiniz.
Herhangi bir sorunda aşağıdaki mail adresinden bana ulaşabilirsiniz, elimden geldiğince yardımcı olmaya çalışırım.
Şuraya da bir adet screenshot ekleyeyim.

Kullandığım kaynaklar:
Keith Burnett, http://sohcahtoa.org.uk/openbsd.html
ftp://ftp.ulak.net.tr/pub/OpenBSD/6.0/amd64/
https://www.openbsd.org/
1 note
·
View note
Text
Ubuntu Linux Windows 10 içinde nasıl çalıştırılır?
Kimse, tam bir işletim sistemi kurmak istemez, sadece terminal tabanlı bir çöple uğraşmak istemez, bu yüzden Microsoft doğru olanı yaptı, ve Linux için Windows Alt Sistemini kullanarak Linux’u Windows içine getirdi. Önde gelen Linux geliştiricilerinden biri olan Canonical, Ubuntu Linux işletim sisteminin çekirdeğini Windows içinde etkin bir şekilde kurmanızı sağlamak için WSL’yi geliştirdi. Karışıklık yok, telaş yok,sadece saf, basit Windows, üstünde Linux eklenmiş erm, var.
“Neden?”Umutsuzca ağladığınızı duyuyoruz. Çünkü geliştiriciler buna bayılıyor. Windows’tan çıkmadan ortak açık kaynak kodlu araçları, komutları ve sunucu servislerini doğrudan kurmalarını ve çalıştırmalarını sağlar. Ayrıca, sanal bir makineyi ateşlemeye gerek kalmadan Linux ile Windows rahatlığında dolaşmanızı sağlar. Bu yüzden ücretsiz, kalkması ve çalışması kolay, fazla yer kaplamaz, bilginizi genişletir ve arkadaşlarınızı korkutmanıza yardımcı olur! Ne aşk değil mi? Bir bakalım ve yol boyunca açıkkaynaklı bir eğlenceyi nasıl yaşayabileceğinizi açıklayalım.
PC’nizi hazırlayın
WSL’yi kurmak ve çalıştırmak, 2016’da ilk kez piyasaya sürülenden biraz daha kolay hale geldi Windows 10 sürümünüzün Fall 2017 olan Windows 16215 Oluşturucu Güncelleştirmesi’ne sahip olması koşuluyla.En karmaşık adım aşağıdakileri yapmaktır: Aramada, “powershell” yazın, bunu sağ tıklayın ve “Yönetici olarak çalıştır” ı seçin (aşağıdaki resme bakın). Aşağıdaki komutu girin ve sisteminizi yeniden başlatın: Enable-WindowsOptionalFeature -Online -FeatureName Microsoft-Windows-Subsystem-Linux
Linuxu Yüklemek
Windows Mağazası’na gidin ve “Linux” ifadesini arayın. Boom – Windows’ta Linux’a yönelik yepyeni bir bölüm. Harikalar asla bitmeyecek mi? Burada sadece Ubuntu ile ilgileniyoruz – OpenSUSE bir diğer önemli Linux dağıtım sistemidir, ancak Ubuntu için farklı bir yükleyici sistemi (paket yönetimi olarak bilinir) kullanır. Bu yüzden Ubuntu’yu seçin ve “Al” a tıklayın (aşağıdaki resme bakın). Bu noktada bir hatayla karşılaşırsanız, PowerShell komutunu çalıştırdığınızdan emin olun, 64-bit bir işlemciye sahip olursunuz, Windows 10 için doğru bir yapıya sahip olursunuz ve C: sürücüsünde Ayarlar da “Varsayılan Kayıt Konumları” altında yüklenir.
Linux kurmak
Bir şey yapmadan önce, Ubuntu için bir kullanıcı hesabı oluşturmanız gerekir; uygun bir kullanıcı adı ve şifre girin. Şimdi Linux sihrini başlatmak için belirsiz terminal gelişmelerine başlayın. Bu ilk ikisi, Ubuntu’nun en son paketlere sahip olmasını ve güncel kalmasını sağlar.
sudo apt-get update
sudo apt-get upgrade
Kayan metnin bir listesini göreceksiniz.Bu ubuntu’nun işletim sistemi dosyalarını depolandığını ve en son hangi listeye sahip olduğunuzu sonra Ubuntu’nun kurulu olduklarından emin olan çevrimiçi depoları ifade eder.Genellikle, güncellemeleri yüklemenin uygun olup olmadığını güncellemeden bir kez size sorar.
Bir GUI yüklemek
Bu noktada, sahip olduğunuz tek şey temel Bash kabuğudur ve bu sizin için süper güçlü olan metin tabanlı terminalinizdir, ancak içinde ya da birlikte yaşamadığımız geliştiriciler ve sunucu ortamları için daha fazlasıdır. Güzel tarafı, Linux dünyasının GUI’sini oluşturmak için X adlı bir grafik sistemi kullanmasıdır. X, bir sunucu-istemci modeli kullanır; bu, ağ bağlantıları üzerinden veya alt sistemlerdeki arabirimlere erişebileceğiniz anlamına gelir. Windows tabanlı bir X sunucusu kuracağız ve Linux istemcisi GUI tabanlı X araçlarını başlatabilecektir.
Ubuntu Tweak
Bu, Windows tarafı tarafından halledilir. Linux tarafında, Ubuntu’yu çalıştırdınız, değil mi? – Herhangi bir GUI etkinliğini doğru ekranda göstermemiz gerekir. Tür:
export DISPLAY=:0.0
Bu ekran çevre değişkenini kalıcı olarak ayarlamak için, şunu yazın:
echo “export DISPLAY=:0.0” >> ~/.bashrc
Bu, Ubuntu’yu her başlattığınızda çalıştırılan ve teknik olarak Bash kabuk kısmı olan bir komut dosyasına yönergeyi ekler. Şimdi bir grafik programı kurmamız gerekiyor:
sudo apt-get install gedit
Biraz zaman alacak ve daha sonra programı başlatmak için bunu yazın
gedit
Bir masaüstü kurun
Eğer bunu çevrimiçi araştırıyorsanız, Dbus düzeltmelerine referanslar bulabilirsiniz; artık gerekli değil, çünkü artık varsayılan Ubuntu kurulumunun bir parçası. Bu, bir Linux masaüstüne dalış yapıp kurabileceğimiz anlamına geliyor; Xfce4 adında hafif bir bilgisayar seçiyoruz. Her komutu sırayla burada çalıştırın:
sudo apt install xfce4
sudo apt install gnome-themes-standard
sudo apt install conky
Masaüstünü hazırlayın
İşleri düzenli tutmak için biraz temizlik yapacağız, bu nedenle şu komutu verin:
nano ~/.xinitrc
Metin düzenleyicide, izleyen kod satırlarını girin. İşlem tamamlandığında, Ctrl-O tuşlarına basın ve kaydetmek için Geri Dön düğmesine basın ve metin düzenleyiciden çıkmak için Ctrl-x tuşlarına basın.
#!/usr/bin/env bash
export LANG=”en_US.UTF-8”
export LC_ALL=”en_US.UTF-8”
exec startxfce4
Çalıştır:
chmod +x ~/.xinitrc
Bu, daha önce oluşturduğumuz dosyayı çalıştırılabilir hale getirecektir. Sonra:
ln -s ~/.xinitrc ~/.xsession
Bu, o dosyayı başka bir standart X yapılandırma dosyasına “bağlar”. Yeni yüklenen Linux masaüstünüzü aşağıdaki komutla başlatın:
dbuslaunch –exit-with-session ~/.xsession
İlk çalıştırmada bir iletişim kutusu açılır; varsayılanı kullanmayı seçin. Xfce4 masaüstü, Windows 10’un üzerinde görünür, böylece Ubuntu penceresinin tam ekran olmadığından emin olabilirsiniz, çünkü pencere çubuğu engellenebilir. Sol üstte bir “Uygulama” menüsü görmelisiniz,üstte bir görev çubuğu çalışıyor. Çıkmak için sol üst menüdeki “Oturumu Kapat” seçeneğini kullanın. Bu noktada oynamak için çok fazla bir şey bulamazsınız, çünkü büyük ölçüde dağınıklıkta çalışır. Firefox gibi programları sudo apt-get install firefox ile ekleyebilirsiniz ve bu “Internet” menüsüne eklenir. İyi eğlenceler!
Linux ve diğer püf noktaları
Önceden, WSL’yi kaldırmak PowerShell’i Yönetici olarak çalıştırmak gerekiyordu.Ama şimdi, eğer Windows 10 güncel ise, yapmanız gereken tek şey Başlat menüsünden / Windows Mağazasından kaldırmak. Yüklemeyi bitirme zamanımıza kadar, Linux kurulumu 1 GB’ı zorlayacak, bu yüzden C sürücünüzün etrafında takılmak istemeyeceksiniz. Sizi burada bırakacağız, ancak WSL ile yapabileceğiniz birçok şey var. Örneğin, sudo apt-get install compiz-core ve sudo apt-get install compizconfig-settingsmanager komutunu çalıştırmak, etrafta dolaşabileceğiniz bir dizi görsel efekt ayarları ekler. Ayrıca ses olmadığını fark edebilirsiniz ve bunu eklemek mümkün olsa da, oldukça zor ve muhtemelen uğraşınıza değmez. Uzun lafın kısası: Linux, PulseAudio adlı bir sunucu / istemci ses sistemi kullanıyor ve hem bir Windows sürümü kurmanız hem de çıktınızı ana makinenize Windows makinenize yönlendirmeniz gerekiyor. Sadece senkronize olmayan sesleri duymanın keyfi için.
Ubuntu Linux Windows 10 içinde nasıl çalıştırılır?
0 notes
Text
Setup VNC Server on Ubuntu 18.04 with Xfce4
vino is Ubuntu's default vnc solution:
sudo apt-get install vino
vino settings are not exposed to xfce4, so you should install gsettings
sudo apt install libglib2.0-bin
Display all the preferences
gsettings list-recursively org.gnome.Vino
[x] Allow other users to control your desktop NOTE: Reverse Boolean
gsettings set org.gnome.Vino view-only false
[ ] You must confirm each access to this machine
gsettings set org.gnome.Vino prompt-enabled false
[x] Require the user to enter this password Step 1. Ask for password (NOTE: Only tested with bash and zsh)
echo -n "VNC Password: " && read -s password < /dev/tty && echo ""
Step 2. Set the preferences
gsettings set org.gnome.Vino authentication-methods "['vnc']" gsettings set org.gnome.Vino vnc-password "$(echo $password | base64)"
Step 3. Clear the $password variable
unset password
[ ] Automatically configure UPnP router to open and forward ports
gsettings set org.gnome.Vino use-upnp false
Show Notification Area Icon ( ) always // Always () client // Only when someone is connected (x) never // Never --if you use xfce.
gsettings set org.gnome.Vino icon-visibility never
Add desktop sharing to xfce autostart: sudo cp /usr/share/applications/vino-server.desktop /etc/xdg/autostart/vino-server.desktop
Verify that vino starts at boot: xfce4-session-settings
Test it: /usr/lib/vino/vino-server --sm-disable
0 notes
Link
Contrairement à Raspbian, OS pour Raspberry Pi basé sur Debian, le serveur VNC de FedBerry que j’ai découvert la semaine dernière n’est pas configuré « out-of-the-box ». Nous allons voir comment le configurer sur un Raspberry Pi 3 en quelques minutes.
On va partir du principe que FedBerry est déjà installé sur le RPi, que vous y êtes déjà connecté en SSH sur votre machine distante.
Sur le Raspberry :
Pour commencer, nous allons installer tigervnc-server :
Une fois l’installation terminée, nous lui assignons un mot de passe avec vncpasswd :
Pour pouvoir s’y connecter en remote, nous devons autoriser les accès VNC avec firewall-cmd :
… et le redémarrer :
Nous pouvons maintenant lancer une première exécution avec vncserver -geometry LARGEURxHAUTEUR :numéro_d'écran :
Si nous nous connectons maintenant au FedBerry, nous allons avoir un écran bleu comme celui-ci :
Pour y remédier, nous allons donc devoir modifier un fichier pour que XFCE soit pris en compte et redémarrer le serveur VNC. Ce fichier à modifier est le xstartup qui se trouve dans le dossier /home/votreUtilisateur/.vnc/ qui vient d’être créé au lancement de la commande vncserver :
Commentez ou supprimez la ligne exec que vous voyez ici en ligne 5 et ajoutez la ligne exec /usr/bin/xfce4-session :
On kill le processus lancé tout à l’heure avec vncserver -kill :numéro_d'écran et on lance à nouveau vncserver -geometry largeurXhauteur :numéro_d'écran
C’est terminé pour le Raspberry Pi.
Sur le PC distant :
Maintenant, il ne nous reste plus qu’à nous connecter au Raspberry Pi avec le client tigervnc (Que vous installerez avec sudo dnf install tigervnc si ce n’est pas déjà fait).
Entrez l’adresse IP du RPi + le numéro d’écran que vous avez choisi tout à l’heure (Dans notre exemple, c’était :1).
Enfin, entrez le mot de passe choisi plus haut avec vncpasswd et vous verrez le bureau d’afficher.
Vous pouvez maintenant utiliser FedBerry comme si vous étiez directement sur le Raspberry Pi. C’est fluide, réactif, le côté « remote » ne se ressent pas vraiment. Les dev ont fait du bon boulot.
0 notes