#y.tutorial
Explore tagged Tumblr posts
Visit Tumblr Blog
Explore Tumblr blogs with no restrictions, modern design and the best experience.
Last Seen Tumblr Blogs


Fun Fact
Tumblr was acquired by Yahoo for $1.1B in 2013.
Note
Hi I just wanted to know how you make high quality gifs? They look so good! Thank you
hello, lovely! thank you for being so kind!! <33
i previously made a general guide of how to make gifs that you can check out!
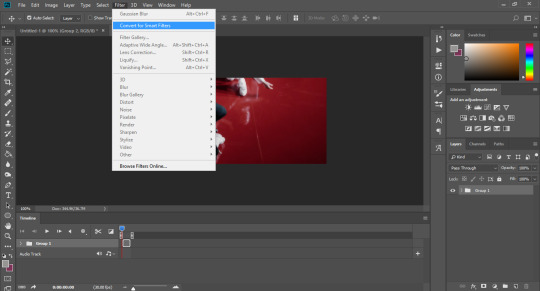
my process is generally the same, but the only thing that has changed for me is how i use vs. i now export into .mov instead of frames (as i upgraded my laptop), and i also don't sharpen through vs anymore. i do it all on photoshop! here are my new sharpening settings.
if you feel like you're still looking for guidance in a few more things, here are more tutorials i made in the past. i'm so sorry to get to this so late, but i hope this was at least helpful! please don't hesitate to reach out if u still find yourself stuck in places <33
5 notes
·
View notes
Note
hi how did you make your header. It’s so cute
hii!! thanks for being so kind!
i made it on photoshop by combining pictures (i.e.: this woozi pic, other background assets) screened with two (i.e: this one, and another one which i can't find anymore 😭) sparkle gifs, colored them, put text (i.e: the big woozi bdbdbxjsn) and watermarks, put a white gradient so it blends seamlessly with the blog's base, then exported it as a gif. 🥰
hope that helped!! lmk if you need any more tips on something more specific :)
0 notes
Note
yza henlo <3 i hope ur well and i know you're so busy and stuff but i was just wondering if you could explain how you make ur watermark look SO good, like it really just blows me away as much as your gifs. i know how make the watermark a shape and place it as a custom object. i guess i'm asking more about the coloring of it? maybe the thickness is the trick. hope i'm not bothering u haskjdf love u!
EZ MY BESTIE WHAT AN ABSOLUTE DELIGHT!!! HIIII 🥹 i'm overjoyed to see u in my notifs 🥹🥹🥹🥹🥹
ALSO NAURRR YOURE NEVER A BOTHER DONT EVER APOLOGIZE 😡😡😡 AND THANK U that is so nice of u 😔 hope you're doing much much better its what u deserve <333 and pls nxndjdjdj me n my little watermarks r honored, ure too kind 😭😭
foremost i make them as big as i could before turning them into shapes (the canvas i used was 2500x2500 iirc) which really helps w pixelation esp bc they final output isn't a vector!! also agreed on thickness! if you're going for more decorative ones, i usually use fonts that are on the thicker side as they tend to be more readable from afar. this is esp important to keep in mind bc resizing the final exported shape will be unavoidable since we're not using the same dimensions all the time, and we want them to show up regardless (of size, i.e: 540/268/144px)! aside from that, what i also do is just try to resize them differently as i'm making them just to check if they'll still be readable hehe. otherwise, if it's just plain text it's better to just retain a single size (i.e: a constant font size) based on my experience. this works best w thinner and simpler fonts in my case at least!
as for the coloring, i usually just use white blended as overlay especially if there already are lots of colors in the gif! otherwise, if they aren't visible that way, i use white -> blend it as difference -> double click the shape layer and go to gradient overlay -> choose hard light as the blending mode -> pick colors from the gif to use in the gradient, and that's pretty much it! (sorry i can't include screenshots rn 😭)
hope i was able to give you the answer u were looking for 🥹 if not, pls don't hesitate to shoot a question again any time <333
#sorry to get to this so late i haven't been here in almost a week 😭😭😭😭#also thank u again for being so kind i hope ure having a great one 🥰🥰 MWAH#ezralia 🍄#haylo4ever#y.ask#y.tutorial
5 notes
·
View notes
Note
these are so clear and smooth i genuinely had to blink bc it was so gorgeous literally as clean as a person's eyesight HOW did u do it 😭 (also i missed ur pretty gifs)
PLEEK coming from YOU??????????? i am both grateful and honored 😔
honestly i'm just doing the same things over and over again dkjfkjfdjk but the key is just to get hq files!!
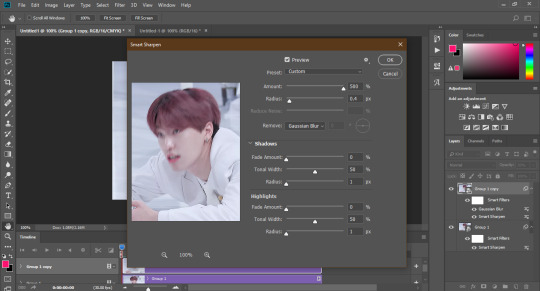
my sharpening is still the traditional dinosaur way fdjkdfjkjfd (same as i always used to do, i skip the vs one and do these)
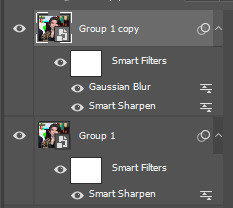
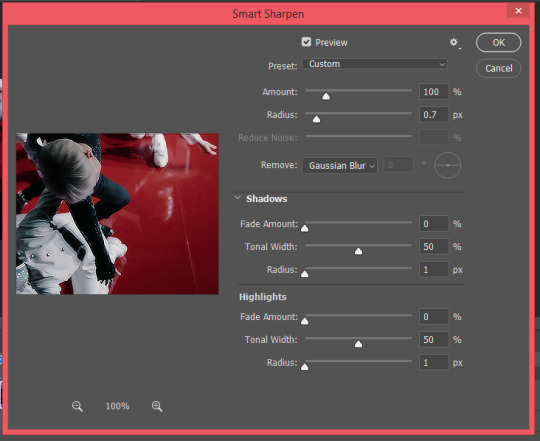
first layer (group 1) has smart sharpen on 500% amount, 0.4 radius, 0% noise, remove gaussian blur
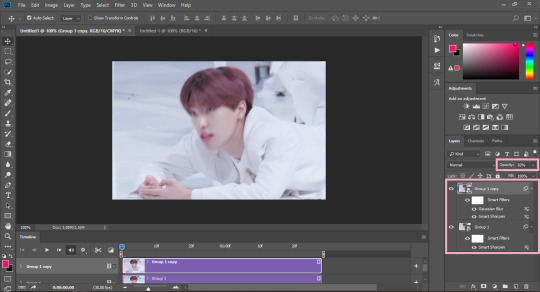
second layer (group 1 copy) has the same smart sharpen except it's on 0.3 radius, and gaussian blur's on 0.2!! then i set that layer's opacity to 50% hehe
this is all i do really 😭 i just adjust the radius and amount based on the vid fjdfjkfdjk i should be the one asking YOU how u make ur gifs they always look so clean and hd 😋
6 notes
·
View notes
Note
hiiiii. i loved how you recolored seungkwan's teaser photo from the other day. if it's not too much, may i ask how you did it? ♡
hello, thank you for being so kind! i didn't save the psd so i just tried to recreate how i colored it previously as best as i could 😅 here's what i did!
this is the original photo

i'm using photoshop for all my editing! i first resized, removed the text, and sharpened the photo to fit tumblr's dimensions. i sharpened this a bit more than my original edit so there might be a few differences in terms of details as well.

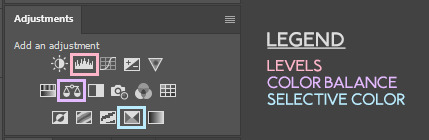
after that, i play around with adjustment layers to tweak the colors until i'm satisfied with the outcome. for this, i used levels, selective color, and color balance.
here are the settings i used for the recreation
levels 1:

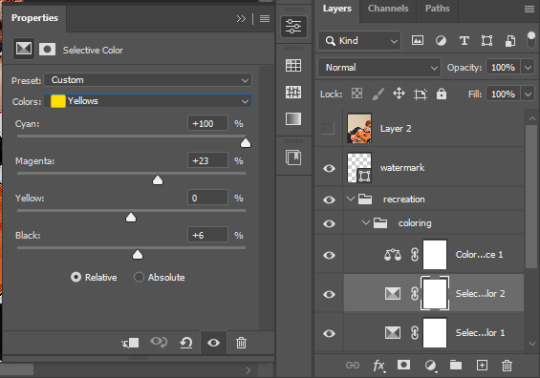
selective color 1 (reds & yellows):
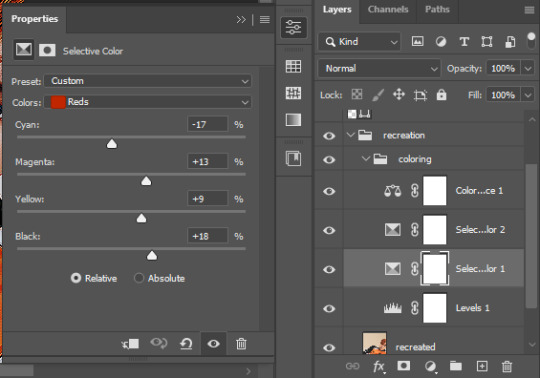
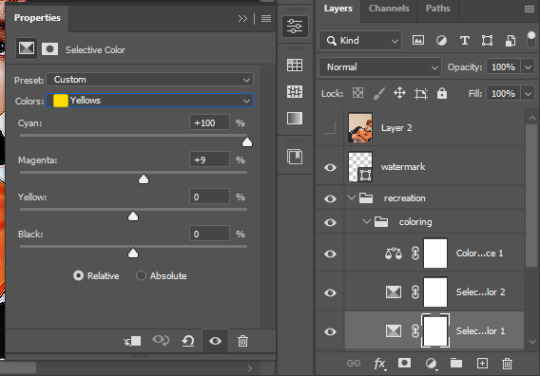
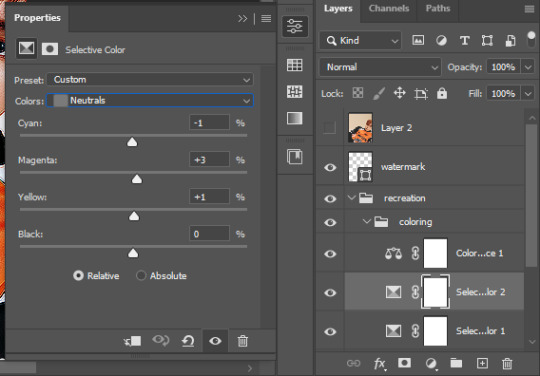
selective color 2 (yellows, whites, neutrals, blacks):


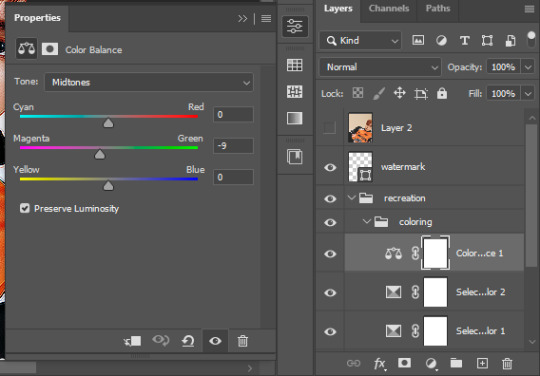
color balance 1 (midtones, highlights):

and here's the final output!

hope that helped <33 lmk if there's anything unclear!
6 notes
·
View notes
Note
hello!!! i hope you're doing well!! i just wanted to pop in here and say that i really love your gifs, they're sooooo soooo pretty and i'm in awe every time i see one :D.
I also just recently started making gifs and have been having some difficulties getting it to look how i want (esp w the resolution once its been exported). I was hoping u could give a newbie some tips? tysmmmm
hiii! thank you for being so kind <3
the most important thing imo is starting out with a quality source, so the output would also look great without you having to do So Much to it. the dimensions of the gif are the most crucial on making them appear hd on tumblr, so you also have to keep that in mind! but strictly export-wise, the color reduction algorithm (selective, adaptive, perceptual, restrictive) is very important. the CRA dictates how the color table for your gif (and therefore how your gif will look) will be generated!

since gifs only have a maximum of 256 colors, your coloring is also crucial to how your gif exports (including its size). what you see in the canvas doesn’t exactly translate to how your gif would look when exported, so having less colors will help preserve quality. for example, these gifs have quite a bit of a color range (with the equivalent color table above). this is what i see on the canvas:

but when exported it looks something like this.

as you can see, it isn’t really faithful to how i colored it in the canvas and it lost a bit of color. because exporting eliminates colors to limit it to 256, you can see some dithering (the tiny dots where some colors are) because the colors on the canvas exceed 256. reducing/making the colors in the gif similar with hue/selective color usually helps with that.
this is how (a frame) of my new gif with reduced colors looks in the canvas.

and this is what it looks like when exported.

as you can see it’s a bit more faithful to what i’ve done in the canvas. <3 this isn’t an excellent example as it doesn’t have Too Many differing colors but it’s the only psd i’ve saved recently saur fkdjshfjds
if it isn’t clear, here are other awesome tutorials (1, 2, 3) that also discuss it more in depth <3 hope this helps!! <3
#ik it's kinda terminology heavy but idk what else to call it sorry fdsjkfdhs#anon#y.ask#y.tutorial#flashing tw
11 notes
·
View notes
Note
can you teach me how you sharpen your gifs??? 🥺
henlo, bestie!! ofc, with pleasure <3
i use both vs (vapoursynth) and ps (photoshop) to sharpen my gifs 99% of the time. if i'm satisfied with how they come out of vs i don't do additional sharpening on them anymore, but that's rare esp bc my vs is literally broken lol.
here are my vs settings! (oh, also keep in mind that i now use the 64bit ver!!)
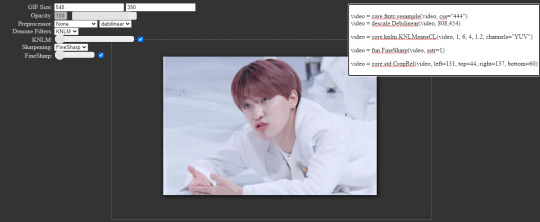
preprocessor: let me tell u.. debilinear makes A LOT of difference... but if you're using 32bit, my old settings for the preprocessor used to be resamplehq. as for the fps, on both versions, i don't use the qtgmc filters unless i'm giffing a .tp/.ts file!
denoise: ideally, i'd use knlm. i used to be able to use it until i updated my laptop to 64bit 2 weeks ago but then the knlm plugin broke so.. my gifs look kinda.. rough lol. so i currently do not use it, but i definitely recommend u to! i normally don't up the strength of it unless the video is grainy/low quality, and i never go beyond 4 if i do.
sharpening: i also never go above 1 on the strength for finesharp!
if you only wanna do the vs settings, here's how it'd turn out:
however, i almost always still do additional sharpening on ps bc i find that they make gifs look like they have more depth! also just bc i want to lol and i like my gifs glowy. some gifs really don't need them though, and doing additional sharpening adds up on the file size that's why my gifs are always so big jdfjkfdjfkd
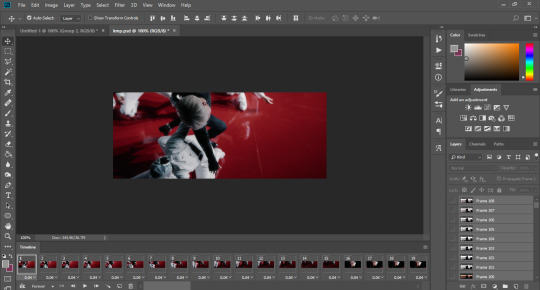
anyway, you'd want to convert your frames into a timeline if they aren't already in a timeline, and then duplicate the layer!!

then select the first group and go to filter -> sharpen -> smart sharpen. these are my settings:

now click on the 2nd group (the copy), then do the same smart sharpen!
and now we get to my secret sauce <3 gaussian blur!! on the same layer (the 2nd group), go to filter -> blur -> gaussian blur. set the strength to 2!

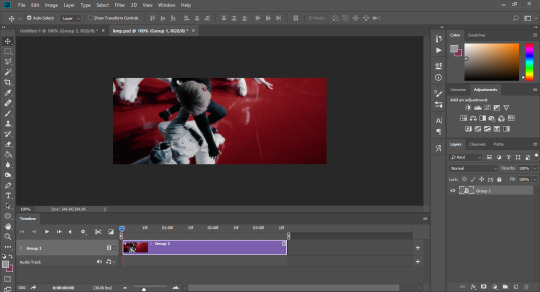
now you just have to adjust the opacity of the 2nd layer/group to your liking. for this example it's on 50%! your workspace should now look like this:
here's the outcome of sharpening with vs and ps!!
if you're not sure of what the difference is, here they are side by side (look at his hair!!):

or if you just wanna see them as a whole again, here they are lol.
and the final ouputs with both versions:

coloring also plays a big role with how sharp your gifs would look, so always keep that in mind! (these examples have the same coloring though!!)
that’s pretty much it for me <3 you can always adjust the smart sharpen on ps if they start looking weird. for me i only change the amount and not the radius, but you should also experiment with what works best for you!
i hope that was of help!! here’s my old tutorial that also links to some resources abt sharpening!! <3
#if y'all saw the previous tags for this post... <3#ok i'm done now <3 thank u for waiting!!#and thank u for even coming to me abt this <3#don't hesitate to ask if u have more questions!!#anon#y.ask#y.tutorial
54 notes
·
View notes
Note
YZA! i read your gif sharpening tutorial and saw that you dont use finesharp anymore. if you dont mind, would you explain your reason for not using it anymore? do you sharpen solely on photoshop now? have a nice day/night <333
hello ann my love <33 thank u for giving that lil tutorial some love hehe.
i find that vs already sharpens the vid a bit for you even without using any of the filters, and although i now prefer my gifs tending towards the sharper side style-wise, it is kinda hard to gauge how sharp vs will make them bc it doesn't have real time feedback unlike ps! that being said i also personally find them kinda hard to work with since i use different strengths for each set so they have the tendency to look… gritty to me but not in a good way although i haven't gotten to my desired sharpness yet. now i did a lil bit of experimenting bc i actually haven't used finesharp in a long time now (and maybe past yza was just not using them right), but yeah, i still prefer how ps alone can sharpen them now.
comparison


it also makes processing them slower on my jurassic aged laptop so 💀 ik knlm would help a LOT with finesharp on vs but it doesn't work on me anymore saur </3 finesharp is still really good, but i think it just always boils down to preference, hehe. ik a lot of amazing ccs who only use finesharp while still avoiding that grittiness!
but tl;dr, yes, i only sharpen on ps now bc i dont like how vs sharpens them anymore. i also don't use any of the vs filters (except for the preprocessors bc they're crucial to some file types). :D
#sorry that got so long for absolutely no reason 😭#hope that helped though djfkdjsf lmk if u have more questions <33 i'd be more than glad to answer em#hope ure having an even better day!! MWAH#ann 💛#beyoonce#y.ask#y.tutorial
5 notes
·
View notes
Note
Hey I have been thinking of making gifs but i have no idea where to start so I thought y not ask a fellow carat who makes awesome gifss❤️
A little guidance would mean a lot!!
aww, anon!! thank you for coming to me for this. i love talking people’s ears off!! DFJKJDFKDF but that being said, i’ll keep this under a keep reading since i’ll go through things quite thoroughly!
there’s really a million and one ways to make gifs, but i’ll show you how i do it and the basics in general (+ maybe some alternatives). keep in mind that i use windows though, so i’m not sure how helpful this will be if you’re on a mac. anyhoot, i’ll be dividing this tutorial into 6 parts, namely sourcing, choosing a program to resize/import with (vapoursynth and/or KM player basics), photoshop basics (KM Player tutorial extension), sharpening, coloring, and exporting.

the primary issue with sourcing is that the videos we want to gif come from different sources, and not all of them are conveniently downloadable. i’m going to list a few different sites/programs (that are free! <3) which allow me to download them!
4k Video Downloader: this program allows you to download from multiple sites, but i mainly use this for youtube. it’s better than other online alternatives (such as y2mate, which you can use if you can’t download this!) since it allows you to download above 1080p and also allows you to download subtitles if you want to. make sure to download it as .mkv though because options above 1080p will not show up if you’re downloading in .mp4!
Soshistagram: this is my go-to vlive downloader! it also allows you to choose the quality of your download.
Twitter Video Downloader & Instagram Downloader: exactly as their name implies, lol. twitter and instagram don’t really provide HD videos so i don’t mind downloading them through these. (the 2nd link also enables you to download from a number of other sources!)
Inspect Element: when worse comes to worst and if you're incredibly desperate to gif something that cannot be downloaded from any of these, you can (almost) always rip it off from the source code, lol. i won’t get into too much detail about this since so much information about this is readily available on the internet!
as you may have noticed, i’ve been mentioning quality for a lot of these. while being able to download content may be the priority, it is also really important (maybe even equally important) to download high quality resources. it’s not a very good idea to gif from anything below 720p as they usually don’t come out as nice, so to get videos like these, i usually go to either the sources themselves (e.g: their official youtube account, music shows’ respective youtube accounts, studio choom, etc.) and if i won’t be able to find them there, they’re surely on our beloved and reliable rosebay (who provides almost every svt content out there! people usually go here to get performance stages and huya streams, but almost everything is literally here, lol). you can also find performance stages on kpopexciting and kpop24hours (which requires membership, so watch out for when they open registrations up!). that being said though, it’s quite hard to find sources for chinaline, but legohouse is the best for this!
when sourcing from fansites, always check if they allow editing first! if it’s not explicitly said, you can always ask them. (most of them reply :D) if you don’t know how to, here’s a good guide for such! thank you @hanwooz for making this guide. <3
it’s also worth noting that performance stages and a few other high quality content come in .tp/.ts files which you might need a different media player for. for this, i use vlc for everything! this is also available for mac.
sometimes, you might also need to extract files (as sources compress them to take up less space during upload). i use peazip to do this! it’s a great AND FREE alternative to winrar.
you might also encounter download limits on gdrive. you can simply make a copy of the file, put it in a folder, then download the whole folder.

on to the more interesting part, we finally start making our gif! for this, i use photoshop cc (i downloaded it here lol) and vapoursynth OR KM player. these aren’t the only programs you can use, but these are what worked for me and my old 32-bit laptop, lol. you can find 64-bit and mac alternatives on the links as well i believe, and if not, you can just do a bit of digging around those sites!
(additional notes: another alternative for photoshop is GIMP but i don’t really remember how to use it. photopea’s also a web-based alternative, but i can’t say much about it since i haven’t dabbled there yet. there are also add-ons for photoshop such as topaz, but i (again) cannot use those, but i heard that they help a lot with making gifs look clean! avisynth is also an alternative to vapoursynth, but vapoursynth has added features i believe)
gifs are basically just moving pictures, so you can either capture moments you like as a video or as a series of images. photoshop accepts both, but as for me, i cannot import videos directly to photoshop so i do them frame by frame. to capture these images, one method is processing them through KM Player.

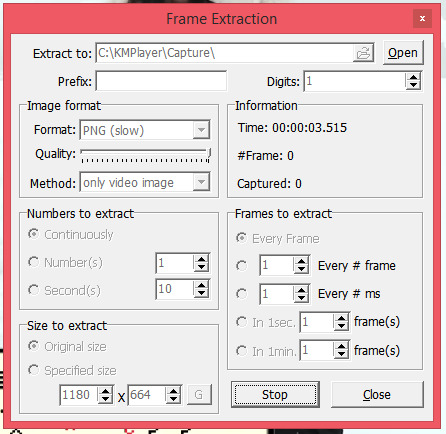
km player is basically a media player with a feature that allows you to get snapshots of videos continually (therefore, the series of images).
step 1: simply go to the timestamp of the moment you want to gif (i usually watch the videos first and type out all the timestamps of all the moments i want to gif) and press CTRL + G

this window would then show up. you can choose where you want your snapshots to go by changing the folder that’s highlighted. keep in mind that you need separate folders for each gif! if you don’t change the folder, the new screencaps would overwrite the frames you previously captured. as for the image format, i only use either PNG or JPG/JPEG, as they capture the best quality from this media player. PNGs take a lot longer to capture though. the numbers to extract tells you how many frames it would capture. i set it to ‘continuously’ so gifs don’t come out choppy/look like they’re skipping. it’s almost the same principle with the other panel named frames to extract. as for the rest, just make sure to follow every setting on screenshot! (you can always explore/experiment with the rest of them later on)
step 2: afterwards, click start, and play your video. your laptop might get quite slow when this process starts.
step 3: when you’ve gone through your timestamp, press 'stop’, and go to the folder you previously chose!
your folder should look similar to this:
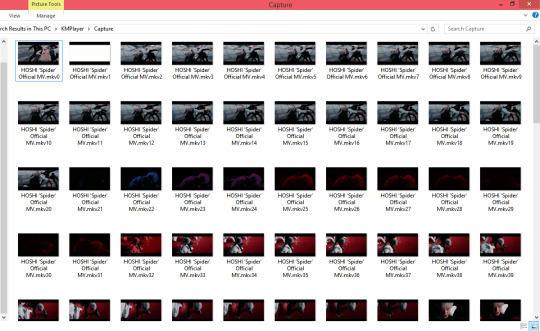
simply erase all the frames that you don’t want to be included in your gif, and you’re ready to import! we’ll be keeping these aside for now and learn another way to get frames.

another alternative is to use vapoursynth. to me, this is a whole LOT easier and basically does all of the work for you. i really recommend this! ever since i got it to work just a few months ago, i can never really make gifs without it anymore. i use the old version though (rip </3), so i won't have the new preprocessors, denoise filters, and sharpening. i suggest you always take the most updated one because i heard they make a lot of difference output-wise!
bear in mind that vapoursynth uses python, so if you encounter some errors, it might just be that you don’t have it downloaded yet. just follow the instructions here! (for the longest time i couldn’t figure out why my vs wouldn’t work and it was because of this.... lol)
it’s very important to know tumblr size dimensions when it comes to gifs (whether you’re going to use vapoursynth or not), but i’m including it on this part since it’s crucial to how vs (vapoursynth) works. your gifs may look good on photoshop, but if they’re the wrong size they’ll inevitably end up blurry on tumblr unless someone clicks on them. here are the dimensions (image made by @dazzlingkai):

you can use any height for these gifs, but these are the width dimensions you need to follow! **UPDATE: the middle gif for a 3-set is now also 177px!
nibreon has a video on how to gif using vs, but if you like text better, i can also provide it step by step for you.
step 1: to get started, simply drag your file to the vs shortcut (entitled “vapoursynth (drop video file on me)”). and this window should appear. (i’m using hoshi’s spider mv for this tutorial btw!)
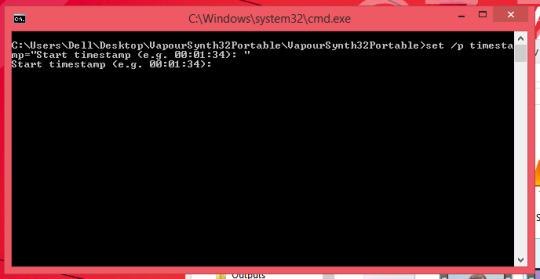
simply encode your chosen timestamp (in this case mine is 00:02:02) and press enter. (i don’t really trim my videos as other CCs do and just send them straight to vs, haha.)
step 2: this second line then asks you how long you want the video to be trimmed/previewed for. if your timestamp is 00:02:02-00:02:08, then what you’ll encode on this line is 00:00:06. (basically the duration of the video/part of the video)

step 3: after it processes, this resizer will then show up in your default browser.
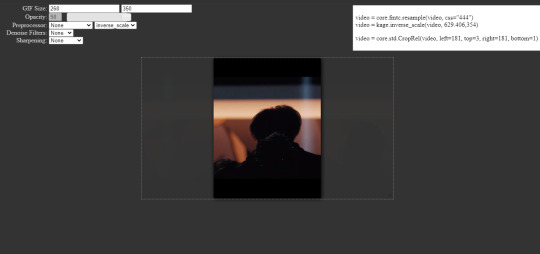
this is where the size dimensions become important! choose the size of your liking and resize the video as you want. i find resizing much easier with vs as you have more control over the size with real time feedback.
additional notes:
opacity: just allows you to view the area outside of your size width. doesn’t really matter much, but i love it as it helps me precisely resize gifs especially when i don’t want to include captions/subtitles.
preprocessor: refers to how vs would process (lol??) your gifs frame by frame. this is crucial to how your gifs would look! it is explained very well and thoroughly here, but basically, it tells you the speed and the manner in which the images/initial video of your gif will be exported in. this one doesn’t matter much on regular videos, but for performances (.ts/.tp files, etc.) it does make a lot of difference. i usually use qtgmc 60 slow on performances. for the rest, i use qtgmc 30 fast (or 60 fast when there are very few frames just so they would run smoother). i’m also always on resamplehq (the second part of preprocessing)! a lot of CCs don’t use preprocessing for regular videos though (.mp4, .mkv, etc.). if it’s still unclear for you, i’ll include more tutorials and examples (although very few) at the end, dw! **UPDATE: i’m now on the 64bit ver. as i’m using a new laptop, my preprocessor is now debilinear (instead of resamplehq). i also am now a changed woman and discovered that you really don’t need to use the fps preprocessor for regular videos BECAUSE they’re not rendered “splicely”, it just takes more of your time. they look exactly the same. <3
denoise filters: smoothens out your gifs. very useful especially if the source is grainy! i always use KNLM for this but you can try BM3D as well. bm3d takes much longer to process though!
sharpening: pretty self-explanatory. it just makes your gifs look clearer/sharper! i use finesharp almost always set to 1, but it really depends on your preference. i also do additional sharpening on photoshop most of the time though! **UPDATE: recently changed how i make gifs and i don’t use this sharpening anymore because my preferences have changed, but it’s still a good place to start if you’re just beginning to make gifs!!
step 4: after this, go onto the vs window. the lines of code initially look like this:
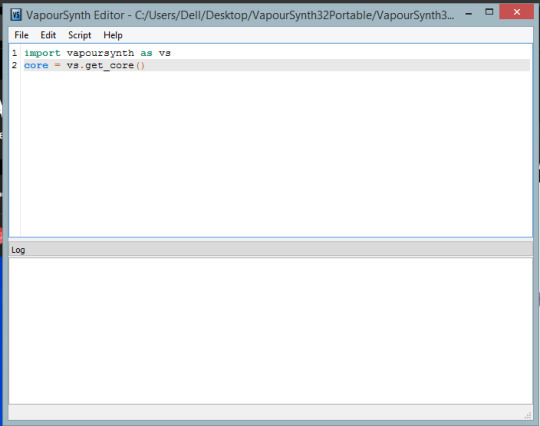
but in order to process the video for gif purposes, we need to use vapoursynth’s plugins. you can modify this later on (which is really unnecessary, but it’s possible if you want to experiment more fjdjkdf), so for now, just open up the included script from the vapoursynth folder (gifs).
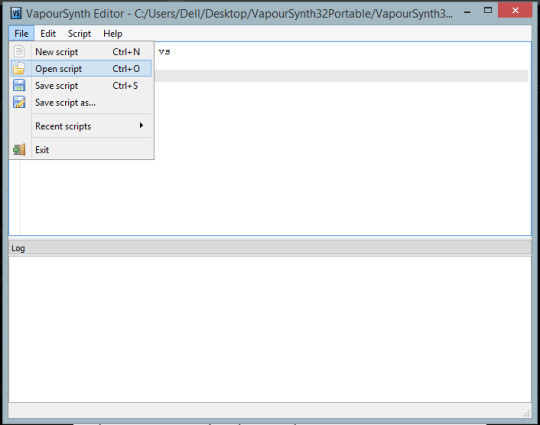
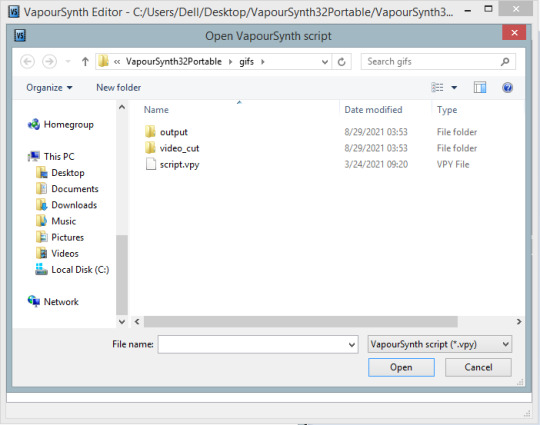
if you’ve downloaded vapoursynth directly from their site and not from the link i’ve included, this won’t show up in the folder and you’d have to assemble it all yourself. this is what i meant when i mentioned that you can modify vapoursynth’s plugins yourself! i’ve never seen anyone do that, but just so you know lol.
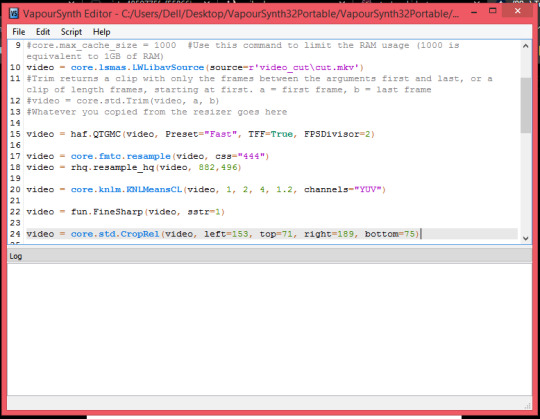
your code should now look similar to this:

note: you can also lessen the ram usage of vs so your laptop won’t lag as much!! just follow what line 9 says <3
step 5: then, copy and paste the text that’s in the upper right corner to vapoursynth. you must paste it after the 13th line! it should look similar to this.
step 6: just press f8 (or go to script, then encode video). this window will show up.
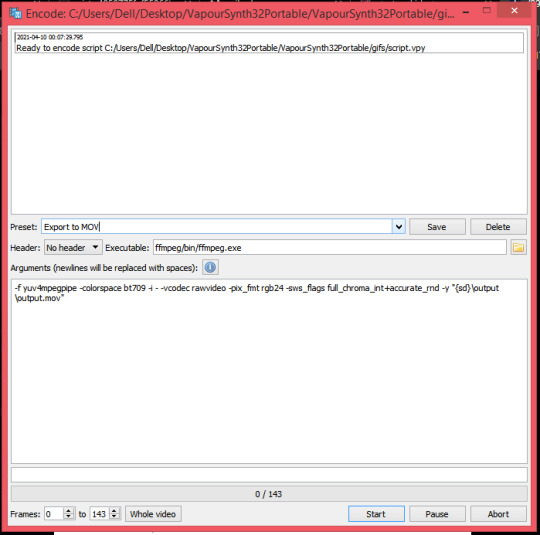
this is what you’ll usually do if you want to save it as a video, but since i can’t import videos, i change the preset to ‘export to png sequence’. some CCs like trimming the video here (as you can see at the bottom, there’s a label for the number of frames), but just like what we did with KM Player i just export it all (by pressing start). make sure your header is also set to Y4M if you’re exporting to PNG!
step 7: you’ll see all of your frames on the vs folder and if you didn’t trim (like me jdsjdskj), you can just erase unwanted scenes (just like what we did for KM Player)! if you’re making more than one gif, transfer these pngs to another folder (or rename them) as in the case of kmplayer. you need separate folders/names for each gif as not changing the folder/name and exporting again would overwrite the frames you previously captured.
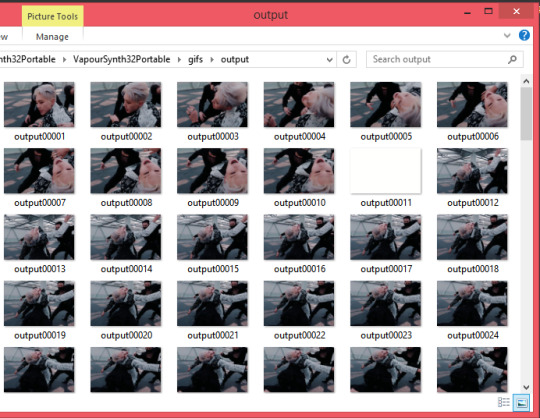
and this is where it ends for vapoursynth!

now that we have all the frames ready, we’re going to be using photoshop and get all the fun stuff going!

KM Player is a lot more tedious (can’t believe i used this for more than a year omg), so we’re gonna have to do a few more steps and pick up from where we’ve left.
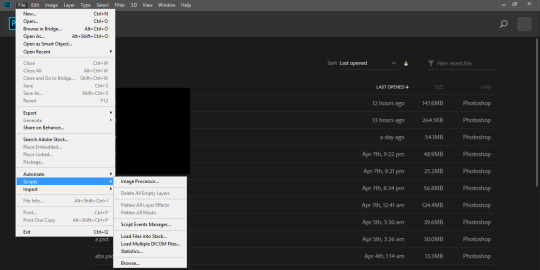
step 1: import your frames by going to file, scripts, then ‘load files into stack’
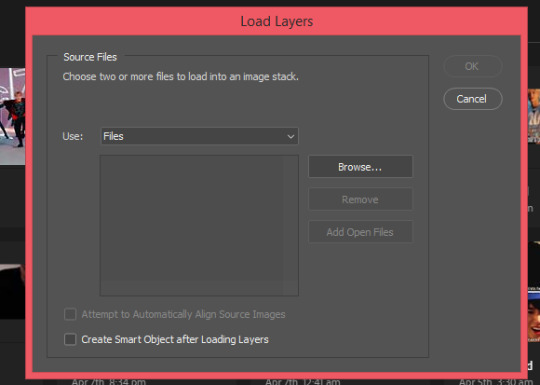
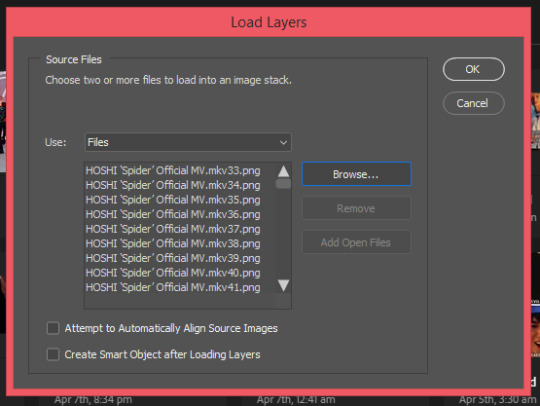
step 2: click browse, select the folder you saved your frames in, select all the frames, click enter, and then press ‘OK’.
step 3: your workspace should look something like this. click create frame animation (if that doesn’t initially show up and your window says ‘create timeline animation’, just click the little arrow beside it and switch it to frame).
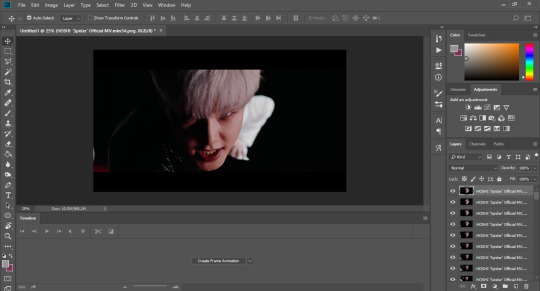
(additionally, if you don’t see the timeline below, you can enable it by going to window, then check the timeline option)
step 4: make frames from layers.
step 5: reverse frames.

step 6: the trickiest part of giffing from km player!! (thankfully, we’re only making 540px gifs for this tutorial) estimate the area you want to include, then crop your canvas by pressing ‘C’ on your keyboard or selecting the crop tool on the toolbar (it’s the 5th icon here on my screen).
**UPDATE: you can also crop by ratios using the crop tool as seen on the screenshot below!
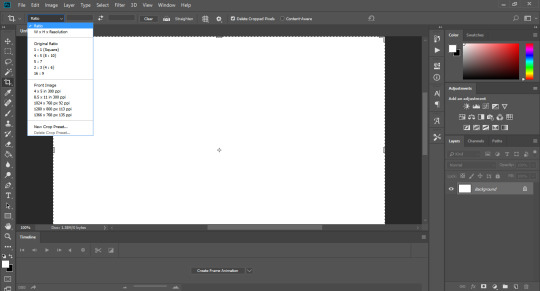
after cropping, your workspace should look similar to this.
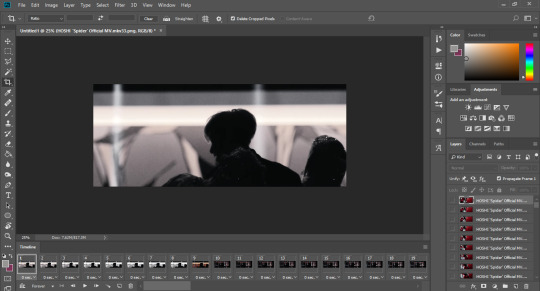
step 7: and now we FINALLY resize like barbarians :D i always like shortcuts (which you can prob tell by now) a.k.a the easier and more convenient route, so just click ‘CTRL + ALT + I’ so the image resizing window can pop up. alternatively, you can go to image, then image size.

now set the width to 542 (which is 2 pixels larger than tumblr’s required width) and press ‘ok’.
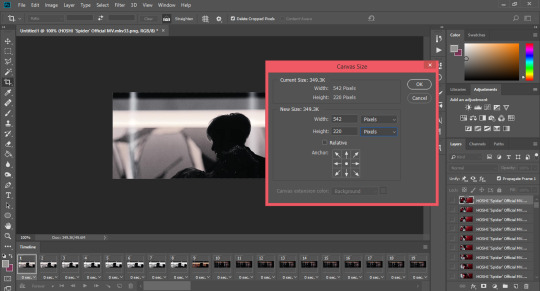
step 8: as you can see, there are weird white/kind of faded pixels on the outer edges of the gif, and that’s the exact reason why we needed those 2 extra pixels from the last step. you can remove this the hard way by zooming at 1800% and removing 2 pixels per side or we can always go the easy route and press ‘CTRL + ALT + C’ (or go to image, then canvas size) and then resize the canvas width to 540 (don’t forget to remove 2 pixels from whatever height u have too!) <3
step 9: now we have a clean and sexy gif. you can completely stop here, and start exporting, but coloring and sharpening make all the difference (to me at least)!
as for vapoursynth, you only need to follow steps 1 to 5 (aka importing <3)

these steps aren’t ‘necessary’ but these are the essence and what makes tumblr gifs tumblr gifs (aka prettie <3).
there is so much potential with sharpening alone! usually, if they haven’t used the sharpening settings on vs, CCs may choose to do it through photoshop (although i personally always do additional sharpening on ps even if they’ve already gone through vs) by converting these frames into a smart object. you can do so by:
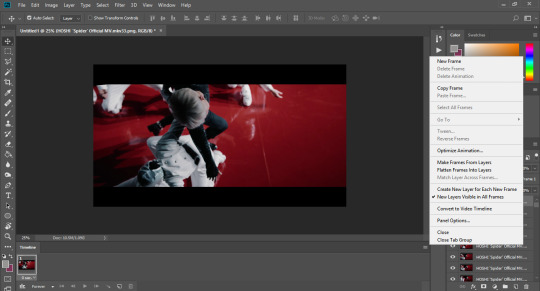
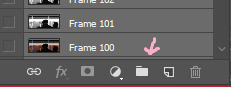
step 1: press ‘CTRL + ALT + A’ on your keyboard. this will select all of your frames IN THEIR LAYERS (not the ones on the timeline)
as you can see, they’re all highlighted on the bottom right panel.
step 2: place all of them in a folder by clicking this one!
step 3: then, convert your frame animation into a timeline by clicking the tiny icon beside the ‘forever’ loop.
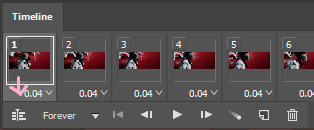
it should look like this afterwards:
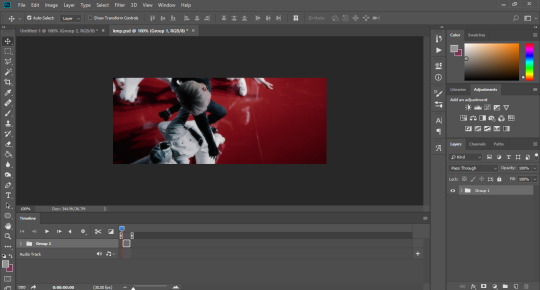
step 4: now we finally convert to smart filters by clicking filters, then convert to smart filter
which turns out like this after being converted
step 5: now sharpen to your liking! go to filters, sharpen, then smart sharpen. these are the settings i use, but i usually just play around with them until i like what i see. i won’t go in depth about this because there are a lot of tutorials that talk about this (which i will link some of below!!). the most important part to adjust is the amount and radius though!
again, you can stop here, but i like adding a bit of glow to my gifs, which is done by adding gaussian blur (another filter)! i learnt this method from this tutorial. i don’t think i can add any more to it as it’s perfectly complete as is, so i won’t be elaborating anymore!
additionally, if you don’t want to do all of that manually (although i suggest you learn how to do it manually first), there are available sharpening actions you can see around the internet. just choose one that’s to your liking! here are a few of them. you can also save your own settings as an action if you don’t wanna do them repeatedly.

my personal favorite! this is what makes the giffing process so rewarding for me. for coloring, adjustment layers are your best friends! you can try messing around with all of these.
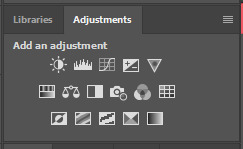
i usually use selective color (my beloved <3), levels, curves, saturation, exposure, vibrance, color balance, photo filter, channel mixer, and gradient maps (not specifically in that order). i won’t actually do a specific tutorial as coloring extremely varies from each gif (one psd/coloring might work for another but may look absolutely horrifying on one lol, this applies even to frames that are from the same video!!) but i’m just going to give a few tips and refer to a few tutorials that might help you out!
generally, the more colors there are in your gif, the bigger the gif size will be. this is also important when you are exporting! (gifs that have very few frames with a lot of color and gifs that have up to 200 frames but have very few colors in them can actually save as the same size)
if you wanna lessen the file size and noise, gamma, and off-set are your best friends! (make the gifs a bit darker) you can also delete a few colors as shown in this tutorial!
i used to be unaware of this when i was a new gifmaker, but be careful of whitewashing! dreamy (@scoupsy) has an excellent tutorial that combats this. annie (@imjaebumaf) also touches a bit more on this!
resources are always available for you to learn! one good way of learning how to color is by seeing how others also do it, and that is through their psds. i really love izzie’s (@coupsnim) colorings, and she recently put out a set for her blog’s anniversary too, so you can check that out! <3 i’ve also seen a lot of psds here from tumblr resource blogs, and deviantart has really good ones as well.
i don’t really have things i keep in mind other than those. just have fun and i’m sure in time it’ll turn out great! again, practice is everything!

last but not the least, we address the speed of the gif before we export! it’s the decimal places under the frames on the timeline. make sure that you select all frames if you want a consistent speed! you can always play around with it though.
for 30fps gifs, i usually do 0.03 to 0.035. photoshop shows 0.035 as 0.04, but i’m pretty sure it isn’t the exact same speed as 0.04. as for 60fps gifs, my speed ranges from 0.01 to 0.025.

and finally, we go to the settings themselves! i used to take exporting settings very lightly, but lately i have realized that it also impacts the way your gifs look by a lot! to export, press ‘CTRL + SHIFT + ALT + S’ on your keyboard, or simply go to file, export, then save for web.
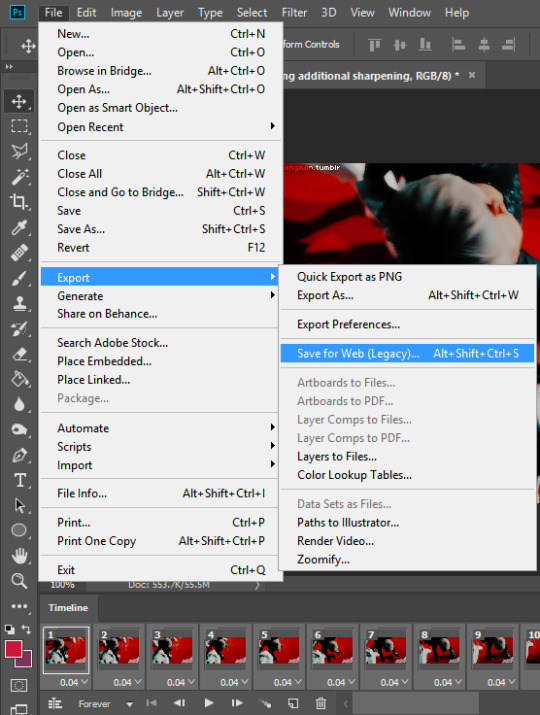
there are so many ways you can play around with it, but here are my current settings.
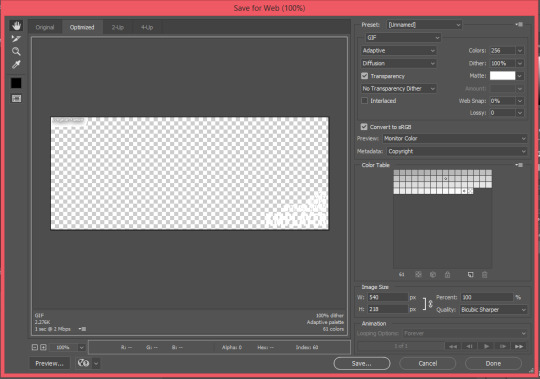
the color reduction algorithm (i.e: adaptive, selective, etc.) is one of the most important things as this determines the quality and color table of your exported gif! it really differs for each gif, but lately i lean towards the adaptive setting as i like the way it has been making my gifs look.
also very important to remember that tumblr’s current gif size limit is 10MB so make sure to keep your gifs under that size!!
you can also remove a few frames/skip every nth frame to lessen size if you’re running over the limit. :)

to show you how different each process will make a gif look, i’m including some examples (actually the ones we were working on during the tutorial!) to demonstrate a bit better.
this is specifically for an mv, but this tutorial has been really long now jdkjkfdjkfd so i will link down resources that show examples of it w/ performance stages (you can see a much bigger difference here)! also note that the vs one has slightly lesser frames (they could have the same frame number and size but i didn’t wanna redo it lol 😭). again, the .035 indicated is the speed used.

i know this is a bit much for an intro, but i wanted this to be a one-stop guide so you won't have to scramble for more resources. however, if some parts are hard to understand, here are a few tutorials that might help! (1, 2, 3 by @jinims, 4 by @soonhoonsol, 5, 6 is another general tutorial but i find the sharpening part especially helpful!)
and a few more resources that helped me out when i was beginning
sparkle tutorial
sparkle action
blurring captions
**UPDATE: my own sharpening tutorial <3, update 2
**UPDATE: my own color reduction algorithm tutorial
i hope this was helpful, and i can’t wait to see your gifs! <3
#a bit all over the place but#i learnt all of this on my own and through tutorials as well but i hope this at least makes sense!!#this is literally everything i know ig lol#don't hesitate to ask if some parts are unclear <3#all of this is also intimidating at first but i'm sure you'll get the hang of it!!#it's really just dexterity sdksdjk trial and error!#i hope i didn't forget anything? i might also edit this if i find the need to/i rmb to add smth <3#i didn't know tutorials took this much time omg i respect tutorial blogs even more now#literally took me more than 4 hours omg and i know u can tell the exact moment i started losing it#edit: i put those tags on while i saved the draft but i literally sat here for 5+ hours making this but it's worth it and i really enjoyed!!#i'll proofread this tmr it's 3 am now and my brain is fried from uni too <3#anon#y.ask#flashing tw#ok i just proofread this but it already has 20 notes that's so embarrassing <3#u can literally witness my sleep deprivation#anyway it's fine now i think (or my sleepy brain thinks it is)#i'll prob revisit this again tmr#y.psd#y.tutorial
229 notes
·
View notes
Note
Hi!! Can I ask you if you have any advice on how to only colour one part of a gif? Like you did with your Jeonghan bday set? I have a hard time figuring it out ㅠㅠ
hey bestie!! it def is v challenging, i also find it quite difficult at times so don't feel too discouraged!
i think the way i'd go about it differs on a case to case basis, especially considering the color i'm going to be changing, but here's a very basic guide/a gist of how i do it <3
for me, the easiest colors to manipulate are blues and cyans so i'll be using scenes with them on this example!
this is my base gif
i usually do a preliminary coloring first majorly bc of the skin before adjusting/changing the color im trying to play with. here is how it currently looks like
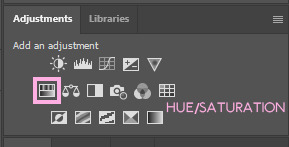
and now we play with the colors!! go to your adjustments layer and select "selective color", the next panel should appear
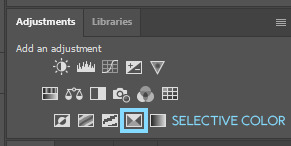
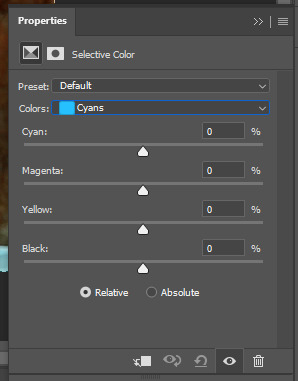
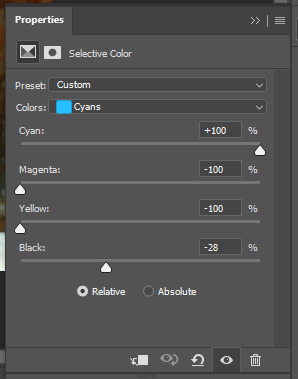
you can try to slide the panels around to make sure you're augmenting the color that you want. i just like doing it because sometimes greens read as yellows, etc, hehe. now. what im trying to change here are cyans bc of cheol's background. the first thing i like doing is reducing the "shades" available by trying to make it one solid color. given that his background also has hints of blue in it, i first move the sliders around to my liking to achieve this.
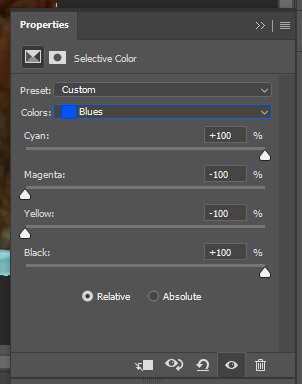
now that i have a more cyan background, i can choose to repeat that step to make it more solid, but in this case i'm satisfied so i wont do that lmao 😭 now i boost the cyan itself to make it more vibrant. more vibrant colors are easier to change later on!
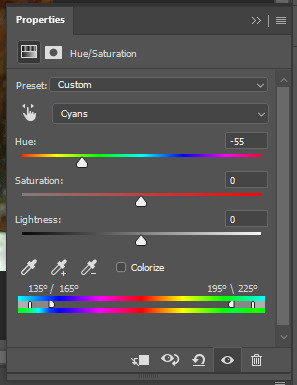
now for the fun part!! we use hue/saturation to finally change the colors. since i'm changing cyans, i'm going to select cyan and just move the slider to the color i want. in this case that's red!
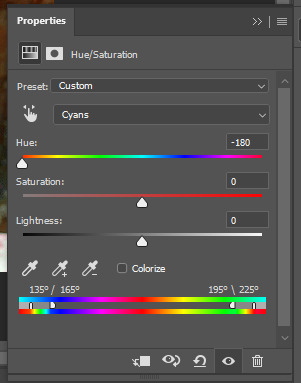
and there you have it! you can also move the saturation and lightness sliders to augment the color to your liking. here are other color examples and their equivalent sliders too (just bc i enjoyed making this lmao)


you can always do more coloring on top of it too in case the skin got messed up, hehe. hope that made sense! sorry its a little all over the place my brain just got fried from class fdjfdjfdj if you have more questions don't hesitate to ask, i'd be more than glad to answer them <33 hope this helps!!
#anon#y.ask#y.tutorial#didnt proofread this so i hope it still makes sense i'll go back to it later jfdfkf
3 notes
·
View notes