
Just gathering inspiration for future crafty urges. main blog: @your-local-squirrel
Last active 60 minutes ago
Don't wanna be here? Send us removal request.
Statistics
We looked inside some of the posts by tangled-brain and here's what we found interesting.
Average Info
Notes Per Post
173K
Likes Per Post
102K
Reblog Per Post
71K
Reply Per Post
155
Time Between Posts
1 month
Number of Posts By Type
Photo
1
Text
10
Last Seen Tumblr Blogs


Fun Fact
In 2020, Tumblr had 29.4 million users in the US.
Photo

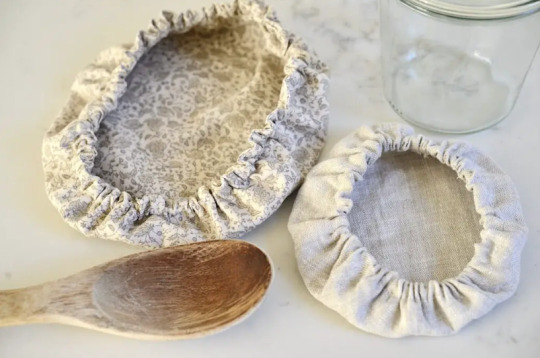

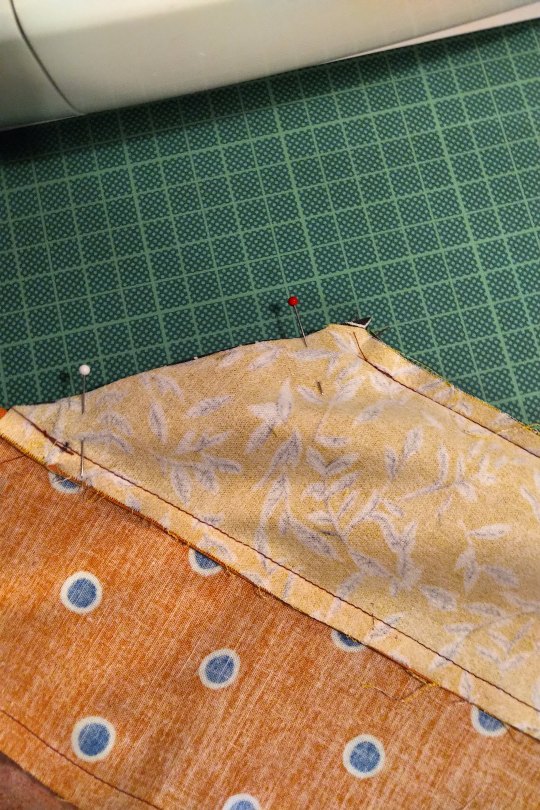
DIY Reusable Bowl Covers
Reusable bowl covers are very easy to sew and you can make them exactly fit all those bowls and jars you use the most.
✖✖✖✖✖✖✖✖
sew-much-to-do: a visual collection of sewing tutorials/patterns, knitting, diy, crafts, recipes, etc.
310 notes
·
View notes

Text
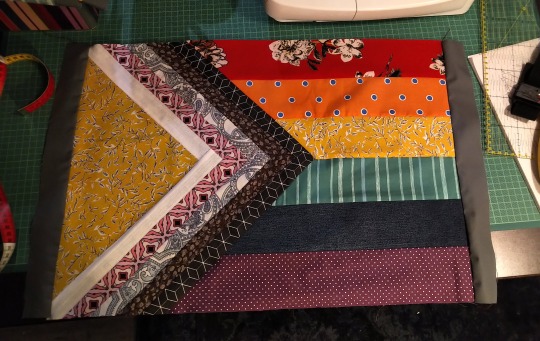
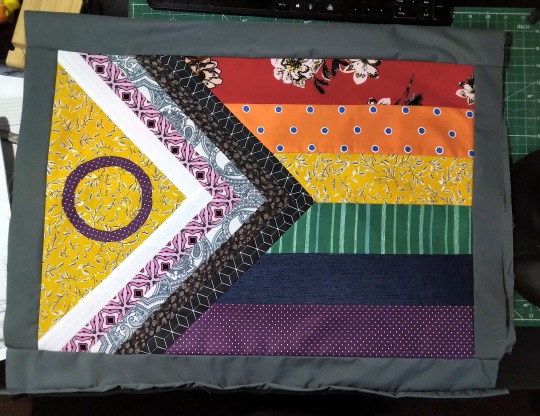
Progress Pride Flag Quilt Block Pattern & Tutorial
Don't you just love the flag of our people? Do you have an inner grandma that years to make stuff? Do you want to combine these two things and make a queer quilt?
Well, I've got you.
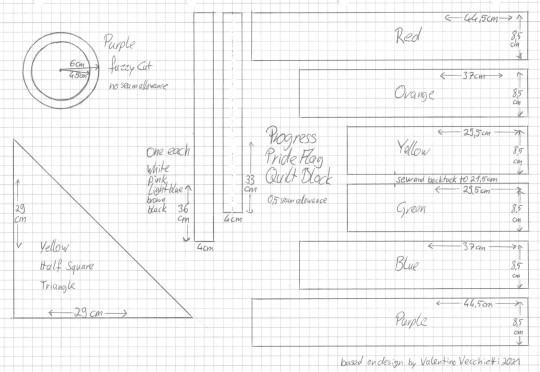
Behold the pattern! And my lack of graphic skills, so I drew it on paper!
Basically it's a bunch of rectangles, one half square triangle and a fuzzy cut circle. I don't know shit about quilting and I was able to come up with it. Why centimeter, you ask? Because I'm German and that's what I'm familiar with. Why weird measurements and not jelly rolls and layer cakes and stuff? Because I'm German and quilting is not really a thing here.
Onto the tutorial!
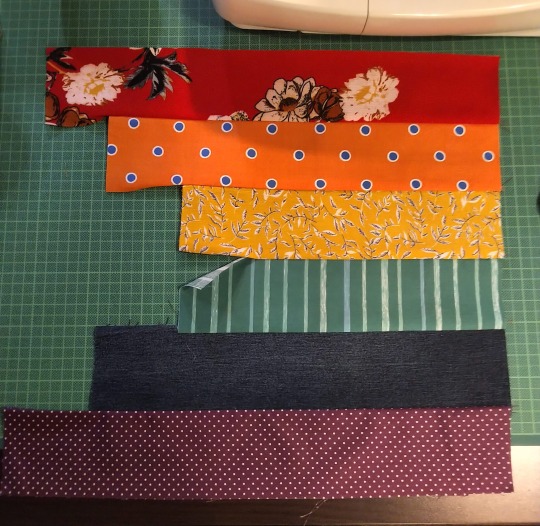
You'll need:
A scrap of fabric of red, orange, yellow, green, blue, purple, black, brown, light blue, pink, white each
additional fabric for the border
Cutting mat, quilting ruler, roll cutter
sewing machine
thread
pins
double sided interfacing
iron and ironing board
fabric sheers
compasses
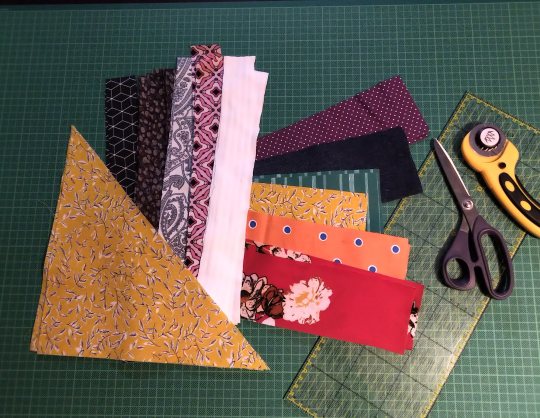
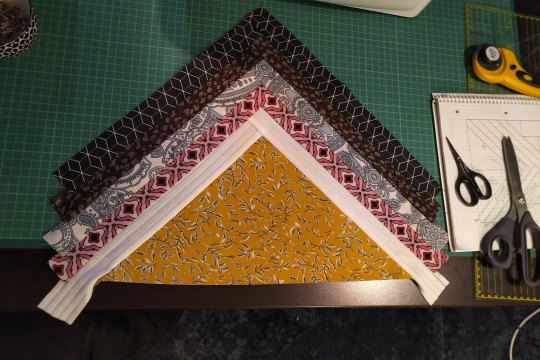
Step 1: Cut everything. Duh. We'll take care of the circle later, don't worry about that now. The half square triangle is exactly what it sounds like. A square and then you cut it diagonally. That's why I didn't give the length of the hypotenuse.
(Note: I'm making two blocks at the same time, that's why there's so much fabric. Also this is a middle of the night project, hence the lighting.)
I'm using all kinds of different fabrics, different weights and drapes, some stretchy, some transparent, so I needed to interface some of them.
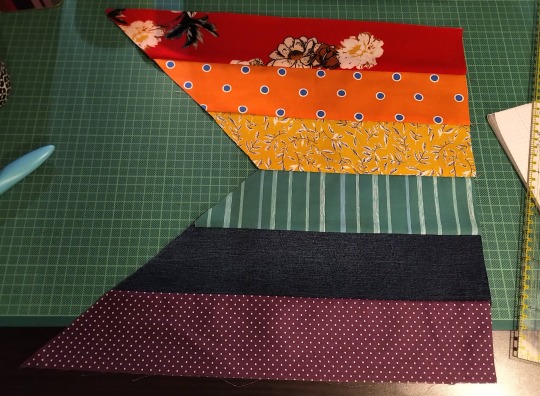
Step 2: Sew the rainbow together. 0,5cm seam allowance on everything, that's exactly the edge of the foot on your machine. Double and triple check that everything is facing the right direction before sewing. The seam of yellow and green does not get sewn fully, only 21,5 cm! That's important later! Also backtack there. Don't forget to iron.
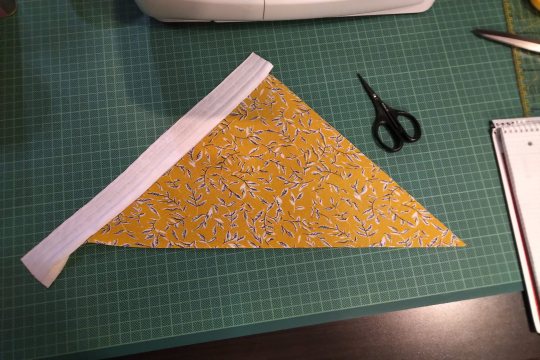
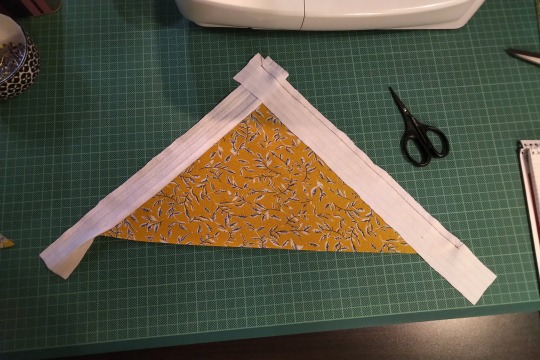
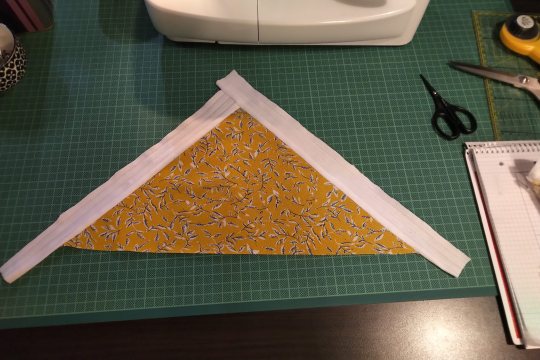
Step 3: Sew the strips to the half square triangle. For this you have to switch between the sewing machine and the ironing board constantly. Attach the shorter strip diretly to one side of the HST, iron it open. The second strip of the same colour gets attatched to the other side of the HST and the first strip. Look at the pictures closely if you're unsure how that works. Also the strips are longer than the triangle. We'll square that up later.
All strips attatched will look like this. See how the two strips meet at the tip!
Step 4: Cut the rainbow part to size. The length between yellow and green is 22cm long. The shorter seam from before plus some seam allowance. The outsides of red and purple are 44,5cm long. These two points are the beginning and end of your cutting line. You will cut a little triangle from every single colour. Do this slowly and carefully. Maybe your fabrics have stretched a bit (mine did). Don't worry, it will be ok.

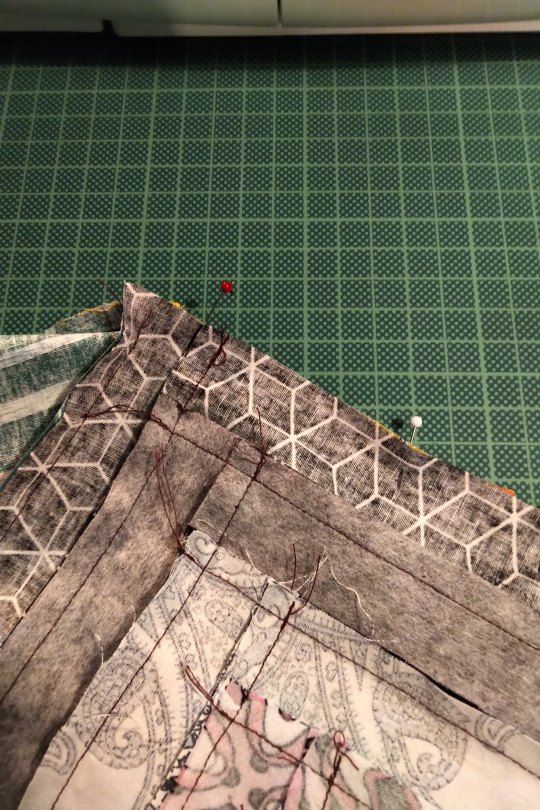
Step 5: The Y seam, part one. Y seams are tricky, but there's only one for this block. So put your strips part on your rainbow part and line them up so that the tip of the strip part overhangs the seam between yellow and green by about half a centimeter. Remember that it's not about the edges of the fabric, but where the seam will be. But don't sew all the way! Leave 0,5cm at the tip!
You can also mark on your strip piece two lines 0,5cm from the edges of the black. They should form a little square at the tip. There they meet is where the actual tip on the finished block will be. So place this spot directly on the seem between yellow and green and only sew right up to it. Not beyond.
Step 6: The Y seam, part two. Now, fold both the rainbow part and the strips part in half and if you've done the last step correctly, the remaining two edges will allign. Pin and sew.
I can't explain it better than I've done here, I'm sure there are tutorias out there. Good luck!
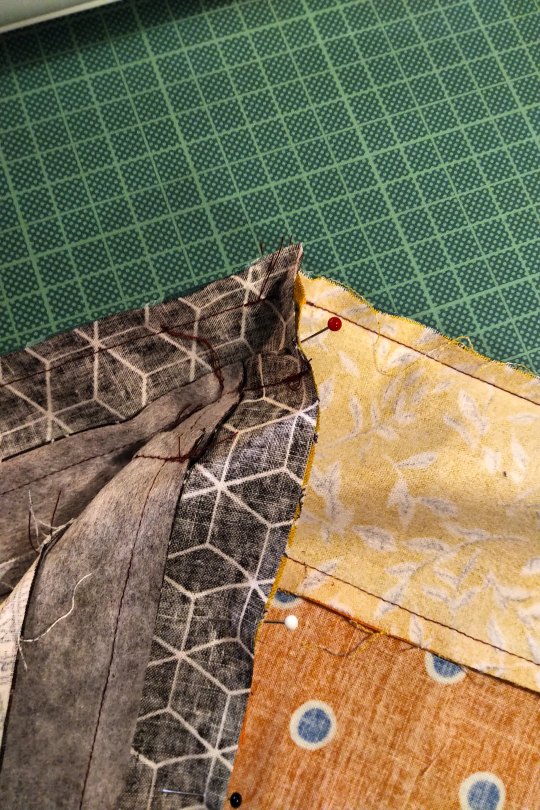
Step 7: Square up. Iron your block to that everything is nice and straight and flat. Then use the fabric edges of the red and purple to cut the remaining ends of the strips. Use the HST to cut the white. Be careful, the long side of the triangle is on the bias and likely stretched a bit.
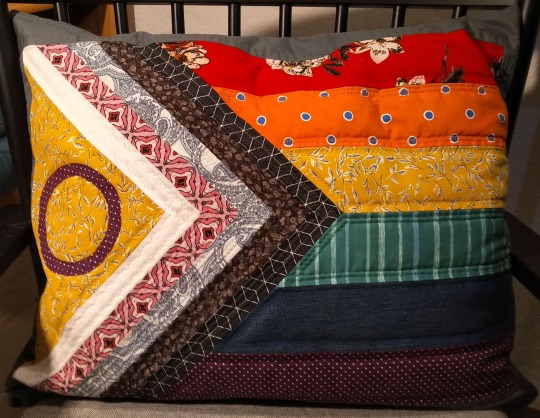
I already added borders here. I'm making a pillow case.
Step 8: Fuzzy cut and raw edge applique. Double sided iron on interfacing is essentially double sided tape. It has two types of glue, one gets activated by 2 seconds of heat, the other by 5 or so (depends on the product). The second side is also covered with a paper that needs to be removed before the second gluing. Read the instructions of the product you are using!
Use your compasses to draw a circle on the protective paper side of the interfacing. It's actually two circles from the same middle point, see pattern. Cut it out roughly. Then place it with the rougher side on the backside of your purple fabric and iron for 2 seconds on middle heat. If you've just ironed your fabric before and the ironing board is still hot, wait for it to cool down. Also let the fabric cool down after applying. Then cut out your circle. The interfacing will have stiffened the fabric, so that shouldn't be a problem. Then remove the protective paper, place the circle on the yellow triangle where you want it and iron for 5 seconds. Let cool.
And you're done! The applique at this point is only secured with the interfacing, but it should hold fairly well. The quilting will secure it further.
And that's it. BTW, did you know that this design was made by Valentino Vecchietti for Intersex Equality Rights UK in 2021? Now you do. Happy quilting!
250 notes
·
View notes
Text


Posting these ones again because they make me happy
2 notes
·
View notes
Text


2 notes
·
View notes
Text
This makes me quite happy
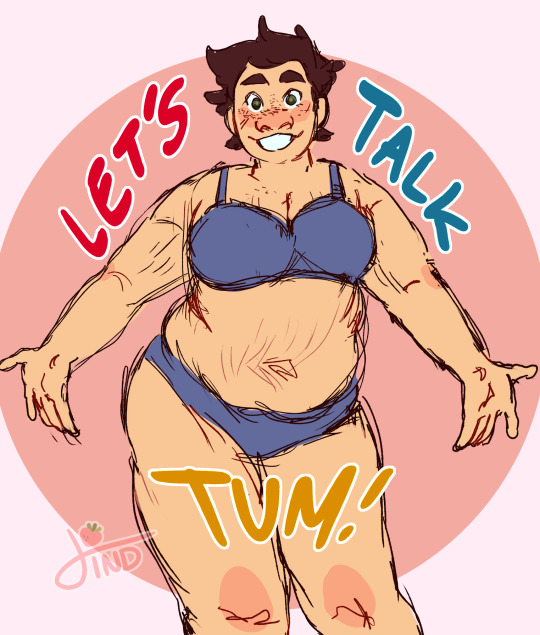
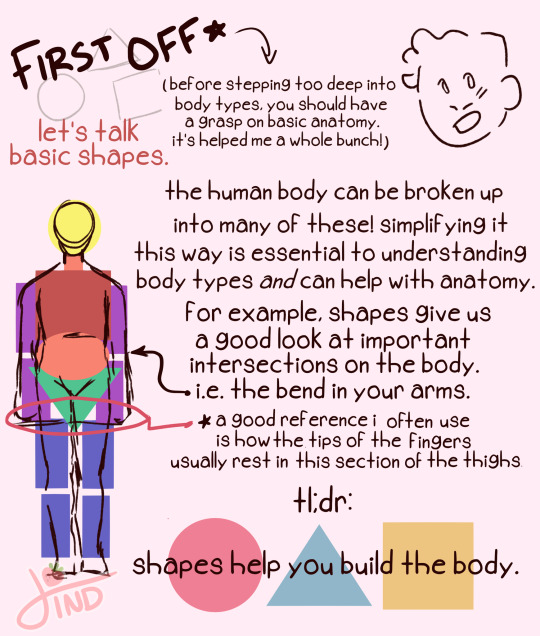
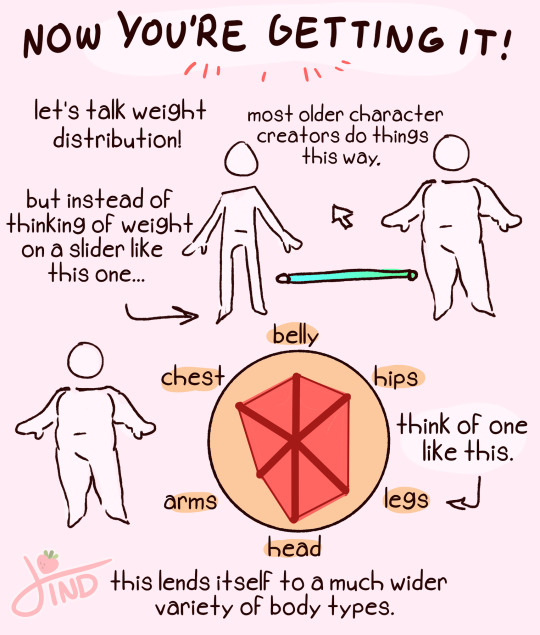
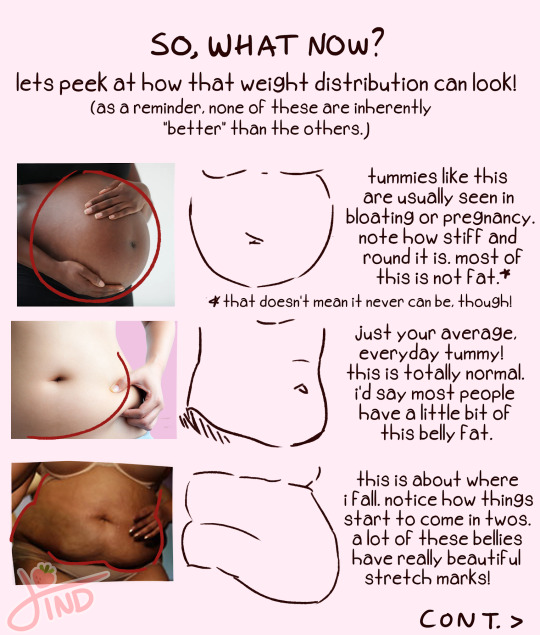
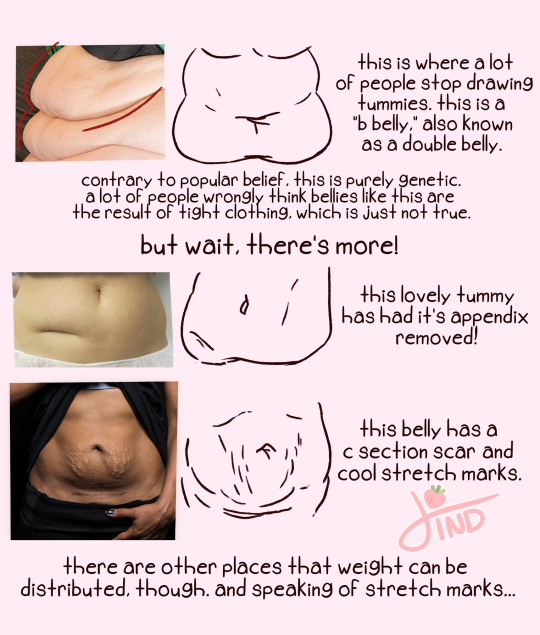
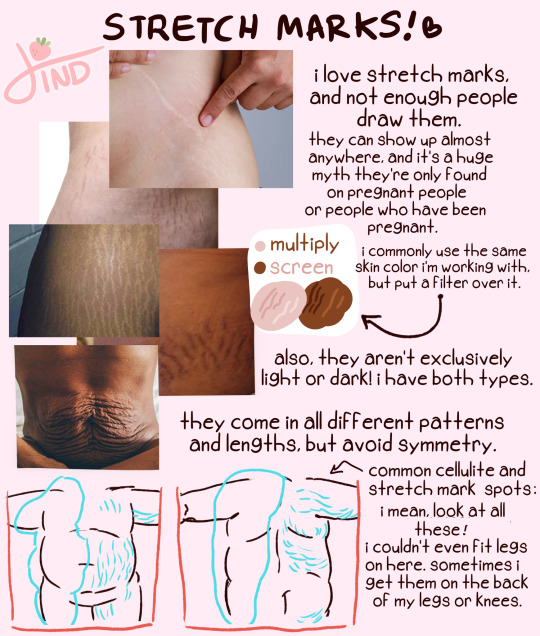
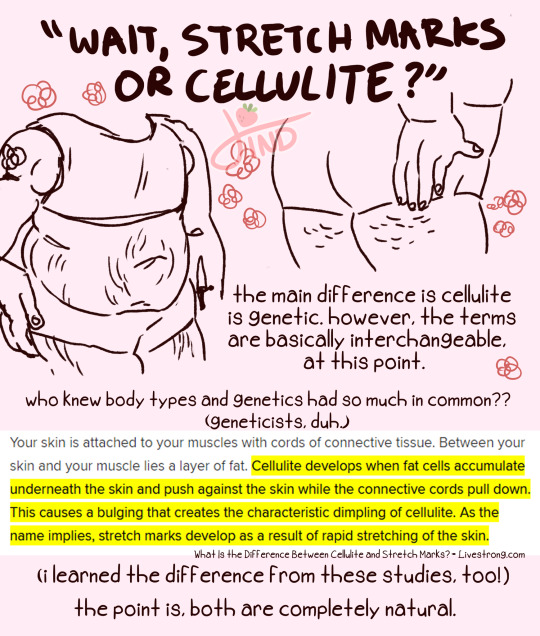
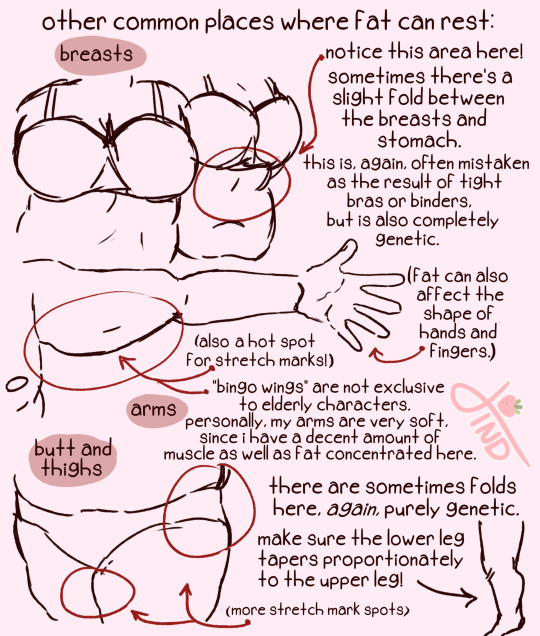
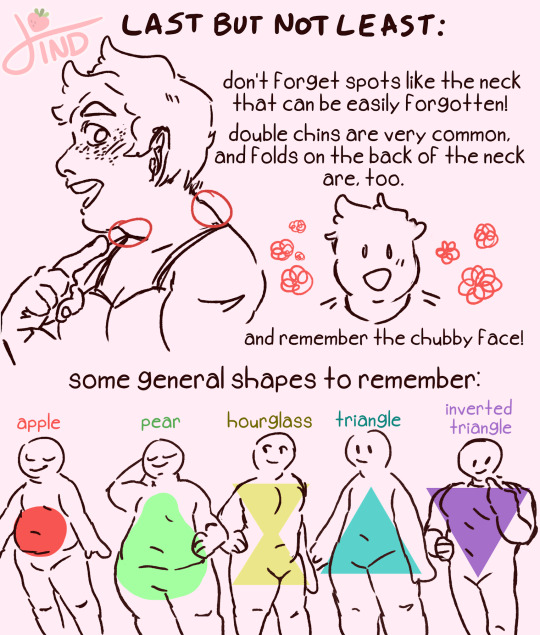
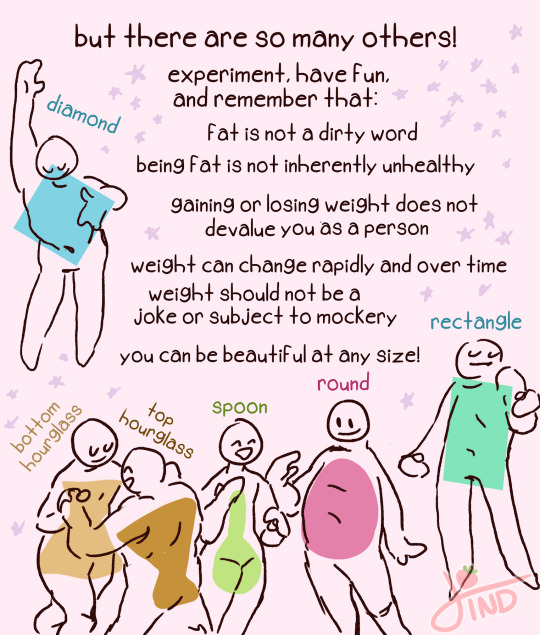
as requested- my zine about fat and plus size body types from instagram!💖 happy drawing everyone!
119K notes
·
View notes


Text
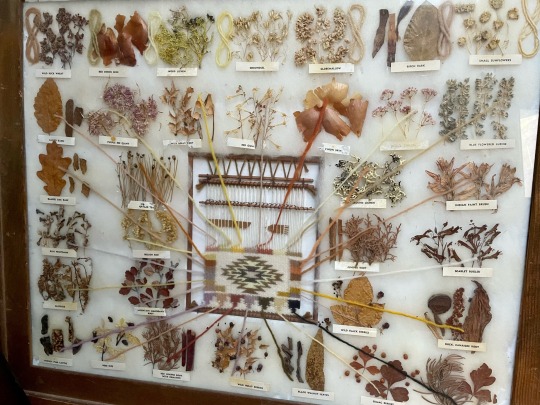
My bf got this dye chart with local plants at an art thrift store! 🍂
26K notes
·
View notes
Text

Got bored, made a booty, you know how it be.
[Image ID: White linen embroidered with dark purple thread in an abstract silhouette of a woman's form. The woman's form is from mid-thigh to shoulder, and is facing away. One arm is raised above her head, the other is tucked in at her side. The curve of her back, butt, and the side of her breast are visible. End ID]
#embroidery#scrap fabric#diy#tattoo idea#women are hot#curvy#curvy woman tattoo#feminine craft#booty#wasteless crafts#crafts#bored#image id#image described#body postivity#ignore the wrinkles please
2 notes
·
View notes
Text
I am open to constructive criticism, including and especially when it comes to accessibility. Tell me if my image descriptions suck. Tell me how to improve.
2 notes
·
View notes
Text

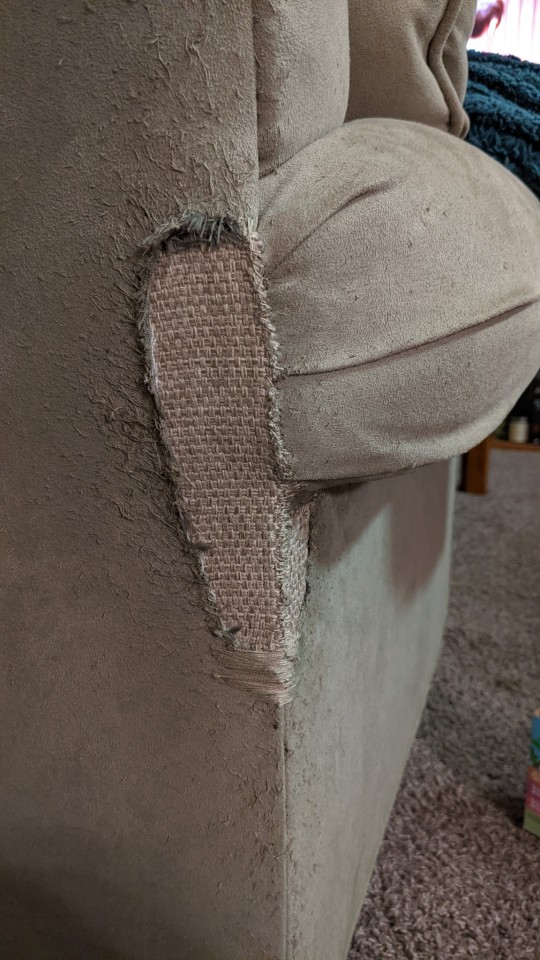
I've been really inspired by the visible mending ideas on @wastelesscrafts page, and decided to give it a shot on my cat-scratched couch.
Details on the process below the image description for anyone interested.
[Image ID: Three pictures of the back right corner of an olive green suede couch, each image from a slightly different angle. There is a hole in the fabric just below the back of the armrest, roughly the size and shape of the sole of a shoe. The hole has been patched with a cream-colored fabric with a thick, textured weave. The surrounding area of the couch has loose threads from cat scratches. End Image ID.]
This corner of the couch is their absolute favorite scratching spot, and they made a hole down to the wood that was bigger than my hand. I didn't bother making the edges pretty because I expect that they'll have this destroyed soon too, though I'm considering adding vines & flowers if it holds up well over the next month or so.
I used scrap upholstery fabric in a color I thought looked nice, and embroidery floss (3 strands, not 6, too hard to get through fabric) that matched the couch. I would list what stitches I used but honestly there was absolutely no method to the madness. Some combination of determination and desperation seemed to do the trick though.
Even with thimbles this was murder. The thick fabrics + the upholstery padding made this really tough, I wouldn't recommend this if you have issues with finger mobility, strength, or sensitivity.
Funky project, would spend a day on it again, but only after my fingers heal.
#visible mending#patches#patchwork#embroidery#upcycle#mending#sewing#scrap fabric#diy#image id#crazy cat lady#why are you reading the tags?#sorry im not trying to pry#do what you want i guess#nut
103 notes
·
View notes